
This codelab is part of the Android Kotlin Fundamentals course. You'll get the most value out of this course if you work through the codelabs in sequence. All the course codelabs are listed on the Android Kotlin Fundamentals codelabs landing page.
Introduction
In this codelab, you learn about resources that are helpful to Kotlin Android developers, including templates, documentation, videos, and sample apps.
What you should already know
- The basic workflow of Android Studio.
- How to use the Layout Editor in Android Studio.
What you'll learn
- Where to find Kotlin and Android developer information and resources.
- How to change the launcher icon in an app.
- How to look for help when you're building Android apps using Kotlin.
What you'll do
- Explore some of the resources available to Kotlin Android developers of all levels.
- Download and explore a Kotlin Android sample app.
- Change an app's launcher icon.
In this codelab, you learn about templates, samples, documentation, and other resources that are available for Kotlin Android developers.
First you create a simple app from an Android Studio template and modify the app. Then you download and explore the Android Sunflower sample app. You replace the sample app's launcher icon (a sunflower) with a clip-art image asset that's available within Android Studio (a smiley face).
Android Studio provides templates for common and recommended app and activity designs. Built-in templates save you time, and they help you follow design best practices.
Each template incorporates a skeleton activity and user interface. You've already used the Empty Activity template in this course. The Basic Activity template has more features and incorporates recommended app features, such as the options menu that appears in the app bar on Android-powered devices.
Step 1: Explore the Basic Activity architecture
- In Android Studio, create a project.
- In the Choose your project dialog, select the Basic Activity template, and click Next.
- In the Configure your project dialog, name the app whatever you'd like. Select Kotlin for the language, and select the Use AndroidX artifacts checkbox. Click Finish.
- Build the app and run it on an emulator or Android-powered device.
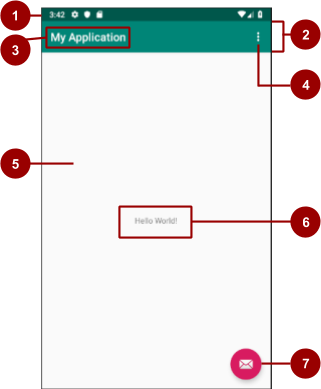
- Identify the labeled parts in the figure and table below. Find their equivalents on your device or emulator screen. Inspect the corresponding Kotlin code and XML files described in the table.
Being familiar with the Kotlin source code and XML files will help you extend and customize the Basic Activity template for your own needs.
Architecture of the Basic Activity template
# | UI description | Code reference |
1 | Status bar, which the Android system provides and controls. | Not visible in the template code, but you can access the status-bar from your activity. For example, you can add code in |
2 | The app bar, also called the action bar, provides visual structure, standardized visual elements, and navigation. | In inside the AppBarLayout element. For backward compatibility, the To change the appearance of the app bar, change the toolbar attributes. For app bar tutorials, see Add the app bar. |
3 | The app name is initially derived from your package name, but you can change it to anything you want. | In
Specify the |
4 | The options-menu overflow button holds menu items for the activity. The overflow button also holds global menu options such as Search and Settings for the app. Your app menu items go into this menu. | In
To see the options-menu items, open the file. Only the Settings menu item is specified in this template. |
5 | The CoordinatorLayout | In |
6 | The template uses a TextView to display "Hello World". You replace this | The "Hello World" text view is in the |
7 | Floating action button (FAB) | In |
Step 2: Customize the app that the template produces
Change the appearance of the app produced by the Basic Activity template. For example, you can change the color of the app bar to match the status bar. (On some devices, the status bar is a darker shade of the same primary color that the app bar uses.)
- Change the name of the app that the app bar displays. To do this, change the
app_namestring resource in the res > values > strings.xml file to the following:
<string name="app_name">New Application</string>- Change the color of the app bar (
Toolbar) in the res > layout > activity_main.xml by changing theandroid:backgroundattribute to"?attr/colorPrimaryDark". This value sets the app bar color to a darker primary color that matches the status bar:
android:background="?attr/colorPrimaryDark"- Run the app. The app's new name appears in the status bar, and the background color of the app bar is darker and matches the color of the status bar. When you click the FAB, a snackbar appears, shown as 1 in the screenshot below.
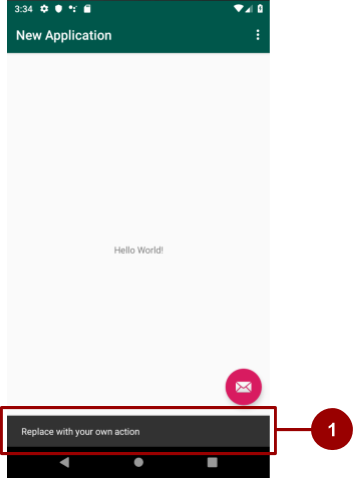
- Change the snackbar text. To do this, open
MainActivityand look for the stub code inonCreate()that sets anonClick()listener for the button. Change"Replace with your own action"to something else. For example:
fab.setOnClickListener { view ->
   Snackbar.make(view, "This FAB needs an action!", Snackbar.LENGTH_LONG)
       .setAction("Action", null).show()
}- The FAB uses the app's accent color, so one way to change the FAB's color is to change the accent color. To change accent color, open the res > values > colors.xml file and change the
colorAccentattribute, as shown below. (For help choosing colors, see the Material Design color system.)
<color name="colorAccent">#1DE9B6</color>- Run the app. The FAB uses the new color, and the snackbar text has changed.

Step 3: Explore how to add activities using templates
For the codelabs in this course so far, you've used the Empty Activity and Basic Activity templates to start new projects. You can also use activity templates when creating activities after your project has been created.
- Create an app project or choose an existing project.
- In the Project > Android pane, right-click on the java folder.
- Select New > Activity > Gallery.
- Add an activity to the app by selecting one of the
Activitytemplates. For example, select Navigation Drawer Activity to add anActivitythat has a navigation drawer. - To display the activity in the layout editor, double-click the activity's layout file (for example
activity_main2.xml). Use the Design tab and the Text tab to switch between the activity's layout preview and layout code.
The Google Samples repositories on GitHub provide Kotlin Android code samples that you can study, copy, and incorporate into your projects.
Step 1: Download and run a Kotlin Android code sample
- In a browser, navigate to github.com/googlesamples.
- For Language, select Kotlin.
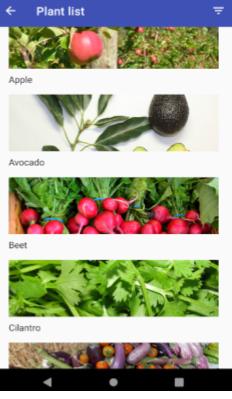
- Select a Kotlin Android sample app that's been modified recently and download the app's project code. For this example, download the zip file for the android-sunflower app, which demonstrates some of the components of Android Jetpack.
- In Android Studio, open the android-sunflower-master project.
- Accept any updates that Android Studio recommends, then run the app on an emulator or Android-powered device.
Step 2: Explore a Kotlin Android code sample
Now that you have the Android Sunflower sample app open in Android Studio, learn about the app and explore its project files.
- For information about what a sample app is demonstrating, visit the app's README file in GitHub. For this example, see the Android Sunflower README.
- In Android Studio, open one of the Kotlin activity files in the app, for example
GardenActivity.kt.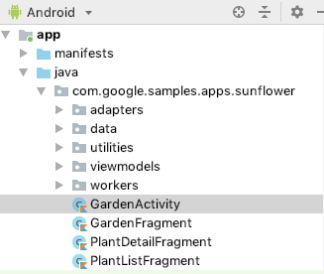
- In
GardenActivity.kt, find a class, type, or procedure that you're not familiar with and look it up in the Android Developer documentation. For example, to learn more about thesetContentView()method, search on developer.android.com to findsetContentView().
Step 3: Change the launcher icon
In this step, you change the launcher icon for the Android Sunflower sample app. You add a clip-art image and use it to replace the current Android Sunflower launcher icon.
Launcher icons
Each app that you create with Android Studio starts with a default launcher icon that represents the app. Launcher icons are sometimes called app icons or product icons.
If you publish an app on Google Play, the app's launcher icon appears in the app's listing and search results in the Google Play store.
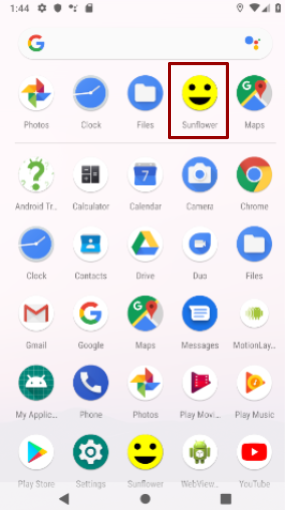
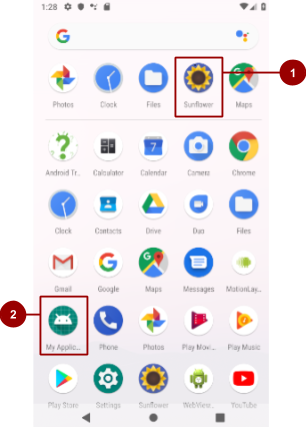
After an app is installed on an Android-powered device, the app's launcher icon appears on the device's home screen and elsewhere on the device. For example, the Android Sunflower app's launcher icon appears in the device's Search Apps window, shown as 1 in the screenshot below. The default launcher icon, shown as 2 below, is used initially for all app projects that you create in Android Studio.
Changing the launcher icon
Going through the process of changing the launcher icon introduces you to Android Studio's image asset features.
In Android Studio, here's how to change the Android Sunflower app's launcher icon:
- In the Project > Android pane, right-click (or Control+click) the res folder. Select New > Image Asset. The Configure Image Asset dialog appears.
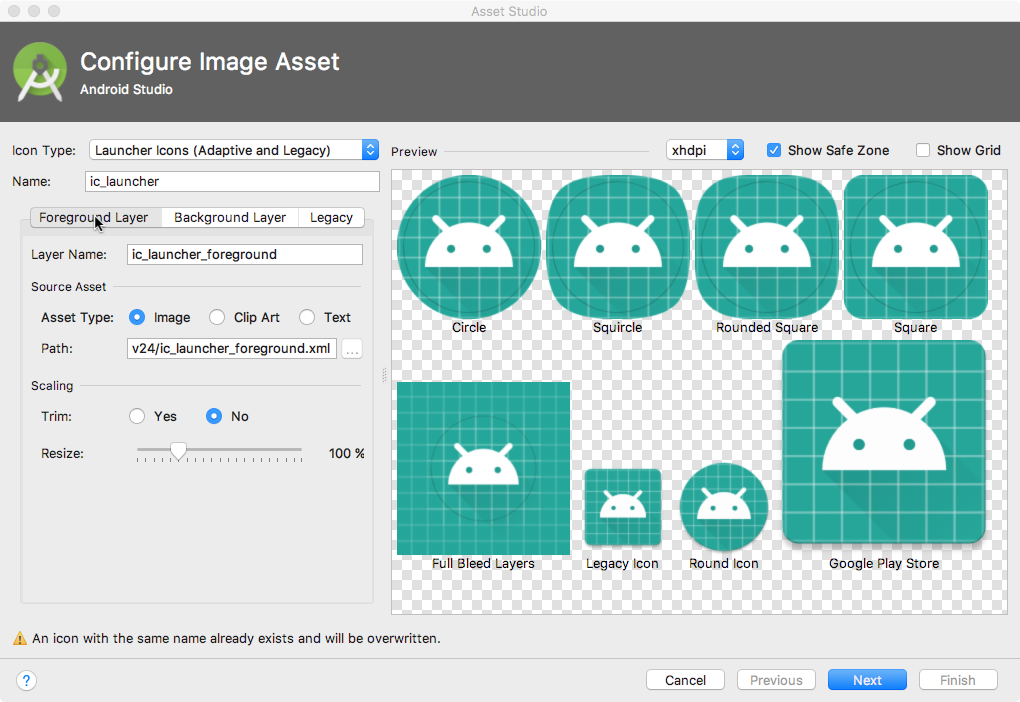
- In the Icon Type field, select Launcher Icons (Adaptive & Legacy) if it's not already selected. Click the Foreground Layer tab.
- For the Asset Type, select Clip Art, shown as 1 in the screenshot below.

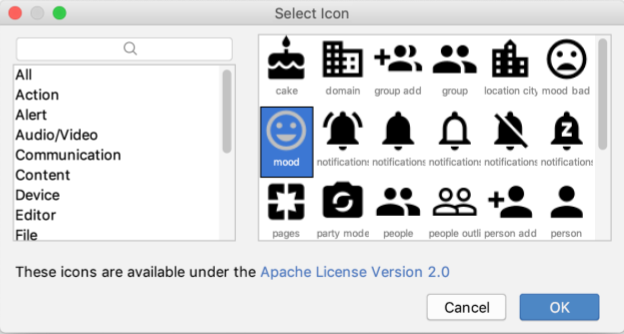
- Click the robot icon in the Clip Art field, shown as 2 in the screenshot above. The Select Icon dialog appears, showing the Material Design icon set.
- Browse the Select Icon dialog, or search for an icon by name. Select an icon, such as the mood icon to suggest a good mood. Click OK.
- In the Configure Image Asset dialog, click the Background Layer tab. For the Asset Type, select Color. Click the color chip and select a color to use as the background layer for the icon.
- Click the Legacy tab and review the default settings. Confirm that you want to generate legacy, round, and Google Play Store icons. Click Next.
- The Confirm Icon Path dialog appears, showing where icon files are being added and overwritten. Click Finish.
- Run the app on an AVD emulator or Android-powered device.
Android Studio automatically adds the launcher images to the mipmap directories for the different screen densities. The Android Sunflower app now uses the new clip-art icon as its launch icon.
- Run the app again. Make sure the new launcher icon appears in the Search Apps screen.
Step 1: Explore the official Android documentation
Explore a few of the most useful Android documentation sites and become familiar with what's available:
- Go to developer.android.com. This official Android developer documentation is kept current by Google.
- Go to developer.android.com/design/. This site offers guidelines for designing the look and functionality of high-quality Android apps.
- Go to material.io, which is a site about Material Design. Material Design is a conceptual design philosophy that outlines how all apps, not just Android apps, should look and function on mobile devices. Navigate the links to learn more about Material Design. For example, to learn about the use of color, click the Design tab, then select Color.
- Go to developer.android.com/docs/ to find API information, reference documentation, tutorials, tool guides, and code samples.
- Go to developer.android.com/distribute/ to find information about publishing an app on Google Play. Google Play is Google's digital distribution system for apps developed with the Android SDK. Use the Google Play Console to grow your user base and start earning money.
Step 2: Explore content from the Android team and Google Search
- Explore the Android Developer YouTube channel, which is a great source of tutorials and tips.
- Visit the official Android blog, where the Android team posts news and tips.
- Enter a question into Google Search, and the Google Search engine collects relevant results from various resources. For example, use Google Search to ask the question, "What is the most popular Android OS version in India?" You can even enter error messages in Google Search.
Step 3: Search on Stack Overflow
Stack Overflow is a community of programmers helping each other. If you run into a problem, chances are high that someone has already posted an answer.
- Go to Stack Overflow.
- In the search box, enter a question such as "How do I set up and use ADB over Wi-Fi?" You can search on Stack Overflow without registering, but if you want to post a new question or answer a question, you need to register.
- In the search box, enter
[android]. The[]brackets indicate that you want to search for posts that have been tagged as being about Android. - You can combine tags and search terms to make your search more specific. Try these searches:
[android] and [layout][android] "hello world"
Step 4: Use the SDK Manager to install offline documentation
When you install Android Studio, essential components of the Android SDK are installed along with it. To install other available libraries and documentation, use the SDK Manager.
To explore the SDK Manager and download SDK documentation, follow these steps:
- In Android Studio, select Tools > SDK Manager. The SDK Manager opens.
- In the left column of the SDK Manager, select Android SDK (1 in the screenshot below).
- Note the path in the Android SDK Location field (2 in the screenshot below). You use this path later to find whatever you install.

- In the SDK Manager, click the SDK Platforms tab. From here, you can install more versions of the Android system.
- Click the SDK Tools tab. From here, you can install SDK developer tools that are not installed by default. You can also install an offline version of the Android developer documentation.
- Click the SDK Update Sites tab. Android Studio checks the listed and selected sites regularly for updates.
- Return to the SDK Tools tab and select the Documentation for Android SDK checkbox, if it's not already selected. Click Apply.
A confirmation dialog opens, showing you how much disk space the download requires. Click OK. - When the installation finishes, click Finish.
To find the documentation that you installed, follow these steps:
- On your computer, navigate to the
Android/sdk/directory. (To find the path to the directory, see The Android SDK Location field, shown as 2 in the screenshot above.) - Open the
docs/directory. - Find the
index.htmlfile and open it in a browser.
- Official Android developer documentation is at developer.android.com.
- Material Design is a conceptual design philosophy that outlines how apps should look and function on mobile devices. Material Design isn't just for Android apps. The Material Design guidelines are at material.io.
- Android Studio provides templates for common and recommended app and activity designs. These templates offer working code for common use cases.
- When you create a project, you can choose a template for your first activity.
- While you are developing your app, you can create activities and other app components from built-in templates.
- Google Samples contains code samples that you can study, copy, and incorporate into your projects.
Udacity course:
Android Studio documentation:
Android developer documentation:
- Android developer site
- Google Developers Training site
- Layouts
- App resources overview
- Menus
TextView- String resources
- App Manifest Overview
Code samples:
- Source code for Google Developers Training courses on GitHub
- Google Samples
- Android code samples for developers
Videos:
Other resources:
Start the next lesson:
For links to other codelabs in this course, see the Android Kotlin Fundamentals codelabs landing page.