
Memorystore for Redis 是 Google Cloud 的一种全代管式 Redis 服务。通过利用具有高扩缩能力、高可用性且高度安全的 Redis 服务,在 Google Cloud 上运行的应用可实现卓越性能,且不必管理复杂的 Redis 部署。它可以用作数据缓存的后端,以提高 Spring Boot 应用的性能。本 Codelab 会说明如何进行设置。
学习内容
- 如何将 Memorystore 用作 Spring Boot 应用的缓存后端。
所需条件
- Google Cloud 项目
- 浏览器,例如 Google Chrome
- 熟悉标准的 Linux 文本编辑器,例如 Vim、Emacs 和 GNU Nano
您将如何使用本 Codelab?
您如何评价自己在 Google Cloud 服务方面的经验水平?
自定进度的环境设置
如果您还没有 Google 帐号(Gmail 或 Google Apps),则必须创建一个。登录 Google Cloud Platform Console (console.cloud.google.com) 并创建一个新项目:


请记住项目 ID,它在所有 Google Cloud 项目中都是唯一名称(很抱歉,上述名称已被占用,您无法使用!)。它稍后将在此 Codelab 中被称为 PROJECT_ID。
接下来,您需要在 Cloud Console 中启用结算功能,才能使用 Google Cloud 资源。
在此 Codelab 中运行仅花费几美元,但是如果您决定使用更多资源或继续让它们运行,费用可能更高(请参阅本文档末尾的“清理”部分)。
Google Cloud Platform 的新用户有资格获享 $300 免费试用。
激活 Google Cloud Shell
在 GCP 控制台中,点击右上角工具栏上的 Cloud Shell 图标:

然后点击“启动 Cloud Shell”:

配置和连接到环境应该只需要片刻时间:

这个虚拟机已加载了您需要的所有开发工具。它提供了一个永久性的 5GB 主目录,并且在 Google Cloud 上运行,从而大大增强了网络性能和身份验证功能。只需使用一个浏览器或 Google Chromebook 即可完成本实验中的大部分(甚至全部)工作。
在连接到 Cloud Shell 后,您应该会看到自己已通过身份验证,并且相关项目已设置为您的 PROJECT_ID。
在 Cloud Shell 中运行以下命令以确认您已通过身份验证:
gcloud auth list
命令输出
Credentialed accounts:
 - <myaccount>@<mydomain>.com (active)
gcloud config list project
命令输出
[core]
project = <PROJECT_ID>
如果不是上述结果,您可以使用以下命令进行设置:
gcloud config set project <PROJECT_ID>
命令输出
Updated property [core/project].
启动 Cloud Shell。
Cloud Shell 启动后,您可以使用命令行来创建新的 Memorystore 实例。
$ gcloud redis instances create myinstance --size=1 --region=us-central1
如果未启用 Memorystore API,系统会询问您是否要启用它。回答 y。
API [redis.googleapis.com] not enabled on project [204466653457].
Would you like to enable and retry (this will take a few minutes)?
(y/N)?  y
Enabling service redis.googleapis.com on project 204166153457...
Waiting for async operation operations/tmo-acf.c8909997-1b4e-1a62-b6f5-7da75cce1416 to complete...
Operation finished successfully. The following command can describe the Operation details:
 gcloud services operations describe operations/tmo-acf.c8909997-1b4e-1a62-b6f5-7da75cce1416
Create request issued for: [myinstance]
Waiting for operation [operation-1538645026454-57763b937ad39-2564ab37-3fea7701] to complete...done.
Created instance [myinstance].
操作完成后,您的实例即准备就绪可供使用。
运行以下命令来获取实例的 redis 主机 IP 地址。稍后,您在配置 Spring Boot 应用时将再次使用它。
$ gcloud redis instances describe myinstance --region=us-central1 \
  | grep host
host: 10.0.0.4
如果您导航到 Google Cloud Console 中的存储 > Memorystore,应该就能看到您的实例处于“准备就绪”状态:

在同一地区创建一个 Compute Engine 实例。
$ gcloud compute instances create instance-1 --zone us-central1-c
操作完成后,您的实例即准备就绪可供使用。
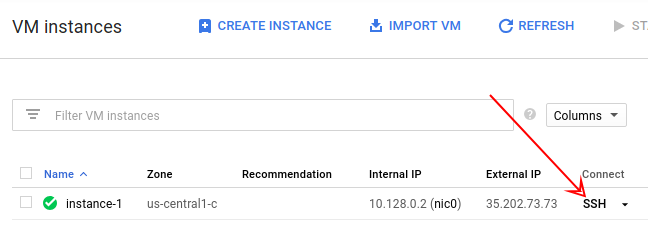
导航到计算 >Compute Engine >虚拟机实例来连接到您的实例,然后在连接列中点击 SSH:
在虚拟机 (VM) 实例 shell(而不是 Cloud Shell)中,安装 OpenJDK、Maven 和 telnet:
$ sudo apt-get install openjdk-8-jdk-headless maven telnet
等待安装完成,然后继续执行下一步。
使用 web、redis 和 cache 依赖项创建一个新的 Spring Boot 项目:
$ curl https://start.spring.io/starter.tgz \
  -d dependencies=web,redis,cache -d language=java -d baseDir=cache-app \
  | tar -xzvf - && cd cache-app
修改 application.properties 文件,将应用配置为使用 Memorystore for Redis 主机的 IP 地址。
$ nano src/main/resources/application.properties
添加以下行,使其具有您的 Memorystore for Redis IP 地址(由前面几个步骤得到):
spring.redis.host=<memorystore-host-ip-address>
在后面添加新的一行,并创建 REST 控制器 Java 类:
$ nano src/main/java/com/example/demo/HelloWorldController.java
将以下内容粘贴到文件中:
package com.example.demo;

import org.springframework.beans.factory.annotation.Autowired;
import org.springframework.cache.annotation.Cacheable;
import org.springframework.data.redis.core.StringRedisTemplate;
import org.springframework.web.bind.annotation.PathVariable;
import org.springframework.web.bind.annotation.RequestMapping;
import org.springframework.web.bind.annotation.RestController;

@RestController
public class HelloWorldController {
@Autowired
private StringRedisTemplate template;

@RequestMapping("/hello/{name}")
@Cacheable("hello")
public String hello(@PathVariable String name) throws InterruptedException {
  Thread.sleep(5000);
  return "Hello " + name;
 }
}
@RequestMapping 注释将该方法作为 HTTP 端点公开,并将路径的一部分映射到方法参数中(如 @PathVariable 注释所示)。
@Cacheable("hello") 注释用于指示应缓存方法执行,缓存名称为“hello”。它与参数值一起用作缓存键。稍后您会在 Codelab 中看到一个示例。
此外,您还需要在 Spring Boot 应用类中启用缓存。
修改 DemoApplication.java:
$ nano src/main/java/com/example/demo/DemoApplication.java
导入 org.springframework.cache.annotation.EnableCaching 并用对类添加此注释。结果应如下所示:
package com.example.demo;

import org.springframework.boot.SpringApplication;
import org.springframework.boot.autoconfigure.SpringBootApplication;
import org.springframework.cache.annotation.EnableCaching;

@SpringBootApplication
@EnableCaching
public class DemoApplication {

public static void main(String[] args) {
  SpringApplication.run(DemoApplication.class, args);
 }
}
现在,您可以运行应用了!
$ mvn spring-boot:run
使用与之前相同的方式另外打开一个到实例的 SSH 连接。在新的 SSH 窗口中,多次访问 /hello/ 端点,并传递“bob”作为名称。
$ time curl http://localhost:8080/hello/bob
Hello bob!

real        0m5.408s
user        0m0.036s
sys        0m0.009s

$ time curl http://localhost:8080/hello/bob
Hello bob!

real        0m0.092s
user        0m0.021s
sys        0m0.027s
请注意,第一次请求需要 5 秒钟,但是下一次请求要快得多,尽管您在方法中调用了 Thread.sleep(5000)。这是因为实际方法仅执行了一次,并且结果被放入了缓存中。之后的每次调用都会直接从缓存中返回结果。
实际上,您可以准确查看应用缓存的内容。在与上一步相同的终端中,使用 telnet 连接到 Memorystore for Redis 主机:
$ telnet <memorystore-host-ip-address> 6379
如需查看缓存键列表,请使用以下命令:
KEYS *
hello::bob
如您所见,缓存名称用作键的前缀,参数值用作第二部分。
如需检索值,请使用 GET 命令:
$ GET hello::bob
   Hello bob!
使用 QUIT 命令可退出。
如需清理,请从 Cloud Shell 中删除 Compute Engine 和 Memorystore 实例。
删除计算实例:
$ gcloud compute instances delete instance-1 --zone us-central1-c
删除 Memorystore for Redis 实例:
$ gcloud redis instances delete myinstance --region=us-central1
您已创建 Memorystore for Redis 和 Compute Engine 实例。此外,您还将 Spring Boot 应用配置为将 Memorystore 与 Spring Boot 缓存结合使用!
了解详情
- Spring Boot 缓存
- Memorystore
- Google Cloud 上的 Spring 项目
- Google Cloud GitHub 上的 Spring 代码库
- Google Cloud 上的 Java
许可
此作品已获得 Creative Commons Attribution 2.0 通用许可授权。