
Dataflow is a unified programming model and a managed service for developing and executing a wide range of data processing patterns including ETL, batch computation, and continuous computation. Because Dataflow is a managed service, it can allocate resources on demand to minimize latency while maintaining high utilization efficiency.
The Dataflow model combines batch and stream processing so developers don't have to make tradeoffs between correctness, cost, and processing time. In this codelab, you'll learn how to run a Dataflow pipeline that counts the occurrences of unique words in a text file.
This tutorial is adapted from https://cloud.google.com/dataflow/docs/quickstarts/quickstart-java-maven
What you'll learn
- How to create a Maven project with the Cloud Dataflow SDK
- Run an example pipeline using the Google Cloud Platform Console
- How to delete the associated Cloud Storage bucket and its contents
What you'll need
How will you use this tutorial?
How would you rate your experience with using Google Cloud Platform services?
Self-paced environment setup
If you don't already have a Google Account (Gmail or Google Apps), you must create one. Sign-in to Google Cloud Platform console (console.cloud.google.com) and create a new project:


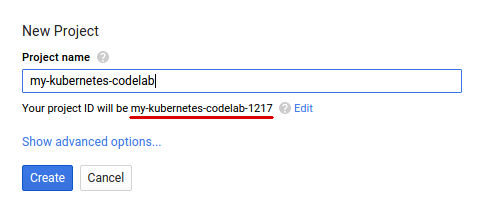
Remember the project ID, a unique name across all Google Cloud projects (the name above has already been taken and will not work for you, sorry!). It will be referred to later in this codelab as PROJECT_ID.
Next, you'll need to enable billing in the Cloud Console in order to use Google Cloud resources.
Running through this codelab shouldn't cost you more than a few dollars, but it could be more if you decide to use more resources or if you leave them running (see "cleanup" section at the end of this document).
New users of Google Cloud Platform are eligible for a $300 free trial.
Enable the APIs
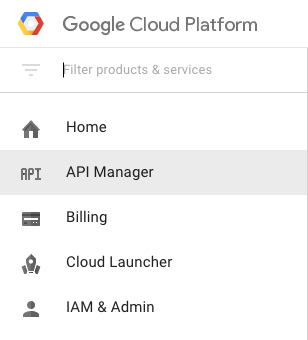
Click on the menu icon in the top left of the screen.

Select API Manager from the drop down.
Search for "Google Compute Engine" in the search box. Click on "Google Compute Engine API" in the results list that appears.

On the Google Compute Engine page click Enable

Once it has enabled click the arrow to go back.
Now search for the following APIs and enable them as well:
- Google Dataflow API
- Stackdriver Logging API
- Google Cloud Storage
- Google Cloud Storage JSON API
- BigQuery API
- Google Cloud Pub/Sub API
- Google Cloud Datastore API
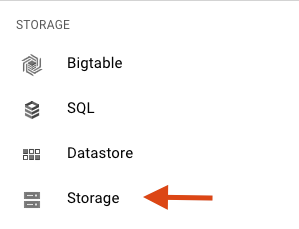
In the Google Cloud Platform Console, click the Menu icon on the top left of the screen:
Scroll down and select Cloud Storage in the Storage subsection:
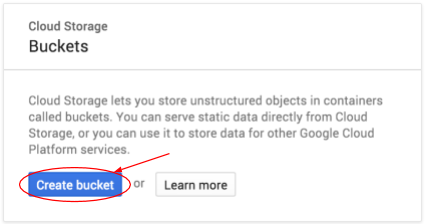
You should now see the Cloud Storage Browser, and assuming you are using a project that does not currently have any Cloud Storage buckets, you will see a dialog box inviting you to create a new bucket:

Press the Create bucket button to create one:

Enter a name for your bucket. As the dialog box notes, bucket names must be unique across all of Cloud Storage. So if you choose an obvious name, such as "test", you will probably find that someone else has already created a bucket with that name, and will receive an error.
There are also some rules regarding what characters are allowed in bucket names. If you start and end your bucket name with a letter or number, and only use dashes in the middle, then you'll be fine. If you try to use special characters, or try to start or end your bucket name with something other than a letter or number, the dialog box will remind you of the rules.
Enter a unique name for your bucket and press Create. If you choose something that's already in use, you will see the error message shown above. When you have successfully created a bucket, you will be taken to your new, empty, bucket in the browser:

The bucket name you see will, of course, be different, since they must be unique across all projects.
Activate Google Cloud Shell
From the GCP Console click the Cloud Shell icon on the top right toolbar:

Then click "Start Cloud Shell":

It should only take a few moments to provision and connect to the environment:

This virtual machine is loaded with all the development tools you'll need. It offers a persistent 5GB home directory, and runs on the Google Cloud, greatly enhancing network performance and authentication. Much, if not all, of your work in this lab can be done with simply a browser or your Google Chromebook.
Once connected to Cloud Shell, you should see that you are already authenticated and that the project is already set to your PROJECT_ID.
Run the following command in Cloud Shell to confirm that you are authenticated:
gcloud auth list
Command output
Credentialed accounts:
 - <myaccount>@<mydomain>.com (active)
gcloud config list project
Command output
[core]
project = <PROJECT_ID>
If it is not, you can set it with this command:
gcloud config set project <PROJECT_ID>
Command output
Updated property [core/project].
After Cloud Shell launches, let's get started by creating a Maven project containing the Cloud Dataflow SDK for Java.
Run the mvn archetype:generate command in your shell as follows:
  mvn archetype:generate \
     -DarchetypeArtifactId=google-cloud-dataflow-java-archetypes-examples \
     -DarchetypeGroupId=com.google.cloud.dataflow \
     -DarchetypeVersion=1.9.0 \
     -DgroupId=com.example \
     -DartifactId=first-dataflow \
     -Dversion="0.1" \
     -DinteractiveMode=false \
     -Dpackage=com.example
After running the command, you should see a new directory called first-dataflow under your current directory. first-dataflow contains a Maven project that includes the Cloud Dataflow SDK for Java and example pipelines.
Let's start by saving our project ID and Cloud Storage bucket names as environment variables. You can do this in Cloud Shell. Be sure to replace <your_project_id> with your own project ID.
export PROJECT_ID=<your_project_id>Now we will do the same for the Cloud Storage bucket. Remember, to replace <your_bucket_name> with the unique name you used to create your bucket in an earlier step.
export BUCKET_NAME=<your_bucket_name>Change to the first-dataflow/ directory.
cd first-dataflowWe're going to run a pipeline called WordCount, which reads text, tokenizes the text lines into individual words, and performs a frequency count on each of those words. First we'll run the pipeline, and while it's running we'll take a look at what's happening in each step.
Start the pipeline by running the command mvn compile exec:java in your shell or terminal window. For the --project, --stagingLocation, and --output arguments, the below command references the environment variables you set up earlier in this step.
mvn compile exec:java \
-Dexec.mainClass=com.example.WordCount \
-Dexec.args="--project=${PROJECT_ID} \
--stagingLocation=gs://${BUCKET_NAME}/staging/ \
--output=gs://${BUCKET_NAME}/output \
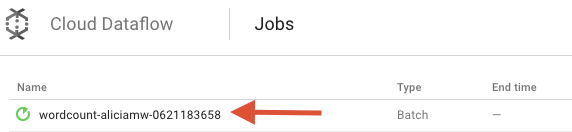
--runner=BlockingDataflowPipelineRunner"While the job is running, let's find the job in the job list.
Open the Cloud Dataflow Monitoring UI in the Google Cloud Platform Console. You should see your wordcount job with a status of Running:

Now, let's look at the pipeline parameters. Start by clicking on the name of your job:
When you select a job, you can view the execution graph. A pipeline's execution graph represents each transform in the pipeline as a box that contains the transform name and some status information. You can click on the carat in the top right corner of each step to see more details:
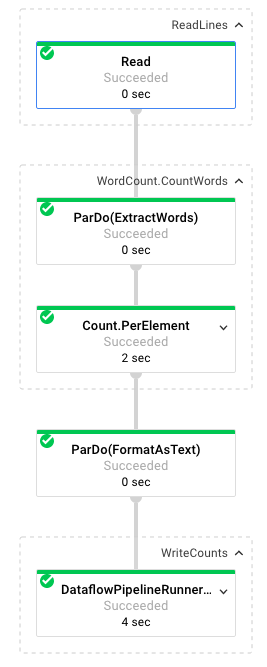
Let's see how the pipeline transforms the data at each step:
- Read: In this step, the pipeline reads from an input source. In this case, it's a text file from Cloud Storage with the entire text of the Shakespeare play King Lear. Our pipeline reads the file line by line and outputs each a
PCollection, where each line in our text file is an element in the collection. - CountWords: The
CountWordsstep has two parts. First, it uses a parallel do function (ParDo) namedExtractWordsto tokenize each line into individual words. The output of ExtractWords is a new PCollection where each element is a word. The next step,Count, utilizes a transform provided by the Dataflow SDK which returns key, value pairs where the key is a unique word and the value is the number of times it occurs. Here's the method implementingCountWords, and you can check out the full WordCount.java file on GitHub:
  /**
   * A PTransform that converts a PCollection containing lines of text
   * into a PCollection of formatted word counts.
   */
  public static class CountWords extends PTransform<PCollection<String>,
      PCollection<KV<String, Long>>> {
    @Override
    public PCollection<KV<String, Long>> apply(PCollection<String> lines) {

      // Convert lines of text into individual words.
      PCollection<String> words = lines.apply(
          ParDo.of(new ExtractWordsFn()));

      // Count the number of times each word occurs.
      PCollection<KV<String, Long>> wordCounts =
          words.apply(Count.<String>perElement());

      return wordCounts;
    }
}- FormatAsText: This is a function that formats each key, value pair into a printable string. Here's the
FormatAsTexttransform to implement this:
  /** A SimpleFunction that converts a Word and Count into a printable string. */
  public static class FormatAsTextFn extends SimpleFunction<KV<String, Long>, String> {
    @Override
    public String apply(KV<String, Long> input) {
      return input.getKey() + ": " + input.getValue();
    }
}- WriteCounts: In this step we write the printable strings into multiple sharded text files.
We'll take a look at the resulting output from the pipeline in a few minutes.
Now take a look at the Summary page to the right of the graph, which includes pipeline parameters that we included in the mvn compile exec:java command.
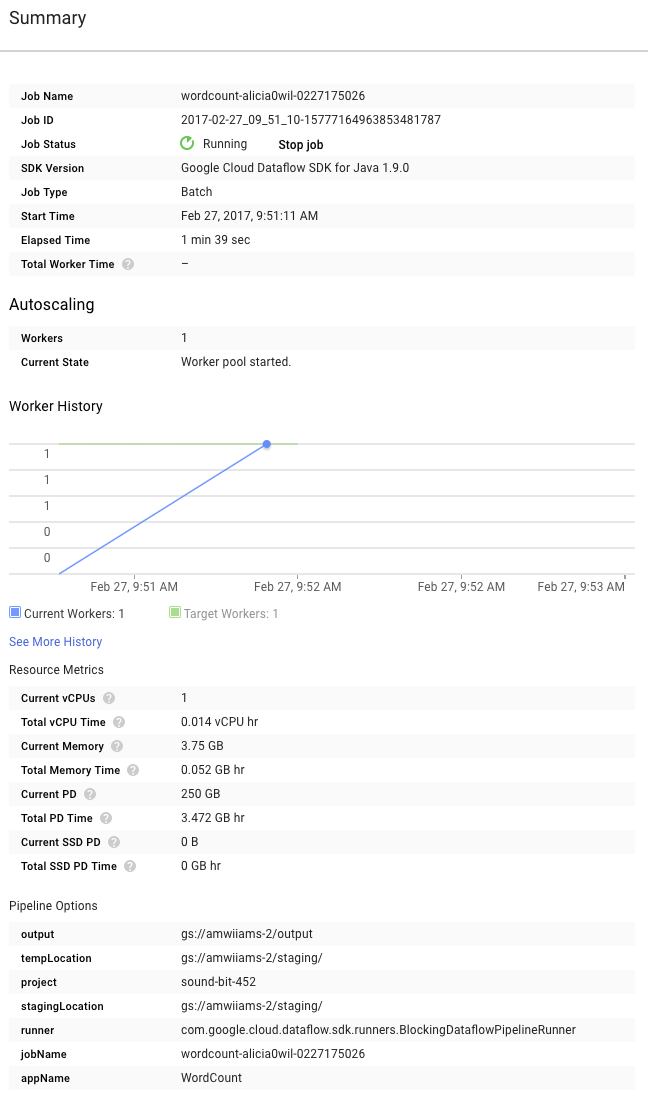
You can also see Custom counters for the pipeline, which in this case shows how many empty lines have been encountered so far during execution. You can add new counters to your pipeline in order to track application-specific metrics.
You can click the Logs icon to view the specific error messages.

You filter the messages that appear in the Job Log tab by using the Minimum Severity drop-down menu.
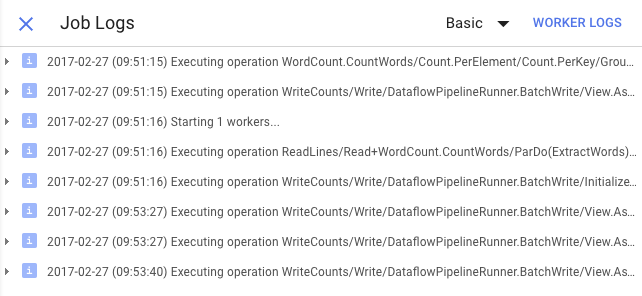
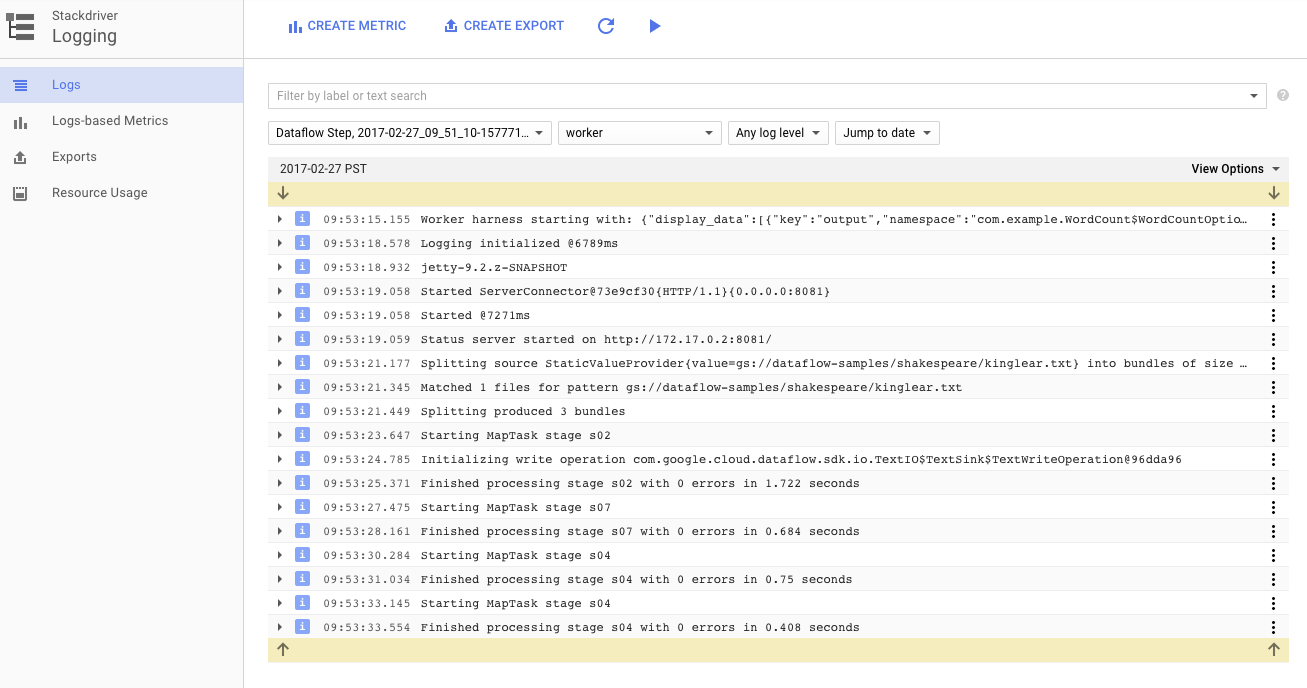
You can use the Worker Logs button in the logs tab to view worker logs for the Compute Engine instances that run your pipeline. Worker Logs consist of log lines generated by your code and the Dataflow generated code running it.
If you are trying to debug a failure in the pipeline, oftentimes there will be additional logging in the Worker Logs that helps solve the problem. Keep in mind that these logs are aggregated across all workers, and can be filtered and searched.
In the next step, we'll check that your job succeeded.
Open the Cloud Dataflow Monitoring UI in the Google Cloud Platform Console.
You should see your wordcount job with a status of Running at first, and then Succeeded:

The job will take approximately 3-4 minutes to run.
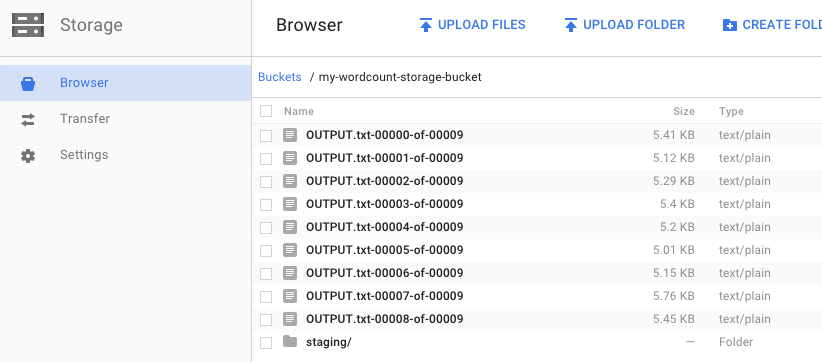
Remember when you ran the pipeline and specified an output bucket? Let's take a look at the result (because don't you want to see how many times each word in King Lear occurred?!). Navigate back to the Cloud Storage Browser in the Google Cloud Platform Console. In your bucket, you should see the output files and staging files that your job created:
You can shut down your resources from the Google Cloud Platform Console.
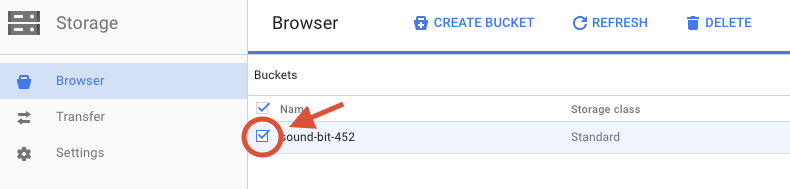
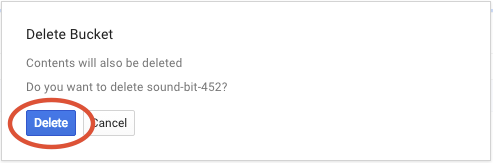
Open the Cloud Storage browser in the Google Cloud Platform Console.

Select the checkbox next to the bucket that you created.
Click DELETE to permanently delete the bucket and its contents.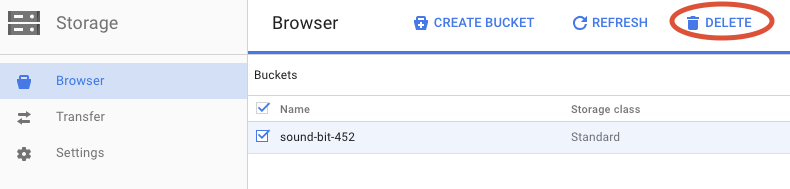
You learned how to create a Maven project with the Cloud Dataflow SDK, run an example pipeline using the Google Cloud Platform Console, and delete the associated Cloud Storage bucket and its contents.
Learn More
- Dataflow Documentation: https://cloud.google.com/dataflow/docs/
License
This work is licensed under a Creative Commons Attribution 3.0 Generic License, and Apache 2.0 license.