
ในโค้ดแล็บนี้ เราจะมาเรียนรู้วิธีสร้างแอปกล้องที่ใช้ CameraX เพื่อแสดงช่องมองภาพ ถ่ายรูป และวิเคราะห์สตรีมรูปภาพจากกล้อง
เราจึงจะนำเสนอแนวคิดของกรณีการใช้งานใน CameraX ซึ่งสามารถใช้สำหรับการดำเนินการต่างๆ ของกล้อง ตั้งแต่การแสดงช่องมองภาพไปจนถึงการวิเคราะห์เฟรมแบบเรียลไทม์
สิ่งที่เราจะเรียนรู้
- วิธีเพิ่มการขึ้นต่อกันของ CameraX
- วิธีแสดงตัวอย่างกล้องในกิจกรรม (กรณีการใช้งานเวอร์ชันตัวอย่าง)
- วิธีถ่ายรูปและบันทึกลงในพื้นที่เก็บข้อมูล (กรณีการใช้งาน ImageCapture)
- วิธีวิเคราะห์เฟรมจากกล้องแบบเรียลไทม์ (กรณีการใช้งาน ImageAnalysis)
ฮาร์ดแวร์ที่เราต้องใช้
- อุปกรณ์ Android แม้ว่าโปรแกรมจำลองของ Android Studio จะใช้งานได้ดีก็ตาม ระดับ API ขั้นต่ำที่รองรับคือ 21
ซอฟต์แวร์ที่เราต้องใช้
- Android Studio 3.3 ขึ้นไป
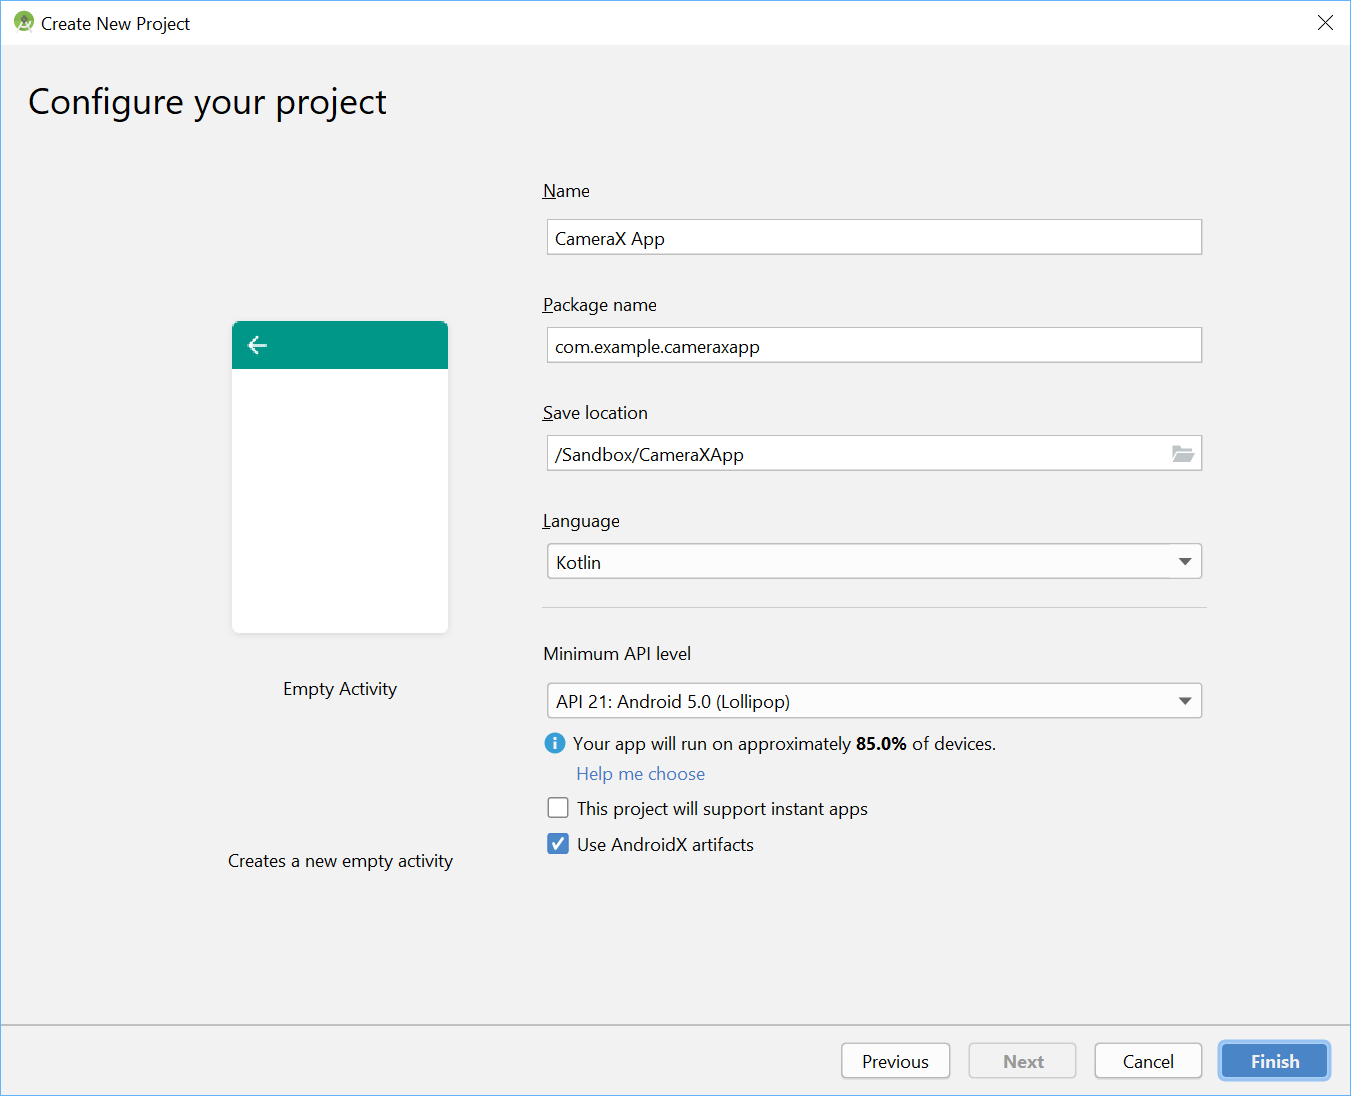
ใช้เมนู Android Studio เพื่อเริ่มโปรเจ็กต์ใหม่และเลือกกิจกรรมว่างเมื่อได้รับข้อความแจ้ง

จากนั้นเราก็เลือกชื่อที่ต้องการได้ ซึ่งเราเลือกชื่อ "CameraX App" เราควรตรวจสอบว่าได้ตั้งค่าภาษาเป็น Kotlin, ระดับ API ขั้นต่ำเป็น 21 (ซึ่งเป็นระดับขั้นต่ำที่จำเป็นสำหรับ CameraX) และเราใช้ Artifact ของ AndroidX
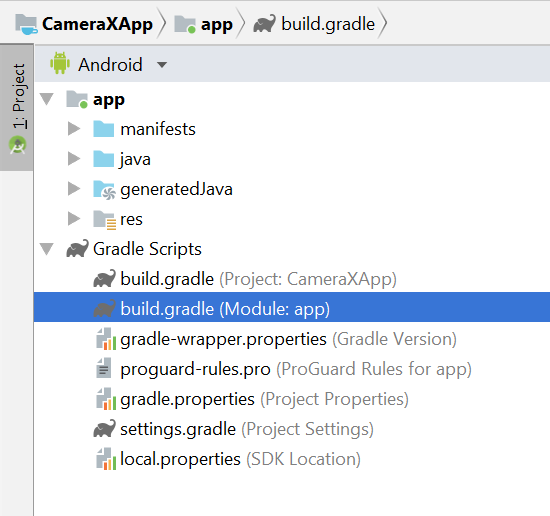
ในการเริ่มต้น ให้เพิ่มทรัพยากร Dependency ของ CameraX ลงในไฟล์ Gradle ของแอปภายในส่วน dependencies ดังนี้
// Use the most recent version of CameraX, currently that is alpha04
def camerax_version = "1.0.0-alpha04"
implementation "androidx.camera:camera-core:${camerax_version}"
implementation "androidx.camera:camera-camera2:${camerax_version}"
เมื่อได้รับข้อความแจ้ง ให้คลิกซิงค์เลย แล้วเราจะพร้อมใช้ CameraX ในแอป
เราจะใช้ SurfaceTexture เพื่อแสดงช่องมองภาพของกล้อง ในโค้ดแล็บนี้ เราจะแสดงช่องมองภาพในรูปแบบสี่เหลี่ยมจัตุรัสที่มีขนาดคงที่ ดูตัวอย่างที่ครอบคลุมมากขึ้นซึ่งแสดงช่องมองภาพที่ตอบสนองได้ที่ตัวอย่างอย่างเป็นทางการ
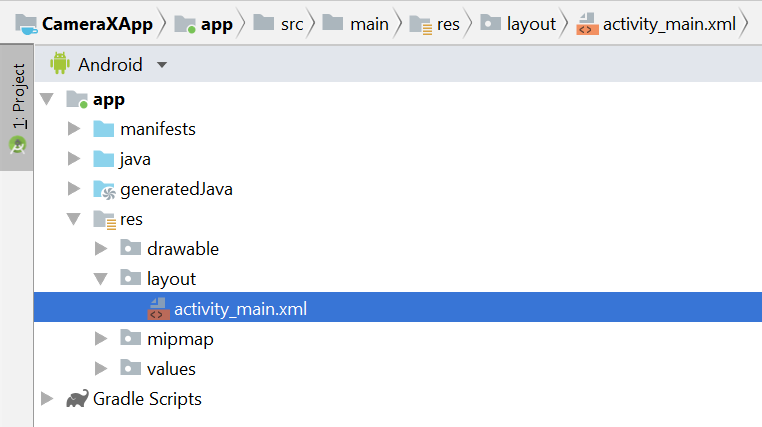
มาแก้ไขไฟล์เลย์เอาต์ activity_main ใน res > layout > activity_main.xml กัน
<?xml version="1.0" encoding="utf-8"?>
<androidx.constraintlayout.widget.ConstraintLayout
        xmlns:android="http://schemas.android.com/apk/res/android"
        xmlns:tools="http://schemas.android.com/tools"
        xmlns:app="http://schemas.android.com/apk/res-auto"
        android:layout_width="match_parent"
        android:layout_height="match_parent"
        tools:context=".MainActivity">

    <TextureView
            android:id="@+id/view_finder"
            android:layout_width="640px"
            android:layout_height="640px"
            app:layout_constraintTop_toTopOf="parent"
            app:layout_constraintBottom_toBottomOf="parent"
            app:layout_constraintStart_toStartOf="parent"
            app:layout_constraintEnd_toEndOf="parent" />

</androidx.constraintlayout.widget.ConstraintLayout>
ส่วนสำคัญของการเพิ่มฟังก์ชันการทำงานในโปรเจ็กต์ที่ใช้กล้องคือการขอสิทธิ์ CAMERA ที่เหมาะสม ก่อนอื่นเราต้องประกาศในไฟล์ Manifest ก่อนแท็ก Application ดังนี้
<uses-permission android:name="android.permission.CAMERA" />จากนั้นใน MainActivity เราต้องขอสิทธิ์ที่รันไทม์ เราจะทำการเปลี่ยนแปลงในไฟล์ MainActivity ที่อยู่ใน java > com.example.cameraxapp > MainActivity.kt ดังนี้

ที่ด้านบนของไฟล์ นอกคำจำกัดความของคลาส MainActivity ให้เพิ่มค่าคงที่และการนำเข้าต่อไปนี้
// Your IDE likely can auto-import these classes, but there are several
// different implementations so we list them here to disambiguate
import android.Manifest
import android.util.Size
import android.graphics.Matrix
import java.util.concurrent.TimeUnit

// This is an arbitrary number we are using to keep tab of the permission
// request. Where an app has multiple context for requesting permission,
// this can help differentiate the different contexts
private const val REQUEST_CODE_PERMISSIONS = 10

// This is an array of all the permission specified in the manifest
private val REQUIRED_PERMISSIONS = arrayOf(Manifest.permission.CAMERA)
ภายในคลาส MainActivity ให้เพิ่มฟิลด์และเมธอดตัวช่วยต่อไปนี้ ซึ่งใช้เพื่อขอสิทธิ์และทริกเกอร์โค้ดเมื่อเราทราบว่าได้รับสิทธิ์ทั้งหมดแล้ว
class MainActivity : AppCompatActivity(), LifecycleOwner {

    override fun onCreate(savedInstanceState: Bundle?) {
        ...
    }

    // Add this after onCreate

    private lateinit var viewFinder: TextureView

    private fun startCamera() {
        // TODO: Implement CameraX operations
    }

    private fun updateTransform() {
        // TODO: Implement camera viewfinder transformations
    }

    /**
     * Process result from permission request dialog box, has the request
     * been granted? If yes, start Camera. Otherwise display a toast
     */
    override fun onRequestPermissionsResult(
        requestCode: Int, permissions: Array<String>, grantResults: IntArray) {
        if (requestCode == REQUEST_CODE_PERMISSIONS) {
            if (allPermissionsGranted()) {
                viewFinder.post { startCamera() }
            } else {
                Toast.makeText(this,
                    "Permissions not granted by the user.",
                    Toast.LENGTH_SHORT).show()
                finish()
            }
        }
    }

    /**
     * Check if all permission specified in the manifest have been granted
     */
    private fun allPermissionsGranted() = REQUIRED_PERMISSIONS.all {
        ContextCompat.checkSelfPermission(
               baseContext, it) == PackageManager.PERMISSION_GRANTED
    }
}
สุดท้าย เราจะรวมทุกอย่างไว้ใน onCreate เพื่อทริกเกอร์คำขอสิทธิ์เมื่อเหมาะสม
override fun onCreate(savedInstanceState: Bundle?) {
    ...

    // Add this at the end of onCreate function

    viewFinder = findViewById(R.id.view_finder)

    // Request camera permissions
    if (allPermissionsGranted()) {
        viewFinder.post { startCamera() }
    } else {
        ActivityCompat.requestPermissions(
            this, REQUIRED_PERMISSIONS, REQUEST_CODE_PERMISSIONS)
    }

    // Every time the provided texture view changes, recompute layout
    viewFinder.addOnLayoutChangeListener { _, _, _, _, _, _, _, _, _ ->
        updateTransform()
    }
}
ตอนนี้เมื่อแอปพลิเคชันเริ่มต้นทำงาน แอปจะตรวจสอบว่ามีสิทธิ์เข้าถึงกล้องที่เหมาะสมหรือไม่ หากมี ก็จะเรียกใช้ `startCamera()` โดยตรง ไม่เช่นนั้น ระบบจะขอสิทธิ์ และเมื่อได้รับสิทธิ์แล้วก็จะเรียกใช้ `startCamera()`
สำหรับแอปพลิเคชันกล้องส่วนใหญ่ การแสดงช่องมองภาพต่อผู้ใช้เป็นสิ่งสำคัญมาก มิฉะนั้นผู้ใช้จะชี้กล้องไปยังตำแหน่งที่ถูกต้องได้ยากมาก คุณสามารถใช้ช่องมองภาพได้โดยใช้คลาส `Preview` ของ CameraX
หากต้องการใช้การแสดงตัวอย่าง เราต้องกำหนดค่าก่อน จากนั้นระบบจะใช้การกำหนดค่าดังกล่าวเพื่อสร้างอินสแตนซ์ของกรณีการใช้งาน อินสแตนซ์ที่ได้คือสิ่งที่เราต้องผูกกับวงจรของ CameraX เราจะดำเนินการนี้ภายในเมธอด `startCamera()` โดยกรอกข้อมูลการติดตั้งใช้งานด้วยโค้ดนี้
private fun startCamera() {

    // Create configuration object for the viewfinder use case
    val previewConfig = PreviewConfig.Builder().apply {
        setTargetAspectRatio(Rational(1, 1))
        setTargetResolution(Size(640, 640))
    }.build()

    // Build the viewfinder use case
    val preview = Preview(previewConfig)

    // Every time the viewfinder is updated, recompute layout
    preview.setOnPreviewOutputUpdateListener {

        // To update the SurfaceTexture, we have to remove it and re-add it
        val parent = viewFinder.parent as ViewGroup
        parent.removeView(viewFinder)
        parent.addView(viewFinder, 0)

        viewFinder.surfaceTexture = it.surfaceTexture
        updateTransform()
    }

    // Bind use cases to lifecycle
    // If Android Studio complains about "this" being not a LifecycleOwner
    // try rebuilding the project or updating the appcompat dependency to
    // version 1.1.0 or higher.
    CameraX.bindToLifecycle(this, preview)
}
ตอนนี้เราต้องใช้เมธอด `updateTransform()` ที่ลึกลับ ภายใน `updateTransform()` เป้าหมายคือการชดเชยการเปลี่ยนแปลงการวางแนวอุปกรณ์เพื่อแสดงช่องมองภาพในการหมุนแนวตั้ง
private fun updateTransform() {
    val matrix = Matrix()

    // Compute the center of the view finder
    val centerX = viewFinder.width / 2f
    val centerY = viewFinder.height / 2f

    // Correct preview output to account for display rotation
    val rotationDegrees = when(viewFinder.display.rotation) {
        Surface.ROTATION_0 -> 0
        Surface.ROTATION_90 -> 90
        Surface.ROTATION_180 -> 180
        Surface.ROTATION_270 -> 270
        else -> return
    }
    matrix.postRotate(-rotationDegrees.toFloat(), centerX, centerY)

    // Finally, apply transformations to our TextureView
    viewFinder.setTransform(matrix)
}
หากต้องการใช้แอปที่พร้อมใช้งานจริง โปรดดูตัวอย่างอย่างเป็นทางการเพื่อดูว่าต้องจัดการอะไรอีกบ้าง เราจะใช้ทางลัดบางอย่างเพื่อให้ Codelab นี้สั้นลง ตัวอย่างเช่น เราจะไม่ติดตามการเปลี่ยนแปลงการกำหนดค่าบางอย่าง เช่น การหมุนอุปกรณ์ 180 องศา ซึ่งไม่ได้ทริกเกอร์เครื่องมือฟังการเปลี่ยนแปลงเลย์เอาต์ ช่องมองภาพที่ไม่ใช่สี่เหลี่ยมจัตุรัสยังต้องชดเชยการเปลี่ยนแปลงสัดส่วนภาพเมื่ออุปกรณ์หมุนด้วย
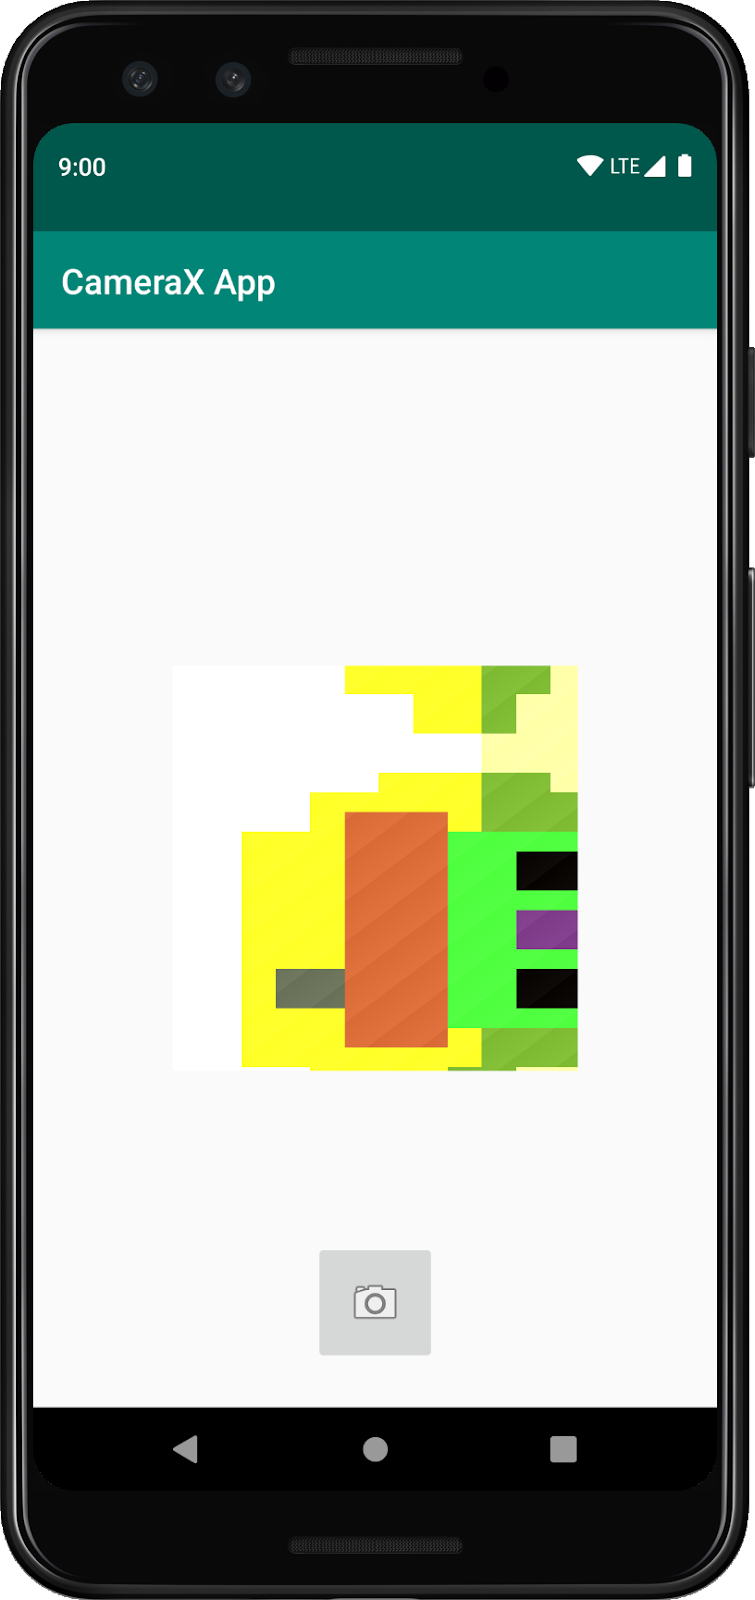
หากเราสร้างและเรียกใช้แอป ตอนนี้เราควรเห็นตัวอย่างแบบเรียลไทม์ เยี่ยมไปเลย

หากต้องการให้ผู้ใช้ถ่ายภาพได้ เราจะจัดปุ่มให้เป็นส่วนหนึ่งของเลย์เอาต์หลังจากมุมมองพื้นผิวใน res > layout > activity_main.xml ดังนี้
<ImageButton
        android:id="@+id/capture_button"
        android:layout_width="72dp"
        android:layout_height="72dp"
        android:layout_margin="24dp"
        app:srcCompat="@android:drawable/ic_menu_camera"
        app:layout_constraintBottom_toBottomOf="parent"
        app:layout_constraintEnd_toEndOf="parent"
        app:layout_constraintStart_toStartOf="parent" />
Use Case อื่นๆ จะทำงานในลักษณะที่คล้ายกันมากเมื่อเทียบกับเวอร์ชันตัวอย่าง ก่อนอื่น เราต้องกำหนดออบเจ็กต์การกำหนดค่าซึ่งใช้เพื่อสร้างออบเจ็กต์ Use Case จริง หากต้องการถ่ายภาพ เมื่อกดปุ่มจับภาพ เราต้องอัปเดตเมธอด `startCamera()` และเพิ่มโค้ดอีก 2-3 บรรทัดที่ส่วนท้ายก่อนที่จะเรียกใช้ CameraX.bindToLifecycle
private fun startCamera() {

    ...

    // Add this before CameraX.bindToLifecycle

    // Create configuration object for the image capture use case
    val imageCaptureConfig = ImageCaptureConfig.Builder()
        .apply {
            setTargetAspectRatio(Rational(1, 1))
            // We don't set a resolution for image capture; instead, we
            // select a capture mode which will infer the appropriate
            // resolution based on aspect ration and requested mode
            setCaptureMode(ImageCapture.CaptureMode.MIN_LATENCY)
    }.build()

    // Build the image capture use case and attach button click listener
    val imageCapture = ImageCapture(imageCaptureConfig)
    findViewById<ImageButton>(R.id.capture_button).setOnClickListener {
        val file = File(externalMediaDirs.first(),
            "${System.currentTimeMillis()}.jpg")
        imageCapture.takePicture(file,
            object : ImageCapture.OnImageSavedListener {
            override fun onError(error: ImageCapture.UseCaseError,
                                 message: String, exc: Throwable?) {
                val msg = "Photo capture failed: $message"
                Toast.makeText(baseContext, msg, Toast.LENGTH_SHORT).show()
                Log.e("CameraXApp", msg)
                exc?.printStackTrace()
            }

            override fun onImageSaved(file: File) {
                val msg = "Photo capture succeeded: ${file.absolutePath}"
                Toast.makeText(baseContext, msg, Toast.LENGTH_SHORT).show()
                Log.d("CameraXApp", msg)
            }
        })
    }

    // Bind use cases to lifecycle
    // If Android Studio complains about "this" being not a LifecycleOwner
    // try rebuilding the project or updating the appcompat dependency to
    // version 1.1.0 or higher.
    CameraX.bindToLifecycle(this, preview)
}
จากนั้นอัปเดตการเรียกใช้ CameraX.bindToLifecycle เพื่อรวม Use Case ใหม่
CameraX.bindToLifecycle(this, preview, imageCapture)เพียงเท่านี้เราก็มีปุ่มถ่ายภาพที่ใช้งานได้แล้ว
ฟีเจอร์ที่น่าสนใจมากของ CameraX คือคลาส ImageAnalysis ซึ่งช่วยให้เรากำหนดคลาสที่กำหนดเองซึ่งใช้ส่วนต่อประสาน ImageAnalysis.Analyzer ได้ ซึ่งจะเรียกใช้กับเฟรมกล้องที่เข้ามา ตามวิสัยทัศน์หลักของ CameraX เราจึงไม่ต้องกังวลเรื่องการจัดการสถานะเซสชันของกล้องหรือแม้แต่การทิ้งรูปภาพ เพียงแค่ผูกกับวงจรที่ต้องการของแอปก็เพียงพอแล้ว เช่นเดียวกับคอมโพเนนต์ที่รับรู้ถึงวงจรอื่นๆ
ก่อนอื่น เราจะใช้เครื่องมือวิเคราะห์รูปภาพที่กำหนดเอง เครื่องมือวิเคราะห์ของเราค่อนข้างเรียบง่าย โดยจะบันทึกเฉพาะค่าความสว่างเฉลี่ยของรูปภาพ แต่แสดงให้เห็นถึงสิ่งที่ต้องทำสำหรับ Use Case ที่ซับซ้อนโดยพลการ สิ่งที่เราต้องทำคือการลบล้างฟังก์ชัน `analyze` ในคลาสที่ใช้การติดตั้งใช้งานอินเทอร์เฟซ ImageAnalysis.Analyzer เราสามารถกําหนดการติดตั้งใช้งานเป็นคลาสภายใน MainActivity ได้ดังนี้
private class LuminosityAnalyzer : ImageAnalysis.Analyzer {
    private var lastAnalyzedTimestamp = 0L

    /**
     * Helper extension function used to extract a byte array from an
     * image plane buffer
     */
    private fun ByteBuffer.toByteArray(): ByteArray {
        rewind()    // Rewind the buffer to zero
        val data = ByteArray(remaining())
        get(data)   // Copy the buffer into a byte array
        return data // Return the byte array
    }

    override fun analyze(image: ImageProxy, rotationDegrees: Int) {
        val currentTimestamp = System.currentTimeMillis()
        // Calculate the average luma no more often than every second
        if (currentTimestamp - lastAnalyzedTimestamp >=
            TimeUnit.SECONDS.toMillis(1)) {
            // Since format in ImageAnalysis is YUV, image.planes[0]
            // contains the Y (luminance) plane
            val buffer = image.planes[0].buffer
            // Extract image data from callback object
            val data = buffer.toByteArray()
            // Convert the data into an array of pixel values
            val pixels = data.map { it.toInt() and 0xFF }
            // Compute average luminance for the image
            val luma = pixels.average()
            // Log the new luma value
            Log.d("CameraXApp", "Average luminosity: $luma")
            // Update timestamp of last analyzed frame
            lastAnalyzedTimestamp = currentTimestamp
        }
    }
}
เมื่อคลาสของเราใช้การติดตั้งอินเทอร์เฟซ ImageAnalysis.Analyzer สิ่งที่เราต้องทำคือสร้างอินสแตนซ์ ImageAnalysis เหมือนกับ Use Case อื่นๆ และอัปเดตฟังก์ชัน `startCamera()` อีกครั้งก่อนที่จะเรียกใช้ CameraX.bindToLifecycle
private fun startCamera() {

    ...

    // Add this before CameraX.bindToLifecycle

    // Setup image analysis pipeline that computes average pixel luminance
    val analyzerConfig = ImageAnalysisConfig.Builder().apply {
        // Use a worker thread for image analysis to prevent glitches
        val analyzerThread = HandlerThread(
            "LuminosityAnalysis").apply { start() }
        setCallbackHandler(Handler(analyzerThread.looper))
        // In our analysis, we care more about the latest image than
        // analyzing *every* image
        setImageReaderMode(
            ImageAnalysis.ImageReaderMode.ACQUIRE_LATEST_IMAGE)
    }.build()

    // Build the image analysis use case and instantiate our analyzer
    val analyzerUseCase = ImageAnalysis(analyzerConfig).apply {
        analyzer = LuminosityAnalyzer()
    }

    // Bind use cases to lifecycle
    // If Android Studio complains about "this" being not a LifecycleOwner
    // try rebuilding the project or updating the appcompat dependency to
    // version 1.1.0 or higher.
    CameraX.bindToLifecycle(this, preview, imageCapture)
}
นอกจากนี้ เรายังอัปเดตการเรียกใช้ CameraX.bindtoLifecycle เพื่อเชื่อมโยง Use Case ใหม่ด้วย
CameraX.bindToLifecycle(
    this, preview, imageCapture, analyzerUseCase)
การเรียกใช้แอปในตอนนี้จะสร้างข้อความที่คล้ายกับข้อความนี้ใน Logcat ทุกๆ วินาทีโดยประมาณ
D/CameraXApp: Average luminosity: ...หากต้องการทดสอบแอป สิ่งที่เราต้องทำก็คือคลิกปุ่มเรียกใช้ใน Android Studio จากนั้นระบบจะสร้าง โปรเจ็กต์ของเรา แล้วติดตั้งใช้งานและเปิดใช้ในอุปกรณ์หรือโปรแกรมจำลองที่เลือก เมื่อแอปโหลดแล้ว เราควรเห็นช่องมองภาพ ซึ่งจะยังคงตั้งตรงแม้หลังจากหมุนอุปกรณ์แล้ว เนื่องจากโค้ดการจัดการการวางแนวที่เราเพิ่มไปก่อนหน้านี้ และควรจะถ่ายรูปโดยใช้ปุ่มได้ด้วย

คุณทำโค้ดแล็บเสร็จแล้วและทำได้สำเร็จ เมื่อย้อนกลับไป คุณได้ติดตั้งใช้งานสิ่งต่อไปนี้ในแอป Android ใหม่ตั้งแต่ต้น
- รวมการอ้างอิง CameraX ไว้ในโปรเจ็กต์
- แสดงช่องมองภาพของกล้อง (ใช้ Use Case ของการแสดงตัวอย่าง)
- ใช้การจับภาพและบันทึกรูปภาพลงในพื้นที่เก็บข้อมูล (ใช้กรณีการใช้งาน ImageCapture)
- วิเคราะห์เฟรมจากกล้องแบบเรียลไทม์ (ใช้กรณีการใช้งาน ImageAnalysis)
หากสนใจอ่านเพิ่มเติมเกี่ยวกับ CameraX และสิ่งที่คุณทำได้ด้วย CameraX โปรดดูเอกสารประกอบหรือโคลนตัวอย่างอย่างเป็นทางการ