
This codelab is part of the Advanced Android in Kotlin course. You'll get the most value out of this course if you work through the codelabs in sequence, but it is not mandatory. All the course codelabs are listed on the Advanced Android in Kotlin codelabs landing page.
Introduction
In the previous codelab, you added notifications to your egg timer which are created and triggered within your app. Another important use case of notifications is to remotely send push notifications which can be received even when your app is not running.
What is a push notification?
Push notifications are notifications that the server "pushes" to mobile devices. They can be delivered to a device regardless of whether your app is running or not.
Push notifications are a great way to let users know about an update or remind them of a task or feature. Imagine waiting for a product to be in stock again. With a push notification, a shopping app can let you know about stock updates rather than you having to check the stock status everyday.
Push notifications make use of the publish/subscribe pattern, which allows backend apps to push relevant content to interested clients. Without a publish/subscribe model, your app's users would need to periodically check for updates in your app. This process is tedious and unreliable for users. Furthermore, as the number of clients grows, these periodic checks would place too large of a load on networking and processing resources, both for your app's server and for a user's device.
Just like all other types of notifications, make sure you respect your users with push notifications. If the notification content is not interesting or timely for the user, they can easily turn off all notifications from your app.
What is Firebase Cloud Messaging?
Firebase Cloud Messaging is part of the Firebase platform for mobile development. Usually you would need to set up a server from scratch that can communicate with mobile devices to trigger notifications. With Firebase Cloud Messaging, you can send notifications to all of your installed app users, or a subset of them, without setting up a server. For example, you can send users a reminder or give them a special promotion, such as a free gift.You can remotely push a notification to a single device or multiple devices.
You can also use Firebase Cloud Messages to transfer data from your backend app or from a Firebase project to your users.
In this codelab, you will learn how to use Firebase Cloud Messaging to send push notifications for your Android app, as well as send data.
If you run into any issues (code bugs, grammatical errors, unclear wording, etc.) as you work through this codelab, please report the issue via the Report a mistake link in the lower left corner of the codelab.
What you should already know
You should be familiar with:
- How to create Android apps in Kotlin. In particular, work with the Android SDK.
- How to design your app using architecture components and data binding.
- A basic understanding of broadcast receivers.
- A basic understanding of AlarmManager.
- How to create and send notifications using NotificationManager.
What you'll learn
- How to push messages to the user via Firebase Cloud Messaging.
- How to send data from a backend to your app using data messages, which is a part of Firebase Cloud Messaging.
What you'll do
- Add push notifications to the starter app.
- Handle Firebase Cloud Messaging while your app is running.
- Transfer data with Firebase Cloud Messaging.
In this codelab you will be working on the code from the previous Using Notifications in Android Apps codelab. In the previous codelab, you built an egg timer app that sends notifications when the cooking timer is up. In this codelab, you will add Firebase Cloud Messaging to send push notifications to your app users to remind them to eat eggs.
To get the sample app, you can either:
Clone the repository from GitHub and switch to the starter branch:
$ git clone https://github.com/googlecodelabs/android-kotlin-notifications-fcm
Alternatively, you can download the repository as a Zip file, unzip it, and open it in Android Studio.
Step 1: Create a Firebase project
Before you can add Firebase to your Android app, you need to create a Firebase project to connect to your Android app.
- Log in to the Firebase console.
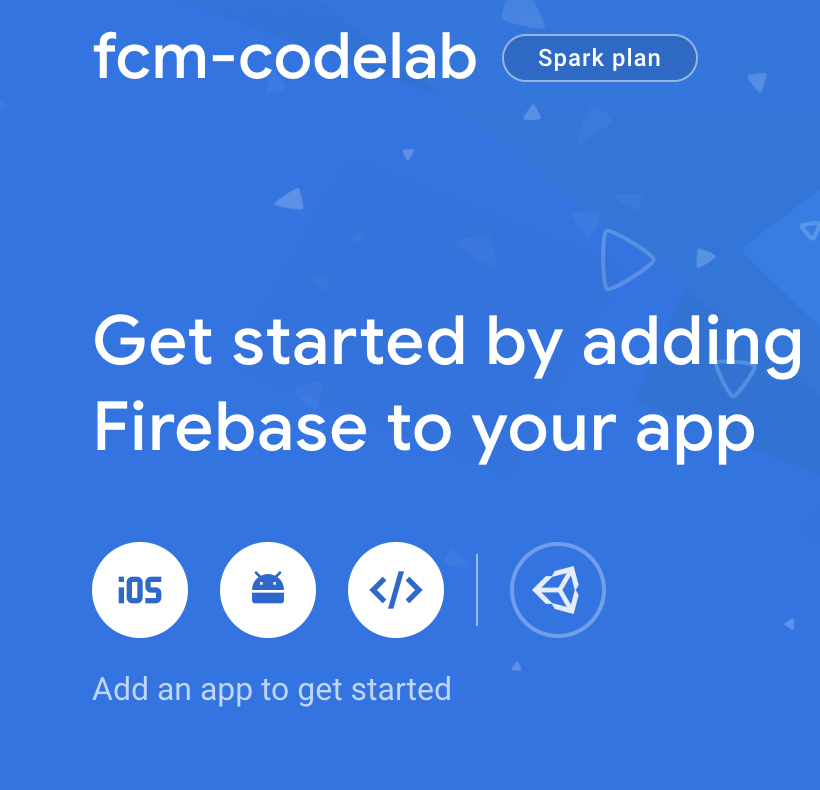
- Click Add project, then select or enter a Project name. Name your project fcm-codelab.
- Click Continue.
- You can skip setting up Google Analytics by turning off the Enable Google Analytics for this project button..
- Click Create Project to finish setting up the Firebase project.
Step 2: Register your app with Firebase
Now that you have a Firebase project, you can add your Android app to it.
- In the center of the Firebase console's project overview page, click the Android icon to launch the setup workflow.
- In the Android package name field, enter
com.example.android.eggtimernotifications. - Click Register app.
Important: Make sure you enter the correct ID for your app because you cannot add or modify this value after you've registered your app with your Firebase project.
Step 3: Add the Firebase configuration file to your project
Add the Firebase Android configuration file to your app.
- Click Download google-services.json to obtain your Firebase Android config file (
google-services.json). Make sure the config file is not appended with additional characters and is namedgoogle-services.jsonexactly. - Move your config file into the module (app-level) directory of your app.
Step 4: Configure your Android project to enable Firebase products
To enable Firebase products in your app, you must add the google-services plugin to your Gradle files.
- In your root-level (project-level) Gradle file (
build.gradle), check that you have Google's Maven repository. - Then, add rules to include the Google Services plugin.
build.gradle
buildscript {

  repositories {
    // Check that you have the following line (if not, add it):
    google()  // Google's Maven repository
  }

  dependencies {
    // ...

    // Add the following line:
    classpath 'com.google.gms:google-services:4.3.2'  // Google Services plugin
  }
}

allprojects {
  // ...

  repositories {
    // Check that you have the following line (if not, add it):
    google()  // Google's Maven repository
    // ...
  }
}- In your module (app-level) Gradle file (usually
app/build.gradle), add a line to apply the plugin to the bottom of the file.
app/build.gradle
apply plugin: 'com.android.application'

android {
  // ...
}

// Add the following line to the bottom of the file:
apply plugin: 'com.google.gms.google-services'  // Google Play services Gradle plugin
In this task, you will add Firebase Cloud Messaging (FCM) to your project to make use of push notifications.
The Android service code for FCM of this codelab is given in MyFirebaseMessagingService.kt. In the following steps you will add code to your Android app.
You will use the Notifications composer to test your implementation. Notifications composer is a tool that helps you to compose and send messages from the Firebase console website.
- Open
MyFirebaseMessagingService.kt - Inspect the file and in particular the following functions:
onNewToken()—Called automatically if your service is registered in the Android manifest. This function is called when you first run your app and every time Firebase issues a new token for your app. A token is an access key to your Firebase backend project. It's generated for your specific client device. With this token, Firebase knows which client the backend should send messages to. Firebase also knows if this client is valid and has access to this Firebase project.onMessageReceived— Called when your app is running and Firebase sends a message to your app. This function receives aRemoteMessageobject which, can carry a notification or data message payload. You will learn more about the differences between notifications and data message payloads later in this codelab.
Step 1: Sending FCM notifications to a single device
The Notifications console lets you test sending a notification. To send a message to a specific device using the console, you need to know that device's registration token.
When the Firebase backend generates a new or refreshed token, the onNewToken() function will be called, with the new token passed in as an argument. If you want to target a single device or create a group of devices to which you want to send a broadcast message, you'll need to access this token by extending FirebaseMessagingService and overriding onNewToken().
- Open
AndroidManifest.xmland uncomment the following code to enable theMyFirebaseMessagingServicefor the egg timer app. The service meta-data in the Android manifest registersMyFirebaseMessagingServiceas a service and adds an intent filter so this service will receive messages sent from FCM. The last part of the metadata declaresbreakfast_notification_channel_idasdefault_notification_channel_idfor Firebase. You will be using this ID in the next step.
<!-- AndroidManifest.xml -->
<!-- TODO: Step 3.0 uncomment to start the service  -->

        <service
                android:name=".MyFirebaseMessagingService"
                android:exported="false">
            <intent-filter>
                <action android:name="com.google.firebase.MESSAGING_EVENT"/>
            </intent-filter>
        </service>
        <!-- [START fcm_default_icon] -->
        <!--
 Set custom default icon. This is used when no icon is set for incoming notification messages.
             See README(https://goo.gl/l4GJaQ) for more.
        -->
        <meta-data
                android:name="com.google.firebase.messaging.default_notification_icon"
                android:resource="@drawable/common_google_signin_btn_icon_dark"/>
        <!--
 Set color used with incoming notification messages. This is used when no color is set for the incoming
             notification message. See README(https://goo.gl/6BKBk7) for more.
        -->
        <meta-data
                android:name="com.google.firebase.messaging.default_notification_color"
                android:resource="@color/colorAccent"/> <!-- [END fcm_default_icon] -->
        <!-- [START fcm_default_channel] -->
        <meta-data
            android:name="com.google.firebase.messaging.default_notification_channel_id"
            android:value="@string/breakfast_notification_channel_id" />
        <!-- [END fcm_default_channel] -->
It is a good idea to create a new notification channel for the FCM since your users may want to enable/disable egg timer or FCM push notifications separately.
- Open
ui/EggTimerFragment.kt. InonCreateView(), add the following channel creation code.
// EggTimerFragment.kt

   // TODO: Step 3.1 create a new channel for FCM
    createChannel(
        getString(R.string.breakfast_notification_channel_id),
        getString(R.string.breakfast_notification_channel_name)
)- Open
MyFirebaseMessagingService.ktand uncomment theonNewToken()function. This function will be called when a new token is generated.
// MyFirebaseMessagingService.kt
// TODO: Step 3.2 log registration token
// [START on_new_token]
/**
* Called if InstanceID token is updated. This may occur if the security of
* the previous token had been compromised. Note that this is called when the
* InstanceID token is initially generated so this is where you would retrieve
* the token.
*/
override fun onNewToken(token: String?) {
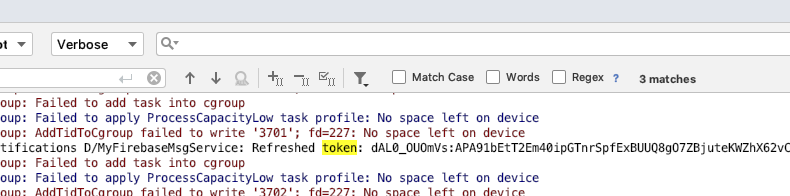
Log.d(TAG, "Refreshed token: $token")
// If you want to send messages to this application instance or
// manage this apps subscriptions on the server side, send the
// Instance ID token to your app server.
sendRegistrationToServer(token)
}
// [END on_new_token]- Run the egg timer app.
- Observe logcat (View > Tool Windows > Logcat). You should see a log line showing your token similar to the one below. This is the token you need in order to send a message to this device. This function is only called when a new token is created.
2019-07-23 13:09:15.243 2312-2459/com.example.android.eggtimernotifications D/MyFirebaseMsgService: Refreshed token: f2esflBoQbI:APA91bFMzNNFaIskjr6KIV4zKjnPA4hxekmrtbrtba2aDbh593WQnm11ed54Mv6MZ9Yeerver7pzgwfKx7R9BHFffLBItLEgPvrtF0TtX9ToCrXZ5y7Hd-m
Note: If you do not see the token in the logcat messages, your app may already have received the token before. In that case, uninstalling the app will help you to receive a new token.
Now you can test by sending a notification. In order to send a notification, you will use the Notifications composer.
- Open the Firebase Console and select your project.
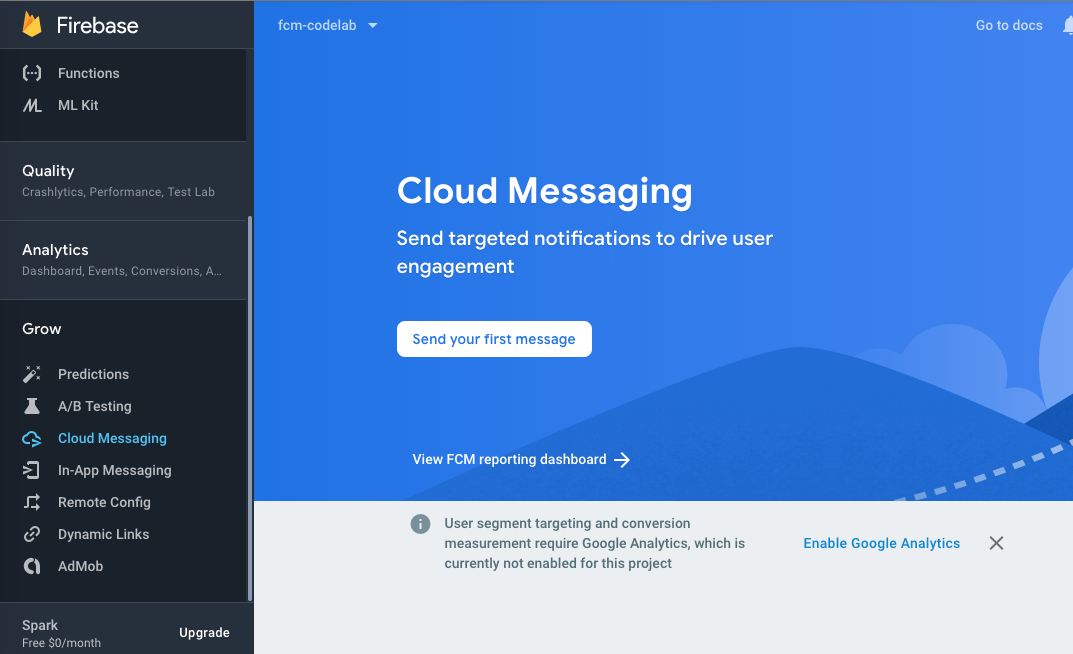
- Next, select Cloud Messaging from the navigation on the left.
- Click Send your first message.
- Enter
Time for Breakfast!as the notification title andDon't forget to eat eggs!as the notification text, and select Send test message. The Test on device pop-up dialog appears, asking that you provide an FCM registration token.
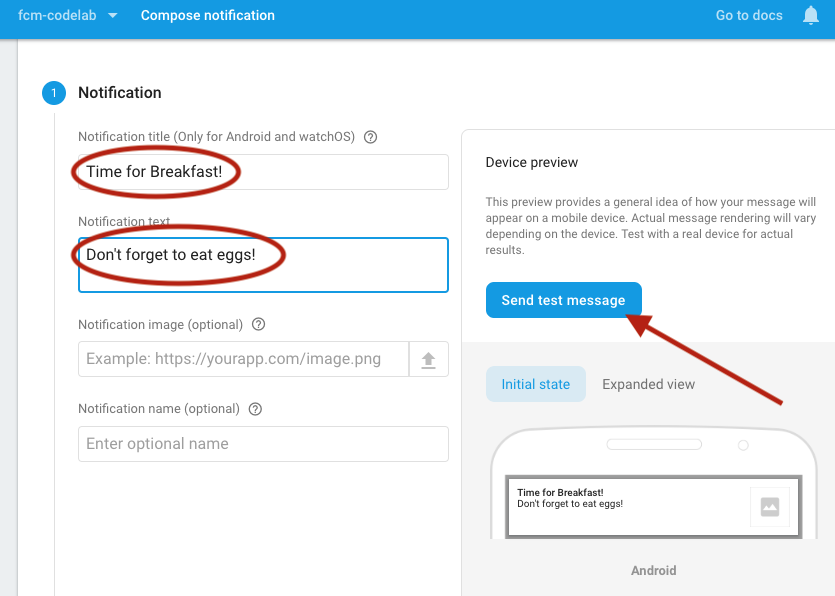
- Copy your app token from logcat.
- Paste this token into the Add an FCM registration token field within the popup window, then click the Add button next to the token.
- In the checkbox list that appears, select the token. The Test button should become enabled.
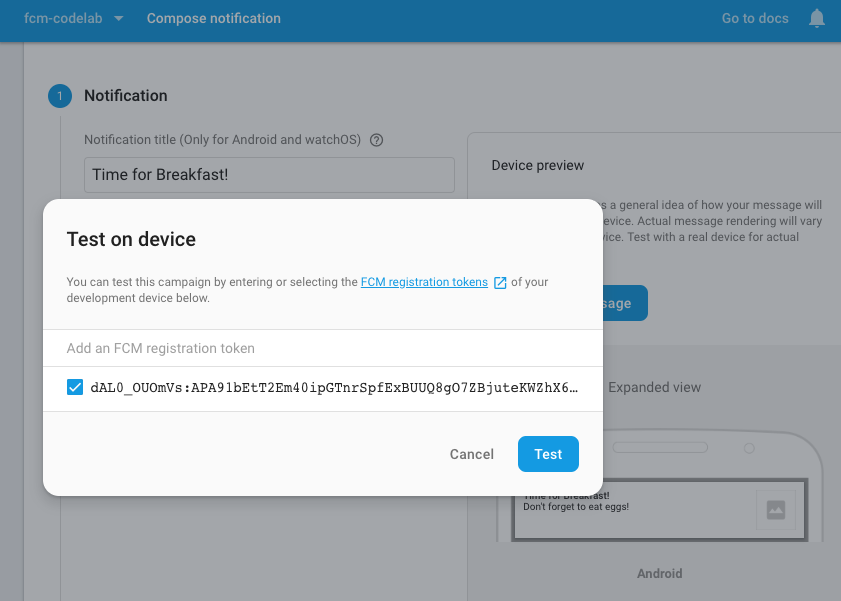
- On your device, put the Egg Timer app in the background.
- In the popup, click Test.
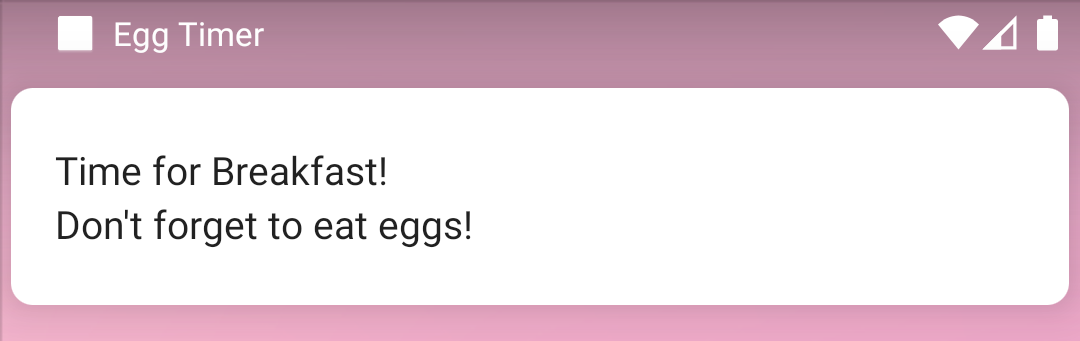
- After you click Test, the targeted client device that has your app running in the background should receive the notification in the system notifications tray. (You will see more on how to handle the FCM messages when your app is in the foreground later.)
Task: Sending FCM Notifications to a Topic
FCM topic messaging is based on the publish/subscribe model.
A messaging app can be a good example for the Publish/Subscribe model. Imagine that an app checks for new messages every 10 seconds. This will not only drain your phone battery, but will also use unnecessary network resources, and will create an unnecessary load on your app's server. Instead, a client device can subscribe and be notified when there are new messages delivered through your app.
Topics allow you to send a message to multiple devices that have opted in to that particular topic. For clients, topics are specific data sources which the client is interested in. For the server, topics are groups of devices which have opted in to receive updates on a specific data source. Topics can be used to present categories of notifications, such as news, weather forecasts, and sports results. For this part of the codelab, you will create a "breakfast" topic to remind the interested app users to eat eggs with their breakfast.
To subscribe to a topic, the client app calls the Firebase Cloud Messaging subscribeToTopic() function with the topic name breakfast. This call can have two outcomes. If the caller succeeds, the OnCompleteListener callback will be called with the subscribed message. If the client fails to subscribe, the callback will receive an error message instead.
In your app, you will automatically subscribe your users to the breakfast topic. In most production apps, however, it's better to give users control over which topics to subscribe to.
- Open
EggTimerFragment.ktand find the emptysubscribeTopic()function. - Get an instance of
FirebaseMessagingand call thesubscibeToTopic()function with the topic name. - Add an
addOnCompleteListenerto get notified back from FCM on whether your subscription succeeded or failed.
// EggTimerFragment.kt

   // TODO: Step 3.3 subscribe to breakfast topic
    private fun subscribeTopic() {
        // [START subscribe_topics]
        FirebaseMessaging.getInstance().subscribeToTopic(TOPIC)
            .addOnCompleteListener { task ->
                var msg = getString(R.string.message_subscribed)
                if (!task.isSuccessful) {
                    msg = getString(R.string.message_subscribe_failed)
                }
                Toast.makeText(context, msg, Toast.LENGTH_SHORT).show()
            }
        // [END subscribe_topics]
}- Call the
subscribeTopic()function to subscribe to a topic when the app starts. Scroll up toonCreateView()and add a call tosubscribeTopic().
// EggTimerFragment.kt

   // TODO: Step 3.4 call subscribe topics on start
    subscribeTopic()

return binding.root- To subscribe to the breakfast topic, run the app again. You should see a toast message saying "Subscribed to topic".
Now you can test sending messages to a topic:
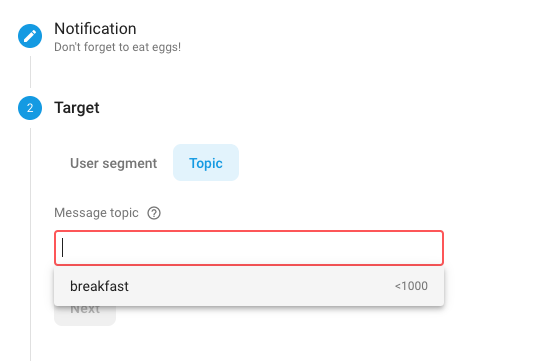
- Open the Notifications composerand select Compose Notification.
- Set the notification Notification title and Notification text as before.
- This time, instead of sending the message to a single device, click Topic under Target and enter
breakfastas the message topic.
- Select Now for Scheduling.
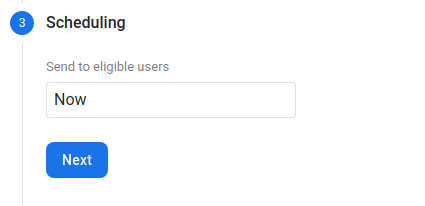
- Make sure your app is running in the background on your testing device.
- Click Review, and then click Publish. If you can run the app on more than one device, you can test and observe that the notification is received on all devices subscribed to this topic.
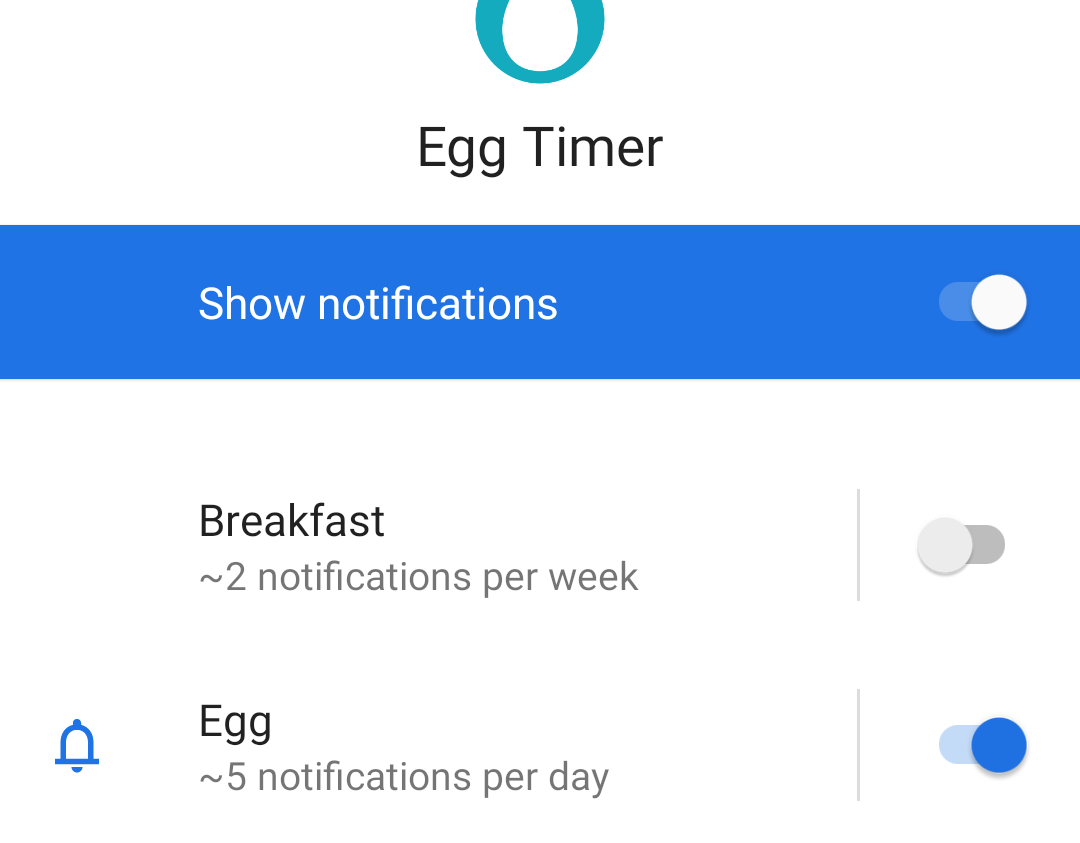
The app has the following channels for notifications now, Egg and Breakfast. On a client device, long-click the app icon, select Info, and click Notifications. You should see the Egg and Breakfast notification channels, as shown in the following screenshot. If you deselect the Breakfast channel, your app will not receive any notifications sent over this channel.
When using notifications, always keep in mind that users can turn off any notification channel at any time.
Step 1: Data messages
FCM messages can also contain a data payload that processes the messages in the client app, use data messages instead of notification messages.
In order to handle data messages, you need to handle the data payload in the onMessageReceived() function of MyFirebaseMessagingService. The payload is stored in the data property of the remoteMessage object. Both the remoteMessage object and the data property can be null.
- Open
MyFirebaseMessagingService. - Check if the
dataproperty of theremoteMessageobject has some value and print the data to the log.
// MyFirebaseMessagingService.kt

    // [START receive_message]
    override fun onMessageReceived(remoteMessage: RemoteMessage?) {
        // Not getting messages here? See why this may be: https://goo.gl/39bRNJ
        Log.d(TAG, "From: ${remoteMessage?.from}")

       // TODO: Step 3.5 check messages for data
        // Check if the message contains a data payload.
        remoteMessage?.data?.let {
            Log.d(TAG, "Message data payload: " + remoteMessage.data)
        }

    }
    // [END receive_message]
To test your code, you can use the Notifications composer again.
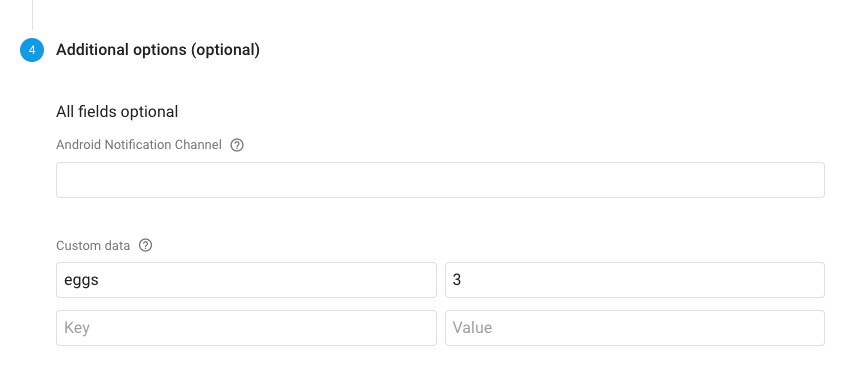
- Open the Notification composer, create a new message, setting its Target to the "breakfast" topic.
- This time, when you get to Step 4, Additional options, set the Custom data key and value properties as follows:
- Key:
eggs - Value:
3
- Make sure your app is running in the foreground. If your app is in the background, the FCM message will trigger an automatic notification and the
onMessageReceived()function will receive only theremoteMessageobject when the user clicks the notification. - Send the message from the Notifications composer, and observe the data message log that appears in logcat.
Step 2: Handling messages in the foreground and background
When a client device running your app receives a message that includes both notification and data payloads, the app's behavior depends on whether your app is in the background or the foreground on that device:
- If the app is running the background, if the message has a notification payload, the notification is automatically shown in the notification tray. If the message also has a data payload, the data payload will be handled by the app when the user taps on the notification.
- If the app is running in the foreground, if the message notification has a notification payload, the notification will not appear automatically. The app needs to decide how to handle the notification in the
onMessageReceived()function. If the message also has data payload, both payloads will be handled by the app.
For the purpose of this codelab, you want to remind the app user to have some eggs for breakfast. You are not planning to send any data, but you also want to make sure the reminder notification always appears, regardless of up whether the app is in foreground or background.
When you send an FCM message to devices on which the egg timer app is installed, the notification message will be shown automatically if the app is not running or is in the background. However, if the app is running in the foreground, then the notification is not shown automatically; instead, the app's code decides what to do with the message. If the app is in the foreground when it receives an FCM message, the onMessageReceived() function will be triggered automatically with the FCM message. This is where your app can silently handle notification and data payloads or trigger a notification.
For your app, you want to make sure the user gets the reminder when the app is in the foreground, so let's implement some code to trigger a notification:
- Open the
onMessageReceived()function inMyFirebaseMessagingServiceagain. - Immediately after the code you recently added to check the data message, add the following code which sends a notification using the notifications framework.
// MyFirebaseMessagingService.kt

    // TODO: Step 3.6 check messages for notification and call sendNotification
    // Check if the message contains a notification payload.
    remoteMessage.notification?.let {
        Log.d(TAG, "Message Notification Body: ${it.body}")
        sendNotification(it.body as String)
}- If you run the app again and send a notification by using the Notifications composer, you should see a notification just like you used to see in the first part of the codelab, regardless of whether the app is in the foreground or background.
The solution code is in the master branch of your downloaded code.
- Implement a FCM BroadcastReceiver by extending
FirebaseMessagingService. - Set up a Firebase Cloud Messaging (FCM) project and add FCM to your Android app.
- Test your app by sending push notifications from the Notifications composer.
- Subscribe to FCM topics by calling the
subscribeToTopic()function of theFirebaseMessagingclass. - Send a data payload using a
RemoteMessageobject. - Handle data in the
onMessageReceived()function. - Add logic to handle FCM when the app is in the foreground and when it's in the background.
Udacity course:
Firebase documentation:
For links to other codelabs in this course, see the Advanced Android in Kotlin codelabs landing page.