
This codelab is part of the Advanced Android in Kotlin course. You'll get the most value out of this course if you work through the codelabs in sequence, but it is not mandatory. All the course codelabs are listed on the Advanced Android in Kotlin codelabs landing page.
Introduction
In Android, you have several techniques available for implementing custom 2D graphics and animations in views.
In addition to using drawables, you can create 2D drawings using the drawing methods of the Canvas class. The Canvas is a 2D drawing surface that provides methods for drawing. This is useful when your app needs to regularly redraw itself, because what the user sees changes over time. In this codelab, you learn how to create and draw on a canvas that is displayed in a View.
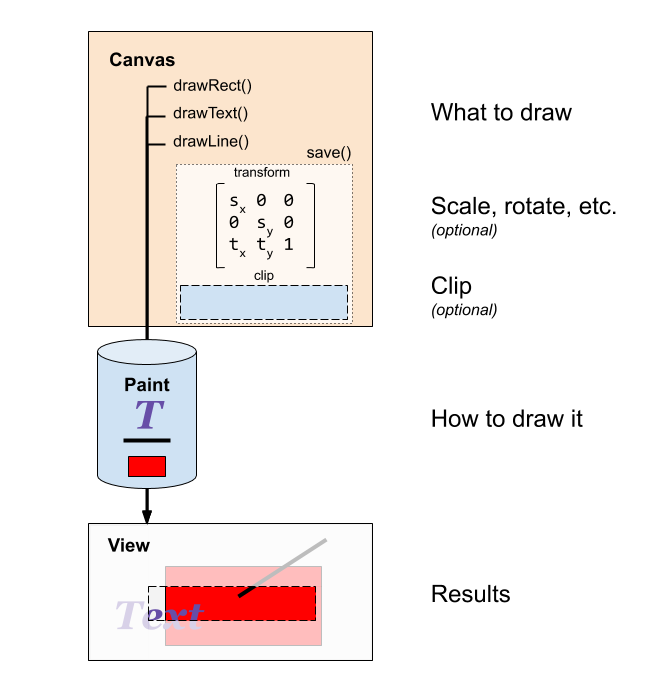
The types of operations you can perform on a canvas include:
- Fill the whole canvas with color.
- Draw shapes, such as rectangles, arcs, and paths styled as defined in a
Paintobject. ThePaintobject holds the style and color information about how to draw geometries (such as line, rectangle, oval, and paths), or for example, the typeface of text. - Apply transformations, such as translation, scaling, or custom transformations.
- Clip, that is, apply a shape or path to the canvas to define its visible portions.
How you can think of Android drawing (super-simplified!)
Drawing in Android or on any other modern system, is a complex process that includes layers of abstractions, and optimizations down to the hardware. How Android draws is a fascinating topic about which much has been written, and its details are beyond the scope of this codelab.
In the context of this codelab, and its app that draws on a canvas for display in a full-screen view, you can think of it in the following way.

- You need a view for displaying what you are drawing. This could be one of the views provided by the Android system. Or, In this codelab, you create a custom view that serves as the content view for your app (
MyCanvasView). - This view, as all views, comes with its own canvas (
canvas). - For the most basic way of drawing on the canvas of a view, you override its
onDraw()method and draw on its canvas. - When building drawing, you need to cache what you have drawn before. There are several ways of caching your data, one is in a bitmap (
extraBitmap). Another is to save a history of what you drawn as coordinates and instructions. - To draw to your caching bitmap (
extraBitmap) using the canvas drawing API, you create a caching canvas (extraCanvas) for your caching bitmap. - You then draw on your caching canvas (
extraCanvas), which draws onto your caching bitmap (extraBitmap). - To display everything drawn on the screen, you tell the view's canvas (
canvas) to draw the caching bitmap (extraBitmap).
What you should already know
- How to create an app with an Activity, a basic layout, and run it using Android Studio.
- How to associate event handlers with views.
- How to create a custom view.
What you'll learn
- How to create a
Canvasand draw on it in response to user touch.
What you'll do
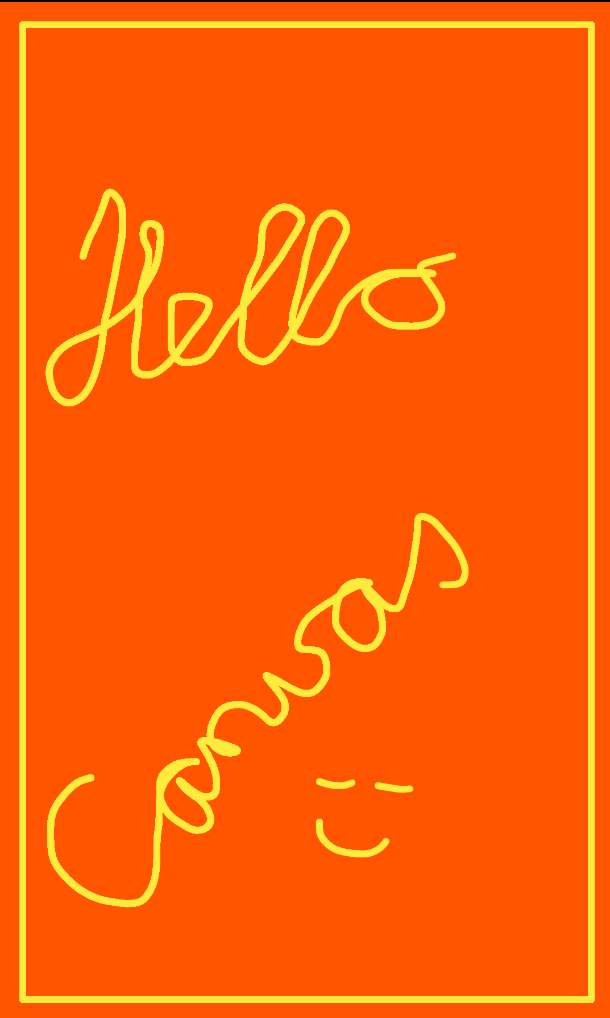
- Create an app that draws lines on the screen in response to the user touching the screen.
- Capture motion events, and in response, draw lines on a canvas that is displayed in a fullscreen custom view on the screen.
The MiniPaint app uses a custom view to display a line in response to user touches, as shown in the screenshot below.
Step 1. Create the MiniPaint project
- Create a new Kotlin project called MiniPaint that uses the Empty Activity template.
- Open the
app/res/values/colors.xmlfile and add the following two colors.
<color name="colorBackground">#FFFF5500</color>
<color name="colorPaint">#FFFFEB3B</color>- Open
styles.xml - In the parent of the given
AppThemestyle, replaceDarkActionBarwithNoActionBar. This removes the action bar, so that you can draw fullscreen.
<style name="AppTheme" parent="Theme.AppCompat.Light.NoActionBar">Step 2. Create the MyCanvasView class
In this step you create a custom view, MyCanvasView, for drawing.
- In the
app/java/com.example.android.minipaintpackage, create a New > Kotlin File/Class calledMyCanvasView. - Make the
MyCanvasViewclass extend theViewclass and pass in thecontext: Context. Accept the suggested imports.
import android.content.Context
import android.view.View

class MyCanvasView(context: Context) : View(context) {
}
Step 3. Set MyCanvasView as the content view
To display what you will draw in MyCanvasView, you have to set it as the content view of the MainActivity.
- Open
strings.xmland define a string to use for the view's content description.
<string name="canvasContentDescription">Mini Paint is a simple line drawing app.
Drag your fingers to draw. Rotate the phone to clear.</string>- Open
MainActivity.kt - In
onCreate(), deletesetContentView(R.layout.activity_main). - Create an instance of
MyCanvasView.
val myCanvasView = MyCanvasView(this)- Below that, request the full screen for the layout of
myCanvasView. Do this by setting theSYSTEM_UI_FLAG_FULLSCREENflag onmyCanvasView. In this way, the view completely fills the screen.
myCanvasView.systemUiVisibility = SYSTEM_UI_FLAG_FULLSCREEN- Add a content description.
myCanvasView.contentDescription = getString(R.string.canvasContentDescription)- Below that, set the content view to
myCanvasView.
setContentView(myCanvasView)- Run your app. You will see a completely white screen, because the canvas has no size and you have not drawn anything yet.
Step 1. Override onSizeChanged()
The onSizeChanged() method is called by the Android system whenever a view changes size. Because the view starts out with no size, the view's onSizeChanged() method is also called after the Activity first creates and inflates it. This onSizeChanged() method is therefore the ideal place to create and set up the view's canvas.
- In
MyCanvasView, at the class level, define variables for a canvas and a bitmap. Call themextraCanvasandextraBitmap. These are your bitmap and canvas for caching what has been drawn before.
private lateinit var extraCanvas: Canvas
private lateinit var extraBitmap: Bitmap- Define a class level variable
backgroundColorfor the background color of the canvas and initialize it to thecolorBackgroundyou defined earlier.
private val backgroundColor = ResourcesCompat.getColor(resources, R.color.colorBackground, null)- In
MyCanvasView, override theonSizeChanged()method. This callback method is called by the Android system with the changed screen dimensions, that is, with a new width and height (to change to) and the old width and height (to change from).
override fun onSizeChanged(width: Int, height: Int, oldWidth: Int, oldHeight: Int) {
   super.onSizeChanged(width, height, oldWidth, oldHeight)
}- Inside
onSizeChanged(), create an instance ofBitmapwith the new width and height, which are the screen size, and assign it toextraBitmap. The third argument is the bitmap color configuration.ARGB_8888stores each color in 4 bytes and is recommended.
extraBitmap = Bitmap.createBitmap(width, height, Bitmap.Config.ARGB_8888)- Create a
Canvasinstance fromextraBitmapand assign it toextraCanvas.
extraCanvas = Canvas(extraBitmap)- Specify the background color in which to fill
extraCanvas.
extraCanvas.drawColor(backgroundColor)- Looking at
onSizeChanged(), a new bitmap and canvas are created every time the function executes. You need a new bitmap, because the size has changed. However, this is a memory leak, leaving the old bitmaps around. To fix this, recycleextraBitmapbefore creating the next one by adding this code right after the call tosuper.
if (::extraBitmap.isInitialized) extraBitmap.recycle()Step 2. Override onDraw()
All drawing work for MyCanvasView happens in onDraw().
To start, display the canvas, filling the screen with the background color that you set in onSizeChanged().
- Override
onDraw()and draw the contents of the cachedextraBitmapon the canvas associated with the view. ThedrawBitmap()Canvasmethod comes in several versions. In this code, you provide the bitmap, the x and y coordinates (in pixels) of the top left corner, andnullfor thePaint, as you'll set that later.
override fun onDraw(canvas: Canvas) {
   super.onDraw(canvas)
canvas.drawBitmap(extraBitmap, 0f, 0f, null)
}
Notice that the canvas that is passed to onDraw() and used by the system to display the bitmap is different than the one you created in the onSizeChanged() method and used by you to draw on the bitmap.
- Run your app. You should see the whole screen filled with the specified background color.

In order to draw, you need a Paint object that specifies how things are styled when drawn, and a Path that specifies what is being drawn.
Step 1. Initialize a Paint object
- In MyCanvasView.kt, at the top file level, define a constant for the stroke width.
private const val STROKE_WIDTH = 12f // has to be float- At the class level of
MyCanvasView, define a variabledrawColorfor holding the color to draw with, and initialize it with thecolorPaintresource you defined earlier.
private val drawColor = ResourcesCompat.getColor(resources, R.color.colorPaint, null)- At the class level, below, add a variable
paintfor aPaintobject and initialize it as follows.
// Set up the paint with which to draw.
private val paint = Paint().apply {
   color = drawColor
   // Smooths out edges of what is drawn without affecting shape.
   isAntiAlias = true
   // Dithering affects how colors with higher-precision than the device are down-sampled.
   isDither = true
   style = Paint.Style.STROKE // default: FILL
   strokeJoin = Paint.Join.ROUND // default: MITER
   strokeCap = Paint.Cap.ROUND // default: BUTT
   strokeWidth = STROKE_WIDTH // default: Hairline-width (really thin)
}- The
colorof thepaintis thedrawColoryou defined earlier. isAntiAliasdefines whether to apply edge smoothing. SettingisAntiAliastotrue, smoothes out the edges of what is drawn without affecting the shape.isDither, whentrue, affects how colors with higher-precision than the device are down-sampled. For example, dithering is the most common means of reducing the color range of images down to the 256 (or fewer) colors.stylesets the type of painting to be done to a stroke, which is essentially a line.Paint.Stylespecifies if the primitive being drawn is filled, stroked, or both (in the same color). The default is to fill the object to which the paint is applied. ("Fill" colors the inside of shape, while "stroke" follows its outline.)strokeJoinofPaint.Joinspecifies how lines and curve segments join on a stroked path. The default isMITER.strokeCapsets the shape of the end of the line to be a cap.Paint.Capspecifies how the beginning and ending of stroked lines and paths. The default isBUTT.strokeWidthspecifies the width of the stroke in pixels. The default is hairline width, which is really thin, so it's set to theSTROKE_WIDTHconstant you defined earlier.
Step 2. Initialize a Path object
The Path is the path of what the user is drawing.
- In
MyCanvasView, add a variablepathand initialize it with aPathobject to store the path that is being drawn when following the user's touch on the screen. Importandroid.graphics.Pathfor thePath.
private var path = Path()Step 1. Respond to motion on the display
The onTouchEvent() method on a view is called whenever the user touches the display.
- In
MyCanvasView, override theonTouchEvent()method to cache thexandycoordinates of the passed inevent. Then use awhenexpression to handle motion events for touching down on the screen, moving on the screen, and releasing touch on the screen. These are the events of interest for drawing a line on the screen. For each event type, call a utility method, as shown in the code below. See theMotionEventclass documentation for a full list of touch events.
override fun onTouchEvent(event: MotionEvent): Boolean {
   motionTouchEventX = event.x
   motionTouchEventY = event.y

   when (event.action) {
       MotionEvent.ACTION_DOWN -> touchStart()
       MotionEvent.ACTION_MOVE -> touchMove()
       MotionEvent.ACTION_UP -> touchUp()
   }
   return true
}- At the class level, add the missing
motionTouchEventXandmotionTouchEventYvariables for caching the x and y coordinates of the current touch event (theMotionEventcoordinates). Initialize them to0f.
private var motionTouchEventX = 0f
private var motionTouchEventY = 0f- Create stubs for the three functions
touchStart(),touchMove(), andtouchUp().
private fun touchStart() {}

private fun touchMove() {}

private fun touchUp() {}- Your code should build and run, but you won't see anything different from the colored background yet.
Step 2. Implement touchStart()
This method is called when the user first touches the screen.
- At the class level, add variables to cache the latest x and y values. After the user stops moving and lifts their touch, these are the starting point for the next path (the next segment of the line to draw).
private var currentX = 0f
private var currentY = 0f- Implement the
touchStart()method as follows. Reset thepath, move to the x-y coordinates of the touch event (motionTouchEventXandmotionTouchEventY), and assigncurrentXandcurrentYto that value.
private fun touchStart() {
   path.reset()
   path.moveTo(motionTouchEventX, motionTouchEventY)
   currentX = motionTouchEventX
   currentY = motionTouchEventY
}
Step 3. Implement touchMove()
- At the class level, add a
touchTolerancevariable and set it toViewConfiguration.get(context).scaledTouchSlop.
private val touchTolerance = ViewConfiguration.get(context).scaledTouchSlopUsing a path, there is no need to draw every pixel and each time request a refresh of the display. Instead, you can (and will) interpolate a path between points for much better performance.
- If the finger has barely moved, there is no need to draw.
- If the finger has moved less than the
touchTolerancedistance, don't draw. scaledTouchSlopreturns the distance in pixels a touch can wander before the system thinks the user is scrolling.
- Define the
touchMove()method. Calculate the traveled distance (dx,dy), create a curve between the two points and store it inpath, update the runningcurrentXandcurrentYtally, and draw thepath. Then callinvalidate()to force redrawing of the screen with the updatedpath.
private fun touchMove() {
   val dx = Math.abs(motionTouchEventX - currentX)
   val dy = Math.abs(motionTouchEventY - currentY)
   if (dx >= touchTolerance || dy >= touchTolerance) {
       // QuadTo() adds a quadratic bezier from the last point,
       // approaching control point (x1,y1), and ending at (x2,y2).
       path.quadTo(currentX, currentY, (motionTouchEventX + currentX) / 2, (motionTouchEventY + currentY) / 2)
       currentX = motionTouchEventX
       currentY = motionTouchEventY
       // Draw the path in the extra bitmap to cache it.
       extraCanvas.drawPath(path, paint)
   }
   invalidate()
}
This method in more detail:
- Calculate the distance that has been moved (
dx, dy). - If the movement was further than the touch tolerance, add a segment to the path.
- Set the starting point for the next segment to the endpoint of this segment.
- Using
quadTo()instead oflineTo()create a smoothly drawn line without corners. See Bezier Curves. - Call
invalidate()to (eventually callonDraw()and) redraw the view.
Step 4: Implement touchUp()
When the user lifts their touch, all that is needed is to reset the path so it does not get drawn again. Nothing is drawn, so no invalidation is needed.
- Implement the
touchUp()method.
private fun touchUp() {
   // Reset the path so it doesn't get drawn again.
   path.reset()
}- Run your code and use your finger to draw on the screen. Notice that if you rotate the device, the screen is cleared, because the drawing state is not saved. For this sample app, this is by design, to give the user a simple way to clear the screen.
Step 5: Draw a frame around the sketch
As the user draws on the screen, your app constructs the path and saves it in the bitmap extraBitmap. The onDraw() method displays the extra bitmap in the view's canvas. You can do more drawing in onDraw(). For example, you could draw shapes after drawing the bitmap.
In this step you draw a frame around the edge of the picture.
- In
MyCanvasView, add a variable calledframethat holds aRectobject.
private lateinit var frame: Rect- At the end of
onSizeChanged()define an inset, and add code to create theRectthat will be used for the frame, using the new dimensions and the inset.
// Calculate a rectangular frame around the picture.
val inset = 40
frame = Rect(inset, inset, width - inset, height - inset)- In
onDraw(), after drawing the bitmap, draw a rectangle.
// Draw a frame around the canvas.
canvas.drawRect(frame, paint)- Run your app. Notice the frame.
Task (optional): Storing data in a Path
In the current app, the drawing information is stored in a bitmap. While this is a good solution, it is not the only possible way for storing drawing information. How you store your drawing history depends on the app, and your various requirements. For example, if you are drawing shapes, you could save a list of shapes with their location and dimensions. For the MiniPaint app, you could save the path as a Path. Below is the general outline on how to do that, if you want to try it.
- In
MyCanvasView, remove all the code forextraCanvasandextraBitmap. - Add variables for the path so far, and the path being drawn currently.
// Path representing the drawing so far
private val drawing = Path()

// Path representing what's currently being drawn
private val curPath = Path()- In
onDraw(), instead of drawing the bitmap, draw the stored and current paths.
// Draw the drawing so far
canvas.drawPath(drawing, paint)
// Draw any current squiggle
canvas.drawPath(curPath, paint)
// Draw a frame around the canvas
canvas.drawRect(frame, paint)- In
touchUp(), add the current path to the previous path and reset the current path.
// Add the current path to the drawing so far
drawing.addPath(curPath)
// Rewind the current path for the next touch
curPath.reset()- Run your app, and yes, there should be no difference whatsoever.
Download the code for the finished codelab..
$ git clone https://github.com/googlecodelabs/android-kotlin-drawing-canvas
Alternatively you can download the repository as a Zip file, unzip it, and open it in Android Studio.
- A
Canvasis a 2D drawing surface that provides methods for drawing. - The
Canvascan be associated with aViewinstance that displays it. - The
Paintobject holds the style and color information about how to draw geometries (such as line, rectangle, oval, and paths) and text. - A common pattern for working with a canvas is to create a custom view and override the
onDraw()andonSizeChanged()methods. - Override the
onTouchEvent()method to capture user touches and respond to them by drawing things. - You can use an extra bitmap to cache information for drawings that change over time. Alternatively, you could store shapes, or a path.
Udacity course:
Android developer documentation:
CanvasclassBitmapclassViewclassPaintclassBitmap.configconfigurationsPathclass- Bezier curves Wikipedia page
- Canvas and Drawables
- Graphics Architecture series of articles (advanced)
- drawables
- onDraw()
- onSizeChanged()
MotionEventViewConfiguration.get(context).scaledTouchSlop
This section lists possible homework assignments for students who are working through this codelab as part of a course led by an instructor. It's up to the instructor to do the following:
- Assign homework if required.
- Communicate to students how to submit homework assignments.
- Grade the homework assignments.
Instructors can use these suggestions as little or as much as they want, and should feel free to assign any other homework they feel is appropriate.
If you're working through this codelab on your own, feel free to use these homework assignments to test your knowledge.
Answer these questions
Question 1
Which of the following components are required for working with a Canvas? Select all that apply.
▢ Bitmap
▢ Paint
▢ Path
▢ View
Question 2
What does a call to invalidate() do (in general terms)?
▢ Invalidates and restarts your app.
▢ Erases the drawing from the bitmap.
▢ Indicates that the previous code should not be run.
▢ Tells the system that it has to redraw the screen.
Question 3
What is the function of the Canvas, Bitmap, and Paint objects?
▢ 2D drawing surface, bitmap displayed on the screen, styling information for drawing.
▢ 3D drawing surface, bitmap for caching the path, styling information for drawing.
▢ 2D drawing surface, bitmap displayed on the screen, styling for the view.
▢ Cache for drawing information, bitmap to draw on, styling information for drawing.
For links to other codelabs in this course, see the Advanced Android in Kotlin codelabs landing page.