
Actions on Google is a developer platform that lets you create software to extend the functionality of the Google Assistant, Google's virtual personal assistant, across more than 500 million devices, including smart speakers, phones, cars, TVs, headphones, and more. Users engage Google Assistant in conversation to get things done, like buying groceries or booking a ride (for a complete list of what's possible now, see the Actions directory.) As a developer, you can use Actions on Google to easily create and manage delightful and effective conversational experiences between users and your own 3rd-party service.
This codelab module is part of a multi-module tutorial. Each module can be taken standalone or in a learning sequence with other modules. In each module, you'll be provided with end-to-end instructions on how to build an Action from given software requirements. We'll also teach the necessary concepts and best practices for implementing Actions that give users high-quality conversational experiences.
This codelab covers intermediate and advanced-level concepts for developing with Actions on Google. We strongly recommend that you familiarize yourself with the topics covered in the Level 1 and Level 2 codelabs before starting this one.
What you'll build
In this codelab, you'll refine a conversational Action to include these additional features:
- Remembers the user's name between conversation sessions.
- Handles user silence following a prompt for input.
- Allows users to exit the Action at any point during the conversation.
- Presents users with a visual selection response on devices with supported screens.
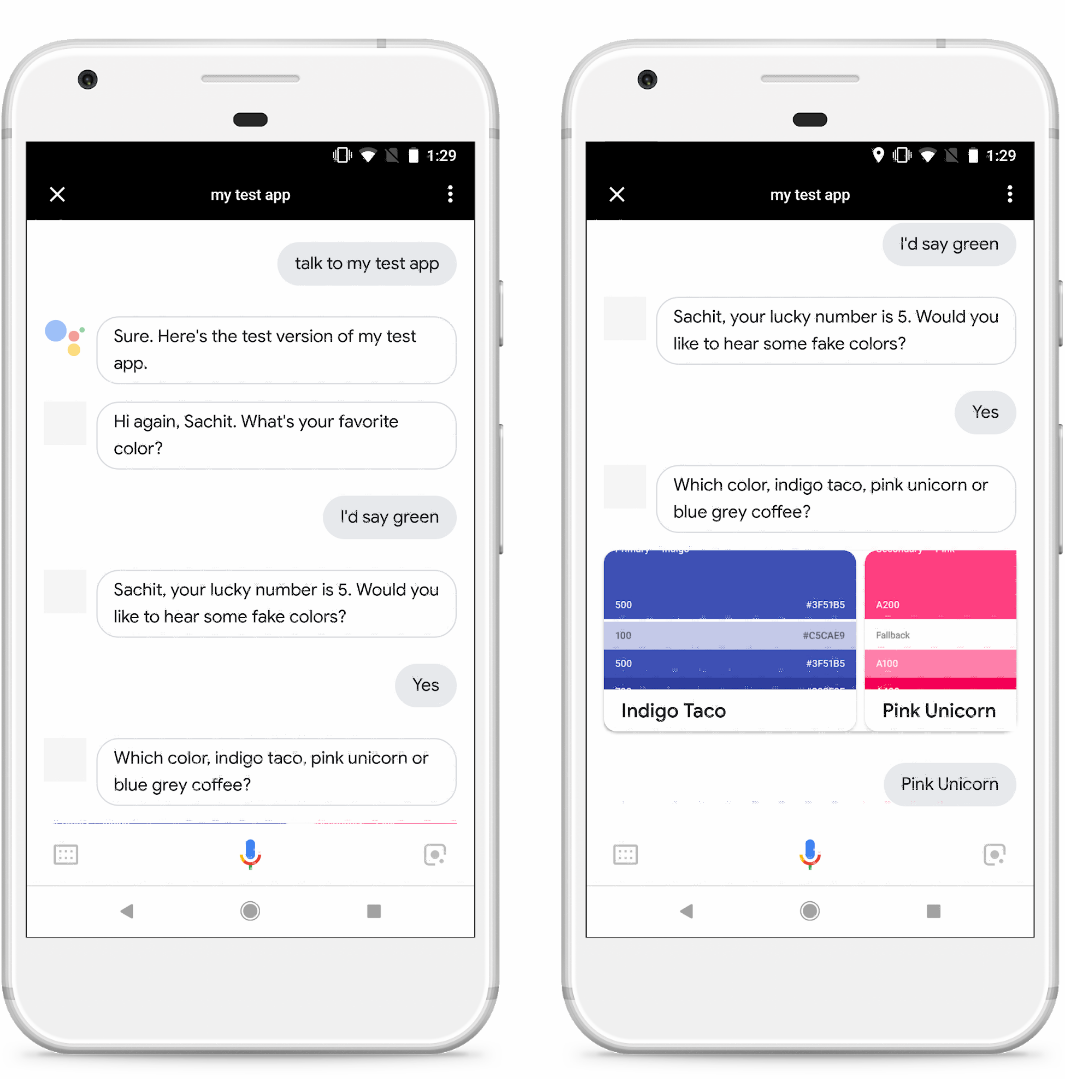
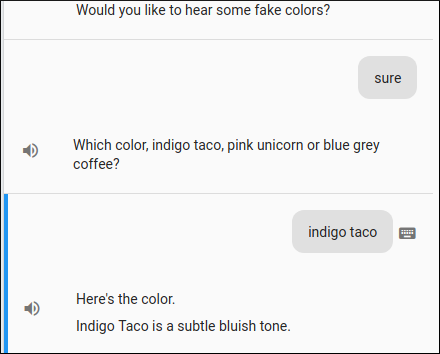
The following screenshots show an example of the conversational flow with the Action you'll build:
What you'll learn
- How to create sample dialogs when designing conversational Actions.
- How to personalize user greetings on subsequent visits using cross-conversation storage.
- How to gracefully handle user silence and cancellations.
- How to design your Action for multiple surfaces so that it sends users a rich visual response (namely, a carousel) if users are on devices with supported screens and sends a basic card response to voice-only surfaces.
- How to handle a user's selection from the list of options displayed to them through the carousel.
What you'll need
The following tools must be in your environment:
- An IDE/text editor of your choice, such as WebStorm, Atom, or Sublime.
- A terminal to run shell commands with NodeJS, npm, and git installed.
- A web browser, such as Chrome.
Familiarity with JavaScript (ES6) is strongly recommended, although not required, to understand the webhook code used in this codelab.
Optional: Get the sample code
You can optionally get the full project code for this codelab from our GitHub repository.
If you have already installed the Firebase command-line interface, you can skip these steps and proceed to the next section.
The Firebase Command Line Interface (CLI) allows you to deploy your Actions project to Cloud Functions.
To install or upgrade the CLI, run the following npm command:
npm install -g firebase-toolsTo verify that the CLI has been installed correctly, open a terminal and run the following command:
firebase --versionMake sure the version of the Firebase CLI is above 3.5.0 so it has all the latest features required for Cloud Functions. If it's not, run npm install -g firebase-tools to upgrade.
Authorize the Firebase CLI by running the following command:
firebase loginFor this codelab, you'll start where the Level 2 codelab ended.
Download your base files
If you don't have the codelab cloned locally, run the following command to clone the GitHub repository for the codelab:
git clone https://github.com/actions-on-google/codelabs-nodejs
For the sake of clarity, we strongly recommend you rename the /level2-complete directory name to /level3. You can do so by using the mv command in your terminal, as shown below:
$ cd codelabs-nodejs
$ mv ./level2-complete ./level3
Set up your project and agent
If you've already completed the Level 2 codelab, you don't need to do anything else to set up the Actions project and the Dialogflow agent for this codelab. Please proceed to deploy your fulfillment.
If you're starting from scratch, do the following:
- Open the Actions console.
- Click New project.
- Type in a Project name, like "actions-codelab-3". This name is for your own internal reference; later on, you can set an external name for your project.Click Create Project.
- Rather than pick a category, scroll down to the More options section and click the Conversational card.
- Click Build your Action to expand the options and select Add Action(s).
- Click Add your first Action.
- On the Create Action dialog, select Custom Intent, and then click Build to launch the Dialogflow console.
- In the Dialogflow console's Create Agent page, click Create.
- Click the
 (gear icon) on the left navigation.
 - Click Export and Import.
- Click Restore From Zip.
- Upload the
codelab-level-two.zipfile from the/level3directory you created earlier. - Type "RESTORE" and click Restore.
- Click Done.
Deploy your fulfillment
Now that your Actions project and Dialogflow agent are ready, do the following to deploy your local index.js file using the Firebase Functions CLI:
- In a terminal, navigate to the
/level3/functionsdirectory of your base files clone. - Using the Actions project ID, run the following command:
firebase use <PROJECT_ID>- Run the following command in the terminal to install dependencies:
npm install- Run the following command in the terminal to deploy your webhook code to Firebase:
firebase deployAfter a few minutes, you should see "Deploy complete!", which indicates that you've successfully deployed your webhook to Firebase.
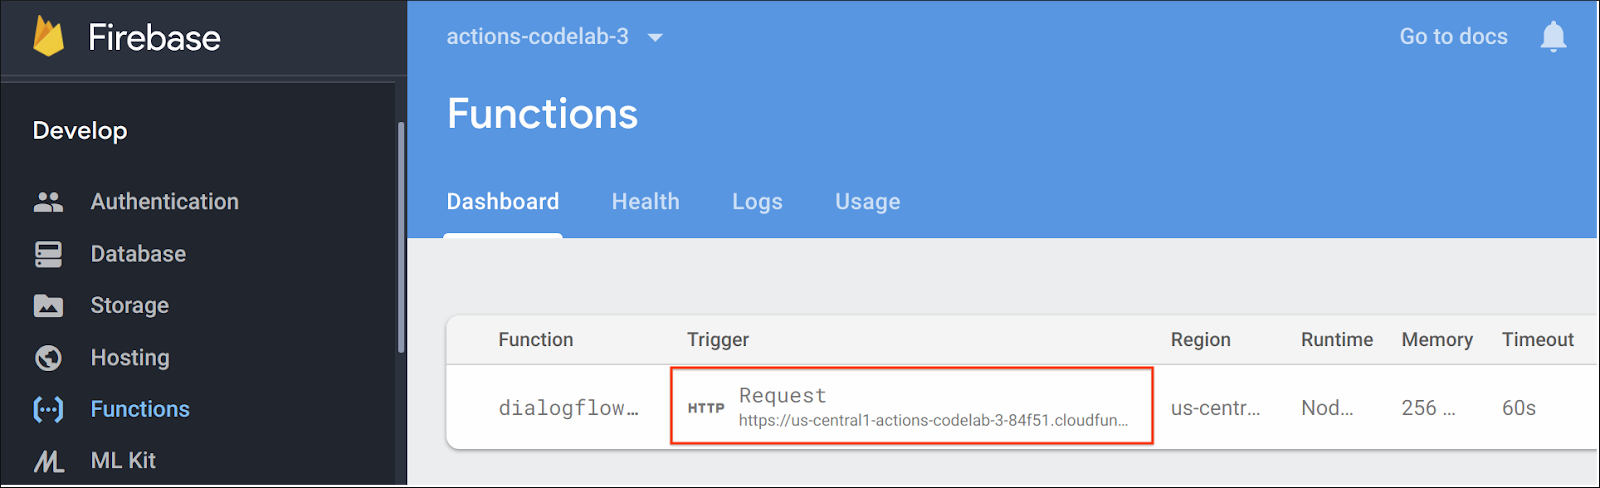
Retrieve the deployment URL
You need to provide Dialogflow with the URL to the cloud function. To retrieve this URL, follow these steps:
- Open the Firebase Console.
- Select your Actions project from the list of options.
- Navigate to Develop > Functions on the left navigation bar. If you're prompted to "Choose data sharing settings", you can ignore this option by clicking Do this later.
- Under the Dashboard tab, you should see an entry for "dialogflowFirebaseFulfillment" with a URL under Trigger. Copy this URL.
Set the URL in Dialogflow
Now, you need to update your Dialogflow agent to use your webhook for fulfillment. To do so, follow these steps:
- Open the Dialogflow console (you can close the Firebase console if you'd like).
- Click Fulfillment on the left navigation.
- Enable Webhook.
- Paste the URL you copied from the Firebase dashboard if it doesn't already appear.
- Click Save.
Verify your project is correctly set up
At this point, users can start a conversation by explicitly invoking your Action. Your fulfillment first uses the actions_intent_PERMISSION helper intent to obtain the user's display name, with their permission. Once users are mid-conversation, they can trigger the ‘favorite color' intent by providing a color; then, they receive a lucky number with a sound effect. Lastly, they can provide a "favorite fake color" that matches to the ‘fakeColor' custom entity and receive a basic card in response.
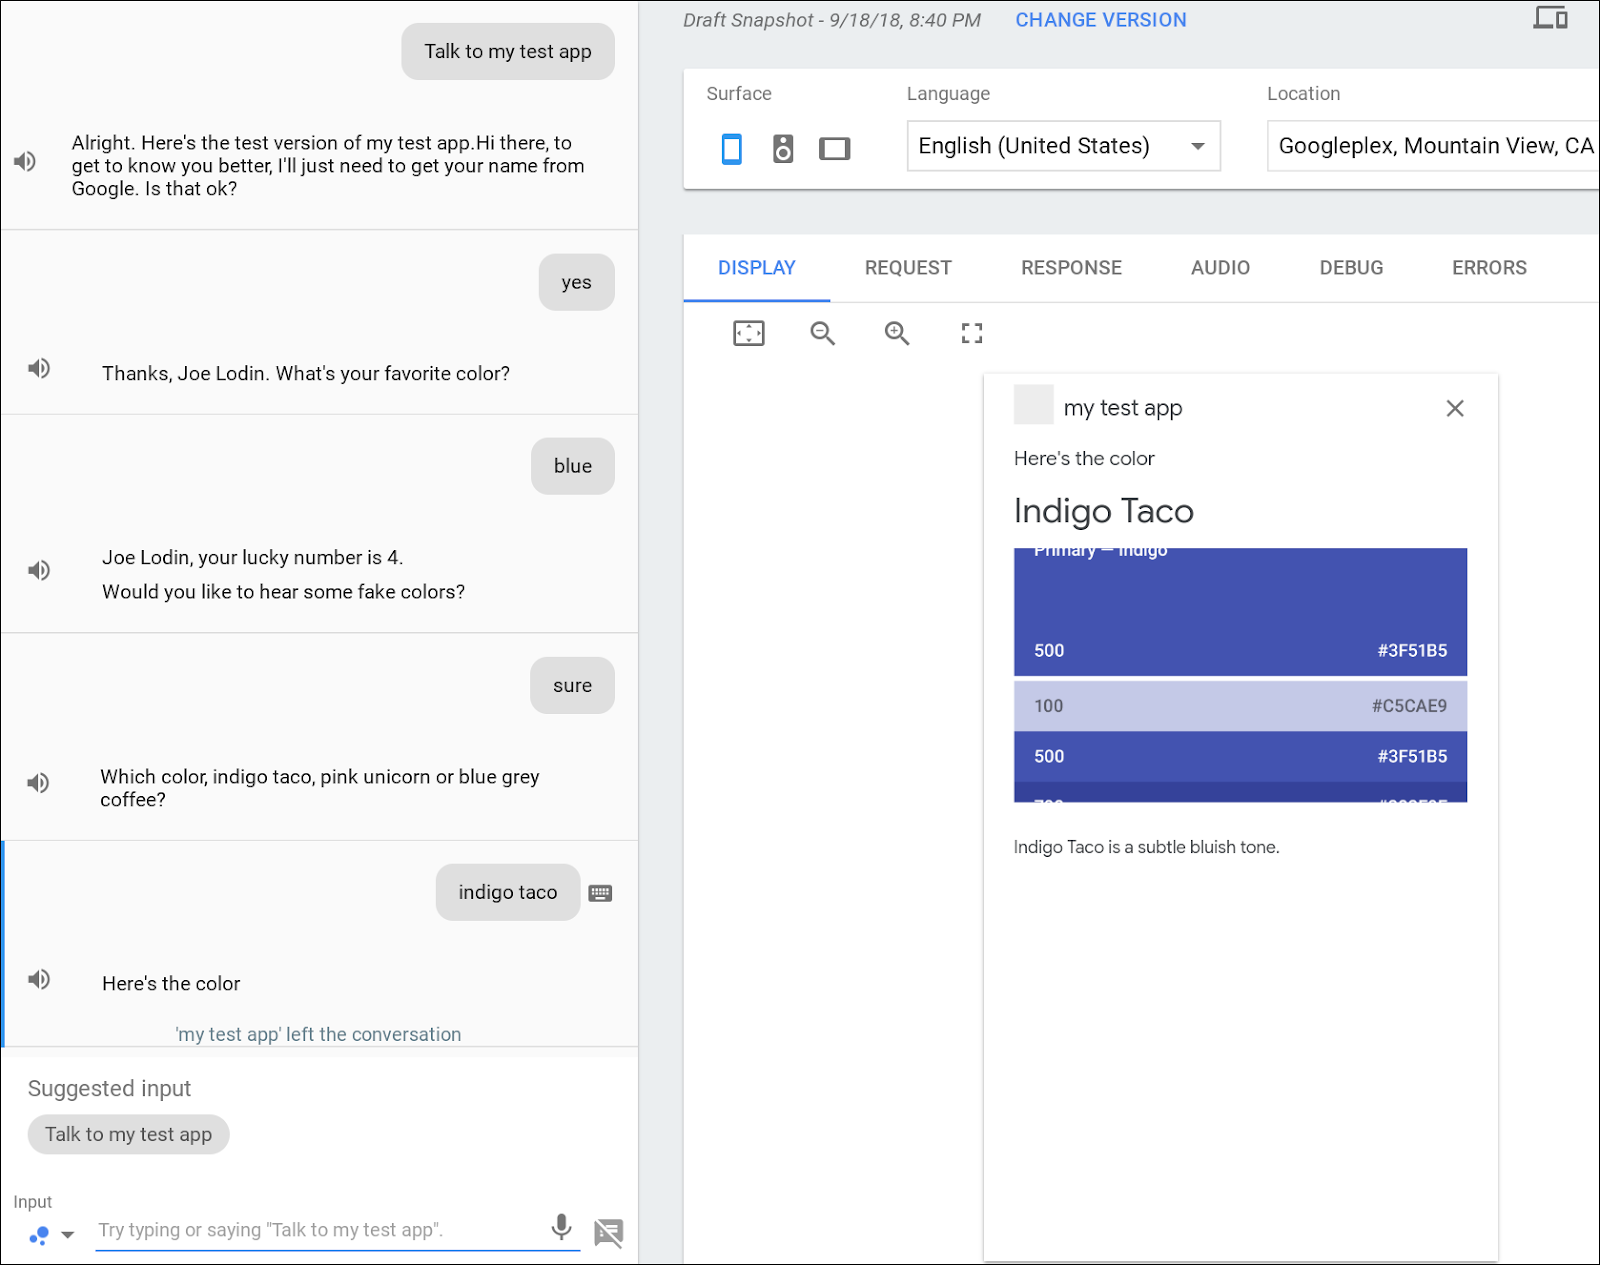
To test out your Action in the Actions simulator:
- In the Dialogflow console left navigation, click on Integrations > Google Assistant.
- Make sure Auto-preview changes is enabled and click Test to update your Actions project.
- The Actions simulator loads your Actions project. To test your Action, type "Talk to my test app" into the Input field and press enter.
- You should see the first response from the completed Level 2 codelab: "Hi there, to get to know you better, I'll just need to get your name from Google. Is that ok?"
- Type "yes" and press enter.
- You should see a response with your Google account's name. Try following the prompts to continue the conversation while making sure that your fulfillment has a response for each input.
Before going further into this codelab, let's take a moment to discuss the first step when building any Action: writing sample dialogs.
Before you start coding, or even writing conversational flows, take the time to write out (and say out loud!) sample interactions between your user and Action. Write these interactions for ‘happy paths', when the conversation is progressing as expected, but also write them for when things go wrong (for example, when the user provides some unexpected input). You can take a look at this blog post for more tips about how to write your sample dialogs.
We recommend that you try to write out the sample dialogs at the beginning of the development lifecycle (before you start coding), and then iterate on your design as you add new conversational paths to your Action.
Here's an example of how you might represent the ‘happy path' for this codelab as a sample dialog:
User: | "Talk to my test app." |
Action: | "Hi there, to get to know your better, I'll just need to get your name from Google. Is that ok?" |
User: | "Yes." |
Action: | "Thanks, <name>. What's your favorite color?" |
User: | "It's... umm...it's green!" |
Action: | "Your lucky number is 5. Would you like to hear some fake colors?" |
User: | "Yes." |
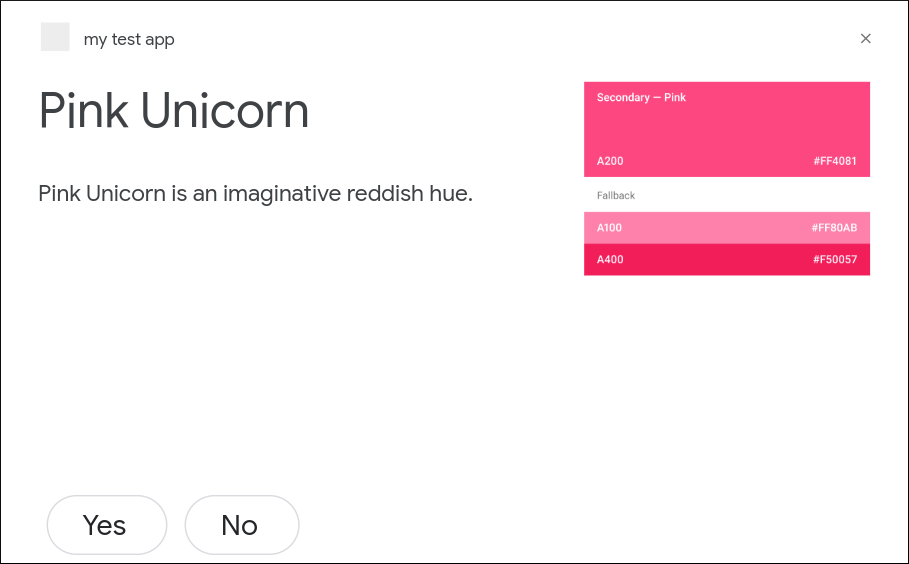
Action: | "Which color, indigo taco, pink unicorn or blue grey coffee?" |
User: | "Pink unicorn." |
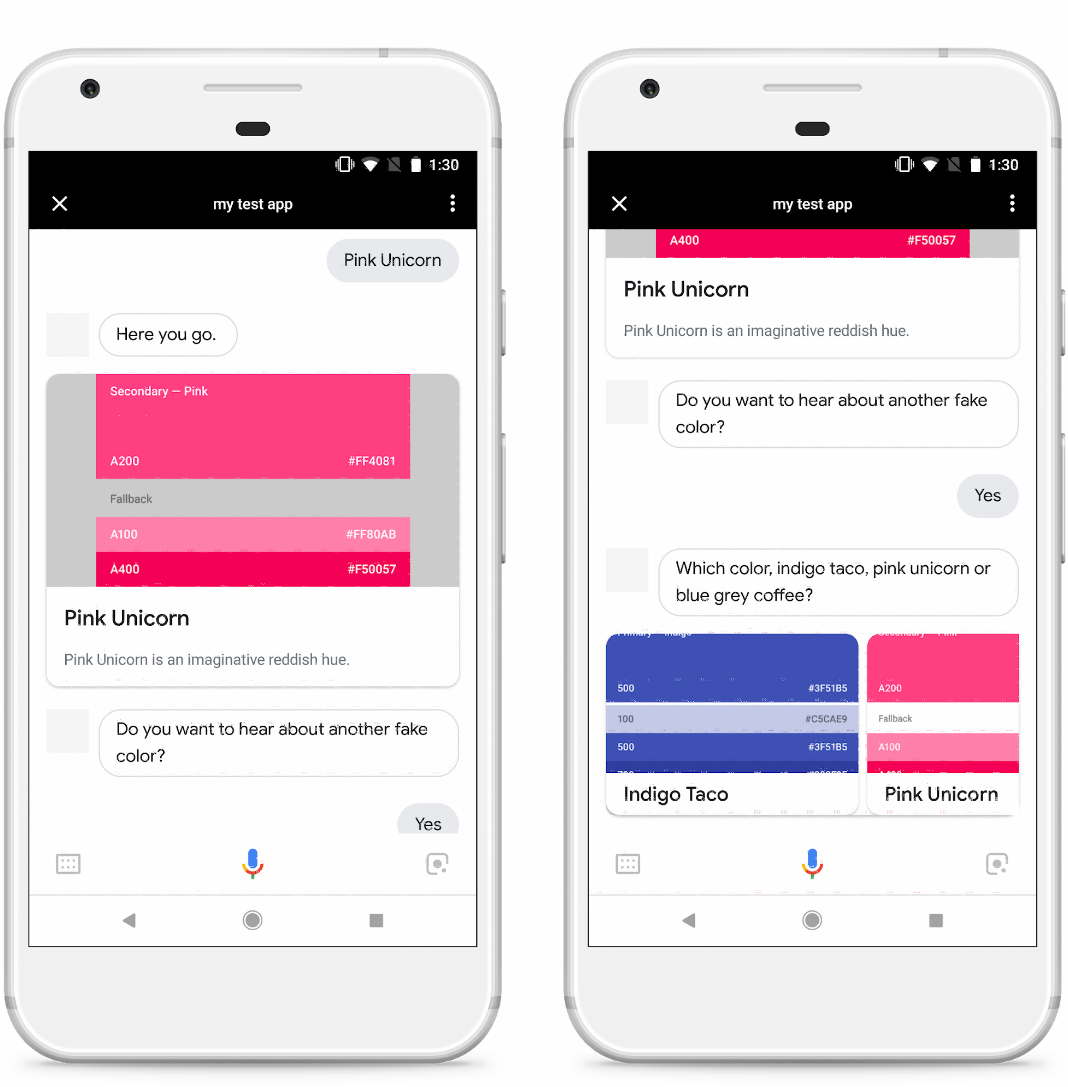
Action: | "Here's the color." <shows image of color> |
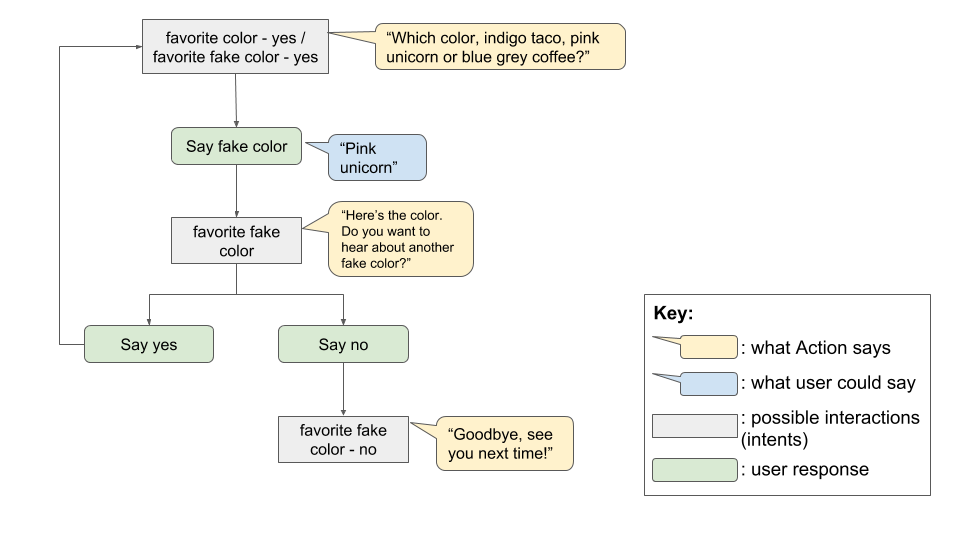
Here's a visual representation of this flow:

Exercise: Write sample dialog
As a short exercise, take a minute to think about how you might write the sample dialog to model other interactions where the user provides unexpected responses to the Action's prompts or if the user is silent.
Here's an example of such a dialog:
User: | "Talk to my test app." |
Action: | "Hi there, to get to know your better, I'll just need to get your name from Google. Is that ok?" |
User: | "Nope." |
Action: | "OK, no worries. What's your favorite color?" |
User: | "It's... umm...it's a boat!" |
Action: | "Sorry, what was that?" |
User: | "I mean green." |
Action: | "Your lucky number is 5. Would you like to hear some fake colors?" |
User: | "Yes." |
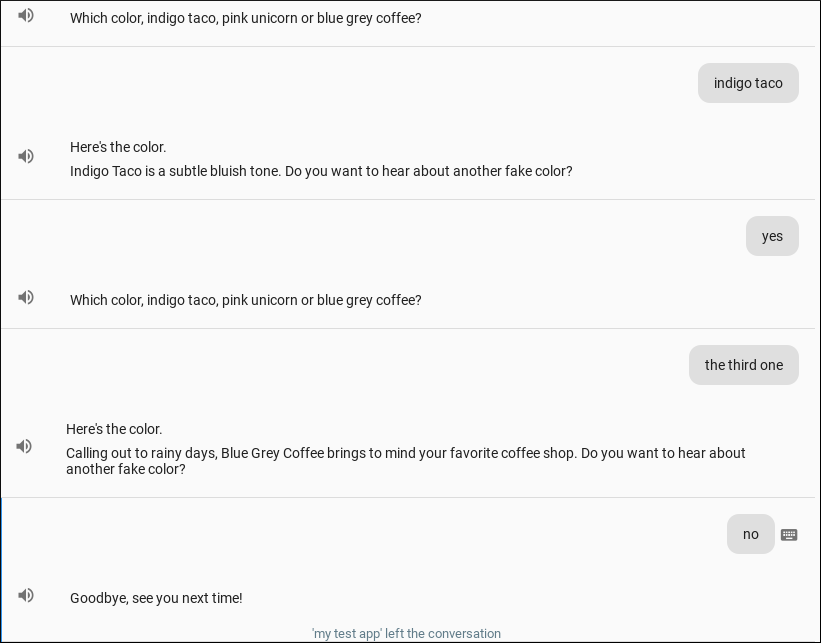
Action: | "Which color, indigo taco, pink unicorn or blue grey coffee?" |
User: | <silence> |
Action: | "Which color would you like to hear about?" |
User: | "Pink unicorn." |
Action: | "Here's the color." <shows image of color> "Would you like to hear about another fake color?" |
User: | "No." |
Action: | "Let me know when you want to talk about colors again!" |
It is often helpful for your Action to store data between conversation sessions with the same user. Your Action can ask users for their preferences and remember them for later use, which lets you personalize future conversations with that user. For example, an Action that gives users a weather report based on a zip code could ask users whether they'd like the Action to remember their zip code for later conversations.
The conv.user.storage object is a data structure provided by the Actions on Google Node.js client library for saving data across conversations for a particular user. In this section of the codelab, you'll use this feature to cheerfully greet the user by name whenever they start a new conversation with your Action.
Implement the fulfillment
 Open your
 index.js file in an editor and replace all instances of conv.data with conv.user.storage.
Update your default welcome intent handler to use the conv.user.storage object by replacing this code:
index.js
// Handle the Dialogflow intent named 'Default Welcome Intent'.
app.intent('Default Welcome Intent', (conv) => {
 // Asks the user's permission to know their name, for personalization.
 conv.ask(new Permission({
   context: 'Hi there, to get to know you better',
   permissions: 'NAME',
 }));
});
with this:
index.js
// Handle the Dialogflow intent named 'Default Welcome Intent'.
app.intent('Default Welcome Intent', (conv) => {
 const name = conv.user.storage.userName;
 if (!name) {
   // Asks the user's permission to know their name, for personalization.
   conv.ask(new Permission({
     context: 'Hi there, to get to know you better',
     permissions: 'NAME',
   }));
 } else {
   conv.ask(`Hi again, ${name}. What's your favorite color?`);
 }
});
In the Level 2 codelab, we introduced the conv.data object, which allowed you to store data between turns of the same conversation. In the updated snippet above, you use the conv.user.storage object instead for storing the user's name between conversations. If the user previously granted your Action permission to access their name, it will appear in the greeting message.
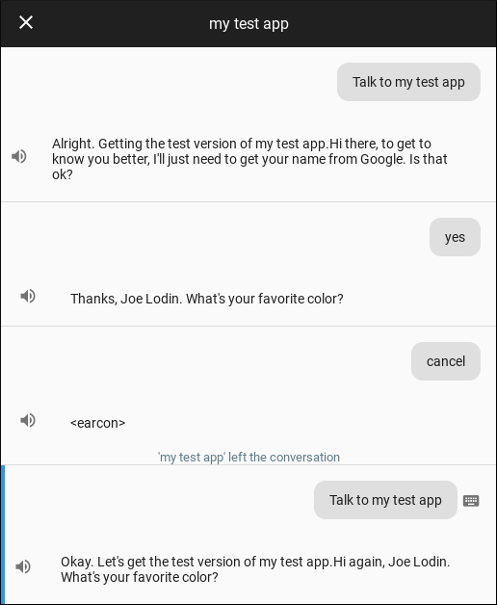
Test your conversation data storage
In the terminal, run the following command to deploy your updated webhook code to Firebase:
firebase deployTo test out your Action in the Actions simulator:
- In the Actions console, navigate to Test.
- Type "Talk to my test app" into the Input field and press enter.
- Type "Yes" and press enter.
- Type "Cancel" and press enter.
- Type "Talk to my test app" again into the Input field and press enter to start another conversation.
At the start of this second conversation, your Action should remember your name from the first time you granted permission:
On smart speakers or other surfaces without a screen, there may not always be an obvious visual indicator of whether the device is waiting for a user response. Users may not realize your Action is waiting for them to respond, so it's an important design practice to implement no-input event handling to remind users that they need to respond.
Set up Dialogflow
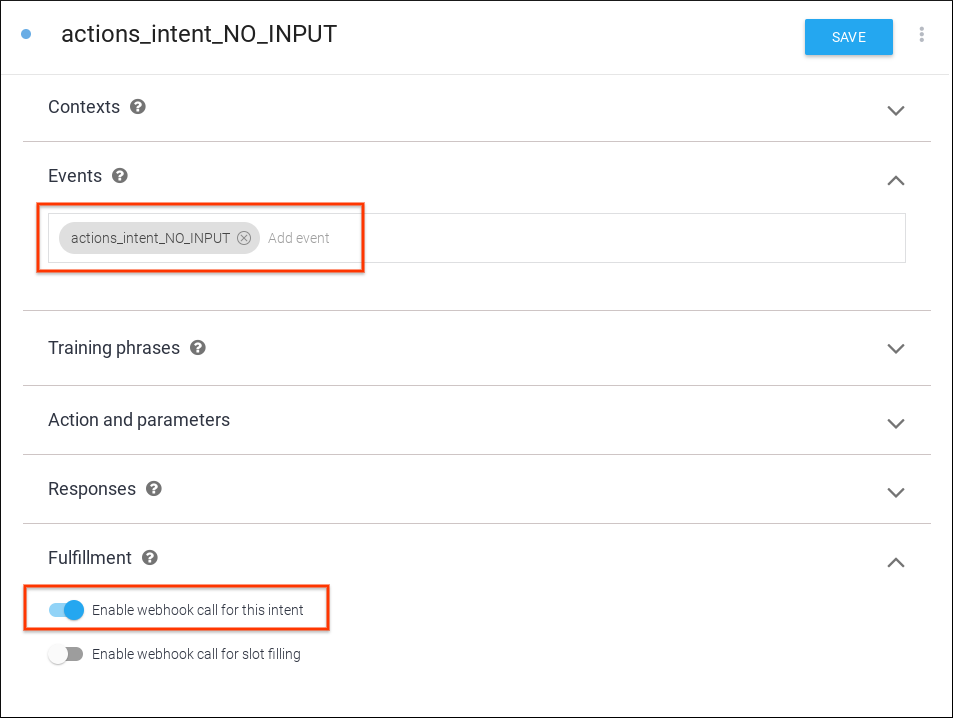
- Set up a new intent to handle the no-input event. In the Dialogflow console, click the + button next to Intents in the left navigation to create a new intent.
- You can name this new intent whatever you'd like. In our example, we've named it actions_intent_NO_INPUT.
- Under Events, add a new event called "actions_intent_NO_INPUT".
- Toggle on the webhook fulfillment switch and click Save.
Implement the fulfillment
Open your index.js file in an editor and add the following code:
index.js
// Handle the Dialogflow NO_INPUT intent.
// Triggered when the user doesn't provide input to the Action
app.intent('actions_intent_NO_INPUT', (conv) => {
  // Use the number of reprompts to vary response
  const repromptCount = parseInt(conv.arguments.get('REPROMPT_COUNT'));
  if (repromptCount === 0) {
    conv.ask('Which color would you like to hear about?');
  } else if (repromptCount === 1) {
    conv.ask(`Please say the name of a color.`);
  } else if (conv.arguments.get('IS_FINAL_REPROMPT')) {
    conv.close(`Sorry we're having trouble. Let's ` +
      `try this again later. Goodbye.`);
  }
});
Notice that we take advantage of a property of the conversation object called the REPROMPT_COUNT. This value lets us know how many times the user has been prompted, so we can modify our message each time. In the code snippet, the maximum reprompt count is set at 2, at which point the conversation ends. This is a best practice, as re-prompting the user more than 3 times can increase frustration and stall the conversation.
Test your custom reprompts
In the terminal, run the following command to deploy your updated webhook code to Firebase:
firebase deployTo test out your custom reprompt in the Actions simulator, follow these steps:
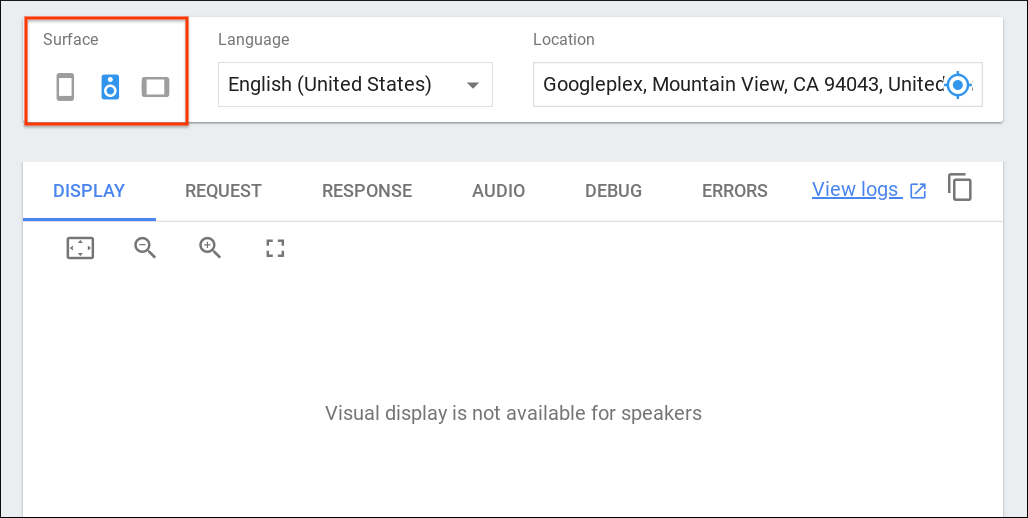
- In the Actions console, navigate to Test.
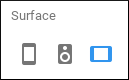
- Make sure to end any conversations in progress; then, under Surface, select the Speaker icon:
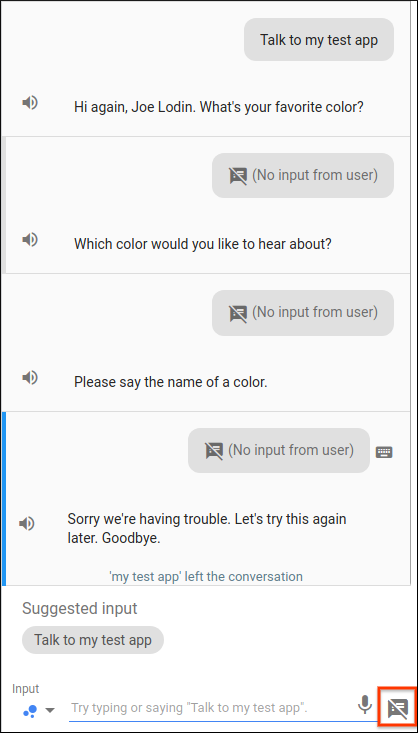
- Type "Talk to my test app" into the Input field and press enter. If your Action doesn't remember your name, type "yes" and press enter.
- Click the No Input
 icon to the right of the Input field to simulate a non-response.
Your Action should respond with a custom reprompt message every time you simulate a non-response instead of entering a color, eventually exiting after the third reprompt:
Your Action should allow users to quickly bow out of conversations, even if they haven't followed the conversation path all the way through. By default, Actions on Google exits the conversation and plays an earcon whenever the user utters one of these keywords: "exit", "cancel", "stop", "nevermind", and "goodbye".
You can customize this behavior by registering for the actions_intent_CANCEL event in Dialogflow and defining a custom response.
In this section, you'll create a new cancel intent in Dialogflow and add a suitable final response message.
Set up Dialogflow
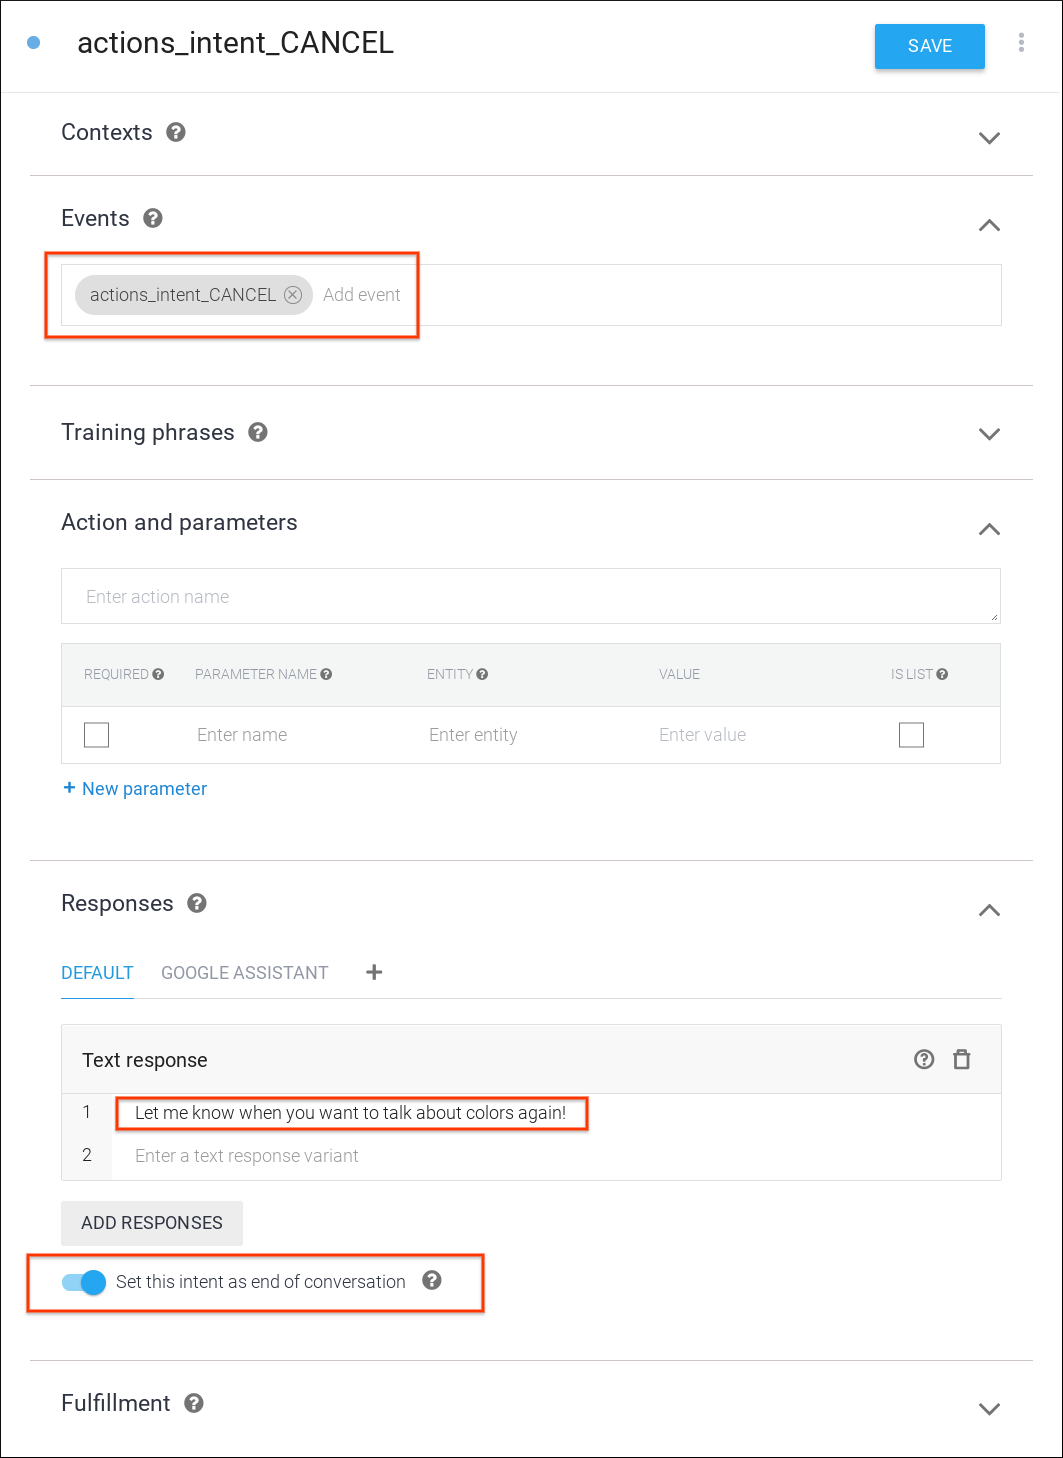
- Set up a new intent for handling the user exiting. In the Dialogflow console, click the + button next to Intents in the left navigation to create a new intent.
- You can name this new intent whatever you'd like. In our example, we've named it
actions_intent_CANCEL. - Under Events, add a new event called
actions_intent_CANCEL. - Under Responses, add a Text response like "Let me know when you want to talk about colors again!". Note that a good design practice is to keep exit text responses shorter than 60 characters.
- Toggle on the Set this intent as end of conversation switch below Add Responses.
- Click Save.
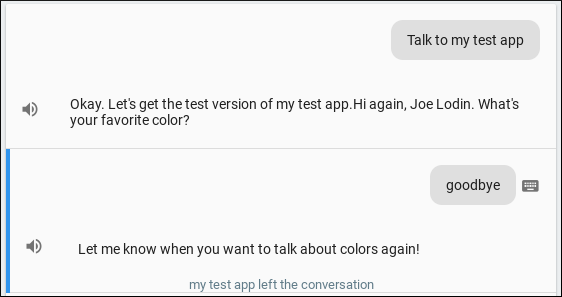
Test your custom exit
To test out your custom exit prompt in the Actions simulator, follow these steps:
- In the Actions console, navigate to Test.
- Type "Talk to my test app" into the Input field and press enter. If your Action doesn't remember your name, type "yes".
- Type "Goodbye" and press enter.
Your Action should respond with your custom exit prompt and end the conversation.
In this section of the codelab, you'll enhance your Action by adding the ability for users to view and select a fake color option on devices with screen output.
Design the conversational experience
It's important to design conversational experiences to be multimodal, which means that users can participate via voice and text as well as other interaction modes that their devices support (for example, touchscreen).
We always start with designing the conversation and writing sample dialogs for the voice-only experience. Then, we design the multi-modal experience, which involves adding visuals as enhancements where it makes sense.
For devices with screen output, the Actions on Google platform provides several types of visual components that you can optionally integrate into your Action to provide detailed information to users.
One common use case for adding multimodal support is when users need to make a choice between several available options during the conversation.
In our conversation design, there's a decision point in the flow where the user needs to pick a fake color. We'll enhance this interaction by adding a visual component.
A good candidate for representing choices visually is the carousel. This component lets your Action present a selection of items for users to pick, where each item is easily differentiated by an image.
Set up Dialogflow
Make the following changes in the Dialogflow console to add the carousel:
Enable webhooks calls for the follow-up intent
When your favorite color - yes follow-up intent is matched, the user is provided with the carousel, which is a visual element. As a best practice, you should check that the user's current device has a screen before presenting them with visual elements. You'll be updating your favorite color - yes follow-up intent to perform this check.
- In the left navigation menu of the Dialogflow console, click on Intents.
- Click on the arrow next to the
favorite colorintent and selectfavorite color - yes. - At the bottom of the page, under the Fulfillment section, toggle the Enable webhook call for this intent option.
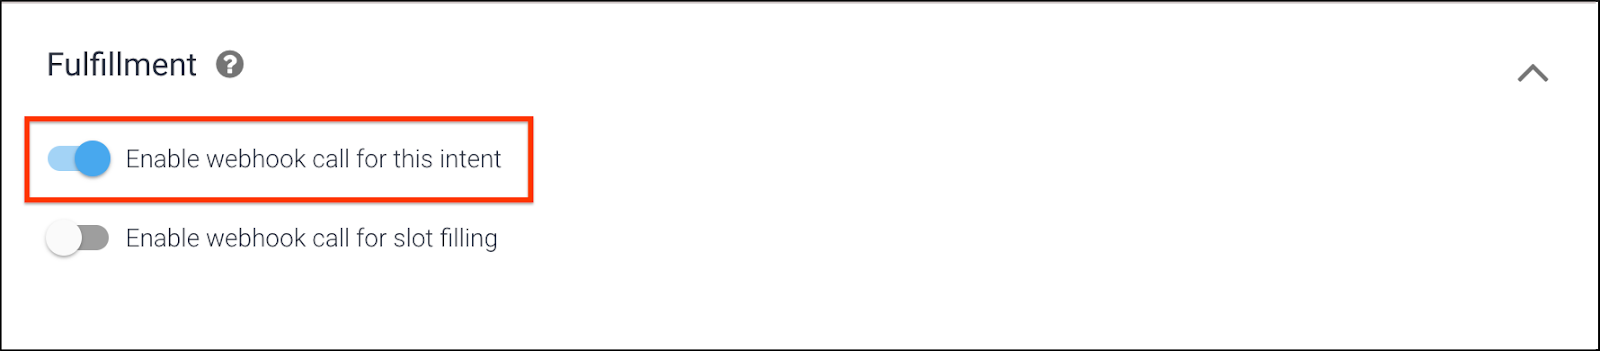
- Click Save at the top of the page.
Update intents for handling visual selection
You'll need to update the favorite fake color intent in the Dialogflow console to handle the user's selection. To do so, follow these steps:
- In the Dialogflow console left navigation, click on Intents and select the
favorite fake colorintent. - Under Events, add
actions_intent_OPTION. Dialogflow will look for this specific event when a user selects an option from the carousel.
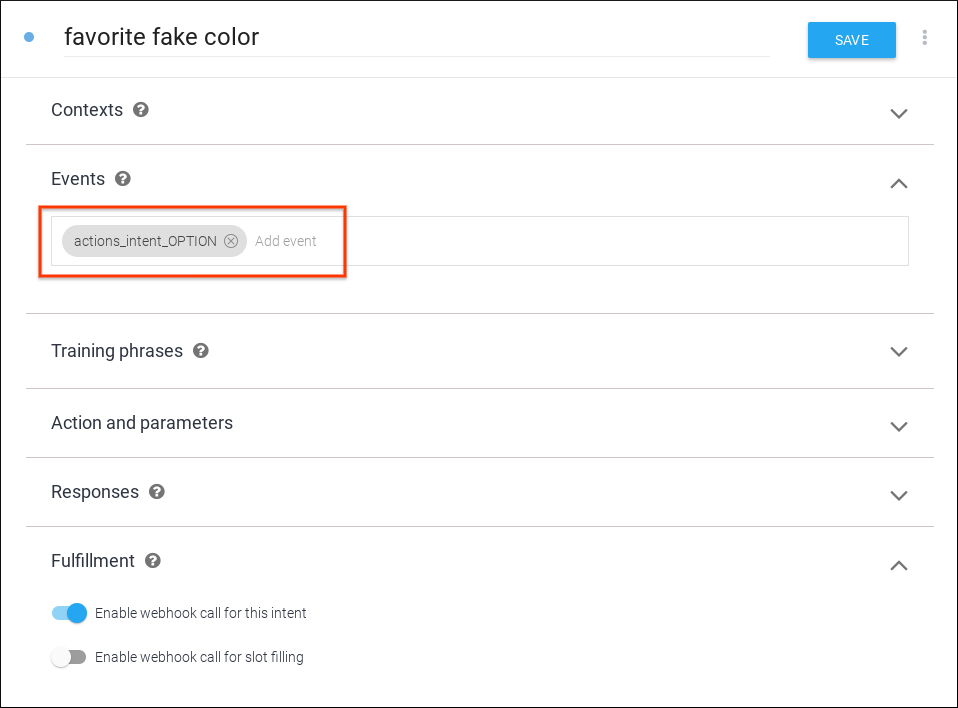
- Click Save at the top of the page.
Implement the fulfillment
To implement the fulfillment in your webhook, perform the following steps:
Load dependencies
To support the multimodal conversation experience, you'll need to provide variable responses based on the surface capabilities of the device. You'll do this by checking the conv.screen property in your fulfillment.
In the index.js file, update the require() function to add the Carousel and Image packages from the actions-on-google package, so your imports look like this:
index.js
// Import the Dialogflow module and response creation dependencies
// from the Actions on Google client library.
const {
  dialogflow,
  BasicCard,
  Permission,
  Suggestions,
  Carousel,
  Image,
} = require('actions-on-google');
Build the carousel
Next, you'll define the fakeColorCarousel() function to build the carousel.
In the index.js file, add a fakeColorCarousel() function with the following code:
index.js
// In the case the user is interacting with the Action on a screened device
// The Fake Color Carousel will display a carousel of color cards
const fakeColorCarousel = () => {
  const carousel = new Carousel({
   items: {
     'indigo taco': {
       title: 'Indigo Taco',
       synonyms: ['indigo', 'taco'],
       image: new Image({
         url: 'https://storage.googleapis.com/material-design/publish/material_v_12/assets/0BxFyKV4eeNjDN1JRbF9ZMHZsa1k/style-color-uiapplication-palette1.png',
         alt: 'Indigo Taco Color',
       }),
     },
     'pink unicorn': {
       title: 'Pink Unicorn',
       synonyms: ['pink', 'unicorn'],
       image: new Image({
         url: 'https://storage.googleapis.com/material-design/publish/material_v_12/assets/0BxFyKV4eeNjDbFVfTXpoaEE5Vzg/style-color-uiapplication-palette2.png',
         alt: 'Pink Unicorn Color',
       }),
     },
     'blue grey coffee': {
       title: 'Blue Grey Coffee',
       synonyms: ['blue', 'grey', 'coffee'],
       image: new Image({
         url: 'https://storage.googleapis.com/material-design/publish/material_v_12/assets/0BxFyKV4eeNjDZUdpeURtaTUwLUk/style-color-colorsystem-gray-secondary-161116.png',
         alt: 'Blue Grey Coffee Color',
       }),
     },
 }});
 return carousel;
};
Notice that carousels are built using the Items object, which has several properties, including titles and Images. The Image type contains a url which opens when the user clicks on the selection, as well as alternative text for accessibility.
To identify which carousel card the user selected, you'll use the keys of the Items object; namely, "indigo taco", "pink unicorn", or "blue grey coffee".
Add the intent handler for ‘favorite fake color - yes'
Next, you'll need to add a handler for the favorite color - yes follow-up intent to check if the conv.screen property is true. If so, this indicates that the device has a screen. You can then send a response asking the user to select a fake color from the carousel by calling the ask() function with fakeColorCarousel(), which you pass as the argument.
In the index.js file, add a check for a screen on the current surface by adding the following code to your fulfillment:
index.js
// Handle the Dialogflow intent named 'favorite color - yes'
app.intent('favorite color - yes', (conv) => {
 conv.ask('Which color, indigo taco, pink unicorn or blue grey coffee?');
 // If the user is using a screened device, display the carousel
 if (conv.screen) return conv.ask(fakeColorCarousel());
});
Support non-screened devices
If the surface capability check returned false, your user is interacting with your Action on a device that doesn't have a screen. You should support as many different users as possible with your Action, so you're now going to add an alternate response that reads the color's description instead of displaying a visual element.
In the index.js file, add a screen capability check and fallback by replacing the following code:
index.js
// Handle the Dialogflow intent named 'favorite fake color'.
// The intent collects a parameter named 'fakeColor'.
app.intent('favorite fake color', (conv, {fakeColor}) => {
 // Present user with the corresponding basic card and end the conversation.
 conv.close(`Here's the color`, new BasicCard(colorMap[fakeColor]));
});
with this:
index.js
// Handle the Dialogflow intent named 'favorite fake color'.
// The intent collects a parameter named 'fakeColor'.
app.intent('favorite fake color', (conv, {fakeColor}) => {
 fakeColor = conv.arguments.get('OPTION') || fakeColor;
 // Present user with the corresponding basic card and end the conversation.
 conv.ask(`Here's the color.`, new BasicCard(colorMap[fakeColor]));
 if (!conv.screen) {
   conv.ask(colorMap[fakeColor].text);
 }
});
Test your carousel response
In the terminal, run the following command to deploy your updated webhook code to Firebase:
firebase deployTo test out your carousel response in the Actions simulator, follow these steps:
- In the Actions console, navigate to Test.
- Under Surface, select the Smart Display icon.
- Type "Talk to my test app" into the Input field and press enter. If your Action doesn't remember your name, type "yes" and press enter.
- Type "blue" and press enter.
- Type "sure" and press enter.
You should see your carousel response appear under the Display tab on the right.
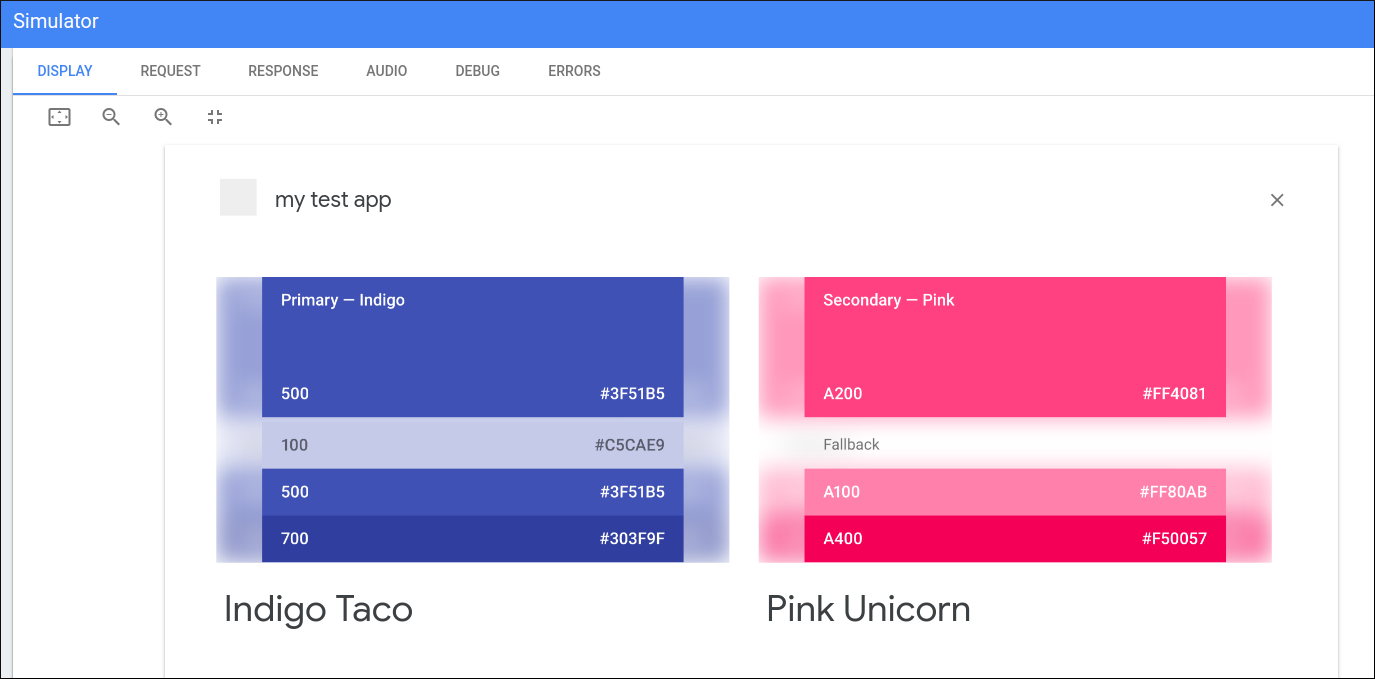
You can either type out an option in the simulator or click on one of the carousel options to receive a card with more details about that color.
Test your non-visual response
You should also test your response to see how it renders on a device without the screen capability. To test your response on a voice-only surface, follow these steps:
- Press the X on the upper left corner of the simulator to exit the previous conversation.
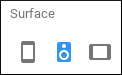
- Under Surface, select the Speaker icon.
- Type "Talk to my test app" into the Input field and press enter. If your Action doesn't remember your name, type "yes" and press enter.
- Type "blue" and press enter.
- Type "sure" and press enter.
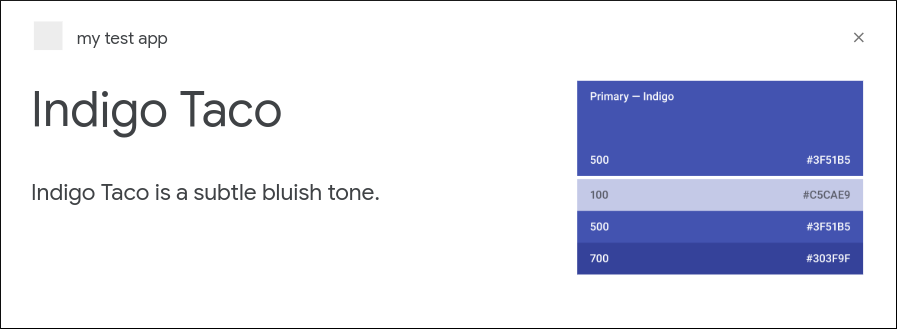
- Type "indigo taco" and press enter.
You should get a spoken response back with a description corresponding to the color you picked.
Your Action presents users with a multiple-choice question ("Which color, indigo taco, pink unicorn or blue grey coffee?") at the end of the conversation. Users should be able to see the other options they could have picked without having to re-invoke your Action and navigate through your conversation up to the decision point.
Design the conversational experience
In this section of the codelab, you're going to create prompts that let a user choose to either pick another color or gracefully end the conversation.
Here's an example sample dialog for the interaction scenario where the user wants to pick another fake color:
Action: | "Would you like to hear some fake colors?" |
User: | "Yes" |
Action: | "Which color, indigo taco, pink unicorn or blue grey coffee?" |
User: | "I like pink unicorn." |
Action: | "Here's the color. Do you want to hear about another fake color?" |
User: | "Yes please." |
Action: | "Which color, indigo taco, pink unicorn or blue grey coffee?" |
Here's an example sample dialog for the interaction scenario where the user declines to pick another fake color:
Action: | "Would you like to hear some fake colors?" |
User: | "Yes" |
Action: | "Which color, indigo taco, pink unicorn or blue grey coffee?" |
User: | "I like pink unicorn." |
Action: | "Here's the color. Do you want to hear about another fake color?" |
User: | "No thanks." |
Action: | "Goodbye, see you next time!" |
Here's a visual representation of these sample dialogs:
To implement this flow, we'll use follow-up intents that Dialogflow matches based on the user's response after a particular intent. In our Action, we'll apply follow-up intents in the following way:
- If the user says "No" after being asked if they want to hear another favorite color, we'll trigger a follow-up intent that sends a final message and ends the conversation.
- If the user says "Yes" after that same prompt, we'll trigger a follow-up intent that prompts the user to specify another favorite fake color.
When using follow-up intents, your Action needs to be aware of the conversational context. That is, it needs to understand the statements leading up to a certain point in the conversation. Unless the user changes the subject, we can assume that the thread of conversation continues. Therefore, it's likely that your Action can use a user's previous utterances to resolve ambiguities and better understand their current utterances. For example, a flower ordering Action should understand that the user query "What about a half dozen?" is a follow-up to the user's previous utterance, and interpret it as "How much does a bouquet of 6 roses cost?"
Set up Dialogflow
To follow up your carousel selection with additional prompts, do the following:
- In the Dialogflow console left navigation, click on Intents.
- Hover your cursor over favorite fake color, then click Add follow-up intent. Do this twice, once selecting yes and again selecting no.
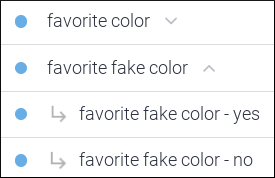
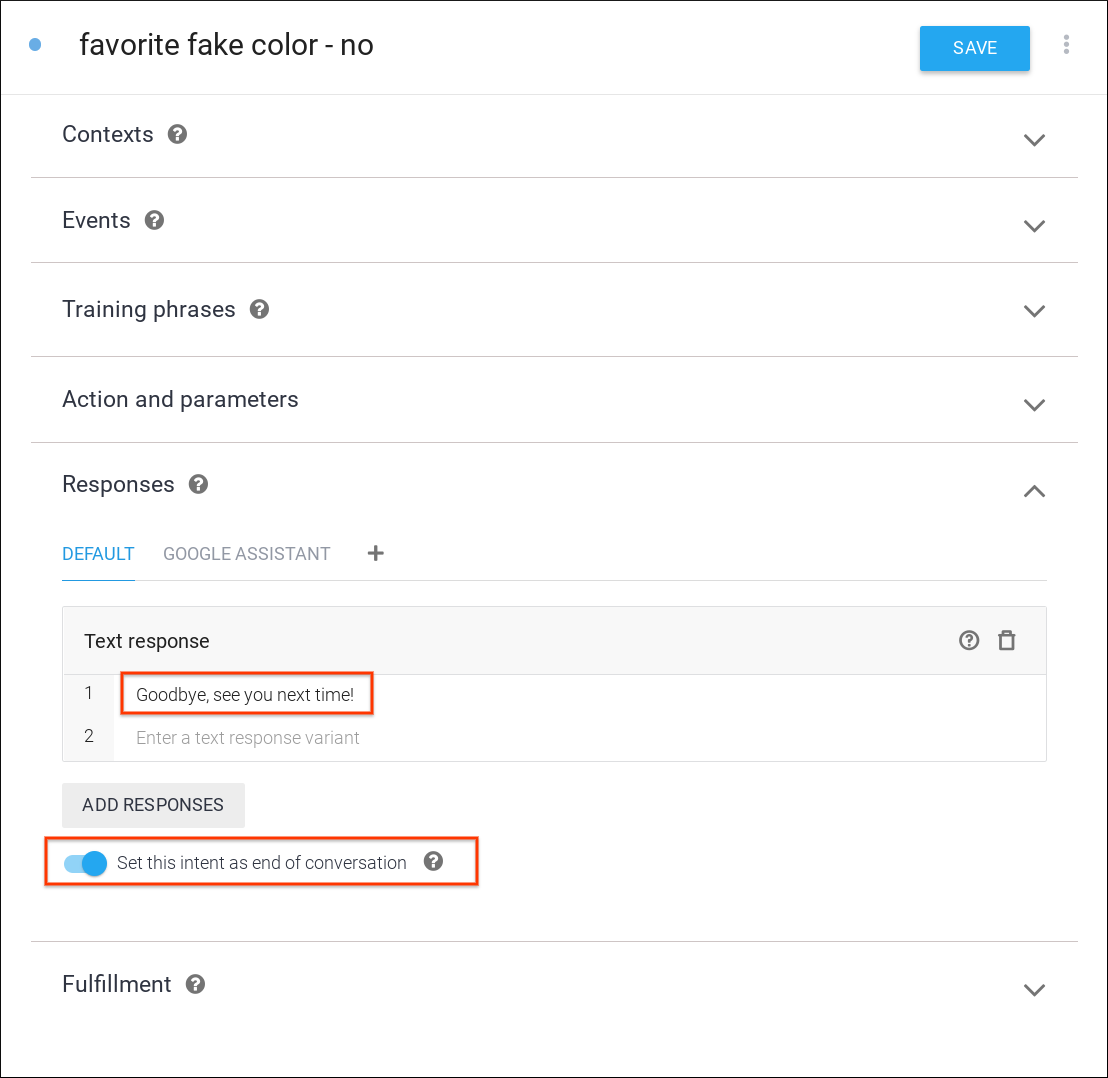
Click on the favorite fake color - no intent, and do the following:
- Under Responses, add "Goodbye, see you next time!" as a Text response.
- Turn on Set this intent as end of conversation.
- Click Save.
Click on Intents in the left navigation and click on the favorite fake color - yes intent. Then, do the following:
- Under Fulfillment, turn on Enable webhook call for this intent.
- Click Save.

Implement fulfillment
Next, you'll need to add a handler for the favorite fake color - yes follow-up intent.
In the index.js file, replace the following code:
index.js
// Handle the Dialogflow intent named 'favorite color - yes'
app.intent('favorite color - yes', (conv) => {
 conv.ask('Which color, indigo taco, pink unicorn or blue grey coffee?');
 // If the user is using a screened device, display the carousel
 if (conv.screen) return conv.ask(fakeColorCarousel());
});
with this:
index.js
// Handle the Dialogflow follow-up intents
app.intent(['favorite color - yes', 'favorite fake color - yes'], (conv) => {
 conv.ask('Which color, indigo taco, pink unicorn or blue grey coffee?');
 // If the user is using a screened device, display the carousel
 if (conv.screen) return conv.ask(fakeColorCarousel());
});
Lastly, you'll add suggestion chips to the favorite fake color intent handler that trigger your two new follow-up intents.
In the index.js file, update the favorite fake color intent handler with suggestion chips by replacing the following code:
index.js
// Handle the Dialogflow intent named 'favorite fake color'.
// The intent collects a parameter named 'fakeColor'.
app.intent('favorite fake color', (conv, {fakeColor}) => {
 fakeColor = conv.arguments.get('OPTION') || fakeColor;
 // Present user with the corresponding basic card and end the conversation.
 conv.ask(`Here's the color.`, new BasicCard(colorMap[fakeColor]));
 if (!conv.screen) {
   conv.ask(colorMap[fakeColor].text);
 }
});
with this:
index.js
// Handle the Dialogflow intent named 'favorite fake color'.
// The intent collects a parameter named 'fakeColor'.
app.intent('favorite fake color', (conv, {fakeColor}) => {
  fakeColor = conv.arguments.get('OPTION') || fakeColor;
  // Present user with the corresponding basic card and end the conversation.
  if (!conv.screen) {
    conv.ask(colorMap[fakeColor].text);
  } else {
    conv.ask(`Here you go.`, new BasicCard(colorMap[fakeColor]));
  }
  conv.ask('Do you want to hear about another fake color?');
  conv.ask(new Suggestions('Yes', 'No'));
});
Test your carousel's follow-up prompt
In the terminal, run the following command to deploy your updated webhook code to Firebase:
firebase deployTo test out your follow-up prompt in the Actions simulator, do the following:
- In the Actions console, navigate to Tes.
- Under Surface, select the Smart Display icon.
- Type "Talk to my test app" into the Input field and hit enter. If your Action doesn't remember your name, type "yes".
- Type "blue".
- Type "yes".
- Click on one of the carousel options. You should be asked whether you want to pick another color, and see suggestion chips under the basic card that say Yes and No.
Clicking on the Yes chip should show you the carousel again, and the No chip should exit the conversation with a friendly message.
You should also test your response to see how it handles being run on a device without the screen capability. To test your response on a different surface, do the following:
- Type or click ‘No' to exit the previous conversation.
- Under Surface, select the Speaker icon.
- Type "Talk to my test app" into the Input field and hit enter. If your Action doesn't remember your name, type "yes".
- Type "blue".
- Type "sure".
- Type "Indigo taco". You should be asked whether you want to pick another color.
Responding with "yes" should prompt you with the three colors again, and responding with "no" should exit the conversation with a friendly message.
Congratulations!
You've now covered the advanced skills necessary to build conversational user interfaces with Actions on Google.
Additional learning resources
You can explore these resources for learning about Actions on Google:
- actions.google.com: The official documentation site for Actions on Google.
- Actions on Google GitHub repo: Sample code and libraries.
- Dialogflow.com: The official documentation site for Dialogflow.
- r/GoogleAssistantDev: The official Reddit community for developers working with the Google Assistant.
- Conversation design guidelines: Best practices and guidelines for how to design Actions.
Follow us on Twitter @ActionsOnGoogle to stay tuned to our latest announcements, and tweet to #AoGDevs to share what you have built!
Feedback survey
Before you go, please fill out this form to let us know how we're doing!