
Actions on Google is a developer platform that lets you create software to extend the functionality of Google Assistant, Google's virtual personal assistant, across more than 1 billion devices, including smart speakers, phones, cars, TVs, headphones, and more. Users engage Assistant in conversation to get things done, such as buying groceries or booking a ride. (For a complete list of what's possible, see the Actions directory.)
As a developer, you can use Actions on Google to easily create and manage delightful and effective conversational experiences between users and your own third-party fulfillment service. The codelab covers beginner-level concepts for developing with Actions on Google. You do not need any prior experience with the platform to complete the codelab.
What you'll build
You'll build a simple Conversational Action with the following features:
- Users can start a conversation by explicitly calling your Action by name, which then responds with a greeting message.
- Once in conversation, users are prompted to provide their favorite color. Your Action parses the user's input to extract the information that it needs (namely, the color parameter).
- If a color is provided, your Action processes the color parameter to autogenerate a "lucky number" to send back to the user and the conversation ends.
- If no color is provided, then your Action sends the user additional prompts until the parameter is extracted.
- Users can explicitly leave the conversation at any time.

What you'll learn
- How Actions work
- How to create a project in the Actions Console
- How to create a Dialogflow agent
- How to define training phrases in Dialogflow
- How to test your Action in the Actions Console Simulator
- How to use Dialogflow slot-filling and system entities
- How to implement Action fulfillment using the Actions on Google client library and the Dialogflow inline editor
What you'll need
The following tools must be in your environment:
- A web browser, such as Google Chrome
Optional: Get the sample code
You can get the full project code for the codelab from the GitHub repository.
So, how does an Action work?
To start a conversation, the user needs to invoke your Action through Assistant. Users say or type a phrase like, "Hey Google, talk to Google IO." That tells Assistant the name of the Action to talk to.
From that point forward,, the user is talking to your Action and giving it input. The conversation continues as a two-way dialog until the user's intent is fulfilled or the conversation is finished.

Look at what happens behind the scenes during a conversation.

- Your Actions run entirely in the cloud, even when users talk to them on their phones, smart home devices, or watches.
- Every Action supports a specific intent and has a corresponding fulfillment that processes the intent.
- The user's device sends the user's utterance to Assistant, which routes it to your fulfillment service via HTTP POST requests.
- Your fulfillment figures out a relevant response and sends that back to Assistant, which ultimately returns it to the user.
You create Actions by creating an Actions project and defining two things for each action—the intent and fulfillment.
Check your Google permission settings
In order to test the Action that you'll build for this codelab, you need to enable the necessary permissions.
- Go to the Activity Controls page.
- Sign in with your Google Account, if you have not already done so.
- Ensure that the following permissions are enabled:
- Device Information
- Voice & Audio Activity
- Web & App Activity (You should also enable the option to Include Chrome history.)
Create an Actions project
Actions projects are containers for your Action or Actions with the metadata (name, description, and category) that becomes your Actions directory listing.

To start building Actions, you need to create an Actions project as follows:
- Open the Actions Console.
- Click New project.
- Type in a Project name, such as "actions-codelab." (The name is for your internal reference. Later, you can set an external name for your project.)
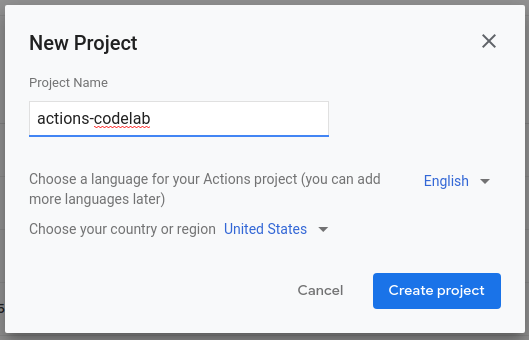
- Click Create project.
- Rather than pick a category, scroll down to the More options section and click on the Conversational card.
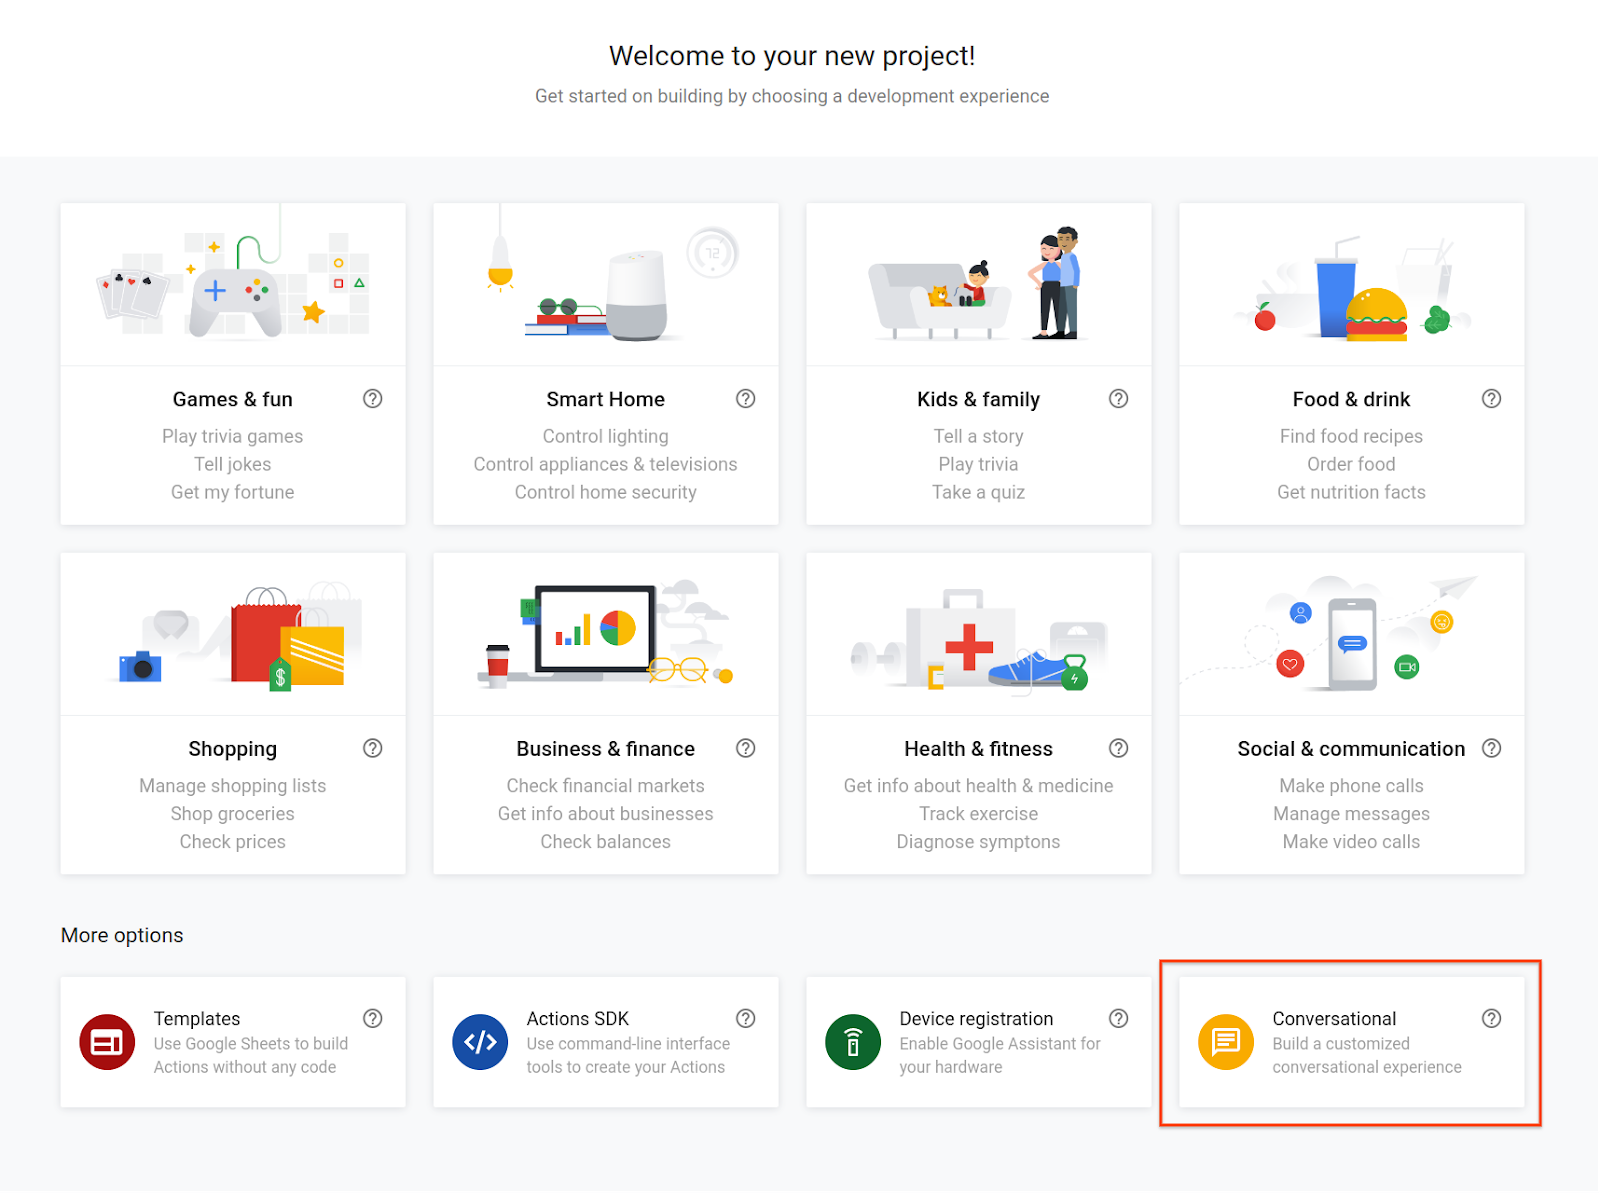
- Click Build your Action to expand the options and select Add Action(s).
- Click Add your first action.
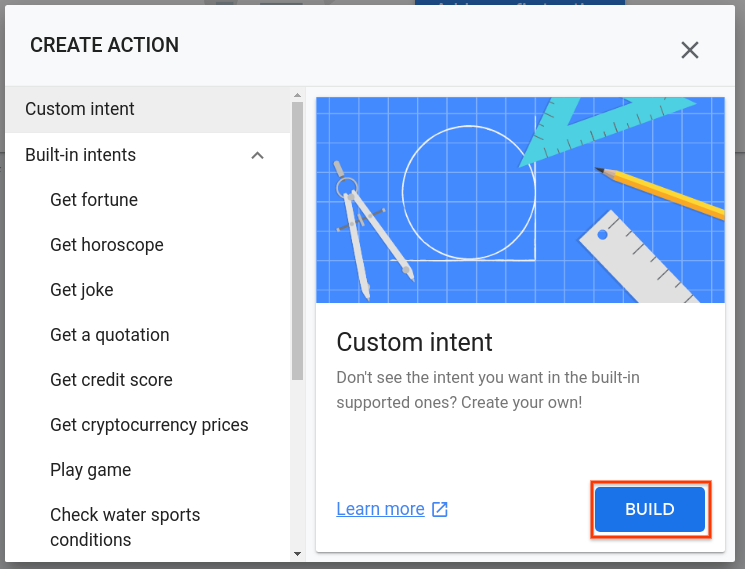
- On the Create Action dialog, select Custom intent and click Build. That opens the Dialogflow Console in another tab.
How Actions work with Dialogflow
You might wonder how Assistant parses the semantic meaning of user input, such as spoken utterances. That's done via natural-language understanding (NLU), which allows Google's software to recognize words in speech.
For your Actions, Google provides a service called Dialogflow to let you handle NLU easily. Dialogflow simplifies the task of understanding user input, extracting key words and phrases from the input, and returning responses. You define how all that works within a Dialogflow agent.
The following diagram shows an example of how Dialogflow (represented by the second column from the right) handles user input from Assistant and sends requests to your fulfillment (represented by the rightmost column).

Create a Dialogflow agent
Now that you built your Actions project, create a Dialogflow agent and associate it with your project:
- You should already be in the Dialogflow Console with your Actions project name at the top. You may need to authorize Dialogflow to use your Google Account and accept the terms of service.
- Click Create.
")
If the agent creation is successful, then you'll be in the Intents page and you can begin customizing how your Dialogflow agent responds to user requests.
Users start the conversation with your Actions through invocation. (An example of an explicit invocation is a phrase like, "Hey Google, talk to MovieTime.") Assistant then tries to match the user's input to one of your Actions.
Create a welcome intent
Every Actions project must have a welcome intent that acts as an entry point for users to start conversations. The welcome intent is triggered when users explicitly invoke an Action by uttering its name.
By default, Dialogflow creates a welcome intent for you. Modify the welcome intent that users trigger when they say, "Hey Google, talk to my test app."
- In the Intents page of the Dialogflow Console, click on Default Welcome Intent.
")
- Delete all of the other text responses by clicking the trash icon next to each one.
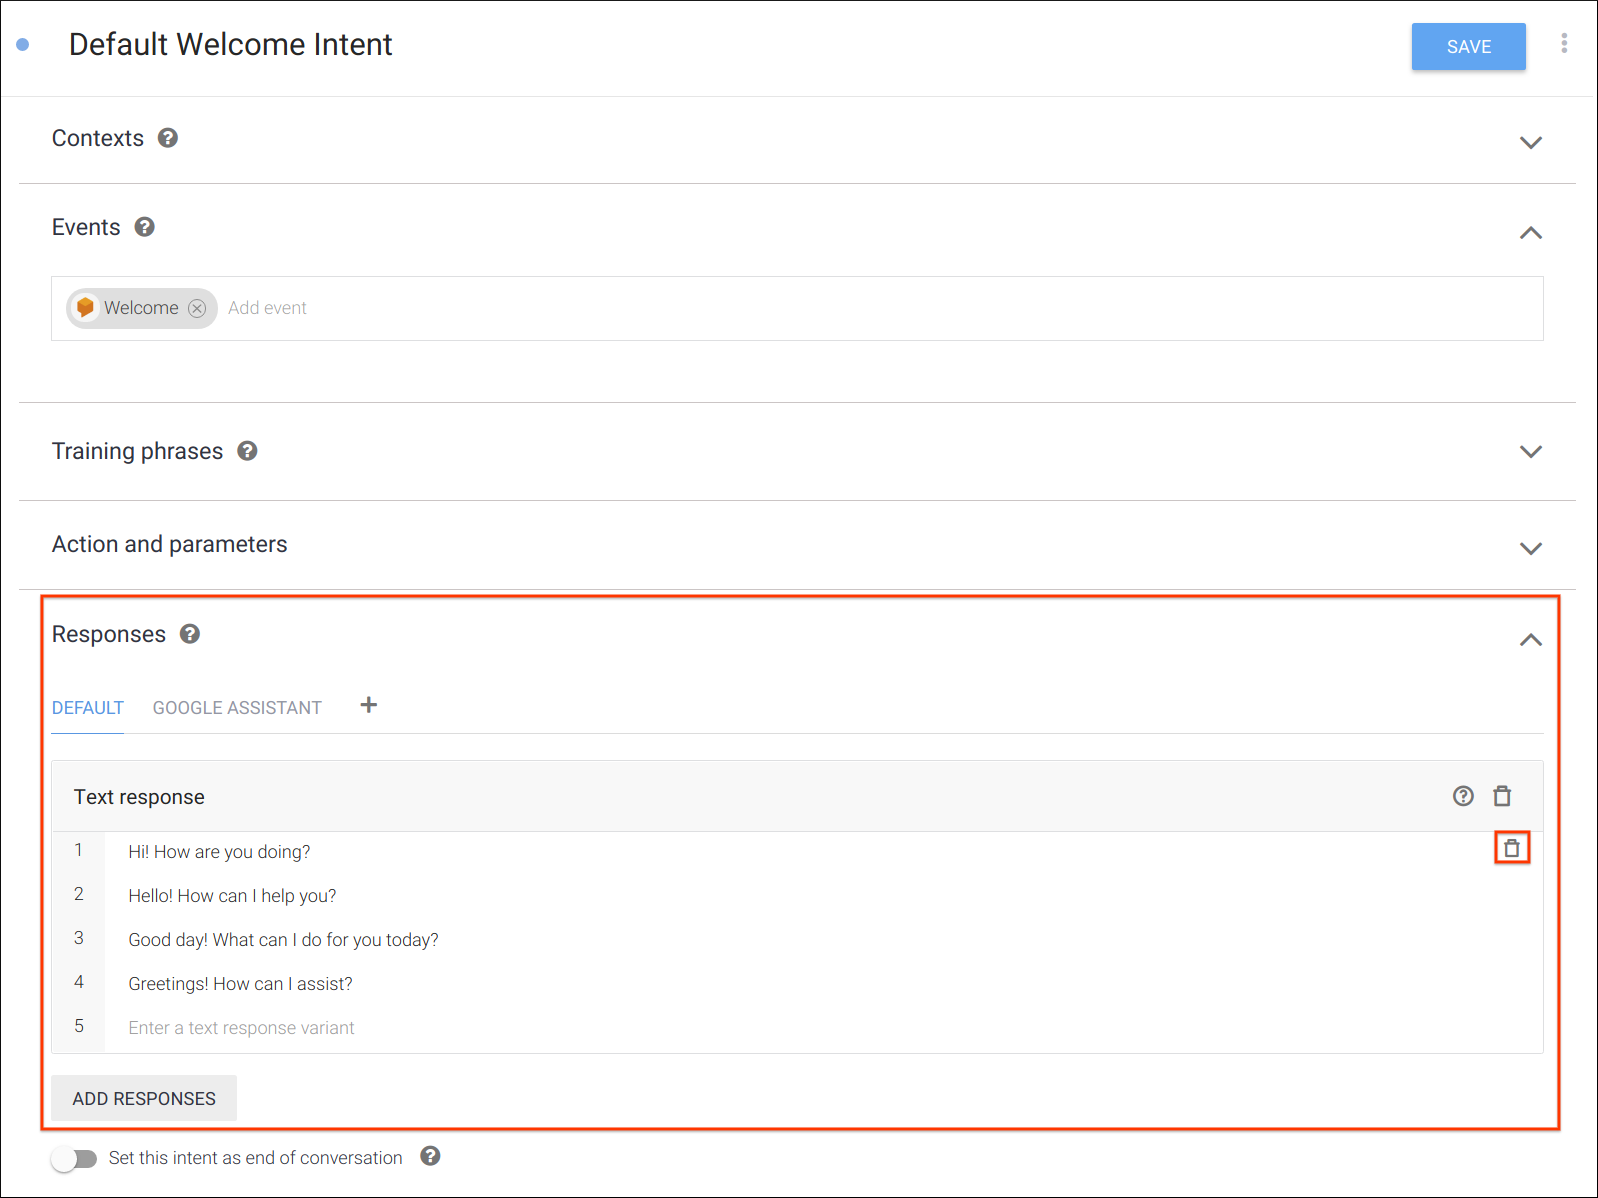
- Under the Responses section, click Enter a text response and type, "Welcome! What is your favorite color?"
- Click Save. You should see an Intent saved notification briefly pop up.
Test the welcome intent
The Actions Console provides a web interface for testing called the simulator. The interface lets you simulate hardware devices and their settings. You can also access debug information, such as the request and response that your fulfillment receives and sends.
Test your Action in the Actions Console simulator.
- In the Dialogflow Console left navigation bar, click on Integrations. Then, click on Google Assistant > Integration Settings.
- Click Test to update your Actions project and load it into the Actions Console simulator. (If you see a Check auto-preview setting dialog, you can leave the Auto-preview changes option enabled, then click Continue.)
")
- To test your Action in the simulator, type "Talk to my test app" in the Input field and hit enter.
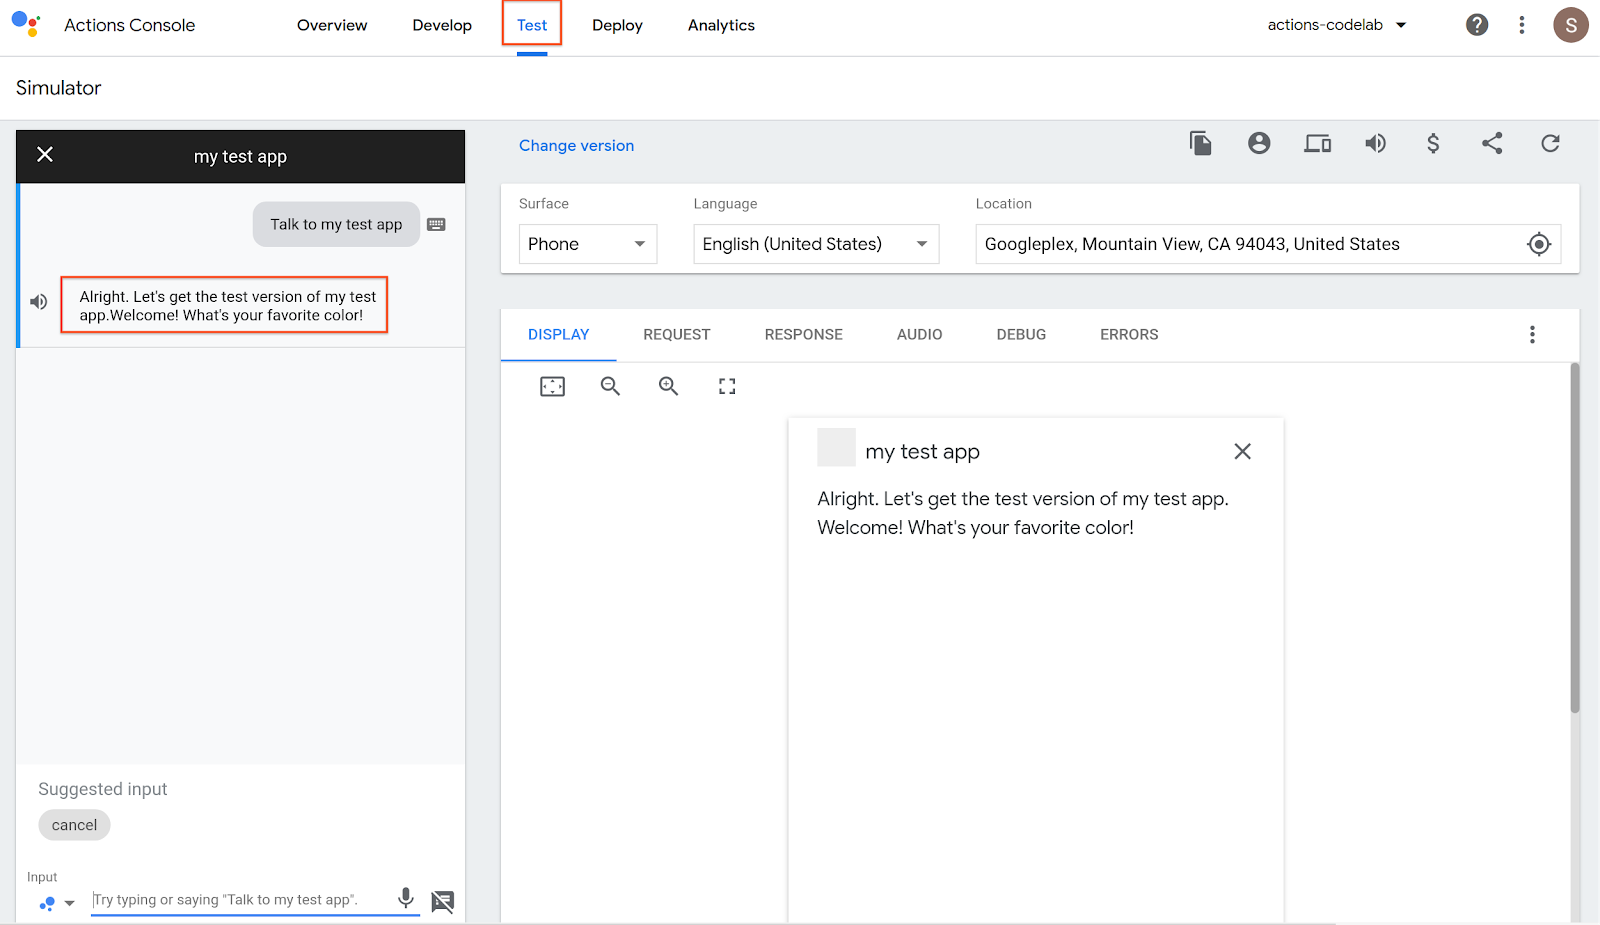
When your Action's welcome intent is invoked, Assistant responds with the greeting message and prompts the user to provide their favorite color.
Debug your Action
The panel on the right shows debugging information that's useful when testing your Action.
- In the Request and Response tabs, you can see the request and response bodies in JSON between Assistant and Dialogflow.
- In the Audio tab, you see your Action's speech response. You can change the response and update it to hear how it sounds when synthesized into speech.
- The Debug and Errors tabs provide additional information to help you troubleshoot issues with your Action's response.
Now that users have a way to start a conversation, keep the ball rolling.
Now you need to learn the basics of setting up slot-filling, an important capability in Dialogflow that allows you to collect a set of values from the user through natural, back-and-forth conversation. The capability is useful if your Action needs a specific set of parameter values to fulfill the user's intent.
To see slot-filling in action (no pun intended!), you'll create a new intent to see the color response. When the user speaks or types their response, Dialogflow parses the user's input to extract the information that your fulfillment needs—namely, the color—and sends it to your fulfillment. Your fulfillment then autogenerates a lucky number to send to the user.
To implement the response, you need to add two components in the Dialogflow Console—a Dialogflow intent and a Dialogflow webhook.
You define Dialogflow intents in your agent to control how you want Dialogflow to process user requests.
In the welcome intent, you asked the user for a favorite color. Now you need to make an intent to capture the information. To do that, you need to use two specific sections of an intent— training phrases and parameters—to parse the information that you need from users.
Create a Dialogflow intent
To create the Dialogflow intent, do the following:
- In the Dialogflow Console, close the Assistant integration settings page if you have it opened. In the left navigation bar, click on Intents, then click on Create intent.
- In the intent name field at the top, type in "favorite color" as the name of your new intent. Click Save.
- Under Training phrases, add the following user expressions by typing in the following phrases, then click Enter on your keyboard:
- "purple is my favorite"
- "black is my favorite color"
- "i love yellow"
- "Pink"
- "my favorite color is green"
- Under Action and parameters, create the prompt text to ask the user for their favorite color. You should see a line with color in the Parameter Name field. The parameter entry is automatically created by Dialogflow because it is able to auto-annotate words and phrases that it recognizes as entities in the training phrases. On that line, do the following:
- Check the Required box.
- Click Define prompts.
- Enter "What's your favorite color?" as a prompt.
- Click Close.

- Under the Fulfillment section in the page (not the left navigation bar), click Enable Fulfillment. (You may need to expand the section by clicking on the downward-pointing arrow.)
- Turn on Enable webhook call for this intent.
- Click Save.
After you completed those steps, Dialogflow will automatically extract parameters that it recognizes from user speech that triggers the intent (in this case, the color parameter). Once it obtains that information, Dialogflow makes it available to your fulfillment.
In this section, you implement a Dialogflow webhook that contains the logic to construct a conversational response. You also try your Action in real time by using the Actions Console simulator.
The Dialogflow webhook contains the logic for dynamically constructing response messages to send to the user.
Build your webhook
Use the Dialogflow Console's inline code editor to build and deploy the webhook. To build a webhook for your Action, do the following:
- In the left navigation bar, click Fulfillment.
- Toggle Inline Editor to Enabled.
")
- Replace the contents of index.js with the following code:
index.js
'use strict';

// Import the Dialogflow module from the Actions on Google client library.
const {dialogflow} = require('actions-on-google');

// Import the firebase-functions package for deployment.
const functions = require('firebase-functions');

// Instantiate the Dialogflow client.
const app = dialogflow({debug: true});

// Handle the Dialogflow intent named 'favorite color'.
// The intent collects a parameter named 'color'.
app.intent('favorite color', (conv, {color}) => {
    const luckyNumber = color.length;
    // Respond with the user's lucky number and end the conversation.
    conv.close('Your lucky number is ' + luckyNumber);
});

// Set the DialogflowApp object to handle the HTTPS POST request.
exports.dialogflowFirebaseFulfillment = functions.https.onRequest(app);- Click Deploy. (You need to wait a couple minutes for Dialogflow to provision and deploy your webhook code. When the code is successfully deployed, you see an updated Last deployed timestamp next to the Deploy button.
Understand the code
The code for the webhook is implemented in JavaScript. When you use Dialogflow's inline code editor, it deploys your webhook code on a managed environment in the cloud using Cloud Functions for Firebase.
The webhook code uses the Actions on Google Node.js client library to respond to HTTP requests that Assistant sends to your webhook. The library allows you to create a DialogflowApp object, which acts as a wrapper for the Dialogflow API.
In this case, an app variable of the DialogflowApp object type is created. The app.intent() function is used to declare a callback to handle the favorite-color intent.
The callback receives the following two important arguments:
- A
DialogflowConversationobject. It's a client library abstraction of the state of the dialog and includes properties that represent values of the incoming request to your webhook, such as the current active Dialogflow contexts and the surface capabilities of the user device. - A Dialogflow
Parametersobject. It's a JavaScript Object representation of the parameter values collected in the related intent. (Remember in the previous section when you defined the parameter name "color" to tell Dialogflow to extract a value corresponding to thesys.colorentity? The same parameter name is used by the client library to represent its value.)
The callback generates the user's lucky number by determining the length of the word for their color (For example, the six-character word "orange" would return a favorite color of six). It then uses the close method of the Conversation object parameter to respond to the user and end the conversation. The response is a simple string (such as, "Your lucky number is 6.")

The figure shows how the variable color on line 21 of the webhook implementation uses the parameter name that you defined earlier in the Dialogflow Console. For example, if the user said "My favorite color is green," then your variable color on line 21 would have the value "green."
Test your Action
Test your Action.
- Open the Actions Console and select your Actions project.
- Click the Test tab at the top. Click on the X button at the top of the output window, which exits you from any conversation that you might have started earlier in the simulator.
- Type "Talk to my test app" in the Input field and hit Enter on your keyboard.
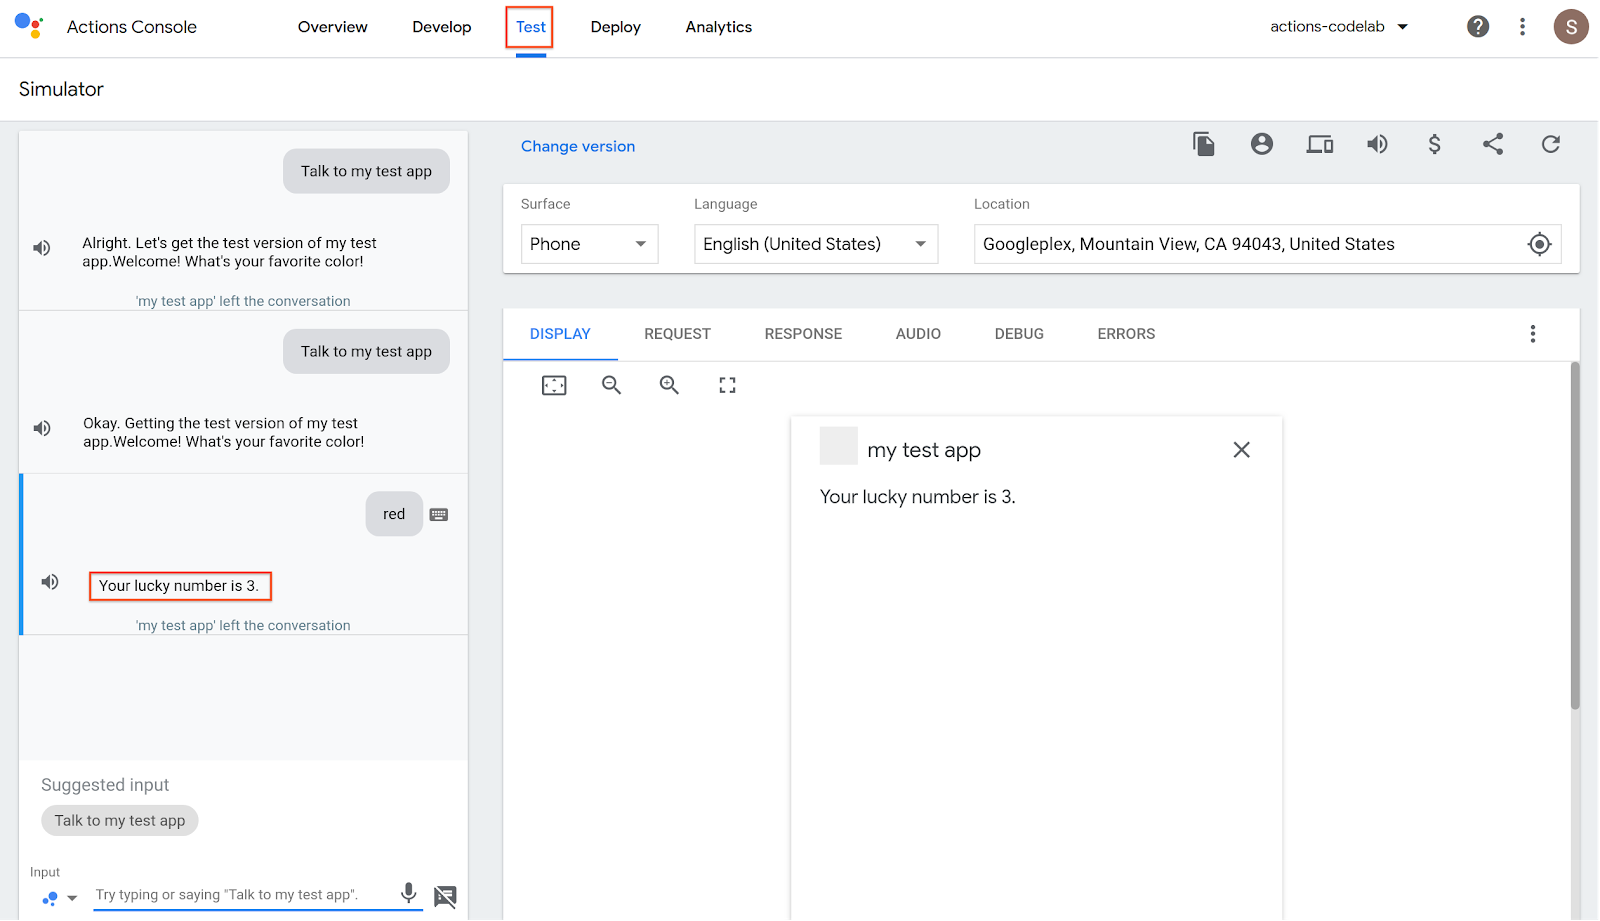
The simulator then performs an explicit invocation by calling your welcome intent. Once you're mid-conversation, you can trigger the ‘favorite color' custom intent by providing a color. For example, try testing with the following phrases:
- "Red."
- "I love green."
- "My favorite is pink."
Congratulations!
You know the basics of building conversational user interfaces with Actions on Google.
What you covered
- How to set up an Actions project with the Actions Console.
- How to create a welcome intent so that users can start a conversation with your Action.
- How to create conversational responses with Dialogflow intents and a custom webhook.
- How to test your Action in real time with the Actions Console simulator.
What's next
Explore the following resources to learn more about Actions on Google:
- The official documentation site for Actions on Google.
- Actions on Google GitHub repo for sample code and libraries.
- The official documentation site for Dialogflow.
- The official Reddit community for developers working with Assistant.
Follow @ActionsOnGoogle on Twitter for the latest announcements and tweet with #AoGDevs to share what you build!
Feedback survey
Before you go, please fill out a brief survey about your experience.