Page Summary
-
The Cast Debug Logger API and Command and Control (CaC) Tool help developers debug Web Receiver apps by capturing logs.
-
To use the Cast Debug Logger API, your Cast device must be registered on the Google Cast SDK Developer Console and use firmware version 1.44 or above.
-
Initialize the Cast Debug Logger by including a script and creating a
CastDebugLoggerobject, but ensuresetEnabledis set tofalsefor production. -
The API allows logging player events and custom messages with customizable tags and logger levels.
-
A debug overlay on the Web Receiver displays custom log messages, which can be toggled and cleared using provided methods.
The Web Receiver SDK provides the CastDebugLogger API for developers to easily debug their Web Receiver app and a companion Command and Control (CaC) Tool to capture logs.
Initialization
To use the CastDebugLogger API, include the following script in your Web Receiver app right after the Web Receiver SDK script:
<!-- Web Receiver SDK -->
<script src="//www.gstatic.com/cast/sdk/libs/caf_receiver/v3/cast_receiver_framework.js"></script>
<!-- Cast Debug Logger -->
<script src="//www.gstatic.com/cast/sdk/libs/devtools/debug_layer/caf_receiver_logger.js"></script>
Create the CastDebugLogger object and enable the logger:
const castDebugLogger = cast.debug.CastDebugLogger.getInstance();

const context = cast.framework.CastReceiverContext.getInstance();

context.addEventListener(cast.framework.system.EventType.READY, () => {
  if (!castDebugLogger.debugOverlayElement_) {
      // Enable debug logger and show a 'DEBUG MODE' overlay at top left corner.
      castDebugLogger.setEnabled(true);
  }
});
When the debug logger is enabled, an overlay displaying DEBUG MODE will show on the receiver.

Log Player Events
Using CastDebugLogger you can easily log player events that are fired by
the Web Receiver SDK and use different logger levels to log the event data.
The loggerLevelByEvents config takes cast.framework.events.EventType
and cast.framework.events.category
to specify the events to be logged.
For example, if you want to know when the player CORE events are triggered
or a mediaStatus change is broadcasted, use the following config to log the
events:
castDebugLogger.loggerLevelByEvents = {
  'cast.framework.events.category.CORE': cast.framework.LoggerLevel.INFO,
  'cast.framework.events.EventType.MEDIA_STATUS': cast.framework.LoggerLevel.DEBUG
}
Log Custom Messages with Custom Tags
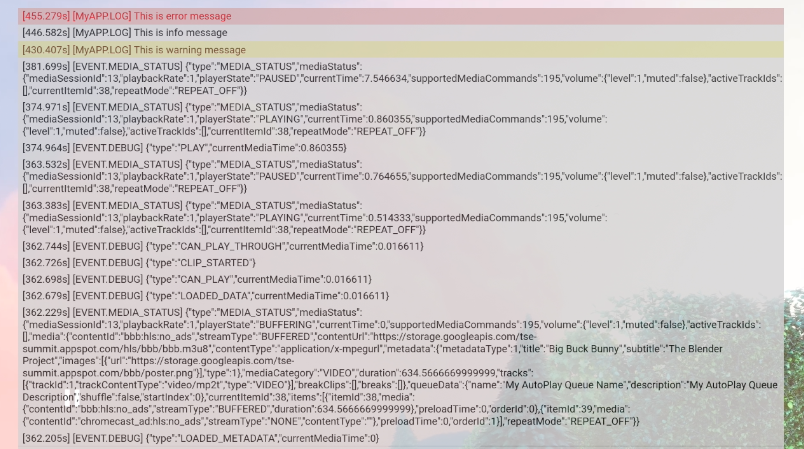
The CastDebugLogger API allows you to create log messages that appear on the Web Receiver debug overlay with different colors. Use the following log methods, listed in order from highest to lowest priority:
castDebugLogger.error(custom_tag, message);castDebugLogger.warn(custom_tag, message);castDebugLogger.info(custom_tag, message);castDebugLogger.debug(custom_tag, message);
For each log method, the first parameter should be a custom tag and the second parameter is the log message. The tag can be any string that you find helpful.
Here is an example of how to use the debug logger in the LOAD interceptor.
const LOG_TAG = 'MyReceiverApp';

playerManager.setMessageInterceptor(
    cast.framework.messages.MessageType.LOAD,
    request => {
        castDebugLogger.debug(LOG_TAG, 'Intercepting LOAD request');

        return new Promise((resolve, reject) => {
            fetchMediaAsset(request.media.contentId).then(
                data => {
                    let item = data[request.media.contentId];
                    if (!item) {
                        castDebugLogger.error(LOG_TAG, 'Content not found');

                        reject();
                    } else {
                        request.media.contentUrl = item.stream.hls;
                        castDebugLogger.info(LOG_TAG,
                            'Playable URL:', request.media.contentUrl);

                        resolve(request);
                    }
                }
            );
        });
    }
);
You can control which messages appear on the debug overlay by setting the log
level in loggerLevelByTags for each custom tag. For example, enabling a
custom tag with log level cast.framework.LoggerLevel.DEBUG would display
all messages added with error, warn, info, and debug log messages. Another
example is that enabling a custom tag with WARNING level would only display
error and warn log messages.
The loggerLevelByTags config is optional. If a custom tag is not configured
for its logger level, all log messages will display on the debug overlay.
const LOG_TAG1 = 'Tag1';
const LOG_TAG2 = 'Tag2';

// Set verbosity level for custom tags
castDebugLogger.loggerLevelByTags = {
    [LOG_TAG1]: cast.framework.LoggerLevel.WARNING,
    [LOG_TAG2]: cast.framework.LoggerLevel.DEBUG,
};
castDebugLogger.debug(LOG_TAG1, 'debug log from tag1');
castDebugLogger.info(LOG_TAG1, 'info log from tag1');
castDebugLogger.warn(LOG_TAG1, 'warn log from tag1');
castDebugLogger.error(LOG_TAG1, 'error log from tag1');

castDebugLogger.debug(LOG_TAG2, 'debug log from tag2');
castDebugLogger.info(LOG_TAG2, 'info log from tag2');
castDebugLogger.warn(LOG_TAG2, 'warn log from tag2');
castDebugLogger.error(LOG_TAG2, 'error log from tag2');

// example outputs:
// [Tag1] [WARN] warn log from tag1
// [Tag1] [ERROR] error log from tag1
// [Tag2] [DEBUG] debug log from tag2
// [Tag2] [INFO] info log from tag2
// [Tag2] [WARN] warn log from tag2
// [Tag2] [ERROR] error log from tag2
Debug Overlay
The Cast Debug Logger provides a debug overlay on the Web Receiver to show
your custom log messages. Use showDebugLogs to toggle the debug overlay
and clearDebugLogs to clear log messages on the overlay.
Reminder: use showDebugLogs and clearDebugLogs after castDebugLogger is
enabled.
const context = cast.framework.CastReceiverContext.getInstance();

context.addEventListener(cast.framework.system.EventType.READY, () => {
  if (!castDebugLogger.debugOverlayElement_) {
      // Enable debug logger and show a 'DEBUG MODE' overlay at top left corner.
      castDebugLogger.setEnabled(true);
      // Show debug overlay
      castDebugLogger.showDebugLogs(true);
      // Clear log messages on debug overlay
      castDebugLogger.clearDebugLogs();
  }
});