In this codelab, you’ll learn how to use Dialogflow to create a conversational interface to power an RBM agent.
What are you going to build in this codelab?
- A Dialogflow agent that powers an RBM agent’s conversation
- A conversational interface for a fictional bike shop that lets users know information about the bike shop and set appointments to fix or service their bike
What you’ll learn
- How to use Dialogflow's three main constructs (intents, entities, and contexts) to create a conversational interface
- How to connect your conversational interface to your own services and APIs using Dialogflow's fulfillment and inline editor (powered by Cloud Functions for Firebase)
- How to create RBM response types from Dialogflow in order to create a rich RBM experience for users
What you’ll need
- A Google account
Create and query your first agent
Duration: 10:00
Create your first Dialogflow agent
To create a Dialogflow agent:
- Open a new tab and sign in to Dialogflow.
Click Create agent in the left navigation.

Enter "CodelabRBMBikeShop" for your agent's name, "English" as the default language, and set the default timezone to your timezone. Then click Create.

The Dialogflow console
You should now see the Dialogflow console. If you're working on a smaller screen and the left navigation is hidden, click the navigation button in the upper-left corner. The settings button takes you to the current agent's settings.

The middle of the page shows a list of intents for the agent. By default, Dialogflow agents start with two intents. Your agent matches Default Fallback Intent when it doesn't understand what your users say. The Default Welcome Intent greets your users. You can alter these intents to customize the experience.

On the right is the Dialogflow simulator. This lets you try out your agent by speaking or typing messages.

Querying your agent
Dialogflow agents are best described as NLU (Natural Language Understanding) modules. These can be included in your app, product, or service to transform natural user requests into actionable data.
Time to try out your agent! In the simulator on the right, click into the text field that says Try it now, type "Hi", and press Enter.

Dialogflow identifies the query, matches the Default Welcome Intent, and responds with a generic greeting. This works because Dialogflow automatically trains the Default Welcome Intent with some sample greetings.
Create an RBM agent
Sign into the Business Communications Developer Console, then click Create agent.

In the Name field, enter "Your Name’s Bike Shop" (like "Sean’s Bike Agent"), select a Region, and click Create agent.

Connect your RBM agent to Dialogflow
After your RBM agent is created, click the agent to see the agent’s Overview page. Click the Integrations link in the left navigation.
By default, RBM agent’s use Google Cloud Pub/Sub to handle user messages. To connect your RBM agent to the Dialogflow agent you created earlier, click the Dialogflow integration.
In the dialog, click Connect existing model. Follow the instructions to give your RBM agent permissions to call your Dialogflow agent, then click Next.
Finally, you need to provide the Dialogflow project ID. In a different browser tab than the Business Communications Developer Console, go to Dialogflow and open the CodelabRBMBikeShop agent you created earlier. Click the gear icon near the project name in the left navigation.

Clicking this takes you to the model’s settings. Under GOOGLE PROJECT, find and copy the Project ID.

Go back to your tab with the Business Communications Developer Console open, paste the project ID into the dialog, then click Start integration.

This process takes about two minutes to complete. Once complete, you should see the Dialogflow integration option highlighted and a View agent link available.

All messages to and from your agent are now being handled by the CodelabRBMBikeShop Dialogflow agent.
Invite your test device and send a message
Before diving into Dialogflow, let’s get your test device set up. If you don't already have a device capable of receiving RBM messages, follow this guide to get your device ready.
From the Business Communications Developer Console, click Devices in the left navigation. In the form, enter in your device’s full phone number in E.164 format (for example, +12223334444) and click Add.
On your device, you receive the test invite. Tap Make me a tester.

In your browser, find your device in the Devices list and send your device a test message. If you received a message on your device from your RBM agent, you're all set to continue with this codelab.
Creating your welcome intent
Typically with a Dialogflow-powered RBM agent, to start a conversation, you make an API call that specifies the user's phone number and the Dialogflow intent that begins the conversation (usually your agent's welcome intent). For this codelab, we'll skip this step and instead use the conversational thread we already created in the prior step with the test device from the Business Communications Developer Console. However, if you want to read more about this API feature, check out this guide.
Let’s begin by adding RBM responses to the Default Welcome Intent so Dialogflow can use it with your RBM agent. First, navigate to the browser tab that has Dialogflow open. Click Default Welcome Intent, scroll down to the Responses section, click + in the list of response types, and select RCS Business Messaging (RBM).

Click Add Responses, then select Simple Response. In the text field for the Simple Response enter enter "Hi, welcome to Hogarth's bike shop. How can I help?" (replace Hogarth with your name), then click Save.
Initiating a conversation
Now that you have a welcome intent configured, go back to your test device and send the message "Hi". This message triggers the Default Welcome Intent, and you should see something similar to the image below.

Update your welcome intent
Now that you have Dialogflow sending a simple message, let’s update the message to be a little more helpful. We want to not only greet the user, but also guide the actions they take.
The agent we're creating needs to support two main features: checking the hours of the business, and scheduling an appointment. Let’s replace our simple response welcome message with a card that provides suggested replies to carry out these interactions.
In Default Welcome Intent's, Responses section, select the RCS Business Messaging (RBM) tab. Remove the existing Simple Response by clicking the trash can icon. Next, click Add Responses and select Standalone Rich Card.
In the Standalone Rich Card form, enter the following:
- Card Title: Hi, welcome to Hogarth's bike shop.
- Card Description: How can I help you? Select from the options below:
- Select Card Orientation: Vertical
- Image/Video URL: https://storage.googleapis.com/df-rbm-codelab/bike-shop.jpg
- Select Media Height: Medium
Click Add Suggestion and enter the following:
- Suggestion text: What are your hours?
- Suggestion Postback: reply_hours
Add another suggestion by clicking Add Suggestion and entering the following:
- Suggestion text: Make an appointment
- Suggestion Postback: reply_appointment
Click Save.
Try it out!
Once the model says "Agent training complete", go back to your device and send the message "Hi" to your agent. You should now see the Standalone Rich Card you just designed.

Try tapping What are your hours?. Notice that the Default Fallback Intent gets triggered. This is because your Dialogflow agent doesn't know how to handle the postback data that you configured for this suggestion, "reply_hours".
Let’s fix this.
Creating your Hours intent
Dialogflow uses intents to categorize a user's intentions. Intents have Training Phrases, which are examples of what a user might say to your agent. For example, someone wanting to know the hours our bike shop is open might ask, "When do you open?", "What are your hours?", or "How late can I come in?".
All of these queries are unique but have the same intention: to get information on when our bike shop is open.
To cover this query, create an "Hours" intent:
- In the left navigation, click on the + next to Intents.
- For Intent name, enter "Hours".
Under Training Phrases, click Add user expression and enter the following, pressing enter after each entry:
When do you open?What are your hours?How late can I come in?reply_hours.
This last training phrase is used to map the postback data that you configured in the prior section with this intent.
Under Responses, click + and select RCS Business Messaging (RBM).
Click Add Responses and select Simple Response.
In the text field for the Simple Response, enter "We're open every weekday from 9am to 5:30pm."
Click Save.

Try it out!
Now try asking your agent for its hours. On your device, in the conversation for your RBM agent, enter "When are you open?" and send the message to your agent.

Your agent now responds to the query correctly. Notice that even though your query was a little different from the training phrase ("When are you open?" versus "When do you open?"), Dialogflow still matched the query to the right intent. You can also try tapping What are your hours? in the rich card.
Dialogflow uses training phrases as examples for a machine learning model to match users' queries to the correct intent. The machine learning model checks the query against every intent in the agent, gives every intent a score, and the highest-scoring intent is matched. If the highest scoring intent has a very low score, the fallback intent is matched.
Adding fulfillment
While it works, the agent we’ve created behaves a little unnatural. When the user asks something like "Are you open?", the agent will respond with "We’re open every weekday from 9am to 5:30pm". It would be much more natural—and helpful—if the agent told us directly whether the shop is open.
To do this, our agent needs to check whether the shop is currently open and generate a different response in either case. In Dialogflow, this type of complex logic should be implemented in the fulfillment webhook.
A fulfillment webhook is an HTTP server that is called by Dialogflow with information about the current conversation state. The fulfillment code takes any required actions, then generates a response that Dialogflow returns to the user.
We’ll now go through the process of deploying a fulfillment webhook that makes our agent respond more helpfully.
Setup: Deploying and enabling fulfillment
Dialogflow has a built-in Cloud Functions for Firebase editor that allows you to write and deploy JavaScript code that will handle your fulfillment.
In Dialogflow’s left navigation, click Fulfillment to open the fulfillment page. Click the toggle next to Inline Editor to enable the Cloud Functions for Firebase editor.

You’ll notice the editor contains two files: "index.js", which contains the main code for the fulfillment, and "package.json", which details required dependencies.
Now we’re going to import some sample code that will power your fulfillment.
Copy and paste the text of this file into "index.js", replacing all of its current content:
https://storage.googleapis.com/df-rbm-codelab/index.js
Now, scroll to the bottom of the page and click DEPLOY. After a minute or so, your code will be deployed to Cloud Functions for Firebase.
Once the function is deployed, you see the date and time of deployment at the bottom of the page:

Take a look at the fulfillment code. The hoursHandler
function calls currentlyOpen to determine if the
shop is currently open, and adds a different RBM response depending on the
condition.
function hoursHandler(agent) {
    let responseText = 'We\'re currently closed, but we open every weekday at 9am!';
    if (currentlyOpen()) {
      responseText = 'We\'re open now!! We close at 5pm today.';
    }

    let payload = {
    "fulfillmentMessages": [
        {
          "platform": "GOOGLE_RBM",
          "rbmText": {
              "text": responseText
          }
        }
      ]
    };

    return response.status(200).json(payload);
}
The line intentMap.set('Hours', hoursHandler); tells the fulfillment library
that the hoursHandler function should run when the "Hours" intent is matched.
However, we also need to tell Dialogflow to enable fulfillment for our "Hours"
intent.
In the left navigation, click Intents and open the "Hours" intent. Open the Fulfillment section at the bottom and select Enable webhook call for this intent, so that it is toggled on.
Once you save the intent, you can give it a try. In the simulator on the right, enter "Are you open?". If you click Diagnostic Info and inspect the API response, you should see the fulfillment response. Note that the timezone used by the Cloud Functions for Firebase server will be UTC, so the response might not be correct for your current local time.
If there’s an error in your fulfillment, Dialogflow uses whatever response is defined in the Responses section of the Intent page, allowing your agent to recover gracefully.
Next up, we'll use entities to extract the relevant parts of user's query. This enables our users to set up an appointment with our bike shop to fix or service their bike.
Extract data with entities
Duration: 12:00
In this section, we'll go over how to extract data from a user's query to let user's make an appointment with our bike shop to service or fix their bike.
Add parameters to your intents
Parameters are relevant words or phrases in a user's query that Dialogflow extracts so your agent can provide a proper response. You'll create a new intent with parameters and learn how to include their values in your responses.
- Click + next to Intents in the left navigation to create a new intent.
- For the intent name, enter "Make Appointment" at the top of the page.
- Add the following as Training Phrases:
reply_appointmentI'd like to schedule an appointment for next ThursdayI'd like to get my bike fixed,I have a mountain bike that needs servicingMy bike is brokenCan I schedule service for 4pm tomorrow?Can you fix my road bike?Can I set up an appointment for noon on Friday?
Dialogflow automatically detects known parameters in your Training Phrases and creates them for you.

Below Training Phrases, Dialogflow automatically fills out the parameter table with the information it gathers:
- the parameter is optional (not required)
- named date and time
- corresponds to the system entity type @sys.date and @sys.time**
- has the value of $date and $time
- is not a list

Using parameter data
You can use the value of a parameter in your responses. In this case, you can
use $date and $time in your responses and they are replaced with the date
and time specified in the query to your agent.
In Responses, add the RCS Business Messaging tab, add the following to a Simple Response, and click Save:
Great! I've set up your appointment for $date at $time. See you then!

Try it out!
Now, query your agent with "Can I get an appointment for 2pm tomorrow?" in the simulator in the right panel.
You can see in the bottom of the simulator output that Dialogflow correctly extracted the parameters "tomorrow" and "2pm" from the query and correctly parsed them as the date and time. Now try the same thing from your test device and see how the response correctly includes the parsed date and time.

Making parameters required
In the case of our bike shop, we need to know the values of both the date and time before we can schedule an appointment. By default, all Dialogflow parameters are optional. To make them required, we need to check the box next to each parameter we wish to make required. Check the box next to each parameter in the "Make Appointment" intent:

Now that each parameter is required, we need to create a prompt for each parameter. Prompts ask the user to provide a value for any parameter not provided when the user initially indicated their intention (in this case, to make an appointment). Click Define prompts to create a prompt for a parameter and enter the following prompts for each parameter:
| Parameter | Prompt |
| date | What day do you want to come in? |
| time | What time works for you? |
After entering the prompts, click Save.
Try it out!
On your device, tap the Make an appointment suggestion or type "I want to get my bike fixed." You get the response "What day do you want to come in?". Indicate a date ("tomorrow") and you get a response asking for a time on the date. Respond to that and you'll see that your appointment has been set.
Queries containing some information in the initial request (i.e. "I want to setup an appointment for tomorrow") fill in the correct parameter (the date), skip the date prompt ("What day do you want to come in?"), and move to the time prompt ("What time works for you?").
We've just used Dialogflow entities and parameters to create a completely unique conversation with no code and very little setup! Next we'll cover how to use fulfillment to help guide the user’s answers to prompts like "What date would you like to schedule an appointment?".
Setup: Enabling fulfillment
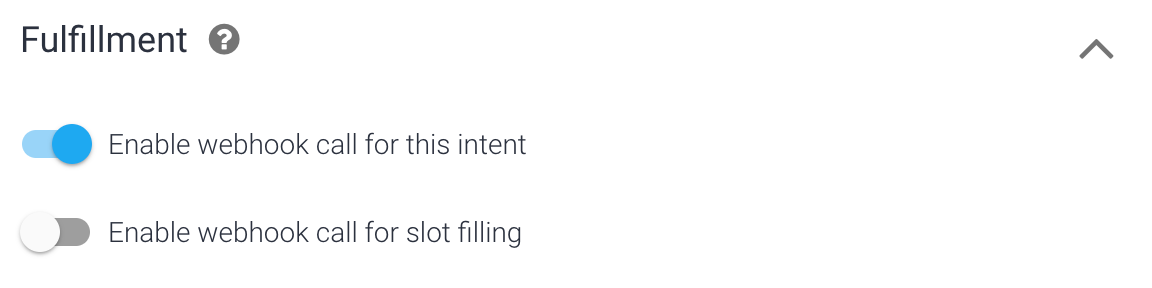
In the left navigation, click Intents and open the "Make Appointment" intent. Open Fulfillment, select Enable webhook call for this intent and Enable webhook call for slot filling so that they are both toggled on, and click Save.
With both of these enabled, when this intent is triggered, Dialogflow uses fulfillment to produce responses for the required parameters, if needed, as well as the RBM response for the intent.

Implement fulfillment
In Dialogflow’s left navigation, click Fulfillment to open the fulfillment page. Scroll down to the line
intentMap.set('Hours', hoursHandler);
And add the following as the next line:
intentMap.set('Make Appointment', makeAppointment);
This tells the fulfillment library that the makeAppointment
function should run when the "Make Appointment" intent is matched.
Next, copy the code below and paste it below the currentlyOpen
function. The two functions, getSuggestedTimes and
getSuggestedDates, create helpful chip lists to facilitate user
responses.
function getSuggestedTimes() {
  return [
        {
          "reply": {
            "text": "9 am",
            "postbackData": "9:00am"
            }
        },
        {
          "reply": {
            "text": "10 am",
            "postbackData": "10:00am"
          }
        },
        {
          "reply": {
            "text": "1 pm",
            "postbackData": "1:00pm"
          }
        },
        {
          "reply": {
            "text": "2 pm",
            "postbackData": "2:00pm"
          }
        }
      ];
}

function getSuggestedDates() {
  return [
        {
          "reply": {
            "text": "Tomorrow",
            "postbackData": "Tomorrow"
          }
        },
        {
          "reply": {
            "text": "A week from now",
            "postbackData": "A week from now"
          }
        },
        {
          "reply": {
            "text": "Two weeks from now",
            "postbackData": "Two weeks from now"
          }
        }
      ];
}
Next, below hoursHandler, copy and paste the code below, then click
Deploy.
function makeAppointment(agent) {
    // extract required parameters
    const appointmentDate = agent.parameters.date;
    const appointmentTime = agent.parameters.time;

    const gotAppointmentDate = appointmentDate.length > 0;
    const gotAppointmentTime = appointmentTime.length > 0;

    let responseText = '';
    let suggestions = [];

    if(gotAppointmentDate && gotAppointmentTime) {
      // We have all required parameters, return success message
      responseText = 'Great! I\'ve set up your appointment for ' +
          appointmentDate + ' at ' + appointmentTime + '.  See you then!';
    }
    else if(gotAppointmentDate) {
      responseText = 'What time works for you?';
      suggestions = getSuggestedTimes();
    }
    else if(gotAppointmentTime) {
      responseText = 'What day do you want to come in?';
      suggestions = getSuggestedDates();
    }
    else {
      responseText = 'What day do you want to come in?';
      suggestions = getSuggestedDates();
    }

    let payload = {
      "fulfillmentMessages": [
      {
        "platform": "GOOGLE_RBM",
        "rbmText": {
          "text": responseText,
          "rbmSuggestion": suggestions
        }
      }
    ]
    };

    return response.status(200).json(payload);
  }
Take a few minutes to inspect the code. Notice that the required parameters are being checked for values and if not set, prompting the user with an appropriate message and set of suggestions.
Try it out!
On your device, tap the Make an appointment suggestion or type "I want to get my bike fixed." You get the response "What day do you want to come in?" along with some helpful suggestions: "Tomorrow", "A week from now", and "Two weeks from now". Indicate a date ("tomorrow") and you'll get back a response asking for a time. Respond to that and you'll see that your appointment has been set.
Manage state with contexts
Duration: 7:00
Add contexts to conversational state
Once our user has successfully set up an appointment, we might want to collect some further information from them. Imagine our bike shop offers two types of appointment: repair, or tune-up. We want to know which of these the user needs.
To get started, let’s update the response for the "Make Appointment" intent to
ask the user what appointment type they need. Replace the success response in
your makeAppointment fulfilment function with the text below, then click
Deploy.
responseText = 'Great! I\'ve set up your appointment for ' +
    appointmentDate + ' at ' + appointmentTime + '.  Do you need a repair for just a tune-up?';
To collect the answer to this question, we need to create another intent. However, it is important that this new intent is matched only after this question has already been answered. To enforce this, we can define it as a follow-up intent.
Follow-up intents are intents that can only be matched after their "parent" intent, (in this case our "Make Appointment" intent) has been matched. Click on Intents in the left navigation (if the menu is hidden, click on the menu ☰ button in the upper left corner). Then hover your mouse over the "Make Appointment" intent and click Add follow-up intent , which appears to the right of the intent name:

Next, click custom from the dropdown menu.

Dialogflow automatically named the follow-up intent "Make Appointment - custom," and the arrow indicates the relationship between the intents.
Follow-up intents can only be matched after the parent intent has been matched. Since this intent will only be matched after the "Make Appointment" intent, we can assume that the user has just been asked the question "Do you need a repair or just a tune-up?".
To capture the answer to this question, we will first need to define some entities.
Creating your first entity
Dialogflow allows you to define developer entities, which function similarly to
Dialogflow's system entities. Let's start by creating an entity type. Since we
want users to be able to choose what type of appointment they'd like to make
with our shop, let's call the entity type AppointmentType. We'll add two
entities in the AppointmentType entity type for the two different types of
appointments: service and fix.
To create an entity type:
- Click + next to Entities in the left navigation.
- For the name of the entity type, enter "AppointmentType".
- Click on the text field and add the following entries:
- service
- fix
- When you enter an entry, pressing tab moves your cursor into the synonym field. Add the following synonyms for each entry. Be sure to add each word individually rather than copying and pasting the whole string:
| Entry | Synonym |
| service |
|
| fix |
|
- Click Save.

Each entity type has to have the following:
- a name to define the category ("AppointmentType")
- one or more entries ("service", "fix")
- one or more synonyms ("maintenance", "tune up", etc)
Dialogflow handles simple things like plurality and capitalization, but make sure to add all possible synonyms. The more you add, the better your agent can determine your entities.
Adding your new entity
Now that we've defined our entity type for appointment, we can use it in the Training phrases of our "Make Appointment - custom" intent:
- Click Intents in the left navigation, then click on the arrow next to the "Make Appointment" intent to reveal its follow-up intents. Click the "Make Appointment - custom" intent.
Add the following as Training phrases:
- Can you service my bike?
- I need a repair.

You should see the appointment entity type automatically annotated in the Training phrases you entered. This adds the
AppointmentTypeparameter to the table, which is below the Training phrases section. Click the checkbox to mark this parameter as REQUIRED.
Click Define prompts and enter "We can service or repair your bike. Which one would you like?"
In Responses, change the response to "Okay, we’ll schedule a $AppointmentType.", then click Save.
Try it out!
On your device, tap the Make an appointment suggestion or type "I want to get my bike fixed." You get the response "What day do you want to come in?" along with some helpful suggestions: "Tomorrow", "A week from now", and "Two weeks from now". Indicate a date ("tomorrow") and you'll get back a response asking for a time on the date.
Select a time, and you see the new response you created asking if this is for service or a tune-up.
Next, enter "I need a repair". You should see the response "Okay, we’ll schedule a fix.", indicating that Dialogflow extracted the correct AppointmentType as an entity.
Right now, the response for this intent ("Okay, we’ll schedule a fix.") is pretty unhelpful. It would be great if the response confirmed the date and time that the appointment was scheduled. To do this, we need the date and time, but the date and time parameters are only present in the "Make Appointment" intent and not in the "Make Appointment - custom" intent.
Intents and contexts
To respond with a parameter gathered from the "Make Appointment" intent, you need to know how follow-up intents work. Follow-up intents use contexts to keep track of if a parent intent has been triggered. If you inspect the "Make Appointment" intent, you see "MakeAppointment-followup" listed as an Output context, prefaced by the number 2:

After the "Make Appointment" intent is matched, Dialogflow attaches the context "MakeAppointment-followup" to the conversation for two turns. Therefore, when the user responds to the question ("Do you need a repair or just a tune-up?"), the context "MakeAppointment-followup" is active. Any intents that have the same Input context are heavily favored when Dialogflow matches intents.
Click Intents in the left navigation, then click the "MakeAppointment - custom" intent.

You can see that the intent has the same input context ("MakeAppointment- followup") as the output context of "Make Appointment". Because of this, "MakeAppointment - custom" only matches after the "Make Appointment" intent is matched.
Contexts and parameters
Contexts store parameter values, which means you can access the values of parameters defined in the "Make Appointment" intent in other intents like "MakeAppointment - custom".
Add the following response to the "MakeAppointment - custom" intent and click Save: "Okay, we’ll schedule a $AppointmentType, #MakeAppointment- followup.date, at #MakeAppointment-followup.time. We’ll see you then."

Now you can query your agent again and get the proper response. First enter "Can I setup an appointment to service my bike at 11am tomorrow?", and then respond to the question with "I need a repair".
In the response confirming the appointment, you should see that the date and time parameter values have been retrieved from the context.
Improving the response format
Duration: 5:00
Use fulfillment to format the date and time
As you likely have noticed, the date and time shown in the success message isn't very user-friendly. To fix this, we need to use fulfillment again so that we can use JavaScript to format the date and time parameters in such a way that can be easily read by a user.
Navigate to your "Make Appointment - custom" intent by clicking Intents in the left navigation and then click on the "MakeAppointment - custom" intent. Scroll down to the bottom of the page and toggle on the Enable webhook call for this intent, then click Save.
Navigate to fulfillment by clicking the Fulfillment link in the left navigation.
Copy the code below and paste in beneath the makeAppointment function.
function makeAppointmentFollowUp(agent) {
    let context = agent.getContext('makeappointment-followup');

    // extract required parameters
    const appointmentDate = new Date(context.parameters.date);
    const appointmentTime = new Date(context.parameters.time);
    const appointmentType = agent.parameters.AppointmentType;

    // format date and time to be human-readable
    const dateAsString = appointmentDate.toLocaleDateString('en-US',
        { weekday: 'long', year: 'numeric', month: 'long', day: 'numeric' });
    const timeAsString = appointmentTime.toLocaleString('en-US',
        { hour: 'numeric', minute: 'numeric', hour12: true });

    // compose response for user
    let responseText = 'Okay, we'll schedule a ' + appointmentType + ', ' + dateAsString +
        ', at ' + timeAsString + '.  We'll see you then.';

    let payload = {
      "fulfillmentMessages": [
      {
        "platform": "GOOGLE_RBM",
        "rbmText": {
          "text": responseText
        }
      }
    ]
    };

    return response.status(200).json(payload);
  }
Below this function, find the line intentMap.set('Make appointment',
makeAppointment); and add intentMap.set('Make appointment - custom',
makeAppointmentFollowUp); so that when the follow-up intent is invoked, the
function you pasted earlier is called.
Take a look at the makeAppointmentFollowUp code and see how the parameters are
being extracted from both the incoming context and this intent. Prior to the
responseText being generated, the code is now formatting the date and time to
be human-readable.
Try it out!
On your device, tap the Make an appointment suggestion or type "I want to get my bike fixed." You get the response "What day do you want to come in?" along with some helpful suggestions: "Tomorrow", "A week from now", and "Two weeks from now". Indicate a date ("tomorrow") and you'll get back a response asking for a time on the date.
Select a time, and you see the new response you created asking if this is for service or a tune-up.
Next, enter "I need a repair". You should see the response confirming the appointment with the appointment type, date and time in a readable format.
You're done!
Duration: 1:00
Nice work!
You’ve now been through all of the stages of building an RBM agent powered by Dialogflow.
Have fun developing for this exciting new platform!