
OAuth リンクタイプは、インプリシット フローと認可コードフローの 2 通りの業界標準 OAuth 2.0 フローをサポートします。
インプリシット コードフローでは、Google がユーザーのブラウザで認可エンドポイントを開きます。ログインに成功すると、長期間有効なアクセス トークンが Google に返されます。このアクセス トークンは、アシスタントからアクションに送信されるすべてのリクエストに含まれるようになりました。
認可コードフローでは、次の 2 つのエンドポイントが必要になります。
- 認可エンドポイント。まだログインしていないユーザーにログイン用の UI を表示し、リクエストされたアクセスへの同意を短期の認可コードの形式で記録します。
- トークン交換エンドポイント。次の 2 種類の交換を行います。
- 長期の更新トークンと短期のアクセス トークンの認可コードを交換します。この処理は、ユーザーがアカウントのリンクフローを行ったときに発生します。
- 長期の更新トークンを短期のアクセス トークンと交換します。この処理は、トークンが期限切れになり、新しいアクセス トークンが必要になった場合に発生します。
暗黙的コードフローは実装が簡単ですが、暗黙的フローで発行されたアクセス トークンに有効期限を設定しないことをおすすめします。暗黙的フローでトークンの有効期限を設定すると、ユーザーは再びアカウントをリンクする必要があります。セキュリティ上の理由によりトークンの有効期限が必要な場合は、代わりに認証コードフローの使用を検討してください。
OAuth によるアカウント リンクを実装する
プロジェクトを構成する
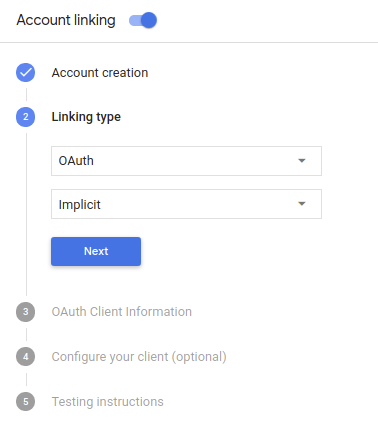
プロジェクトで OAuth によるアカウント リンクを使用するよう構成するには、次の手順に従います。
- Actions Console を開き、使用するプロジェクトを選択します。
- [Develop](開発)タブをクリックして、[Account linking](アカウント リンク)を選択します。
- [アカウントのリンク] の横にあるスイッチを有効にします。
- [アカウントの作成] セクションで、[いいえ、ウェブサイトでのアカウントの作成のみを許可します。] を選択します。
[Linking type] で、[OAuthOAuth] と [ImplicitOAuth] を選択します。
[Client Information](クライアント情報)で、次の操作を行います。
- [Client ID served by your Actions to Google] に、識別する値を割り当てます。 リクエストの数を減らすことができます。
- 認可エンドポイントとトークン交換エンドポイントの URL を挿入します。
- [保存] をクリックします。
OAuth サーバーを実装する
OAuth 2.0 暗黙的フローをサポートするために、サービスは 使用できます。このエンドポイントは、認証と認可を担当します。 データアクセスについてユーザーから同意を得る。認可エンドポイントは、ログインしていないユーザーにログイン用の UI を表示し、リクエストされたアクセスへの同意を記録します。
アクションからサービスの API を呼び出す必要がある場合、Google はこのエンドポイントを使用して、API の呼び出し許可をユーザーから取得します。
通常、Google が開始する OAuth 2.0 インプリシット フローのセッションは次のような流れになります。
- Google がユーザーのブラウザで認可エンドポイントを開きます。ユーザーがログインし(ログインしていない場合)、Google が API を使用してデータにアクセスすることを承諾します(まだ許可していない場合)。
- サービスがアクセス トークンを作成します。そのトークンを含むリクエストを送信して、ユーザーのブラウザを Google にリダイレクトし、Google にアクセス トークンを返します。
- Google がサービスの API を呼び出し、リクエストごとにアクセス トークンを関連付けます。サービスは、アクセス トークンによって API へのアクセスが Google に許可されていることを確認し、API 呼び出しを完了します。
認可リクエストの処理
アクションで OAuth2 インプリシット フローを介してアカウント リンクを行う必要がある場合、Google は、次のパラメータを含むリクエストを使用して、ユーザーを認可エンドポイントに送信します。
| 認可エンドポイントのパラメータ | |
|---|---|
client_id |
Google に割り当てたクライアント ID。 |
redirect_uri |
このリクエストに対するレスポンスを送信する URL。 |
state |
リダイレクト URL で変更されずに Google に返される会計上の値。 |
response_type |
レスポンスで返される値のタイプ。OAuth 2.0 暗黙の API では、
レスポンス タイプは常に token です。 |
たとえば、認可エンドポイントが https://myservice.example.com/auth にある場合、
次のようなリクエストになります。
GET https://myservice.example.com/auth?client_id=GOOGLE_CLIENT_ID&redirect_uri=REDIRECT_URI&state=STATE_STRING&response_type=token
認可エンドポイントでログイン リクエストを処理する場合は、次の手順に従います。
client_idとredirect_uriの値を検証する 意図しないクライアント アプリへのアクセスや構成ミスのあるクライアント アプリclient_idが、指定したクライアント ID と一致することを確認します。 割り当てられていますredirect_uriで指定された URL を確認します。 パラメータの形式は次のとおりです。https://oauth-redirect.googleusercontent.com/r/YOUR_PROJECT_ID
ユーザーがサービスにログインしているかどうか確認します。ユーザーがログインしていない場合は、サービスのログインまたは登録フローを完了します。
Google が API へのアクセスで使用するアクセス トークンを生成します。アクセス トークンには任意の文字列値を設定できますが、トークンを使用するユーザーとクライアントを一意に表し、簡単に推測されない文字列にする必要があります。
ユーザーのブラウザを URL にリダイレクトする HTTP レスポンスを送信する
redirect_uriパラメータで指定します。URL フラグメントに次のパラメータをすべて含めます。access_token: 生成したアクセス トークンtoken_type: 文字列bearerstate: 元の状態から変更されていない状態の値 リクエスト 結果の URL の例を次に示します。https://oauth-redirect.googleusercontent.com/r/YOUR_PROJECT_ID#access_token=ACCESS_TOKEN&token_type=bearer&state=STATE_STRING
Google の OAuth 2.0 リダイレクト ハンドラがアクセス トークンを受け取り、
state 値が変更されていないことを確認します。Google は、
そのトークンを後続の呼び出しにアタッチします。
AppRequest の一部としてアクションに渡します。
認証フローを開始する
アカウント ログイン ヘルパー インテントを使用して認証フローを開始します。次のコード スニペットは、Dialogflow と Actions SDK でこのヘルパーを使用してレスポンスを送信する方法を示します。
Dialogflow:
<ph type="x-smartling-placeholder">const {dialogflow, SignIn} = require('actions-on-google'); const app = dialogflow({ // REPLACE THE PLACEHOLDER WITH THE CLIENT_ID OF YOUR ACTIONS PROJECT clientId: CLIENT_ID, }); // Intent that starts the account linking flow. app.intent('Start Signin', (conv) => { conv.ask(new SignIn('To get your account details')); });
@ForIntent("Start Signin")
public ActionResponse text(ActionRequest request) {
  ResponseBuilder rb = getResponseBuilder(request);
  return rb.add(new SignIn().setContext("To get your account details")).build();
}
{
  "payload": {
    "google": {
      "expectUserResponse": true,
      "richResponse": {
        "items": [
          {
            "simpleResponse": {
              "textToSpeech": "PLACEHOLDER"
            }
          }
        ]
      },
      "userStorage": "{\"data\":{}}",
      "systemIntent": {
        "intent": "actions.intent.SIGN_IN",
        "data": {
          "@type": "type.googleapis.com/google.actions.v2.SignInValueSpec",
          "optContext": "To get your account details"
        }
      }
    }
  },
  "outputContexts": [
    {
      "name": "/contexts/_actions_on_google",
      "lifespanCount": 99,
      "parameters": {
        "data": "{}"
      }
    }
  ]
}
Actions SDK:
<ph type="x-smartling-placeholder">const {actionssdk, SignIn} = require('actions-on-google'); const app = actionssdk({ // REPLACE THE PLACEHOLDER WITH THE CLIENT_ID OF YOUR ACTIONS PROJECT clientId: CLIENT_ID, }); // Intent that starts the account linking flow. app.intent('actions.intent.TEXT', (conv) => { conv.ask(new SignIn('To get your account details')); });
@ForIntent("actions.intent.TEXT")
public ActionResponse text(ActionRequest request) {
  ResponseBuilder rb = getResponseBuilder(request);
  return rb.add(new SignIn().setContext("To get your account details")).build();
}
{
  "expectUserResponse": true,
  "expectedInputs": [
    {
      "inputPrompt": {
        "richInitialPrompt": {
          "items": [
            {
              "simpleResponse": {
                "textToSpeech": "PLACEHOLDER"
              }
            }
          ]
        }
      },
      "possibleIntents": [
        {
          "intent": "actions.intent.SIGN_IN",
          "inputValueData": {
            "@type": "type.googleapis.com/google.actions.v2.SignInValueSpec",
            "optContext": "To get your account details"
          }
        }
      ]
    }
  ],
  "conversationToken": "{\"data\":{}}",
  "userStorage": "{\"data\":{}}"
}
データアクセス リクエストを処理する
アシスタントのリクエストにアクセス トークンが含まれている場合は、まずそのアクセス トークンが有効で期限切れになっていないことを確認してから、関連付けられているユーザー アカウントをデータベースから取得します。