
В этом руководстве приведены рекомендации по написанию кода приложений, которые позволят правильно показывать рекламу на iPhone X.
Требования
- Импортируйте Google Mobile Ads SDK версии 7.26.0 или более поздней отдельно или в составе Firebase.
Баннеры
Баннеры должны размещаться в безопасной зоне, чтобы их не закрывали закругленные углы, датчики и индикатор главного экрана. На этой странице вы найдете примеры того, как добавить ограничения, чтобы разместить баннер в верхней или нижней части безопасной области.
Storyboard/Interface Builder
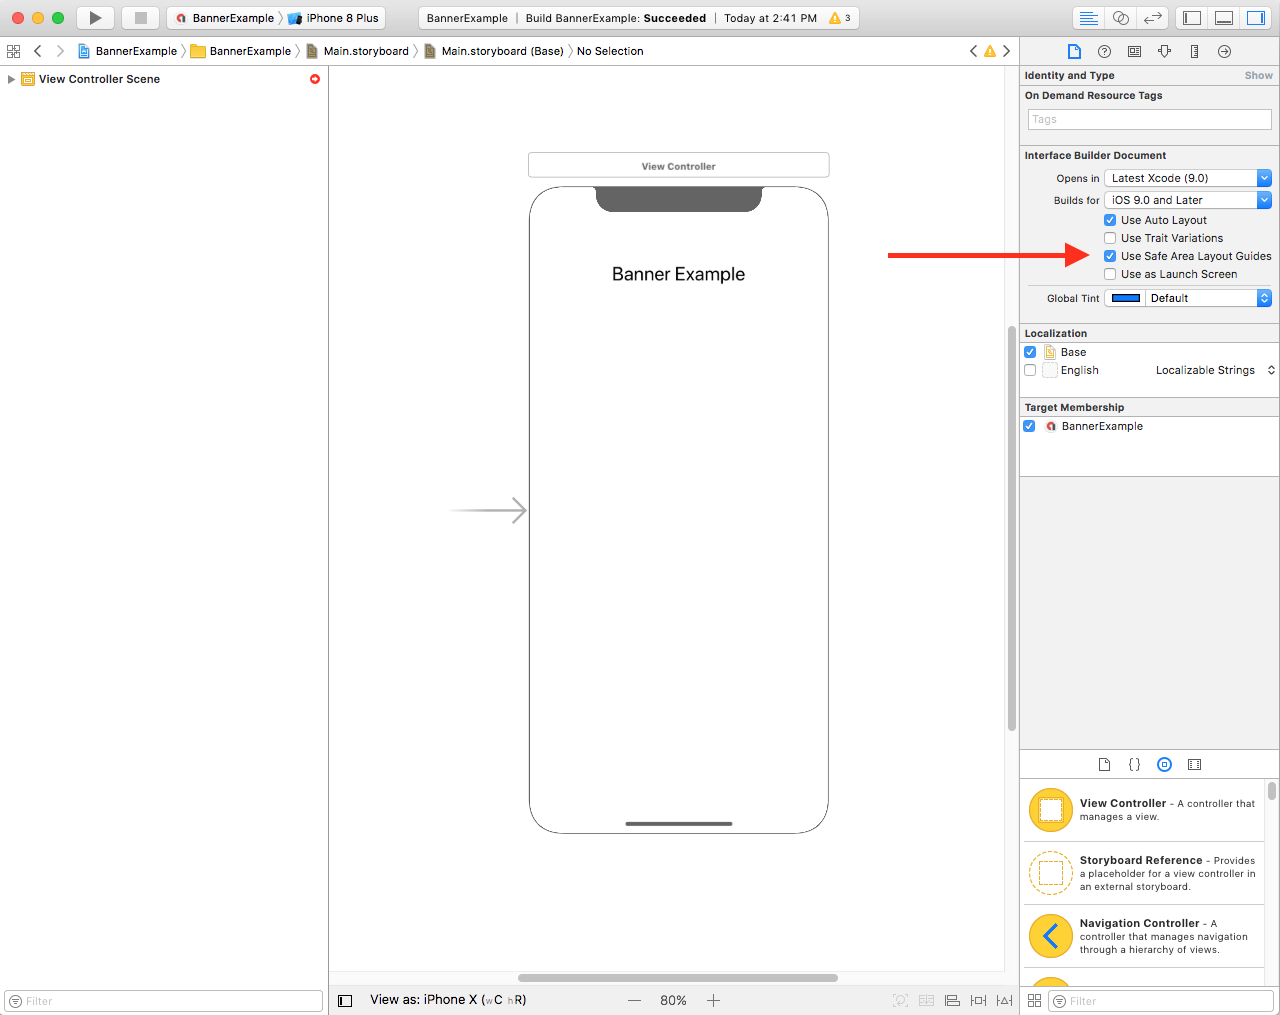
Если вы используете Interface Builder, убедитесь, что у вас включены направляющие макета безопасной зоны. Для этого вам потребуется Xcode 9 или более поздней версии и iOS 9 или более поздней версии.
Откройте файл Interface Builder и нажмите на сцену контроллера представления. Справа появятся параметры Interface Builder Document (Документ Interface Builder). Установите флажок Use Safe Area Layout Guides (Использовать направляющие макета безопасной области) и убедитесь, что вы разрабатываете приложение для iOS 9.0 или более поздней версии.
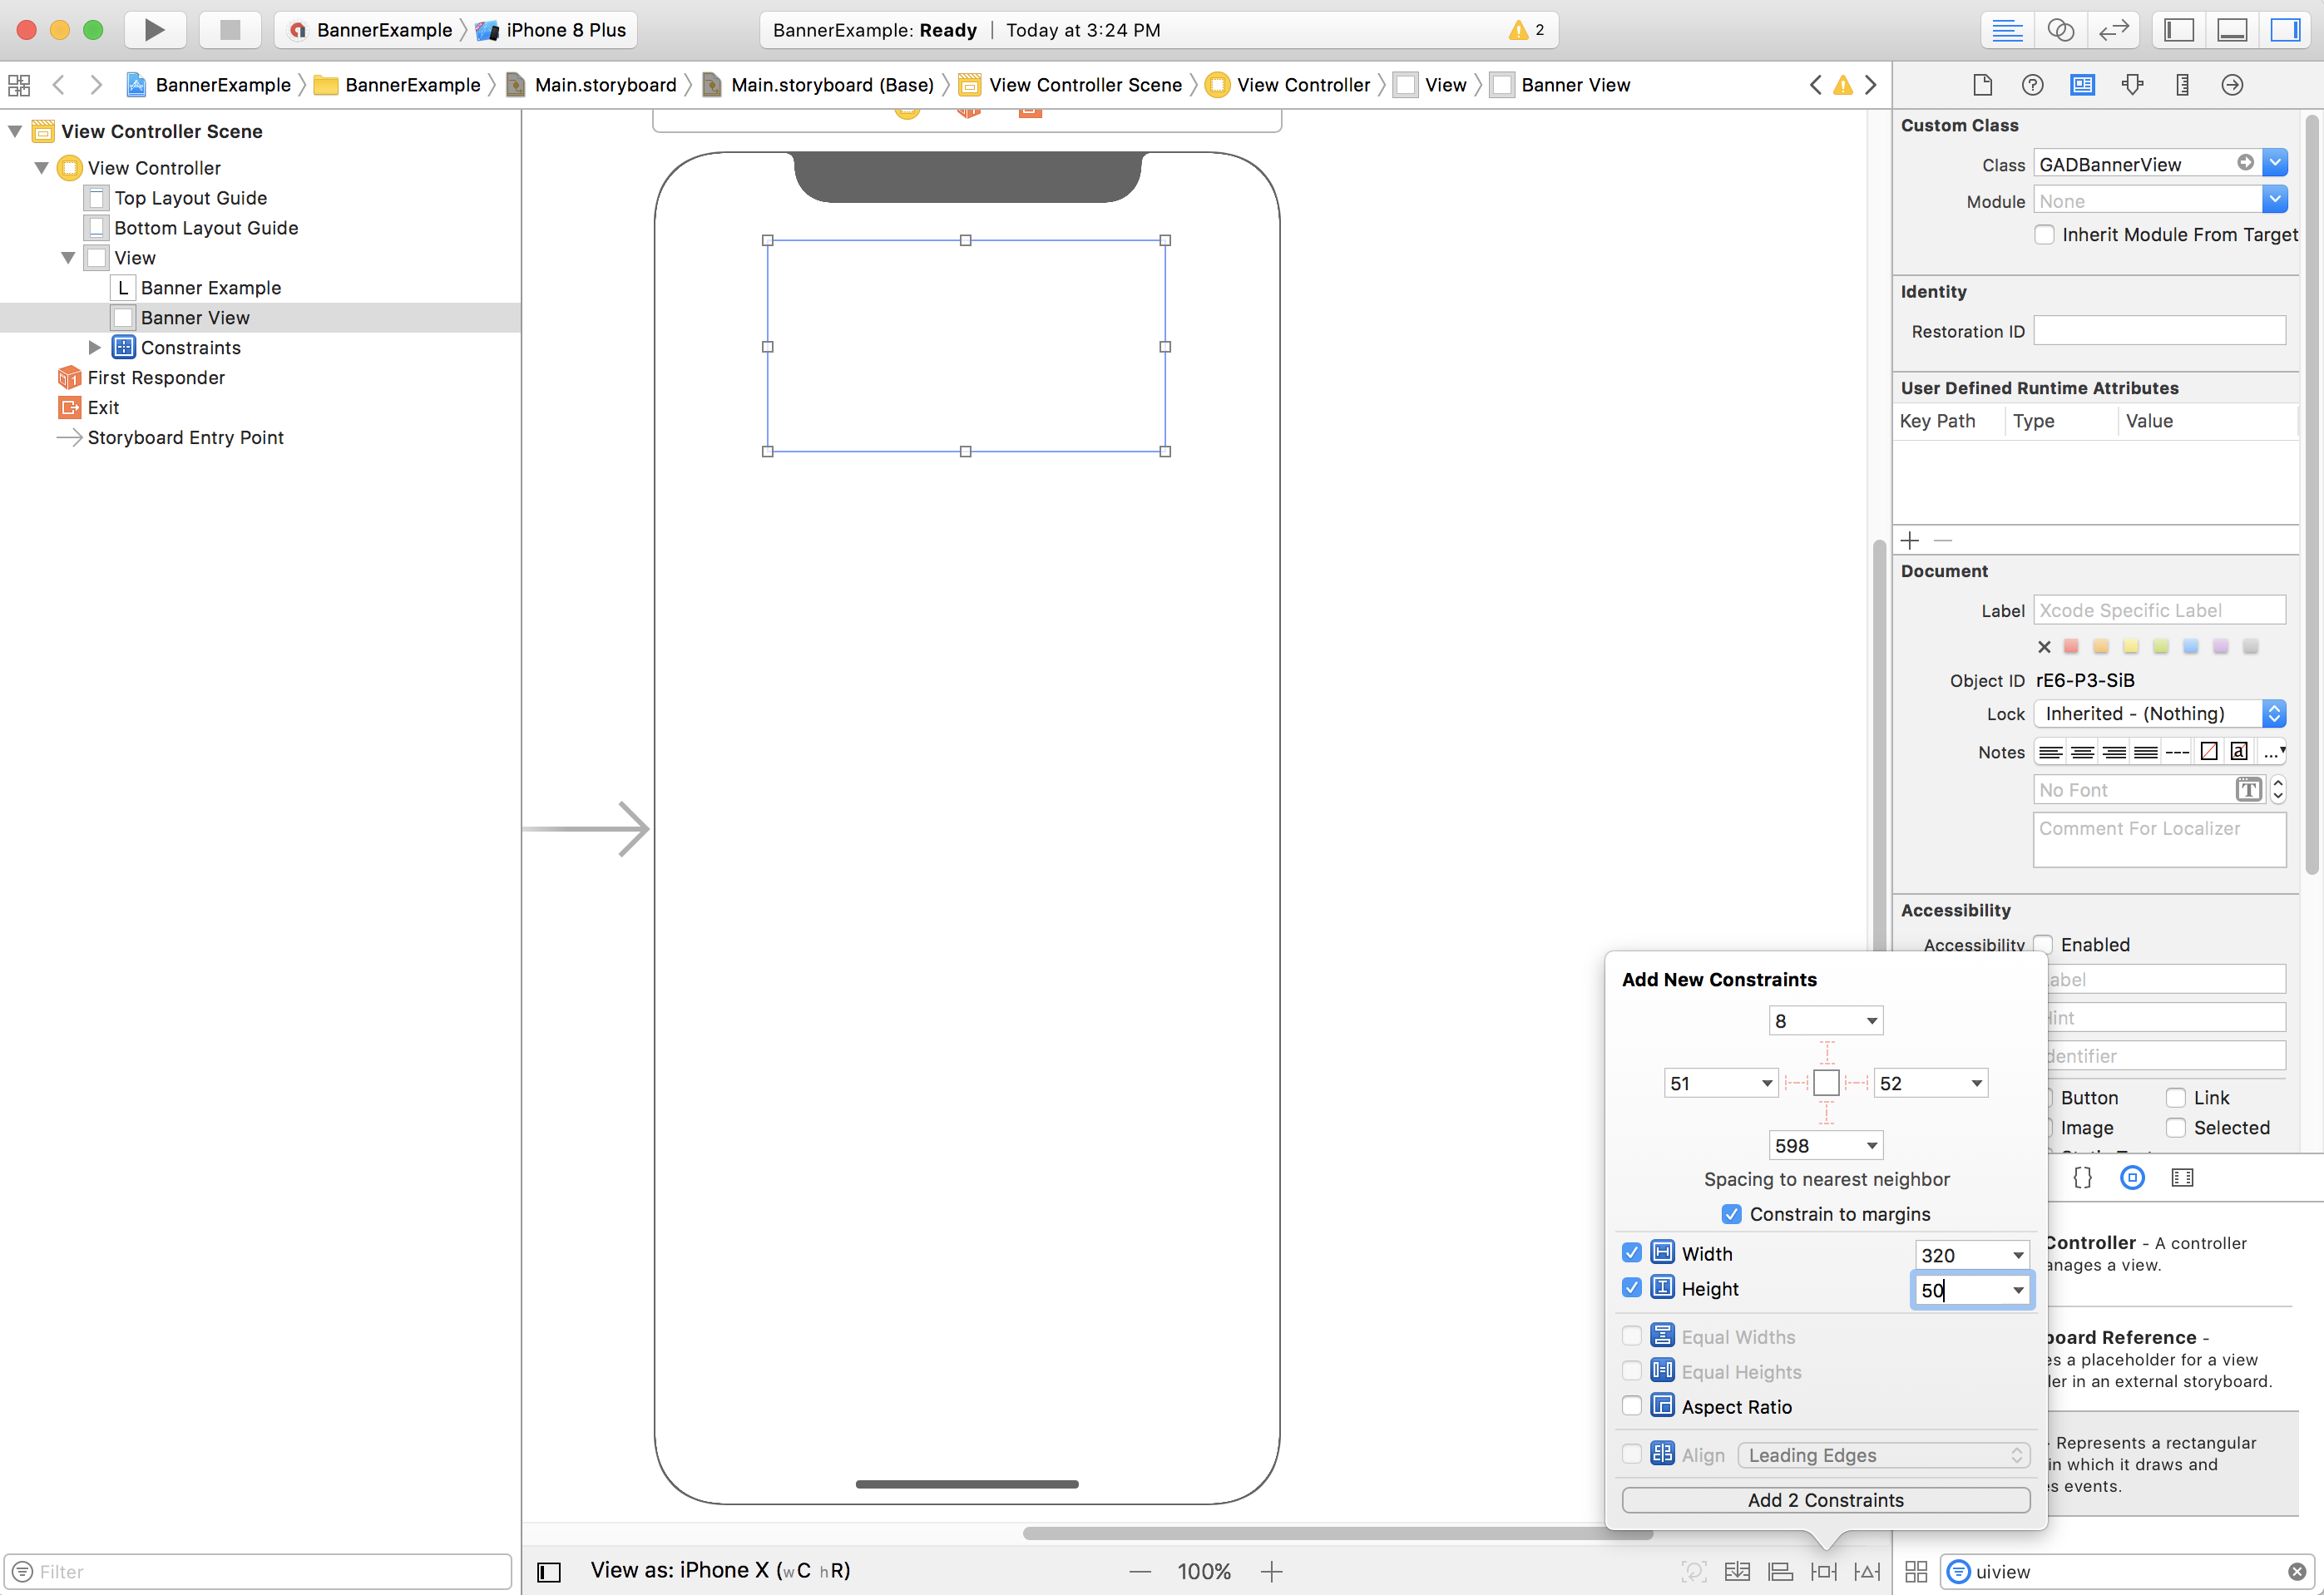
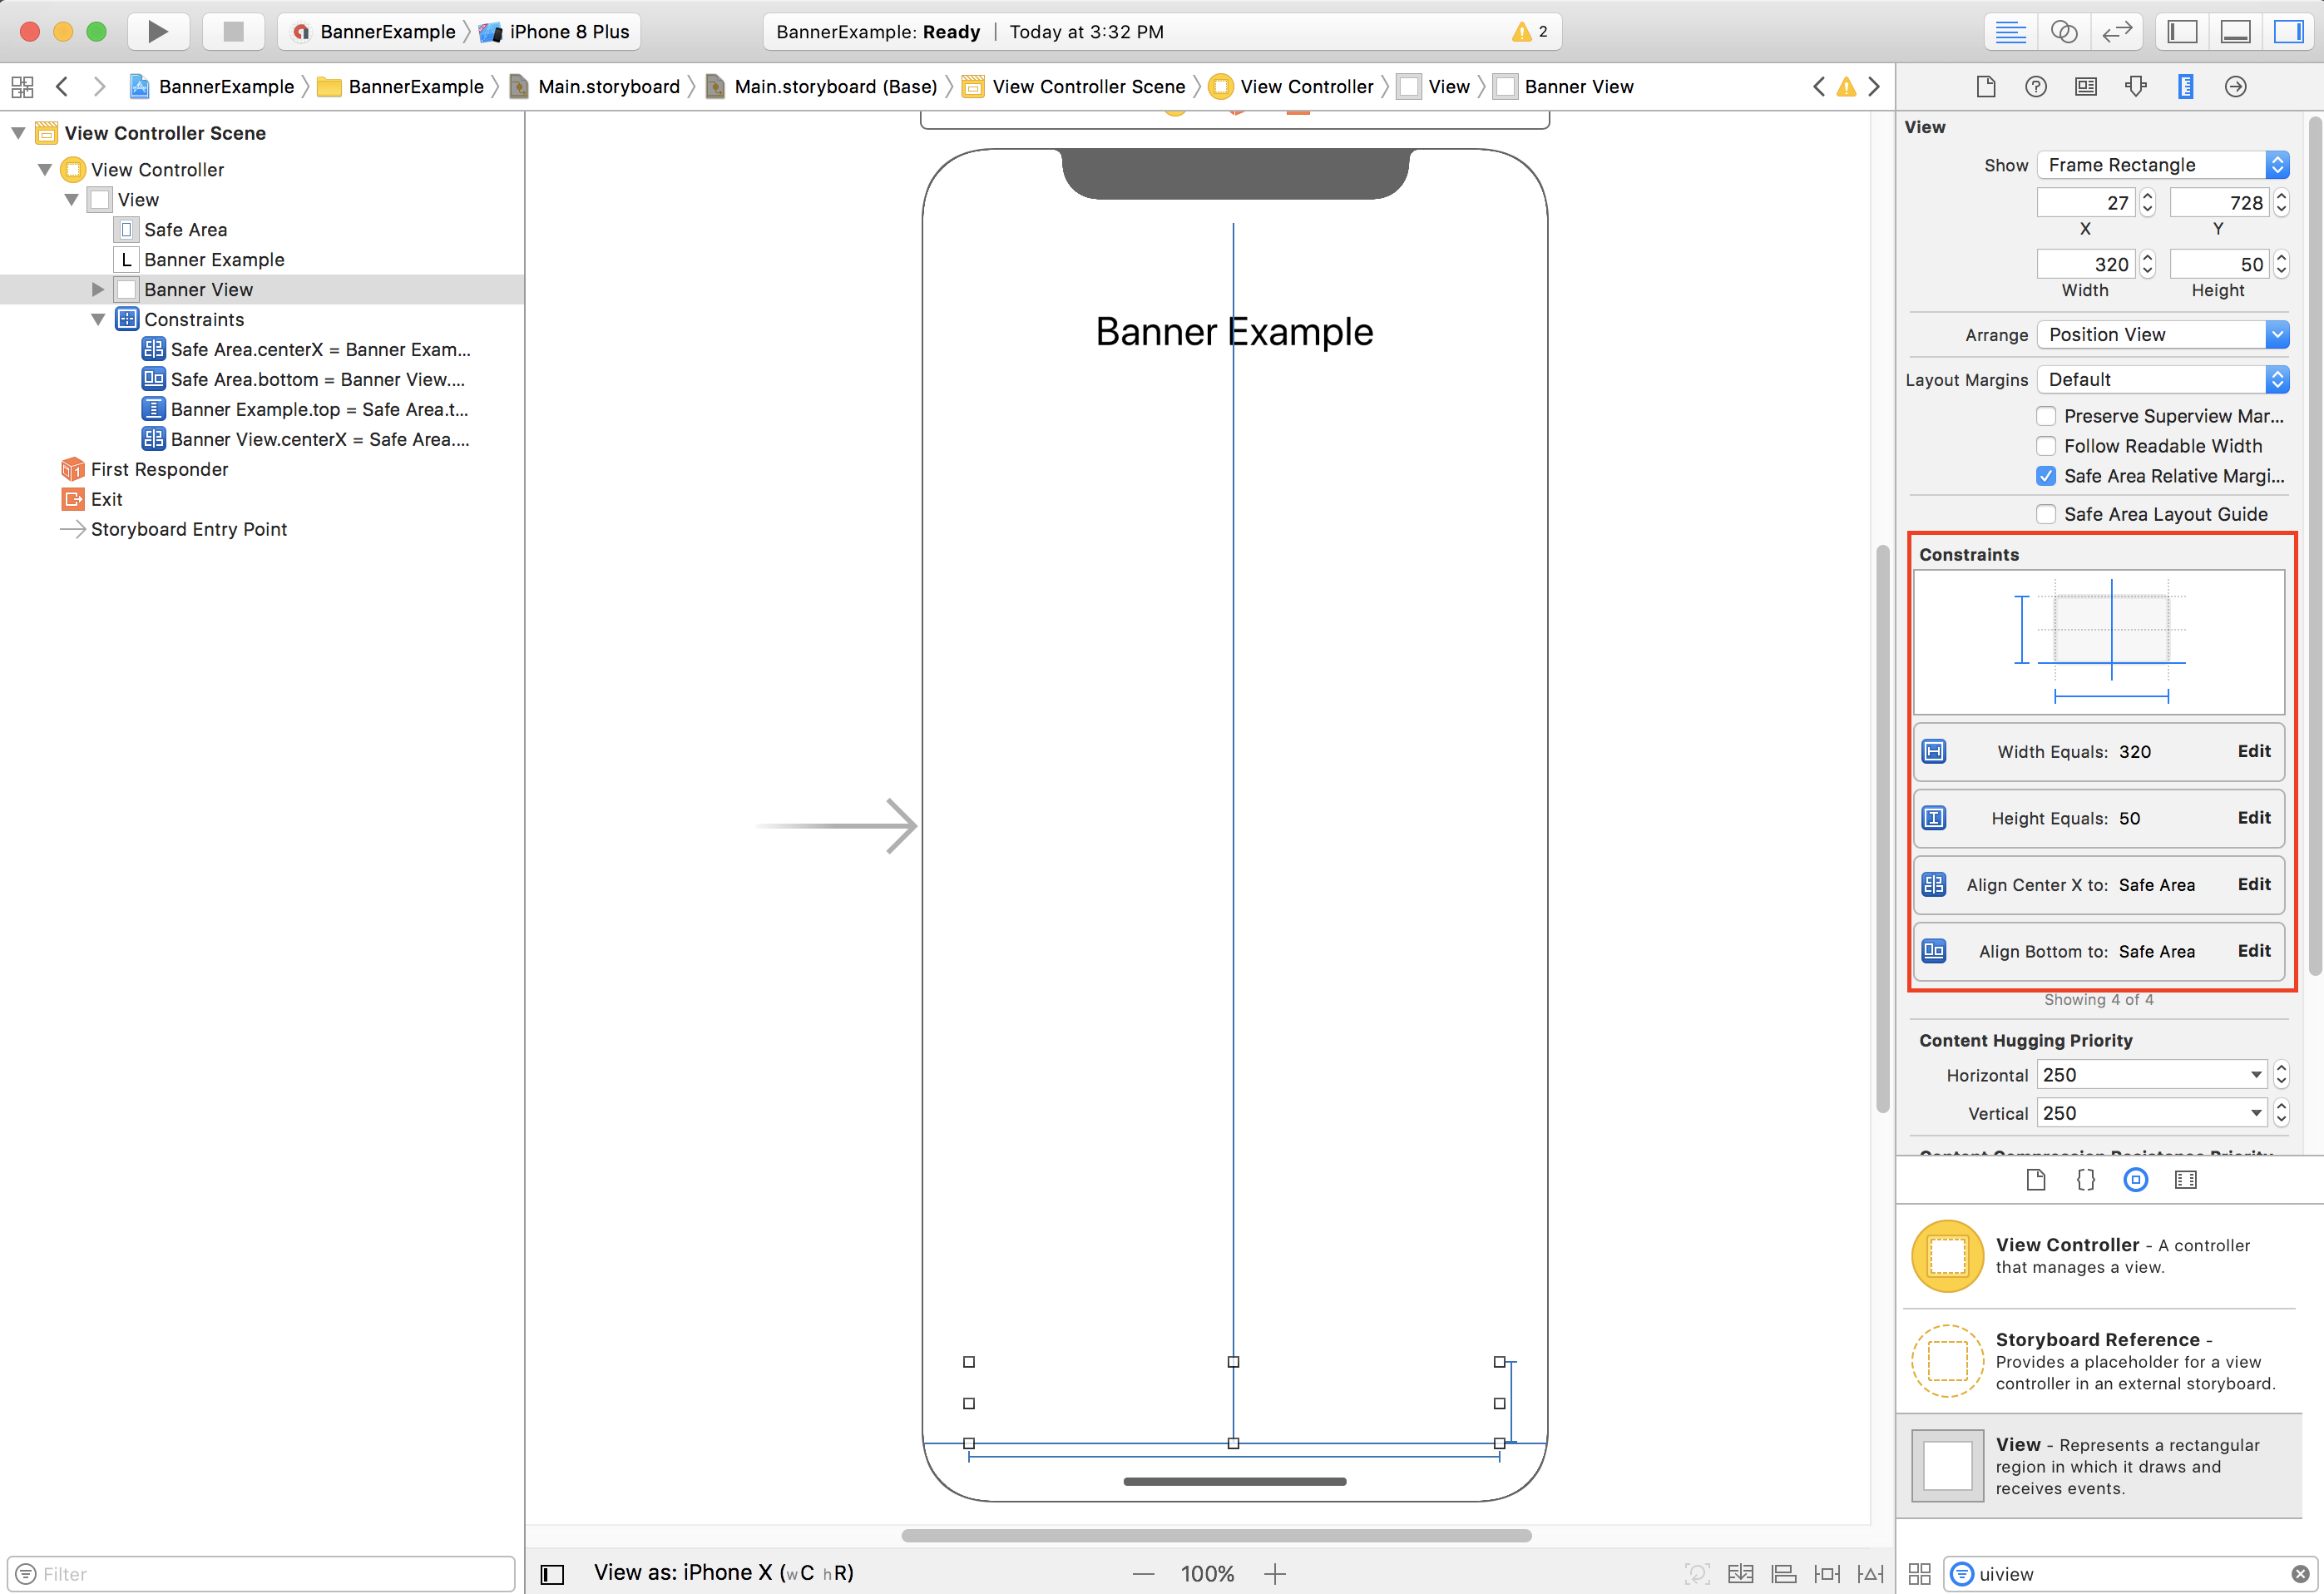
Рекомендуем ограничить размер баннера, задав ширину и высоту.
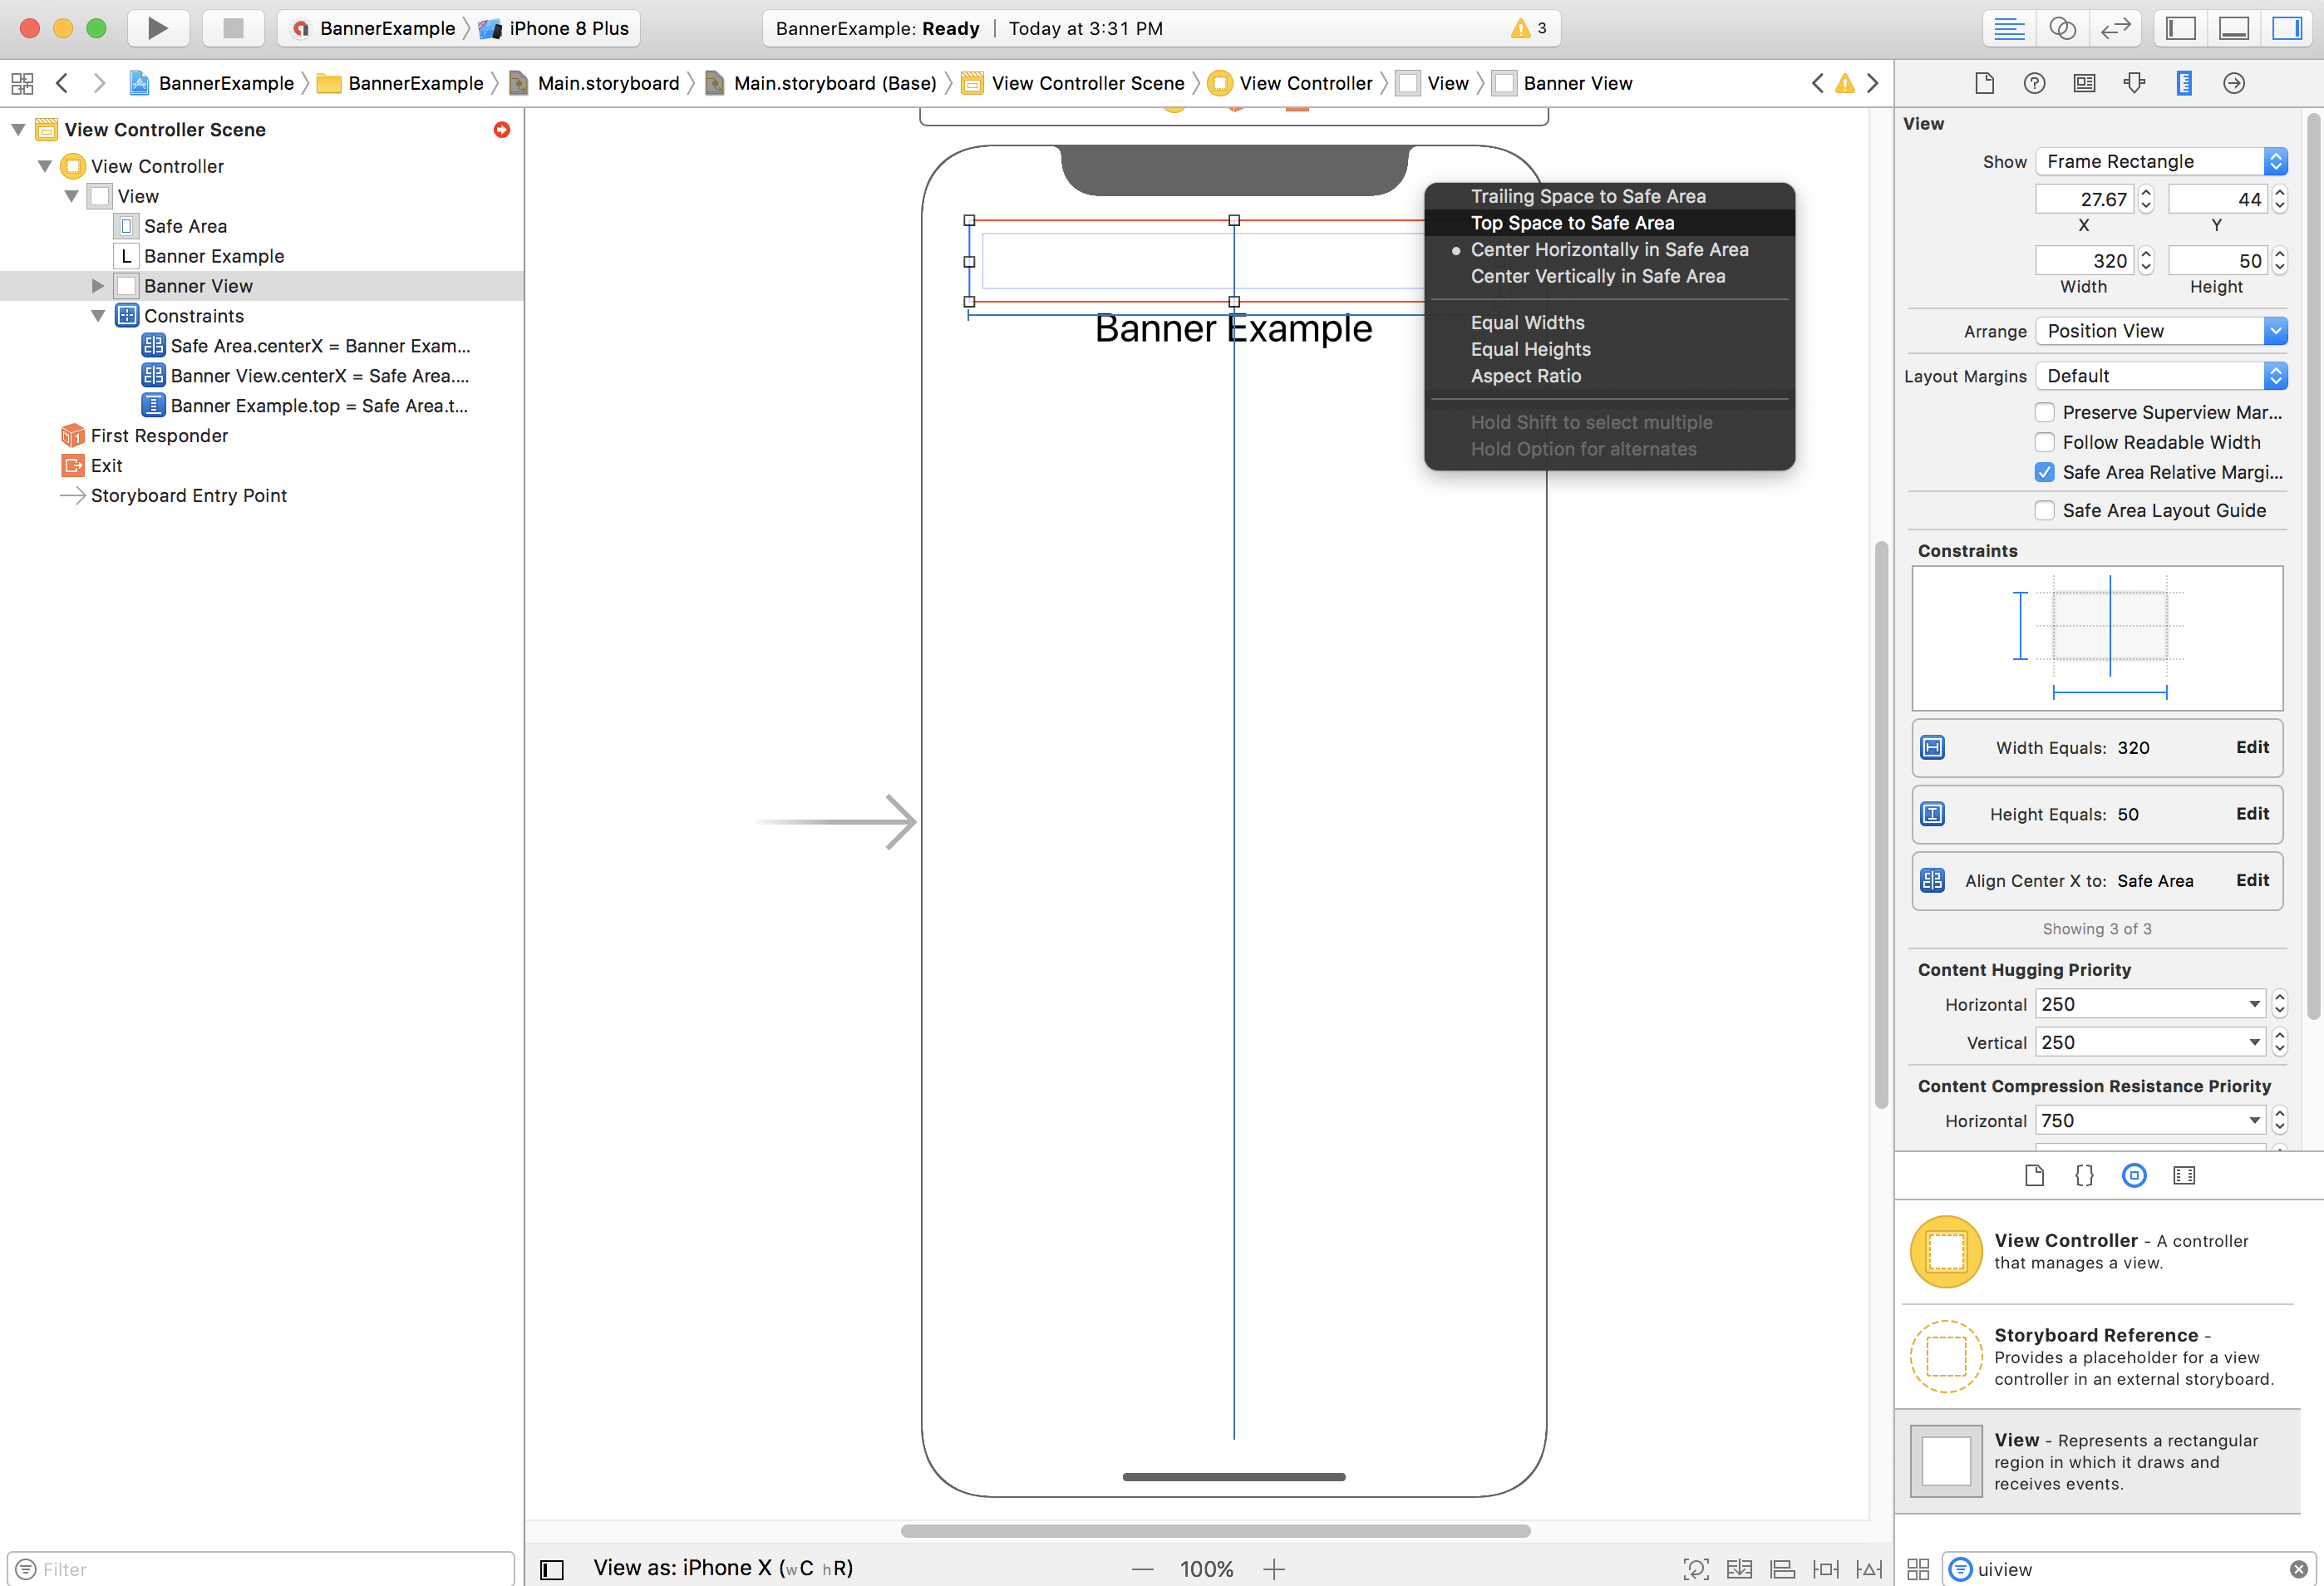
Теперь вы можете выровнять баннер по верхнему краю безопасной области, ограничив свойство Top объекта GADBannerView верхним краем безопасной области:
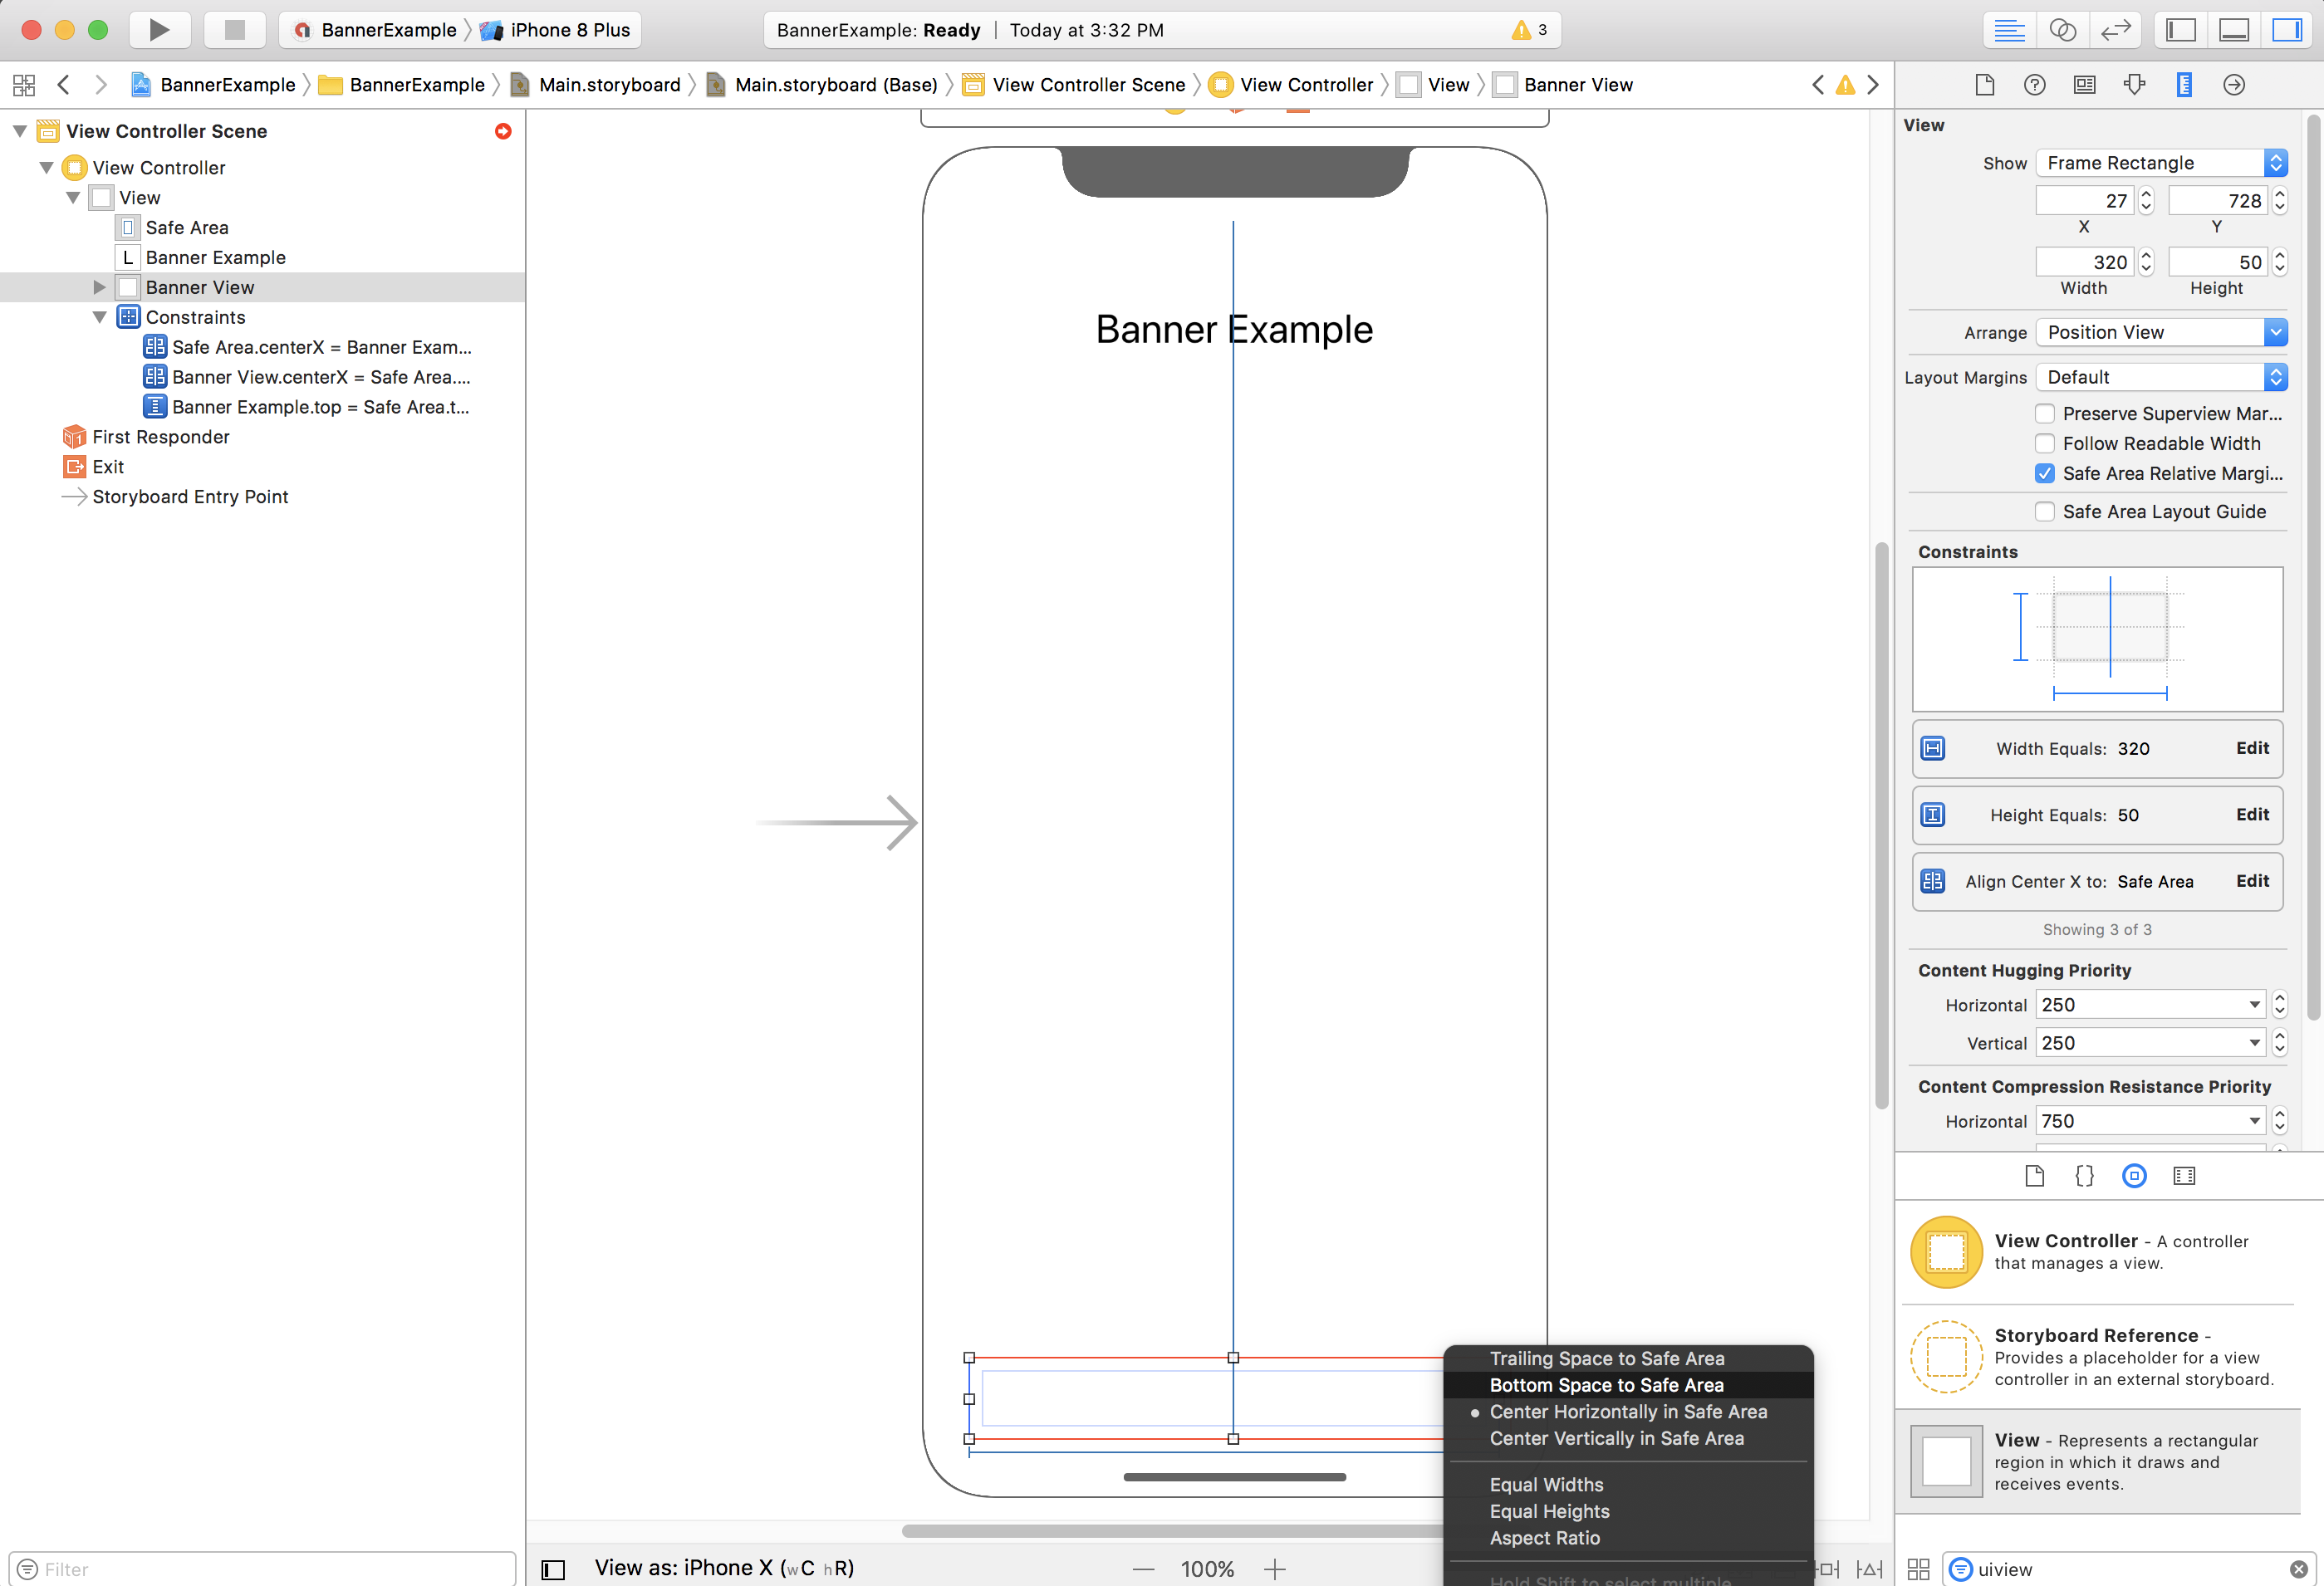
Аналогичным образом можно выровнять баннер по нижнему краю безопасной области, привязав свойство Bottom объекта GADBannerView к нижнему краю безопасной области:
Теперь ограничения должны выглядеть примерно так, как на скриншоте ниже (размеры и расположение могут отличаться):
ViewController
Ниже приведен простой фрагмент кода контроллера представления, который выполняет минимальные действия, необходимые для показа баннера в GADBannerView, как настроено в раскадровке выше.
Swift
class ViewController: UIViewController {

  /// The banner view.
  @IBOutlet var bannerView: BannerView!

  override func viewDidLoad() {
    super.viewDidLoad()
    // Replace this ad unit ID with your own ad unit ID.
    bannerView.adUnitID = "ca-app-pub-3940256099942544/2934735716"
    bannerView.rootViewController = self
    bannerView.load(Request())
  }

}
Objective-C
@interface ViewController()

@property(nonatomic, strong) IBOutlet GADBannerView *bannerView;

@end

@implementation ViewController

- (void)viewDidLoad {
  [super viewDidLoad];

  // Replace this ad unit ID with your own ad unit ID.
  self.bannerView.adUnitID = @"ca-app-pub-3940256099942544/2934735716";
  self.bannerView.rootViewController = self;
  GADRequest *request = [GADRequest request];
  [self.bannerView loadRequest:request];
}
Выравнивание баннеров по краю безопасной области
Если вы хотите выровнять баннер по левому или правому краю, привяжите левый или правый край баннера к левому или правому краю безопасной области, а не к левому или правому краю суперпредставления.
Если вы включили параметр Use Safe Area Layout Guides (Использовать направляющие макета безопасной зоны), то при добавлении ограничений в представлении Interface Builder по умолчанию будет использовать границы безопасной зоны.
Алгоритмическая продажа
Если ваше приложение создает баннеры программно, вы можете определить ограничения и разместить баннер в коде. В этом примере показано, как ограничить баннер, чтобы он был выровнен по центру по горизонтали в нижней части безопасной области:
Swift
class ViewController: UIViewController {

  var bannerView: BannerView!

  override func viewDidLoad() {
    super.viewDidLoad()

    // Instantiate the banner view with your desired banner size.
    bannerView = BannerView(adSize: AdSizeBanner)
    addBannerViewToView(bannerView)
    bannerView.rootViewController = self
    // Set the ad unit ID to your own ad unit ID here.
    bannerView.adUnitID = "ca-app-pub-3940256099942544/2934735716"
    bannerView.load(Request())
  }

  func addBannerViewToView(_ bannerView: UIView) {
    bannerView.translatesAutoresizingMaskIntoConstraints = false
    view.addSubview(bannerView)
    if #available(iOS 11.0, *) {
      positionBannerAtBottomOfSafeArea(bannerView)
    }
    else {
      positionBannerAtBottomOfView(bannerView)
    }
  }

  @available (iOS 11, *)
  func positionBannerAtBottomOfSafeArea(_ bannerView: UIView) {
    // Position the banner. Stick it to the bottom of the Safe Area.
    // Centered horizontally.
    let guide: UILayoutGuide = view.safeAreaLayoutGuide

    NSLayoutConstraint.activate(
      [bannerView.centerXAnchor.constraint(equalTo: guide.centerXAnchor),
       bannerView.bottomAnchor.constraint(equalTo: guide.bottomAnchor)]
    )
  }

  func positionBannerAtBottomOfView(_ bannerView: UIView) {
    // Center the banner horizontally.
    view.addConstraint(NSLayoutConstraint(item: bannerView,
                                          attribute: .centerX,
                                          relatedBy: .equal,
                                          toItem: view,
                                          attribute: .centerX,
                                          multiplier: 1,
                                          constant: 0))
    // Lock the banner to the top of the bottom layout guide.
    view.addConstraint(NSLayoutConstraint(item: bannerView,
                                          attribute: .bottom,
                                          relatedBy: .equal,
                                          toItem: self.bottomLayoutGuide,
                                          attribute: .top,
                                          multiplier: 1,
                                          constant: 0))
  }

}
Objective-C
@interface ViewController()

@property(nonatomic, strong) GADBannerView *bannerView;

@end

@implementation ViewController

- (void)viewDidLoad {
  [super viewDidLoad];

  // Instantiate the banner view with your desired banner size.
  self.bannerView = [[GADBannerView alloc] initWithAdSize:GADAdSizeBanner];
  [self addBannerViewToView:self.bannerView];

  // Replace this ad unit ID with your own ad unit ID.
  self.bannerView.adUnitID = @"ca-app-pub-3940256099942544/2934735716";
  self.bannerView.rootViewController = self;
  GADRequest *request = [GADRequest request];
  [self.bannerView loadRequest:request];
}

#pragma mark - view positioning

-(void)addBannerViewToView:(UIView *_Nonnull)bannerView {
  self.bannerView.translatesAutoresizingMaskIntoConstraints = NO;
  [self.view addSubview:self.bannerView];
  if (@available(ios 11.0, *)) {
    [self positionBannerViewAtBottomOfSafeArea:bannerView];
  } else {
    [self positionBannerViewAtBottomOfView:bannerView];
  }
}

- (void)positionBannerViewAtBottomOfSafeArea:(UIView *_Nonnull)bannerView NS_AVAILABLE_IOS(11.0) {
  // Position the banner. Stick it to the bottom of the Safe Area.
  // Centered horizontally.
  UILayoutGuide *guide = self.view.safeAreaLayoutGuide;
  [NSLayoutConstraint activateConstraints:@[
    [bannerView.centerXAnchor constraintEqualToAnchor:guide.centerXAnchor],
    [bannerView.bottomAnchor constraintEqualToAnchor:guide.bottomAnchor]
  ]];
}

- (void)positionBannerViewAtBottomOfView:(UIView *_Nonnull)bannerView {
  [self.view addConstraint:[NSLayoutConstraint constraintWithItem:bannerView
                                                        attribute:NSLayoutAttributeCenterX
                                                        relatedBy:NSLayoutRelationEqual
                                                           toItem:self.view
                                                        attribute:NSLayoutAttributeCenterX
                                                       multiplier:1
                                                         constant:0]];
  [self.view addConstraint:[NSLayoutConstraint constraintWithItem:bannerView
                                                        attribute:NSLayoutAttributeBottom
                                                        relatedBy:NSLayoutRelationEqual
                                                           toItem:self.bottomLayoutGuide
                                                        attribute:NSLayoutAttributeTop
                                                       multiplier:1
                                                         constant:0]];
}

@end
Описанные выше методы можно легко использовать для ограничения верхней части безопасной области, изменив используемые атрибуты и привязки.
Смарт-баннеры
Если вы используете умные баннеры, особенно в горизонтальной ориентации, рекомендуем использовать ограничения, чтобы выровнять края баннера по левому и правому краям безопасной области.
В Interface Builder эта функция поддерживается начиная с iOS 9. Чтобы ее включить, установите флажок Use Safe Area Layout Guides (Использовать направляющие макета безопасной области), как описано выше.
В коде необходимо задать ограничения по краям относительно направляющих макета безопасной области, если они доступны. Ниже приведен фрагмент кода, который добавляет представление баннера в представление и ограничивает его нижней частью представления по всей ширине:
Swift
func addBannerViewToView(_ bannerView: BannerView) {
  bannerView.translatesAutoresizingMaskIntoConstraints = false
  view.addSubview(bannerView)
  if #available(iOS 11.0, *) {
    // In iOS 11, we need to constrain the view to the safe area.
    positionBannerViewFullWidthAtBottomOfSafeArea(bannerView)
  }
  else {
    // In lower iOS versions, safe area is not available so we use
    // bottom layout guide and view edges.
    positionBannerViewFullWidthAtBottomOfView(bannerView)
  }
}

// MARK: - view positioning
@available (iOS 11, *)
func positionBannerViewFullWidthAtBottomOfSafeArea(_ bannerView: UIView) {
  // Position the banner. Stick it to the bottom of the Safe Area.
  // Make it constrained to the edges of the safe area.
  let guide = view.safeAreaLayoutGuide
  NSLayoutConstraint.activate([
    guide.leftAnchor.constraint(equalTo: bannerView.leftAnchor),
    guide.rightAnchor.constraint(equalTo: bannerView.rightAnchor),
    guide.bottomAnchor.constraint(equalTo: bannerView.bottomAnchor)
  ])
}

func positionBannerViewFullWidthAtBottomOfView(_ bannerView: UIView) {
  view.addConstraint(NSLayoutConstraint(item: bannerView,
                                        attribute: .leading,
                                        relatedBy: .equal,
                                        toItem: view,
                                        attribute: .leading,
                                        multiplier: 1,
                                        constant: 0))
  view.addConstraint(NSLayoutConstraint(item: bannerView,
                                        attribute: .trailing,
                                        relatedBy: .equal,
                                        toItem: view,
                                        attribute: .trailing,
                                        multiplier: 1,
                                        constant: 0))
  view.addConstraint(NSLayoutConstraint(item: bannerView,
                                        attribute: .bottom,
                                        relatedBy: .equal,
                                        toItem: bottomLayoutGuide,
                                        attribute: .top,
                                        multiplier: 1,
                                        constant: 0))
}
Objective-C
- (void)addBannerViewToView:(UIView *)bannerView {
  bannerView.translatesAutoresizingMaskIntoConstraints = NO;
  [self.view addSubview:bannerView];
  if (@available(ios 11.0, *)) {
    // In iOS 11, we need to constrain the view to the safe area.
    [self positionBannerViewFullWidthAtBottomOfSafeArea:bannerView];
  } else {
    // In lower iOS versions, safe area is not available so we use
    // bottom layout guide and view edges.
    [self positionBannerViewFullWidthAtBottomOfView:bannerView];
  }
}

#pragma mark - view positioning

- (void)positionBannerViewFullWidthAtBottomOfSafeArea:(UIView *_Nonnull)bannerView NS_AVAILABLE_IOS(11.0) {
  // Position the banner. Stick it to the bottom of the Safe Area.
  // Make it constrained to the edges of the safe area.
  UILayoutGuide *guide = self.view.safeAreaLayoutGuide;

  [NSLayoutConstraint activateConstraints:@[
    [guide.leftAnchor constraintEqualToAnchor:bannerView.leftAnchor],
    [guide.rightAnchor constraintEqualToAnchor:bannerView.rightAnchor],
    [guide.bottomAnchor constraintEqualToAnchor:bannerView.bottomAnchor]
  ]];
}

- (void)positionBannerViewFullWidthAtBottomOfView:(UIView *_Nonnull)bannerView {
  [self.view addConstraint:[NSLayoutConstraint constraintWithItem:bannerView
                                                        attribute:NSLayoutAttributeLeading
                                                        relatedBy:NSLayoutRelationEqual
                                                           toItem:self.view
                                                        attribute:NSLayoutAttributeLeading
                                                       multiplier:1
                                                         constant:0]];
  [self.view addConstraint:[NSLayoutConstraint constraintWithItem:bannerView
                                                        attribute:NSLayoutAttributeTrailing
                                                        relatedBy:NSLayoutRelationEqual
                                                           toItem:self.view
                                                        attribute:NSLayoutAttributeTrailing
                                                       multiplier:1
                                                         constant:0]];
  [self.view addConstraint:[NSLayoutConstraint constraintWithItem:bannerView
                                                        attribute:NSLayoutAttributeBottom
                                                        relatedBy:NSLayoutRelationEqual
                                                           toItem:self.bottomLayoutGuide
                                                        attribute:NSLayoutAttributeTop
                                                       multiplier:1
                                                         constant:0]];
}
Нативные объявления
Если в вашем приложении нативные объявления закреплены вверху или внизу экрана, к ним применяются те же принципы, что и к баннерам.
Основное отличие заключается в том, что вместо добавления ограничений в GADBannerView вам нужно будет добавить ограничения в GADNativeAdView (или содержащее представление для объявления), чтобы соблюдать руководства по макету безопасной области. Для нативных представлений рекомендуется задавать более явные ограничения размера.
Межстраничные объявления и объявления с вознаграждением
Начиная с версии 7.26.0, Google Mobile Ads SDK полностью поддерживает межстраничные объявления и объявления с вознаграждением для iPhone X.