In addition to the system-defined native formats, Ad Manager publishers have the
option of creating their own native ad formats by defining custom lists of
assets. These are called custom native ad
formats, and can be used with
reserved ads. This enables publishers to pass arbitrary structured data to
their apps. These ads are represented by the
NativeCustomFormatAd
object.
Load custom native ad formats
This guide explains how to load and display custom native ad formats.
Load a custom native ad
To load a custom native ad, do the following:
Include
NativeAdType.CUSTOM_NATIVEtype as an ad type in theNativeAdRequest.Set the custom native ad's format ID.
Kotlin
Java
Custom native ad format ID
The format ID used to identify a custom native ad format can be found in the Ad Manager UI under the Native section inside the Delivery drop-down:
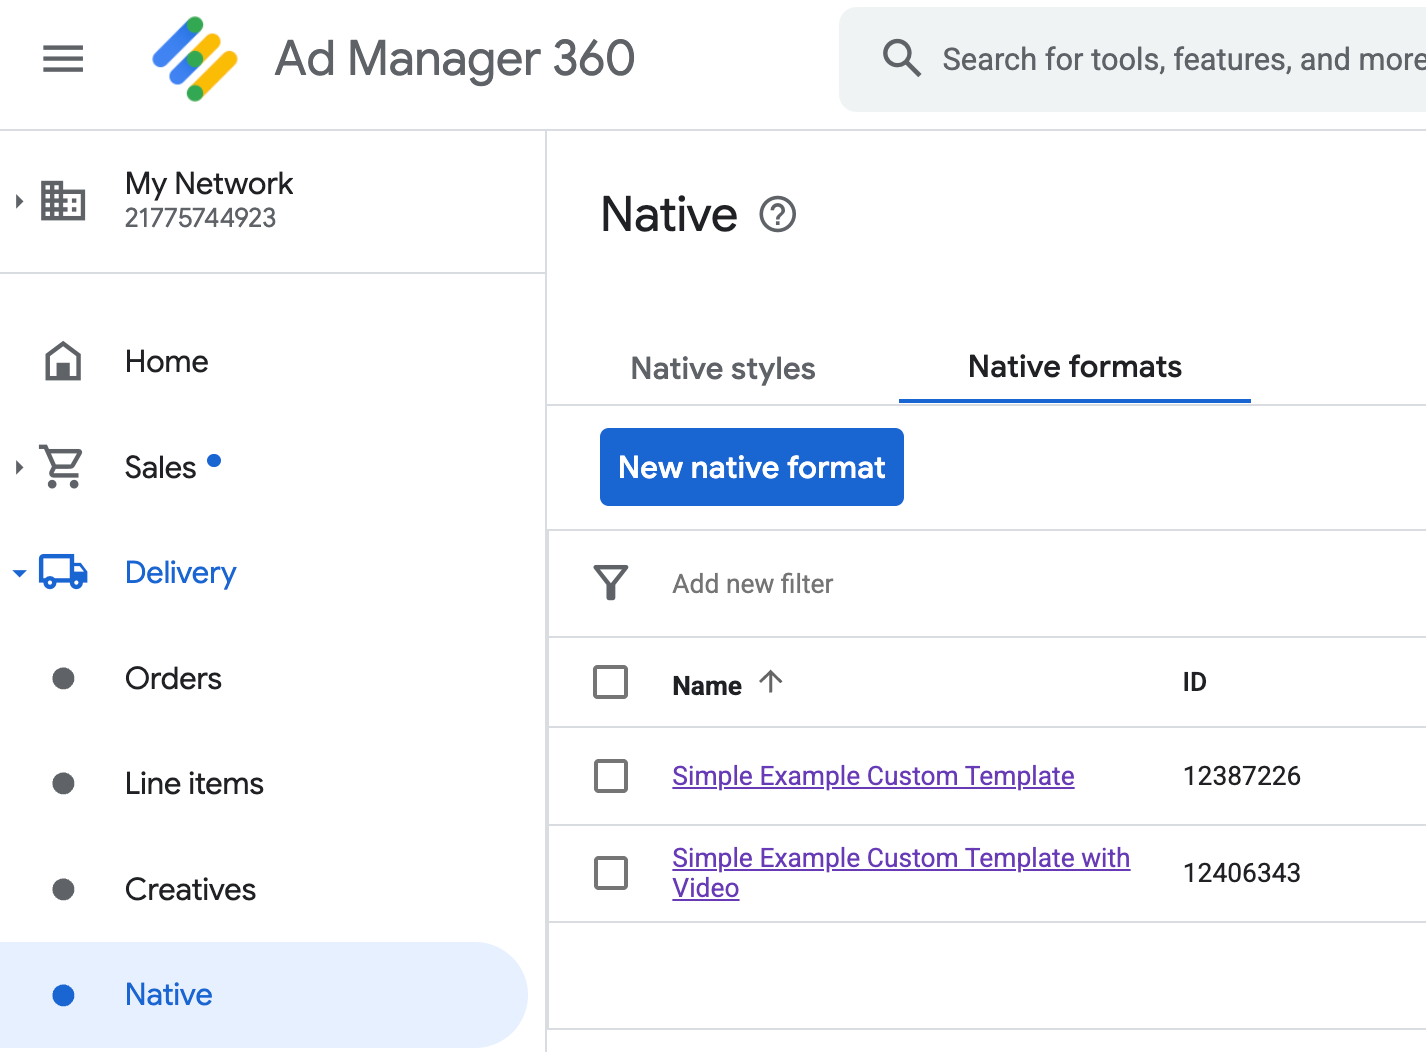
Each custom native ad format ID appears beside its name. Clicking on one of the names brings you to a details screen showing information about the format's fields:
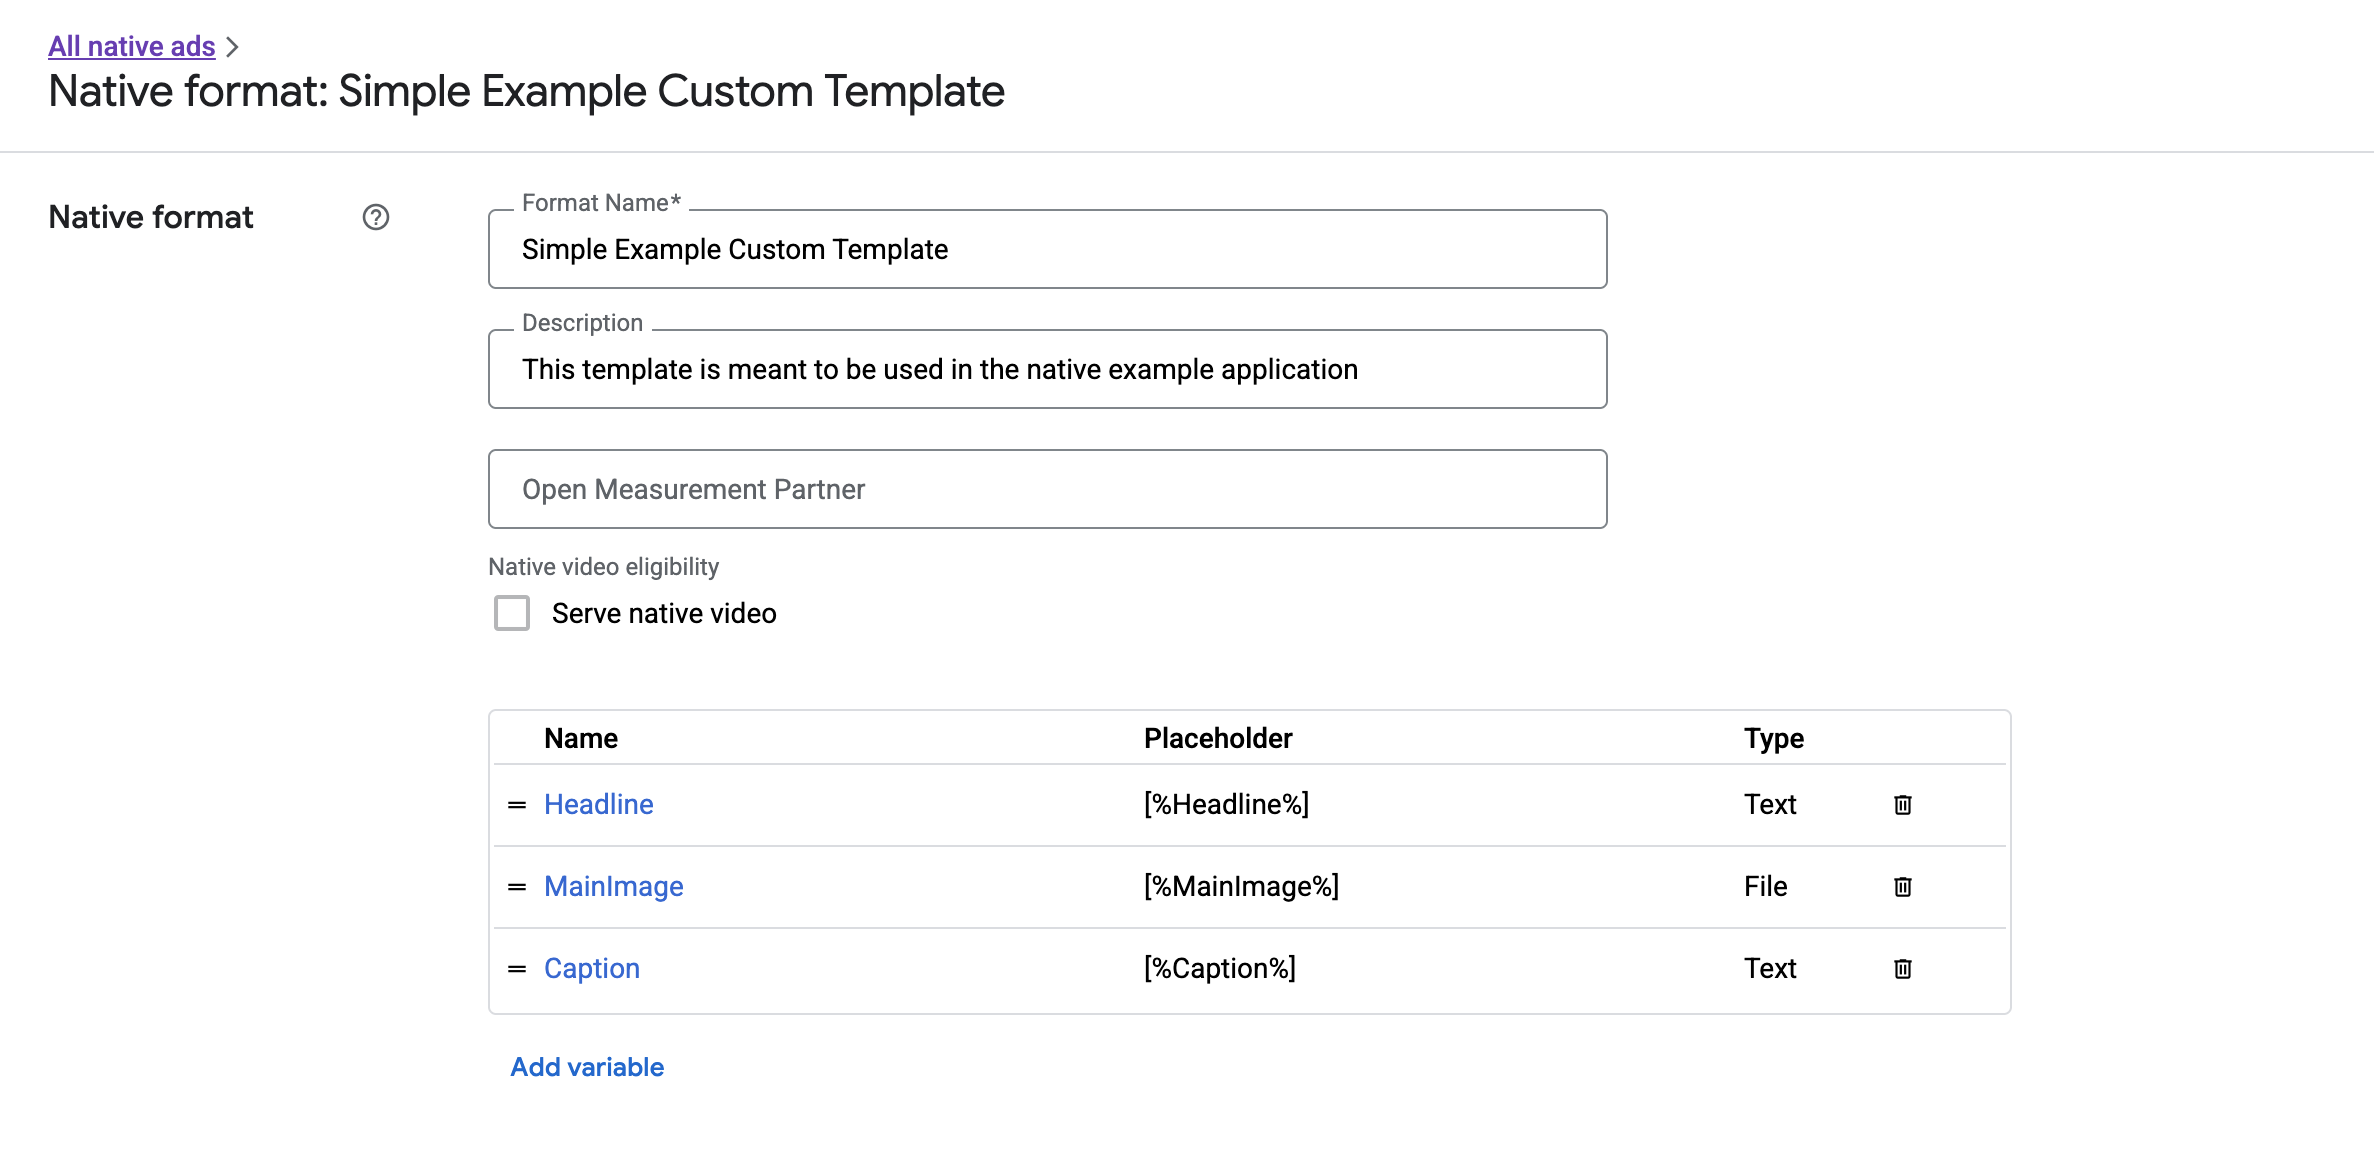
From here, individual fields can be added, edited, and removed. Note the Name of each of the assets. The name is the key used to get the data for each asset when displaying your custom native ad format.
Display custom native ad formats
Custom native ad formats differ from system-defined ones in that publishers have the power to define their own list of assets that make up an ad. Therefore, the process for displaying one differs from system-defined formats in a few ways:
- Text and image assets are available through
getText()andgetImage()getters that take the field name as a parameter. - Because there is no dedicated
ViewGroupclass to register with Google, you need to record impressions and clicks manually. - A custom native ad has a
nullmedia content if the ad does not contain a video asset.
This example shows you how to display a CustomNativeAd:
Kotlin
private fun displayCustomNativeAd(customNativeAd: CustomNativeAd, context: Context) {
  // Render the text elements.

  // The `customNativeAdBinding` is the layout binding for the ad container that
  // contains all `CustomNativeAd` assets.
  customNativeAdBinding.headline.text = customNativeAd.getText("Headline")
  customNativeAdBinding.caption.text = customNativeAd.getText("Caption")

  // If the main asset is an image, render it with an ImageView.
  val imageView = ImageView(context)
  imageView.adjustViewBounds = true
  imageView.setImageDrawable(customNativeAd.getImage("MainImage")?.drawable)
  imageView.setOnClickListener { customNativeAd.performClick("MainImage") }
  customNativeAdBinding.mediaPlaceholder.addView(imageView)

  // Render the ad choices icon.
  renderAdChoices(customNativeAd)

  // Record an impression.
  customNativeAd.recordImpression()
}
Java
private void displayCustomNativeAd(CustomNativeAd customNativeAd, Context context) {
  // Render the text elements.

  // The `customNativeAdBinding` is the layout binding for the ad container that
  // contains all `CustomNativeAd` assets.
  if (customNativeAdBinding != null) {
    customNativeAdBinding.headline.setText(customNativeAd.getText("Headline"));
    customNativeAdBinding.caption.setText(customNativeAd.getText("Caption"));

    ImageView imageView = new ImageView(context);
    imageView.setAdjustViewBounds(true);
    imageView.setImageDrawable(customNativeAd.getImage("MainImage").getDrawable());
    imageView.setOnClickListener(
        new View.OnClickListener() {
          @Override
          public void onClick(View v) {
            customNativeAd.performClick("MainImage");
          }
        });
    customNativeAdBinding.mediaPlaceholder.addView(imageView);

    // Render the ad choices icon.
    renderAdChoices(customNativeAd);

    // Record an impression.
    customNativeAd.recordImpression();
  }
}
Native video for custom native ad formats
When creating a custom format, you have the option to make the format eligible for video.
In your app implementation, you can use CustomNativeAd.getMediaContent()
to get the media content. Then call setMediaContent()
to set the media content on your media view.
If the ad has null media content, make alternate plans to show
the ad without a video.
The following example checks if the ad has video content, and displays an image in its place if a video is not available:
Kotlin
private fun displayVideoCustomNativeAd(customNativeAd: CustomNativeAd, context: Context) {
  // Check whether the custom native ad has video content.
  val mediaContent = customNativeAd.mediaContent
  if (mediaContent != null && mediaContent.hasVideoContent) {
    // Render the media content in a MediaView.
    val mediaView = MediaView(context)
    mediaView.mediaContent = mediaContent
    customNativeAdBinding.mediaPlaceholder.addView(mediaView)
  } else {
    // Fall back to other assets defined on your custom native ad.
    val imageView = ImageView(context)
    imageView.adjustViewBounds = true
    imageView.setImageDrawable(customNativeAd.getImage("MainImage")?.drawable)
    customNativeAdBinding.mediaPlaceholder.addView(imageView)
  }

  // Record an impression.
  customNativeAd.recordImpression()
}
Java
private void displayVideoCustomNativeAd(CustomNativeAd customNativeAd, Context context) {
  // Check whether the custom native ad has video content.
  MediaContent mediaContent = customNativeAd.getMediaContent();
  if (mediaContent != null && mediaContent.getHasVideoContent()) {
    // Render the media content in a MediaView.
    MediaView mediaView = new MediaView(context);
    mediaView.setMediaContent(mediaContent);
    customNativeAdBinding.mediaPlaceholder.addView(mediaView);
  } else {
    // Fall back to other assets defined on your custom native ad.
    ImageView imageView = new ImageView(context);
    imageView.setAdjustViewBounds(true);
    imageView.setImageDrawable(customNativeAd.getImage("MainImage").getDrawable());
    customNativeAdBinding.mediaPlaceholder.addView(imageView);
  }

  // Record an impression.
  customNativeAd.recordImpression();
}
See Video Ads for more information on how you can customize a custom native ad's video experience.
Render the AdChoices icon
As part of Supporting the Digital Services Act (DSA), reservation ads served in the European Economic Area (EEA) require an AdChoices icon and a link to Google's About This Ad page. When implementing custom native ads, you are responsible for rendering the AdChoices icon. We recommend you take steps to render and set the click listener for the AdChoices icon when rendering the main ad assets.
The following example assumes you have defined an <ImageView /> element in
your view hierarchy to hold the AdChoices logo.
<LinearLayout xmlns:android="http://schemas.android.com/apk/res/android">
    <ImageView
        android:id="@+id/adChoices"
        android:layout_width="15dp"
        android:layout_height="15dp"
        android:adjustViewBounds="true"
        android:contentDescription="AdChoices icon." />
</LinearLayout>
The following examples renders the AdChoices icon and configures the appropriate click behavior.
Kotlin
private fun renderAdChoices(customNativeAd: CustomNativeAd) {
  // Render the AdChoices image.
  val adChoiceAsset = customNativeAd.getImage(NativeAdAssetNames.ASSET_ADCHOICES_CONTAINER_VIEW)
  if (adChoiceAsset != null) {
    customNativeAdBinding.adchoices.setImageDrawable(adChoiceAsset.drawable)
    customNativeAdBinding.adchoices.visibility = View.VISIBLE
    customNativeAdBinding.adchoices.setOnClickListener {
      // Handle click. See the next section for more details.
      customNativeAd.performClick(NativeAdAssetNames.ASSET_ADCHOICES_CONTAINER_VIEW)
    }
  } else {
    customNativeAdBinding.adchoices.visibility = View.GONE
  }
}
Java
private void renderAdChoices(CustomNativeAd customNativeAd) {
  // Render the AdChoices image.
  Image adChoiceAsset =
      customNativeAd.getImage(NativeAdAssetNames.ASSET_ADCHOICES_CONTAINER_VIEW);
  if (adChoiceAsset != null) {
    if (customNativeAdBinding != null) {
      customNativeAdBinding.adchoices.setImageDrawable(adChoiceAsset.getDrawable());
      customNativeAdBinding.adchoices.setVisibility(View.VISIBLE);
      customNativeAdBinding.adchoices.setOnClickListener(
          new View.OnClickListener() {
            @Override
            public void onClick(View v) {
              // Handle click.
              customNativeAd.performClick(NativeAdAssetNames.ASSET_ADCHOICES_CONTAINER_VIEW);
            }
          });
    }
  } else {
    if (customNativeAdBinding != null) {
      customNativeAdBinding.adchoices.setVisibility(View.GONE);
    }
  }
}
Record impressions and report clicks
Your app is responsible for recording impressions and reporting click events to Next Gen Mobile Ads SDK.
Record impressions
To record an impression for a custom native ad, call the ad's
recordImpression() method:
Kotlin
// Record an impression.
customNativeAd.recordImpression()
Java
// Record an impression.
customNativeAd.recordImpression();
If your app accidentally calls the method twice for the same ad, the SDK automatically prevents a duplicate impression from being recorded for a single request.
Report clicks
To report to the SDK that a click has occurred on an asset view, call the
ad's performClick() method. Provide the name of the asset that was clicked
using the same string you defined in the Ad Manager UI.
Kotlin
imageView.setOnClickListener { customNativeAd.performClick("MainImage") }
Java
imageView.setOnClickListener(
    new View.OnClickListener() {
      @Override
      public void onClick(View v) {
        customNativeAd.performClick("MainImage");
      }
    });
Note that you don't need to call this method for every view associated with
your ad. If you had another field called "Caption" that was meant to be
displayed but not clicked or tapped on by the user, your app wouldn't need to
call performClick for that asset's view.
Respond to custom click actions
When a click is performed on a custom format ad, there are three possible responses from the SDK, attempted in this order:
- Invoke the
OnCustomClickListenerif one was provided. - For each of the ad's deep link URLs, attempt to locate a content resolver and start the first one that resolves.
- Open a browser and navigate to the ad's destination URL.
To implement a custom click action, provide an OnCustomClickListener:
Kotlin
customNativeAd.onCustomClickListener =
  object : OnCustomClickListener {
    override fun onCustomClick(assetName: String) {
      // Perform your custom action.
    }
  }
Java
customNativeAd.setOnCustomClickListener(
    new OnCustomClickListener() {
      @Override
      public void onCustomClick(@NonNull String assetName) {
        // Perform your custom action.
      }
    });
At first, it might seem strange that custom click listeners exist. After all, your app just told the SDK that a click happened, so why should the SDK turn around and report that to the app?
This flow of information is useful for a few reasons, but most importantly it allows the SDK to remain in control of the response to the click. It can automatically ping third-party tracking URLs that have been set for the creative, for example, and handle other tasks behind the scenes, without any additional code.