
คู่มือนี้อธิบายวิธีใช้เมธอด
create()
ในทรัพยากร Message ของ Google Chat API เพื่อทำสิ่งต่อไปนี้
- ส่งข้อความที่มีข้อความ การ์ด และวิดเจ็ตแบบอินเทอร์แอกทีฟ
- ส่งข้อความแบบส่วนตัวถึงผู้ใช้ Chat ที่เฉพาะเจาะจง
- เริ่มหรือตอบกลับชุดข้อความ
- ตั้งชื่อข้อความเพื่อให้คุณระบุข้อความนั้นในคำขอ Chat API อื่นๆ ได้
ขนาดสูงสุดของข้อความ (รวมข้อความหรือการ์ด) คือ 32,000 ไบต์ หากต้องการส่งข้อความที่มีขนาดเกินกว่านี้ แอป Chat ของคุณ ต้องส่งข้อความหลายรายการแทน
นอกจากจะเรียกใช้ Chat API เพื่อสร้างข้อความแล้ว แอป Chat ยังสร้างและส่งข้อความเพื่อตอบกลับการโต้ตอบของผู้ใช้ได้ด้วย เช่น โพสต์ข้อความต้อนรับหลังจากที่ผู้ใช้เพิ่ม แอป Chat ลงในพื้นที่ทำงาน เมื่อตอบกลับการโต้ตอบ แอปแชทจะใช้ฟีเจอร์การรับส่งข้อความประเภทอื่นๆ ได้ ซึ่งรวมถึง กล่องโต้ตอบแบบอินเทอร์แอกทีฟและอินเทอร์เฟซแสดงตัวอย่างลิงก์ หากต้องการตอบกลับผู้ใช้ แอป Chat จะแสดงข้อความแบบซิงโครนัสโดยไม่ต้องเรียกใช้ Chat API ดูข้อมูลเกี่ยวกับการส่งข้อความเพื่อตอบกลับ การโต้ตอบได้ที่ รับและตอบกลับการโต้ตอบด้วยแอป Google Chat
วิธีที่ Chat แสดงและระบุแหล่งที่มาของข้อความที่สร้างด้วย Chat API
คุณเรียกใช้เมธอด create() ได้โดยใช้
การตรวจสอบสิทธิ์แอป
และการตรวจสอบสิทธิ์ผู้ใช้
Chat จะระบุแหล่งที่มาของผู้ส่งข้อความแตกต่างกัน
โดยขึ้นอยู่กับประเภทการตรวจสอบสิทธิ์ที่คุณใช้
เมื่อคุณตรวจสอบสิทธิ์ในฐานะแอป Chat แอป Chat จะส่งข้อความ

App ข้างชื่อเพื่อระบุว่าผู้ส่งไม่ใช่บุคคลเมื่อคุณตรวจสอบสิทธิ์ในฐานะผู้ใช้ แอป Chat จะส่ง ข้อความในนามของผู้ใช้ นอกจากนี้ Chat ยังระบุแหล่งที่มาของข้อความจากแอป Chat ด้วยการแสดงชื่อแอป

นอกจากนี้ ประเภทการตรวจสอบสิทธิ์ยังกำหนดฟีเจอร์และอินเทอร์เฟซการรับส่งข้อความ ที่คุณจะรวมไว้ในข้อความได้ด้วย การตรวจสอบสิทธิ์แอป ช่วยให้แอป Chat ส่งข้อความที่มี Rich Text อินเทอร์เฟซแบบการ์ด และวิดเจ็ตแบบอินเทอร์แอกทีฟได้ การตรวจสอบสิทธิ์ผู้ใช้ช่วยให้คุณส่งข้อความได้ ในเวอร์ชันตัวอย่างสำหรับนักพัฒนาซอฟต์แวร์ คุณยังส่งการ์ดได้ด้วยตามที่ระบุไว้ในสร้างและอัปเดตการ์ด
ดูข้อมูลเพิ่มเติมเกี่ยวกับฟีเจอร์การรับส่งข้อความที่ใช้ได้กับ Chat API ได้ที่ภาพรวมของข้อความ Google Chat
คู่มือนี้อธิบายวิธีใช้การตรวจสอบสิทธิ์ประเภทใดประเภทหนึ่งเพื่อส่งข้อความ ด้วย Chat API
ข้อกำหนดเบื้องต้น
Node.js
- บัญชี Google Workspace สำหรับธุรกิจหรือองค์กร ที่มีสิทธิ์เข้าถึง Google Chat
- ตั้งค่าสภาพแวดล้อม โดยทำดังนี้
- สร้างโปรเจ็กต์ Google Cloud
- กำหนดค่าหน้าจอขอความยินยอม OAuth
- เปิดใช้และกำหนดค่า Google Chat API พร้อมชื่อ ไอคอน และคำอธิบายสำหรับแอป Chat
- ติดตั้ง Node.js Cloud Client Library
- สร้างข้อมูลเข้าสู่ระบบเพื่อเข้าถึงตามวิธีที่คุณต้องการตรวจสอบสิทธิ์ในคำขอ Google Chat API
ดังนี้
- หากต้องการตรวจสอบสิทธิ์ในฐานะผู้ใช้ Chat ให้
สร้างรหัสไคลเอ็นต์ OAuthและบันทึกข้อมูลเข้าสู่ระบบเป็นไฟล์ JSON ชื่อ
credentials.jsonในไดเรกทอรีในเครื่อง - หากต้องการตรวจสอบสิทธิ์ในฐานะแอป Chat ให้
สร้างบัญชีบริการ
ข้อมูลเข้าสู่ระบบ แล้วบันทึกข้อมูลเข้าสู่ระบบเป็นไฟล์ JSON ชื่อ
credentials.json
- หากต้องการตรวจสอบสิทธิ์ในฐานะผู้ใช้ Chat ให้
สร้างรหัสไคลเอ็นต์ OAuthและบันทึกข้อมูลเข้าสู่ระบบเป็นไฟล์ JSON ชื่อ
- เลือกขอบเขตการให้สิทธิ์ตามว่าคุณต้องการตรวจสอบสิทธิ์ในฐานะผู้ใช้หรือ แอปใน Chat
- พื้นที่ใน Google Chat ที่ผู้ใช้ที่ได้รับการตรวจสอบสิทธิ์หรือแอป Chat ที่โทรเป็นสมาชิก หากต้องการตรวจสอบสิทธิ์ในฐานะแอป Chat ให้เพิ่มแอป Chat ลงในพื้นที่ทำงาน
Python
- บัญชี Google Workspace สำหรับธุรกิจหรือองค์กร ที่มีสิทธิ์เข้าถึง Google Chat
- ตั้งค่าสภาพแวดล้อม โดยทำดังนี้
- สร้างโปรเจ็กต์ Google Cloud
- กำหนดค่าหน้าจอขอความยินยอม OAuth
- เปิดใช้และกำหนดค่า Google Chat API พร้อมชื่อ ไอคอน และคำอธิบายสำหรับแอป Chat
- ติดตั้ง Python Cloud Client Library
- สร้างข้อมูลเข้าสู่ระบบเพื่อเข้าถึงตามวิธีที่คุณต้องการตรวจสอบสิทธิ์ในคำขอ Google Chat API
ดังนี้
- หากต้องการตรวจสอบสิทธิ์ในฐานะผู้ใช้ Chat ให้
สร้างรหัสไคลเอ็นต์ OAuthและบันทึกข้อมูลเข้าสู่ระบบเป็นไฟล์ JSON ชื่อ
credentials.jsonในไดเรกทอรีในเครื่อง - หากต้องการตรวจสอบสิทธิ์ในฐานะแอป Chat ให้
สร้างบัญชีบริการ
ข้อมูลเข้าสู่ระบบ แล้วบันทึกข้อมูลเข้าสู่ระบบเป็นไฟล์ JSON ชื่อ
credentials.json
- หากต้องการตรวจสอบสิทธิ์ในฐานะผู้ใช้ Chat ให้
สร้างรหัสไคลเอ็นต์ OAuthและบันทึกข้อมูลเข้าสู่ระบบเป็นไฟล์ JSON ชื่อ
- เลือกขอบเขตการให้สิทธิ์ตามว่าคุณต้องการตรวจสอบสิทธิ์ในฐานะผู้ใช้หรือ แอปใน Chat
- พื้นที่ใน Google Chat ที่ผู้ใช้ที่ได้รับการตรวจสอบสิทธิ์หรือแอป Chat ที่โทรเป็นสมาชิก หากต้องการตรวจสอบสิทธิ์ในฐานะแอป Chat ให้เพิ่มแอป Chat ลงในพื้นที่ทำงาน
Java
- บัญชี Google Workspace สำหรับธุรกิจหรือองค์กร ที่มีสิทธิ์เข้าถึง Google Chat
- ตั้งค่าสภาพแวดล้อม โดยทำดังนี้
- สร้างโปรเจ็กต์ Google Cloud
- กำหนดค่าหน้าจอขอความยินยอม OAuth
- เปิดใช้และกำหนดค่า Google Chat API พร้อมชื่อ ไอคอน และคำอธิบายสำหรับแอป Chat
- ติดตั้ง Java Cloud Client Library
- สร้างข้อมูลเข้าสู่ระบบเพื่อเข้าถึงตามวิธีที่คุณต้องการตรวจสอบสิทธิ์ในคำขอ Google Chat API
ดังนี้
- หากต้องการตรวจสอบสิทธิ์ในฐานะผู้ใช้ Chat ให้
สร้างรหัสไคลเอ็นต์ OAuthและบันทึกข้อมูลเข้าสู่ระบบเป็นไฟล์ JSON ชื่อ
credentials.jsonในไดเรกทอรีในเครื่อง - หากต้องการตรวจสอบสิทธิ์ในฐานะแอป Chat ให้
สร้างบัญชีบริการ
ข้อมูลเข้าสู่ระบบ แล้วบันทึกข้อมูลเข้าสู่ระบบเป็นไฟล์ JSON ชื่อ
credentials.json
- หากต้องการตรวจสอบสิทธิ์ในฐานะผู้ใช้ Chat ให้
สร้างรหัสไคลเอ็นต์ OAuthและบันทึกข้อมูลเข้าสู่ระบบเป็นไฟล์ JSON ชื่อ
- เลือกขอบเขตการให้สิทธิ์ตามว่าคุณต้องการตรวจสอบสิทธิ์ในฐานะผู้ใช้หรือ แอปใน Chat
- พื้นที่ใน Google Chat ที่ผู้ใช้ที่ได้รับการตรวจสอบสิทธิ์หรือแอป Chat ที่โทรเป็นสมาชิก หากต้องการตรวจสอบสิทธิ์ในฐานะแอป Chat ให้เพิ่มแอป Chat ลงในพื้นที่ทำงาน
Apps Script
- บัญชี Google Workspace สำหรับธุรกิจหรือองค์กร ที่มีสิทธิ์เข้าถึง Google Chat
- ตั้งค่าสภาพแวดล้อม โดยทำดังนี้
- สร้างโปรเจ็กต์ Google Cloud
- กำหนดค่าหน้าจอขอความยินยอม OAuth
- เปิดใช้และกำหนดค่า Google Chat API พร้อมชื่อ ไอคอน และคำอธิบายสำหรับแอป Chat
- สร้างโปรเจ็กต์ Apps Script แบบสแตนด์อโลน และเปิดบริการ Chat ขั้นสูง
- ในคู่มือนี้ คุณต้องใช้การตรวจสอบสิทธิ์ผู้ใช้ หรือแอป หากต้องการตรวจสอบสิทธิ์ในฐานะแอป Chat ให้สร้าง ข้อมูลเข้าสู่ระบบของบัญชีบริการ ดูขั้นตอนได้ที่ ตรวจสอบสิทธิ์และให้สิทธิ์ในฐานะ แอป Google Chat
- เลือกขอบเขตการให้สิทธิ์ตามว่าคุณต้องการตรวจสอบสิทธิ์ในฐานะผู้ใช้หรือ แอปใน Chat
- พื้นที่ใน Google Chat ที่ผู้ใช้ที่ได้รับการตรวจสอบสิทธิ์หรือแอป Chat ที่โทรเป็นสมาชิก หากต้องการตรวจสอบสิทธิ์ในฐานะแอป Chat ให้เพิ่มแอป Chat ลงในพื้นที่ทำงาน
ส่งข้อความในฐานะแอป Chat
ส่วนนี้อธิบายวิธีส่งข้อความที่มีข้อความ การ์ด และวิดเจ็ตอุปกรณ์เสริมแบบอินเทอร์แอกทีฟโดยใช้การตรวจสอบสิทธิ์แอป

หากต้องการเรียกใช้เมธอด CreateMessage()
โดยใช้การตรวจสอบสิทธิ์แอป คุณต้องระบุฟิลด์ต่อไปนี้ในคำขอ
chat.botขอบเขตการให้สิทธิ์Spaceแหล่งข้อมูลที่คุณต้องการโพสต์ข้อความ แอป Chat ต้องเป็นสมาชิกของพื้นที่ทำงาน- แหล่งข้อมูล
Messageที่จะสร้าง หากต้องการกำหนดเนื้อหาของข้อความ คุณสามารถใส่ Rich Text (text) อินเทอร์เฟซการ์ดอย่างน้อย 1 รายการ (cardsV2) หรือทั้ง 2 อย่าง
คุณเลือกที่จะรวมข้อมูลต่อไปนี้หรือไม่ก็ได้
- ฟิลด์
accessoryWidgetsที่จะรวม ปุ่มแบบอินเทอร์แอกทีฟที่ด้านล่างของข้อความ - ฟิลด์
privateMessageViewerถึง ส่งข้อความแบบส่วนตัวไปยังผู้ใช้ที่ระบุ - ฟิลด์
messageIdซึ่งช่วยให้คุณตั้งชื่อข้อความเพื่อใช้ในคำขอ API อื่นๆ ได้ - ฟิลด์
thread.threadKeyและmessageReplyOptionเพื่อ เริ่มหรือตอบกลับชุดข้อความ หากพื้นที่ทำงานไม่ได้ ใช้การสนทนาแบบเธรด ระบบจะไม่สนใจช่องนี้
โค้ดต่อไปนี้แสดงตัวอย่างวิธีที่แอปแชท สามารถส่งข้อความที่โพสต์เป็นแอปแชทซึ่งมี ข้อความ การ์ด และปุ่มที่คลิกได้ที่ด้านล่างของข้อความ
Node.js
Python
Java
Apps Script
หากต้องการเรียกใช้ตัวอย่างนี้ ให้แทนที่ SPACE_NAME ด้วยรหัสจาก
ฟิลด์
name
ของพื้นที่ คุณรับรหัสได้โดยการเรียกใช้เมธอด
ListSpaces()
หรือจาก URL ของพื้นที่ทำงาน
เพิ่มวิดเจ็ตแบบอินเทอร์แอกทีฟที่ด้านล่างของข้อความ
ในตัวอย่างโค้ดแรกของคู่มือนี้ ข้อความแอปแชทจะแสดงปุ่มที่คลิกได้ที่ด้านล่างของข้อความ ซึ่งเรียกว่าวิดเจ็ตเสริม วิดเจ็ตอุปกรณ์เสริม จะปรากฏหลังจากข้อความหรือการ์ดในข้อความ คุณสามารถใช้วิดเจ็ตเหล่านี้เพื่อกระตุ้นให้ผู้ใช้โต้ตอบกับข้อความได้หลายวิธี เช่น
- ให้คะแนนความถูกต้องหรือความพึงพอใจของข้อความ
- รายงานปัญหาเกี่ยวกับแอปข้อความหรือ Chat
- เปิดลิงก์ไปยังเนื้อหาที่เกี่ยวข้อง เช่น เอกสารประกอบ
- ปิดหรือเลื่อนข้อความที่คล้ายกันจากแอป Chat เป็นระยะเวลาที่เฉพาะเจาะจง
หากต้องการเพิ่มวิดเจ็ตอุปกรณ์เสริม ให้ใส่ฟิลด์
accessoryWidgets[]
ในเนื้อหาของคำขอและระบุวิดเจ็ตอย่างน้อย 1 รายการที่ต้องการ
รวมไว้
รูปภาพต่อไปนี้แสดงแอป Chat ที่ต่อท้าย ข้อความด้วยวิดเจ็ตอุปกรณ์เสริมเพื่อให้ผู้ใช้ให้คะแนนประสบการณ์การใช้งาน แอป Chat ได้
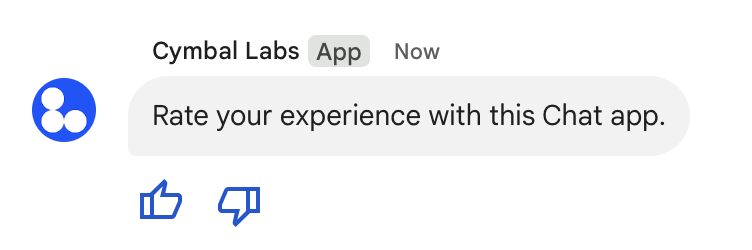
ต่อไปนี้คือเนื้อหาของคำขอที่สร้างข้อความที่มีปุ่มเสริม 2 ปุ่ม เมื่อผู้ใช้คลิกปุ่ม ฟังก์ชันที่เกี่ยวข้อง (เช่น doUpvote) จะประมวลผลการโต้ตอบดังนี้
{
  text: "Rate your experience with this Chat app.",
  accessoryWidgets: [{ buttonList: { buttons: [{
    icon: { material_icon: {
      name: "thumb_up"
    }},
    color: { red: 0, blue: 255, green: 0 },
    onClick: { action: {
      function: "doUpvote"
    }}
  }, {
    icon: { material_icon: {
      name: "thumb_down"
    }},
    color: { red: 0, blue: 255, green: 0 },
    onClick: { action: {
      function: "doDownvote"
    }}
  }]}}]
}
ส่งข้อความแบบส่วนตัว
แอป Chat สามารถส่งข้อความแบบส่วนตัวเพื่อให้ ข้อความดังกล่าวแสดงต่อผู้ใช้ที่เฉพาะเจาะจงในพื้นที่ทำงานเท่านั้น เมื่อแอปแชทส่งข้อความส่วนตัว ข้อความจะแสดงป้ายกำกับที่แจ้งให้ผู้ใช้ทราบว่ามีเพียงผู้ใช้เท่านั้นที่มองเห็นข้อความ
หากต้องการส่งข้อความแบบส่วนตัวโดยใช้ Chat API ให้ระบุฟิลด์
privateMessageViewer
ในส่วนเนื้อหาของคำขอ หากต้องการระบุผู้ใช้ ให้ตั้งค่าเป็น
User
ทรัพยากรที่แสดงถึงผู้ใช้ Chat นอกจากนี้ คุณยังใช้ฟิลด์
name
ของทรัพยากร User ได้ด้วย ดังที่แสดงในตัวอย่างต่อไปนี้
{
  text: "Hello private world!",
  privateMessageViewer: {
    name: "users/USER_ID"
  }
}
หากต้องการใช้ตัวอย่างนี้ ให้แทนที่ USER_ID
ด้วยรหัสที่ไม่ซ้ำสําหรับผู้ใช้ เช่น 12345678987654321 หรือ
hao@cymbalgroup.com ดูข้อมูลเพิ่มเติมเกี่ยวกับการระบุผู้ใช้ได้ที่
ระบุและกำหนดผู้ใช้ Google Chat
หากต้องการส่งข้อความแบบส่วนตัว คุณต้องละเว้นสิ่งต่อไปนี้ในคำขอ
ส่งการแจ้งเตือนที่บังคับหรือข้อความแบบปิดเสียง
เมื่อแอป Chat ส่งข้อความ แอปจะใช้ตัวเลือกใดตัวเลือกหนึ่งต่อไปนี้เพื่อแจ้งเตือนผู้ใช้ได้
- บังคับการแจ้งเตือน: Chat จะส่งข้อความ Push ไปยังผู้รับเสมอ ไม่ว่าผู้รับจะตั้งค่าการแจ้งเตือนหรือสถานะห้ามรบกวน (DND) เป็นอย่างไร ใน Chat ข้อความจะทำให้เกิดการทำตัวหนาและการเลื่อนขึ้น ในรายชื่อหรือรายการหน้าแรกของผู้รับ และแสดงป้าย
- ส่งข้อความแบบปิดเสียง: Chat จะระงับข้อความ Push สำหรับผู้รับ ใน Chat ข้อความดังกล่าวจะไม่ทำให้เกิดลักษณะการแสดงข้อความตัวหนาหรือการปักหมุด ในรายชื่อผู้รับหรือรายการหน้าแรก และจะไม่แสดงป้าย หากข้อความที่ไม่มีเสียงเป็นข้อความสุดท้ายในการสนทนา ระบบจะไม่แสดงเนื้อหาของข้อความดังกล่าวในข้อมูลสรุปหน้าแรก
ไม่ว่าจะเป็นการบังคับหรือการแจ้งเตือนแบบปิดเสียง ข้อความเหล่านี้จะมีตัวบ่งชี้ด้วยภาพที่ แจ้งให้ผู้รับทราบลักษณะการทำงานของการแจ้งเตือนพิเศษ
การแจ้งเตือนแบบบังคับและข้อความแบบเงียบใช้ได้เฉพาะกับแอป Chat ที่ใช้ การตรวจสอบสิทธิ์แอป
การแจ้งเตือนที่บังคับและข้อความแบบเงียบมีข้อจำกัดต่อไปนี้
- ผู้ใช้ภายนอก: การแจ้งเตือนแบบบังคับและข้อความแบบเงียบจะไม่มีผลกับ ผู้ใช้ภายนอก (ผู้เข้าร่วม) ในพื้นที่ทำงาน ผู้ใช้ภายนอกจะได้รับการแจ้งเตือน ตามการตั้งค่าของตนเอง
- การกล่าวถึง: ข้อความที่ปิดเสียงไม่รองรับ การกล่าวถึงผู้ใช้ หากคุณใส่การกล่าวถึงในข้อความที่ปิดเสียง ระบบจะถือว่าเป็นการกล่าวถึงในข้อความธรรมดา
- การแยกชุดข้อความย่อย: คุณเริ่มหรือตอบกลับชุดข้อความด้วยข้อความแบบเงียบไม่ได้
- ประเภทพื้นที่ทำงาน: ระบบไม่รองรับการแจ้งเตือนแบบบังคับและข้อความแบบเงียบใน ข้อความส่วนตัว (DM) หรือพื้นที่ทำงานที่บุคคลซึ่งไม่มี บัญชี Google Workspace เป็นเจ้าของ
- การแจ้งเตือนทางอีเมล: ข้อความที่ปิดเสียงจะไม่ทริกเกอร์การแจ้งเตือนทางอีเมล ข้อความที่แจ้งเตือนโดยบังคับจะทริกเกอร์การแจ้งเตือนทางอีเมลก็ต่อเมื่อมี การกล่าวถึงผู้ใช้ที่เฉพาะเจาะจงด้วย
หากต้องการบังคับให้แสดงการแจ้งเตือนหรือส่งข้อความแบบไม่มีเสียง ให้ใส่ฟิลด์
createMessageNotificationOptions
ในคำขอและตั้งค่า notificationType เป็นค่าใดค่าหนึ่งต่อไปนี้
| ค่า | พฤติกรรม |
|---|---|
NOTIFICATION_TYPE_FORCE_NOTIFY |
บังคับให้แสดงการแจ้งเตือน |
NOTIFICATION_TYPE_SILENT |
ส่งข้อความแบบไม่มีเสียง |
ตัวอย่างต่อไปนี้แสดงเนื้อหา JSON ของคำขอส่งข้อความที่มีการแจ้งเตือนแบบบังคับ
{
  "text": "Critical update: the server is down!",
  "createMessageNotificationOptions": {
    "notificationType": "NOTIFICATION_TYPE_FORCE_NOTIFY"
  }
}
ส่งข้อความ SMS ในนามของผู้ใช้
ส่วนนี้จะอธิบายวิธีส่งข้อความในนามของผู้ใช้โดยใช้การตรวจสอบสิทธิ์ผู้ใช้ เมื่อมีการตรวจสอบสิทธิ์ผู้ใช้ เนื้อหาของข้อความจะมีได้เฉพาะข้อความ และต้องไม่มีฟีเจอร์การรับส่งข้อความที่ใช้ได้เฉพาะใน แอปแชท ซึ่งรวมถึงอินเทอร์เฟซการ์ดและวิดเจ็ตแบบอินเทอร์แอกทีฟ ในเวอร์ชันตัวอย่างสำหรับนักพัฒนาซอฟต์แวร์ คุณสามารถ สร้างข้อความที่มีการ์ดในนามของผู้ใช้ได้ ดูรายละเอียดได้ที่สร้างและอัปเดตการ์ด

หากต้องการเรียกใช้เมธอด CreateMessage() โดยใช้การตรวจสอบสิทธิ์ผู้ใช้ คุณต้องระบุ
ฟิลด์ต่อไปนี้ในคำขอ
- ขอบเขตการให้สิทธิ์
ที่รองรับการตรวจสอบสิทธิ์ผู้ใช้สำหรับวิธีการนี้ ตัวอย่างต่อไปนี้ใช้ขอบเขต
chat.messages.create Spaceแหล่งข้อมูลที่คุณต้องการโพสต์ข้อความ ผู้ใช้ที่ได้รับการตรวจสอบสิทธิ์ต้องเป็น สมาชิกของพื้นที่ทำงาน- แหล่งข้อมูล
Messageที่จะสร้าง หากต้องการกำหนดเนื้อหาของข้อความ คุณต้องรวมฟิลด์text
คุณเลือกที่จะรวมข้อมูลต่อไปนี้หรือไม่ก็ได้
- ฟิลด์
createMessageNotificationOptionsเพื่อ บังคับการแจ้งเตือนหรือส่งข้อความแบบเงียบ - ฟิลด์
messageIdซึ่งช่วยให้คุณตั้งชื่อข้อความเพื่อใช้ในคำขอ API อื่นๆ ได้ - ฟิลด์
thread.threadKeyและmessageReplyOptionเพื่อ เริ่มหรือตอบกลับชุดข้อความ หากพื้นที่ทำงานไม่ได้ ใช้การสนทนาแบบเธรด ระบบจะไม่สนใจช่องนี้
โค้ดต่อไปนี้แสดงตัวอย่างวิธีที่แอป Chat สามารถส่งข้อความในพื้นที่ทำงานที่กำหนดในนามของผู้ใช้ที่ได้รับการตรวจสอบสิทธิ์
Node.js
Python
Java
Apps Script
หากต้องการเรียกใช้ตัวอย่างนี้ ให้แทนที่ SPACE_NAME ด้วยรหัสจาก
ฟิลด์
name
ของพื้นที่ คุณรับรหัสได้โดยการเรียกใช้เมธอด
ListSpaces()
หรือจาก URL ของพื้นที่ทำงาน
เริ่มหรือตอบกลับในชุดข้อความ
สำหรับพื้นที่ทำงานที่ใช้ชุดข้อความ คุณสามารถระบุได้ว่าข้อความใหม่จะเริ่มชุดข้อความใหม่หรือตอบกลับ ชุดข้อความที่มีอยู่
โดยค่าเริ่มต้น ข้อความที่คุณสร้างโดยใช้ Chat API จะเริ่มเธรดใหม่ หากต้องการช่วยให้คุณระบุเธรดและตอบกลับในภายหลังได้ คุณสามารถระบุ คีย์เธรดในคำขอได้โดยทำดังนี้
- ในเนื้อหาของคำขอ ให้ระบุฟิลด์
thread.threadKey - ระบุพารามิเตอร์การค้นหา
messageReplyOptionเพื่อกำหนดสิ่งที่เกิดขึ้นหากมีคีย์อยู่แล้ว
วิธีสร้างข้อความที่ตอบกลับชุดข้อความที่มีอยู่
- โปรดระบุฟิลด์
threadในเนื้อหาของคำขอ หากตั้งค่าไว้ คุณจะ ระบุthreadKeyที่สร้างขึ้นได้ หรือคุณต้องใช้nameของเธรด - ระบุพารามิเตอร์การค้นหา
messageReplyOption
โค้ดต่อไปนี้แสดงตัวอย่างวิธีที่แอป Chat สามารถส่งข้อความที่เริ่มหรือตอบกลับเธรดที่ระบุโดย คีย์ของพื้นที่ทำงานที่กำหนดในนามของผู้ใช้ที่ได้รับการตรวจสอบสิทธิ์
Node.js
Python
Java
Apps Script
หากต้องการเรียกใช้ตัวอย่างนี้ ให้แทนที่รายการต่อไปนี้
THREAD_KEY: คีย์เธรดที่มีอยู่ในพื้นที่ หรือ หากต้องการสร้างเธรดใหม่ ให้ตั้งชื่อที่ไม่ซ้ำกันสำหรับเธรดSPACE_NAME: รหัสจากฟิลด์nameของพื้นที่ทำงาน คุณรับรหัสได้โดยการเรียกใช้เมธอดListSpaces()หรือจาก URL ของพื้นที่ทำงาน
ตั้งชื่อข้อความ
หากต้องการดึงหรือระบุข้อความในการเรียก API ในอนาคต คุณสามารถตั้งชื่อข้อความได้
โดยการตั้งค่าฟิลด์ messageId ในคำขอ
การตั้งชื่อข้อความช่วยให้คุณระบุข้อความได้โดยไม่ต้องจัดเก็บ
รหัสที่ระบบกำหนดจากชื่อทรัพยากรของข้อความ (แสดงในฟิลด์
name
)
เช่น หากต้องการเรียกข้อมูลข้อความโดยใช้เมธอด get() คุณจะต้องใช้ชื่อทรัพยากรเพื่อระบุข้อความที่จะเรียก ชื่อทรัพยากรมีรูปแบบเป็น spaces/{space}/messages/{message} โดย {message} แสดงถึงรหัสที่ระบบกำหนดหรือชื่อที่กำหนดเองที่คุณตั้งค่าเมื่อสร้างข้อความ
หากต้องการตั้งชื่อข้อความ ให้ระบุรหัสที่กำหนดเองในฟิลด์
messageId
เมื่อสร้างข้อความ ฟิลด์ messageId จะตั้งค่าสำหรับฟิลด์
clientAssignedMessageId
ของทรัพยากร Message
คุณตั้งชื่อข้อความได้เมื่อสร้างข้อความเท่านั้น คุณตั้งชื่อหรือ แก้ไขรหัสที่กำหนดเองสำหรับข้อความที่มีอยู่ไม่ได้ รหัสที่กำหนดเองต้องเป็นไปตามข้อกำหนดต่อไปนี้
- เริ่มต้นด้วย
client-เช่นclient-custom-nameเป็นรหัสที่กำหนดเองที่ใช้ได้ แต่custom-nameใช้ไม่ได้ - ประกอบด้วยอักขระสูงสุด 63 ตัว และมีเฉพาะตัวอักษรพิมพ์เล็ก ตัวเลข และขีดกลาง
- ไม่ซ้ำกันภายในพื้นที่ทำงาน แอป Chat จะใช้รหัสที่กำหนดเองเดียวกันสำหรับข้อความต่างๆ ไม่ได้
โค้ดต่อไปนี้แสดงตัวอย่างวิธีที่แอป Chat สามารถส่งข้อความที่มีรหัสไปยังพื้นที่ที่กำหนดในนามของ ผู้ใช้ที่ได้รับการตรวจสอบสิทธิ์
Node.js
Python
Java
Apps Script
หากต้องการเรียกใช้ตัวอย่างนี้ ให้แทนที่รายการต่อไปนี้
SPACE_NAME: รหัสจากฟิลด์nameของพื้นที่ทำงาน คุณรับรหัสได้โดยการเรียกใช้เมธอดListSpaces()หรือจาก URL ของพื้นที่ทำงานMESSAGE-ID: ชื่อข้อความที่ขึ้นต้นด้วยcustom-ต้องไม่ซ้ำกับชื่อข้อความอื่นๆ ที่แอป Chat สร้างขึ้นในพื้นที่ที่ระบุ
ยกข้อความมา
คุณอ้างอิงข้อความอื่นได้โดยเรียกใช้
CreateMessage()
(rpc,
rest)
และตั้งค่า quotedMessageMetadata
(rpc,
rest)
ในคำขอ
คุณยกข้อความภายในชุดข้อความหรือในแชทหลักได้ แต่จะยกข้อความจากชุดข้อความอื่นไม่ได้
โค้ดต่อไปนี้แสดงวิธีสร้างข้อความที่อ้างอิงข้อความอื่น
Node.js
import {createClientWithUserCredentials} from './authentication-utils.js';

const USER_AUTH_OAUTH_SCOPES = ['https://www.googleapis.com/auth/chat.messages.create'];

// This sample shows how to create a message that quotes another message.
async function main() {

  // Create a client
  const chatClient = await createClientWithUserCredentials(USER_AUTH_OAUTH_SCOPES);

  // Initialize request argument(s)
  const request = {

    // TODO(developer): Replace SPACE_NAME .
    parent: 'spaces/SPACE_NAME',

    message: {
      text: 'I am responding to a quoted message!',

      // quotedMessageMetadata lets Chat apps respond to a message by quoting it.
      quotedMessageMetadata: {

        // TODO(developer): Replace QUOTED_MESSAGE_NAME
        // and QUOTED_MESSAGE_LAST_UPDATE_TIME.
        name: 'QUOTED_MESSAGE_NAME',
        lastUpdateTime: 'QUOTED_MESSAGE_LAST_UPDATE_TIME'
      }
    }
  };

  // Make the request
  const response = await chatClient.createMessage(request);

  // Handle the response
  console.log(response);
}

main().catch(console.error);
Python
from authentication_utils import create_client_with_user_credentials
from google.apps import chat_v1 as google_chat
from google.protobuf.timestamp_pb2 import Timestamp

SCOPES = ['https://www.googleapis.com/auth/chat.messages.create']

# This sample shows how to create a message that quotes another message.
def create_message_quote_message():
    '''Creates a message that quotes another message.'''

    # Create a client
    client = create_client_with_user_credentials(SCOPES)

    # Create a timestamp from the RFC-3339 string.
    # TODO(developer): Replace QUOTED_MESSAGE_LAST_UPDATE_TIME.
    last_update_time = Timestamp()
    last_update_time.FromJsonString('QUOTED_MESSAGE_LAST_UPDATE_TIME')

    # Initialize request argument(s)
    request = google_chat.CreateMessageRequest(

        # TODO(developer): Replace SPACE_NAME.
        parent='spaces/SPACE_NAME',

        # Create the message.
        message = google_chat.Message(
            text='I am responding to a quoted message!',

            # quotedMessageMetadata lets Chat apps respond to a message by quoting it.
            quoted_message_metadata=google_chat.QuotedMessageMetadata(

                name='QUOTED_MESSAGE_NAME',
                last_update_time=last_update_time
            )
        )
    )

    # Make the request
    response = client.create_message(request)

    # Handle the response
    print(response)

create_message_quote_message()
Java
import com.google.chat.v1.ChatServiceClient;
import com.google.chat.v1.CreateMessageRequest;
import com.google.chat.v1.Message;
import com.google.chat.v1.QuotedMessageMetadata;
import com.google.protobuf.util.Timestamps;
import com.google.workspace.api.chat.samples.utils.AuthenticationUtils;
import java.text.ParseException;

// This sample shows how to create a message that quotes another message.
public class CreateMessageQuoteMessage {
  public static void main(String[] args) throws Exception, ParseException {
    // Create a client.
    ChatServiceClient chatClient = AuthenticationUtils.createClientWithUserCredentials();

    // Initialize request argument(s).
    // TODO(developer): Replace SPACE_NAME, QUOTED_MESSAGE_NAME,
    // and QUOTED_MESSAGE_LAST_UPDATE_TIME here.
    String parent = "spaces/SPACE_NAME";
    String quotedMessageName = "QUOTED_MESSAGE_NAME";
    String lastUpdateTime = "QUOTED_MESSAGE_LAST_UPDATE_TIME";

    QuotedMessageMetadata quotedMessageMetadata =
        QuotedMessageMetadata.newBuilder()
            .setName(quotedMessageName)
            .setLastUpdateTime(Timestamps.parse(lastUpdateTime))
            .build();

    Message message = Message.newBuilder()
        .setText("I am responding to a quoted message!")
        .setQuotedMessageMetadata(quotedMessageMetadata)
        .build();

    CreateMessageRequest request =
        CreateMessageRequest.newBuilder()
            .setParent(parent)
            .setMessage(message)
            .build();

    // Make the request.
    Message response = chatClient.createMessage(request);

    // Handle the response.
    System.out.println(response);
  }
}
Apps Script
/**
 * Creates a message that quotes another message.
 *
 * Relies on the OAuth2 scope 'https://www.googleapis.com/auth/chat.messages.create'
 * referenced in the manifest file (appsscript.json).
 */
function createMessageQuoteMessage() {

  // Initialize request argument(s)
  // TODO(developer): Replace SPACE_NAME here.
  const parent = 'spaces/SPACE_NAME';

  const message = {

    // The text content of the message.
    text: 'I am responding to a quoted message!',

    // quotedMessageMetadata lets Chat apps respond to a message by quoting it.
    //
    // TODO(developer): Replace QUOTED_MESSAGE_NAME
    // and QUOTED_MESSAGE_LAST_UPDATE_TIME .
    quotedMessageMetadata: {
      name: 'QUOTED_MESSAGE_NAME',
      lastUpdateTime: 'QUOTED_MESSAGE_LAST_UPDATE_TIME',
    }
  };

  // Make the request
  const response = Chat.Spaces.Messages.create(message, parent);

  // Handle the response
  console.log(response);
}
หากต้องการเรียกใช้ตัวอย่างนี้ ให้แทนที่รายการต่อไปนี้
SPACE_NAME: รหัสจากฟิลด์nameของพื้นที่ทำงาน คุณรับรหัสได้โดยการเรียกใช้เมธอดListSpaces()(rpc,rest) หรือจาก URL ของพื้นที่QUOTED_MESSAGE_NAME: แหล่งข้อมูลข้อความname(rpc,rest) ของ ข้อความที่จะอ้างอิงในรูปแบบspaces/{space}/messages/{message}QUOTED_MESSAGE_LAST_UPDATE_TIME: เวลาอัปเดตล่าสุด ของข้อความที่คุณต้องการอ้างอิง หากไม่เคยมีการแก้ไขข้อความ จะตรงกับcreateTime(rpc,rest) หากมีการแก้ไขข้อความ จะตรงกับlastUpdateTime(rpc,rest)
แก้ปัญหา
เมื่อแอป Google Chat หรือการ์ดแสดงข้อผิดพลาด อินเทอร์เฟซของ Chat จะแสดงข้อความว่า "เกิดข้อผิดพลาด" หรือ "ดำเนินการตามคำขอของคุณไม่ได้" บางครั้ง UI ของ Chat อาจไม่แสดงข้อความแสดงข้อผิดพลาดใดๆ แต่แอปหรือการ์ด Chat อาจให้ผลลัพธ์ที่ไม่คาดคิด เช่น ข้อความในการ์ดอาจไม่ปรากฏ
แม้ว่าข้อความแสดงข้อผิดพลาดอาจไม่แสดงใน UI ของ Chat แต่ข้อความแสดงข้อผิดพลาดและข้อมูลบันทึกที่อธิบายไว้จะช่วยคุณแก้ไขข้อผิดพลาดได้เมื่อเปิดการบันทึกข้อผิดพลาดสำหรับแอป Chat หากต้องการความช่วยเหลือในการดู การแก้ไขข้อบกพร่อง และการแก้ไขข้อผิดพลาด โปรดดู แก้ปัญหาและแก้ไขข้อผิดพลาดของ Google Chat
หัวข้อที่เกี่ยวข้อง
- ใช้เครื่องมือสร้างการ์ดเพื่อ ออกแบบและแสดงตัวอย่างข้อความการ์ด JSON สำหรับแอป Chat
- จัดรูปแบบข้อความ
- ดูรายละเอียดเกี่ยวกับข้อความ
- แสดงรายการข้อความในพื้นที่ทำงาน
- อัปเดตข้อความ
- ลบข้อความ
- ระบุผู้ใช้ในข้อความ Google Chat
- ส่งข้อความไปยัง Google Chat ด้วยเว็บฮุคขาเข้า