
Coding level: Advanced
Duration: 45 minutes
Project type: Google Workspace add-on
extending Chat,
Gmail,
Calendar,
Drive,
Docs, Sheets, and Slides.
This tutorial shows you how to publish AI agents to Google Workspace as Google Workspace add-ons, using Apps Script or HTTP endpoints. After your publish your add-on, your users can interact with the AI agents within their workflows.
Overview
In this tutorial, you deploy the Travel Concierge sample from the Agent Development Kit (ADK). The Travel Concierge is a conversational multi-agent AI that uses tools like the Google Maps Platform Places API, Google Search Grounding, and a Model Context Protocol (MCP) server.
The ADK provides chat and text interfaces for developers by default. In this tutorial, you add a Graphical User Interface (GUI) to Google Workspace applications that your users can access directly in Chat, Gmail, Calendar, Drive, Docs, Sheets, and Slides.
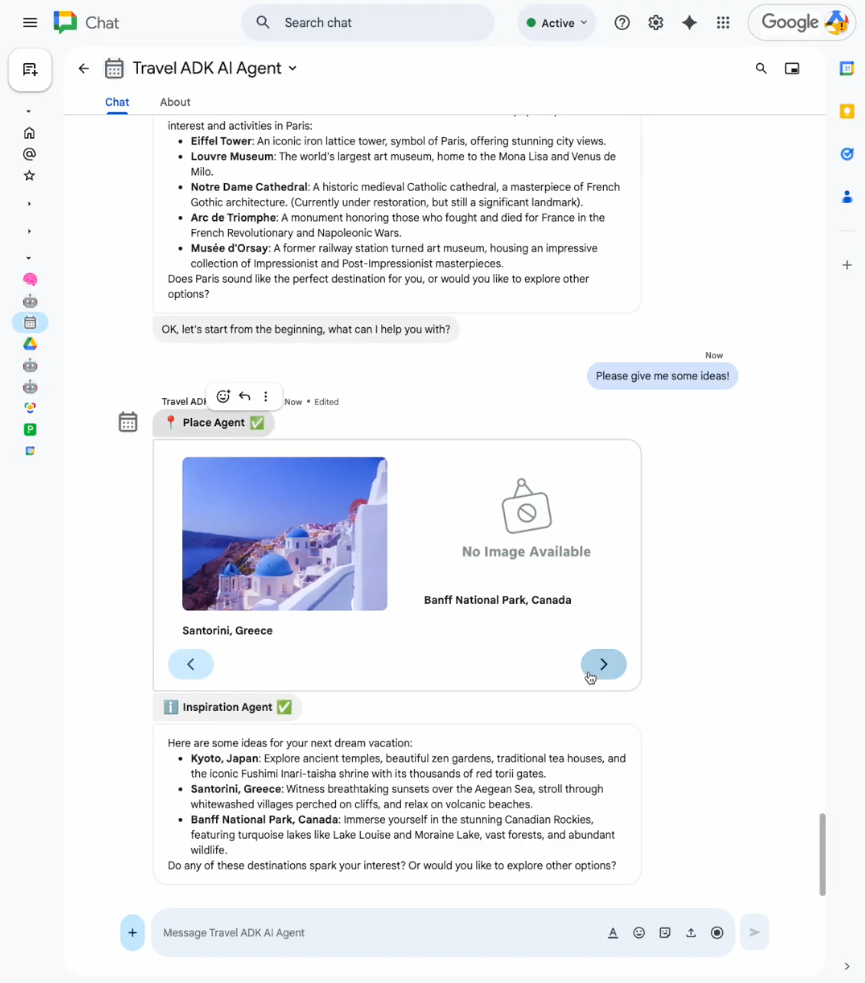
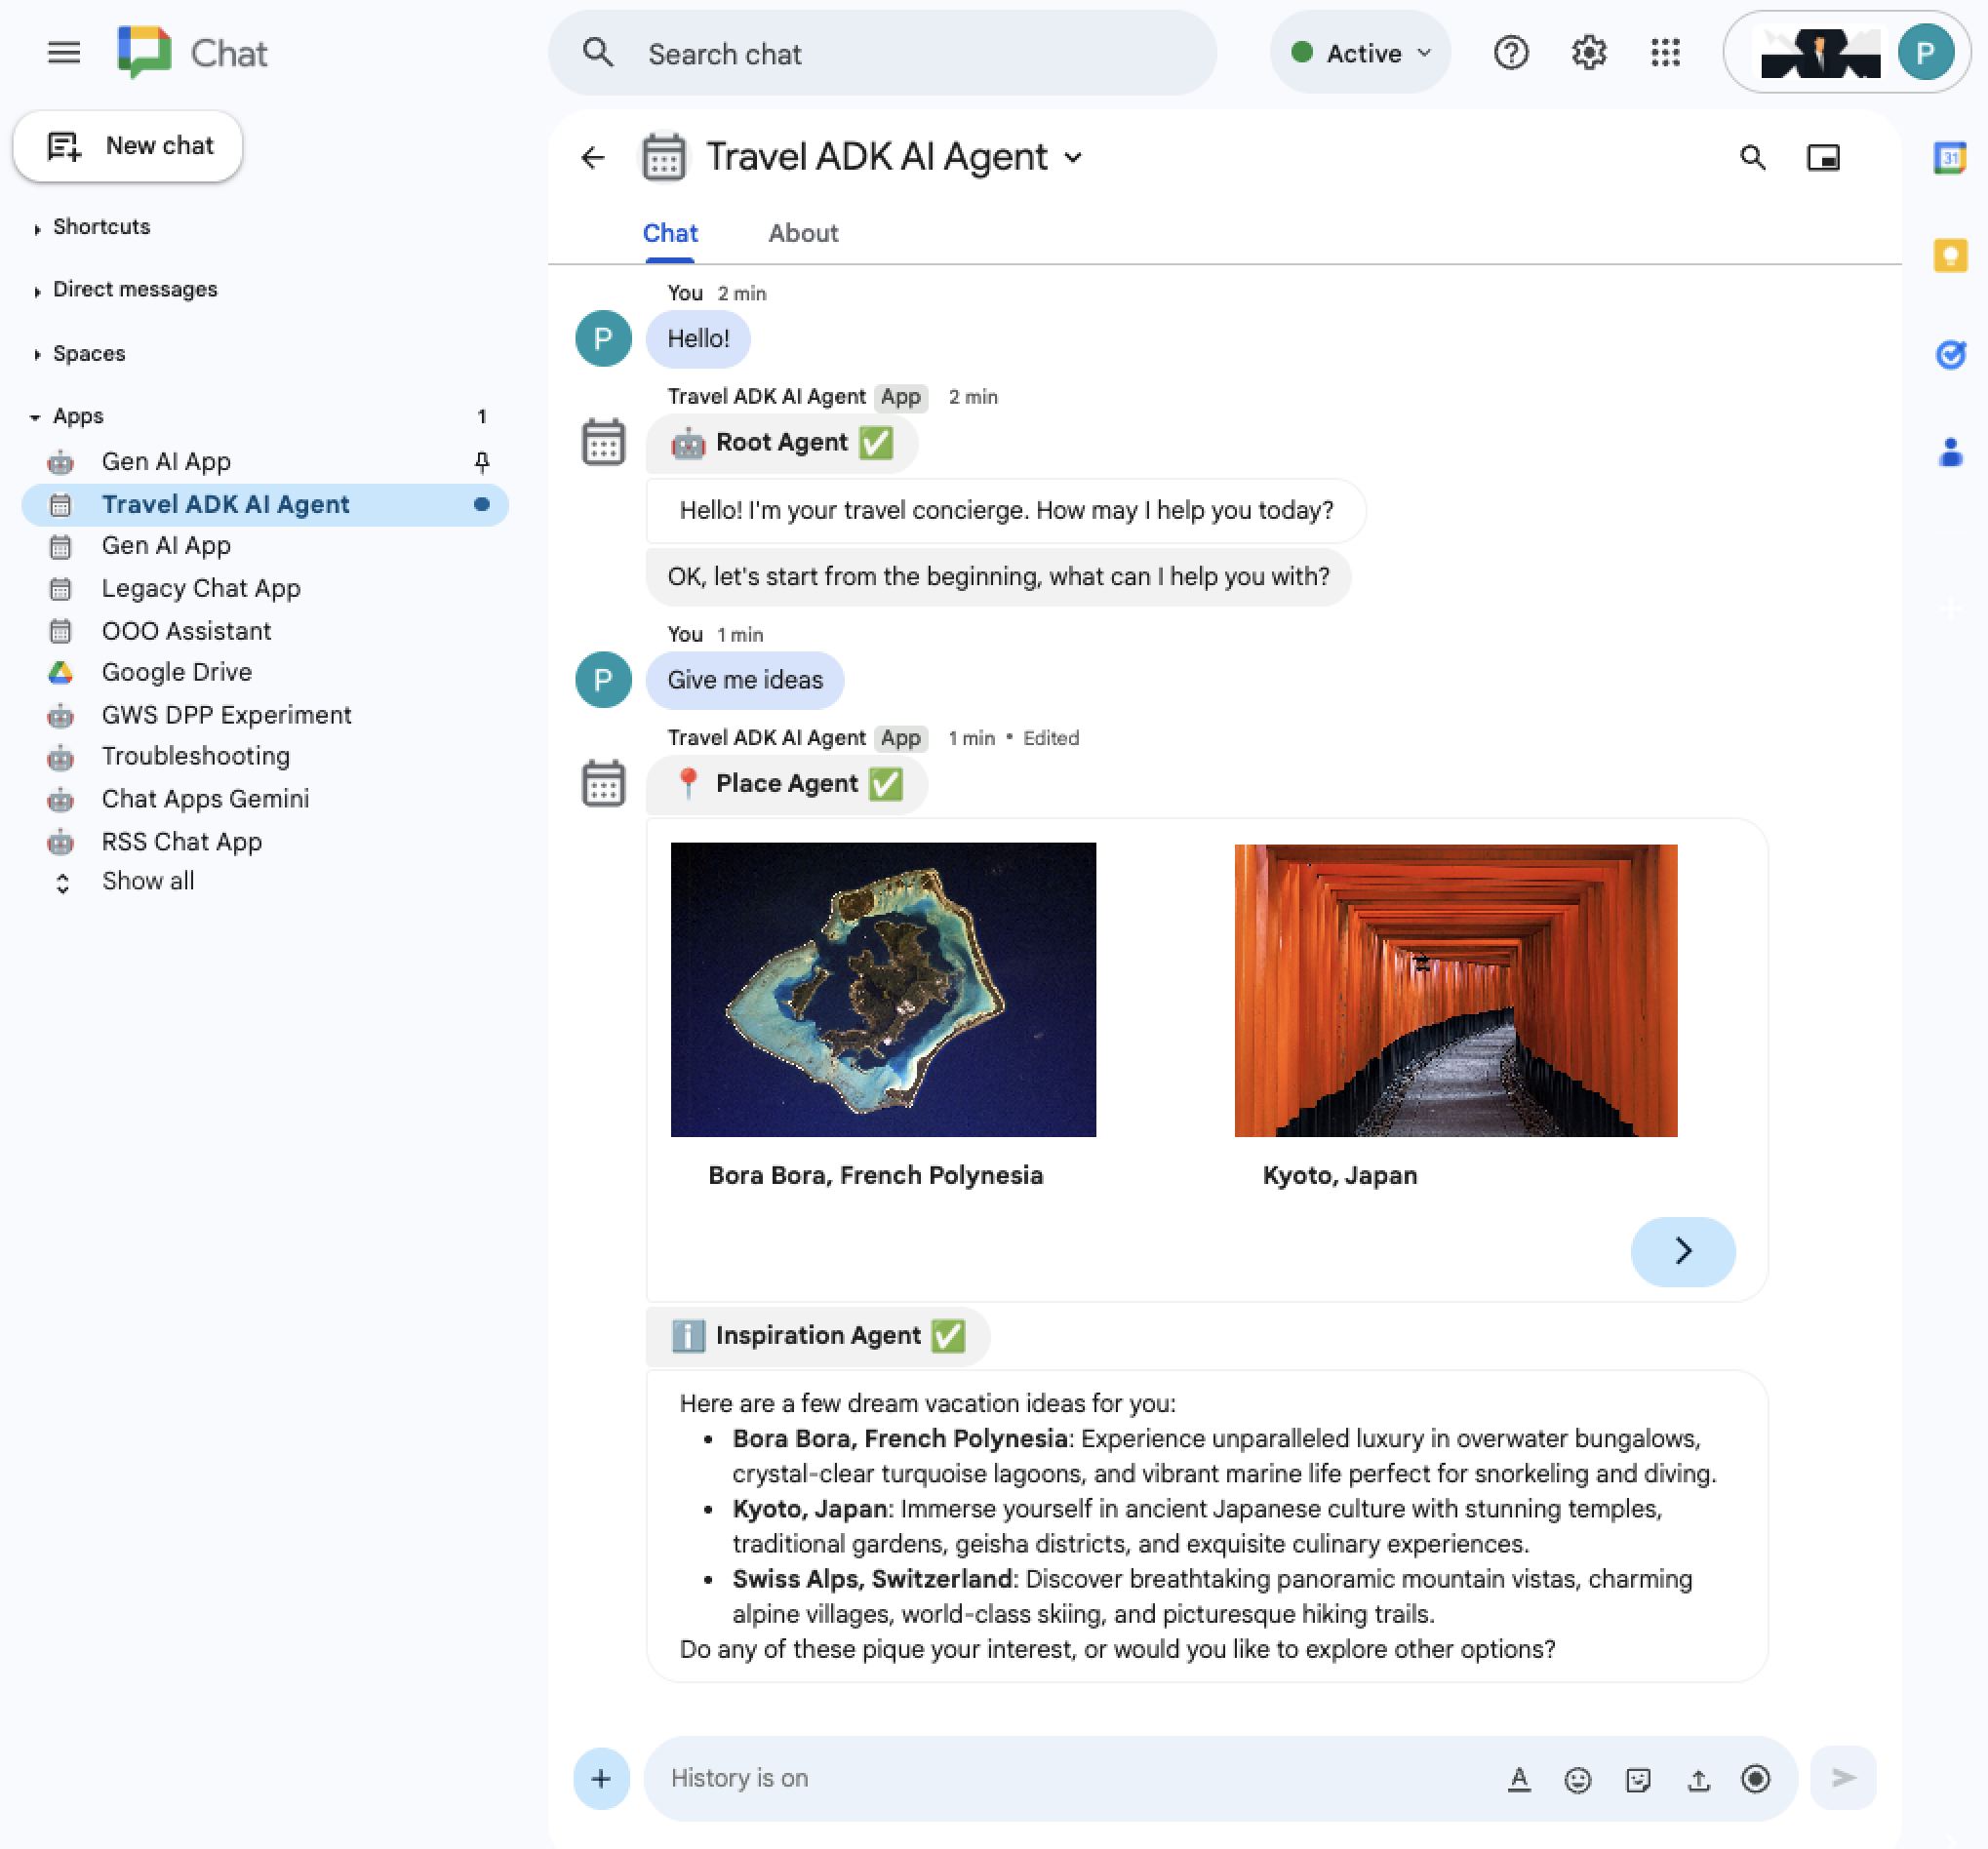
Figure 1. Using the AI agent from Chat to brainstorm travel ideas. 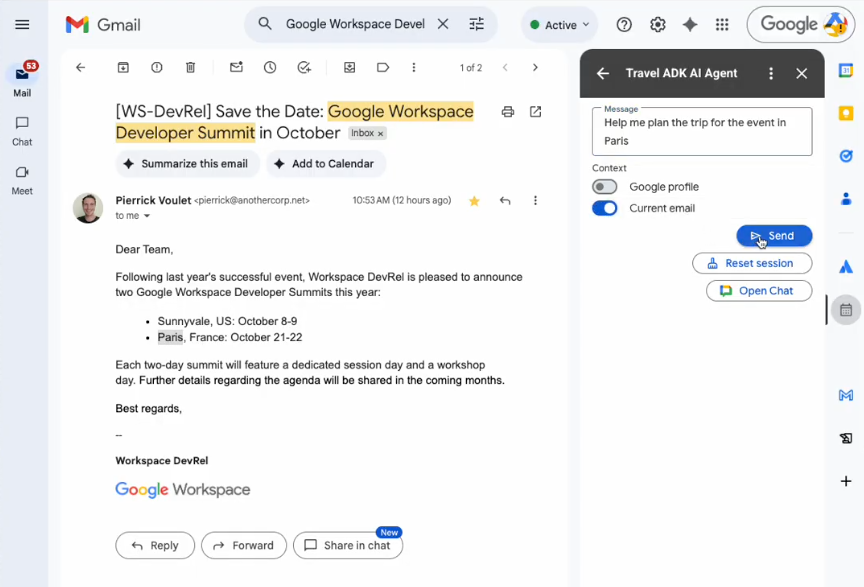
Figure 2. Using the AI agent from Gmail to plan a travel from the context in the selected email.
Objectives
- Set up the environment.
- Deploy the AI agent.
- Set up the project.
- Deploy to Gmail, Calendar, Drive, Docs, Sheets, Slides.
- Deploy to Chat.
- Test the solution.
About this solution
This solution relies on the following core technologies: the ADK, Google Cloud & Google Workspace APIs, Vertex AI Agent Engine, and Card framework.
The GUIs are designed differently for Chat and non-Chat (Gmail, Calendar, Drive, Docs, Sheets, Slides) applications to take into account their specific features and limitations.
Features
The following features of the Travel Concierge application are common across all Google Workspace applications:
Persistent user sessions: Sessions are managed by Vertex AI for persistence. Each user shares one session across all Workspace applications. Users can manually reset their session to start a new conversation.
Rich messaging: Users send text messages and receive responses with rich text and card widgets.
Error handling: Unexpected errors are gracefully handled using configurable retries and statuses in responses.
The Chat app has the following additional features:
Multimodal user messaging: Users can send messages with attachments, including audio and video recorded directly from the Chat space.
More visually-advanced responses: Responses can be generated with more advanced widgets such as carousels with images by relying on Chat-only features of the Card framework and more rendering space.
Other applications have these additional features:
Google profile context: Users can send messages with their profile information (limited to birthdays in this sample).
Gmail context: Users can send messages with emails (limited to one subject and body in this sample).
Agent's Chat space access: Users can open the Chat app direct message (DM) space in a new tab with one button click.
Architecture
The Travel Concierge application receives and processes Google Workspace add-on interaction events from Google Workspace applications, uses Vertex AI to prompt the ADK AI agent and manage user sessions, and relies on Google Cloud and Google Workspace APIs to gather context and display responses.
The following diagrams shows the main user flow: send a message to the AI agent.
HTTP
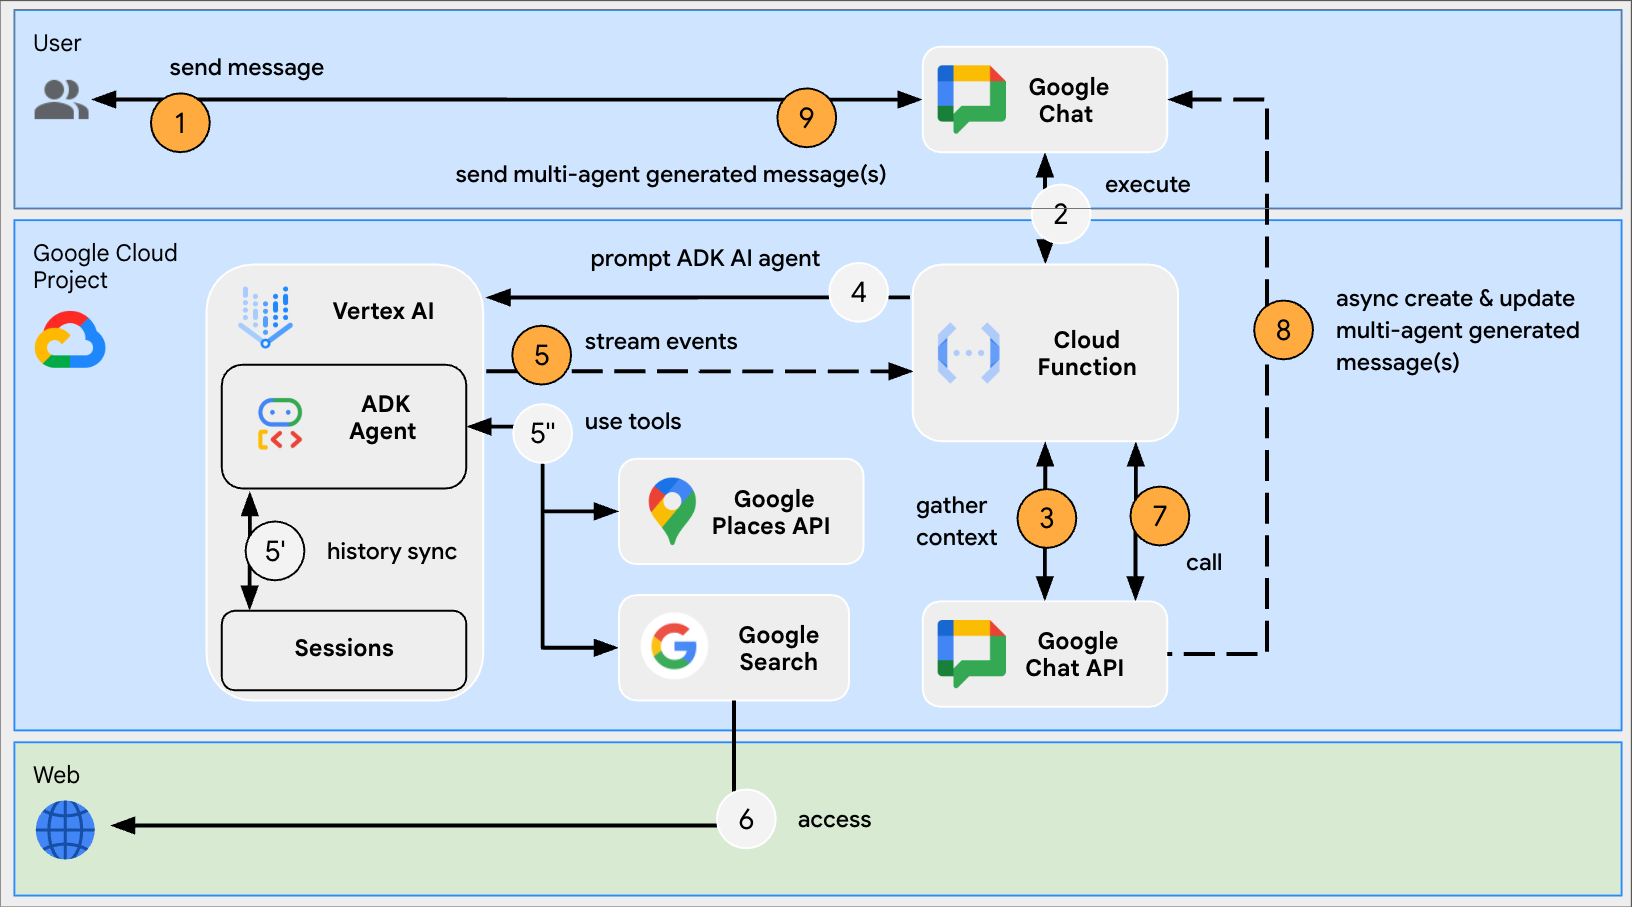
Figure 3. The Chat app completes the context with attachments from the user message, and sends a set of messages with the history of the sub-agent interactions and the final overall answer in chronological order. 
Figure 4. The non-Chat applications completes the context with the user's Google profile and item selection, and displays a set of sections with the history of the sub-agent interactions and the final overall answer in reverse chronological order.
Apps Script
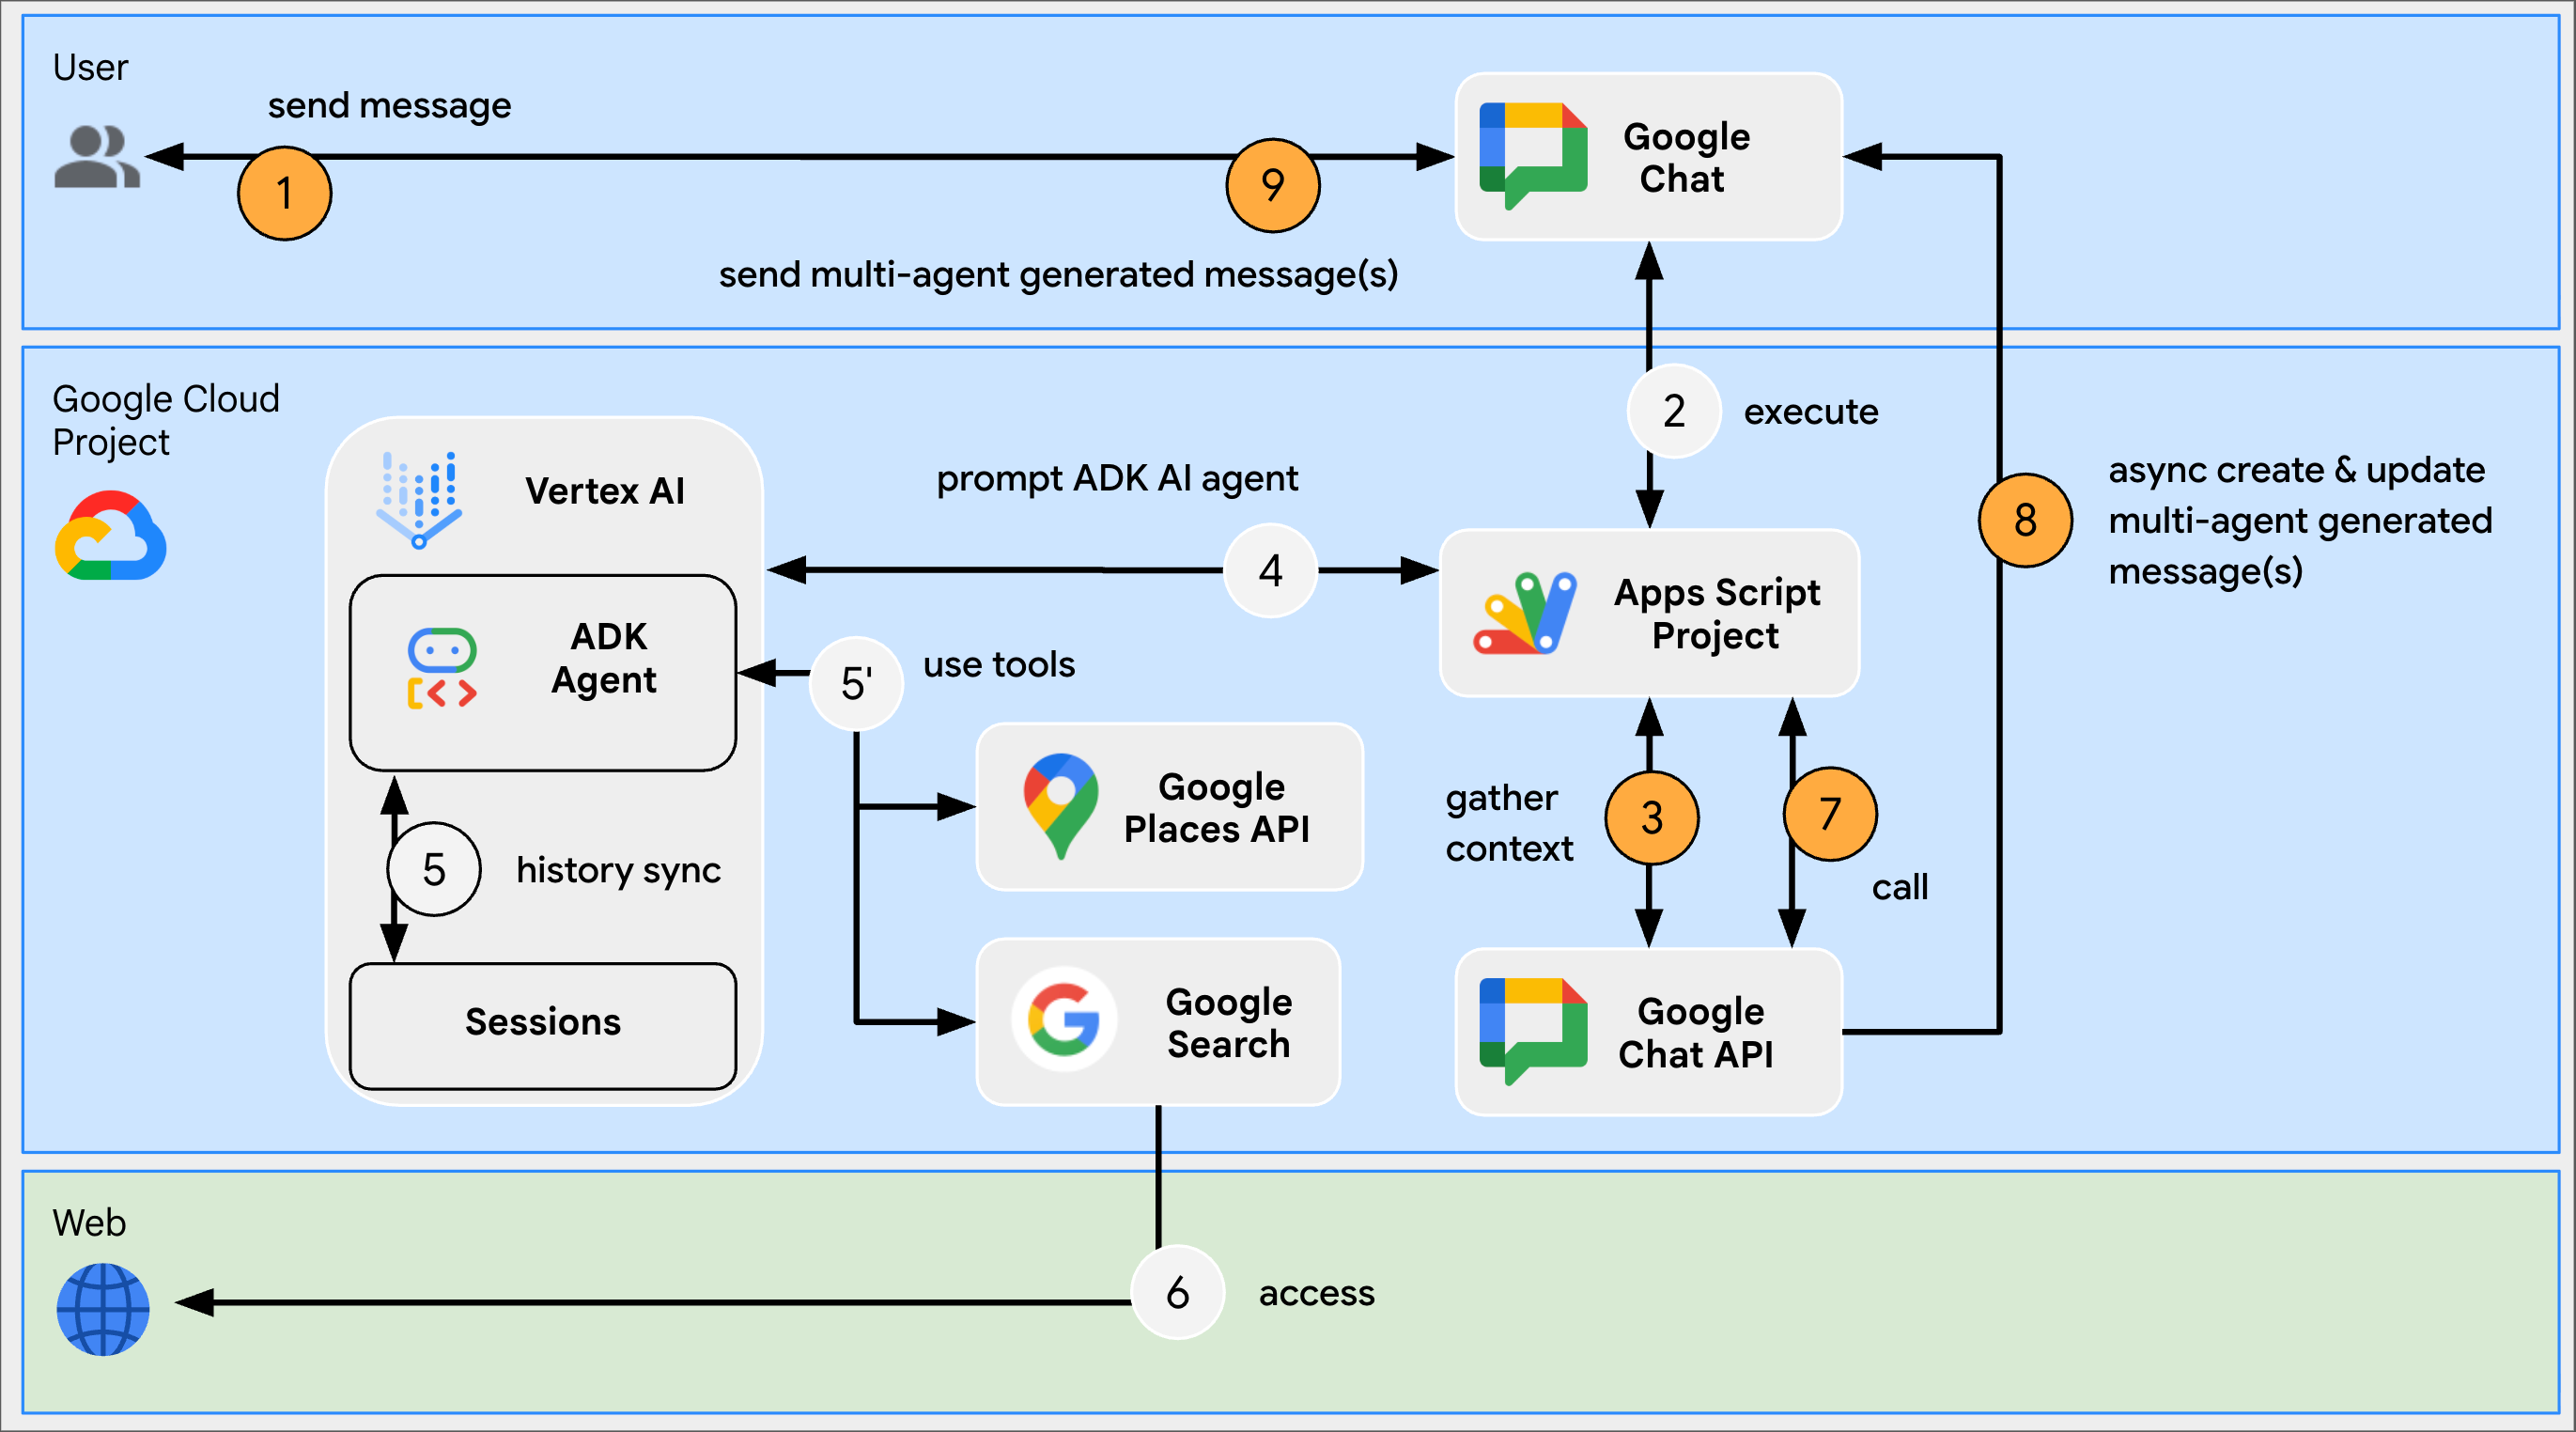
Figure 3. The Chat app completes the context with attachments from the user message, and sends a set of messages with the history of the sub-agent interactions and the final overall answer in chronological order. 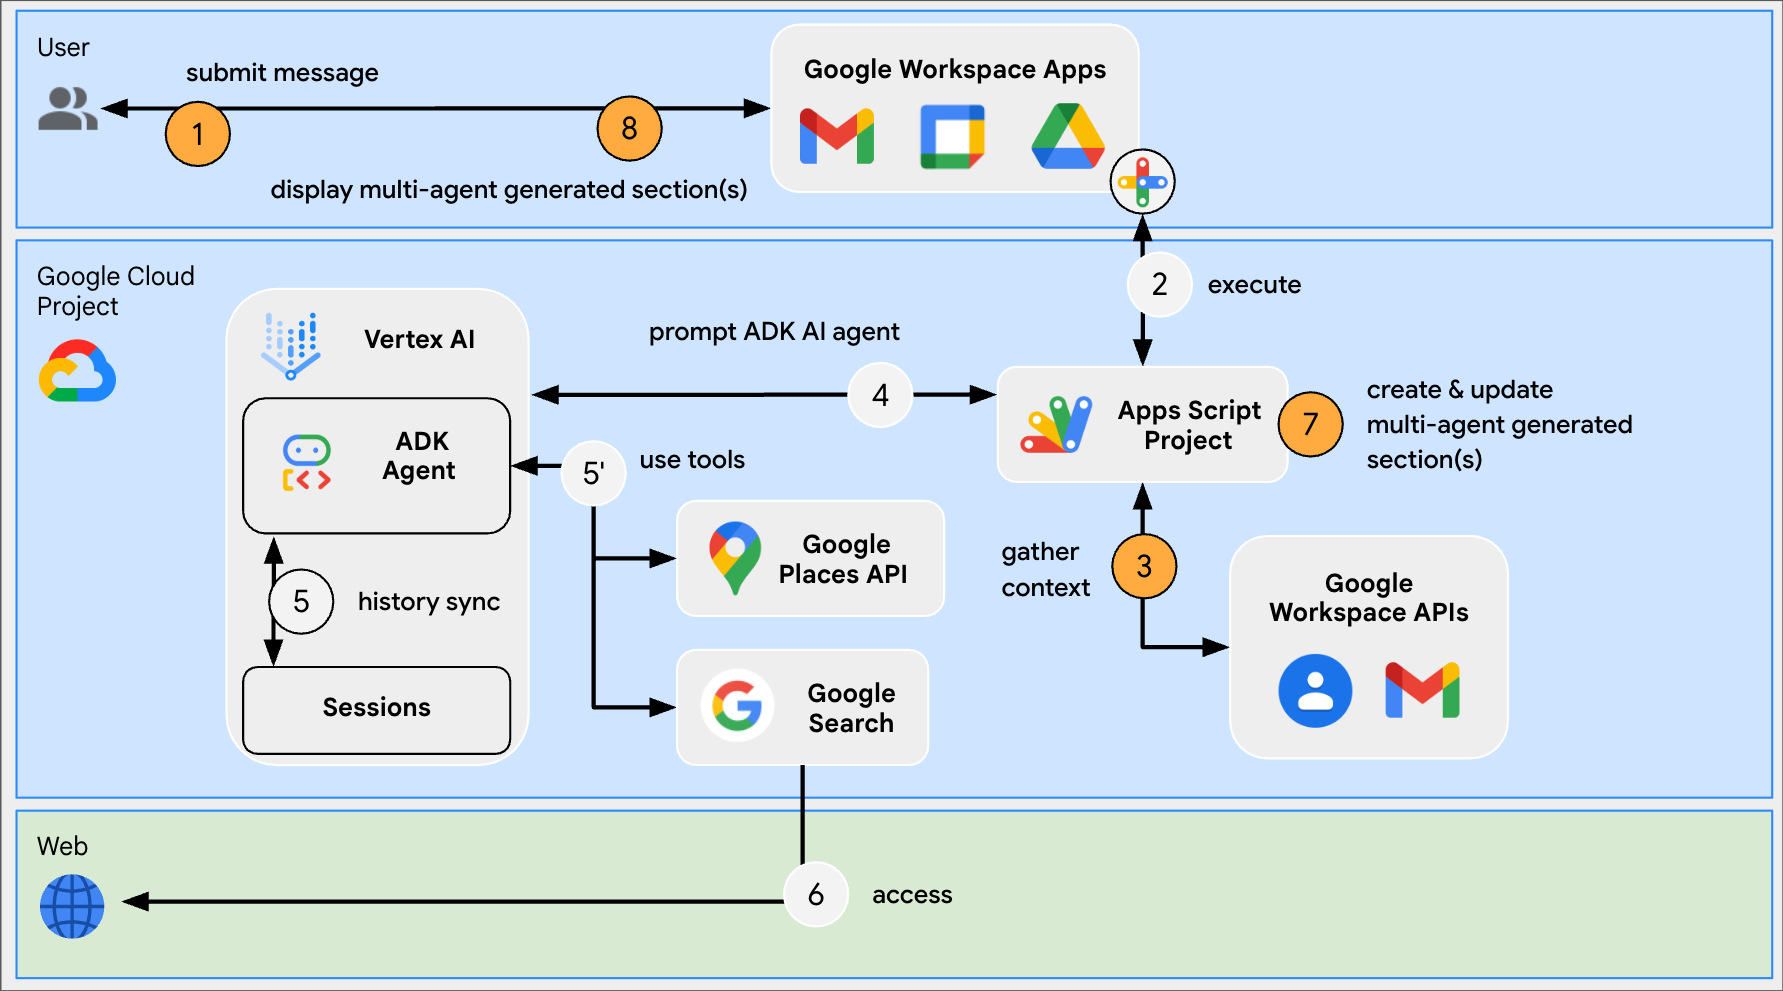
Figure 4. The non-Chat applications completes the context with the user's Google profile and item selection, and displays a set of sections with the history of the sub-agent interactions and the final overall answer in reverse chronological order.
Prerequisites
A Business or Enterprise Google Workspace account with access to Google Chat.
A web browser with access to the internet.
Prerequisites specific to the Travel Concierge ADK AI agent
- Python 3.10+: For installation, follow instructions on the official Python website.
uv: For installation, follow instructions on the officialuvwebsite.- Google Cloud CLI: For installation, follow instructions on the official Google Cloud website.
Prepare the environment
This section shows how to create and configure a Google Cloud project.
Create a Google Cloud project
Google Cloud console
- In the Google Cloud console, go to Menu > IAM & Admin > Create a Project.
-
In the Project Name field, enter a descriptive name for your project.
Optional: To edit the Project ID, click Edit. The project ID can't be changed after the project is created, so choose an ID that meets your needs for the lifetime of the project.
- In the Location field, click Browse to display potential locations for your project. Then, click Select.
- Click Create. The Google Cloud console navigates to the Dashboard page and your project is created within a few minutes.
gcloud CLI
In one of the following development environments, access the Google Cloud
CLI (gcloud):
-
Cloud Shell: To use an online terminal with the gcloud CLI
already set up, activate Cloud Shell.
Activate Cloud Shell -
Local Shell: To use a local development environment,
install and
initialize
the gcloud CLI.
To create a Cloud project, use thegcloud projects createcommand:gcloud projects create PROJECT_ID
Enable billing for the Cloud project
Google Cloud console
- In the Google Cloud console, go to Billing. Click Menu > Billing > My Projects.
- In Select an organization, choose the organization associated with your Google Cloud project.
- In the project row, open the Actions menu (), click Change billing, and choose the Cloud Billing account.
- Click Set account.
gcloud CLI
- To list available billing accounts, run:
gcloud billing accounts list - Link a billing account with a Google Cloud project:
gcloud billing projects link PROJECT_ID --billing-account=BILLING_ACCOUNT_IDReplace the following:
PROJECT_IDis the Project ID for the Cloud project for which you want to enable billing.BILLING_ACCOUNT_IDis the billing account ID to link with the Google Cloud project.
Enable the Google Cloud APIs
HTTP
In the Google Cloud console, enable the Vertex AI, Places, People, Google Chat, Gmail, Cloud Build, Cloud Functions, Cloud Pub/Sub, Cloud Logging, Artifact Registry, Cloud Run, Google Workspace add-ons, and Cloud Resource Manager APIs.
Confirm that you're enabling the APIs in the correct Cloud project, then click Next.
Confirm that you're enabling the correct APIs, then click Enable.
Apps Script
In the Google Cloud console, enable the Vertex AI, Places, People, Google Chat, and Cloud Resource manager APIs.
Confirm that you're enabling the APIs in the correct Cloud project, then click Next.
Confirm that you're enabling the correct APIs, then click Enable.
Get a Google Maps Platform Places API key
In the Google Cloud console, go to the Google Maps Platform > Keys & Credentials page.
The Get Started on Google Maps Platform dialog displays your newly created API key, an alphanumeric string. You'll need this string in the next sections.
Create a service account in Google Cloud console
Create a new service account with the role Vertex AI User by following
these steps:
Google Cloud console
- In the Google Cloud console, go to Menu > IAM & Admin > Service Accounts.
- Click Create service account.
- Fill in the service account details, then click Create and continue.
- Optional: Assign roles to your service account to grant access to your Google Cloud project's resources. For more details, refer to Granting, changing, and revoking access to resources.
- Click Continue.
- Optional: Enter users or groups that can manage and perform actions with this service account. For more details, refer to Managing service account impersonation.
- Click Done. Make a note of the email address for the service account.
gcloud CLI
- Create the service account:
gcloud iam service-accounts createSERVICE_ACCOUNT_NAME\ --display-name="SERVICE_ACCOUNT_NAME" - Optional: Assign roles to your service account to grant access to your Google Cloud project's resources. For more details, refer to Granting, changing, and revoking access to resources.
The service account appears on the service account page. Next, create a private key for the service account.
Create a private key
To create and download a private key for the service account, follow these steps:
- In the Google Cloud console, go to Menu > IAM & Admin > Service Accounts.
- Select your service account.
- Click Keys > Add key > Create new key.
- Select JSON, then click Create.
Your new public/private key pair is generated and downloaded to your machine as a new file. Save the downloaded JSON file as
credentials.jsonin your working directory. This file is the only copy of this key. For information about how to store your key securely, see Managing service account keys. - Click Close.
For more information about service accounts, see service accounts in the Google Cloud IAM documentation.
Configure the OAuth consent screen
Google Workspace add-ons require a consent screen configuration. Configuring your add-on's OAuth consent screen defines what Google displays to users.
- In the Google API Console, go to Menu > Google Auth platform > Branding.
- If you have already configured the Google Auth platform, you can configure the following OAuth Consent Screen settings in Branding, Audience, and Data Access. If you see a message that says Google Auth platform not configured yet, click Get Started:
- Under App Information, in App name, enter a name for the app.
- In User support email, choose a support email address where users can contact you if they have questions about their consent.
- Click Next.
- Under Audience, select Internal.
- Click Next.
- Under Contact Information, enter an Email address where you can be notified about any changes to your project.
- Click Next.
- Under Finish, review the Google API Services User Data Policy and if you agree, select I agree to the Google API Services: User Data Policy.
- Click Continue.
- Click Create.
- For now, you can skip adding scopes. In the future, when you create an app for use outside of your Google Workspace organization, you must change the User type to External. Then add the authorization scopes that your app requires. To learn more, see the full Configure OAuth consent guide.
Deploy the Travel Concierge ADK AI Agent
If not done already, authenticate with your Google Cloud account and configure Google Cloud CLI to use your Google Cloud project.
gcloud auth application-default logingcloud config set project PROJECT_IDgcloud auth application-default set-quota-project PROJECT_IDReplace PROJECT_ID with the ID of the Cloud project you created.
Download this GitHub repository
In your preferred local development environment, extract the downloaded archive file and open the
adk-samples/python/agents/travel-conciergedirectory.unzip adk-samples-main.zipcd adk-samples-main/python/agents/travel-conciergeCreate a new Cloud Storage bucket dedicated to the ADK AI agent.
gcloud storage buckets create gs://CLOUD_STORAGE_BUCKET_NAME --project=PROJECT_ID --location=PROJECT_LOCATIONReplace the following:
- CLOUD_STORAGE_BUCKET_NAME with a unique bucket name you want to use.
- PROJECT_ID with the ID of the Cloud project you created.
- PROJECT_LOCATION with the location of the Cloud project you created.
Set the following environment variables:
export GOOGLE_GENAI_USE_VERTEXAI=1export GOOGLE_CLOUD_PROJECT=PROJECT_IDexport GOOGLE_CLOUD_LOCATION=PROJECT_LOCATIONexport GOOGLE_PLACES_API_KEY=PLACES_API_KEYexport GOOGLE_CLOUD_STORAGE_BUCKET=CLOUD_STORAGE_BUCKET_NAMEexport TRAVEL_CONCIERGE_SCENARIO=travel_concierge/profiles/itinerary_empty_default.jsonReplace the following:
- PROJECT_ID with the ID of the Cloud project you created.
- PROJECT_LOCATION with the location of the Cloud project you created.
- PLACES_API_KEY with the string of the API key you created.
- CLOUD_STORAGE_BUCKET_NAME with the name of the bucket you created.
Install and deploy ADK AI agent.
uv sync --group deploymentuv run python deployment/deploy.py --createRetrieve the project number and engine ID from the last printed log as PROJECT_NUMBER and ENGINE_ID respectively, you'll need both of them later to configure your project.
Created remote agent: projects/PROJECT_NUMBER/locations/us-central1/reasoningEngines/ENGINE_ID
Review the sample code
Optionally, before setting up the project, take a moment to review and familiarize yourself with the sample code hosted on GitHub.
Python
Apps Script
Create and configure the project
Python
Download this GitHub repository
In your preferred local development environment, extract the downloaded archive file and open the
add-ons-samples/python/travel-adk-ai-agentdirectory.unzip add-ons-samples-main.zipcd add-ons-samples-main/python/travel-adk-ai-agentMove the JSON key file
credentials.jsonfrom the service account downloaded in previous steps to the project directory.In the Google API Console, go to Cloud Run:
Click Write a function.
On the Create service page, set up your function:
- In the Service name field, enter
travel-concierge-app. - In the Region list, select the location of the Cloud project you created, PROJECT_LOCATION.
- Under Endpoint URL, click
 .
. - In the Runtime list, select the most recent version of Python.
- In the Authentication section, select Allow public access.
- In the Containers, Volumes, Networking, Security section, under
Resources:
- In the Memory field, select 1 GiB.
- In the CPU field, select 2.
- Click Create, and wait for Cloud Run to create the service. The console redirects you to the Source tab.
- In the Service name field, enter
In your preferred local development environment, deploy the source of the project:
gcloud run deploy travel-concierge-app --quiet --source . \
    --region PROJECT_LOCATION  \
    --function adk_ai_agent  \
    --set-env-vars LOCATION=LOCATION,PROJECT_NUMBER=PROJECT_NUMBER,ENGINE_ID=ENGINE_ID,BASE_URL=BASE_URL
Replace the following:
- PROJECT_LOCATION with the location of the Cloud Run function you previously created.
- LOCATION with the location of the Google Cloud project created in previous steps, PROJECT_LOCATION.
- PROJECT_NUMBER with the project number of the Travel Concierge ADK AI Agent deployed in previous steps.
- ENGINE_ID with the engine ID of the Travel Concierge ADK AI Agent deployed in previous steps.
- BASE_URL with the Endpoint URL that you previously copied.
Apps Script
To create an Apps Script project and configure it to use your deployed Travel Concierge ADK AI agent:
Click the following button to open the Travel Concierge ADK AI Agent Apps Script project.
Open the projectClick Overview, then
Make a copy.Name your copy of the Apps Script project:
- Click Copy of Travel Concierge ADK AI Agent.
- In Project title, type
Travel Concierge ADK AI Agent. - Click Rename.
In your Apps Script project, click
 Editor and
move the file
Editor and
move the file VertexAi.gsup until it's above the fileAgentHandler.gsby using the file action Move file up.In your Apps Script project, click
 Project Settings,
click Edit script properties, then click Add script property
to add the following script properties:
Project Settings,
click Edit script properties, then click Add script property
to add the following script properties:ENGINE_IDwith the engine ID of the Travel Concierge ADK AI Agent deployed in previous steps, ENGINE_ID.LOCATIONwith the location of the Google Cloud project created in previous steps, PROJECT_LOCATION.PROJECT_NUMBERwith the project number of the Travel Concierge ADK AI Agent deployed in previous steps, PROJECT_NUMBER.SERVICE_ACCOUNT_KEYwith the JSON key from the service account downloaded in previous steps such as{ ... }.Click Save script properties
In your Apps Script project, click
Project Settings.Under Google Cloud Platform (GCP) Project, click Change project.
In GCP project number, paste the project number of the Travel Concierge ADK AI Agent deployed in previous steps, PROJECT_NUMBER.
Click Set project. The Cloud project and Apps Script project are now connected.
Deploy to Gmail, Calendar, Drive, Docs, Sheets, Slides
Python
Use a Google Workspace add-on deployment to install the sample project to all Google Workspace applications (but Google Chat) to enable testing.
In your preferred local development environment, open the file
deployment.jsonfrom the code source of the project and replace all occurrences of$BASE_URLwith the value of BASE_URL, the Endpoint URL that you copied in previous steps.Create a Google Workspace add-on deployment named
travel-concierge-addon:gcloud workspace-add-ons deployments create travel-concierge-addon \ --deployment-file=deployment.jsonInstall the Google Workspace add-on deployment:
gcloud workspace-add-ons deployments install travel-concierge-addon
Apps Script
Install the Apps Script project to all Google Workspace applications (but Google Chat) to enable testing.
- In your Apps Script project, click Deploy > Test deployments, then Install.
The add-on is now accessible from Google Workspace application's sidebars.
Deploy to Chat
Python
Install the sample project to Chat using the Endpoint URL to enable testing.
In the API Console, search for
Google Chat API, click Google Chat API, then Manage, and Configuration.Set up the Chat app:
- In the App name field, enter
Travel ADK AI Agent. - In the Avatar URL field, enter
https://goo.gle/3SfMkjb. - In the Description field, enter
Travel ADK AI Agent. - Under Connection settings, select HTTP endpoint URL.
- Under Triggers, select Use a common HTTP endpoint URL for all triggers.
- In the HTTP endpoint URL field, paste the Endpoint URL that you previously copied, BASE_URL.
- Register a Quick command that the
fully implemented Chat app uses:
- Under Commands, click Add a command.
- In Command ID, type
1. - In Description, type
Reset session. - Under Command type, select Quick command.
- In Name, type
Reset session. - Click Done. The quick command is registered and listed.
- Under Visibility, select Make this Chat app available to specific people and groups in Your Workspace Domain and enter your email address.
- Under Logs, select Log errors to Logging.
- Click Save.
- In the App name field, enter
Apps Script
Install the Apps Script project to Chat using the Head Deployment ID to enable testing.
In your Apps Script project, click Deploy > Test deployments, then
 Copy under Head Deployment ID.
In the API Console, search for
Google Chat API, click Google Chat API, then Manage, and Configuration.Set up the Chat app:
- In the App name field, enter
Travel ADK AI Agent. - In the Avatar URL field, enter
https://goo.gle/3SfMkjb. - In the Description field, enter
Travel ADK AI Agent. - Under Connection settings, select Apps Script.
- In the Deployment ID field, paste the Head deployment ID that you previously copied.
- Register a Quick command that the
fully implemented Chat app uses:
- Under Commands, click Add a command.
- In Command ID, type
1. - In Description, type
Reset session. - Under Command type, select Quick command.
- In Name, type
Reset session. - Click Done. The quick command is registered and listed.
- Under Visibility, select Make this Chat app available to specific people and groups in Your Workspace Domain and enter your email address.
- Under Logs, select Log errors to Logging.
- Click Save.
- In the App name field, enter
The app is now accessible from Google Chat.
Open Google Chat.
Create the Chat DM space:
- Click New Chat.
- Type and select the app
Travel ADK AI Agentin the search. - In the
Install appdialog, click Install app. - The
Install appdialog closes and the newly created Chat DM space is selected.
The Chat app is ready to respond to messages.
Test the agent
Open Gmail.
Send the following email to yourself:
- Subject:
You need to travel to Paris - Body:
Please be there between 11/25/2025 and 11/30/2025!
- Subject:
Open the Travel ADK AI Agent add-on from the sidebar.
Click Grant permissions to complete the set up of the add-on.
Click Send after configuring the following request to the agent:
- Message:
Please help me plan this travel! - Context: select Current email
The sidebar is updated with the agent's response.
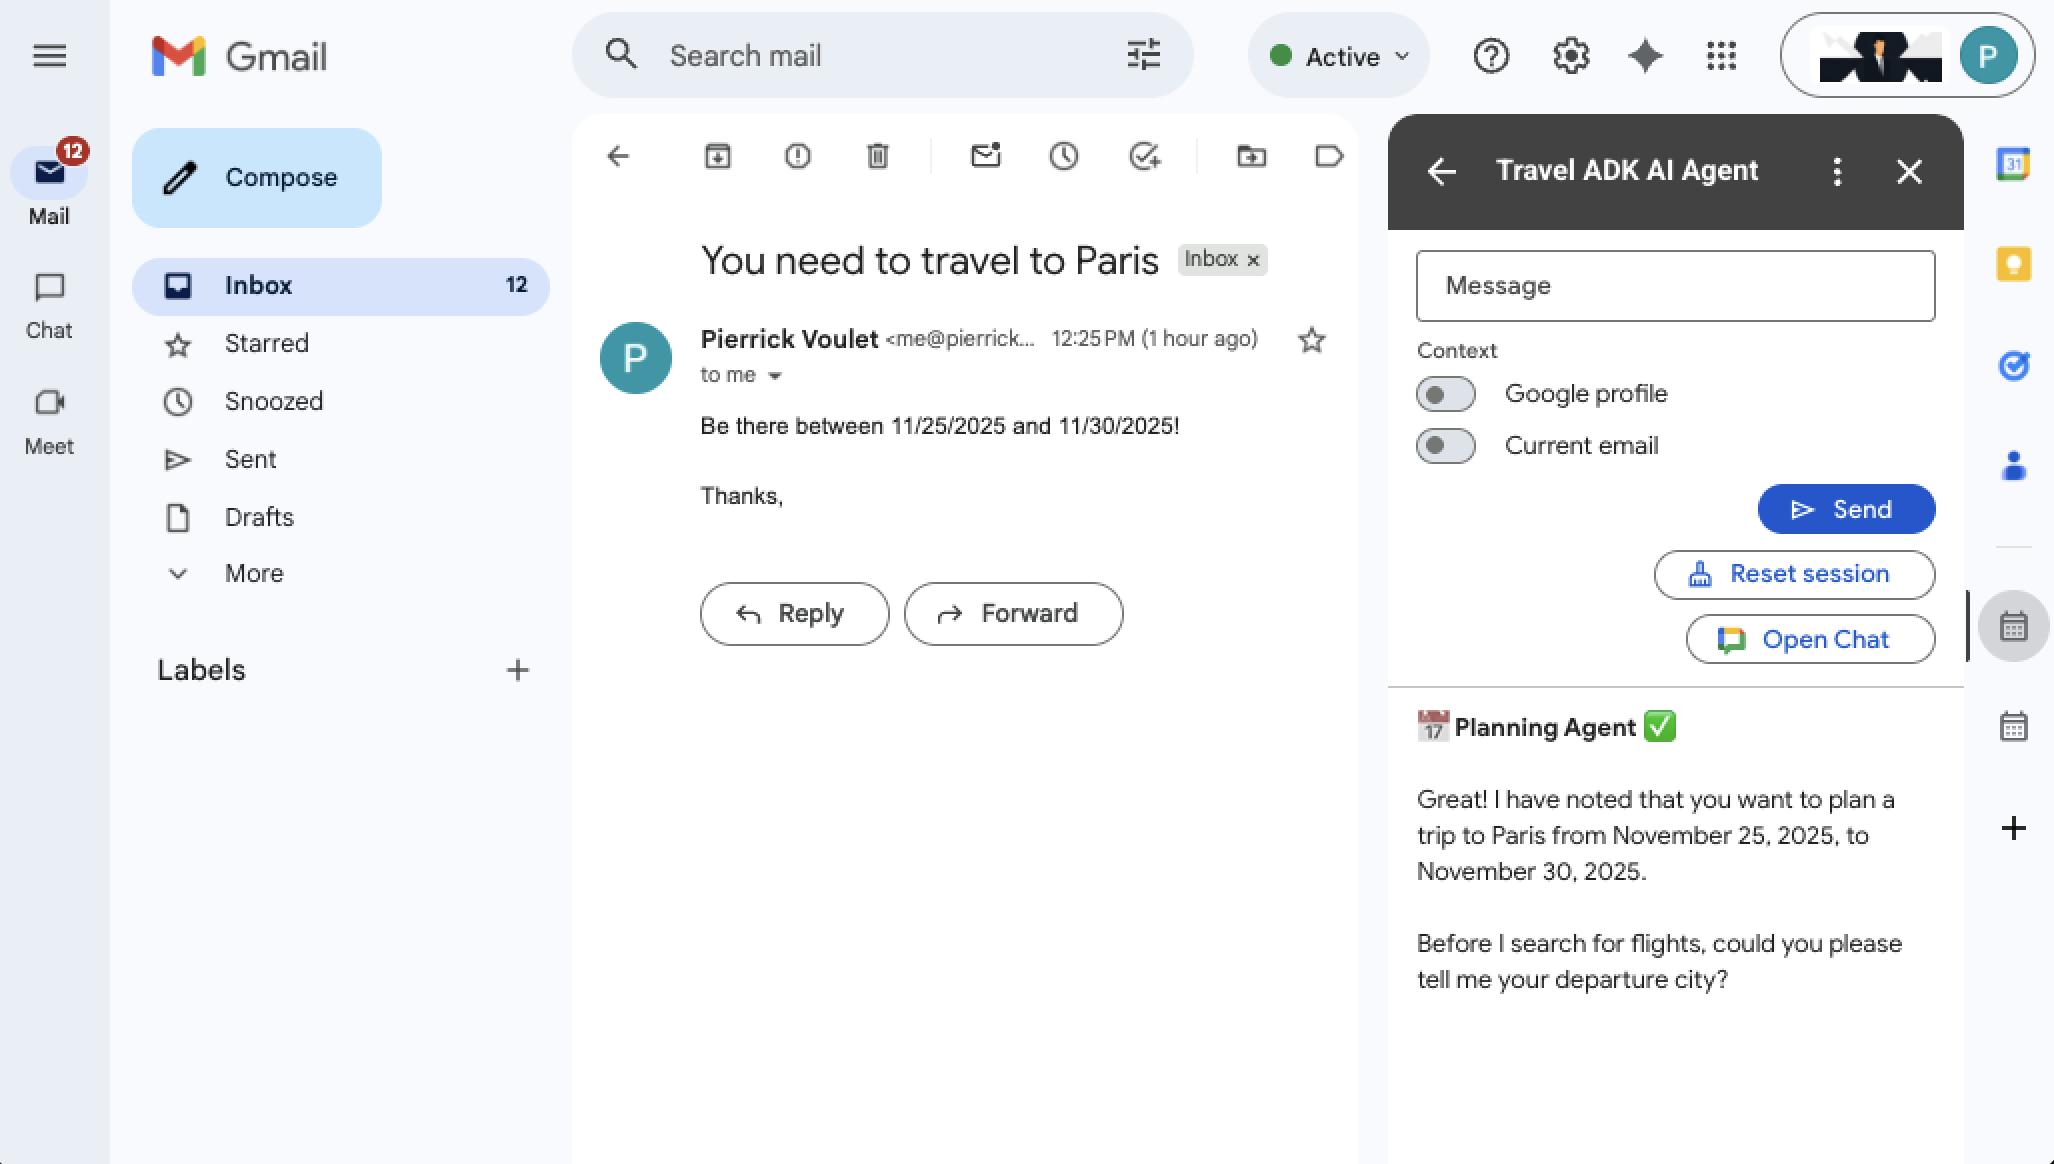
- Message:
Click Open Chat to be redirected to the Chat DM space.
Click + > Reset session.
You receive a new message that confirms it's done:
OK, let's start from the beginning, what can I help you with?Send the message
Give me ideas.You receive new messages with the agent's response.
Send the message
I want to go there!after uploading a picture of any location such as the Eiffel Tower.You receive new messages with the agent's response.

Limitations
HTTP
In Google Workspace applications other than Chat, the AI agent has the following limitations:
It's synchronous: Sidebars can only be updated in response to user interactions, so the AI agent responses are displayed only after full completion (no streaming).
It can time out: The sidebar updates time out when they take more than a few minutes to complete.
These limitations don't exist in Chat.
Apps Script
In all Google Workspace applications, the AI agent calls Vertex AI REST APIs using UrlFetchApp, which causes the following limitations:
It's synchronous: The AI agent responses are returned only after full completion (no streaming).
It can time out: The AI agent requests time out when they take roughly more than a minute to complete.
Customization
This solution supports ADK AI agents hosted in Vertex AI Agent Engine, a subset of Google Workspace application UIs, and response renderings specific to responses of the Travel Concierge sample. The solution uses an extensible framework, so you can customize it by modifying the following files:
Python
main.py: Defines the main UIs and user interactions logic (Google Workspace event handlers). A typical extension would be to enable Drive documents as context feature for the Drive application, similar to what's done with Gmail messages for the Gmail application.
vertex_ai.py: Manages the AI agent sessions, responses, errors, and defines Vertex AI-specific interfaces to implement to support agent interactions and response renderings. Typical extensions would be to add support for multi-sessions for separate user conversations, and other AI agent management platforms.
agent_handler.py: Implements Vertex AI-specific interfaces defined in vertex_ai.py in the specific cases of Chat and non-Chat applications. A typical extension would be to add buttons for users to send feedback about AI agent responses.
google_workspace.py: Implements non AI agent management-platform interactions using API calls. Only Google Workspace APIs are used in this sample to gather context details and take actions. A typical extension would be to add functions to retrieve business data from Google Calendar or a Customer Relationship Management (CRM).
travel_agent_ui_render.gs: Implements Travel Concierge-specific response renderings for the sub-agents and Workspace applications. Typical extensions would be to add support for new response renderings to graphically display flight options, and other AI agents.
Apps Script
Code.gs: Defines the main UIs and user interactions logic (Google Workspace event handlers). A typical extension would be to enable Drive documents as context feature for the Drive application, similar to what's done with Gmail messages for the Gmail application.
VertexAi.gs: Manages the AI agent sessions, responses, errors, and defines Vertex AI-specific interfaces to implement to support agent interactions and response renderings. Typical extensions would be to add support for multi-sessions for separate user conversations, and other AI agent management platforms.
AgentHandler.gs: Implements Vertex AI-specific interfaces defined in VertexAi.gs in the specific cases of Chat and non-Chat applications. A typical extension would be to add buttons for users to send feedback about AI agent responses.
GoogleWorkspace.gs: Implements non AI agent management-platform interactions using API calls. Only Google Workspace APIs are used in this sample to gather context details and take actions. A typical extension would be to add functions to retrieve business data from Google Calendar or a Customer Relationship Management (CRM).
TravelAgentUiRender.gs: Implements Travel Concierge-specific response renderings for the sub-agents and Workspace applications. Typical extensions would be to add support for new response renderings to graphically display flight options, and other AI agents.
Clean up
To avoid incurring charges to your Google Cloud account for the resources used in this tutorial, we recommend that you delete the Cloud project.
- In the Google API Console, go to the Manage resources page. Click Menu > IAM & Admin > Manage Resources.
- In the project list, select the project you want to delete and then click Delete .
- In the dialog, type the project ID and then click Shut down to delete the project.
Related topics
- Fact-check statements with an ADK AI agent and Gemini model
- Integrate fundamental AI concepts in Chat apps
- Answer questions based on Chat conversations with a Gemini AI Chat app
- Respond to incidents with Google Chat, Vertex AI, Apps Script, and user authentication
- Manage projects with Google Chat, Vertex AI, and Firestore
- Build a Chat app as a Google Workspace add-on with Apps Script