Page Summary
-
This page provides a comprehensive guide to using Sceneform for building AR experiences in Android, covering setup, rendering, and scene interaction.
-
Developers need to import the Sceneform plugin, configure build.gradle files, update the AndroidManifest.xml, and perform runtime checks to integrate Sceneform into their projects.
-
Sceneform utilizes renderables created from Android views, 3D assets, or basic shapes, which are then attached to nodes within the scene graph for rendering and interaction.
-
ArFragment simplifies AR session management and provides an ArSceneView for displaying the augmented reality content, handling camera images and user interactions.
-
Sceneform leverages ARCore for motion tracking and plane detection, enabling the placement and manipulation of virtual objects in the real world through the scene graph.
This page explains key concepts by exploring the code in the Hello Sceneform sample app. Note:
This sample uses Sceneform and ARCore.
To use Sceneform without ARCore, follow the steps below while ignoring the ARCore dependency and CAMERA permission requirements. Use
SceneViewin your app's layout as described in Build the Scene.This sample app is written as an AR Required app.
To learn more about AR Optional vs. AR Required apps, see Enabling ARCore.
To get started with Sceneform in your project, you'll need to:
- Import the Sceneform plugin
- Configure your project's
build.gradlefiles - Update your
AndroidManifest.xml - Perform runtime checks and create a scene view
- Create renderables
- Build the Scene
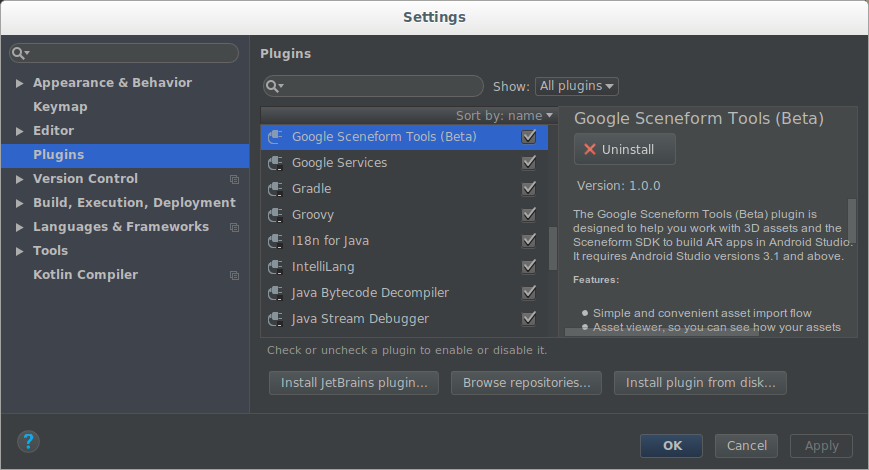
Import the Sceneform plugin into your project
Once installed, the Sceneform plugin lets you import, view, and build 3D assets in the Sceneform SDK for AR apps in Android Studio. It requires Android Studio versions 3.1 and above.
To install the plugin:
In Android Studio open the Plugins settings:
Windows: File > Settings > Plugins > Browse Repositories
macOS: Android Studio > Preferences > Plugins
Click Browse repositories, and install the Google Sceneform Tools (Beta).
Configure your project's build.gradle files
Make sure your project's
build.gradleincludes Google's Maven repository:allprojects { repositories { google() …Update your app's
build.gradleto add the latest ARCore and Sceneform UX dependencies, and ensure that your project settings are compatible with both libraries.android { … defaultConfig { // Sceneform requires minSdkVersion >= 24. minSdkVersion 24 … } // Sceneform libraries use language constructs from Java 8. // Add these compile options if targeting minSdkVersion < 26. compileOptions { sourceCompatibility JavaVersion.VERSION_1_8 targetCompatibility JavaVersion.VERSION_1_8 } } dependencies { … // Provides ARCore Session and related resources. implementation 'com.google.ar:core:1.15.0' // Provides ArFragment, and other UX resources. implementation 'com.google.ar.sceneform.ux:sceneform-ux:1.15.0' // Alternatively, use ArSceneView without the UX dependency. implementation 'com.google.ar.sceneform:core:1.15.0' }
Update your AndroidManifest.xml
Modify your AndroidManifest.xml to indicate that your app uses
(AR Optional) or requires (AR Required) ARCore and CAMERA access:
<!-- Both "AR Optional" and "AR Required" apps require CAMERA permission. -->
<uses-permission android:name="android.permission.CAMERA" />

<!-- Sceneform requires OpenGL ES 3.0 or later. -->
<uses-feature android:glEsVersion="0x00030000" android:required="true" />

<!-- Indicates that app requires ARCore ("AR Required"). Ensures the app is
     visible only in the Google Play Store on devices that support ARCore.
     For "AR Optional" apps remove this line. -->
<uses-feature android:name="android.hardware.camera.ar" />

<application>
    …
    <!-- Indicates that app requires ARCore ("AR Required"). Causes the Google
         Play Store to download and install Google Play Services for AR along
         with the app. For an "AR Optional" app, specify "optional" instead of
         "required".
    -->
    <meta-data android:name="com.google.ar.core" android:value="required" />
</application>
Perform runtime checks and create a scene view
The easiest way to get started using Sceneform and create a scene view is by
using an
ArFragment, which
automatically handles ARCore session management after performing necessary
ARCore runtime checks:
Checks whether a compatible version of Google Play Services for AR is installed, prompting the user to install or update as necessary
Checks whether the app has access to the camera, and asks the user for permission if it has not yet been granted
If your app needs to request additional permissions, or would like to customize how and when the AR session is created, you can instead:
Create a subclass of
ArFragmentto request additional permissions.Use or extend
ArSceneViewdirectly. Your app must perform the ARCore version check and callsetupSession()to create the ARCore session manually, as demonstrated in the Solar System sample.
Once the checks pass, ArFragment creates:
An
ArSceneView, accessible viagetArSceneView(), that:Renders the camera images from the session on to its surface
Renders a built-in Sceneform UX animation that shows users how they should move their phone to activate the AR experience.
Highlights detected
Planesusing the defaultPlaneRenderer
An ARCore
Session, accessible viagetSession()
To use ArFragment in your app, add it to your activity's layout, as
demonstrated in
activity_ux.xml
in the Hello Sceneform sample:
<fragment android:name="com.google.ar.sceneform.ux.ArFragment"
    android:id="@+id/ux_fragment"
    android:layout_width="match_parent"
    android:layout_height="match_parent" />
Create renderables
A Renderable
is a 3D model that can be placed anywhere in the scene and consists of Meshes,
Materials and Textures.
Renderables can be created from:
Standard Android
ViewRenderables are rendered as flat 2D cards in the 3D scene, while maintaining the ability to interact with them via touch.3D asset files (OBJ, FBX, glTF) can be imported, converted, and previewed using the Android Studio plugin. For more information, see Import and Preview 3D Assets.
Basic shapes and materials can be programmatically combined to create more complicated objects at runtime.
The sample app creates a renderable from a 3D andy.obj asset file. When this
asset is imported, the
Sceneform plugin updates the
app's build.gradle to apply the plugin and add a sceneform.asset()
entry for the imported model:
apply plugin: 'com.google.ar.sceneform.plugin'

sceneform.asset('sampledata/models/andy.obj', // 'Source Asset Path' specified during import.
                'default',                    // 'Material Path' specified during import.
                'sampledata/models/andy.sfa', // '.sfa Output Path' specified during import.
                'src/main/res/raw/andy')      // '.sfb Output Path' specified during import.
The res/raw/andy resource is used to create a ModelRenderable:
private ModelRenderable andyRenderable;

@Override
protected void onCreate(Bundle savedInstanceState) {
    …

    ModelRenderable.builder()
        .setSource(this, R.raw.andy)
        .build()
        .thenAccept(renderable -> andyRenderable = renderable)
        .exceptionally(
            throwable -> {
            Log.e(TAG, "Unable to load Renderable.", throwable);
            return null;
        });
}
Build the Scene
The ARSceneView has a
Scene attached to it.
The scene is a tree-like data structure that holds Nodes that are the virtual
objects to be rendered.
Here the andy renderable is attached directly to root Scene node:
Node node = new Node();
node.setParent(arFragment.getArSceneView().getScene());
node.setRenderable(andyRenderable);
Each node contains all the information Sceneform needs to render it (including its position, orientation, and renderable object) as well as interact with it (including its collision shape and event listeners).
Nodes can be added to other nodes, forming a parent-child relationship. When a node is a child of another node, it moves, rotates, and scales with its parent—like how your arms move when your body moves. A node can have multiple children, but only one parent, thus forming a tree-like structure. This structure is known as the scene graph.
Each frame, Sceneform renders the scene graph from the Camera's point of view (guided by ARCore motion tracking). Your app can interact with the scene by listening for touch and gesture events, performing hit tests against nodes, and placing anchors. For more info, see Build and Interact with the Scene.