- Sceneform SDK for Android was open sourced and archived (github.com/google-ar/sceneform-android-sdk) with version 1.16.0.
- This site (developers.google.com/sceneform) serves as the documentation archive for the previous version, Sceneform SDK for Android 1.15.0.
- Do not use version 1.17.0 of the Sceneform Maven artifacts.
- The 1.17.1 Maven artifacts can be used. Other than the version, however, the 1.17.1 artifacts are identical to the 1.15.0 artifacts.
Run Sceneform apps in Android Emulator
Stay organized with collections
Save and categorize content based on your preferences.
Use the Android Emulator
to test AR scenarios without a physical device. The Android Emulator lets you
run ARCore apps in a virtual environment with an emulated device that you
control.
Set up your development environment
Software requirements:
Hardware requirements:
- You'll also need a development machine that supports OpenGL ES 3.0 or
higher to use Sceneform in your app.
Install Android Studio 3.1 or later.
In Android Studio, go to Preferences > Appearance and Behavior > System Settings > Android SDK.
Select the SDK Platforms tab and check Show Package Details.
Under Android 8.1 (Oreo), select:
Google APIs Intel x86 Atom System Image API Level 27, version 4 or later.
Select the SDK Tools tab and add Android Emulator 27.2.9 or later.
Click OK to install the selected pacakges and tools.
Click OK again to confirm changes.
Accept the license agreement for the Component Installer.
Click Finish.
Create a virtual device with AR support
You can follow the Android Studio instructions to create a
Virtual Device
with AR support.
Sceneform requires OpenGL ES 3.0 or higher.
Make sure your emulator is configured to use the latest version of
OpenGL ES:
- Click
in the running emulator's toolbar.
- Select Settings > Advanced > OpenGL ES API level >
Renderer maximum (up to OpenGL ES 3.1).
- Restart the emulator. When prompted, do not save the current state.
After restarting the emulator, briefly interact with the emulated deivce,
then check whether OpenGL ES 3.0 or higher is being used by grepping the
device logs:
adb logcat | grep eglMakeCurrent
If you see ver 3 0
or higher version, then you can run Sceneform
apps in the emulator:
… … … … D EGL_emulation: eglMakeCurrent: 0xebe63540: ver 3 0 (tinfo 0xd104cb40)
If you see a lower version, then your desktop GPU does not support
OpenGL ES 3.0 and you must instead use a physical
supported device to run Sceneform apps.
Run your app
Test an ARCore app on an AR-supported virtual device in the emulator. To do
this, you can follow the Android Studio instructions to
run an app in the Android Emulator.
Update Google Play Services for AR
The version of Google Play Services for AR on the emulator is likely out of
date. Follow these instructions to update it:
Download the latest Google_Play_Services_for_AR_1.15.0_x86_for_emulator.apk from the GitHub
releases page.
Install the downloaded APK into each AVD you'd like to use:
Start the desired AVD, then drag the downloaded APK onto the running
emulator, or install it using adb
while the virtual device is running:
adb install -r Google_Play_Services_for_AR_1.15.0_x86_for_emulator.apk
Repeat these steps process for any additional AVDs you'd like to use.
Control the virtual scene
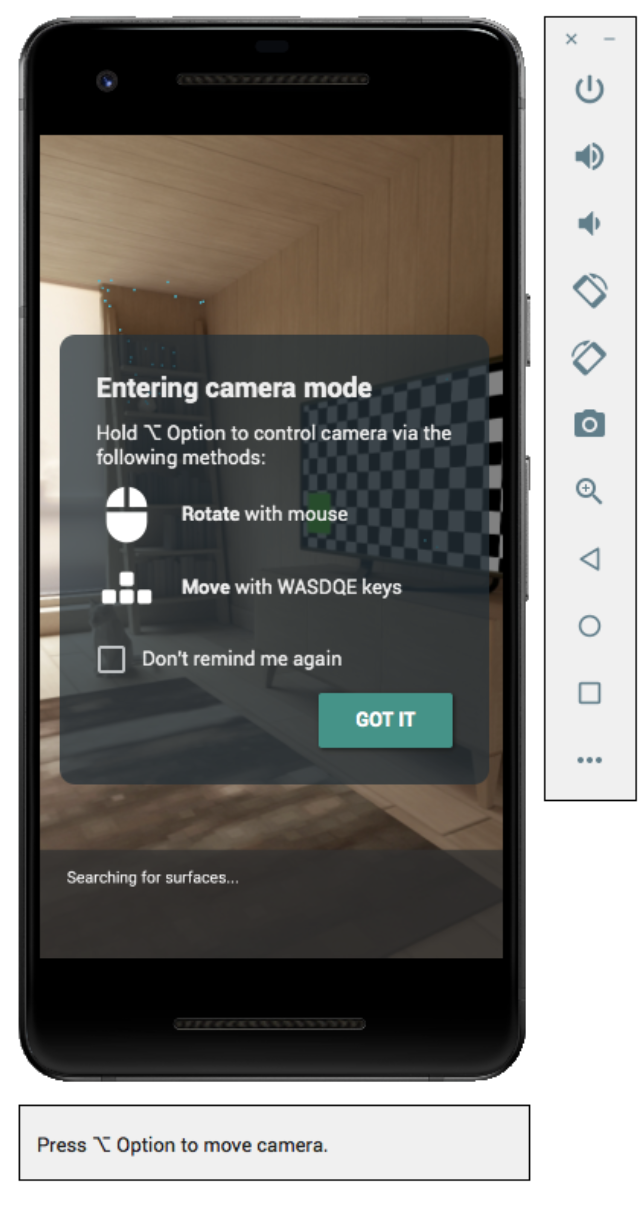
When your app connects to ARCore, you’ll see an overlay describing how to control
the camera and a status bar below the emulator window.
![]()
Move the virtual camera
Press and hold Option (macOS) or Alt (Linux or Windows) to access camera
movement controls. Use the following controls to move the camera:
Platform |
Action |
What to do |
macOS
|
Move left or right
|
Hold Option + press A or D
|
|
Move down or up
|
Hold Option + press Q or E
|
|
Move forward or back
|
Hold Option + press W or S
|
|
Change device orientation
|
Hold Option + move mouse
|
Linux or Windows
|
Move left or right
|
Hold Alt + press A or D
|
|
Move down or up
|
Hold Alt + press Q or E
|
|
Move forward or back
|
Hold Alt + press W or S
|
|
Change device orientation
|
Hold Alt + move mouse
|
Release Option or Alt to return to interactive mode in the emulator.
Use the Virtual Sensors tab in Extended controls
for more precise device positioning.
Troubleshooting tips
If your ARCore app launches and you see an "AR Core not supported" message,
check the revision on your system image. Make sure you are using
API Level 27 Revision 4.
If your ARCore app fails to open the camera when it launches, make sure that
Camera Back is set to VirtualScene, as described in the configuration
steps above.
Except as otherwise noted, the content of this page is licensed under the Creative Commons Attribution 4.0 License, and code samples are licensed under the Apache 2.0 License. For details, see the Google Developers Site Policies. Java is a registered trademark of Oracle and/or its affiliates.
Last updated 2024-06-26 UTC.
[[["Easy to understand","easyToUnderstand","thumb-up"],["Solved my problem","solvedMyProblem","thumb-up"],["Other","otherUp","thumb-up"]],[["Missing the information I need","missingTheInformationINeed","thumb-down"],["Too complicated / too many steps","tooComplicatedTooManySteps","thumb-down"],["Out of date","outOfDate","thumb-down"],["Samples / code issue","samplesCodeIssue","thumb-down"],["Other","otherDown","thumb-down"]],["Last updated 2024-06-26 UTC."],[[["\u003cp\u003eThe Android Emulator can be used to test ARCore apps in a virtual environment without a physical device, using a controlled emulated device.\u003c/p\u003e\n"],["\u003cp\u003eTo use the emulator for AR development, you need Android Studio 3.1 or later and Android Emulator 27.2.9 or later, along with a development machine supporting OpenGL ES 3.0 or higher.\u003c/p\u003e\n"],["\u003cp\u003eYou can create a virtual device with AR support by selecting the Pixel or Pixel 2 hardware profile and the Oreo: API Level 27: x86: Android 8.1 (Google APIs) system image, while ensuring the Camera Back is set to VirtualScene.\u003c/p\u003e\n"],["\u003cp\u003eTo configure the emulator to support Sceneform, you need to set the OpenGL ES API level to Renderer maximum (up to OpenGL ES 3.1) and verify that the emulator is using at least version 3.0.\u003c/p\u003e\n"],["\u003cp\u003eTo control the virtual camera within the AR environment, press and hold Option (macOS) or Alt (Linux/Windows) and use the A, S, D, W, Q, or E keys, or move the mouse for device orientation changes.\u003c/p\u003e\n"]]],["To test AR apps without a physical device, use the Android Emulator. First, install Android Studio 3.1+ and Android Emulator 27.2.9+. Configure the emulator with a Pixel/Pixel 2 device, Android 8.1 (API 27) system image, and set \"Camera Back\" to \"VirtualScene.\" Ensure OpenGL ES 3.0+ is enabled and update Google Play Services for AR. Control the virtual camera using Option/Alt plus WASD/QE keys or mouse movement. Finally, run the app on the emulator and interact with the AR environment.\n"],null,["Use the [Android Emulator](//developer.android.com/studio/run/emulator.html)\nto test AR scenarios without a physical device. The Android Emulator lets you\nrun ARCore apps in a virtual environment with an emulated device that you\ncontrol.\n\nSet up your development environment\n\nSoftware requirements:\n\n- [Android Studio](//developer.android.com/studio/) **3.1** or later.\n\n- [Android Emulator](//developer.android.com/studio/run/emulator.html#requirements)\n **27.2.9** or later.\n\nHardware requirements:\n\n- You'll also need a development machine that supports **OpenGL ES 3.0** or higher to use Sceneform in your app.\n\nGet Android Studio and SDK tools for ARCore\n\n1. Install [Android Studio](//developer.android.com/studio/) 3.1 or later.\n\n2. In Android Studio, go to **Preferences \\\u003e Appearance and Behavior \\\u003e System Settings \\\u003e Android SDK**.\n\n3. Select the **SDK Platforms** tab and check **Show Package Details**.\n\n Under **Android 8.1 (Oreo)** , select: \n\n **Google APIs Intel x86 Atom System Image** API Level 27, version 4 or later.\n4. Select the **SDK Tools** tab and add **Android Emulator** 27.2.9 or later.\n\n5. Click **OK** to install the selected pacakges and tools.\n\n6. Click **OK** again to confirm changes.\n\n7. Accept the license agreement for the Component Installer.\n\n8. Click **Finish**.\n\nCreate a virtual device with AR support\n\nYou can follow the Android Studio instructions to [create a\nVirtual Device](//developer.android.com/studio/run/managing-avds.html#createavd)\nwith AR support.\n\nConfigure the virtual device\n\n- Select the **Pixel** or **Pixel 2** hardware profile.\n- Select the **Oreo: API Level 27: x86: Android 8.1 (Google APIs)** system image.\n- Confirm that your virtual device is configured correctly:\n\n - Go to **Verify Configuration \\\u003e Show Advanced Settings**.\n - Make sure that **Camera Back** is set to **VirtualScene**.\n\nConfigure the emulator to support Sceneform\n\nSceneform requires **OpenGL ES 3.0** or higher.\n\n1. Make sure your emulator is configured to use the latest version of\n OpenGL ES:\n\n - Click in the running emulator's toolbar.\n - Select **Settings \\\u003e Advanced \\\u003e OpenGL ES API level \\\u003e\n Renderer maximum (up to OpenGL ES 3.1)**.\n - Restart the emulator. When prompted, do not save the current state.\n2. After restarting the emulator, briefly interact with the emulated deivce,\n then check whether OpenGL ES 3.0 or higher is being used by grepping the\n device logs:\n\n \u003cbr /\u003e\n\n ```\n adb logcat | grep eglMakeCurrent\n ```\n\n \u003cbr /\u003e\n\n If you see **`ver 3 0`** or higher version, then you can run Sceneform\n apps in the emulator: \n\n ```\n … … … … D EGL_emulation: eglMakeCurrent: 0xebe63540: ver 3 0 (tinfo 0xd104cb40)\n ```\n\n \u003cbr /\u003e\n\n If you see a lower version, then your desktop GPU does not support\n OpenGL ES 3.0 and you must instead use a physical\n [supported device](/ar/discover/supported-devices) to run Sceneform apps.\n\nRun your app\n\nTest an ARCore app on an AR-supported virtual device in the emulator. To do\nthis, you can follow the [Android Studio instructions](//developer.android.com/studio/run/emulator.html#runningapp) to\nrun an app in the Android Emulator.\n| **Note:** To run apps with NDK components in the Android Emulator, your app must be built with [**x86 ABIs**](//developer.android.com/ndk/guides/abis.html). For an example, see the [**ARCore HelloAR C sample app**](//github.com/google-ar/arcore-android-sdk/tree/master/samples/hello_ar_c).\n\nUpdate Google Play Services for AR\n\nThe version of Google Play Services for AR on the emulator is likely out of\ndate. Follow these instructions to update it:\n\n1. Download the latest **Google_Play_Services_for_AR_1.15.0_x86_for_emulator.apk** from the GitHub\n [releases](//github.com/google-ar/arcore-android-sdk/releases) page.\n\n2. Install the downloaded APK into each AVD you'd like to use:\n\n Start the desired AVD, then drag the downloaded APK onto the running\n emulator, or install it using `adb` while the virtual device is running: \n\n ```\n adb install -r Google_Play_Services_for_AR_1.15.0_x86_for_emulator.apk\n ```\n\n \u003cbr /\u003e\n\nRepeat these steps process for any additional AVDs you'd like to use.\n\nControl the virtual scene\n\nWhen your app connects to ARCore, you'll see an overlay describing how to control\nthe camera and a status bar below the emulator window.\n\nMove the virtual camera\n\nPress and hold **Option** (macOS) or **Alt** (Linux or Windows) to access camera\nmovement controls. Use the following controls to move the camera:\n\n\u003cbr /\u003e\n\n| Platform | Action | What to do |\n|--------------------------|---------------------------|----------------------------------------|\n| **macOS** | Move left or right | Hold **Option** + press **A** or **D** |\n| | Move down or up | Hold **Option** + press **Q** or **E** |\n| | Move forward or back | Hold **Option** + press **W** or **S** |\n| | Change device orientation | Hold **Option** + move mouse |\n| **Linux** or **Windows** | Move left or right | Hold **Alt** + press **A** or **D** |\n| | Move down or up | Hold **Alt** + press **Q** or **E** |\n| | Move forward or back | Hold **Alt** + press **W** or **S** |\n| | Change device orientation | Hold **Alt** + move mouse |\n\n\u003cbr /\u003e\n\nRelease **Option** or **Alt** to return to interactive mode in the emulator.\n\nUse the **Virtual Sensors** tab in [Extended controls](//developer.android.com/studio/run/emulator.html#extended)\nfor more precise device positioning.\n\nTroubleshooting tips\n\n- If your ARCore app launches and you see an \"AR Core not supported\" message,\n check the revision on your system image. Make sure you are using\n **API Level 27 Revision 4**.\n\n- If your ARCore app fails to open the camera when it launches, make sure that\n **Camera Back** is set to **VirtualScene** , as described in the [configuration\n steps above](#configure_the_virtual_device)."]]