

ডেভেলপার হিসেবে রেজিস্টার করা হল একটি বাধ্যতামূলক, এককালীন সেট-আপ প্রসেস যা আপনার Google Cloud প্রোজেক্টকে আপনার Merchant Center অ্যাকাউন্টের সাথে লিঙ্ক করে এবং Google-এ আপনার ডেভেলপার সংক্রান্ত যোগাযোগের তথ্য রেজিস্টার করে। এর ফলে Google আপনার দেওয়া প্রাসঙ্গিক টেকনিক্যাল পরিচিতির কাছে পরিষেবা সংক্রান্ত গুরুত্বপূর্ণ ঘোষণা এবং বাধ্যতামূলক আপডেট পাঠাতে পারে।
এই ডকুমেন্টটি Merchant API ব্যবহার শুরু করা সম্পর্কিত মাল্টি-পার্ট সিরিজের অংশ। আপনি আগে থেকেই Merchant API-তে রেজিস্টার করে থাকলে, পরের বিভাগে চলে যেতে পারেন: আপনার প্রথম প্রোডাক্ট যোগ করুন
পূর্বশর্ত
মার্চেন্ট API ব্যবহার করার জন্য রেজিস্টার করার আগে, আপনি নিম্নলিখিত প্রয়োজনীয়তা পূরণ করছেন কিনা তা নিশ্চিত করুন:
- Merchant Center অ্যাকাউন্ট: আপনার আগে থেকেই Merchant Center অ্যাকাউন্ট থাকতে হবে। রেজিস্ট্রেশন শুধুমাত্র প্রোডাকশন অ্যাকাউন্টের ক্ষেত্রে কাজ করে। টেস্ট অ্যাকাউন্ট ডেভেলপার রেজিস্ট্রেশনের জন্য উপযুক্ত নয়।
- যাচাই করা হোমপেজ: আপনার Merchant Center অ্যাকাউন্টে অবশ্যই যাচাই করা ওয়েবসাইট থাকতে হবে। এটি আপনার ব্যবসার সাথে যুক্ত ডোমেনের মালিকানা প্রমাণ করে।
- Merchant Center অ্যাকাউন্টে অ্যাডমিন অ্যাক্সেস: রেজিস্ট্রেশন কলের অনুমোদন করার জন্য আপনি যে ইমেল বা পরিষেবা
অ্যাকাউন্ট ব্যবহার করেন, সেটির অবশ্যই আপনি যে Merchant Center অ্যাকাউন্টে রেজিস্টার করছেন সেটিতে
ADMINঅ্যাক্সেস টাইপ থাকতে হবে। আরও তথ্যের জন্য, Merchant API-তে অনুরোধ অনুমোদন করা দেখুন। - Google Cloud প্রোজেক্ট আইডি: আপনার অ্যাপ্লিকেশনকে অবশ্যই একটি নির্দিষ্ট Google Cloud প্রোজেক্টের সাথে যুক্ত থাকতে হবে যাতে যাচাইকরণের জন্য ক্রেডেনশিয়াল প্রদান করা যায়। প্রোজেক্ট আইডি কোথায় পাবেন সেই সম্পর্কে বিস্তারিত জানতে, প্রোজেক্টের নাম, নম্বর ও আইডি খুঁজুন দেখুন।
- Google অ্যাকাউন্টের সাথে যুক্ত সঠিক ইমেল আইডি যা আপনি Google-এর থেকে আপডেট পাওয়ার জন্য ডেভেলপার যোগাযোগের পয়েন্ট হিসেবে প্রদান করেন। পরিষেবা অ্যাকাউন্টের ইমেল হলে চলবে না। আপনি এমন একটি ইমেল আইডি ব্যবহার করতে পারেন যা আগে থেকেই Merchant Center অ্যাকাউন্টের অংশ অথবা একটি নতুন ইমেল আইডি।
Merchant API-এর সাথে ডেভেলপার হিসেবে রেজিস্টার করুন
Merchant API ব্যবহার করতে, আপনাকে registerGcp পদ্ধতির মাধ্যমে আপনার Merchant Center অ্যাকাউন্টের সাথে ডেভেলপার সংক্রান্ত যোগাযোগের তথ্য এবং Google Cloud প্রোজেক্ট অবশ্যই রেজিস্টার করতে হবে।
আপনি একাধিক মার্চেন্ট অ্যাকাউন্টের সাথে কাজ করছেন কিনা তা নির্বিশেষে, আপনি যে Google Cloud প্রজেক্ট ব্যবহার করতে চান তার জন্য একবার রেজিস্ট্রেশন অপারেশন সম্পন্ন করুন। আপনি একাধিক Google Cloud প্রোজেক্ট নিয়ে কাজ করলে, একই Merchant Center অ্যাকাউন্টে সেগুলির মধ্যে যেকোনও একটি বা সবকটি রেজিস্টার করতে পারবেন।
রেজিস্ট্রেশন সংক্রান্ত সুবিধা
রেজিস্ট্রেশন করলে নিম্নলিখিত সুবিধা পাওয়া যায়:
- টেকনিক্যাল পরিচিতি তৈরি করা: এটি Merchant Center-এ টেকনিক্যাল পরিচিতি তৈরি করে। Google, টেকনিক্যাল পরিচিতিতে API-নির্দিষ্ট গুরুত্বপূর্ণ আপডেট পাঠায়, যেমন পরিষেবা সংক্রান্ত ঘোষণা ও নতুন ফিচার সম্পর্কিত তথ্য।
- একাধিক মার্চেন্ট অ্যাকাউন্ট ম্যানেজ করা: এটি আপনাকে আপনার ম্যানেজ করা সব মার্চেন্ট অ্যাকাউন্টের জন্য ডেভেলপারের যোগাযোগের পয়েন্ট হিসেবে কাজ করতে দেয়।
রেজিস্ট্রেশন ছাড়া, রেজিস্টার না করা
Google Cloud প্রোজেক্ট থেকে Merchant API-তে করা যেকোনও কল ব্লক করা হয় এবং 401 স্ট্যাটাস সহ একটি সমস্যা কোড
UNAUTHENTICATED এবং নিম্নলিখিত সমস্যার মেসেজ দেখানো হয়:
GCP project with id {GCP_ID} and number {GCP_NUMBER} is not registered with the merchant account.
Follow these steps https://developers.google.com/merchant/api/guides/quickstart#register_as_a_developer
to register the GCP project with the merchant account then try calling the API again in 5 minutes.
গুরুত্বপূর্ণ বিবেচনা
- প্রতিটি Google Cloud প্রোজেক্টের জন্য একবার সেট-আপ: রেজিস্ট্রেশন হল প্রতিটি Google Cloud প্রোজেক্টের জন্য একবার সেট-আপ করার প্রসেস এবং এটি Google Cloud প্রোজেক্টের মধ্যে থাকা সব ব্যবহারকারী ও পরিষেবা অ্যাকাউন্টের ক্ষেত্রে প্রযোজ্য। আপনার Google Cloud প্রোজেক্টে Merchant API চালু করা আছে কিনা ভাল করে দেখে নিন।
- প্রতিটি Google Cloud প্রোজেক্ট যেকোনও সময়ে শুধুমাত্র একটি Merchant Center অ্যাকাউন্টের সাথে রেজিস্টার করা যেতে পারে: আপনি যদি একাধিক Merchant Center অ্যাকাউন্টের সাথে একসাথে একটি Google Cloud প্রোজেক্ট রেজিস্টার করার চেষ্টা করেন, তাহলে আপনি একটি
ALREADY_REGISTEREDসমস্যা দেখতে পাবেন। রেজিস্ট্রেশনের জন্য একই ডেভেলপার ইমেল আইডি ব্যবহার করুন। মনে রাখবেন, একাধিক Google Cloud প্রোজেক্ট একই Merchant Center অ্যাকাউন্টে রেজিস্টার করা যেতে পারে। আপনার রেজিস্টার করা Google Cloud প্রোজেক্ট পরিবর্তন বা রোটেট করার নির্দেশাবলীর জন্য, Google Cloud প্রোজেক্ট ম্যানেজ ও ট্রানজিশন করা দেখুন। একাধিক মার্চেন্ট ম্যানেজ করা থার্ড-পার্টির (3P) জন্য সঠিক অ্যাকাউন্ট নির্ধারণ করা: দীর্ঘমেয়াদী স্থিতিশীলতা নিশ্চিত করতে এবং পরিষেবাতে বাধা এড়াতে, একাধিক মার্চেন্টের প্রতিনিধিত্ব বা ম্যানেজ করা থার্ড-পার্টিকে Google ইকোসিস্টেমের মধ্যে উপযুক্ত অ্যাকাউন্ট স্ট্রাকচার ব্যবহার করতে হবে। আমরা সাজেস্ট করি যে আপনার ব্যবসার ধরন অনুযায়ী, আপনার ব্যবসার পরিচয় তুলে ধরে এমন অ্যাকাউন্ট রেজিস্টার করুন:
- আগে থেকে উন্নত অ্যাকাউন্ট আছে এমন মার্কেটপ্লেস: আপনার ব্যবসা যদি মার্কেটপ্লেস হিসেবে কাজ করে এবং আগে থেকেই সমগ্র প্ল্যাটফর্মের প্রতিনিধিত্বকারী একটি উন্নত অ্যাকাউন্ট থাকে, তাহলে আপনার এই আগে থেকে থাকা অ্যাকাউন্ট আইডি ব্যবহার করা উচিত।
- তুলনামূলক শপিং পরিষেবা (CSS): আপনি CSS হলে, আপনাকে নিজের অনন্য CSS অ্যাকাউন্ট আইডি বা CSS গ্রুপ অ্যাকাউন্ট আইডি ব্যবহার করতে হবে।
- এজেন্সি, ডেভেলপার ও অন্যান্য থার্ড-পার্টি: আপনি যদি এমন কোনও থার্ড-পার্টি ব্যবসা হন যা এজেন্সি বা থার্ড-পার্টি ডেভেলপার একাধিক মার্চেন্ট অ্যাকাউন্ট ম্যানেজ করে এবং আপনার ব্যবসার প্রতিনিধিত্বকারী একটি Merchant Center আইডি না থাকে, তাহলে আপনাকে একটি নতুন, প্রাথমিক Merchant Center অ্যাকাউন্ট তৈরি করতে হবে এবং এটিকে উন্নত অ্যাকাউন্টে কনভার্ট করার অনুরোধ করতে হবে। উন্নত অ্যাকাউন্ট সাব-অ্যাকাউন্ট ম্যানেজ করতে পারে এবং থার্ড-পার্টি অপারেশনের জন্য প্রয়োজনীয় স্ট্রাকচার প্রদান করে।
নিচের সারণীতে বিভিন্ন ধরনের পার্টনারদের জন্য সাজেশন দেওয়া হয়েছে:
অংশীদার প্রকার রেজিস্টার করার জন্য সাজেস্ট করা অ্যাকাউন্ট মার্কেটপ্লেস আপনার প্রধান (বা সবচেয়ে বড়) উন্নত অ্যাকাউন্ট। বিজ্ঞাপন এজেন্সি আপনার কোম্পানির প্রতিনিধিত্বকারী একটি স্বতন্ত্র অ্যাকাউন্ট বা উন্নত অ্যাকাউন্ট। আপনি যদি Merchant API ব্যবহার করা শুরু করেন, তাহলে আমরা সিঙ্গল অ্যাকাউন্ট তৈরি করার সাজেশন দিই। তুলনামূলক কেনাকাটার পরিষেবা (CSS) আপনার CSS গ্রুপ অ্যাকাউন্ট আইডি বা নির্দিষ্ট CSS অ্যাকাউন্ট আইডি, অ্যাকাউন্টটি সম্পূর্ণ CSS গ্রুপ বা গ্রুপের মধ্যে শুধুমাত্র একটি নির্দিষ্ট CSS-কে প্রতিনিধিত্ব করে কিনা তার উপর নির্ভর করে। CSS উন্নত অ্যাকাউন্ট ব্যবহার করবেন না। মার্চেন্ট বা ব্র্যান্ড আপনার ব্র্যান্ডের প্রতিনিধিত্ব করে এমন মূল অ্যাকাউন্ট। স্ট্যান্ডঅ্যালোন বা উন্নত অ্যাকাউন্ট হতে পারে। পয়েন্ট অফ সেল (POS)/ইনভেনটরি ডেটা প্রদানকারী আপনার প্রধান (বা সবচেয়ে বড়) অ্যাডভান্সড অ্যাকাউন্ট। অন্যান্য থার্ড-পার্টি আপনার Merchant Center অ্যাকাউন্ট থাকলে, আপনি এটি রেজিস্ট্রেশনের জন্য ব্যবহার করতে পারবেন। অন্যথায়, কোম্পানির স্ট্যান্ডঅ্যালোন অ্যাকাউন্ট তৈরি করুন। তারপর আপনার ওয়েবসাইট যাচাই করুন। শুধুমাত্র আপনার প্রাথমিক Merchant Center-এর জন্য রেজিস্ট্রেশন করুন: আপনি শুধুমাত্র আপনার প্রাথমিক Merchant Center অ্যাকাউন্ট ব্যবহার করে ডেভেলপার রেজিস্ট্রেশন করেন এবং লিঙ্ক করা সব Merchant Center সাবঅ্যাকাউন্টের জন্য ডেভেলপার পরিচিতি হয়ে যান। আপনার প্রতিটি Merchant Center সাব-অ্যাকাউন্টের জন্য রেজিস্ট্রেশন করবেন না।
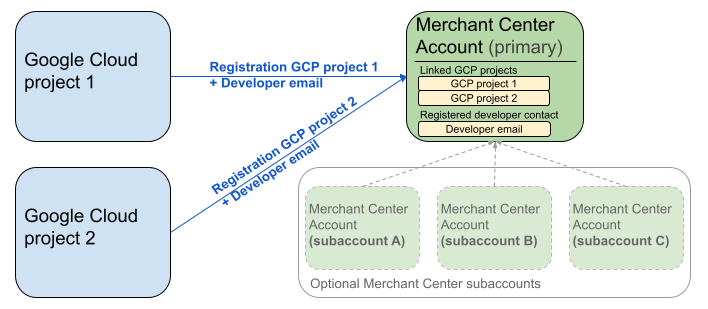
আগের ডায়াগ্রামটি একাধিক Google Cloud প্রোজেক্ট এবং ঐচ্ছিকভাবে একাধিক Merchant Center সাব-অ্যাকাউন্ট সহ একটি প্রাথমিক Merchant Center ব্যবহার করার সময় রেজিস্ট্রেশন সেট-আপ দেখায়।
যাচাইকরণের প্রয়োজনীয়তা: রেজিস্ট্রেশন করার সময়, যাচাই করা Merchant Center অ্যাকাউন্ট (যে অ্যাকাউন্টে আপনার ক্রেডেনশিয়াল থাকে) এবং ছদ্মবেশী Merchant Center অ্যাকাউন্ট (যে অ্যাকাউন্ট আপনি রেজিস্টার করছেন) একই হতে হবে। আপনি যদি আলাদা অভিভাবক বা ম্যানেজার অ্যাকাউন্ট দিয়ে যাচাইকরণ করেন, তাহলে সাব-অ্যাকাউন্টের জন্য রেজিস্টার করতে পারবেন না।
শুধুমাত্র যাচাই করা ওয়েবসাইট অ্যাকাউন্ট: শুধুমাত্র যাচাই করা ওয়েবসাইট আছে এমন Merchant Center অ্যাকাউন্টের জন্য রেজিস্ট্রেশনের অনুমতি দেওয়া হয়।
টেস্ট অ্যাকাউন্টেররেজিস্ট্রেশন নেই: আপনি টেস্ট অ্যাকাউন্টের রেজিস্ট্রেশন করতে পারবেন না।
আপনি ডেভেলপার ইমেল আইডি রেজিস্টার করার পরে:
- রেজিস্ট্রেশনের ৫ মিনিটের মধ্যেই আপনি Merchant API কল করতে পারবেন।
- ইমেলটি যদি কোনও বর্তমান Merchant Center ব্যবহারকারীর হয়, তাহলে তাকে
API developerভূমিকা দেওয়া হয়। অন্যথায়, Merchant Center-এ একটি নতুন ব্যবহারকারী তৈরি করা হয় এবং মেয়াদ শেষ হয়ে যাওয়া ও রেজিস্ট্রেশন প্রক্রিয়া আবার শুরু করা এড়াতে তাকে ১৪ দিনের মধ্যে আমন্ত্রণ গ্রহণ করতে হবে। ব্যবহারকারী আমন্ত্রণের লিঙ্কে ক্লিক করার পরেই আপনি রেজিস্ট্রেশন প্রসেস সম্পূর্ণ করেন।
রেজিস্ট্রেশন কল করা
registerGcp মেথড কল করে আপনি রেজিস্টার করেন। রেজিস্ট্রেশন কল করার জন্য আপনার কাছে দুটি বিকল্প আছে:
- বিকল্প ১: সরাসরি API কল আপনি সরাসরি API এন্ডপয়েন্টে র-অনুরোধ করেন, সাধারণত HTTP(S)-এর মাধ্যমে। আপনি ম্যানুয়ালি অনুরোধের বডি তৈরি করা, হেডার সেট করা (যাতে যাচাইকরণ অন্তর্ভুক্ত) এবং উত্তরের পার্সিংয়ের মতো বিষয়গুলি হ্যান্ডেল করেন।
- বিকল্প ২: ক্লায়েন্ট লাইব্রেরি আপনি আগে থেকে তৈরি করা লাইব্রেরি ব্যবহার করেন যা Merchant API-এর সাথে ইন্টার্যাক্ট করার জন্য আরও সুবিধাজনক, ভাষা-ভিত্তিক উপায় অফার করে। এগুলি যাচাইকরণ ও অনুমোদন ম্যানেজ করে এবং অন্তর্নিহিত HTTP কমিউনিকেশনকে অ্যাবস্ট্রাক্ট করার একটি সুবিধাজনক উপায় অফার করে। দ্রুত শুরু করার জন্য অফিসিয়াল কোড স্যাম্পেল উপলভ্য আছে।
রেজিস্ট্রেশন কলের জন্য অনুমোদন
Merchant API-তে অনুরোধ অনুমোদন করা ধাপে যেভাবে বর্ণনা করা হয়েছে, আপনার কাছে দুটি আলাদা যাচাইকরণ পরিস্থিতি রয়েছে:
- OAuth 2.0: থার্ড-পার্টি পরিষেবা প্রদানকারী বা এজেন্সির জন্য যারা একাধিক মার্চেন্ট অ্যাকাউন্ট ম্যানেজ করে
- পরিষেবা অ্যাকাউন্ট: আপনার নিজের Merchant Center অ্যাকাউন্টে অ্যাক্সেস পেতে
রেজিস্ট্রেশন কলের অনুমোদনের ব্যাপারে আরও তথ্যের জন্য, আমি কীভাবে রেজিস্ট্রেশন কলের জন্য যাচাইকরণ ও অনুমোদন করব? দেখুন।
রেজিস্ট্রেশন কল
নিম্নলিখিত উদাহরণে, আপনি সরাসরি API কল বা ক্লায়েন্ট লাইব্রেরি ব্যবহার করে রেজিস্ট্রেশন কল সম্পূর্ণ করেন।
আপনি registerGcp পদ্ধতি ব্যবহার করে রেজিস্ট্রেশন কল করেন।
POST https://merchantapi.googleapis.com/accounts/v1/accounts/{ACCOUNT_ID}/developerRegistration:registerGcp
Content-Type: application/json
Authorization: Bearer {ACCESS_TOKEN}"

{
  "developerEmail": "{DEVELOPER_EMAIL}"
}
নিম্নলিখিত বিষয়গুলি পরিবর্তন করুন:
ACCOUNT_ID: আপনার Merchant Center আইডিACCESS_TOKEN: API কল করার জন্য অনুমোদন টোকেনDEVELOPER_EMAIL: প্রাথমিক টেকনিক্যাল পরিচিতির ইমেল আইডি
কল সফল হলে DeveloperRegistration রিসোর্স রিটার্ন করে, লিঙ্ক করার স্ট্যাটাস কনফার্ম করে:
  "name": "accounts/{ACCOUNT_ID}/developerRegistration",
  "gcpIds": ["{GOOGLE_CLOUD_PROJECT_ID}"]
Python
Python ক্লায়েন্ট লাইব্রেরি সেট-আপ করতে, নমুনা ডাউনলোড করুন এবং Google Merchant API Python স্যাম্পেল থেকে নির্দেশাবলী অনুসরণ করুন।
from examples.authentication import configuration
from examples.authentication import generate_user_credentials
from google.shopping.merchant_accounts_v1 import DeveloperRegistrationServiceClient
from google.shopping.merchant_accounts_v1 import RegisterGcpRequest
def register_gcp(account_id: str, developer_email: str) -> None:
"""Registers the GCP project used to call the Merchant API with a developer email.
Args:
account_id: The ID of your Merchant Center account.
developer_email: The email address of the developer to register.
"""
# Get OAuth credentials.
credentials = generate_user_credentials.main()
# Create a client to the Developer Registration Service.
client = DeveloperRegistrationServiceClient(credentials=credentials)
# The name has the format: accounts/{account}/developerRegistration
name = f"accounts/{account_id}/developerRegistration"
# Create the request to register the GCP project.
request = RegisterGcpRequest(
name=name,
developer_email=developer_email,
)
# Make the API call and handle potential errors.
try:
print("Sending RegisterGcp request:")
response = client.register_gcp(request=request)
print("Registered GCP project successfully:")
print(response)
except RuntimeError as e:
print(f"An error occurred: {e}")
if __name__ == "__main__":
# Your Merchant Center account ID.
# This can be found in the Merchant Center UI.
_account_id = configuration.Configuration().read_merchant_info()
# The developer email to associate with the GCP project.
_developer_email = "YOUR_EMAIL_HERE"
register_gcp(_account_id, _developer_email)
Java
জাভা ক্লায়েন্ট লাইব্রেরি সেট-আপ করতে, নমুনা ডাউনলোড করুন এবং Google Merchant API জাভা স্যাম্পেল থেকে নির্দেশাবলী অনুসরণ করুন।
import com.google.api.gax.core.FixedCredentialsProvider;
import com.google.auth.oauth2.GoogleCredentials;
import com.google.shopping.merchant.accounts.v1.DeveloperRegistration;
import com.google.shopping.merchant.accounts.v1.DeveloperRegistrationName;
import com.google.shopping.merchant.accounts.v1.DeveloperRegistrationServiceClient;
import com.google.shopping.merchant.accounts.v1.DeveloperRegistrationServiceSettings;
import com.google.shopping.merchant.accounts.v1.RegisterGcpRequest;
import shopping.merchant.samples.utils.Authenticator;
import shopping.merchant.samples.utils.Config;
/**
* This class demonstrates how to register the GCP project used to call the Merchant API with a
* developer email.
*/
public class RegisterGcpSample {
public static DeveloperRegistration registerGcp(Config config, String developerEmail) throws Exception {
// Obtains OAuth token based on the user's configuration.
GoogleCredentials credential = new Authenticator().authenticate();
// Creates service settings using the credentials retrieved above.
DeveloperRegistrationServiceSettings developerRegistrationServiceSettings =
DeveloperRegistrationServiceSettings.newBuilder()
.setCredentialsProvider(FixedCredentialsProvider.create(credential))
.build();
// Creates DeveloperRegistration name to identify the DeveloperRegistration.
// The name has the format: accounts/{account}/developerRegistration
String name =
DeveloperRegistrationName.newBuilder()
.setAccount(config.getAccountId().toString())
.build()
.toString();
// Calls the API and propagates any network failures/errors.
try (DeveloperRegistrationServiceClient developerRegistrationServiceClient =
DeveloperRegistrationServiceClient.create(developerRegistrationServiceSettings)) {
// Creates a request to register the GCP project with the developer email.
RegisterGcpRequest request =
RegisterGcpRequest.newBuilder().setName(name).setDeveloperEmail(developerEmail).build();
System.out.println("Sending RegisterGcp request:");
DeveloperRegistration response = developerRegistrationServiceClient.registerGcp(request);
System.out.println(response);
return response;
}
}
public static void main(String[] args) throws Exception {
Config config = Config.load();
String developerEmail = "YOUR_EMAIL_HERE"; // Replace with your email
registerGcp(config, developerEmail);
}
}
PHP
স্যাম্পেল ডাউনলোড করুন এবং Google Merchant API PHP স্যাম্পেল থেকে নির্দেশিকা অনুসরণ করে PHP ক্লায়েন্ট লাইব্রেরি সেট-আপ করুন।
require_once __DIR__ . '/../../../../vendor/autoload.php';
require_once __DIR__ . '/../../../Authentication/Authentication.php';
require_once __DIR__ . '/../../../Authentication/Config.php';
use Google\ApiCore\ApiException;
use Google\Shopping\Merchant\Accounts\V1\Client\DeveloperRegistrationServiceClient;
use Google\Shopping\Merchant\Accounts\V1\RegisterGcpRequest;
/**
* This class demonstrates how to register the GCP project used to call the
* Merchant API with a developer email.
*/
class RegisterGcpSample
{
/**
* A helper function to create the name string for the
* DeveloperRegistration.
*
* @param string $accountId The merchant account ID.
* @return string The name, which has the format:
* `accounts/{account}/developerRegistration`
*/
private static function getName(string $accountId): string
{
return sprintf("accounts/%s/developerRegistration", $accountId);
}
/**
* Registers the GCP project with a developer email.
*
* @param array $config The configuration data for authentication and account ID.
* @param string $developerEmail The email of the developer to register.
*/
public static function registerGcpSample(array $config, string $developerEmail): void
{
// Obtains OAuth credentials from the configuration file.
$credentials = Authentication::useServiceAccountOrTokenFile();
// Creates a configuration object for the client.
$options = ['credentials' => $credentials];
// Creates the DeveloperRegistrationServiceClient.
$developerRegistrationServiceClient = new DeveloperRegistrationServiceClient($options);
// Creates the name of the developer registration to identify it.
$name = self::getName($config['accountId']);
// Calls the API and handles any network failures.
try {
// Creates a request to register the GCP project with the developer email.
$request = new RegisterGcpRequest([
'name' => $name,
'developer_email' => $developerEmail
]);
printf("Sending RegisterGcp request:%s", PHP_EOL);
// The `registerGcp` method returns a `DeveloperRegistration` object
// upon success.
$response = $developerRegistrationServiceClient->registerGcp($request);
print "Successfully registered developer email '$developerEmail' for account {$config['accountId']}.\n";
print_r($response);
} catch (ApiException $e) {
printf("An error occurred: %s%s", $e->getMessage(), PHP_EOL);
}
}
/**
* Helper to execute the sample.
*/
public function callSample(): void
{
$config = Config::generateConfig();
// An email address for a developer to register for the API.
$developerEmail = 'YOUR_EMAIL_HERE'; // Replace with your email
self::registerGcpSample($config, $developerEmail);
}
}
// Executes the sample.
$sample = new RegisterGcpSample();
$sample->callSample();
cURL
curl -X POST "https://merchantapi.googleapis.com/accounts/v1/accounts/{ACCOUNT_ID}/developerRegistration:registerGcp" \
-H "Content-Type: application/json" \
-H "Authorization: Bearer {ACCESS_TOKEN}" \
-d '{
  "developerEmail": "{DEVELOPER_EMAIL}"
}'
রেজিস্ট্রেশন সম্পূর্ণ করতে, আপনাকে অবশ্যই নিশ্চিত করতে হবে যে Merchant Center-এ অন্তত একজন ব্যবহারকারীর API developer ভূমিকা আছে। এটি করতে, আপনি
নিচে উল্লেখ করা অপারেশনগুলির মধ্যে একটি করতে পারেন:
registerGcpপদ্ধতিতেdeveloperEmailপ্রদান করুন।- Merchant Center UI-তে
API developerভূমিকা আছে এমন একজন নতুন ব্যবহারকারীকে যোগ করুন। - Merchant Center UI-তে আগে থেকে থাকা কোনও ব্যবহারকারীকে
API developerভূমিকা অ্যাসাইন করুন। - নতুন ব্যবহারকারী তৈরি করতে
accounts.users.createমেথড কল করুন এবং সেটিকেAPI developerভূমিকা অ্যাসাইন করুন। accounts.users.patchপদ্ধতি ব্যবহার করে আগে থেকেই থাকা ব্যবহারকারীকেAPI developerভূমিকা অ্যাসাইন করুন।
রেজিস্ট্রেশনের পরে পেশাদার পদ্ধতি
অ্যাক্সেস ম্যানেজমেন্টের সুবিধা পেতে এবং ভবিষ্যতে পরিষেবা বিঘ্নিত হওয়া আটকাতে, প্রাথমিক রেজিস্ট্রেশন সম্পূর্ণ করার পরে আমরা আপনাকে পেশাদার পদ্ধতির একটি সেট অনুসরণ করার সাজেশন দিই:
API developer-কে অতিরিক্ত অনুমতি দিন
আপনি কোনও ডেভেলপার পরিচিতি রেজিস্টার করলে, তাকে অটোমেটিক
API developer ভূমিকা অ্যাসাইন করা হয়। Merchant Center অ্যাকাউন্ট ম্যানেজ করা বা সব API কল করার জন্য
প্রয়োজনীয় অন্যান্য অনুমতি এই ভূমিকায় অন্তর্ভুক্ত নয়। আমরা
সাজেস্ট করি যে আপনার ডেভেলপারদের ADMIN বা STANDARD ভূমিকা যোগ করুন যাতে তারা
সম্পূর্ণ অ্যাক্সেস পান।
ব্যবহারকারীর অ্যাক্সেস অধিকার পরিবর্তন করতে, accounts.users.patch পদ্ধতি ব্যবহার করুন। ভূমিকা যোগ করতে বা সরাতে, আপনি অনুরোধের বডির updateMask ফিল্ডে অ্যাক্সেস অধিকার নির্দিষ্ট করেন:
PATCH https://merchantapi.googleapis.com/accounts/v1/{ACCOUNT_ID}/users/{DEVELOPER_EMAIL}?update_mask=access_rights
Content-Type: application/json
Authorization: Bearer {ACCESS_TOKEN}"

{
  "name": "accounts/{ACCOUNT_ID}/users/{DEVELOPER_EMAIL}",
  "access_rights": [ "ADMIN", "API_DEVELOPER" ]
}
Python
from examples.authentication import configuration
from examples.authentication import generate_user_credentials
from google.protobuf import field_mask_pb2
from google.shopping.merchant_accounts_v1 import AccessRight
from google.shopping.merchant_accounts_v1 import UpdateUserRequest
from google.shopping.merchant_accounts_v1 import User
from google.shopping.merchant_accounts_v1 import UserServiceClient
FieldMask = field_mask_pb2.FieldMask
_ACCOUNT = configuration.Configuration().read_merchant_info()
def update_user(user_email, user_access_right):
"""Updates a user to make it an admin of the MC account."""
credentials = generate_user_credentials.main()
client = UserServiceClient(credentials=credentials)
# Create user name string
name = "accounts/" + _ACCOUNT + "/users/" + user_email
user = User(name=name, access_rights=[user_access_right])
field_mask = FieldMask(paths=["access_rights"])
try:
request = UpdateUserRequest(user=user, update_mask=field_mask)
print("Sending Update User request")
response = client.update_user(request=request)
print("Updated User Name below")
print(response.name)
except RuntimeError as e:
print(e)
if __name__ == "__main__":
# Modify this email to update the right user
email = "USER_MAIL_ACCOUNT"
access_right = AccessRight.ADMIN
update_user(email, access_right)
জাভা
import com.google.api.gax.core.FixedCredentialsProvider;
import com.google.auth.oauth2.GoogleCredentials;
import com.google.protobuf.FieldMask;
import com.google.shopping.merchant.accounts.v1.AccessRight;
import com.google.shopping.merchant.accounts.v1.UpdateUserRequest;
import com.google.shopping.merchant.accounts.v1.User;
import com.google.shopping.merchant.accounts.v1.UserName;
import com.google.shopping.merchant.accounts.v1.UserServiceClient;
import com.google.shopping.merchant.accounts.v1.UserServiceSettings;
import shopping.merchant.samples.utils.Authenticator;
import shopping.merchant.samples.utils.Config;
/** This class demonstrates how to update a user to make it an admin of the MC account. */
public class UpdateUserSample {
public static void updateUser(Config config, String email, AccessRight accessRight)
throws Exception {
GoogleCredentials credential = new Authenticator().authenticate();
UserServiceSettings userServiceSettings =
UserServiceSettings.newBuilder()
.setCredentialsProvider(FixedCredentialsProvider.create(credential))
.build();
// Creates user name to identify user.
String name =
UserName.newBuilder()
.setAccount(config.getAccountId().toString())
.setEmail(email)
.build()
.toString();
// Create a user with the updated fields.
User user = User.newBuilder().setName(name).addAccessRights(accessRight).build();
FieldMask fieldMask = FieldMask.newBuilder().addPaths("access_rights").build();
try (UserServiceClient userServiceClient = UserServiceClient.create(userServiceSettings)) {
UpdateUserRequest request =
UpdateUserRequest.newBuilder().setUser(user).setUpdateMask(fieldMask).build();
System.out.println("Sending Update User request");
User response = userServiceClient.updateUser(request);
System.out.println("Updated User Name below");
System.out.println(response.getName());
} catch (Exception e) {
System.out.println(e);
}
}
public static void main(String[] args) throws Exception {
Config config = Config.load();
String email = "testUser@gmail.com";
// Give the user admin rights. Note that all other rights, like
// PERFORMANCE_REPORTING, would be overwritten in this example
// if the user had those access rights before the update.
AccessRight accessRight = AccessRight.ADMIN;
updateUser(config, email, accessRight);
}
}
PHP
use Google\ApiCore\ApiException;
use Google\Protobuf\FieldMask;
use Google\Shopping\Merchant\Accounts\V1\AccessRight;
use Google\Shopping\Merchant\Accounts\V1\UpdateUserRequest;
use Google\Shopping\Merchant\Accounts\V1\User;
use Google\Shopping\Merchant\Accounts\V1\Client\UserServiceClient;
/**
* Updates a user.
*
* @param array $config The configuration data.
* @param string $email The email address of the user.
* @param int $accessRight The access right to grant the user.
* @return void
*/
function updateUser($config, $email, $accessRights): void
{
// Gets the OAuth credentials to make the request.
$credentials = Authentication::useServiceAccountOrTokenFile();
// Creates options config containing credentials for the client to use.
$options = ['credentials' => $credentials];
// Creates a client.
$userServiceClient = new UserServiceClient($options);
// Creates user name to identify user.
$name = 'accounts/' . $config['accountId'] . "/users/" . $email;
$user = (new User())
->setName($name)
->setAccessRights($accessRights);
$fieldMask = (new FieldMask())->setPaths(['access_rights']);
// Calls the API and catches and prints any network failures/errors.
try {
$request = new UpdateUserRequest([
'user' => $user,
'update_mask' => $fieldMask,
]);
print "Sending Update User request\n";
$response = $userServiceClient->updateUser($request);
print "Updated User Name below\n";
print $response->getName() . "\n";
} catch (ApiException $e) {
print $e->getMessage();
}
}
$config = Config::generateConfig();
$email = "testUser@gmail.com";
$accessRights = [AccessRight::ADMIN];
updateUser($config, $email, $accessRights);
cURL
curl -X PATCH \
"https://merchantapi.googleapis.com/accounts/v1/{ACCOUNT_ID}/users/{USER_EMAIL}?update_mask=access_rights" \
-H "Content-Type: application/json" \
-H "Authorization: Bearer {ACCESS_TOKEN}" \
-d '{
  "access_rights": [
    "ADMIN",
    "API_DEVELOPER"
  ]
}'
আরও ডেভেলপারের পরিচিতি যোগ করুন
প্রাথমিক ডেভেলপার পরিচিতি চলে গেলে বা অ্যাক্সেস হারিয়ে ফেললে, ব্যবসার ক্ষেত্রে বিঘ্ন এড়াতে,
অতিরিক্ত পরিচিতি থাকা অত্যন্ত গুরুত্বপূর্ণ। আমরা সাজেস্ট করি যে ব্যাক-আপ হিসেবে কাজ করার জন্য Merchant Center-এ
API developer ভূমিকা সহ অন্তত
একজন অতিরিক্ত ব্যবহারকারী রাখুন।
আপনি Merchant API-তে accounts.users পরিষেবা অথবা Merchant Center UI-তে অ্যাক্সেস ও পরিষেবা পৃষ্ঠা ব্যবহার করে কোনও ব্যবহারকারীকে যোগ করতে বা আগে থেকে থাকা কোনও ব্যবহারকারীর তথ্য আপডেট করতে পারবেন। ব্যাক-আপ ডেভেলপারদের আগে থেকেই যোগ করে রাখলে, আপনি আরও বেশি স্থিতিশীল ইন্টিগ্রেশন তৈরি করতে পারেন যা কোনও একক ব্যক্তির উপর নির্ভর করে না।
PATCH https://merchantapi.googleapis.com/products/v1/accounts/{ACCOUNT_ID}/users
Content-Type: application/json
Authorization: Bearer {ACCESS_TOKEN}"
{
  "user_id": {USER_EMAIL},
  "user": { "access_rights": [ "API_DEVELOPER", "ADMIN" ] }
}
Python
from examples.authentication import configuration
from examples.authentication import generate_user_credentials
from google.shopping.merchant_accounts_v1 import AccessRight
from google.shopping.merchant_accounts_v1 import CreateUserRequest
from google.shopping.merchant_accounts_v1 import User
from google.shopping.merchant_accounts_v1 import UserServiceClient
_ACCOUNT = configuration.Configuration().read_merchant_info()
def get_parent(account_id):
return f"accounts/{account_id}"
def create_user(user_email):
"""Creates a user for a Merchant Center account."""
# Get OAuth credentials
credentials = generate_user_credentials.main()
# Create a UserServiceClient
client = UserServiceClient(credentials=credentials)
# Create parent string
parent = get_parent(_ACCOUNT)
# Create the request
request = CreateUserRequest(
parent=parent,
user_id=user_email,
user=User(
access_rights=[AccessRight.ADMIN, AccessRight.PERFORMANCE_REPORTING]
),
)
try:
print("Sending Create User request")
response = client.create_user(request=request)
print("Inserted User Name below")
print(response.name)
except RuntimeError as e:
print(e)
if __name__ == "__main__":
# Modify this email to create a new user
email = "USER_MAIL_ACCOUNT"
create_user(email)
জাভা
import com.google.api.gax.core.FixedCredentialsProvider;
import com.google.auth.oauth2.GoogleCredentials;
import com.google.shopping.merchant.accounts.v1.AccessRight;
import com.google.shopping.merchant.accounts.v1.CreateUserRequest;
import com.google.shopping.merchant.accounts.v1.User;
import com.google.shopping.merchant.accounts.v1.UserServiceClient;
import com.google.shopping.merchant.accounts.v1.UserServiceSettings;
import shopping.merchant.samples.utils.Authenticator;
import shopping.merchant.samples.utils.Config;
/** This class demonstrates how to create a user for a Merchant Center account. */
public class CreateUserSample {
private static String getParent(String accountId) {
return String.format("accounts/%s", accountId);
}
public static void createUser(Config config, String email) throws Exception {
// Obtains OAuth token based on the user's configuration.
GoogleCredentials credential = new Authenticator().authenticate();
// Creates service settings using the credentials retrieved above.
UserServiceSettings userServiceSettings =
UserServiceSettings.newBuilder()
.setCredentialsProvider(FixedCredentialsProvider.create(credential))
.build();
// Creates parent to identify where to insert the user.
String parent = getParent(config.getAccountId().toString());
// Calls the API and catches and prints any network failures/errors.
try (UserServiceClient userServiceClient = UserServiceClient.create(userServiceSettings)) {
CreateUserRequest request =
CreateUserRequest.newBuilder()
.setParent(parent)
// This field is the email address of the user.
.setUserId(email)
.setUser(
User.newBuilder()
.addAccessRights(AccessRight.ADMIN)
.addAccessRights(AccessRight.PERFORMANCE_REPORTING)
.build())
.build();
System.out.println("Sending Create User request");
User response = userServiceClient.createUser(request);
System.out.println("Inserted User Name below");
// The last part of the user name will be the email address of the user.
// Format: `accounts/{account}/user/{user}`
System.out.println(response.getName());
} catch (Exception e) {
System.out.println(e);
}
}
public static void main(String[] args) throws Exception {
Config config = Config.load();
// The email address of this user.
String email = "testUser@gmail.com";
createUser(config, email);
}
}
PHP
use Google\ApiCore\ApiException;
use Google\Shopping\Merchant\Accounts\V1\AccessRight;
use Google\Shopping\Merchant\Accounts\V1\CreateUserRequest;
use Google\Shopping\Merchant\Accounts\V1\User;
use Google\Shopping\Merchant\Accounts\V1\Client\UserServiceClient;
/**
* Creates a user.
*
* @param array $config The configuration data.
* @param string $email The email address of the user.
* @return void
*/
function createUser($config, $email): void
{
// Gets the OAuth credentials to make the request.
$credentials = Authentication::useServiceAccountOrTokenFile();
// Creates options config containing credentials for the client to use.
$options = ['credentials' => $credentials];
// Creates a client.
$userServiceClient = new UserServiceClient($options);
// Creates parent to identify where to insert the user.
$parent = sprintf("accounts/%s", $config['accountId']);
// Calls the API and catches and prints any network failures/errors.
try {
$request = new CreateUserRequest([
'parent' => $parent,
'user_id' => $email,
'user' => (new User())
->setAccessRights([AccessRight::ADMIN,AccessRight::PERFORMANCE_REPORTING])
]);
print "Sending Create User request\n";
$response = $userServiceClient->createUser($request);
print "Inserted User Name below\n";
print $response->getName() . "\n";
} catch (ApiException $e) {
print $e->getMessage();
}
}
$config = Config::generateConfig();
$email = "testUser@gmail.com";
createUser($config, $email);
cURL
curl -X PATCH \
"https://merchantapi.googleapis.com/products/v1/accounts/{ACCOUNT_ID}/users/{USER_EMAIL}?update_mask=access_rights" \
-H "Content-Type: application/json" \
-H "Authorization: Bearer {ACCESS_TOKEN}" \
-d '{
  "access_rights": [
    "ADMIN",
    "API_DEVELOPER"
  ]
}'