

ההרשמה כמפתח היא תהליך הגדרה חד-פעמי חובה, שבו מקשרים את פרויקט Google Cloud לחשבון Merchant Center ורושמים את פרטי הקשר של המפתח ב-Google. כך Google יכולה לשלוח הודעות קריטיות לגבי השירות ועדכונים חיוניים לאנשי הקשר הטכניים הרלוונטיים שציינתם.
המאמר הזה הוא חלק מסדרה של מאמרים על תחילת העבודה עם Merchant API. אם כבר נרשמתם ל-Merchant API, אתם יכולים לדלג לקטע הבא: הוספת המוצר הראשון .
דרישות מוקדמות
לפני שאתם נרשמים לשימוש ב-Merchant API, ודאו שאתם עומדים בדרישות הבאות:
- חשבון Merchant Center: צריך חשבון Merchant Center קיים. אפשר להירשם רק לחשבונות בסביבת הייצור. חשבונות בדיקה לא כשירים לרישום כמפתחים.
- דף בית מאומת: באתר שלכם צריך להיות דף בית מאומת בחשבון Merchant Center. כך מוכיחים בעלות על הדומיין שמשויך לעסק.
- הרשאת אדמין בחשבון Merchant Center: לאימייל או לחשבון השירות שאתם משתמשים בהם כדי לאשר את קריאת הרישום צריך להיות סוג הגישה
ADMINבחשבון Merchant Center שאתם נרשמים אליו. מידע נוסף על אישור בקשות ל-Merchant API - מזהה הפרויקט ב-Google Cloud: האפליקציה שלכם צריכה להיות משויכת לפרויקט ייעודי ב-Google Cloud כדי לספק פרטי כניסה לאימות. פרטים על המקום שבו אפשר למצוא את מזהה הפרויקט זמינים במאמר איך למצוא את השם, המספר והמזהה של הפרויקט.
- כתובת אימייל תקינה שמשויכת לחשבון Google שציינתם כנקודת הקשר של המפתח לקבלת עדכונים מ-Google. אסור להשתמש בכתובת אימייל של חשבון שירות. אפשר להשתמש בכתובת אימייל שכבר משויכת לחשבון Merchant Center או בכתובת חדשה.
הרשמה כמפתח ב-Merchant API
כדי להשתמש ב-Merchant API, אתם חייבים לרשום את פרטי הקשר של המפתח ואת פרויקט הענן ב-Google בחשבון Merchant Center באמצעות השיטה registerGcp.
גם אם אתם עובדים עם כמה חשבונות של מוכרים, אתם צריכים לבצע את פעולת הרישום פעם אחת לכל פרויקט ב-Google Cloud שבו אתם מתכוונים להשתמש. אם אתם עובדים עם כמה פרויקטים ב-Google Cloud, אתם יכולים לרשום כל אחד מהם או את כולם לאותו חשבון Merchant Center.
הטבות בהרשמה
היתרונות של הרישום:
- יצירת איש קשר טכני: יצירת איש קשר טכני ב-Merchant Center. Google שולחת עדכונים חשובים שספציפיים ל-API לאיש הקשר הטכני, כמו הודעות בנוגע לשירות ומידע על תכונות חדשות.
- ניהול של כמה חשבונות של מוכר/ת: אתם יכולים לייצג את נקודת הקשר של המפתח בכל חשבונות של מוכר/ת שאתם מנהלים.
למעט רישום, כל הפעלה של Merchant API מפרויקט לא רשום ב-Google Cloud נחסמת, ומוחזר קוד השגיאה 401 עם הסטטוס UNAUTHENTICATED והודעת השגיאה הבאה:
GCP project with id {GCP_ID} and number {GCP_NUMBER} is not registered with the merchant account.
Follow these steps https://developers.google.com/merchant/api/guides/quickstart#register_as_a_developer
to register the GCP project with the merchant account then try calling the API again in 5 minutes.
שיקולים חשובים
- הגדרה חד-פעמית לכל פרויקט ב-Google Cloud: הרישום הוא הגדרה חד-פעמית לכל פרויקט ב-Google Cloud, והוא חל על כל המשתמשים וחשבונות השירות בפרויקט ב-Google Cloud. מוודאים שממשק Merchant API מופעל בפרויקט ב-Google Cloud.
- כל פרויקט בענן של Google יכול להיות רשום רק בחשבון Merchant Center אחד בכל זמן נתון: אם תנסו לרשום פרויקט אחד בענן של Google בכמה חשבונות Merchant Center בו-זמנית, תוצג לכם שגיאה
ALREADY_REGISTERED. השתמשו באותה כתובת אימייל של המפתח לצורך ההרשמה. שימו לב שאפשר לרשום כמה פרויקטים בענן של Google לאותו חשבון Merchant Center. הוראות לשינוי או להחלפה של פרויקט Google Cloud רשום מופיעות במאמר ניהול פרויקטים ב-Google Cloud ומעבר ביניהם. הגדרת החשבון הנכון לצדדים שלישיים שמנהלים כמה מוכרים: כדי להבטיח יציבות לטווח ארוך ולמנוע שיבושים בשירות, צדדים שלישיים שמייצגים או מנהלים כמה מוכרים צריכים להשתמש במבנה החשבון המתאים בסביבה העסקית של Google. מומלץ לרשום את החשבון שמייצג את זהות העסק, בהתאם לסוג העסק:
- זירות מסחר עם חשבון מתקדם קיים: אם העסק שלכם פועל כזירת מסחר וכבר יש לו חשבון מתקדם שמייצג את כל הפלטפורמה, אתם צריכים להשתמש במספר החשבון הקיים הזה.
- שירותי השוואת מחירים (CSS): אם אתם שירות CSS, אתם צריכים להשתמש במזהה הייחודי של חשבון ה-CSS או במזהה של חשבון קבוצת ה-CSS.
- סוכנויות, מפתחים וספקי צד שלישי אחרים: אם אתם עסק צד שלישי כמו סוכנות או מפתח צד שלישי שמנהל כמה חשבונות של מוֹכרים ואין לכם מספר חשבון Merchant Center יחיד שמייצג את העסק שלכם, אתם צריכים ליצור חשבון Merchant Center ראשי חדש ולבקש להמיר אותו לחשבון מתקדם. בחשבונות מתקדמים אפשר לנהל חשבונות משנה ולספק את המבנה הנדרש לפעולות של צד ג'.
בטבלה הבאה ריכזנו המלצות לסוגים שונים של שותפים:
סוג שותף החשבון המומלץ לרישום זירות מסחר החשבון המתקדם הראשי (או הגדול ביותר) שלכם. סוכנויות פרסום חשבון עצמאי או חשבון מתקדם שמייצג את החברה שלכם. אם אתם רק מתחילים להשתמש ב-Merchant API, מומלץ ליצור חשבון עצמאי. שירותי השוואת מחירים (CSS) מספר החשבון של קבוצת ה-CSS או מספר חשבון CSS ספציפי, בהתאם לשאלה אם החשבון מייצג את קבוצת ה-CSS כולה או רק שירות CSS ספציפי בתוך קבוצה. אל תשתמשו בחשבון מתקדם של שירות CSS. מוכרים או מותגים החשבון הראשי שמייצג את המותג שלכם. יכול להיות חשבון עצמאי או חשבון מתקדם. ספקים של נתוני POS (נקודת מכירה) או נתוני מלאי החשבון המתקדם הראשי (או הגדול ביותר) שלכם. ספקי צד שלישי אחרים אם יש לכם חשבון Merchant Center, אתם יכולים להשתמש בו כדי להירשם. אם לא, צריך ליצור חשבון עצמאי של החברה. ואז לאמת את האתר. לבצע את הרישום רק בחשבון הראשי ב-Merchant Center: אתם מבצעים את הרישום למפתחים רק בחשבון הראשי ב-Merchant Center, ואתם הופכים לאיש הקשר של המפתחים בכל חשבונות המשנה המקושרים ב-Merchant Center. אין צורך לבצע רישום לכל אחד מהחשבונות המשניים שלכם ב-Merchant Center.
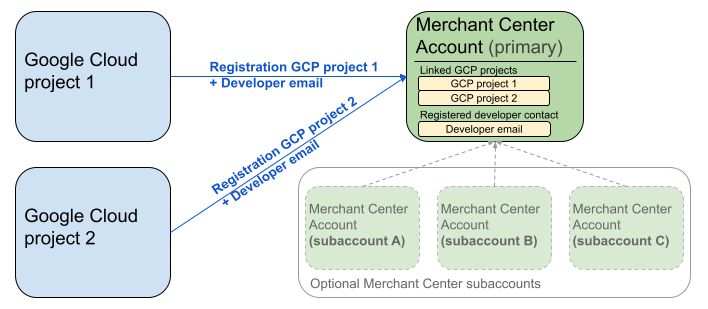
בתרשים שלמעלה מוצגת הגדרת הרישום כשמשתמשים בכמה פרויקטים ב-Google Cloud ובחשבון Merchant Center ראשי אחד, עם אפשרות לכמה חשבונות משנה ב-Merchant Center.
דרישת אימות: כשמבצעים הרשמה, חשבון Merchant Center המאומת (שבו נמצאים פרטי הכניסה שלכם) צריך להיות זהה לחשבון Merchant Center שמתחזים אליו (החשבון שאתם רושמים). אי אפשר להירשם לחשבון משנה אם אתם מאומתים באמצעות חשבון הורה או חשבון ניהול נפרד.
רק חשבונות עם אתר מאומת: ההרשמה מותרת רק לחשבונות Merchant Center עם אתר מאומת.
אין רישום של חשבונות בדיקה: אי אפשר לרשום חשבונות בדיקה.
אחרי שרושמים כתובת אימייל של מפתח:
- אפשר לבצע קריאות ל-Merchant API תוך 5 דקות מההרשמה.
- אם כתובת האימייל שייכת למשתמש קיים ב-Merchant Center, הוא יקבל את התפקיד
API developer. אם אין לו חשבון, נוצר משתמש חדש ב-Merchant Center והוא צריך לאשר את ההזמנה תוך 14 ימים כדי שהתוקף שלה לא יפוג וכדי שלא יהיה צורך להתחיל את תהליך ההרשמה מחדש. תהליך ההרשמה יושלם רק אחרי שהמשתמש ילחץ על קישור ההזמנה.
ביצוע שיחת הרישום
כדי להירשם, מפעילים את השיטה registerGcp. יש שתי דרכים לבצע את שיחת הרישום:
- אפשרות 1: קריאות ישירות ל-API – שולחים בקשות גולמיות ישירות לנקודות קצה ל-API, בדרך כלל באמצעות HTTP(S). אתם צריכים לטפל באופן ידני בהיבטים כמו יצירת גוף הבקשה, הגדרת כותרות (כולל אימות) וניתוח התגובה.
- אפשרות 2: ספריות לקוח אתם משתמשים בספריות מוכנות מראש שמציעות דרך נוחה יותר, שמתאימה לשפה, לאינטראקציה עם Merchant API. הן מטפלות באימות ובהרשאות, ומציעות דרך נוחה להפשטת תקשורת ה-HTTP הבסיסית. כדי להתחיל לעבוד במהירות, אפשר להשתמש בדוגמאות הקוד הרשמיות.
הרשאה לשיחת הרישום
כמו שמתואר בשלב הרשאת בקשות ל-Merchant API, יש שני תרחישי אימות שונים:
- OAuth 2.0: לסוכנויות או לספקי צד שלישי שמנהלים כמה חשבונות של מוכרים
- חשבונות שירות: לגישה לחשבון Merchant Center שלכם
למידע נוסף על הרשאת קריאת הרישום, ראו איך מבצעים אימות והרשאה של קריאת הרישום?
שיחת רישום
בדוגמאות הבאות, קריאת הרישום מתבצעת באמצעות קריאות ישירות ל-API או ספריות לקוח.
מבצעים את קריאת הרישום באמצעות ה-method registerGcp.
POST https://merchantapi.googleapis.com/accounts/v1/accounts/{ACCOUNT_ID}/developerRegistration:registerGcp
Content-Type: application/json
Authorization: Bearer {ACCESS_TOKEN}"

{
  "developerEmail": "{DEVELOPER_EMAIL}"
}
מחליפים את מה שכתוב בשדות הבאים:
-
ACCOUNT_ID: מספר חשבון Merchant Center -
ACCESS_TOKEN: טוקן ההרשאה לביצוע הקריאה ל-API -
DEVELOPER_EMAIL: כתובת האימייל של איש הקשר הראשי בנושאים טכניים
קריאה מוצלחת מחזירה משאב DeveloperRegistration, שמאשר את סטטוס הקישור:
  "name": "accounts/{ACCOUNT_ID}/developerRegistration",
  "gcpIds": ["{GOOGLE_CLOUD_PROJECT_ID}"]
Python
מורידים את הדוגמאות ופועלים לפי ההנחיות בדוגמאות של Google Merchant API ב-Python כדי להגדיר את ספריות הלקוח ב-Python.
from examples.authentication import configuration
from examples.authentication import generate_user_credentials
from google.shopping.merchant_accounts_v1 import DeveloperRegistrationServiceClient
from google.shopping.merchant_accounts_v1 import RegisterGcpRequest
def register_gcp(account_id: str, developer_email: str) -> None:
"""Registers the GCP project used to call the Merchant API with a developer email.
Args:
account_id: The ID of your Merchant Center account.
developer_email: The email address of the developer to register.
"""
# Get OAuth credentials.
credentials = generate_user_credentials.main()
# Create a client to the Developer Registration Service.
client = DeveloperRegistrationServiceClient(credentials=credentials)
# The name has the format: accounts/{account}/developerRegistration
name = f"accounts/{account_id}/developerRegistration"
# Create the request to register the GCP project.
request = RegisterGcpRequest(
name=name,
developer_email=developer_email,
)
# Make the API call and handle potential errors.
try:
print("Sending RegisterGcp request:")
response = client.register_gcp(request=request)
print("Registered GCP project successfully:")
print(response)
except RuntimeError as e:
print(f"An error occurred: {e}")
if __name__ == "__main__":
# Your Merchant Center account ID.
# This can be found in the Merchant Center UI.
_account_id = configuration.Configuration().read_merchant_info()
# The developer email to associate with the GCP project.
_developer_email = "YOUR_EMAIL_HERE"
register_gcp(_account_id, _developer_email)
Java
מורידים את הדוגמאות ופועלים לפי ההנחיות בדוגמאות ל-Java ב-Google Merchant API כדי להגדיר את ספריות הלקוח של Java.
import com.google.api.gax.core.FixedCredentialsProvider;
import com.google.auth.oauth2.GoogleCredentials;
import com.google.shopping.merchant.accounts.v1.DeveloperRegistration;
import com.google.shopping.merchant.accounts.v1.DeveloperRegistrationName;
import com.google.shopping.merchant.accounts.v1.DeveloperRegistrationServiceClient;
import com.google.shopping.merchant.accounts.v1.DeveloperRegistrationServiceSettings;
import com.google.shopping.merchant.accounts.v1.RegisterGcpRequest;
import shopping.merchant.samples.utils.Authenticator;
import shopping.merchant.samples.utils.Config;
/**
* This class demonstrates how to register the GCP project used to call the Merchant API with a
* developer email.
*/
public class RegisterGcpSample {
public static DeveloperRegistration registerGcp(Config config, String developerEmail) throws Exception {
// Obtains OAuth token based on the user's configuration.
GoogleCredentials credential = new Authenticator().authenticate();
// Creates service settings using the credentials retrieved above.
DeveloperRegistrationServiceSettings developerRegistrationServiceSettings =
DeveloperRegistrationServiceSettings.newBuilder()
.setCredentialsProvider(FixedCredentialsProvider.create(credential))
.build();
// Creates DeveloperRegistration name to identify the DeveloperRegistration.
// The name has the format: accounts/{account}/developerRegistration
String name =
DeveloperRegistrationName.newBuilder()
.setAccount(config.getAccountId().toString())
.build()
.toString();
// Calls the API and propagates any network failures/errors.
try (DeveloperRegistrationServiceClient developerRegistrationServiceClient =
DeveloperRegistrationServiceClient.create(developerRegistrationServiceSettings)) {
// Creates a request to register the GCP project with the developer email.
RegisterGcpRequest request =
RegisterGcpRequest.newBuilder().setName(name).setDeveloperEmail(developerEmail).build();
System.out.println("Sending RegisterGcp request:");
DeveloperRegistration response = developerRegistrationServiceClient.registerGcp(request);
System.out.println(response);
return response;
}
}
public static void main(String[] args) throws Exception {
Config config = Config.load();
String developerEmail = "YOUR_EMAIL_HERE"; // Replace with your email
registerGcp(config, developerEmail);
}
}
PHP
מורידים את הדוגמאות ופועלים לפי ההנחיות מדוגמאות ה-PHP של Google Merchant API כדי להגדיר את ספריות הלקוח של PHP.
require_once __DIR__ . '/../../../../vendor/autoload.php';
require_once __DIR__ . '/../../../Authentication/Authentication.php';
require_once __DIR__ . '/../../../Authentication/Config.php';
use Google\ApiCore\ApiException;
use Google\Shopping\Merchant\Accounts\V1\Client\DeveloperRegistrationServiceClient;
use Google\Shopping\Merchant\Accounts\V1\RegisterGcpRequest;
/**
* This class demonstrates how to register the GCP project used to call the
* Merchant API with a developer email.
*/
class RegisterGcpSample
{
/**
* A helper function to create the name string for the
* DeveloperRegistration.
*
* @param string $accountId The merchant account ID.
* @return string The name, which has the format:
* `accounts/{account}/developerRegistration`
*/
private static function getName(string $accountId): string
{
return sprintf("accounts/%s/developerRegistration", $accountId);
}
/**
* Registers the GCP project with a developer email.
*
* @param array $config The configuration data for authentication and account ID.
* @param string $developerEmail The email of the developer to register.
*/
public static function registerGcpSample(array $config, string $developerEmail): void
{
// Obtains OAuth credentials from the configuration file.
$credentials = Authentication::useServiceAccountOrTokenFile();
// Creates a configuration object for the client.
$options = ['credentials' => $credentials];
// Creates the DeveloperRegistrationServiceClient.
$developerRegistrationServiceClient = new DeveloperRegistrationServiceClient($options);
// Creates the name of the developer registration to identify it.
$name = self::getName($config['accountId']);
// Calls the API and handles any network failures.
try {
// Creates a request to register the GCP project with the developer email.
$request = new RegisterGcpRequest([
'name' => $name,
'developer_email' => $developerEmail
]);
printf("Sending RegisterGcp request:%s", PHP_EOL);
// The `registerGcp` method returns a `DeveloperRegistration` object
// upon success.
$response = $developerRegistrationServiceClient->registerGcp($request);
print "Successfully registered developer email '$developerEmail' for account {$config['accountId']}.\n";
print_r($response);
} catch (ApiException $e) {
printf("An error occurred: %s%s", $e->getMessage(), PHP_EOL);
}
}
/**
* Helper to execute the sample.
*/
public function callSample(): void
{
$config = Config::generateConfig();
// An email address for a developer to register for the API.
$developerEmail = 'YOUR_EMAIL_HERE'; // Replace with your email
self::registerGcpSample($config, $developerEmail);
}
}
// Executes the sample.
$sample = new RegisterGcpSample();
$sample->callSample();
cURL
curl -X POST "https://merchantapi.googleapis.com/accounts/v1/accounts/{ACCOUNT_ID}/developerRegistration:registerGcp" \
-H "Content-Type: application/json" \
-H "Authorization: Bearer {ACCESS_TOKEN}" \
-d '{
  "developerEmail": "{DEVELOPER_EMAIL}"
}'
כדי להשלים את הרישום, צריך לוודא שלפחות למשתמש אחד ב-Merchant Center יש את התפקיד API developer. כדי לעשות את זה, אפשר לבצע אחת מהפעולות הבאות:
- מעבירים את
developerEmailל-methodregisterGcp. - להוסיף משתמש חדש עם התפקיד
API developerבממשק המשתמש של Merchant Center. - מקצים את התפקיד
API developerלמשתמש קיים בממשק המשתמש של Merchant Center. - מפעילים את ה-method
accounts.users.createכדי ליצור משתמש חדש ולהקצות לו את התפקידAPI developer. - מקצים את התפקיד
API developerלמשתמש קיים באמצעות השיטהaccounts.users.patch.
שיטות מומלצות אחרי ההרשמה
כדי ליהנות מניהול הרשאות גישה יעיל ולמנוע שיבושים עתידיים בשירות, מומלץ לפעול לפי השיטות המומלצות הבאות אחרי שמשלימים את הרישום הראשוני:
מתן הרשאות נוספות ל-API developer
כשרושמים איש קשר של מפתח, מוקצה לו באופן אוטומטי התפקיד API developer. התפקיד הזה לא כולל הרשאות אחרות שנדרשות כדי לנהל את חשבון Merchant Center או לבצע את כל הקריאות ל-API. מומלץ להוסיף למפתחים את התפקידים ADMIN או STANDARD כדי לספק להם גישה מקיפה.
כדי לשנות את הרשאות הגישה של משתמש, משתמשים ב-method accounts.users.patch. כדי להוסיף או להסיר תפקידים, צריך לציין את זכויות הגישה בשדה updateMask של גוף הבקשה:
PATCH https://merchantapi.googleapis.com/accounts/v1/{ACCOUNT_ID}/users/{DEVELOPER_EMAIL}?update_mask=access_rights
Content-Type: application/json
Authorization: Bearer {ACCESS_TOKEN}"

{
  "name": "accounts/{ACCOUNT_ID}/users/{DEVELOPER_EMAIL}",
  "access_rights": [ "ADMIN", "API_DEVELOPER" ]
}
Python
from examples.authentication import configuration
from examples.authentication import generate_user_credentials
from google.protobuf import field_mask_pb2
from google.shopping.merchant_accounts_v1 import AccessRight
from google.shopping.merchant_accounts_v1 import UpdateUserRequest
from google.shopping.merchant_accounts_v1 import User
from google.shopping.merchant_accounts_v1 import UserServiceClient
FieldMask = field_mask_pb2.FieldMask
_ACCOUNT = configuration.Configuration().read_merchant_info()
def update_user(user_email, user_access_right):
"""Updates a user to make it an admin of the MC account."""
credentials = generate_user_credentials.main()
client = UserServiceClient(credentials=credentials)
# Create user name string
name = "accounts/" + _ACCOUNT + "/users/" + user_email
user = User(name=name, access_rights=[user_access_right])
field_mask = FieldMask(paths=["access_rights"])
try:
request = UpdateUserRequest(user=user, update_mask=field_mask)
print("Sending Update User request")
response = client.update_user(request=request)
print("Updated User Name below")
print(response.name)
except RuntimeError as e:
print(e)
if __name__ == "__main__":
# Modify this email to update the right user
email = "USER_MAIL_ACCOUNT"
access_right = AccessRight.ADMIN
update_user(email, access_right)
Java
import com.google.api.gax.core.FixedCredentialsProvider;
import com.google.auth.oauth2.GoogleCredentials;
import com.google.protobuf.FieldMask;
import com.google.shopping.merchant.accounts.v1.AccessRight;
import com.google.shopping.merchant.accounts.v1.UpdateUserRequest;
import com.google.shopping.merchant.accounts.v1.User;
import com.google.shopping.merchant.accounts.v1.UserName;
import com.google.shopping.merchant.accounts.v1.UserServiceClient;
import com.google.shopping.merchant.accounts.v1.UserServiceSettings;
import shopping.merchant.samples.utils.Authenticator;
import shopping.merchant.samples.utils.Config;
/** This class demonstrates how to update a user to make it an admin of the MC account. */
public class UpdateUserSample {
public static void updateUser(Config config, String email, AccessRight accessRight)
throws Exception {
GoogleCredentials credential = new Authenticator().authenticate();
UserServiceSettings userServiceSettings =
UserServiceSettings.newBuilder()
.setCredentialsProvider(FixedCredentialsProvider.create(credential))
.build();
// Creates user name to identify user.
String name =
UserName.newBuilder()
.setAccount(config.getAccountId().toString())
.setEmail(email)
.build()
.toString();
// Create a user with the updated fields.
User user = User.newBuilder().setName(name).addAccessRights(accessRight).build();
FieldMask fieldMask = FieldMask.newBuilder().addPaths("access_rights").build();
try (UserServiceClient userServiceClient = UserServiceClient.create(userServiceSettings)) {
UpdateUserRequest request =
UpdateUserRequest.newBuilder().setUser(user).setUpdateMask(fieldMask).build();
System.out.println("Sending Update User request");
User response = userServiceClient.updateUser(request);
System.out.println("Updated User Name below");
System.out.println(response.getName());
} catch (Exception e) {
System.out.println(e);
}
}
public static void main(String[] args) throws Exception {
Config config = Config.load();
String email = "testUser@gmail.com";
// Give the user admin rights. Note that all other rights, like
// PERFORMANCE_REPORTING, would be overwritten in this example
// if the user had those access rights before the update.
AccessRight accessRight = AccessRight.ADMIN;
updateUser(config, email, accessRight);
}
}
PHP
use Google\ApiCore\ApiException;
use Google\Protobuf\FieldMask;
use Google\Shopping\Merchant\Accounts\V1\AccessRight;
use Google\Shopping\Merchant\Accounts\V1\UpdateUserRequest;
use Google\Shopping\Merchant\Accounts\V1\User;
use Google\Shopping\Merchant\Accounts\V1\Client\UserServiceClient;
/**
* Updates a user.
*
* @param array $config The configuration data.
* @param string $email The email address of the user.
* @param int $accessRight The access right to grant the user.
* @return void
*/
function updateUser($config, $email, $accessRights): void
{
// Gets the OAuth credentials to make the request.
$credentials = Authentication::useServiceAccountOrTokenFile();
// Creates options config containing credentials for the client to use.
$options = ['credentials' => $credentials];
// Creates a client.
$userServiceClient = new UserServiceClient($options);
// Creates user name to identify user.
$name = 'accounts/' . $config['accountId'] . "/users/" . $email;
$user = (new User())
->setName($name)
->setAccessRights($accessRights);
$fieldMask = (new FieldMask())->setPaths(['access_rights']);
// Calls the API and catches and prints any network failures/errors.
try {
$request = new UpdateUserRequest([
'user' => $user,
'update_mask' => $fieldMask,
]);
print "Sending Update User request\n";
$response = $userServiceClient->updateUser($request);
print "Updated User Name below\n";
print $response->getName() . "\n";
} catch (ApiException $e) {
print $e->getMessage();
}
}
$config = Config::generateConfig();
$email = "testUser@gmail.com";
$accessRights = [AccessRight::ADMIN];
updateUser($config, $email, $accessRights);
cURL
curl -X PATCH \
"https://merchantapi.googleapis.com/accounts/v1/{ACCOUNT_ID}/users/{USER_EMAIL}?update_mask=access_rights" \
-H "Content-Type: application/json" \
-H "Authorization: Bearer {ACCESS_TOKEN}" \
-d '{
  "access_rights": [
    "ADMIN",
    "API_DEVELOPER"
  ]
}'
הוספת עוד אנשי קשר של המפתח
כדי למנוע שיבושים בעסק אם איש הקשר הראשי של המפתח עוזב או מאבד את הגישה, חשוב שיהיו אנשי קשר נוספים. מומלץ להוסיף לפחות משתמש אחד נוסף עם התפקיד API developer ב-Merchant Center, כדי שיהיה לכם גיבוי.
אתם יכולים להוסיף משתמש או לעדכן משתמש קיים באמצעות השירות accounts.users ב-Merchant API או בדף גישה ושירותים בממשק המשתמש של Merchant Center. אם תוסיפו מפתחים לגיבוי, תוכלו ליצור שילוב עמיד יותר שלא תלוי באדם אחד.
PATCH https://merchantapi.googleapis.com/products/v1/accounts/{ACCOUNT_ID}/users
Content-Type: application/json
Authorization: Bearer {ACCESS_TOKEN}"
{
  "user_id": {USER_EMAIL},
  "user": { "access_rights": [ "API_DEVELOPER", "ADMIN" ] }
}
Python
from examples.authentication import configuration
from examples.authentication import generate_user_credentials
from google.shopping.merchant_accounts_v1 import AccessRight
from google.shopping.merchant_accounts_v1 import CreateUserRequest
from google.shopping.merchant_accounts_v1 import User
from google.shopping.merchant_accounts_v1 import UserServiceClient
_ACCOUNT = configuration.Configuration().read_merchant_info()
def get_parent(account_id):
return f"accounts/{account_id}"
def create_user(user_email):
"""Creates a user for a Merchant Center account."""
# Get OAuth credentials
credentials = generate_user_credentials.main()
# Create a UserServiceClient
client = UserServiceClient(credentials=credentials)
# Create parent string
parent = get_parent(_ACCOUNT)
# Create the request
request = CreateUserRequest(
parent=parent,
user_id=user_email,
user=User(
access_rights=[AccessRight.ADMIN, AccessRight.PERFORMANCE_REPORTING]
),
)
try:
print("Sending Create User request")
response = client.create_user(request=request)
print("Inserted User Name below")
print(response.name)
except RuntimeError as e:
print(e)
if __name__ == "__main__":
# Modify this email to create a new user
email = "USER_MAIL_ACCOUNT"
create_user(email)
Java
import com.google.api.gax.core.FixedCredentialsProvider;
import com.google.auth.oauth2.GoogleCredentials;
import com.google.shopping.merchant.accounts.v1.AccessRight;
import com.google.shopping.merchant.accounts.v1.CreateUserRequest;
import com.google.shopping.merchant.accounts.v1.User;
import com.google.shopping.merchant.accounts.v1.UserServiceClient;
import com.google.shopping.merchant.accounts.v1.UserServiceSettings;
import shopping.merchant.samples.utils.Authenticator;
import shopping.merchant.samples.utils.Config;
/** This class demonstrates how to create a user for a Merchant Center account. */
public class CreateUserSample {
private static String getParent(String accountId) {
return String.format("accounts/%s", accountId);
}
public static void createUser(Config config, String email) throws Exception {
// Obtains OAuth token based on the user's configuration.
GoogleCredentials credential = new Authenticator().authenticate();
// Creates service settings using the credentials retrieved above.
UserServiceSettings userServiceSettings =
UserServiceSettings.newBuilder()
.setCredentialsProvider(FixedCredentialsProvider.create(credential))
.build();
// Creates parent to identify where to insert the user.
String parent = getParent(config.getAccountId().toString());
// Calls the API and catches and prints any network failures/errors.
try (UserServiceClient userServiceClient = UserServiceClient.create(userServiceSettings)) {
CreateUserRequest request =
CreateUserRequest.newBuilder()
.setParent(parent)
// This field is the email address of the user.
.setUserId(email)
.setUser(
User.newBuilder()
.addAccessRights(AccessRight.ADMIN)
.addAccessRights(AccessRight.PERFORMANCE_REPORTING)
.build())
.build();
System.out.println("Sending Create User request");
User response = userServiceClient.createUser(request);
System.out.println("Inserted User Name below");
// The last part of the user name will be the email address of the user.
// Format: `accounts/{account}/user/{user}`
System.out.println(response.getName());
} catch (Exception e) {
System.out.println(e);
}
}
public static void main(String[] args) throws Exception {
Config config = Config.load();
// The email address of this user.
String email = "testUser@gmail.com";
createUser(config, email);
}
}
PHP
use Google\ApiCore\ApiException;
use Google\Shopping\Merchant\Accounts\V1\AccessRight;
use Google\Shopping\Merchant\Accounts\V1\CreateUserRequest;
use Google\Shopping\Merchant\Accounts\V1\User;
use Google\Shopping\Merchant\Accounts\V1\Client\UserServiceClient;
/**
* Creates a user.
*
* @param array $config The configuration data.
* @param string $email The email address of the user.
* @return void
*/
function createUser($config, $email): void
{
// Gets the OAuth credentials to make the request.
$credentials = Authentication::useServiceAccountOrTokenFile();
// Creates options config containing credentials for the client to use.
$options = ['credentials' => $credentials];
// Creates a client.
$userServiceClient = new UserServiceClient($options);
// Creates parent to identify where to insert the user.
$parent = sprintf("accounts/%s", $config['accountId']);
// Calls the API and catches and prints any network failures/errors.
try {
$request = new CreateUserRequest([
'parent' => $parent,
'user_id' => $email,
'user' => (new User())
->setAccessRights([AccessRight::ADMIN,AccessRight::PERFORMANCE_REPORTING])
]);
print "Sending Create User request\n";
$response = $userServiceClient->createUser($request);
print "Inserted User Name below\n";
print $response->getName() . "\n";
} catch (ApiException $e) {
print $e->getMessage();
}
}
$config = Config::generateConfig();
$email = "testUser@gmail.com";
createUser($config, $email);
cURL
curl -X PATCH \
"https://merchantapi.googleapis.com/products/v1/accounts/{ACCOUNT_ID}/users/{USER_EMAIL}?update_mask=access_rights" \
-H "Content-Type: application/json" \
-H "Authorization: Bearer {ACCESS_TOKEN}" \
-d '{
  "access_rights": [
    "ADMIN",
    "API_DEVELOPER"
  ]
}'