

مؤلفه «جزئیات جا»
مؤلفه «جزئیات مکان» در «کیت میانای کاربر جاها» به شما امکان میدهد مؤلفه میانای کاربر تکیای را اضافه کنید که جزئیات مکان را در برنامهتان نمایش میدهد. این مؤلفه قابلسفارشیسازی است.
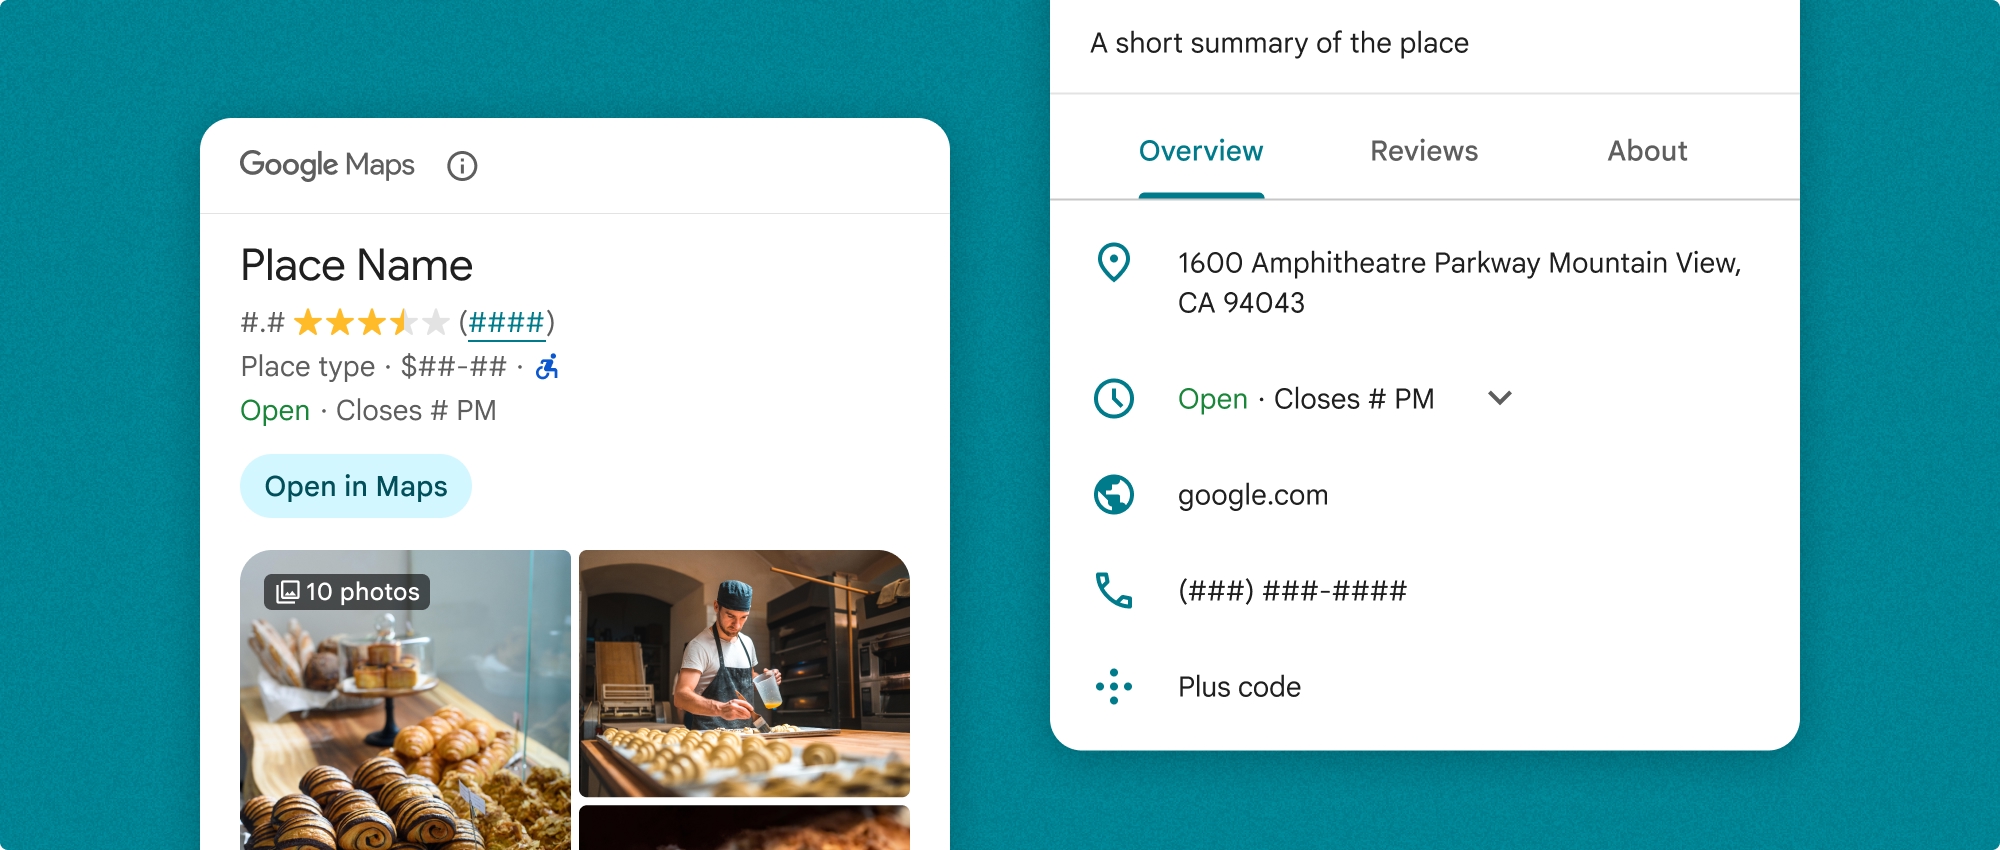
مؤلفه «جزئیات جا» را میتوان بهطور مستقل یا همراه با دیگر سرویسها و میاناهای برنامهسازی کاربردی Google Maps Platform استفاده کرد. این مؤلفه شناسه مکان، نام منبع، یا مختصات طول/عرض جغرافیایی را میگیرد و اطلاعات جزئیات مکان رندرشده را برمیگرداند.
عنصر «جزئیات مکان» کاملاً زمینهپذیر است و به شما امکان میدهد قلمها، رنگها، و شعاعهای گوشه را سفارشیسازی کنید تا با مورد استفاده و دستورالعملهای نمانام دیداریتان مطابقت داشته باشد. با ایجاد زمینهای که PlacesMaterialTheme را گسترش میدهد و جایگزینهایی برای مشخصههای زمینه ارائه میدهد، میتوانید ظاهر جزئیات مکان را سفارشیسازی کنید. همچنین میتوانید با مشخص کردن فهرستی از ورودیهای «محتوا»، که هریک مربوط به بخشی از اطلاعات نشاندادهشده درباره مکان است، فیلدهای جزئیات مکان را که میخواهید اضافه شود سفارشیسازی کنید.
گونههای چیدمان
مؤلفه «جزئیات مکان» از دو نوع چیدمان اصلی پشتیبانی میکند:
- فشرده: چیدمانی برای پیشنمایش اطلاعات کلیدی.
- کامل: چیدمانی جامع که همه جزئیات مکان دردسترس را نمایش میدهد.
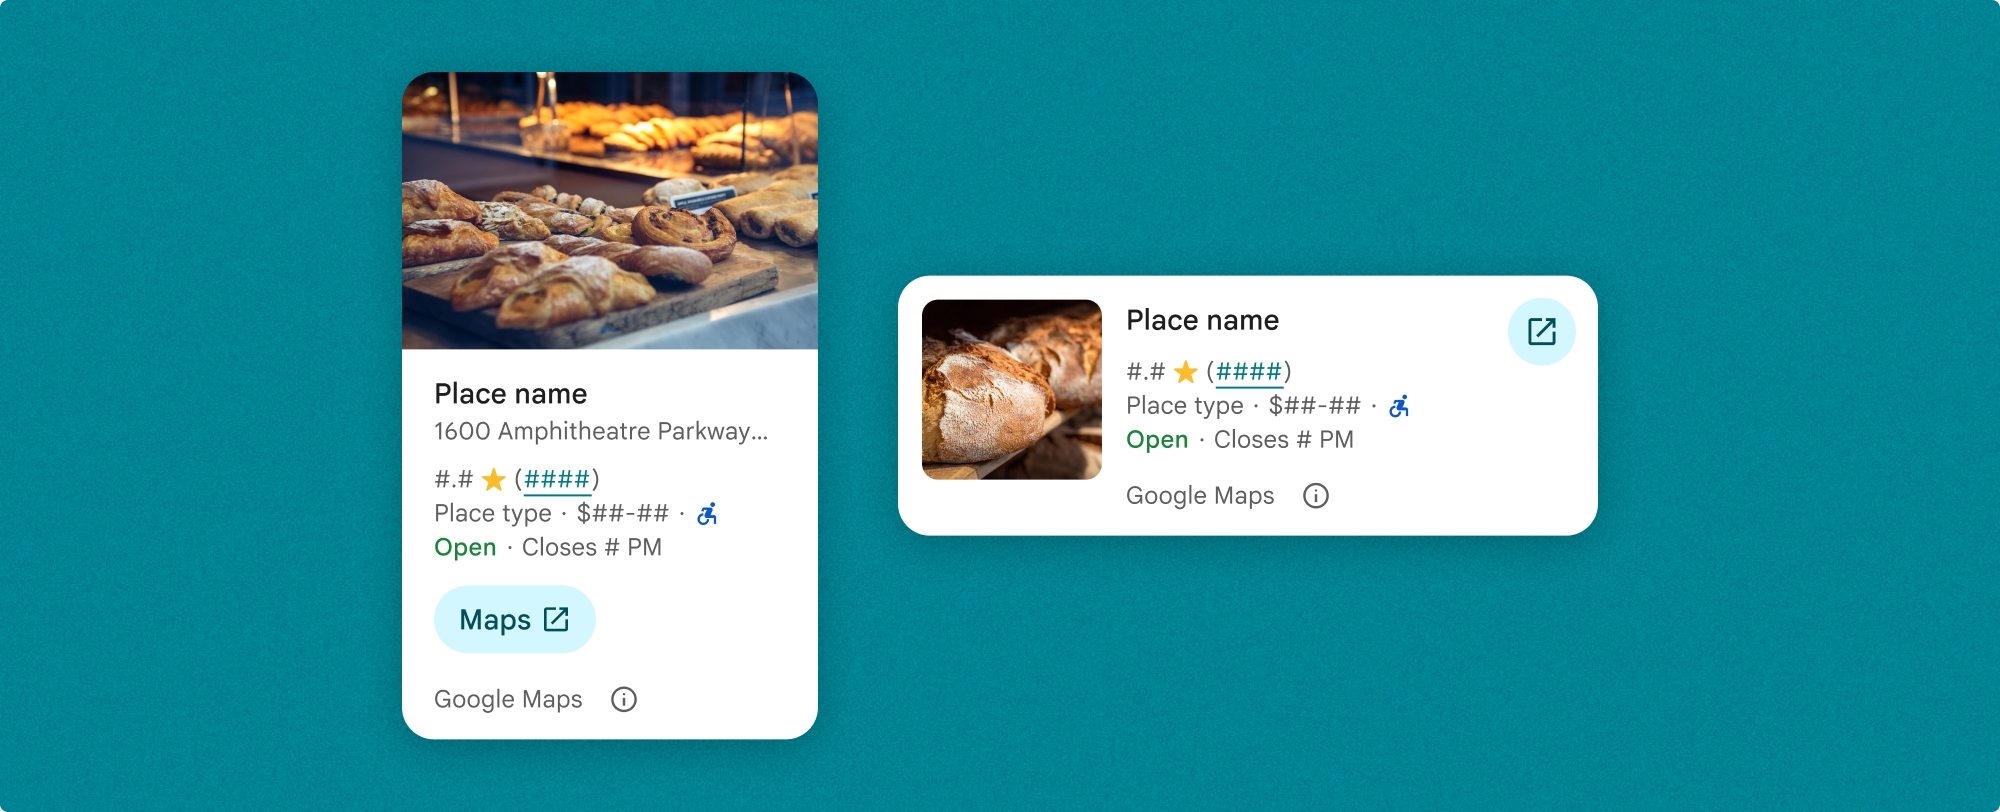
چیدمان فشرده را میتوان در جهت عمودی یا افقی نمایش داد. این کار به شما امکان میدهد مؤلفه را در چیدمانهای طراحی و اندازههای صفحهنمایش مختلف ادغام کنید. چیدمان کامل فقط بهصورت عمودی نمایش داده میشود.
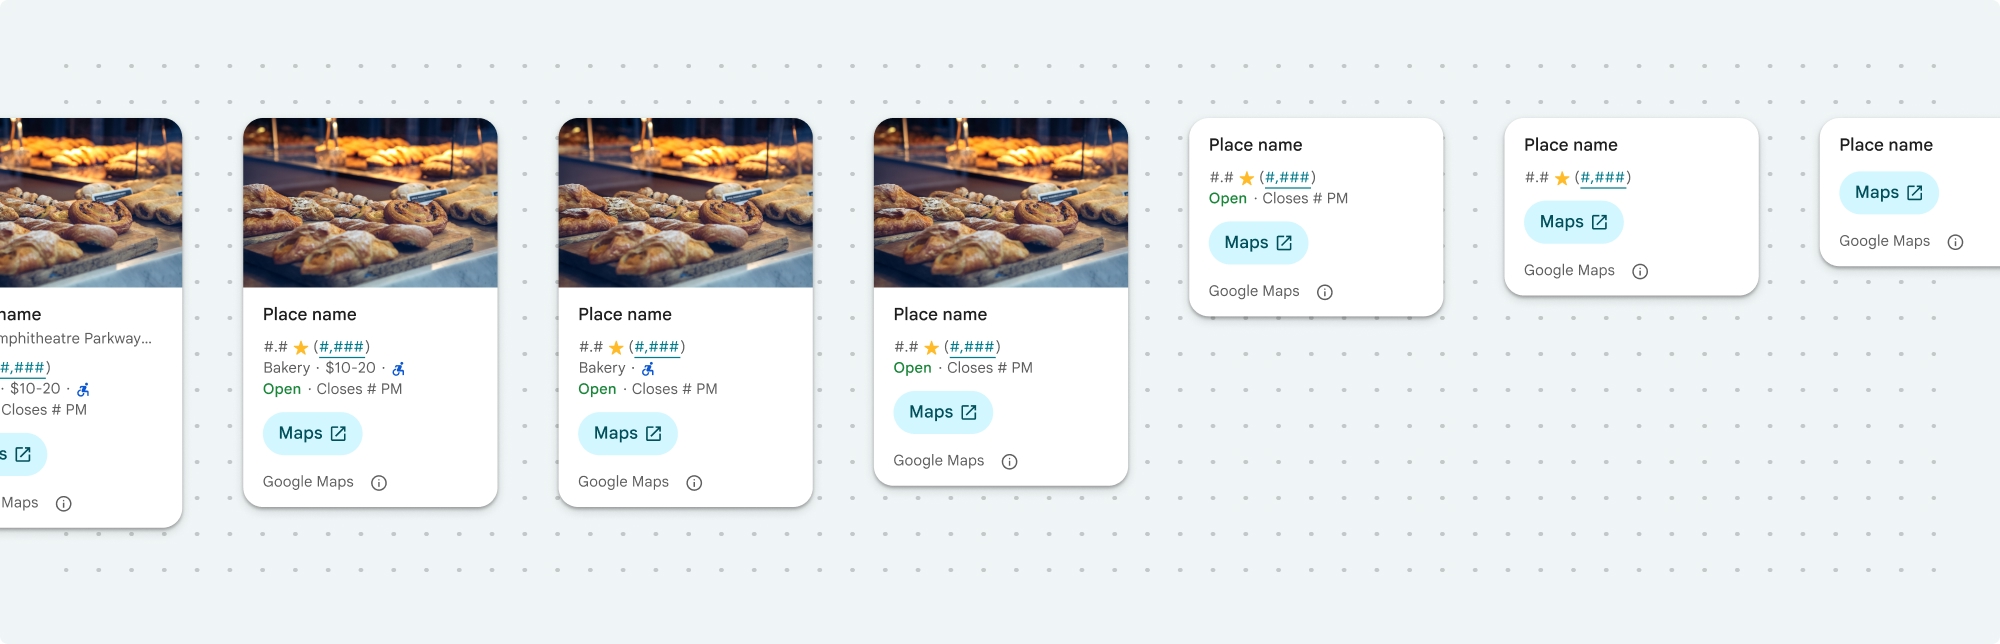
عنصر «جزئیات مکان» به شما امکان میدهد محتوای نمایشدادهشده در عنصر را بهصورت دقیق کنترل کنید. هر عنصر (مانند عکسها، مرورها، و اطلاعات تماس) را میتوان بهطور جداگانه نشان داد یا پنهان کرد، که امکان سفارشیسازی دقیق ظاهر مؤلفهها و تراکم اطلاعات را فراهم میکند.
نمای فشرده «جزئیات جا»
تکهفایل فشرده «جزئیات جا» (PlaceDetailsCompactFragment) جزئیات مکان انتخابشده را بااستفاده از حداقل فضا ارائه میکند. این ممکن است در پنجره اطلاعاتی که مکانی را در نقشه برجسته میکند، در تجربه رسانههای اجتماعی مانند همرسانی مکان در گپ، بهعنوان پیشنهادی برای انتخاب مکان فعلی شما، یا در مقاله رسانهای برای ارجاع به مکان در Google Maps مفید باشد.
نمای کامل «جزئیات جا»
نمای کامل جزئیات مکان (PlaceDetailsFragment) سطح بزرگتری را برای نمایش اطلاعات جزئیات مکان ارائه میدهد و به شما امکان میدهد انواع بیشتری از اطلاعات را نمایش دهید.
گزینههای نمایش محتوا
بااستفاده از شمارشها در PlaceDetailsCompactFragment.Content یا PlaceDetailsFragment.Content میتوانید مشخص کنید کدام محتوا نمایش داده شود.
| نمای فشرده | نمای کامل |
|---|---|
|
|
صورتحساب
هنگام استفاده از «کیت میانای کاربر جزئیات مکان»، هربار که روش .loadWithPlaceId()، .loadWithResourceName()، یا loadWithCoordinates() فراخوانی میشود، صورتحساب برای شما صادر میشود. اگر مکان یکسانی را چندین بار بار کنید، هزینه هر درخواست از شما کسر میشود.
برای جلوگیری از کسر هزینه چندباره، .loadWithPlaceId() یا .loadWithResourceName() را مستقیماً در روشهای چرخه حیات Android اضافه نکنید. برای مثال، مستقیماً .loadWithPlaceId() یا .loadWithResourceName() را در روش onResume() فراخوانی نکنید.
افزودن جزئیات مکان به برنامه
با افزودن تکهای به چیدمان، میتوانید جزئیات مکان را به برنامهتان اضافه کنید. وقتی قطعه را نمونهسازی میکنید، میتوانید ظاهر و احساس اطلاعات جزئیات مکان را سفارشیسازی کنید تا با نیازهای شما مطابقت داشته باشد و با ظاهر برنامهتان هماهنگ شود. درباره سفارشیسازی بیشتر بدانید.
سه روش در Kotlin و Java دردسترس دارید: یکی برای بار کردن قطعه با «شناسه مکان» (loadWithPlaceId())، یکی برای بار کردن قطعه با نام منبع (loadWithResourceName())، و یکی برای بار کردن قطعه با مختصات طول/عرض جغرافیایی (loadWithCoordinates()). میتوانید هر روشی را که میخواهید یا چند روش را انتخاب کنید.
موقعیت پیشفرض برای نمای فشرده عمودی است. اگر چیدمان افقی میخواهید، Orientation.HORIZONTAL را مشخص کنید. همچنین میتوانید برای شفافیت بیشتر، Orientation.VERTICAL را بهصورت اختیاری مشخص کنید. نمای کامل فقط بهصورت عمودی نمایش داده میشود.
نمونهها را در بخش نمونههای مؤلفه «جزئیات مکان» ببینید.
سفارشیسازی ظاهر دیداری
سبکپردازی سفارشی
میتوانید رنگها، طرح حروف، فاصلهگذاری، حاشیهها، و گوشههای مؤلفه «جزئیات مکان» را سفارشیسازی کنید.
کیت میانای کاربر «جاها» رویکرد سیستم طراحی را برای سفارشیسازی دیداری ارائه میدهد که تقریباً براساس طراحی مواد (با برخی اصلاحات خاص Google Maps) است. برای رنگ و نویسهنگاری، به مرجع «طراحی مواد» مراجعه کنید. بهطور پیشفرض، سبک از زبان طراحی دیداری Google Maps پیروی میکند.
«کیت میانای کاربر جاها» بهطور پیشفرض زمینه تیره ارائه میدهد، بنابراین ممکن است لازم باشد هم زمینه تیره و هم زمینه روشن را سفارشیسازی کنید. برای سفارشیسازی کردن زمینه تیره، ورودیای برای رنگ در values-night/colors.xml اضافه کنید.
برای اطلاعات بیشتر درباره سبکدهی، بخش سبکدهی سفارشی را ببینید.
سفارشیسازی عرض و ارتفاع
نماهای فشرده
عرضهای توصیهشده:
- جهت عمودی: بین ۱۸۰dp و ۳۰۰dp.
- جهت افقی: بین ۱۸۰dp و ۵۰۰dp.
عرضهای کمتر از ۱۶۰dp ممکن است بهدرستی نمایش داده نشوند.
روال مطلوب این است که ارتفاعی برای نماهای فشرده تنظیم نکنید. این کار به محتوای پنجره اجازه میدهد ارتفاع را تنظیم کند و همه اطلاعات نمایش داده شود.
بازدیدهای کامل
برای نماهای کامل، پهنای توصیهشده بین ۲۵۰dp و ۴۵۰dp است. عرض کمتر از ۲۵۰dp ممکن است بهدرستی نمایش داده نشود.
میتوانید ارتفاع عنصر را تنظیم کنید: نمای عمودی «جزئیات مکان» در فضای اختصاصدادهشده بهصورت عمودی پیمایش خواهد شد.
روال مطلوب این است که ارتفاعی برای نماهای کامل تنظیم کنید. این کار باعث میشود محتوای پنجره بهدرستی پیمایش شود.
نمونههای عنصر «جزئیات جا»
ایجاد نمای فشرده یا کامل
Kotlin
        // We create a new instance of the fragment using its factory method.
        // We can specify which content to show, the orientation, and a custom theme.
        val fragment = PlaceDetailsCompactFragment.newInstance(
            PlaceDetailsCompactFragment.ALL_CONTENT, // Show all available content.
            orientation,
            R.style.CustomizedPlaceDetailsTheme,
        ).apply {
            // The PlaceLoadListener provides callbacks for when the place data is successfully
            // loaded or when an error occurs. This is where we update our UI state.
            setPlaceLoadListener(object : PlaceLoadListener {
                override fun onSuccess(place: Place) {
                    Log.d(TAG, "Place loaded: ${place.id}")
                    // Once the data is loaded, we hide the loading indicator and show the fragment.
                    binding.loadingIndicatorMain.visibility = View.GONE
                    binding.placeDetailsContainer.visibility = View.VISIBLE
                    binding.dismissButton.visibility = View.VISIBLE
                }

                override fun onFailure(e: Exception) {
                    Log.e(TAG, "Place failed to load", e)
                    // On failure, we hide the UI and notify the user.
                    dismissPlaceDetails()
                    Toast.makeText(this@MainActivity, "Failed to load place details.", Toast.LENGTH_SHORT).show()
                }
            })
        }

        // We add the fragment to our layout's container view.
        // `commitNow()` is used to ensure the fragment is immediately added and available,
        // which is important because we need to call a method on it right after.
        supportFragmentManager
            .beginTransaction()
            .replace(binding.placeDetailsContainer.id, fragment)
            .commitNow()

        // **This is the key step**: After adding the fragment, we call `loadWithPlaceId`
        // to trigger the data loading process for the selected place.
        // We use `post` to ensure this runs after the layout has been measured,
        // which can prevent potential timing issues.
        binding.root.post {
            fragment.loadWithPlaceId(placeId)
        }
    }
جاوا
PlaceDetailsCompactFragment fragment =
  PlaceDetailsCompactFragment.newInstance(
        Orientation.HORIZONTAL,
        Arrays.asList(Content.ADDRESS, Content.TYPE, Content.RATING, Content.ACCESSIBLE_ENTRANCE_ICON),
        R.style.CustomizedPlaceDetailsTheme);

fragment.setPlaceLoadListener(
  new PlaceLoadListener() {
        @Override public void onSuccess(Place place) { ... }

        @Override public void onFailure(Exception e) { ... }
});

getSupportFragmentManager()
      .beginTransaction()
      .add(R.id.fragment_container, fragment)
      .commitNow();

// Load the fragment with a Place ID.
fragment.loadWithPlaceId(placeId);

// Load the fragment with a resource name.
fragment.loadWithResourceName(resourceName);
این نمونه کد کامل جهت نمای فشرده را بهصورت برنامهنویسی براساس پیکربندی دستگاه کاربر تعیین میکند.
Kotlin
package com.example.placedetailsuikit

import android.Manifest
import android.annotation.SuppressLint
import android.content.pm.PackageManager
import android.content.res.Configuration
import android.location.Location
import android.os.Bundle
import android.util.Log
import android.view.View
import android.widget.Toast
import androidx.activity.enableEdgeToEdge
import androidx.activity.result.ActivityResultLauncher
import androidx.activity.result.contract.ActivityResultContracts
import androidx.activity.viewModels
import androidx.appcompat.app.AppCompatActivity
import androidx.core.app.ActivityCompat
import androidx.lifecycle.ViewModel
import com.example.placedetailsuikit.databinding.ActivityMainBinding
import com.google.android.gms.location.FusedLocationProviderClient
import com.google.android.gms.location.LocationServices
import com.google.android.gms.maps.CameraUpdateFactory
import com.google.android.gms.maps.GoogleMap
import com.google.android.gms.maps.OnMapReadyCallback
import com.google.android.gms.maps.SupportMapFragment
import com.google.android.gms.maps.model.LatLng
import com.google.android.gms.maps.model.PointOfInterest
import com.google.android.libraries.places.api.Places
import com.google.android.libraries.places.api.model.Place
import com.google.android.libraries.places.widget.PlaceDetailsCompactFragment
import com.google.android.libraries.places.widget.PlaceLoadListener
import com.google.android.libraries.places.widget.model.Orientation

private const val TAG = "PlacesUiKit"

/**
 * A simple ViewModel to store UI state that needs to survive configuration changes.
 * In this case, it holds the ID of the selected place. Using a ViewModel is good practice
 * as it prevents data loss during events like screen rotation, ensuring a
 * seamless user experience.
 */
class MainViewModel : ViewModel() {
    var selectedPlaceId: String? = null
}

/**
 * This activity serves as a basic example of integrating the Place Details UI Kit.
 * It demonstrates the fundamental steps required:
 * 1. Setting up a Google Map.
 * 2. Requesting location permissions to center the map.
 * 3. Handling clicks on Points of Interest (POIs) to get a Place ID.
 * 4. Using the Place ID to load and display place details in a [PlaceDetailsCompactFragment].
 */
class MainActivity : AppCompatActivity(), OnMapReadyCallback, GoogleMap.OnPoiClickListener {
    // ViewBinding provides type-safe access to views defined in the XML layout,
    // eliminating the need for `findViewById` and preventing null pointer exceptions.
    private lateinit var binding: ActivityMainBinding
    private var googleMap: GoogleMap? = null

    // The FusedLocationProviderClient is the main entry point for interacting with the
    // fused location provider, which intelligently manages the underlying location technologies.
    private lateinit var fusedLocationClient: FusedLocationProviderClient

    // Using registerForActivityResult is the modern, recommended approach for handling
    // permission requests. It decouples the request from the handling logic, making the
    // code cleaner and easier to manage compared to the older `onRequestPermissionsResult` callback.
    private lateinit var requestPermissionLauncher: ActivityResultLauncher<Array<String>>

    // The `by viewModels()` delegate provides a lazy-initialized ViewModel scoped to this Activity.
    // This ensures that we get the same ViewModel instance across configuration changes.
    private val viewModel: MainViewModel by viewModels()

    override fun onCreate(savedInstanceState: Bundle?) {
        super.onCreate(savedInstanceState)

        // The ActivityResultLauncher is initialized here. The lambda defines the callback
        // that will be executed once the user responds to the permission dialog.
        requestPermissionLauncher =
            registerForActivityResult(ActivityResultContracts.RequestMultiplePermissions()) { permissions ->
                // We check if either fine or coarse location permission was granted.
                if (permissions[Manifest.permission.ACCESS_FINE_LOCATION] == true || permissions[Manifest.permission.ACCESS_COARSE_LOCATION] == true) {
                    Log.d(TAG, "Location permission granted by user.")
                    fetchLastLocation()
                } else {
                    // If permission is denied, we inform the user and default to a known location.
                    // This ensures the app remains functional even without location access.
                    Log.d(TAG, "Location permission denied by user.")
                    Toast.makeText(
                        this,
                        "Location permission denied. Showing default location.",
                        Toast.LENGTH_LONG
                    ).show()
                    moveToSydney()
                }
            }

        // enableEdgeToEdge() allows the app to draw behind the system bars for a more immersive experience.
        enableEdgeToEdge()
        binding = ActivityMainBinding.inflate(layoutInflater)
        setContentView(binding.root)

        binding.dismissButton.setOnClickListener {
            dismissPlaceDetails()
        }

        // --- Crucial: Initialize Places SDK ---
        // It's essential to initialize the Places SDK before making any other Places API calls.
        // This should ideally be done once, for example, in the Application's `onCreate`.
        val apiKey = BuildConfig.PLACES_API_KEY
        if (apiKey.isEmpty() || apiKey == "YOUR_API_KEY") {
            // A valid API key is required for the Places SDK to function.
            Log.e(TAG, "No api key")
            Toast.makeText(
                this,
                "Add your own API_KEY in local.properties",
                Toast.LENGTH_LONG
            ).show()
            finish()
            return
        }

        // `initializeWithNewPlacesApiEnabled` is used to opt-in to the new SDK version.
        Places.initializeWithNewPlacesApiEnabled(applicationContext, apiKey)

        fusedLocationClient = LocationServices.getFusedLocationProviderClient(this)
        // ------------------------------------

        // The SupportMapFragment is the container for the map. `getMapAsync` allows us to
        // work with the GoogleMap object via a callback once it's fully initialized.
        val mapFragment =
            supportFragmentManager.findFragmentById(R.id.map_fragment) as SupportMapFragment?
        mapFragment?.getMapAsync(this)

        // This block handles restoration after a configuration change (e.g., screen rotation).
        // If a place was selected before the rotation, its ID is stored in the ViewModel.
        // We use this ID to immediately show the details fragment again.
        if (viewModel.selectedPlaceId != null) {
            viewModel.selectedPlaceId?.let { placeId ->
                Log.d(TAG, "Restoring PlaceDetailsFragment for place ID: $placeId")
                showPlaceDetailsFragment(placeId)
            }
        }
    }

    /**
     * This callback is triggered when the GoogleMap object is ready to be used.
     * All map setup logic should be placed here.
     */
    override fun onMapReady(map: GoogleMap) {
        Log.d(TAG, "Map is ready")
        googleMap = map
        // Setting the OnPoiClickListener allows us to capture user taps on points of interest.
        googleMap?.setOnPoiClickListener(this)

        // After the map is ready, we determine the initial camera position based on location permissions.
        if (isLocationPermissionGranted()) {
            fetchLastLocation()
        } else {
            requestLocationPermissions()
        }
    }

    /**
     * A helper function to centralize the check for location permissions.
     */
    private fun isLocationPermissionGranted(): Boolean {
        return ActivityCompat.checkSelfPermission(
            this,
            Manifest.permission.ACCESS_FINE_LOCATION
        ) == PackageManager.PERMISSION_GRANTED ||
                ActivityCompat.checkSelfPermission(
                    this,
                    Manifest.permission.ACCESS_COARSE_LOCATION
                ) == PackageManager.PERMISSION_GRANTED
    }

    /**
     * This function triggers the permission request flow. The result is handled by the
     * ActivityResultLauncher defined in `onCreate`.
     */
    private fun requestLocationPermissions() {
        Log.d(TAG, "Requesting location permissions.")
        requestPermissionLauncher.launch(
            arrayOf(
                Manifest.permission.ACCESS_FINE_LOCATION,
                Manifest.permission.ACCESS_COARSE_LOCATION
            )
        )
    }

    /**
     * Fetches the device's last known location. This is a fast and battery-efficient way
     * to get a location fix. It should only be called after verifying permissions.
     */
    @SuppressLint("MissingPermission")
    private fun fetchLastLocation() {
        // Double-checking permissions here is a good practice, although the call sites are already guarded.
        if (isLocationPermissionGranted()) {
            fusedLocationClient.lastLocation
                .addOnSuccessListener { location: Location? ->
                    if (location != null) {
                        val userLocation = LatLng(location.latitude, location.longitude)
                        googleMap?.moveCamera(CameraUpdateFactory.newLatLngZoom(userLocation, 13f))
                        Log.d(TAG, "Moved to user's last known location.")
                    } else {
                        // `lastLocation` can be null if the location has never been recorded.
                        // In this case, we fall back to a default location.
                        Log.d(TAG, "Last known location is null. Falling back to Sydney.")
                        moveToSydney()
                    }
                }
                .addOnFailureListener {
                    // This listener handles errors in the location fetching process.
                    Log.e(TAG, "Failed to get location.", it)
                    moveToSydney()
                }
        }
    }

    /**
     * Moves the map camera to a default, hardcoded location (Sydney).
     * This serves as a reliable fallback.
     */
    private fun moveToSydney() {
        val sydney = LatLng(-33.8688, 151.2093)
        googleMap?.moveCamera(CameraUpdateFactory.newLatLngZoom(sydney, 13f))
        Log.d(TAG, "Moved to Sydney")
    }

    /**
     * This is the callback for the `OnPoiClickListener`. It's triggered when a user
     * taps a POI on the map.
     */
    override fun onPoiClick(poi: PointOfInterest) {
        val placeId = poi.placeId
        Log.d(TAG, "Place ID: $placeId")

        // We save the selected place ID to the ViewModel. This is critical for surviving
        // configuration changes. If the user rotates the screen now, the `onCreate`
        // method will be able to restore the place details view.
        viewModel.selectedPlaceId = placeId
        showPlaceDetailsFragment(placeId)
    }

    /**
     * This function is the core of the integration. It creates, configures, and displays
     * the [PlaceDetailsCompactFragment].
     * @param placeId The unique identifier for the place to be displayed.
     */
    private fun showPlaceDetailsFragment(placeId: String) {
        Log.d(TAG, "Showing PlaceDetailsFragment for place ID: $placeId")

        // We manage the visibility of UI elements to provide feedback to the user.
        // The wrapper is shown, and a loading indicator is displayed while the data is fetched.
        binding.placeDetailsWrapper.visibility = View.VISIBLE
        binding.dismissButton.visibility = View.GONE
        binding.placeDetailsContainer.visibility = View.GONE
        binding.loadingIndicatorMain.visibility = View.VISIBLE

        // The Place Details widget can be displayed vertically or horizontally.
        // We dynamically choose the orientation based on the device's current configuration.
        val orientation =
            if (resources.configuration.orientation == Configuration.ORIENTATION_LANDSCAPE) {
                Orientation.HORIZONTAL
            } else {
                Orientation.VERTICAL
            }


        // We create a new instance of the fragment using its factory method.
        // We can specify which content to show, the orientation, and a custom theme.
        val fragment = PlaceDetailsCompactFragment.newInstance(
            PlaceDetailsCompactFragment.ALL_CONTENT, // Show all available content.
            orientation,
            R.style.CustomizedPlaceDetailsTheme,
        ).apply {
            // The PlaceLoadListener provides callbacks for when the place data is successfully
            // loaded or when an error occurs. This is where we update our UI state.
            setPlaceLoadListener(object : PlaceLoadListener {
                override fun onSuccess(place: Place) {
                    Log.d(TAG, "Place loaded: ${place.id}")
                    // Once the data is loaded, we hide the loading indicator and show the fragment.
                    binding.loadingIndicatorMain.visibility = View.GONE
                    binding.placeDetailsContainer.visibility = View.VISIBLE
                    binding.dismissButton.visibility = View.VISIBLE
                }

                override fun onFailure(e: Exception) {
                    Log.e(TAG, "Place failed to load", e)
                    // On failure, we hide the UI and notify the user.
                    dismissPlaceDetails()
                    Toast.makeText(this@MainActivity, "Failed to load place details.", Toast.LENGTH_SHORT).show()
                }
            })
        }

        // We add the fragment to our layout's container view.
        // `commitNow()` is used to ensure the fragment is immediately added and available,
        // which is important because we need to call a method on it right after.
        supportFragmentManager
            .beginTransaction()
            .replace(binding.placeDetailsContainer.id, fragment)
            .commitNow()

        // **This is the key step**: After adding the fragment, we call `loadWithPlaceId`
        // to trigger the data loading process for the selected place.
        // We use `post` to ensure this runs after the layout has been measured,
        // which can prevent potential timing issues.
        binding.root.post {
            fragment.loadWithPlaceId(placeId)
        }
    }


    /**
     * Hides the place details view and clears the selected place ID from the ViewModel.
     */
    private fun dismissPlaceDetails() {
        binding.placeDetailsWrapper.visibility = View.GONE
        // Clearing the ID in the ViewModel is important so that if the user rotates the
        // screen after dismissing, the details view doesn't reappear.
        viewModel.selectedPlaceId = null
    }

    override fun onDestroy() {
        super.onDestroy()
        // It's a good practice to nullify references to objects that have a lifecycle
        // tied to the activity, like the GoogleMap object, to prevent potential memory leaks.
        googleMap = null
    }
}
ایجاد زمینه
هنگام نمونهسازی قطعه، میتوانید زمینهای را مشخص کنید که هرکدام از مشخصههای سبک پیشفرض را لغو کند. هریک از مشخصههای زمینه که ملغی نشده باشد از سبکهای پیشفرض استفاده میکند. اگر میخواهید از زمینه تیره پشتیبانی کنید، میتوانید ورودیای برای رنگ در values-night/colors.xml اضافه کنید.
«کیت میانای کاربر جاها» بهطور پیشفرض زمینه تیره ارائه میدهد، بنابراین ممکن است لازم باشد هم زمینه تیره و هم زمینه روشن را سفارشیسازی کنید. برای سفارشیسازی زمینه تیره، ورودیای برای رنگ در values-night/colors.xml اضافه کنید.
  <style name="CustomizedPlaceDetailsTheme" parent="PlacesMaterialTheme">
    <item name="placesColorPrimary">@color/app_primary_color</item>
    <item name="placesColorOnSurface">@color/app_color_on_surface</item>
    <item name="placesColorOnSurfaceVariant">@color/app_color_on_surface</item>

    <item name="placesTextAppearanceBodySmall">@style/app_text_appearence_small</item>

    <item name="placesCornerRadius">20dp</item>
  </style>
استفاده از محتوای استاندارد
این نمونه از محتوای استاندارد استفاده میکند.
  val fragmentStandardContent = PlaceDetailsCompactFragment.newInstance(
    PlaceDetailsCompactFragment.STANDARD_CONTENT,
    orientation,
    R.style.CustomizedPlaceDetailsTheme
)سفارشیسازی محتوای خاص
این نمونه فقط نشانی، ورودی دسترسپذیر، و گزینههای رسانه Content را برای نمای فشرده انتخاب میکند و آنها را با CustomizedPlaceDetailsTheme ارائه میکند.
  val placeDetailsFragment = PlaceDetailsCompactFragment.newInstance(
    orientation,
    listOf(
        Content.ADDRESS,
        Content.ACCESSIBLE_ENTRANCE,
        Content.MEDIA
    ),
    R.style.CustomizedPlaceDetailsTheme
)
استفاده از همه محتواها
این نمونه از همه گزینههای Content نمای فشرده استفاده میکند.
  val fragmentAllContent = PlaceDetailsCompactFragment.newInstance(
    orientation,
    PlaceDetailsCompactFragment.ALL_CONTENT,
    R.style.CustomizedPlaceDetailsTheme
  )