By integrating the Navigation SDK for Android, your app can go beyond linking to an external map view. With Google Maps navigation, your app can offer dynamic retrieval and single-look reporting of data about a driver's journey.
This guide shows you an Android Studio project, how to integrate the Navigation SDK, and run the demo app supplied with the SDK.
The Navigation SDK is a static library (.aar) that gives you control over the appearance and audio for navigation in your app. For details about the library, open Navigation SDK reference (Javadoc) in a separate window.
Get ready
To get started with the Navigation SDK for Android, be sure to have the following items:
A Google Maps Platform representative for access to the following:
- An API key provisioned for use with Navigation SDK. You need to provide your projectID which you can find in the Google Cloud Console main dashboard, under the project name.
The zip file which contains:
- The static library file .aar in the
libs/directory containing the Navigation SDK as an aar bundle. - Text files for licensing and links to Terms of Use and agreements.
- A demo app to import as a new project in Android Studio. The app's files for building the demo app in Android Studio using Gradle and Maven.
- The static library file .aar in the
Android Studio, the recommended development environment for building an app with the Navigation SDK. This documentation is designed for people familiar with Android development and object-oriented programming concepts. You should also be familiar with Google Maps from a user's point of view.
Get the SDK, demo app, and documentation
After you download and unzip the SDK file, you can examine and run the demo app.
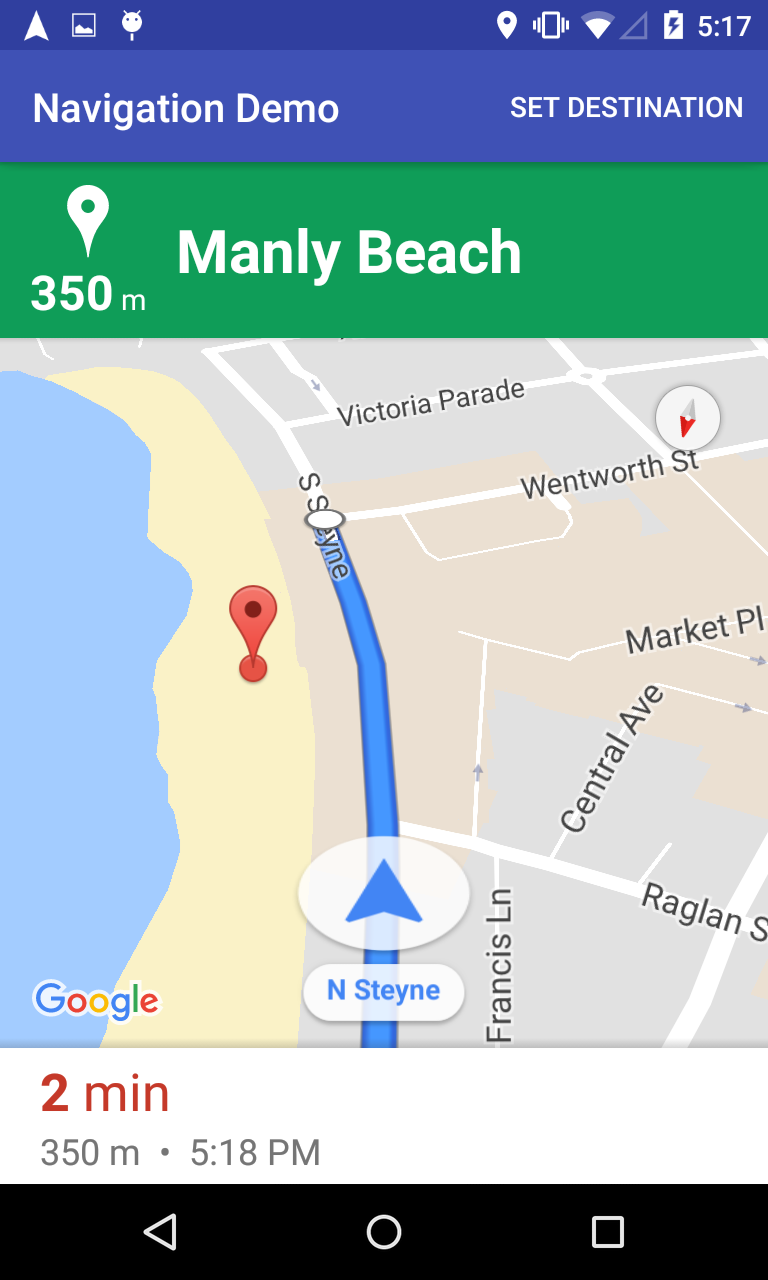
The demo app provides a build that implements a NavigationFragment
class and a variant that implements a NavigationView
class. The NavigationFragment variant runs by default and displays a navigation path
as shown in the following image.
Using your favorite file manager, go to the directory with the SDK files.
Copy the Navigation SDK library into the
app/libsdirectory of thedemoproject:For example, you might run
cp libs/*.aar demo/app/libsin your Linux terminal.In Android Studio, import the demo app and allow Gradle to run.
Open the app's
AndroidManifest.xmland update the value of theAPI_KEYproperty:<?xml version="1.0" encoding="utf-8"?> <manifest xmlns:android="http://schemas.android.com/apk/res/android" package="com.example.navigationapidemo" > <application android:allowBackup="true" android:icon="@mipmap/ic_launcher" android:label="@string/app_name" android:supportsRtl="true" android:theme="@style/_AppTheme" > <meta-data android:name="com.google.android.geo.API_KEY" android:value="YOUR_API_KEY"/> </application> </manifest>Click build and examine the SDK implementation details.
In the java class, note the implementation code.
In the layout xml, note the layout design and text.
In the build.gradle file, note the SDK in the dependencies.
Run the app
Connect an Android device to your computer or use an emulator.
- Android device Refer to the instructions to enable developer options on your Android device and configure your system to detect the device.
- Emulator Use the Android Virtual Device (AVD) Manager to configure a virtual device. When choosing an emulator, make sure you pick an image that includes the Google APIs.
In Android Studio, click the Run menu option (or the play button icon); and then, choose a deployment target.
In the Navigation Demo app, choose Set Destination, then follow the prompts to select a location and start the simulated navigation.
Build the View Variant
The demo app includes a View variant.
In Android Studio, open the demo app and click on Build Variants tab of the Build window.
In the Build Variants window, select viewDebug and the file list changes.
Examine the SDK implementation details for the
NavigationViewclass.In
NavViewActivity.java, note the implementation code.In
Activity_Nav_View.xml, note the layout design and text.
Build and run the app. The app name changes to indicate which version is built. Otherwise, only the rendering object is different.
Next step
Integrate the Navigation SDK for Android into your own app.