
This guide shows how to set up and manage your Google Earth plan in Google Cloud console if you are a Google Cloud billing account administrator.
Billing & project setup
First, you will need to enable billing for your Google Earth plan. You can use an existing Google Cloud project or create a new one by following the steps below:
- Configure your billing account: Sign in to Google Cloud Console using your organization's primary payment account. Ensure a Google Cloud Billing Account is active and a valid form of payment is on file.
- Create a Google Cloud project: Create a dedicated Google Cloud project
to manage your users.
- Navigate to the Google Cloud project creation page.
- Name the project clearly (for example,
Earth-License-Management) and click Create.
Plan management
Once you have a Google Cloud project, you will need to link it to a Google Earth plan and assign users.
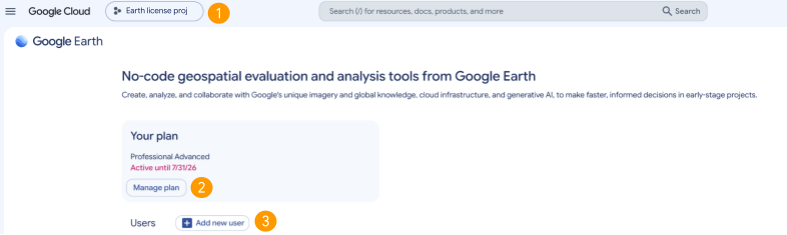
- Navigate to the Google Earth billing page: Ensure the Google Cloud project you would like to associate with Google Earth is selected in the top left project picker, then go to the Google Earth billing page.
- Select your plan: Click Manage Plans and select the plan that fits your organization's needs.
- Assign users to the plan: Select Add new user and enter the email addresses of the team members who require access to the Google Earth plan.
End-user activation
After users have been added, each team member must perform a quick one-time setup to activate their plan access.
Share these steps with your users:
- Launch Google
Earth.
- Navigate to Settings > Billing.
- In the Project drop-down, select the management project created in Phase
1 (for example,
Earth-License-Management).