Page Summary
-
Xcode projects can leverage build rules to manage the compilation of Java files using J2ObjC.
-
The J2ObjC integration process involves updating build settings to link necessary libraries and define search paths.
-
A dedicated build rule is required for processing Java source files, ensuring they are correctly translated into Objective-C.
-
Developers might need to link additional libraries depending on the functionalities used in the translated Java code.
-
Troubleshooting build errors involves analyzing the build command and verifying the configuration settings, particularly search paths and linked libraries.
Most Xcode project types support build rules, which allow developers to modify how existing file types are built, and to define how new file types are built. The J2ObjC scripts are intentionally designed to plug into build systems like Xcode.
The j2objc-sample-reversi project is an example of how to add Java sources to a simple iOS game.
A minimal build requires updating build settings and then adding an J2ObjC build rule.
Update the Build Settings
- Click the project in the Project Navigator to open the Project Editor and ensure the application target is selected.
- Click the Build Settings tab.
- Link the JRE emulation library (
jre_emul) by adding-ljre_emulto Other Linker Flags. It should look like this:
- Click the + to and select Add User-Defined Setting.
- Name the setting
J2OBJC_HOMEand set its value to the location of J2ObjC. This should either be the folder resulting from unzipping the release zip or thej2objc/distfolder if you compiled from source and your root isj2objc. - Under Search Paths modify the following:
- Framework Search Paths add
${J2OBJC_HOME}/frameworks - Library Search Paths add
${J2OBJC_HOME}/lib(for each build configuration). - User Header Search Paths add
${J2OBJC_HOME}/include.
- Framework Search Paths add
- Confirm your settings by searching for
J2OBJC_HOME. You should see something similar to this: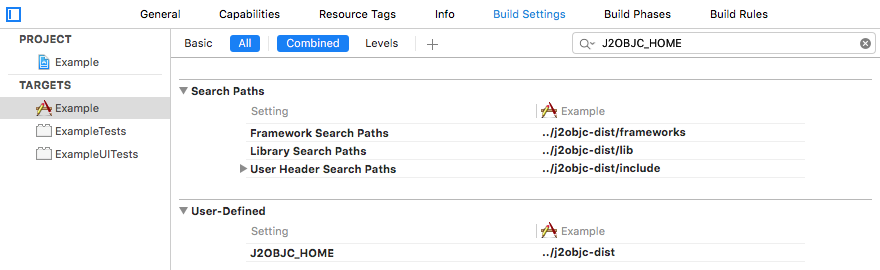
Adding a J2ObjC Build Rule
Determine the root directory of your Java source files, which we'll call
$source-root. The root directory is the directory that contains the top package of your source files.If you using git and would like to pull in your Java files from another git project, you can add a submodule tracking the project with your Java sources. For example, suppose your Xcode project (xcodeproj) is in
~/dev/MyProjectthen you likely have anotherMyProjectdirectory with your Objective-C source. In the~/dev/MyProject/MyProjectdirectory rungit submodule add git@github.com:user/javaprojectto create a~/dev/MyProject/MyProject/javaprojectdirectory with source for your Java project right along side your Objective-C sources. You can then drag that folder into your Xcode project under theMyProjectgroup, which has Xcode mirroring your filesystem.${PROJECT_DIR}/MyProject/javaproject/srcis the$source-root.If your Java sources are in a group or directory in your Xcode project, the
$source-rootis${PROJECT_DIR}/__group_or_directory_name__.If in doubt, right click on that group or directory and select Show in Finder to see the directory and use the absolute path.
For example, if you have a Java package
foo.barin a directory called~/myproject/src, that package's Java files should be in~/myproject/src/foo/bar/**.java-- that means~/myproject/srcis the root directory for your project.If the Java source files are external to the Xcode project, enter the full path used when listing them in a Terminal window.
Click the project in the Project Navigator to open the Project Editor and ensure the application target is selected.
Click the Build Rules tab.
Click the + to add a build rule.
For the new rule's Process option, select "Java source files". The Using option should be "Custom script:".
In the custom script text box, add the following (remember to substitute
$source-root):if [ ! -f "${J2OBJC_HOME}/j2objc" ]; then echo "J2OBJC_HOME is not correctly defined, currently set to '${J2OBJC_HOME}'"; exit 1; fi; "${J2OBJC_HOME}/j2objc" -d ${DERIVED_FILE_DIR} -sourcepath "$source-root" --no-package-directories -g ${INPUT_FILE_PATH};In the Output Files panel, click the + button and add:
${DERIVED_FILE_DIR}/${INPUT_FILE_BASE}.h.Click the + button again, and add
${DERIVED_FILE_DIR}/${INPUT_FILE_BASE}.m.
When you are finished, the settings panel should look something like this (note: as of 10.2, Xcode still defines the DERIVED_FILES_DIR variable the same as DERIVED_FILE_DIR for backwards compatibility):

Linking Additional Libraries
The link build step (Xcode's "Link Binary With Libraries" build phase) needs J2ObjC-specific flags, which vary depending on how your application uses translated Java classes. For a complete list see Required Link Settings. Here are a couple examples what additional libraries you may need to link:
- To use the
java.util.zippackage you must link the libz.dylib library by adding-ljre_zipto your Other Linker Flags. - To do secure hash generation, you must add the Security Framework to your project.
Debugging Build Problems
If Xcode reports a build failure with these steps, open the Issue Navigator and click on an error to inspect the details. This will show the details of what command-line statement was executed. Here are a few common errors:
Class cannot be resolved - Most likely, the
$source-pathyou used was incorrect. Look for the-sourcepathoption in the executed command and ensure it points to the root directory of your Java source files."JreEmulation.h" file not found - Most likely, the problem is a bad User Header Search Paths value. Search the build command for the
-Ioption with the path; if it looks okay, copy the path (not the -I) and in a terminal window runlswith that path to verify there isn't a typo."_IOSClass_FromClass", referenced from: or "_OBJCCLASS$_Java" - Either the Library Search Paths is incorrect or you forgot to link the JRE emulation library by setting Other Linker Flags to
-ljre_emul. You may also need to link additional libraries.Undefined symbols: _iconv* - Link in the required iconv library.
If you still have problems, ask the j2objc-discuss group.