
This codelab is part of the Android Kotlin Fundamentals course. You'll get the most value out of this course if you work through the codelabs in sequence. All the course codelabs are listed on the Android Kotlin Fundamentals codelabs landing page.
Introduction
In the previous codelab, you updated the TrackMySleepQuality app to display data about sleep quality in a RecyclerView. The techniques you learned when you built your first RecyclerView are sufficient for most RecyclerViews that display simple lists that aren't too big. However, there are a number of techniques that make RecyclerView more efficient for large lists and make your code easier to maintain and extend for complex lists and grids.
In this codelab, you build on the sleep-tracker app from the previous codelab. You learn a more effective way to update the list of sleep data, and you learn how to use data binding with RecyclerView. (If you don't have the app from the previous codelab, you can download starter code for this codelab.)
What you should already know
- Building a basic user interface using an activity, fragments, and views.
- Navigating between fragments, and using
safeArgsto pass data between fragments. - View models, view model factories, transformations, and
LiveDataand their observers. - How to create a
Roomdatabase, create a DAO, and define entities. - How to use coroutines for database and other long-running tasks.
- How to implement a basic
RecyclerViewwith anAdapter,ViewHolder, and item layout.
What you'll learn
- How to use
DiffUtilto efficiently update a list displayed byRecyclerView. - How to use data binding with
RecyclerView. - How to use binding adapters to transform data.
What you'll do
- Build on the TrackMySleepQuality app from the previous codelab in this series.
- Update the
SleepNightAdapterto efficiently update the list usingDiffUtil. - Implement data binding for the
RecyclerView, using binding adapters to transform the data.
The sleep-tracker app has two screens, represented by fragments, as shown in the figure below.
|
|
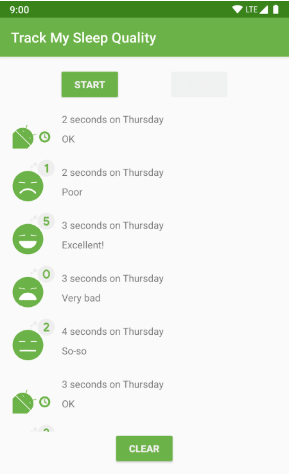
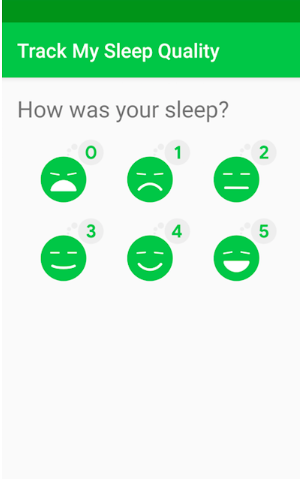
The first screen, shown on the left, has buttons for starting and stopping tracking. The screen shows some of the user's sleep data. The Clear button permanently deletes all the data that the app has collected for the user. The second screen, shown on the right, is for selecting a sleep-quality rating.
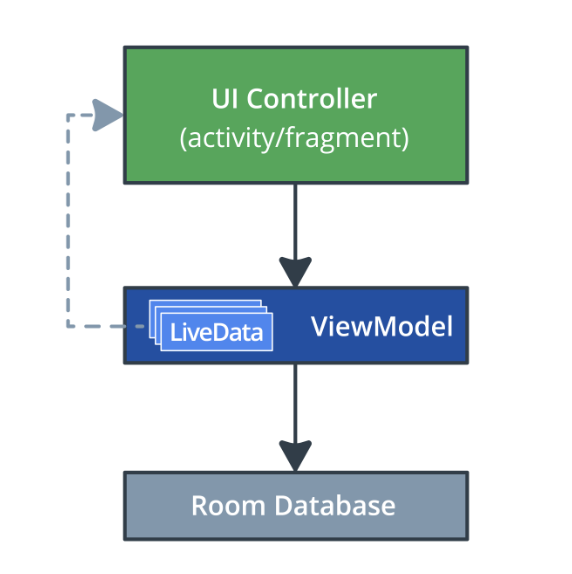
This app is architected to use a UI controller, ViewModel and LiveData, and a Room database to persist sleep data.
The sleep data is displayed in a RecyclerView. In this codelab, you build the DiffUtil and data-binding portion for the RecyclerView. After this codelab, your app will look exactly the same, but it will be more efficient and easier to scale and maintain.
You can continue using the SleepTracker app from the previous codelab, or you can download the RecyclerViewDiffUtilDataBinding-Starter app from GitHub.
- If needed, download the RecyclerViewDiffUtilDataBinding-Starter app from GitHub and open the project in Android Studio.
- Run the app.
- Open the
SleepNightAdapter.ktfile. - Inspect the code to familiarize yourself with the structure of the app. Refer to the diagram below for a recap of using
RecyclerViewwith the adapter pattern to display sleep data to the user.

- From user input, the app creates a list of
SleepNightobjects. EachSleepNightobject represents a single night of sleep, its duration, and quality. - The
SleepNightAdapteradapts the list ofSleepNightobjects into somethingRecyclerViewcan use and display. - The
SleepNightAdapteradapter producesViewHoldersthat contain the views, data, and meta information for the recycler view to display the data. RecyclerViewuses theSleepNightAdapterto determine how many items there are to display (getItemCount()).RecyclerViewusesonCreateViewHolder()andonBindViewHolder()to get view holders bound to data for displaying.
The notifyDataSetChanged() method is inefficient
To tell RecyclerView that an item in the list has changed and needs to be updated, the current code calls notifyDataSetChanged() in the SleepNightAdapter, as shown below.
var data =  listOf<SleepNight>()
   set(value) {
       field = value
       notifyDataSetChanged()
   }
However, notifyDataSetChanged() tells RecyclerView that the entire list is potentially invalid. As a result, RecyclerView rebinds and redraws every item in the list, including items that are not visible on screen. This is a lot of unnecessary work. For large or complex lists, this process could take long enough that the display flickers or stutters as the user scrolls through the list.
To fix this problem, you can tell RecyclerView exactly what has changed. RecyclerView can then update only the views that changed on screen.
RecyclerView has a rich API for updating a single element. You could use notifyItemChanged() to tell RecyclerView that an item has changed, and you could use similar functions for items that are added, removed, or moved. You could do it all manually, but that task would be non-trivial and might involve quite a bit of code.
Fortunately, there's a better way.
DiffUtil is efficient and does the hard work for you
RecyclerView has a class called DiffUtil which is for calculating the differences between two lists. DiffUtil takes an old list and a new list and figures out what's different. It finds items that were added, removed, or changed. Then it uses an algorithm called a Eugene W. Myers's difference algorithm to figure out the minimum number of changes to make from the old list to produce the new list.
Once DiffUtil figures out what has changed, RecyclerView can use that information to update only the items that were changed, added, removed, or moved, which is much more efficient than redoing the entire list.
In this task, you upgrade the SleepNightAdapter to use DiffUtil to optimize the RecyclerView for changes to the data.
Step 1: Implement SleepNightDiffCallback
In order to use the functionality of the DiffUtil class, extend DiffUtil.ItemCallback.
- Open
SleepNightAdapter.kt. - Below the full class definition for
SleepNightAdapter, make a new top-level class calledSleepNightDiffCallbackthat extendsDiffUtil.ItemCallback. PassSleepNightas a generic parameter.
class SleepNightDiffCallback : DiffUtil.ItemCallback<SleepNight>() {
}- Put the cursor in the
SleepNightDiffCallbackclass name. - Press
Alt+Enter(Option+Enteron Mac) and select Implement Members. - In the dialog that opens, shift-left-click to select the
areItemsTheSame()andareContentsTheSame()methods, then click OK.
This generates stubs insideSleepNightDiffCallbackfor the two methods, as shown below.DiffUtiluses these two methods to figure out how the list and items have changed.
    override fun areItemsTheSame(oldItem: SleepNight, newItem: SleepNight): Boolean {
        TODO("not implemented") //To change body of created functions use File | Settings | File Templates.
    }

    override fun areContentsTheSame(oldItem: SleepNight, newItem: SleepNight): Boolean {
        TODO("not implemented") //To change body of created functions use File | Settings | File Templates.
}- Inside
areItemsTheSame(), replace theTODOwith code that tests whether the two passed-inSleepNightitems,oldItemandnewItem, are the same. If the items have the samenightId, they are the same item, so returntrue. Otherwise, returnfalse.DiffUtiluses this test to help discover if an item was added, removed, or moved.
override fun areItemsTheSame(oldItem: SleepNight, newItem: SleepNight): Boolean {
   return oldItem.nightId == newItem.nightId
}- Inside
areContentsTheSame(), check whetheroldItemandnewItemcontain the same data; that is, whether they are equal. This equality check will check all the fields, becauseSleepNightis a data class.Dataclasses automatically defineequalsand a few other methods for you. If there are differences betweenoldItemandnewItem, this code tellsDiffUtilthat the item has been updated.
override fun areContentsTheSame(oldItem: SleepNight, newItem: SleepNight): Boolean {
   return oldItem == newItem
}
It's a common pattern to use a RecyclerView to display a list that changes. RecyclerView provides an adapter class, ListAdapter, that helps you build a RecyclerView adapter that's backed by a list.
ListAdapter keeps track of the list for you and notifies the adapter when the list is updated.
Step 1: Change your adapter to extend ListAdapter
- In the
SleepNightAdapter.ktfile, change the class signature ofSleepNightAdapterto extendListAdapter. - If prompted, import
androidx.recyclerview.widget.ListAdapter. - Add
SleepNightas the first argument to theListAdapter, beforeSleepNightAdapter.ViewHolder. - Add
SleepNightDiffCallback()as a parameter to the constructor. TheListAdapterwill use this to figure out what changed in the list. Your finishedSleepNightAdapterclass signature should look as shown below.
class SleepNightAdapter : ListAdapter<SleepNight, SleepNightAdapter.ViewHolder>(SleepNightDiffCallback()) {- Inside the
SleepNightAdapterclass, delete thedatafield, including the setter. You don't need it anymore, becauseListAdapterkeeps track of the list for you. - Delete the override of
getItemCount(), because theListAdapterimplements this method for you. - To get rid of the error in
onBindViewHolder(), change theitemvariable. Instead of usingdatato get anitem, call thegetItem(position)method that theListAdapterprovides.
val item = getItem(position)Step 2: Use submitList() to keep the list updated
Your code needs to tell the ListAdapter when a changed list is available. ListAdapter provides a method called submitList() to tell ListAdapter that a new version of the list is available. When this method is called, the ListAdapter diffs the new list against the old one and detects items that were added, removed, moved, or changed. Then the ListAdapter updates the items shown by RecyclerView.
- Open
SleepTrackerFragment.kt. - In
onCreateView(), in the observer onsleepTrackerViewModel, find the error where thedatavariable that you've deleted is referenced. - Replace
adapter.data = itwith a call toadapter.submitList(it). The updated code is shown below.
sleepTrackerViewModel.nights.observe(viewLifecycleOwner, Observer {
   it?.let {
       adapter.submitList(it)
   }
})- Run your app. It runs faster, maybe not noticeably if your list is small.
In this task, you use the same technique as in previous codelabs to set up data binding, and you eliminate calls to findViewById().
Step 1: Add data binding to the layout file
- Open the
list_item_sleep_night.xmllayout file in the Text tab. - Put the cursor on the
ConstraintLayouttag and pressAlt+Enter(Option+Enteron a Mac). The intention menu (the "quick fix" menu) opens. - Select Convert to data binding layout. This wraps the layout into
<layout>and adds a<data>tag inside. - Scroll back to the top, if necessary, and inside the
<data>tag, declare a variable namedsleep. - Make its
typethe fully qualified name ofSleepNight,com.example.android.trackmysleepquality.database.SleepNight. Your finished<data>tag should look as shown below.
   <data>
        <variable
            name="sleep"
            type="com.example.android.trackmysleepquality.database.SleepNight"/>
</data>- To force the creation of the
Bindingobject, select Build > Clean Project, then select Build > Rebuild Project. (If you still have problems, select File > Invalidate Caches / Restart.) TheListItemSleepNightBindingbinding object, along with related code, is added to the project's generated files.
Step 2: Inflate the item layout using data binding
- Open
SleepNightAdapter.kt. - In the
ViewHolderclass, find thefrom()method. - Delete the declaration of the
viewvariable.
Code to delete:
val view = layoutInflater
.inflate(R.layout.list_item_sleep_night, parent, false)- Where the
viewvariable was, define a new variable calledbindingthat inflates theListItemSleepNightBindingbinding object, as shown below. Make the necessary import of the binding object.
val binding =
ListItemSleepNightBinding.inflate(layoutInflater, parent, false)- At the end of the function, instead of returning the
view, returnbinding.
return ViewHolder(binding)- To get rid of the error, place your cursor on the word
binding. PressAlt+Enter(Option+Enteron a Mac) to open the intention menu.
- Select Change parameter 'itemView' type of primary constructor of class 'ViewHolder' to 'ListItemSleepNightBinding'. This updates the parameter type of the
ViewHolderclass.

- Scroll up to the class definition of the
ViewHolderto see the change in the signature. You see an error foritemView, because you changeditemViewtobindingin thefrom()method.
In theViewHolderclass definition, right-click on one of the occurrences ofitemViewand select Refactor > Rename. Change the name tobinding. - Prefix the constructor parameter
bindingwithvalto make it a property. - In the call to the parent class,
RecyclerView.ViewHolder, change the parameter frombindingtobinding.root. You need to pass aView, andbinding.rootis the rootConstraintLayoutin your item layout. - Your finished class declaration should look like the code below.
class ViewHolder private constructor(val binding: ListItemSleepNightBinding) : RecyclerView.ViewHolder(binding.root){You also see an error for the calls to findViewById(), and you fix this next.
Step 3: Replace findViewById()
You can now update the sleepLength, quality, and qualityImage properties to use the binding object instead of findViewById().
- Change the initializations of
sleepLength,qualityString, andqualityImageto use the views of thebindingobject, as shown below. After this, your code should not show any more errors.
val sleepLength: TextView = binding.sleepLength
val quality: TextView = binding.qualityString
val qualityImage: ImageView = binding.qualityImage
With the binding object in place, you don't need to define the sleepLength, quality, and qualityImage properties at all anymore. DataBinding will cache the lookups, so there is no need to declare these properties.
- Right-click on the
sleepLength,quality, andqualityImageproperty names. Select Refactor > Inline, or pressControl+Command+N(Option+Command+Non a Mac).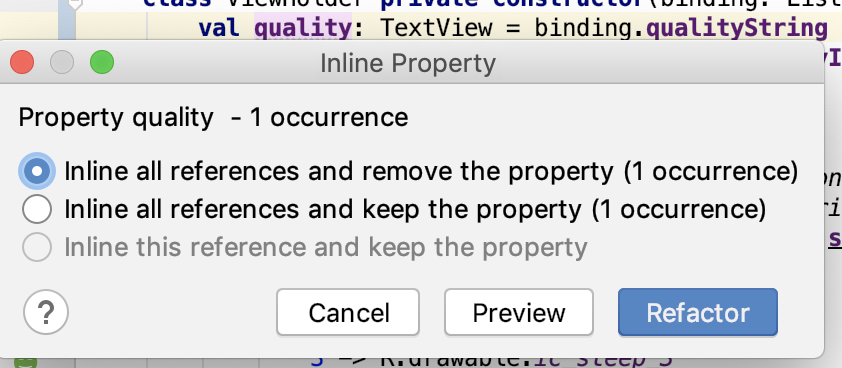
- Run your app. (You may need to Clean and Rebuild your project if it has errors.)
In this task, you upgrade your app to use data binding with binding adapters to set the data in your views.
In a previous codelab, you used the Transformations class to take LiveData and generate formatted strings to display in text views. However, if you need to bind different types, or complex types, you can provide binding adapters to help data binding use those types. Binding adapters are adapters that take your data and adapt it into something that data binding can use to bind a view, like text or an image.
You are going to implement three binding adapters, one for the quality image, and one for each text field. In summary, to declare a binding adapter, you define a method that takes an item and a view, and annotate it with @BindingAdapter. In the body of the method, you implement the transformation. In Kotlin, you can write a binding adapter as an extension function on the view class that receives the data.
Step 1: Create binding adapters
Note that you will have to import a number of classes in the step, and it will not be called out individually.
- Open
SleepNightAdapater.kt. - Inside the
ViewHolderclass, find thebind()method and remind yourself what this method does. You will take the code that calculates the values forbinding.sleepLength,binding.quality, andbinding.qualityImage, and use it inside the adapter instead. (For now, leave the code as it is; you move it in a later step.) - In the
sleeptrackerpackage, create and open a file calledBindingUtils.kt. - Declare an extension function on
TextView, calledsetSleepDurationFormatted, and pass in aSleepNight. This function will be your adapter for calculating and formatting the sleep duration.
fun TextView.setSleepDurationFormatted(item: SleepNight) {}- In the body of
setSleepDurationFormatted, bind the data to the view as you did inViewHolder.bind(). CallconvertDurationToFormatted()and then set thetextof theTextViewto the formatted text. (Because this is an extension function onTextView, you can directly access thetextproperty.)
text = convertDurationToFormatted(item.startTimeMilli, item.endTimeMilli, context.resources)- To tell data binding about this binding adapter, annotate the function with
@BindingAdapter. - This function is the adapter for the
sleepDurationFormattedattribute, so passsleepDurationFormattedas an argument to@BindingAdapter.
@BindingAdapter("sleepDurationFormatted")- The second adapter sets the sleep quality based on the value in a
SleepNightobject. Create an extension function calledsetSleepQualityString()onTextView, and pass in aSleepNight. - In the body, bind the data to the view as you did in
ViewHolder.bind(). CallconvertNumericQualityToStringand set thetext. - Annotate the function with
@BindingAdapter("sleepQualityString").
@BindingAdapter("sleepQualityString")
fun TextView.setSleepQualityString(item: SleepNight) {
   text = convertNumericQualityToString(item.sleepQuality, context.resources)
}- The third binding adapter sets the image on an image view. Create the extension function on
ImageView, callsetSleepImage, and use the code fromViewHolder.bind(), as shown below.
@BindingAdapter("sleepImage")
fun ImageView.setSleepImage(item: SleepNight) {
   setImageResource(when (item.sleepQuality) {
       0 -> R.drawable.ic_sleep_0
       1 -> R.drawable.ic_sleep_1
       2 -> R.drawable.ic_sleep_2
       3 -> R.drawable.ic_sleep_3
       4 -> R.drawable.ic_sleep_4
       5 -> R.drawable.ic_sleep_5
       else -> R.drawable.ic_sleep_active
   })
}
Step 2: Update SleepNightAdapter
- Open
SleepNightAdapter.kt. - Delete everything in the
bind()method, because you can now use data binding and your new adapters to do this work for you.
fun bind(item: SleepNight) {
}- Inside
bind(), assign sleep toitem, because you need tell the binding object about your newSleepNight.
binding.sleep = item- Below that line, add
binding.executePendingBindings(). This call is an optimization that asks data binding to execute any pending bindings right away. It's always a good idea to callexecutePendingBindings()when you use binding adapters in aRecyclerView, because it can slightly speed up sizing the views.
binding.executePendingBindings()Step 3: Add bindings to XML layout
- Open
list_item_sleep_night.xml. - In the
ImageView, add anappproperty with the same name as the binding adapter that sets the image. Pass in thesleepvariable, as shown below.
This property creates the connection between the view and the binding object, via the adapter. WheneversleepImageis referenced, the adapter will adapt the data from theSleepNight.
app:sleepImage="@{sleep}"- Do the same for the
sleep_lengthand thequality_stringtext views. WheneversleepDurationFormattedorsleepQualityStringare referenced, the adapters will adapt the data from theSleepNight.
app:sleepDurationFormatted="@{sleep}"app:sleepQualityString="@{sleep}"- Run your app. It works exactly the same as it did before. The binding adapters take care of all the work of formatting and updating the views as the data changes, simplifying the
ViewHolderand giving the code much better structure than it had before.
You've displayed the same list for the last few exercises. That's by design, to show you that the Adapter interface allows you to architect your code in many different ways. The more complex your code, the more important it becomes to architect it well. In production apps, these patterns and others are used with RecyclerView. The patterns all work, and each has its benefits. Which one you choose depends on what you are building.
Congrats! At this point you're well on your way to mastering RecyclerView on Android.
Android Studio project: RecyclerViewDiffUtilDataBinding.
DiffUtil:
RecyclerViewhas a class calledDiffUtilwhich is for calculating the differences between two lists.DiffUtilhas a class calledItemCallBackthat you extend in order to figure out the difference between two lists.- In the
ItemCallbackclass, you must override theareItemsTheSame()andareContentsTheSame()methods.
ListAdapter:
- To get some list management for free, you can use the
ListAdapterclass instead ofRecyclerView.Adapter. However, if you useListAdapteryou have to write your own adapter for other layouts, which is why this codelab shows you how to do it. - To open the intention menu in Android Studio, place the cursor on any item of code and press
Alt+Enter(Option+Enteron a Mac). This menu is particularly helpful for refactoring code and creating stubs for implementing methods. The menu is context-sensitive, so you need to place cursor exactly to get the correct menu.
Data binding:
- Use data binding in the item layout to bind data to the views.
Binding adapters:
- You previously used
Transformationsto create strings from data. If you need to bind data of different or complex types, provide binding adapters to help data binding use them. - To declare a binding adapter, define a method that takes an item and a view, and annotate the method with
@BindingAdapter. In Kotlin, you can write the binding adapter as an extension function on theView. Pass in the name of the property that the adapter adapts. For example:
@BindingAdapter("sleepDurationFormatted")- In the XML layout, set an
appproperty with the same name as the binding adapter. Pass in a variable with the data. For example:
.app:sleepDurationFormatted="@{sleep}"Udacity courses:
Android developer documentation:
- Create a List with RecyclerView
RecyclerViewDiffUtil- Data Binding Library
- Binding adapters
notifyDataSetChanged()Transformations
Other resources:
This section lists possible homework assignments for students who are working through this codelab as part of a course led by an instructor. It's up to the instructor to do the following:
- Assign homework if required.
- Communicate to students how to submit homework assignments.
- Grade the homework assignments.
Instructors can use these suggestions as little or as much as they want, and should feel free to assign any other homework they feel is appropriate.
If you're working through this codelab on your own, feel free to use these homework assignments to test your knowledge.
Answer these questions
Question 1
Which of the following are necessary to use DiffUtil? Select all that apply.
▢ Extend the ItemCallBack class.
▢ Override areItemsTheSame().
▢ Override areContentsTheSame().
▢ Use data binding to track the differences between items.
Question 2
Which of the following are true about binding adapters?
▢ A binding adapter is a function annotated with @BindingAdapter.
▢ Using a binding adapter allows you to separate data formatting from the view holder.
▢ You must use a RecyclerViewAdapter if you want to use binding adapters.
▢ Binding adapters are a good solution when you need to transform complex data.
Question 3
When should you consider using Transformations instead of a binding adapter? Select all that apply.
▢ Your data is simple.
▢ You are formatting a string.
▢ Your list is very long.
▢ Your ViewHolder only contains one view.
Start the next lesson: