
1. 始める前に
この Codelab では、web-vitals JavaScript ライブラリを使用してウェブページのウェブに関する主な指標を測定する方法を学びます。
Google では、ウェブに関する主な指標を測定し、モバイル デバイスとパソコン デバイスでセグメント化されたページ読み込みの 75 パーセンタイル内に収まるようにすることをおすすめします。
ウェブに関する主な指標には、次の 3 つの指標が含まれます。これらはすべてのウェブページに適用され、ユーザー エクスペリエンスに関する重要な分析情報を提供します。
- Largest Contentful Paint(LCP)。読み込みパフォーマンスを測定します。ページの読み込みが開始されてから 2.5 秒以内に発生する必要があります。
- Interaction to Next Paint(INP)。インタラクティビティを測定し、200 ミリ秒以内に発生する必要があります。
- Cumulative Layout Shift(CLS)。視覚的な安定性を測定し、0.1 以内である必要があります。
前提条件
演習内容
web-vitalsライブラリをウェブページに追加します。- Google Chrome デベロッパー ツールでウェブページのウェブに関する主な指標を測定します。
- 省略可: ウェブページのウェブに関する主な指標を Google アナリティクスにレポートします。
必要なもの
- 任意のテキスト エディタ(Sublime Text、Visual Studio Code など)
- Chromium ベースのウェブブラウザ(Google Chrome、Microsoft Edge など)(Chromium ベースのウェブブラウザが必要な理由について詳しくは、Browser Support をご覧ください)。
2. web-vitals ライブラリをウェブページに追加する
- テキスト エディタで
web-vitals-test.htmlファイルを作成し、次の HTML コードを入力します。
web-vitals-test.html
<!DOCTYPE html>
<html lang="en">
<head>
  <meta charset="utf-8">
  <title>Web Vitals Test</title>
  <meta name="viewport" content="width=device-width, initial-scale=1">
</head>
<body>
  <p><img style="max-width: 360px" src="https://placekitten.com/g/3840/2160" alt="Kitten" /></p>
  <p>Text below image</p>
</body>
</html>
このコードは、この Codelab で使用するウェブページを作成します。
- HTML コードの 2 つ目の
<p>要素の後にある<body>要素に、このモジュール スクリプトを入力して、ファイルを保存します。
web-vitals-test.html
<script type="module">
  import {onCLS, onINP, onLCP} from 'https://unpkg.com/web-vitals@4?module';

  onCLS(console.log);
  onINP(console.log);
  onLCP(console.log);
</script>
このモジュール スクリプトは、コンテンツ配信ネットワークから web-vitals ライブラリを読み込みます。ファイルは次のコード スニペットのようになります。
web-vitals-test.html
<!DOCTYPE html>
<html lang="en">
<head>
  <meta charset="utf-8">
  <title>Web Vitals Test</title>
  <meta name="viewport" content="width=device-width, initial-scale=1">
</head>
<body>
  <p><img style="max-width: 360px" src="https://placekitten.com/g/3840/2160" alt="Kitten" /></p>
  <p>Text below image</p>

<script type="module">
  import {onCLS, onINP, onLCP} from 'https://unpkg.com/web-vitals@4?module';

  onCLS(console.log);
  onINP(console.log);
  onLCP(console.log);
</script>
</body>
</html>
すべての最新のブラウザはモジュール スクリプトをサポートしています。これは、新しい API(ウェブに関する主な指標の測定に必要な API など)のみを使用するコードに適しています。モジュール、またはウェブに関する主な指標の API をサポートしていないブラウザは、このスクリプトを読み込もうとしません。
3. Google Chrome デベロッパー ツールでウェブページのウェブに関する主な指標を測定する
- ウェブブラウザで、保存したファイルを開きます。
- ウェブページを右クリックし、ダイアログで [検証] をクリックします。
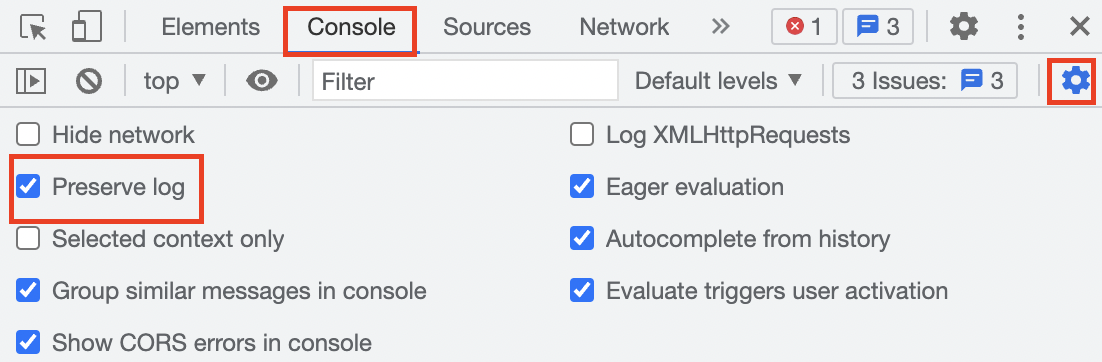
- Google Chrome デベロッパー ツール パネルで、[コンソール] タブをクリックし、[コンソール設定]
 > [ログを保持] を選択します。この設定を有効にすると、ウェブページを更新したときにログが保持されます。
- [ネットワーク] タブをクリックし、スロットリング プルダウン メニューの
 展開矢印をクリックして、[低速 3G] を選択します。この設定では、低速のネットワーク接続をシミュレートします。
![[スロットリング] プルダウン メニューで [低速 3G] 設定が選択されている [ネットワーク] タブ。](https://developers.google.com/static/codelabs/chrome-web-vitals-js/img/16b26ac6ef85d52b.png?hl=ja)
- [コンソール] タブに戻り、ウェブページの任意の場所をクリックします。LCP 指標は [コンソール] タブに表示されます。
![LCP 指標が出力された後の [Console] タブ。](https://developers.google.com/static/codelabs/chrome-web-vitals-js/img/8ccd8d644fc70422.png?hl=ja)
- ウェブページを更新します。CLS 指標は [コンソール] タブに出力されます。
![CLS 指標が出力された後の [コンソール] タブ。](https://developers.google.com/static/codelabs/chrome-web-vitals-js/img/489d0f84ae9c8639.png?hl=ja)
- [ネットワーク] タブに戻り、スロットリング プルダウン メニューの 展開矢印をクリックして、[高速 3G] を選択します。この設定は、高速ネットワーク接続をシミュレートします。
- [コンソール] タブに戻り、ウェブページの任意の場所をクリックします。[コンソール] タブに LCP 指標が再度出力されますが、以前よりも改善されています。
![LCP 指標が再度出力された後の [Console] タブ。](https://developers.google.com/static/codelabs/chrome-web-vitals-js/img/207382e48bf3e18c.png?hl=ja)
- ウェブページを更新します。CLS 指標が [コンソール] タブに再度出力されますが、以前より改善されています。
![CLS 指標が再度出力された後の [Console] タブ。](https://developers.google.com/static/codelabs/chrome-web-vitals-js/img/5475d5f25129a6e0.png?hl=ja)
4. 省略可: ウェブページのウェブに関する主な指標を Google アナリティクスにレポートする
web-vitals-test.htmlファイルのモジュール スクリプトのインポート ステートメントの後に、次のsendToGoogleAnalytics()関数を入力してファイルを保存します。
web-vitals-test.html
function sendToGoogleAnalytics({name, delta, id}) {
  // Assumes the global `gtag()` function exists, see:
  // https://developers.google.com/analytics/devguides/collection/gtagjs
  gtag('event', name, {
    event_category: 'Web Vitals',
    // Google Analytics metrics must be integers, so the value is rounded.
    // For CLS the value is first multiplied by 1000 for greater precision
    // (note: increase the multiplier for greater precision if needed).
    value: Math.round(name === 'CLS' ? delta * 1000 : delta),
    // The `id` value will be unique to the current page load. When sending
    // multiple values from the same page (e.g. for CLS), Google Analytics can
    // compute a total by grouping on this ID (note: requires `eventLabel` to
    // be a dimension in your report).
    event_label: id,
    // Use a non-interaction event to avoid affecting bounce rate.
    non_interaction: true,
  });
}

onCLS(sendToGoogleAnalytics);
onINP(sendToGoogleAnalytics);
onLCP(sendToGoogleAnalytics);
このコードは Core Web Vitals を Google アナリティクスに送信します。Google アナリティクスでは、[上位のイベント] レポートで Core Web Vitals を確認できます。
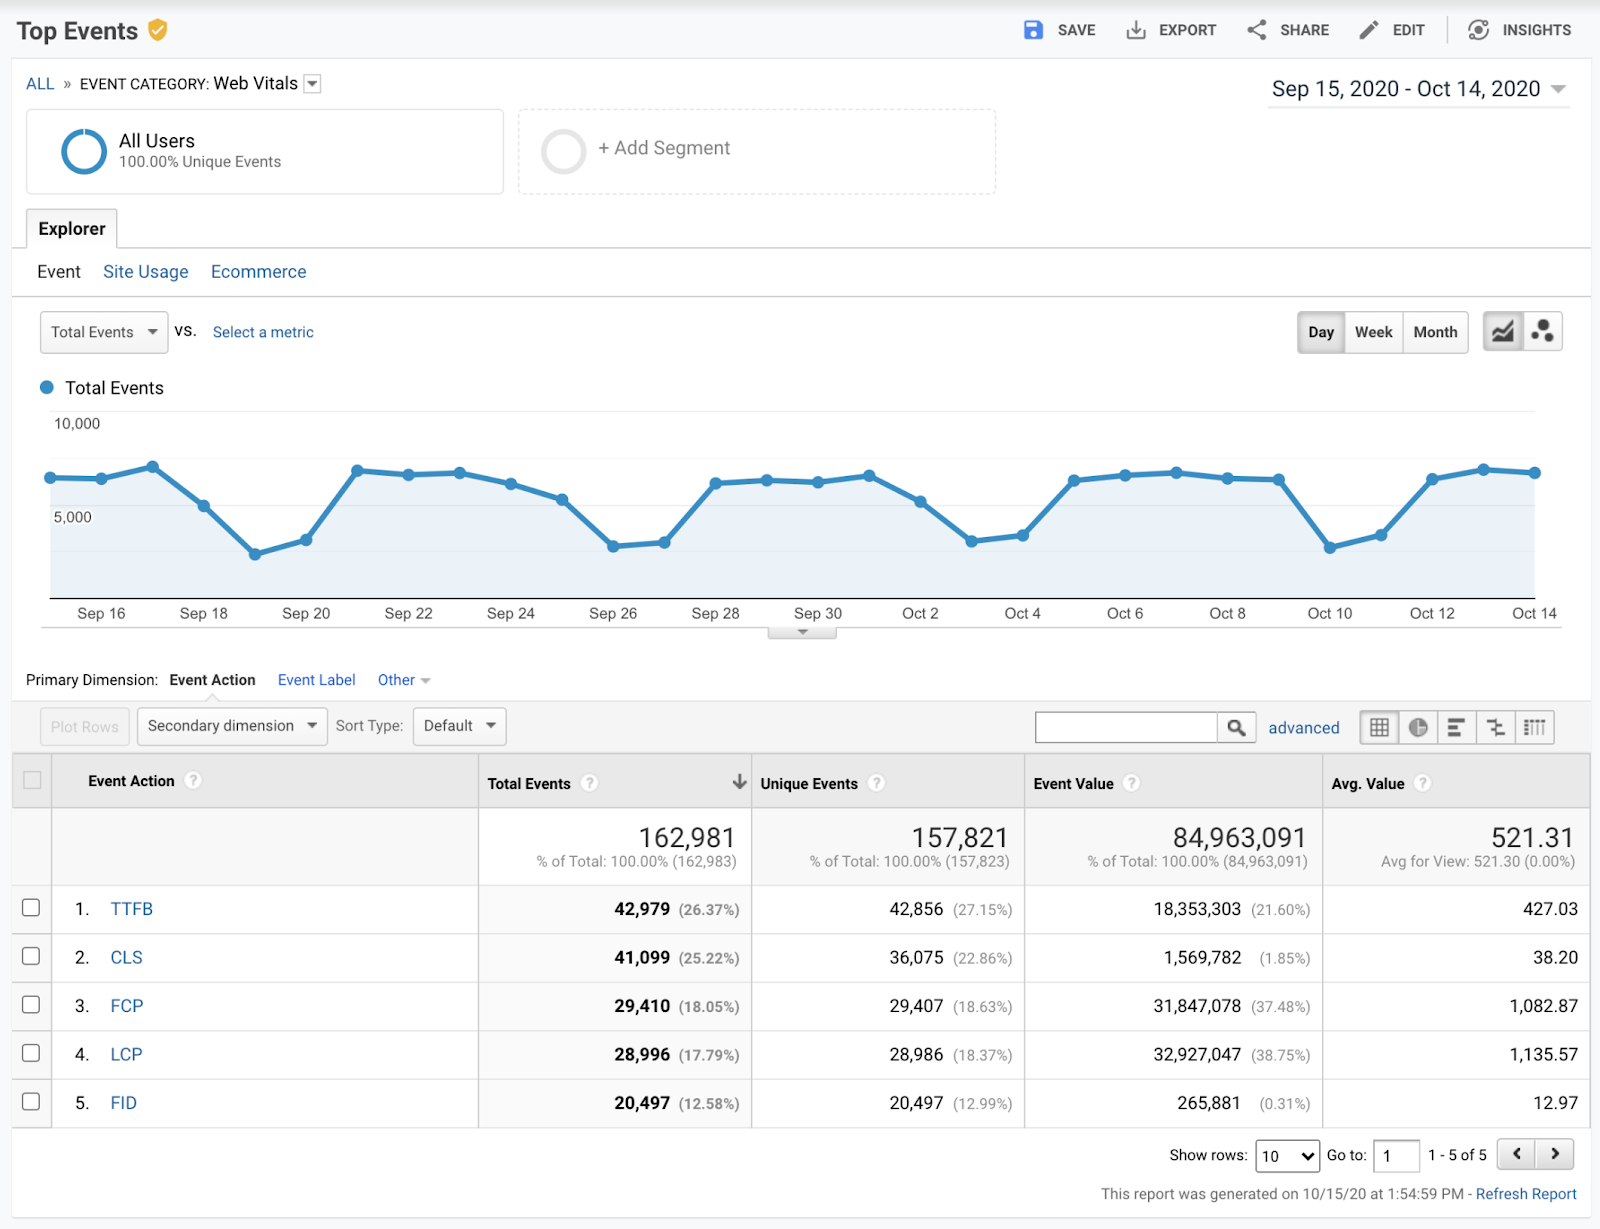
ファイルは次のコード スニペットのようになります。
web-vitals-test.html
<!DOCTYPE html>
<html lang="en">
<head>
  <meta charset="utf-8">
  <title>Web Vitals Test</title>
  <meta name="viewport" content="width=device-width, initial-scale=1">
</head>
<body>
  <p><img style="max-width: 360px" src="https://placekitten.com/g/3840/2160" alt="Kitten" /></p>
  <p>Text below image</p>

<script type="module">
  import {onCLS, onINP, onLCP} from 'https://unpkg.com/web-vitals@4?module';

  function sendToGoogleAnalytics({name, delta, id}) {
    // Assumes the global `gtag()` function exists, see:
    // https://developers.google.com/analytics/devguides/collection/gtagjs
    gtag('event', name, {
      event_category: 'Web Vitals',
      // Google Analytics metrics must be integers, so the value is rounded.
      // For CLS the value is first multiplied by 1000 for greater precision
      // (note: increase the multiplier for greater precision if needed).
      value: Math.round(name === 'CLS' ? delta * 1000 : delta),
      // The `id` value will be unique to the current page load. When sending
      // multiple values from the same page (e.g. for CLS), Google Analytics can
      // compute a total by grouping on this ID (note: requires `eventLabel` to
      // be a dimension in your report).
      event_label: id,
      // Use a non-interaction event to avoid affecting bounce rate.
      non_interaction: true,
    });
  }

  onCLS(sendToGoogleAnalytics);
  onINP(sendToGoogleAnalytics);
  onLCP(sendToGoogleAnalytics);
</script>
</body>
</html>
5. 完了
これで、ここでは、web-vitals ライブラリを使用してウェブページのウェブに関する主な指標を測定し、報告する方法を学びました。