Тип связи OAuth поддерживает два стандартных потока OAuth 2.0: неявный поток и поток кода авторизации .
В потоке неявного кода Google открывает вашу конечную точку авторизации в браузере пользователя. После успешного входа вы возвращаете долговременный токен доступа в Google. Этот токен доступа теперь включается в каждый запрос, отправляемый помощником в ваше действие.
В потоке кода авторизации вам нужны две конечные точки:
- Конечная точка авторизации , которая отвечает за представление пользовательского интерфейса входа пользователям, которые еще не вошли в систему, и запись согласия на запрошенный доступ в виде кратковременного кода авторизации.
- Конечная точка обмена токенами , которая отвечает за два типа обмена:
- Обменивает код авторизации на долгоживущий токен обновления и недолговечный токен доступа. Этот обмен происходит, когда пользователь проходит процесс связывания учетной записи.
- Заменяет долгоживущий токен обновления на недолговечный токен доступа. Этот обмен происходит, когда Google нужен новый токен доступа, потому что срок его действия истек.
Хотя неявный поток кода реализовать проще, Google рекомендует, чтобы токены доступа, выданные с использованием неявного потока, никогда не истекали, потому что использование истечения срока действия токена с неявным потоком вынуждает пользователя снова связывать свою учетную запись. Если вам требуется истечение срока действия токена по соображениям безопасности, вам следует настоятельно рассмотреть возможность использования потока кода аутентификации.
Реализуйте привязку учетных записей OAuth.
Настроить проект
Чтобы настроить проект для использования привязки учетной записи OAuth, выполните следующие действия:
- Откройте консоль действий и выберите проект, который вы хотите использовать.
- Откройте вкладку «Разработка» и выберите «Связывание учетной записи» .
- Включите переключатель рядом с пунктом «Привязка учетной записи» .
- В разделе «Создание учетной записи» выберите «Нет, я хочу разрешить создание учетной записи только на своем веб-сайте» .
В поле «Тип связи» выберите «OAuth и неявное» .
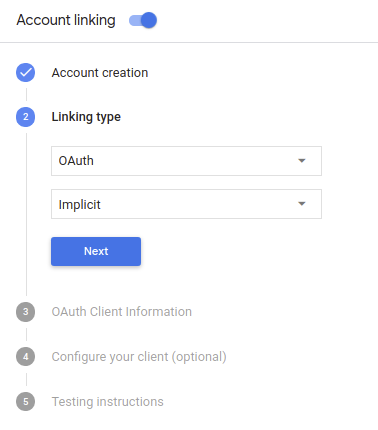
В информации о клиенте :
- Присвойте значение идентификатору клиента, выданному вашими действиями Google, чтобы идентифицировать запросы, поступающие от Google.
- Вставьте URL-адреса конечных точек авторизации и обмена токенами.
- Нажмите Сохранить .
Внедрите свой сервер OAuth
Для поддержки неявного потока OAuth 2.0 ваша служба предоставляет конечную точку авторизации по HTTPS. Эта конечная точка отвечает за аутентификацию и получение согласия пользователей на доступ к данным. Конечная точка авторизации предоставляет пользовательский интерфейс входа вашим пользователям, которые еще не вошли в систему, и записывает согласие на запрошенный доступ.
Когда вашему действию необходимо вызвать один из авторизованных API вашей службы, Google использует эту конечную точку, чтобы получить от ваших пользователей разрешение на вызов этих API от их имени.
Типичный сеанс неявного потока OAuth 2.0, инициированный Google, имеет следующий поток:
- Google открывает вашу конечную точку авторизации в браузере пользователя. Пользователь входит в систему, если он еще не вошел в систему, и предоставляет Google разрешение на доступ к своим данным с помощью вашего API, если он еще не предоставил разрешение.
- Ваша служба создает токен доступа и возвращает его в Google, перенаправляя браузер пользователя обратно в Google с токеном доступа, прикрепленным к запросу.
- Google вызывает API вашего сервиса и прикрепляет токен доступа к каждому запросу. Ваша служба проверяет, что токен доступа предоставляет Google авторизацию для доступа к API, а затем выполняет вызов API.
Обработка запросов на авторизацию
Когда вашему действию необходимо выполнить привязку учетной записи через неявный поток OAuth2, Google отправляет пользователя в вашу конечную точку авторизации с запросом, который включает следующие параметры:
| Параметры конечной точки авторизации | |
|---|---|
client_id | Идентификатор клиента, который вы назначили Google. |
redirect_uri | URL-адрес, на который вы отправляете ответ на этот запрос. |
state | Бухгалтерское значение, которое передается обратно в Google без изменений в URI перенаправления. |
response_type | Тип значения, возвращаемого в ответе. Для неявного потока OAuth 2.0 тип ответа всегда — token . |
Например, если ваша конечная точка авторизации доступна по адресу https://myservice.example.com/auth , запрос может выглядеть так:
GET https://myservice.example.com/auth?client_id=GOOGLE_CLIENT_ID&redirect_uri=REDIRECT_URI&state=STATE_STRING&response_type=token
Чтобы конечная точка авторизации могла обрабатывать запросы на вход, выполните следующие действия:
Проверьте значения
client_idиredirect_uri, чтобы предотвратить предоставление доступа непреднамеренным или неправильно настроенным клиентским приложениям:- Убедитесь, что
client_idсоответствует идентификатору клиента, который вы назначили Google. - Убедитесь, что URL-адрес, указанный параметром
redirect_uri, имеет следующую форму:https://oauth-redirect.googleusercontent.com/r/YOUR_PROJECT_ID
- Убедитесь, что
Проверьте, вошел ли пользователь в ваш сервис. Если пользователь не вошел в систему, завершите процедуру входа или регистрации в вашей службе.
Создайте токен доступа, который Google будет использовать для доступа к вашему API. Маркер доступа может быть любым строковым значением, но он должен однозначно представлять пользователя и клиента, для которого предназначен токен, и не должен быть угадываемым.
Отправьте HTTP-ответ, который перенаправляет браузер пользователя на URL-адрес, указанный параметром
redirect_uri. Включите все следующие параметры во фрагмент URL:-
access_token: только что сгенерированный вами токен доступа. -
token_type:bearerстроки -
state: немодифицированное значение состояния из исходного запроса. Ниже приведен пример результирующего URL-адреса:https://oauth-redirect.googleusercontent.com/r/YOUR_PROJECT_ID#access_token=ACCESS_TOKEN&token_type=bearer&state=STATE_STRING
-
Обработчик перенаправления OAuth 2.0 Google получит токен доступа и подтвердит, что значение state не изменилось. После того как Google получит токен доступа к вашей службе, Google прикрепит этот токен к последующим вызовам вашего действия как часть AppRequest .
Запустить процесс аутентификации
Используйте намерение помощника по входу в учетную запись, чтобы запустить процесс аутентификации. Следующие фрагменты кода описывают, как отправить ответ в Dialogflow и Actions SDK для использования этого помощника.
Диалоговый поток:
const {dialogflow, SignIn} = require('actions-on-google');
const app = dialogflow({
  // REPLACE THE PLACEHOLDER WITH THE CLIENT_ID OF YOUR ACTIONS PROJECT
  clientId: CLIENT_ID,
});
// Intent that starts the account linking flow.
app.intent('Start Signin', (conv) => {
  conv.ask(new SignIn('To get your account details'));
});
@ForIntent("Start Signin")
public ActionResponse text(ActionRequest request) {
  ResponseBuilder rb = getResponseBuilder(request);
  return rb.add(new SignIn().setContext("To get your account details")).build();
}
{
  "payload": {
    "google": {
      "expectUserResponse": true,
      "richResponse": {
        "items": [
          {
            "simpleResponse": {
              "textToSpeech": "PLACEHOLDER"
            }
          }
        ]
      },
      "userStorage": "{\"data\":{}}",
      "systemIntent": {
        "intent": "actions.intent.SIGN_IN",
        "data": {
          "@type": "type.googleapis.com/google.actions.v2.SignInValueSpec",
          "optContext": "To get your account details"
        }
      }
    }
  },
  "outputContexts": [
    {
      "name": "/contexts/_actions_on_google",
      "lifespanCount": 99,
      "parameters": {
        "data": "{}"
      }
    }
  ]
}
Действия SDK:
const {actionssdk, SignIn} = require('actions-on-google');
const app = actionssdk({
  // REPLACE THE PLACEHOLDER WITH THE CLIENT_ID OF YOUR ACTIONS PROJECT
  clientId: CLIENT_ID,
});
// Intent that starts the account linking flow.
app.intent('actions.intent.TEXT', (conv) => {
  conv.ask(new SignIn('To get your account details'));
});
@ForIntent("actions.intent.TEXT")
public ActionResponse text(ActionRequest request) {
  ResponseBuilder rb = getResponseBuilder(request);
  return rb.add(new SignIn().setContext("To get your account details")).build();
}
{
  "expectUserResponse": true,
  "expectedInputs": [
    {
      "inputPrompt": {
        "richInitialPrompt": {
          "items": [
            {
              "simpleResponse": {
                "textToSpeech": "PLACEHOLDER"
              }
            }
          ]
        }
      },
      "possibleIntents": [
        {
          "intent": "actions.intent.SIGN_IN",
          "inputValueData": {
            "@type": "type.googleapis.com/google.actions.v2.SignInValueSpec",
            "optContext": "To get your account details"
          }
        }
      ]
    }
  ],
  "conversationToken": "{\"data\":{}}",
  "userStorage": "{\"data\":{}}"
}
Обработка запросов на доступ к данным
Если запрос Ассистента содержит токен доступа , сначала убедитесь, что токен доступа действителен (и срок его действия не истек), а затем извлеките связанную учетную запись пользователя из своей базы данных.