
El tipo de vinculación OAuth y Acceso con Google agrega el Acceso con Google además del acceso basado en OAuth vinculación de cuentas. Esto proporciona un vínculo basado en la voz sin inconvenientes para los usuarios de Google. y, al mismo tiempo, habilitar la vinculación de cuentas para los usuarios que se registraron en tu servicio con una identidad ajena a Google.
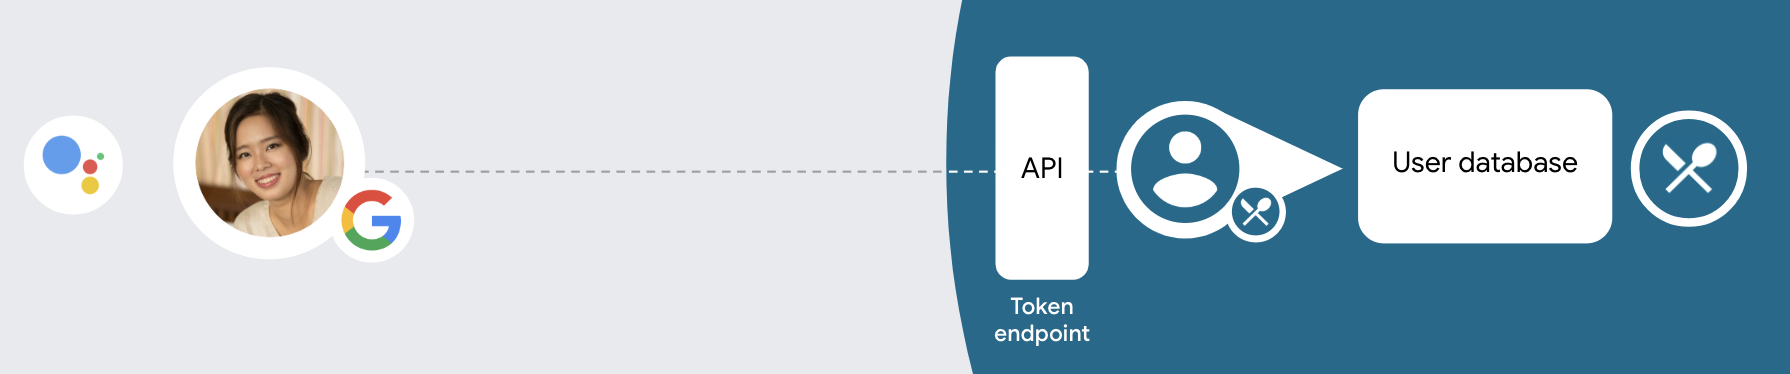
Este tipo de vinculación comienza con el Acceso con Google, que te permite verificar si el La información del perfil de Google ya existe en tu sistema. Si la información del usuario no se encuentra en tu sistema, se inicia un flujo estándar de OAuth. El usuario también puede elige crear una cuenta nueva con la información de su perfil de Google.
Para vincular las cuentas con OAuth y el Acceso con Google, sigue estas indicaciones generales pasos:
- En primer lugar, solicita al usuario que dé su consentimiento para acceder a su perfil de Google.
- Utilizar la información de su perfil para identificar al usuario
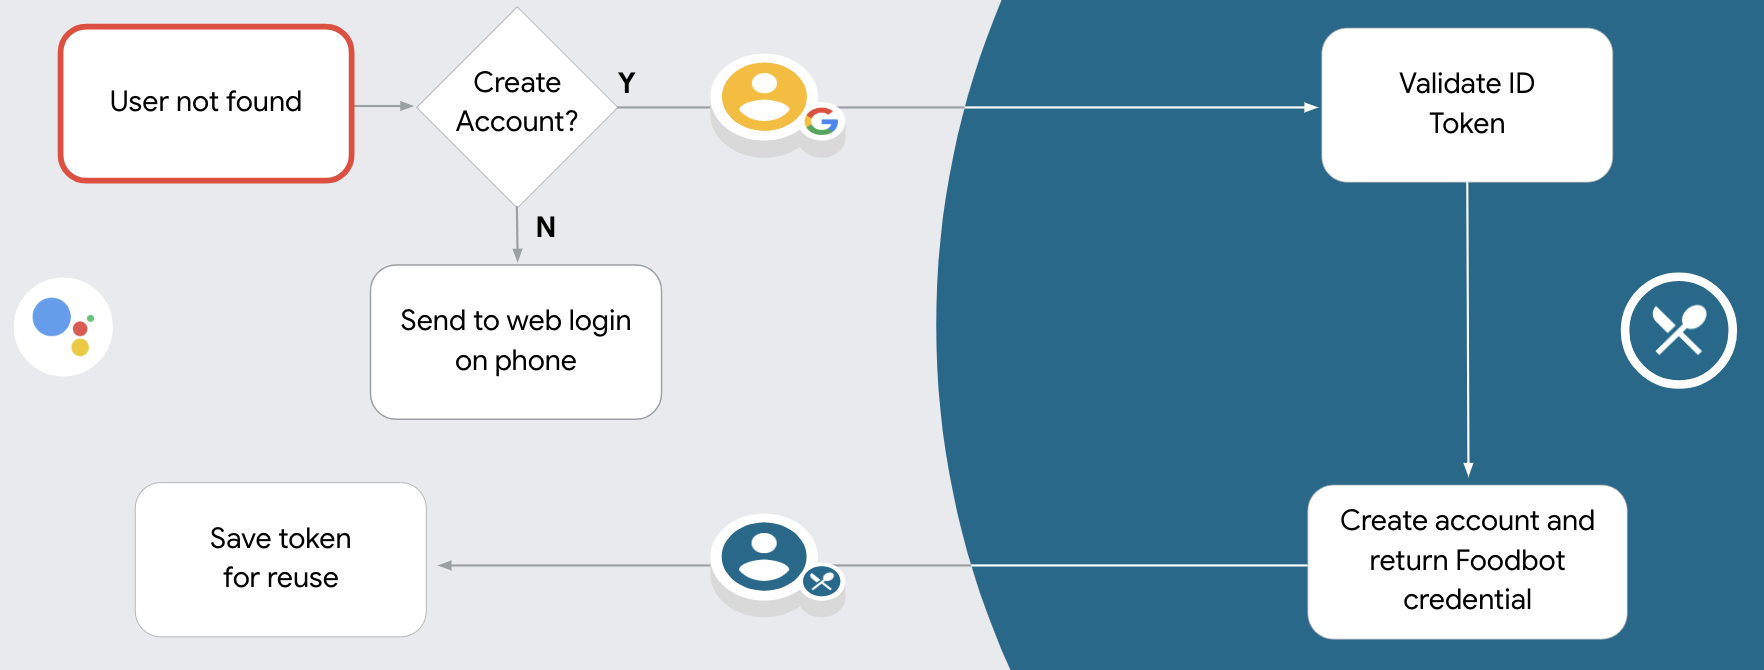
- Si no encuentras una coincidencia para el usuario de Google en tu sistema de autenticación,
el flujo procede dependiendo de si configuraste tu proyecto de acciones
en la Consola de Actions para permitir la creación de cuentas de usuario por voz o solo
tu sitio web.
- Si permites la creación de cuentas mediante la voz, valida el ID token recibido de Google. Luego, puedes crear un usuario basado en el la información de perfil contenida en el token de ID.
- Si no permites la creación de cuentas mediante la voz, se transferirá al usuario a un navegador donde puedan cargar su página de autorización y completar la de tu flujo de creación.
Compatibilidad con la creación de cuentas mediante comandos de voz
Si permites la creación de cuentas de usuario con la voz, Asistente le preguntará al usuario si quieren hacer lo siguiente:
- Crear una cuenta nueva en tu sistema con la información de su Cuenta de Google
- Accede a tu sistema de autenticación con una cuenta diferente si tiene una una cuenta existente que no es de Google.
Te recomendamos que permitas la creación de cuentas por voz si deseas minimizar el en el flujo de creación de la cuenta. El usuario solo debe salir del flujo de voz. si quiere acceder con una cuenta que no es de Google.
No permitir la creación de cuentas por voz
Si inhabilitaste la creación de cuentas de usuario por voz, el Asistente abrirá la URL en que proporcionaste para la autenticación de usuarios. Si la interacción ocurre En un dispositivo que no tiene pantalla, el Asistente dirige al usuario a un teléfono para continuar con el flujo de vinculación de cuentas.
Se recomienda inhabilitar la creación en los siguientes casos:
No quieres permitir que los usuarios que tienen cuentas ajenas a Google creen una cuenta nueva usuario existente y quieres que se vinculen a sus cuentas de usuario existentes en tu de autenticación de la organización. Por ejemplo, si ofreces un programa de lealtad, puede asegurarse de que el usuario no pierda los puntos acumulados con una cuenta existente.
Debes tener el control total del flujo de creación de la cuenta. Por ejemplo, podrías inhabilitar la creación si necesitas mostrar tus condiciones del servicio al usuario durante la creación de una cuenta.
Implementa la vinculación de cuentas de OAuth y Acceso con Google
Las cuentas están vinculadas con flujos de OAuth 2.0 estándar de la industria. Actions on Google admite los flujos de código implícito y de autorización.
En el flujo de código implícito, Google abre tu extremo de autorización en el navegador del usuario. Después de acceder correctamente, devuelves un token de acceso de larga duración a Google. Este token de acceso ahora se incluye en cada solicitud que envía el Asistente a tu acción.
En el flujo de código de autorización, necesitas dos extremos:
- El extremo authorization, que se encarga de presentar la IU de acceso a los usuarios que aún no accedieron y de registrar el consentimiento para el acceso solicitado en forma de un código de autorización de corta duración.
- El extremo de intercambio de tokens, que es responsable de dos tipos de intercambios:
- Intercambia un código de autorización por un token de actualización de larga duración y un token de acceso de corta duración. Este intercambio se produce cuando el usuario pasa por el flujo de vinculación de cuentas.
- Intercambia un token de actualización de larga duración por un token de acceso de corta duración. Este intercambio ocurre cuando Google necesita un token de acceso nuevo porque el que había vencido.
Si bien el flujo de código implícito es más fácil de implementar, Google recomienda que los tokens de acceso emitidos con el flujo implícito nunca venzan, porque el vencimiento del token con el flujo implícito obliga al usuario a vincular su cuenta nuevamente. Si necesitas el vencimiento del token por razones de seguridad, debes considerar usar el flujo de código de Auth.
Configura el proyecto
Para configurar tu proyecto de modo que use OAuth y cuentas de Acceso con Google la vinculación, sigue estos pasos:
- Abre la Consola de Actions y selecciona el proyecto que deseas usar.
- Haz clic en la pestaña Desarrollar y selecciona Vinculación de cuentas.
- Habilita el interruptor junto a Vinculación de cuentas.
- En la sección Creación de la cuenta, selecciona Sí.
En Tipo de vinculación, selecciona OAuth & Acceso con Google e Implícito.
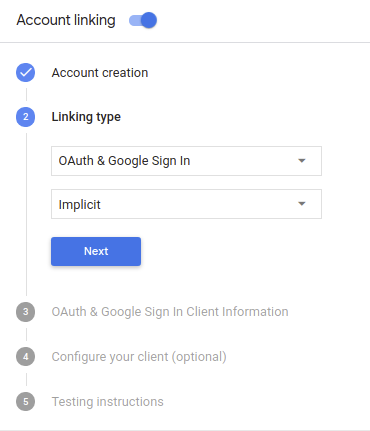
En Client Information, haz lo siguiente:
- Asigna un valor al ID de cliente emitido por tus acciones a Google para identificarlo. solicitudes provenientes de Google.
- Inserta las URLs para los extremos de autorización y intercambio de tokens.
Haz clic en Guardar.
Implementa tu servidor de OAuth
Para admitir el flujo implícito de OAuth 2.0, tu servicio hace una autorización de destino disponible a través de HTTPS. Este extremo es responsable de autenticar y obtener el consentimiento de los usuarios para acceder a los datos. El extremo de autorización presenta una IU de acceso a los usuarios que aún no accedieron y registra el acceso solicitado.
Cuando tu acción necesita llamar a una de las APIs autorizadas de tu servicio, Google usa este extremo para obtener permiso de los usuarios para llamar a estas APIs en sus nombre.
Una sesión típica de flujo implícito de OAuth 2.0 que inicia Google tiene la siguiente flujo:
- Google abre el extremo de autorización en el navegador del usuario. El el usuario accede a la cuenta si aún no lo ha hecho y le concede a Google permiso para acceder sus datos con tu API si aún no han otorgado permiso.
- Tu servicio crea un token de acceso y lo devuelve a Google redireccionando el navegador del usuario de vuelta a Google con el token de acceso que se adjuntan a la solicitud.
- Google llama a las APIs de tu servicio y adjunta el token de acceso con cada solicitud. Tu servicio verifica que el token de acceso otorgue a Google autorización para acceder a la API y, luego, completa la llamada a la API.
Maneja solicitudes de autorización
Cuando tu acción necesite vincular cuentas mediante un flujo implícito de OAuth2, Google envía al usuario a tu extremo de autorización con una solicitud que incluye los siguientes parámetros:
| Parámetros del extremo de autorización | |
|---|---|
client_id |
El ID de cliente que le asignaste a Google |
redirect_uri |
La URL a la que envías la respuesta a esta solicitud. |
state |
Un valor de contabilidad que se devuelve a Google sin modificar en el URI de redireccionamiento. |
response_type |
Es el tipo de valor que se debe mostrar en la respuesta. Para el OAuth 2.0 implícito
el tipo de respuesta siempre es token. |
Por ejemplo, si tu extremo de autorización está disponible en https://myservice.example.com/auth,
una solicitud podría verse así:
GET https://myservice.example.com/auth?client_id=GOOGLE_CLIENT_ID&redirect_uri=REDIRECT_URI&state=STATE_STRING&response_type=token
Para que tu extremo de autorización controle las solicitudes de acceso, sigue estos pasos:
Verifica los valores
client_idyredirect_uripara evita que se otorgue acceso a apps cliente no deseadas o configuradas incorrectamente:- Confirma que
client_idcoincida con el ID de cliente que asignados a Google. - Confirma que la URL especificada por
redirect_uritiene la siguiente forma:https://oauth-redirect.googleusercontent.com/r/YOUR_PROJECT_ID
- Confirma que
Verifica si el usuario accedió a tu servicio. Si el usuario no está firmado completa el flujo de acceso o registro del servicio.
Genera un token de acceso que Google usará para acceder a tu API. El el token de acceso puede ser cualquier valor de cadena, pero debe representar de forma única usuario y cliente para el que es el token y no se debe poder adivinar.
Envía una respuesta HTTP que redirecciona el navegador del usuario a la URL especificadas por el parámetro
redirect_uri. Incluye todos los siguientes parámetros en el fragmento de URL:access_token: Es el token de acceso que acabas de generar.token_type: Es la cadenabearer.state: Es el valor del estado sin modificar del original. solicitud El siguiente es un ejemplo de la URL resultante:https://oauth-redirect.googleusercontent.com/r/YOUR_PROJECT_ID#access_token=ACCESS_TOKEN&token_type=bearer&state=STATE_STRING
El controlador de redireccionamiento de OAuth 2.0 de Google recibirá el token de acceso y confirmará
que el valor de state no haya cambiado. Después de que Google obtiene una
token de acceso para tu servicio, Google adjuntará el token a las llamadas posteriores
a tu acción como parte de AppRequest.
Administra la vinculación automática
Una vez que el usuario otorga tu consentimiento para que la Acción acceda a su perfil de Google, Google envía una solicitud que contiene una aserción firmada de la identidad del usuario de Google. La aserción contiene información que incluye el ID de la Cuenta de Google, el nombre y la dirección de correo electrónico. El extremo de intercambio de tokens configurado para tu proyecto controla a la solicitud.
Si la Cuenta de Google correspondiente ya está presente en tu sistema de autenticación, haz lo siguiente:
el extremo de intercambio de tokens devuelve un token al usuario. Si la Cuenta de Google no
coincide con un usuario existente, tu extremo de intercambio de tokens mostrará un error user_not_found.
La solicitud tiene el siguiente formato:
POST /token HTTP/1.1
Host: oauth2.example.com
Content-Type: application/x-www-form-urlencoded

grant_type=urn:ietf:params:oauth:grant-type:jwt-bearer&intent=get&assertion=JWT&consent_code=CONSENT_CODE&scope=SCOPES
El extremo de intercambio de tokens debe ser capaz de controlar los siguientes parámetros:
| Parámetros de extremo del token | |
|---|---|
grant_type |
El tipo de token que se intercambia. Para estas solicitudes, este
tiene el valor urn:ietf:params:oauth:grant-type:jwt-bearer. |
intent |
Para estas solicitudes, el valor de este parámetro es `get`. |
assertion |
Un token web JSON (JWT) que proporciona una aserción firmada del token de Google la identidad del usuario. El JWT contiene información que incluye el ID de Google ID, nombre y dirección de correo electrónico de la cuenta. |
consent_code |
Opcional: Si está presente, es un código único que indica El usuario otorgó su consentimiento para que tu Acción acceda a los permisos especificados. |
scope |
Opcional: Cualquier alcance que hayas configurado Google para que solicite a los usuarios. |
Cuando el extremo de intercambio de tokens recibe la solicitud de vinculación, debe hacer lo siguiente: lo siguiente:
Valida y decodifica la aserción de JWT
Puedes validar y decodificar la aserción de JWT con una biblioteca de decodificación de JWT para tu lenguaje. Usa las claves públicas de Google (disponibles en JWK o PEM) para verificar el firma.
Cuando se decodifica, la aserción de JWT luce como el siguiente ejemplo:
{
  "sub": 1234567890,        // The unique ID of the user's Google Account
  "iss": "https://accounts.google.com",        // The assertion's issuer
  "aud": "123-abc.apps.googleusercontent.com", // Your server's client ID
  "iat": 233366400,         // Unix timestamp of the assertion's creation time
  "exp": 233370000,         // Unix timestamp of the assertion's expiration time
  "name": "Jan Jansen",
  "given_name": "Jan",
  "family_name": "Jansen",
  "email": "jan@gmail.com", // If present, the user's email address
  "locale": "en_US"
}
Además de verificar la firma del token, verifica que el emisor de la aserción
(iss campo) es https://accounts.google.com y que el público (campo aud)
es el ID de cliente asignado a tu acción.
Verifica si la Cuenta de Google ya está presente en tu sistema de autenticación
Verifica si se cumple alguna de las siguientes condiciones:
- El ID de la Cuenta de Google, que se encuentra en el campo
subde la aserción, está en tu base de datos de usuarios. - La dirección de correo electrónico en la aserción coincide con un usuario de tu base de datos de usuarios.
Si se cumple alguna de estas condiciones, el usuario ya se registró y puedes emitir una token de acceso.
Si no aparece el ID de la Cuenta de Google ni la dirección de correo electrónico especificada en la aserción
coincide con un usuario de tu base de datos, significa que el usuario aún no se registró. En este caso, tu
el extremo de intercambio del token debe responder con un error HTTP 401, que especifica error=user_not_found,
como en el siguiente ejemplo:
HTTP/1.1 401 Unauthorized
Content-Type: application/json;charset=UTF-8

{
  "error":"user_not_found",
}
user_not_found,
llama a tu extremo de intercambio de tokens con el valor del parámetro intent.
Configurar como create y enviar un token de ID que contenga la información de perfil del usuario
con la solicitud.
Controla la creación de cuentas mediante el Acceso con Google
Cuando un usuario necesita crear una cuenta en tu servicio, Google crea
al extremo de intercambio de tokens que especifique
intent=create, como en el siguiente ejemplo:
POST /token HTTP/1.1
Host: oauth2.example.com
Content-Type: application/x-www-form-urlencoded

response_type=token&grant_type=urn:ietf:params:oauth:grant-type:jwt-bearer&scope=SCOPES&intent=create&consent_code=CONSENT_CODE&assertion=JWT[&NEW_ACCOUNT_INFO]
El parámetro assertion contiene un token web JSON (JWT) que proporciona
una aserción firmada
de la identidad del usuario de Google. El JWT contiene información
que incluye el ID de la Cuenta de Google, el nombre y la dirección de correo electrónico del usuario, que puedes usar
para crear una cuenta nueva en tu servicio.
Para responder a las solicitudes de creación de cuentas, el extremo de intercambio de tokens debe hacer lo siguiente:
Valida y decodifica la aserción de JWT
Puedes validar y decodificar la aserción de JWT con una biblioteca de decodificación de JWT para tu lenguaje. Usa las claves públicas de Google (disponibles en JWK o PEM) para verificar el firma.
Cuando se decodifica, la aserción de JWT luce como el siguiente ejemplo:
{
  "sub": 1234567890,        // The unique ID of the user's Google Account
  "iss": "https://accounts.google.com",        // The assertion's issuer
  "aud": "123-abc.apps.googleusercontent.com", // Your server's client ID
  "iat": 233366400,         // Unix timestamp of the assertion's creation time
  "exp": 233370000,         // Unix timestamp of the assertion's expiration time
  "name": "Jan Jansen",
  "given_name": "Jan",
  "family_name": "Jansen",
  "email": "jan@gmail.com", // If present, the user's email address
  "locale": "en_US"
}
Además de verificar la firma del token, verifica que el emisor de la aserción
(iss campo) es https://accounts.google.com y que el público (campo aud)
es el ID de cliente asignado a tu acción.
Validar la información del usuario y crear una cuenta nueva
Verifica si se cumple alguna de las siguientes condiciones:
- El ID de la Cuenta de Google, que se encuentra en el campo
subde la aserción, está en tu base de datos de usuarios. - La dirección de correo electrónico en la aserción coincide con un usuario de tu base de datos de usuarios.
Si se cumple alguna de estas condiciones, solicita al usuario que vincule su cuenta existente con
su Cuenta de Google respondiendo a la solicitud con un error HTTP 401 y especificando
error=linking_error y la dirección de correo electrónico del usuario como login_hint, como en el
siguiente ejemplo:
HTTP/1.1 401 Unauthorized
Content-Type: application/json;charset=UTF-8

{
  "error":"linking_error",
  "login_hint":"foo@bar.com"
}
Si ninguna condición es verdadera, crea una nueva cuenta de usuario con la información. proporcionadas en el JWT. Las cuentas nuevas no suelen tener una contraseña establecida. Sí se recomendó agregar Acceso con Google a otras plataformas para permitir que los usuarios accedan a través de Google en todas las plataformas de tu aplicación. Como alternativa, puedes enviar por correo electrónico al usuario un vínculo que inicie el flujo de recuperación de contraseña para permitirle configurar una contraseña para acceder en otras plataformas.
Cuando se complete la creación, emite un token de acceso y se mostrarán los valores de un objeto JSON en el cuerpo de la respuesta HTTPS, como en el siguiente ejemplo:
{
  "token_type": "Bearer",
  "access_token": "ACCESS_TOKEN",

  "expires_in": SECONDS_TO_EXPIRATION
}
Inicia el flujo de autenticación
Usa el intent del asistente para el acceso a la cuenta para iniciar el flujo de autenticación.
const app = dialogflow({
  // REPLACE THE PLACEHOLDER WITH THE CLIENT_ID OF YOUR ACTIONS PROJECT
  clientId: CLIENT_ID,
})

// Intent that starts the account linking flow.
app.intent('Start Signin', conv => {
  conv.ask(new SignIn('To get your account details'))
})
private String clientId = &<quot;your_clie>nt_id";

@ForIntent("Start Signin")
public ActionResponse text(ActionRequest request) {
  ResponseBuilder rb = getResponseBuilder(request);
  return rb.add(new SignIn().setContext("To get your account details")).build();
}
const app = actionssdk({
  clientId: CLIENT_ID,
})

app.intent('Start Signin', conv => {
  conv.ask(new SignIn('To get your account details'))
})
private String clientId = &<quot;your_clie>nt_id";

@ForIntent("actions.intent.TEXT")
public ActionResponse text(ActionRequest request) {
  ResponseBuilder rb = getResponseBuilder(request);
  return rb.add(new SignIn().setContext("To get your account details")).build();
}
Maneja solicitudes de acceso a los datos
Si la solicitud del Asistente contiene un token de acceso, Comprueba primero que el token de acceso sea válido y no haya vencido, y luego recupéralo desde tu base de datos de la cuenta de usuario, la cuenta de usuario asociada con el token.