
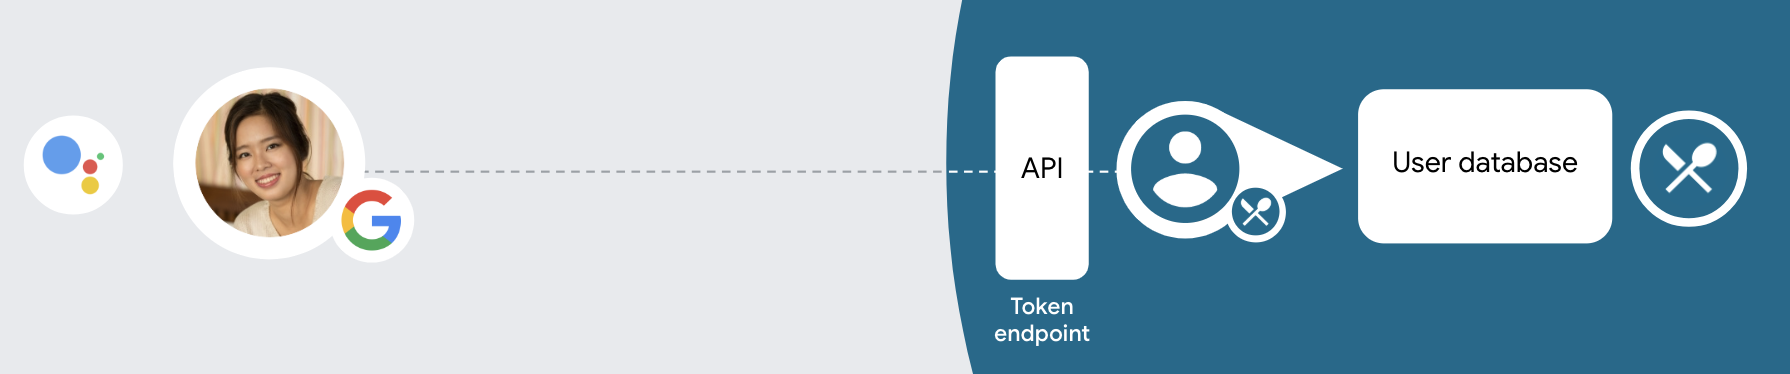
Loại liên kết OAuth và Đăng nhập bằng Google sẽ thêm tính năng Đăng nhập bằng Google bên cạnh OAuth dựa trên liên kết tài khoản. Việc này giúp người dùng Google liên kết liền mạch dựa trên giọng nói đồng thời bật tính năng liên kết tài khoản cho những người dùng đã đăng ký dịch vụ của bạn có thông tin nhận dạng không phải của Google.
Loại liên kết này bắt đầu bằng phương thức Đăng nhập bằng Google, cho phép bạn kiểm tra xem Thông tin hồ sơ trên Google có trong hệ thống của bạn. Nếu thông tin của người dùng nếu không thấy, một quy trình OAuth chuẩn sẽ bắt đầu. Người dùng cũng có thể chọn tạo một tài khoản mới bằng thông tin hồ sơ trên Google của họ.
Để thực hiện liên kết tài khoản bằng OAuth và Đăng nhập bằng Google, hãy làm theo các bước chung sau các bước:
- Trước tiên, hãy yêu cầu người dùng đồng ý truy cập vào hồ sơ trên Google của họ.
- Sử dụng thông tin trong hồ sơ của họ để nhận dạng người dùng.
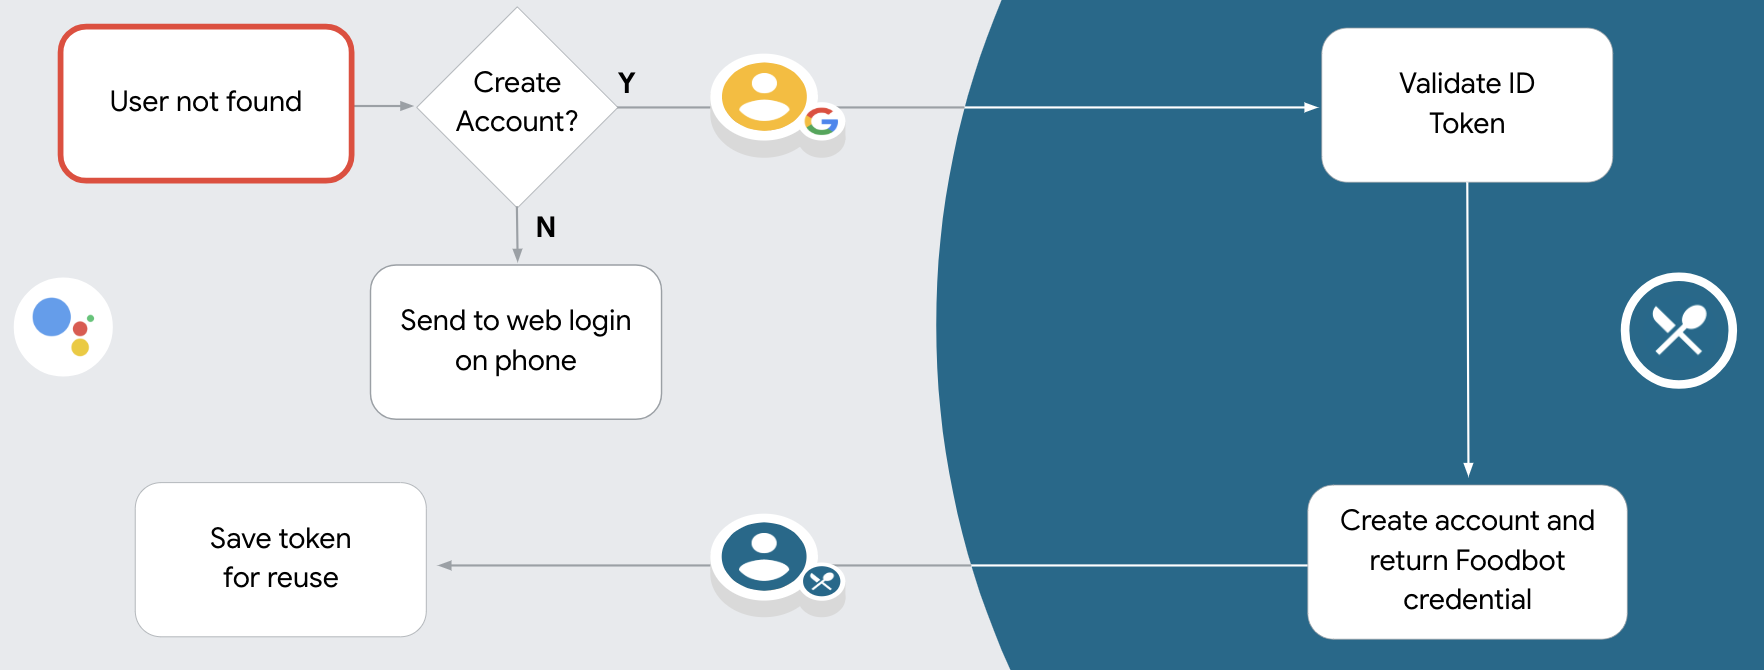
- Nếu bạn không tìm thấy thông tin trùng khớp với người dùng Google trong hệ thống xác thực của mình,
quy trình sẽ tiếp tục tuỳ thuộc vào việc bạn đã định cấu hình dự án Actions hay chưa
trong bảng điều khiển Actions để cho phép tạo tài khoản người dùng thông qua giọng nói hoặc chỉ bật
trang web của bạn.
- Nếu bạn cho phép tạo tài khoản qua giọng nói, hãy xác thực mã mã thông báo nhận được từ Google. Sau đó, bạn có thể tạo người dùng dựa trên thông tin hồ sơ có trong mã thông báo ID.
- Nếu bạn không cho phép tạo tài khoản qua giọng nói, thì người dùng sẽ được chuyển sang trình duyệt nơi họ có thể tải trang uỷ quyền của bạn và hoàn tất quá trình người dùng trong quy trình sáng tạo.
Hỗ trợ tạo tài khoản qua giọng nói
Nếu bạn cho phép tạo tài khoản người dùng qua giọng nói, Trợ lý sẽ hỏi người dùng xem họ muốn làm những việc sau:
- Tạo tài khoản mới trên hệ thống của bạn bằng cách sử dụng thông tin tài khoản Google của họ hoặc
- Đăng nhập vào hệ thống xác thực của bạn bằng một tài khoản khác nếu họ có tài khoản không phải tài khoản Google hiện có.
Bạn nên cho phép tạo tài khoản qua giọng nói nếu muốn giảm thiểu sự phiền hà trong quy trình tạo tài khoản. Người dùng chỉ cần rời khỏi quy trình giọng nói nếu họ muốn đăng nhập bằng một tài khoản hiện có, không phải của Google.
Không cho phép tạo tài khoản qua giọng nói
Nếu bạn không cho phép tạo tài khoản người dùng qua giọng nói, Trợ lý sẽ mở URL đến mà bạn đã cung cấp để xác thực người dùng. Nếu hoạt động tương tác đang diễn ra trên thiết bị không có màn hình, Trợ lý sẽ hướng người dùng đến điện thoại để tiếp tục quy trình liên kết tài khoản.
Bạn nên không cho phép tạo nếu:
Bạn không muốn cho phép người dùng có tài khoản không phải của Google tạo tài khoản mới tài khoản người dùng của họ và muốn họ liên kết với tài khoản người dùng hiện có của họ trong xác thực thay thế. Ví dụ: nếu cung cấp chương trình khách hàng thân thiết, bạn có thể cần đảm bảo rằng người dùng không bị mất điểm đã tích luỹ tài khoản hiện có.
Bạn cần có toàn quyền kiểm soát quy trình tạo tài khoản. Ví dụ: bạn có thể không cho phép tạo nếu bạn cần hiển thị điều khoản dịch vụ cho người dùng trong tạo tài khoản.
Triển khai việc liên kết tài khoản OAuth và tài khoản Đăng nhập bằng Google
Các tài khoản được liên kết với các luồng OAuth 2.0 theo tiêu chuẩn ngành. Actions on Google hỗ trợ các luồng mã uỷ quyền và ngầm ẩn.
Trong luồng mã ngầm định, Google sẽ mở điểm cuối ủy quyền của bạn trong trình duyệt của người dùng. Sau khi đăng nhập thành công, bạn sẽ trả về một mã thông báo truy cập dài hạn cho Google. Mã thông báo truy cập này hiện được đưa vào mọi yêu cầu gửi từ Trợ lý tới Hành động của bạn.
Trong quy trình mã uỷ quyền, bạn cần có 2 điểm cuối:
- Điểm cuối uỷ quyền (trách nhiệm trình bày giao diện người dùng đăng nhập cho người dùng chưa đăng nhập và ghi lại sự đồng ý đối với quyền truy cập được yêu cầu dưới dạng mã uỷ quyền ngắn hạn).
- Điểm cuối token exchange chịu trách nhiệm về hai hình thức trao đổi:
- Trao đổi một mã ủy quyền để lấy mã làm mới trong thời gian dài và một mã truy cập ngắn hạn. Quá trình trao đổi này diễn ra khi người dùng trải qua quy trình liên kết tài khoản.
- Trao đổi mã làm mới trong thời gian dài để lấy mã truy cập ngắn hạn. Quá trình trao đổi này diễn ra khi Google cần một mã truy cập mới vì mã này đã hết hạn.
Mặc dù quy trình mã ngầm định đơn giản hơn nên triển khai, bạn nên sử dụng các mã thông báo truy cập được phát hành bằng quy trình ngầm ẩn, vì việc sử dụng mã thông báo hết hạn với luồng ngầm định sẽ buộc người dùng liên kết lại tài khoản của họ. Nếu cần mã hết hạn vì lý do bảo mật, bạn nên cân nhắc sử dụng quy trình mã xác thực.
Định cấu hình dự án
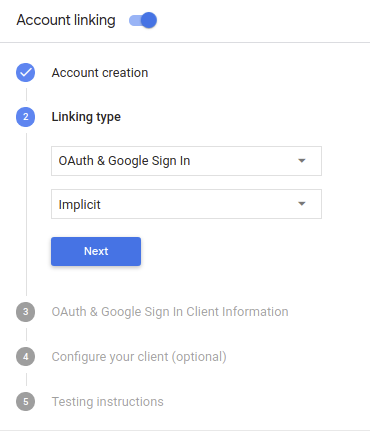
Cách định cấu hình dự án để sử dụng OAuth và tài khoản Đăng nhập bằng Google hãy làm theo các bước sau:
- Mở Bảng điều khiển Actions rồi chọn dự án mà bạn muốn sử dụng.
- Nhấp vào thẻ Phát triển rồi chọn Liên kết tài khoản.
- Bật nút chuyển bên cạnh Liên kết tài khoản.
- Trong phần Tạo tài khoản, hãy chọn Có.
Trong phần Loại liên kết, hãy chọn OAuth và Đăng nhập bằng Google và Ngầm ẩn.
Trong phần Thông tin khách hàng, hãy làm như sau:
- Gán một giá trị cho Mã ứng dụng khách do Actions to Google để xác định các yêu cầu đến từ Google.
- Chèn URL cho điểm cuối Uỷ quyền và Trao đổi mã thông báo.
Nhấp vào Lưu.
Triển khai máy chủ OAuth
Để hỗ trợ quy trình ngầm ẩn OAuth 2.0, dịch vụ của bạn sẽ tạo một yêu cầu uỷ quyền điểm cuối được cung cấp bởi HTTPS. Điểm cuối này chịu trách nhiệm xác thực và có được sự đồng ý của người dùng về việc truy cập dữ liệu. Điểm cuối uỷ quyền biểu thị giao diện người dùng đăng nhập cho những người dùng chưa đăng nhập và ghi lại đồng ý với quyền truy cập được yêu cầu.
Khi Hành động của bạn cần gọi một trong những API được uỷ quyền của dịch vụ, Google sẽ sử dụng điểm cuối này để yêu cầu người dùng cho phép gọi các API này trên thay mặt cho bạn.
Một phiên luồng quy trình ngầm ẩn OAuth 2.0 điển hình do Google khởi tạo có quy trình sau:
- Google sẽ mở điểm cuối uỷ quyền của bạn trong trình duyệt của người dùng. Chiến lược phát hành đĩa đơn người dùng đăng nhập nếu họ chưa đăng nhập và cấp cho Google quyền truy cập dữ liệu của họ cùng với API của bạn nếu họ chưa cấp quyền.
- Dịch vụ của bạn sẽ tạo mã truy cập rồi trả lại cho Google bằng cách chuyển hướng trình duyệt của người dùng trở lại Google bằng mã truy cập được đính kèm vào yêu cầu.
- Google gọi các API của dịch vụ và đính kèm mã truy cập bằng từng yêu cầu. Dịch vụ của bạn xác minh rằng mã truy cập cấp cho Google uỷ quyền truy cập API, sau đó hoàn tất lệnh gọi API.
Xử lý yêu cầu uỷ quyền
Khi Hành động của bạn cần thực hiện việc liên kết tài khoản thông qua luồng ngầm ẩn OAuth2, Google đưa người dùng đến điểm cuối uỷ quyền của bạn kèm theo một yêu cầu bao gồm các thông số sau:
| Tham số điểm cuối ủy quyền | |
|---|---|
client_id |
Mã ứng dụng khách mà bạn đã chỉ định cho Google. |
redirect_uri |
URL mà bạn gửi phản hồi tới yêu cầu này. |
state |
Giá trị sổ sách được chuyển lại cho Google không thay đổi trong URI chuyển hướng. |
response_type |
Loại giá trị cần trả về trong phản hồi. Đối với OAuth 2.0 ngầm ẩn
luồng, loại phản hồi luôn là token. |
Ví dụ: nếu điểm cuối uỷ quyền của bạn có tại https://myservice.example.com/auth,
một yêu cầu có thể có dạng như sau:
GET https://myservice.example.com/auth?client_id=GOOGLE_CLIENT_ID&redirect_uri=REDIRECT_URI&state=STATE_STRING&response_type=token
Để điểm cuối uỷ quyền của bạn có thể xử lý các yêu cầu đăng nhập, hãy làm theo các bước sau:
Xác minh các giá trị
client_idvàredirect_uriđể ngăn việc cấp quyền truy cập vào các ứng dụng khách ngoài ý muốn hoặc bị định cấu hình sai:- Xác nhận rằng
client_idkhớp với mã ứng dụng khách mà bạn được chỉ định cho Google. - Xác nhận rằng URL do
redirect_urichỉ định thông số đó có dạng như sau:https://oauth-redirect.googleusercontent.com/r/YOUR_PROJECT_ID
- Xác nhận rằng
Kiểm tra xem người dùng đã đăng nhập vào dịch vụ của bạn chưa. Nếu người dùng chưa ký hãy hoàn tất quy trình đăng nhập hoặc đăng ký dịch vụ của bạn.
Tạo mã truy cập mà Google sẽ dùng để truy cập vào API của bạn. Chiến lược phát hành đĩa đơn mã truy cập có thể là bất kỳ giá trị chuỗi nào, nhưng mã này phải thể hiện duy nhất người dùng và máy khách của mã thông báo đó và không được phép đoán.
Gửi phản hồi HTTP chuyển hướng trình duyệt của người dùng đến URL do tham số
redirect_urichỉ định. Bao gồm tất cả các tham số sau trong phân đoạn URL:access_token: mã truy cập bạn vừa tạotoken_type: chuỗibearerstate: giá trị trạng thái chưa được sửa đổi so với giá trị gốc yêu cầu Sau đây là ví dụ về URL kết quả:https://oauth-redirect.googleusercontent.com/r/YOUR_PROJECT_ID#access_token=ACCESS_TOKEN&token_type=bearer&state=STATE_STRING
Trình xử lý chuyển hướng OAuth 2.0 của Google sẽ nhận mã truy cập và xác nhận
rằng giá trị state không thay đổi. Sau khi Google có được
mã truy cập của dịch vụ của bạn, Google sẽ đính kèm mã này vào các lệnh gọi tiếp theo
đối với Hành động của bạn trong AppRequest.
Xử lý hoạt động liên kết tự động
Sau khi người dùng đồng ý cho Hành động của bạn truy cập vào hồ sơ của họ trên Google, Google gửi yêu cầu có chứa xác nhận có chữ ký về danh tính của người dùng Google. Xác nhận chứa thông tin bao gồm ID Tài khoản Google của người dùng, tên, và địa chỉ email. Điểm cuối trao đổi mã thông báo được định cấu hình cho các trình xử lý dự án của bạn yêu cầu đó.
Nếu đã có Tài khoản Google tương ứng trong hệ thống xác thực,
điểm cuối trao đổi mã thông báo sẽ trả về một mã thông báo cho người dùng. Nếu Tài khoản Google không
khớp với một người dùng hiện tại, thì điểm cuối trao đổi mã thông báo của bạn sẽ trả về lỗi user_not_found.
Yêu cầu có biểu mẫu sau:
POST /token HTTP/1.1
Host: oauth2.example.com
Content-Type: application/x-www-form-urlencoded

grant_type=urn:ietf:params:oauth:grant-type:jwt-bearer&intent=get&assertion=JWT&consent_code=CONSENT_CODE&scope=SCOPES
Điểm cuối trao đổi mã thông báo của bạn phải có khả năng xử lý các tham số sau:
| Tham số điểm cuối của mã thông báo | |
|---|---|
grant_type |
Loại mã thông báo đang được trao đổi. Đối với các yêu cầu này,
tham số có giá trị urn:ietf:params:oauth:grant-type:jwt-bearer. |
intent |
Đối với các yêu cầu này, giá trị của tham số này là "get". |
assertion |
Mã thông báo web JSON (JWT) cung cấp xác nhận có chữ ký của Google danh tính của người dùng. JWT chứa thông tin bao gồm Mã tài khoản, tên và địa chỉ email. |
consent_code |
Không bắt buộc: Nếu có, mã dùng một lần cho biết rằng người dùng đã đồng ý cho phép Hành động của bạn truy cập vào các phạm vi được chỉ định. |
scope |
Không bắt buộc: Mọi phạm vi mà bạn đã thiết lập để Google yêu cầu người dùng cung cấp. |
Khi nhận được yêu cầu liên kết, điểm cuối trao đổi mã thông báo của bạn sẽ thực hiện sau:
Xác thực và giải mã câu nhận định JWT
Bạn có thể xác thực và giải mã câu nhận định JWT bằng cách sử dụng thư viện giải mã JWT cho ngôn ngữ của mình. Sử dụng khoá công khai của Google (có trong JWK hoặc định dạng PEM để xác minh mã thông báo của bạn.
Khi được giải mã, câu nhận định JWT sẽ có dạng như ví dụ sau:
{
  "sub": 1234567890,        // The unique ID of the user's Google Account
  "iss": "https://accounts.google.com",        // The assertion's issuer
  "aud": "123-abc.apps.googleusercontent.com", // Your server's client ID
  "iat": 233366400,         // Unix timestamp of the assertion's creation time
  "exp": 233370000,         // Unix timestamp of the assertion's expiration time
  "name": "Jan Jansen",
  "given_name": "Jan",
  "family_name": "Jansen",
  "email": "jan@gmail.com", // If present, the user's email address
  "locale": "en_US"
}
Ngoài việc xác minh chữ ký của mã thông báo, hãy xác minh rằng nhà phát hành xác nhận
(trường iss) là https://accounts.google.com và đối tượng (trường aud)
là mã ứng dụng khách được chỉ định cho Hành động của bạn.
Kiểm tra xem Tài khoản Google đã có trong hệ thống xác thực của bạn hay chưa
Kiểm tra xem một trong các điều kiện sau có đúng hay không:
- Mã Tài khoản Google (trong trường
subcủa câu nhận định) có trong cơ sở dữ liệu người dùng của bạn. - Địa chỉ email trong câu nhận định khớp với một người dùng trong cơ sở dữ liệu người dùng của bạn.
Nếu một trong hai điều kiện đều đúng thì người dùng đã đăng ký và bạn có thể đưa ra mã truy cập.
Nếu cả mã Tài khoản Google và địa chỉ email được chỉ định trong câu nhận định đều không
khớp với người dùng trong cơ sở dữ liệu của bạn mà người dùng đó chưa đăng ký. Trong trường hợp này,
điểm cuối trao đổi mã thông báo sẽ phản hồi bằng lỗi HTTP 401, trong đó chỉ định error=user_not_found,
như trong ví dụ sau:
HTTP/1.1 401 Unauthorized
Content-Type: application/json;charset=UTF-8

{
  "error":"user_not_found",
}
user_not_found, Google
gọi điểm cuối trao đổi mã thông báo bằng giá trị của tham số intent
đặt để tạo và gửi mã thông báo ID chứa thông tin hồ sơ của người dùng
với yêu cầu.
Xử lý việc tạo tài khoản thông qua tính năng Đăng nhập bằng Google
Khi người dùng cần tạo một tài khoản trên dịch vụ của bạn, Google sẽ tạo một
đến điểm cuối trao đổi mã thông báo của bạn để chỉ định
intent=create, như trong ví dụ sau:
POST /token HTTP/1.1
Host: oauth2.example.com
Content-Type: application/x-www-form-urlencoded

response_type=token&grant_type=urn:ietf:params:oauth:grant-type:jwt-bearer&scope=SCOPES&intent=create&consent_code=CONSENT_CODE&assertion=JWT[&NEW_ACCOUNT_INFO]
Tham số assertion chứa Mã thông báo web JSON (JWT) cung cấp
xác nhận có chữ ký về danh tính của người dùng Google. JWT chứa thông tin
bao gồm mã Tài khoản Google, tên và địa chỉ email của người dùng mà bạn có thể sử dụng
để tạo một tài khoản mới trên dịch vụ của bạn.
Để phản hồi các yêu cầu tạo tài khoản, điểm cuối trao đổi mã thông báo của bạn phải như sau:
Xác thực và giải mã câu nhận định JWT
Bạn có thể xác thực và giải mã câu nhận định JWT bằng cách sử dụng thư viện giải mã JWT cho ngôn ngữ của mình. Sử dụng khoá công khai của Google (có trong JWK hoặc định dạng PEM để xác minh mã thông báo của bạn.
Khi được giải mã, câu nhận định JWT sẽ có dạng như ví dụ sau:
{
  "sub": 1234567890,        // The unique ID of the user's Google Account
  "iss": "https://accounts.google.com",        // The assertion's issuer
  "aud": "123-abc.apps.googleusercontent.com", // Your server's client ID
  "iat": 233366400,         // Unix timestamp of the assertion's creation time
  "exp": 233370000,         // Unix timestamp of the assertion's expiration time
  "name": "Jan Jansen",
  "given_name": "Jan",
  "family_name": "Jansen",
  "email": "jan@gmail.com", // If present, the user's email address
  "locale": "en_US"
}
Ngoài việc xác minh chữ ký của mã thông báo, hãy xác minh rằng nhà phát hành xác nhận
(trường iss) là https://accounts.google.com và đối tượng (trường aud)
là mã ứng dụng khách được chỉ định cho Hành động của bạn.
Xác thực thông tin người dùng và tạo tài khoản mới
Kiểm tra xem một trong các điều kiện sau có đúng hay không:
- Mã Tài khoản Google (trong trường
subcủa câu nhận định) có trong cơ sở dữ liệu người dùng của bạn. - Địa chỉ email trong câu nhận định khớp với một người dùng trong cơ sở dữ liệu người dùng của bạn.
Nếu một trong hai điều kiện đúng, hãy nhắc người dùng liên kết tài khoản hiện có của họ với
Tài khoản Google của họ bằng cách phản hồi yêu cầu
với lỗi HTTP 401, trong đó chỉ định
error=linking_error và địa chỉ email của người dùng là login_hint, như trong
ví dụ sau:
HTTP/1.1 401 Unauthorized
Content-Type: application/json;charset=UTF-8

{
  "error":"linking_error",
  "login_hint":"foo@bar.com"
}
Nếu không có điều kiện nào đúng, hãy tạo một tài khoản người dùng mới bằng thông tin này được cung cấp trong JWT. Các tài khoản mới thường chưa đặt mật khẩu. Đó là bạn nên thêm tính năng Đăng nhập bằng Google vào các nền tảng khác để người dùng có thể đăng nhập trong thông qua Google trên các nền tảng của ứng dụng. Ngoài ra, bạn có thể gửi cho người dùng một đường liên kết bắt đầu quy trình khôi phục mật khẩu để cho phép người dùng thiết lập mật khẩu để đăng nhập trên các nền tảng khác.
Khi quá trình tạo hoàn tất, hãy cấp một mã truy cập rồi trả về các giá trị trong đối tượng JSON trong nội dung của phản hồi HTTPS, như trong ví dụ sau:
{
  "token_type": "Bearer",
  "access_token": "ACCESS_TOKEN",

  "expires_in": SECONDS_TO_EXPIRATION
}
Bắt đầu quy trình xác thực
Sử dụng ý định trợ giúp Đăng nhập vào tài khoản để bắt đầu quy trình xác thực.
const app = dialogflow({
  // REPLACE THE PLACEHOLDER WITH THE CLIENT_ID OF YOUR ACTIONS PROJECT
  clientId: CLIENT_ID,
})

// Intent that starts the account linking flow.
app.intent('Start Signin', conv => {
  conv.ask(new SignIn('To get your account details'))
})
private String clientId = "<your_client_id>";

@ForIntent("Start Signin")
public ActionResponse text(ActionRequest request) {
  ResponseBuilder rb = getResponseBuilder(request);
  return rb.add(new SignIn().setContext("To get your account details")).build();
}
const app = actionssdk({
  clientId: CLIENT_ID,
})

app.intent('Start Signin', conv => {
  conv.ask(new SignIn('To get your account details'))
})
private String clientId = "<your_client_id>";

@ForIntent("actions.intent.TEXT")
public ActionResponse text(ActionRequest request) {
  ResponseBuilder rb = getResponseBuilder(request);
  return rb.add(new SignIn().setContext("To get your account details")).build();
}
Xử lý các yêu cầu về quyền truy cập dữ liệu
Nếu yêu cầu của Trợ lý chứa mã truy cập, trước tiên, hãy kiểm tra để đảm bảo mã truy cập là hợp lệ và chưa hết hạn, sau đó truy xuất mã này từ cơ sở dữ liệu tài khoản người dùng mà tài khoản người dùng được liên kết với mã thông báo.