
نوع پیوند OAuth و Google Sign-In، Google Sign-In را به پیوند حساب مبتنی بر OAuth اضافه می کند. این پیوند بدون درز مبتنی بر صدا را برای کاربران Google فراهم میکند و همچنین پیوند حساب را برای کاربرانی که با هویت غیر Google در سرویس شما ثبتنام کردهاند، امکانپذیر میکند.
این نوع پیوند با Google Sign-In شروع می شود، که به شما امکان می دهد بررسی کنید که آیا اطلاعات نمایه Google کاربر در سیستم شما وجود دارد یا خیر. اگر اطلاعات کاربر در سیستم شما یافت نشد، یک جریان استاندارد OAuth شروع می شود. کاربر همچنین می تواند انتخاب کند که یک حساب کاربری جدید با اطلاعات نمایه Google خود ایجاد کند.
برای انجام پیوند حساب با OAuth و Google Sign-In، این مراحل کلی را دنبال کنید:
- ابتدا از کاربر بخواهید که رضایت خود را برای دسترسی به نمایه Google خود اعلام کند.
- از اطلاعات موجود در پروفایل خود برای شناسایی کاربر استفاده کنید.
- اگر نتوانستید مطابق با کاربر Google در سیستم احراز هویت خود پیدا کنید، جریان بسته به اینکه پروژه Actions خود را در کنسول Actions پیکربندی کرده باشید تا اجازه ایجاد حساب کاربری از طریق صدا یا فقط در وب سایت خود را بدهد، ادامه می یابد.
- اگر اجازه ایجاد حساب از طریق صدا را میدهید، رمز شناسه دریافتی از Google را تأیید کنید. سپس می توانید یک کاربر بر اساس اطلاعات نمایه موجود در رمز شناسه ایجاد کنید.
- اگر اجازه ایجاد حساب از طریق صدا را ندهید، کاربر به مرورگری منتقل میشود تا بتواند صفحه مجوز شما را بارگیری کند و جریان ایجاد کاربر را تکمیل کند.
از ایجاد حساب کاربری از طریق صدا پشتیبانی کنید
اگر اجازه ایجاد حساب کاربری از طریق صدا را بدهید، دستیار از کاربر میپرسد که آیا میخواهد کارهای زیر را انجام دهد:
- یک حساب کاربری جدید در سیستم خود با استفاده از اطلاعات حساب Google آنها ایجاد کنید، یا
- اگر آنها یک حساب غیر Google موجود دارند، با حساب دیگری وارد سیستم احراز هویت خود شوید.
اگر میخواهید اصطکاک جریان ایجاد حساب را به حداقل برسانید، اجازه ایجاد حساب از طریق صدا توصیه میشود. کاربر فقط در صورتی باید جریان صدا را ترک کند که بخواهد با استفاده از یک حساب موجود غیر Google وارد سیستم شود.
ایجاد حساب از طریق صدا را ممنوع کنید
اگر ایجاد حساب کاربری از طریق صدا را ممنوع کرده باشید، «دستیار» URL را به وبسایتی که برای احراز هویت کاربر ارائه کردهاید باز میکند. اگر تعامل در دستگاهی انجام میشود که صفحهنمایش ندارد، «دستیار» کاربر را به تلفنی هدایت میکند تا جریان پیوند حساب را ادامه دهد.
عدم اجازه ایجاد توصیه می شود اگر:
شما نمیخواهید به کاربرانی که دارای حسابهای غیر Google هستند اجازه ایجاد یک حساب کاربری جدید بدهید و میخواهید در عوض به حسابهای کاربری موجود خود در سیستم احراز هویت شما پیوند دهند. برای مثال، اگر یک برنامه وفاداری ارائه میدهید، ممکن است بخواهید مطمئن شوید که کاربر امتیازهای جمعشده در حساب موجود خود را از دست نمیدهد.
شما باید کنترل کامل جریان ایجاد حساب را داشته باشید. به عنوان مثال، اگر نیاز دارید شرایط خدمات خود را در حین ایجاد حساب به کاربر نشان دهید، می توانید ایجاد را ممنوع کنید.
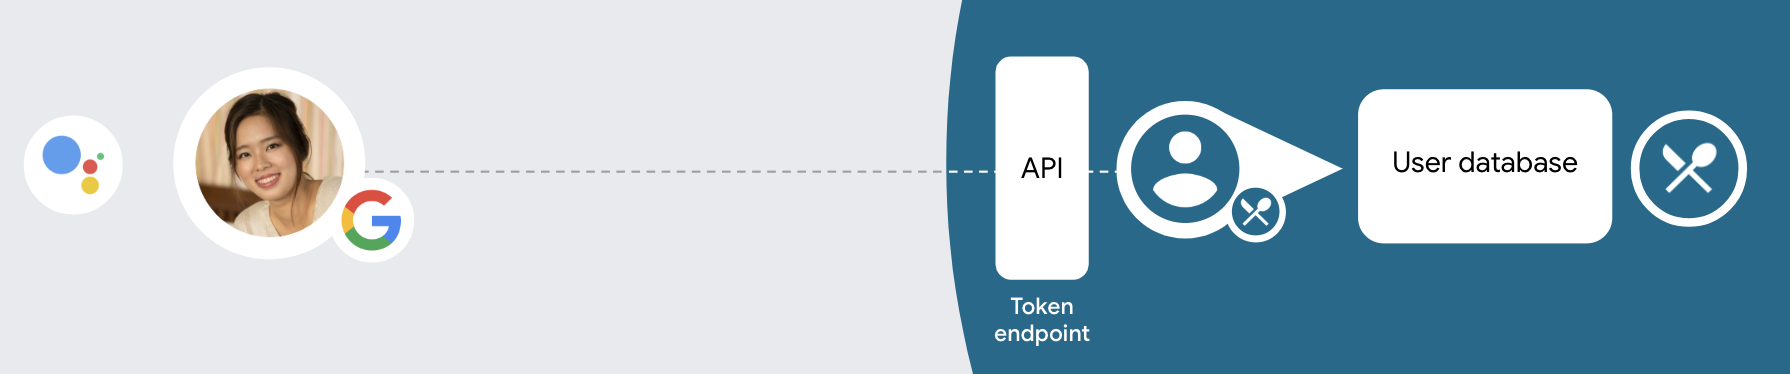
پیوند حساب OAuth و Google Sign-In را پیاده سازی کنید
حسابها با جریانهای استاندارد صنعتی OAuth 2.0 مرتبط هستند. Actions on Google از جریان کد ضمنی و مجوز پشتیبانی می کند.
در جریان کد ضمنی، Google نقطه پایانی مجوز شما را در مرورگر کاربر باز میکند. پس از ورود موفقیت آمیز به سیستم، یک توکن دسترسی طولانی مدت به Google برمی گردانید. این نشانه دسترسی اکنون در هر درخواست ارسال شده از دستیار به Action شما گنجانده شده است.
در جریان کد مجوز، به دو نقطه پایانی نیاز دارید:
- نقطه پایانی مجوز ، که مسئول ارائه رابط کاربری ورود به سیستم به کاربرانی است که قبلاً وارد سیستم نشدهاند و رضایت دسترسی درخواستی را در قالب یک کد مجوز کوتاه مدت ثبت میکند.
- نقطه پایانی تبادل توکن ، که مسئول دو نوع مبادله است:
- یک کد مجوز را برای یک نشانه رفرش طولانی مدت و یک رمز دسترسی کوتاه مدت مبادله می کند. این تبادل زمانی اتفاق میافتد که کاربر از جریان پیوند حساب عبور کند.
- یک نشانه رفرش طولانی مدت را با یک توکن دسترسی کوتاه مدت مبادله می کند. این مبادله زمانی اتفاق میافتد که گوگل به یک توکن دسترسی جدید نیاز دارد، زیرا رمز دسترسی منقضی شده است.
اگرچه اجرای جریان کد ضمنی سادهتر است، اما گوگل توصیه میکند که توکنهای دسترسی صادر شده با استفاده از جریان ضمنی هرگز منقضی نمیشوند، زیرا استفاده از انقضای رمز با جریان ضمنی کاربر را مجبور میکند تا حساب خود را دوباره پیوند دهد. اگر به دلایل امنیتی نیاز به انقضای توکن دارید، باید قویاً از جریان کد تأیید استفاده کنید.
پروژه را پیکربندی کنید
برای پیکربندی پروژه خود برای استفاده از پیوند حساب OAuth و Google Sign-In، این مراحل را دنبال کنید:
- کنسول Actions را باز کنید و پروژه ای را که می خواهید استفاده کنید انتخاب کنید.
- روی تب Develop کلیک کنید و Account linking را انتخاب کنید.
- سوئیچ کنار Account linking را فعال کنید.
- در بخش ایجاد حساب ، بله را انتخاب کنید.
در نوع پیوند ، OAuth & Google Sign In و Implicit را انتخاب کنید.
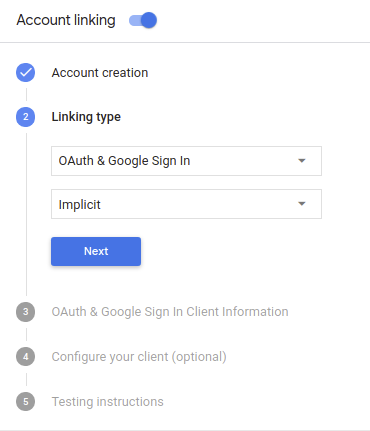
در اطلاعات مشتری ، موارد زیر را انجام دهید:
- یک مقدار به Client ID صادر شده توسط Actions شما به Google اختصاص دهید تا درخواستهای ارسالی از Google را شناسایی کنید.
- آدرسهای اینترنتی را برای نقاط پایانی مجوز و مبادله رمز خود وارد کنید.
روی ذخیره کلیک کنید.
سرور OAuth خود را پیاده سازی کنید
To support the OAuth 2.0 implicit flow, your service makes an authorization endpoint available by HTTPS. This endpoint is responsible for authenticating and obtaining consent from users for data access. The authorization endpoint presents a sign-in UI to your users that aren't already signed in and records consent to the requested access.
When your Action needs to call one of your service's authorized APIs, Google uses this endpoint to get permission from your users to call these APIs on their behalf.
A typical OAuth 2.0 implicit flow session initiated by Google has the following flow:
- Google opens your authorization endpoint in the user's browser. The user signs in if not signed in already, and grants Google permission to access their data with your API if they haven't already granted permission.
- Your service creates an access token and returns it to Google by redirecting the user's browser back to Google with the access token attached to the request.
- Google calls your service's APIs, and attaches the access token with each request. Your service verifies that the access token grants Google authorization to access the API and then completes the API call.
Handle authorization requests
When your Action needs to perform account linking via an OAuth2 implicit flow, Google sends the user to your authorization endpoint with a request that includes the following parameters:
| Authorization endpoint parameters | |
|---|---|
client_id |
The client ID you assigned to Google. |
redirect_uri |
The URL to which you send the response to this request. |
state |
A bookkeeping value that is passed back to Google unchanged in the redirect URI. |
response_type |
The type of value to return in the response. For the OAuth 2.0 implicit
flow, the response type is always token. |
For example, if your authorization endpoint is available at https://myservice.example.com/auth,
a request might look like:
GET https://myservice.example.com/auth?client_id=GOOGLE_CLIENT_ID&redirect_uri=REDIRECT_URI&state=STATE_STRING&response_type=token
For your authorization endpoint to handle sign-in requests, do the following steps:
Verify the
client_idandredirect_urivalues to prevent granting access to unintended or misconfigured client apps:- Confirm that the
client_idmatches the client ID you assigned to Google. - Confirm that the URL specified by the
redirect_uriparameter has the following form:https://oauth-redirect.googleusercontent.com/r/YOUR_PROJECT_ID
- Confirm that the
Check if the user is signed in to your service. If the user isn't signed in, complete your service's sign-in or sign-up flow.
Generate an access token that Google will use to access your API. The access token can be any string value, but it must uniquely represent the user and the client the token is for and must not be guessable.
Send an HTTP response that redirects the user's browser to the URL specified by the
redirect_uriparameter. Include all of the following parameters in the URL fragment:access_token: the access token you just generatedtoken_type: the stringbearerstate: the unmodified state value from the original request The following is an example of the resulting URL:https://oauth-redirect.googleusercontent.com/r/YOUR_PROJECT_ID#access_token=ACCESS_TOKEN&token_type=bearer&state=STATE_STRING
Google's OAuth 2.0 redirect handler will receive the access token and confirm
that the state value hasn't changed. After Google has obtained an
access token for your service, Google will attach the token to subsequent calls
to your Action as part of the AppRequest.
Handle automatic linking
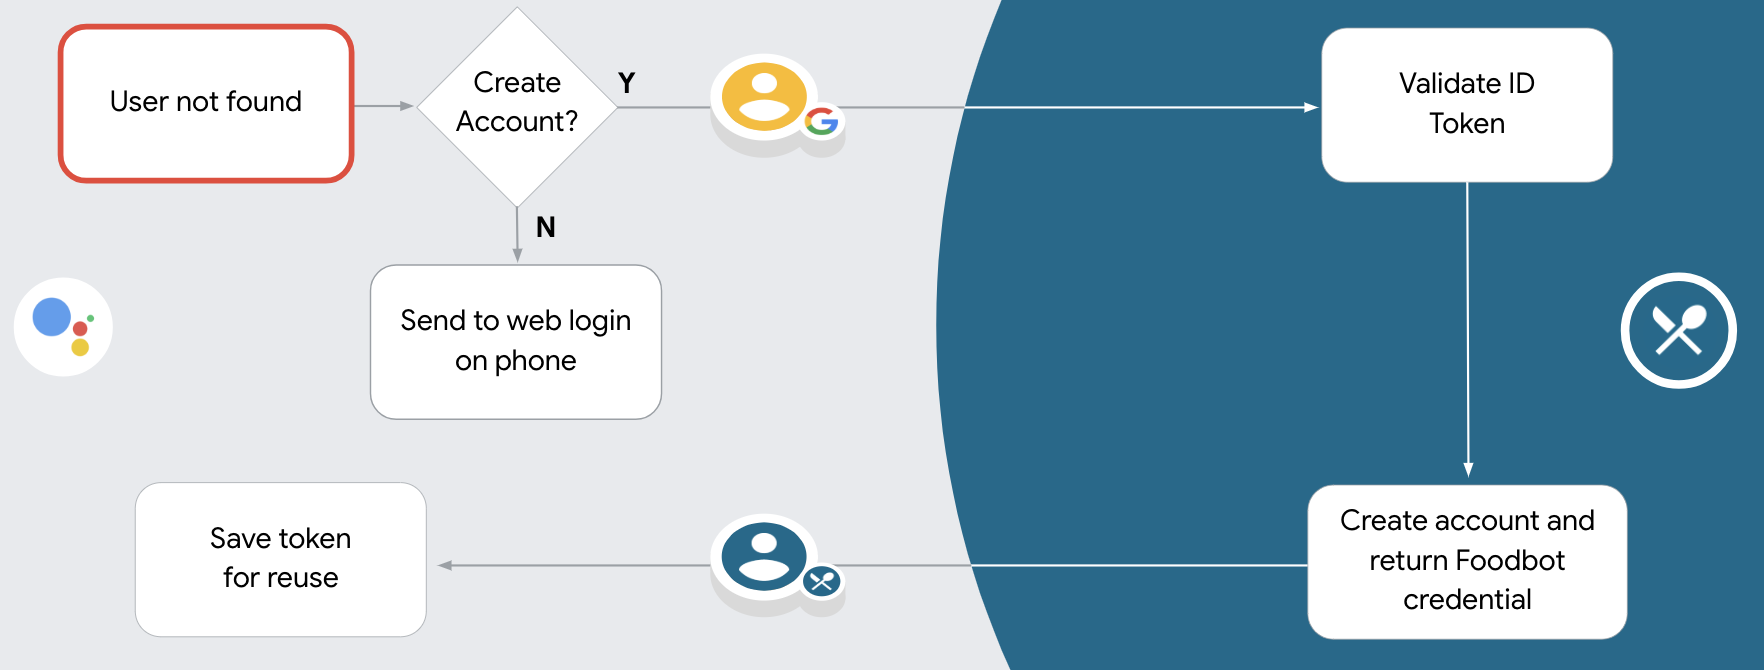
After the user gives your Action consent to access their Google profile, Google sends a request that contains a signed assertion of the Google user's identity. The assertion contains information that includes the user's Google Account ID, name, and email address. The token exchange endpoint configured for your project handles that request.
If the corresponding Google account is already present in your authentication system,
your token exchange endpoint returns a token for the user. If the Google account doesn't
match an existing user, your token exchange endpoint returns a user_not_found error.
The request has the following form:
POST /token HTTP/1.1
Host: oauth2.example.com
Content-Type: application/x-www-form-urlencoded

grant_type=urn:ietf:params:oauth:grant-type:jwt-bearer&intent=get&assertion=JWT&consent_code=CONSENT_CODE&scope=SCOPES
Your token exchange endpoint must be able to handle the following parameters:
| Token endpoint parameters | |
|---|---|
grant_type |
The type of token being exchanged. For these requests, this
parameter has the value urn:ietf:params:oauth:grant-type:jwt-bearer. |
intent |
For these requests, the value of this parameter is `get`. |
assertion |
A JSON Web Token (JWT) that provides a signed assertion of the Google user's identity. The JWT contains information that includes the user's Google Account ID, name, and email address. |
consent_code |
Optional: When present, a one-time code that indicates that the user has granted consent for your Action to access the specified scopes. |
scope |
Optional: Any scopes you configured Google to request from users. |
When your token exchange endpoint receives the linking request, it should do the following:
Validate and decode the JWT assertion
You can validate and decode the JWT assertion by using a JWT-decoding library for your language. Use Google's public keys (available in JWK or PEM format) to verify the token's signature.
When decoded, the JWT assertion looks like the following example:
{
  "sub": 1234567890,        // The unique ID of the user's Google Account
  "iss": "https://accounts.google.com",        // The assertion's issuer
  "aud": "123-abc.apps.googleusercontent.com", // Your server's client ID
  "iat": 233366400,         // Unix timestamp of the assertion's creation time
  "exp": 233370000,         // Unix timestamp of the assertion's expiration time
  "name": "Jan Jansen",
  "given_name": "Jan",
  "family_name": "Jansen",
  "email": "jan@gmail.com", // If present, the user's email address
  "locale": "en_US"
}
In addition to verifying the token's signature, verify that the assertion's issuer
(iss field) is https://accounts.google.com and that the audience (aud field)
is the client ID assigned to your Action.
Check if the Google account is already present in your authentication system
Check whether either of the following conditions are true:
- The Google Account ID, found in the assertion's
subfield, is in your user database. - The email address in the assertion matches a user in your user database.
If either condition is true, the user has already signed up and you can issue an access token.
If neither the Google Account ID nor the email address specified in the assertion
matches a user in your database, the user hasn't signed up yet. In this case, your
token exchange endpoint should reply with a HTTP 401 error, that specifies error=user_not_found,
as in the following example:
HTTP/1.1 401 Unauthorized
Content-Type: application/json;charset=UTF-8

{
  "error":"user_not_found",
}
user_not_found error, Google
calls your token exchange endpoint with the value of the intent parameter
set to create and sending an ID token that contains the user's profile information
with the request.
Handle account creation via Google Sign-In
When a user needs to create an account on your service, Google makes a
request to your token exchange endpoint that specifies
intent=create, as in the following example:
POST /token HTTP/1.1
Host: oauth2.example.com
Content-Type: application/x-www-form-urlencoded

response_type=token&grant_type=urn:ietf:params:oauth:grant-type:jwt-bearer&scope=SCOPES&intent=create&consent_code=CONSENT_CODE&assertion=JWT[&NEW_ACCOUNT_INFO]
The assertion parameter contains A JSON Web Token (JWT) that provides
a signed assertion of the Google user's identity. The JWT contains information
that includes the user's Google Account ID, name, and email address, which you can use
to create a new account on your service.
To respond to account creation requests, your token exchange endpoint must do the following:
Validate and decode the JWT assertion
You can validate and decode the JWT assertion by using a JWT-decoding library for your language. Use Google's public keys (available in JWK or PEM format) to verify the token's signature.
When decoded, the JWT assertion looks like the following example:
{
  "sub": 1234567890,        // The unique ID of the user's Google Account
  "iss": "https://accounts.google.com",        // The assertion's issuer
  "aud": "123-abc.apps.googleusercontent.com", // Your server's client ID
  "iat": 233366400,         // Unix timestamp of the assertion's creation time
  "exp": 233370000,         // Unix timestamp of the assertion's expiration time
  "name": "Jan Jansen",
  "given_name": "Jan",
  "family_name": "Jansen",
  "email": "jan@gmail.com", // If present, the user's email address
  "locale": "en_US"
}
In addition to verifying the token's signature, verify that the assertion's issuer
(iss field) is https://accounts.google.com and that the audience (aud field)
is the client ID assigned to your Action.
Validate user information and create new account
Check whether either of the following conditions are true:
- The Google Account ID, found in the assertion's
subfield, is in your user database. - The email address in the assertion matches a user in your user database.
If either condition is true, prompt the user to link their existing account with
their Google Account by responding to the request with an HTTP 401 error, specifying
error=linking_error and the user's email address as the login_hint, as in the
following example:
HTTP/1.1 401 Unauthorized
Content-Type: application/json;charset=UTF-8

{
  "error":"linking_error",
  "login_hint":"foo@bar.com"
}
If neither condition is true, create a new user account using the information provided in the JWT. New accounts do not typically have a password set. It is recommended that you add Google Sign In to other platforms to enable users to log in via Google across the surfaces of your application. Alternatively, you can email the user a link that starts your password recovery flow to allow the user to set a password for signing in on other platforms.
When the creation is completed, issue an access token and return the values in a JSON object in the body of your HTTPS response, like in the following example:
{
  "token_type": "Bearer",
  "access_token": "ACCESS_TOKEN",

  "expires_in": SECONDS_TO_EXPIRATION
}
جریان احراز هویت را شروع کنید
از هدف کمکی ورود به حساب کاربری برای شروع جریان احراز هویت استفاده کنید.
const app = dialogflow({
  // REPLACE THE PLACEHOLDER WITH THE CLIENT_ID OF YOUR ACTIONS PROJECT
  clientId: CLIENT_ID,
})

// Intent that starts the account linking flow.
app.intent('Start Signin', conv => {
  conv.ask(new SignIn('To get your account details'))
})
private String clientId = "<your_client_id>";

@ForIntent("Start Signin")
public ActionResponse text(ActionRequest request) {
  ResponseBuilder rb = getResponseBuilder(request);
  return rb.add(new SignIn().setContext("To get your account details")).build();
}
const app = actionssdk({
  clientId: CLIENT_ID,
})

app.intent('Start Signin', conv => {
  conv.ask(new SignIn('To get your account details'))
})
private String clientId = "<your_client_id>";

@ForIntent("actions.intent.TEXT")
public ActionResponse text(ActionRequest request) {
  ResponseBuilder rb = getResponseBuilder(request);
  return rb.add(new SignIn().setContext("To get your account details")).build();
}
رسیدگی به درخواست های دسترسی به داده ها
اگر درخواست دستیار حاوی یک نشانه دسترسی است ، ابتدا بررسی کنید که رمز دسترسی معتبر است و منقضی نشده است و سپس حساب کاربری مرتبط با رمز را از پایگاه داده حساب کاربری خود بازیابی کنید.