
קישור מסוג OAuth וכניסה באמצעות חשבון Google מוסיף 'כניסה באמצעות חשבון Google' על בסיס פרוטוקול OAuth. קישור חשבונות. כך המשתמשים ב-Google יכולים לבצע קישור קולי פשוט וקל וגם לאפשר קישור חשבונות למשתמשים שנרשמו לשירות באמצעות זהות שאינה של Google.
סוג הקישור הזה מתחיל בכניסה באמצעות חשבון Google, שמאפשרת לבדוק אם חשבון המשתמש קיימים במערכת שלך פרטים מפרופיל Google. אם פרטי המשתמש לא נמצא במערכת, מתחיל תהליך סטנדרטי של OAuth. המשתמש יכול גם לבחור אם ליצור חשבון חדש עם הפרטים מפרופיל Google שלו.
כדי לבצע קישור חשבונות באמצעות OAuth וכניסה באמצעות חשבון Google, יש לפעול לפי ההנחיות הכלליות הבאות שלבים:
- קודם כל, מבקשים מהמשתמש להביע הסכמה לגישה לפרופיל Google שלו.
- משתמשים במידע מהפרופיל שלהם כדי לזהות את המשתמש.
- אם לא מצאתם התאמה למשתמש Google במערכת האימות:
התהליך ממשיך בהתאם לאופן שבו הגדרתם את פרויקט הפעולות
במסוף הפעולות כדי לאפשר יצירת חשבונות משתמשים באמצעות קול או רק
באתר שלך.
- אם מאפשרים יצירת חשבון באמצעות הקול, צריך לאמת את המזהה שהתקבל מ-Google. לאחר מכן אפשר ליצור משתמש על סמך את פרטי הפרופיל שבאסימון המזהה.
- אם לא תאפשרו ליצור חשבונות באמצעות הקול, המשתמש יועבר אל דפדפן שבו ניתן לטעון את דף ההרשאה ולהשלים את תהליך המשתמש בתהליך היצירה.
תמיכה ביצירת חשבון באמצעות הקול
אם מאפשרים יצירה של חשבון משתמש באמצעות הקול, Assistant שואלת את המשתמש אם הוא רוצה לבצע את הפעולות הבאות:
- ליצור חשבון חדש במערכת שלכם באמצעות הפרטים של חשבון Google שלו, או
- להיכנס למערכת האימות באמצעות חשבון אחר, אם יש לו חשבון קיים שאינו של Google.
מומלץ לאפשר יצירת חשבונות באמצעות הקול אם רוצים לצמצם את תהליך יצירת החשבון. המשתמש צריך רק לעזוב את התהליך הקולי אם הם רוצים להיכנס באמצעות חשבון קיים שאינו של Google.
אי אפשר ליצור חשבונות באמצעות פקודות קוליות
אם אישרתם את האפשרות ליצור חשבון משתמש באמצעות הקול, Assistant תפתח את כתובת ה-URL של האתר שסיפקת לצורך אימות משתמשים. אם האינטראקציה מתרחשת במכשיר שאין בו מסך, Assistant מפנה את המשתמש לטלפון כדי להמשיך בתהליך קישור החשבונות.
מומלץ למנוע את האפשרות ליצור אם:
אינך רוצה לאפשר למשתמשים שיש להם חשבונות שאינם של Google ליצור חשבון חדש חשבון משתמש מסוים ואתם רוצים שהם יקושרו לחשבונות המשתמש הקיימים שלהם במערכת האימות. לדוגמה, אם אתם מציעים מועדון לקוחות, כדאי לוודא שהמשתמש לא מאבד את הנקודות שנצברו חשבון קיים.
צריכה להיות לך שליטה מלאה על תהליך יצירת החשבון. לדוגמה, אפשר: לאסור את היצירה אם אתם צריכים להציג למשתמש את התנאים וההגבלות שלכם במהלך יצירת חשבון.
הטמעת קישור לחשבון OAuth ולכניסה באמצעות חשבון Google
החשבונות מקושרים לתהליכי OAuth 2.0 המקובלים בתחום. ב-Actions on Google יש תמיכה בתהליכים של קוד ההרשאה המרומז.
In the implicit code flow, Google opens your authorization endpoint in the user's browser. After successful sign in, you return a long-lived access token to Google. This access token is now included in every request sent from the Assistant to your Action.
In the authorization code flow, you need two endpoints:
- The authorization endpoint, which is responsible for presenting the sign-in UI to your users that aren't already signed in and recording consent to the requested access in the form of a short-lived authorization code.
- The token exchange endpoint, which is responsible for two types of exchanges:
- Exchanges an authorization code for a long-lived refresh token and a short-lived access token. This exchange happens when the user goes through the account linking flow.
- Exchanges a long-lived refresh token for a short-lived access token. This exchange happens when Google needs a new access token because the one it had expired.
Although the implicit code flow is simpler to implement, Google recommends that access tokens issued using the implicit flow never expire, because using token expiration with the implicit flow forces the user to link their account again. If you need token expiration for security reasons, you should strongly consider using the auth code flow instead.
הגדרת הפרויקט
כדי להגדיר בפרויקט שימוש בחשבון OAuth ובחשבון עם כניסה באמצעות חשבון Google קישור, בצעו את השלבים הבאים:
- פותחים את מסוף הפעולות ובוחרים את הפרויקט שבו רוצים להשתמש.
- לוחצים על הכרטיסייה פיתוח ובוחרים באפשרות קישור חשבונות.
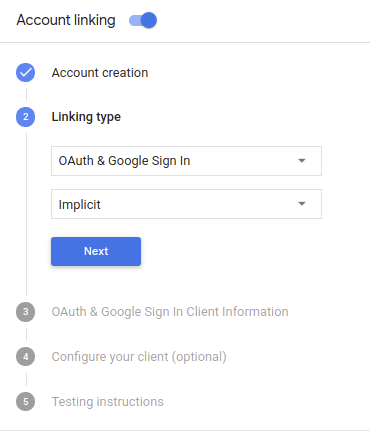
- מפעילים את המתג לצד קישור חשבונות.
- בקטע יצירת חשבון, בוחרים באפשרות כן.
בקטע Linking type (סוג הקישור), בוחרים באפשרות OAuth & כניסה באמצעות חשבון Google ומרומז.
ב-Client Information, מבצעים את הפעולות הבאות:
- מקצים ערך ל-Client-ID שהונפק על ידי הפעולות שלכם ל-Google כדי לזהות בקשות מ-Google.
- מוסיפים את כתובות ה-URL של נקודות הקצה ב-Authorization וב-Token Exchange.
לוחצים על שמירה.
הטמעה של שרת OAuth
To support the OAuth 2.0 implicit flow, your service makes an authorization endpoint available by HTTPS. This endpoint is responsible for authenticating and obtaining consent from users for data access. The authorization endpoint presents a sign-in UI to your users that aren't already signed in and records consent to the requested access.
When your Action needs to call one of your service's authorized APIs, Google uses this endpoint to get permission from your users to call these APIs on their behalf.
A typical OAuth 2.0 implicit flow session initiated by Google has the following flow:
- Google opens your authorization endpoint in the user's browser. The user signs in if not signed in already, and grants Google permission to access their data with your API if they haven't already granted permission.
- Your service creates an access token and returns it to Google by redirecting the user's browser back to Google with the access token attached to the request.
- Google calls your service's APIs, and attaches the access token with each request. Your service verifies that the access token grants Google authorization to access the API and then completes the API call.
Handle authorization requests
When your Action needs to perform account linking via an OAuth2 implicit flow, Google sends the user to your authorization endpoint with a request that includes the following parameters:
| Authorization endpoint parameters | |
|---|---|
client_id |
The client ID you assigned to Google. |
redirect_uri |
The URL to which you send the response to this request. |
state |
A bookkeeping value that is passed back to Google unchanged in the redirect URI. |
response_type |
The type of value to return in the response. For the OAuth 2.0 implicit
flow, the response type is always token. |
For example, if your authorization endpoint is available at https://myservice.example.com/auth,
a request might look like:
GET https://myservice.example.com/auth?client_id=GOOGLE_CLIENT_ID&redirect_uri=REDIRECT_URI&state=STATE_STRING&response_type=token
For your authorization endpoint to handle sign-in requests, do the following steps:
Verify the
client_idandredirect_urivalues to prevent granting access to unintended or misconfigured client apps:- Confirm that the
client_idmatches the client ID you assigned to Google. - Confirm that the URL specified by the
redirect_uriparameter has the following form:https://oauth-redirect.googleusercontent.com/r/YOUR_PROJECT_ID
- Confirm that the
Check if the user is signed in to your service. If the user isn't signed in, complete your service's sign-in or sign-up flow.
Generate an access token that Google will use to access your API. The access token can be any string value, but it must uniquely represent the user and the client the token is for and must not be guessable.
Send an HTTP response that redirects the user's browser to the URL specified by the
redirect_uriparameter. Include all of the following parameters in the URL fragment:access_token: the access token you just generatedtoken_type: the stringbearerstate: the unmodified state value from the original request The following is an example of the resulting URL:https://oauth-redirect.googleusercontent.com/r/YOUR_PROJECT_ID#access_token=ACCESS_TOKEN&token_type=bearer&state=STATE_STRING
Google's OAuth 2.0 redirect handler will receive the access token and confirm
that the state value hasn't changed. After Google has obtained an
access token for your service, Google will attach the token to subsequent calls
to your Action as part of the AppRequest.
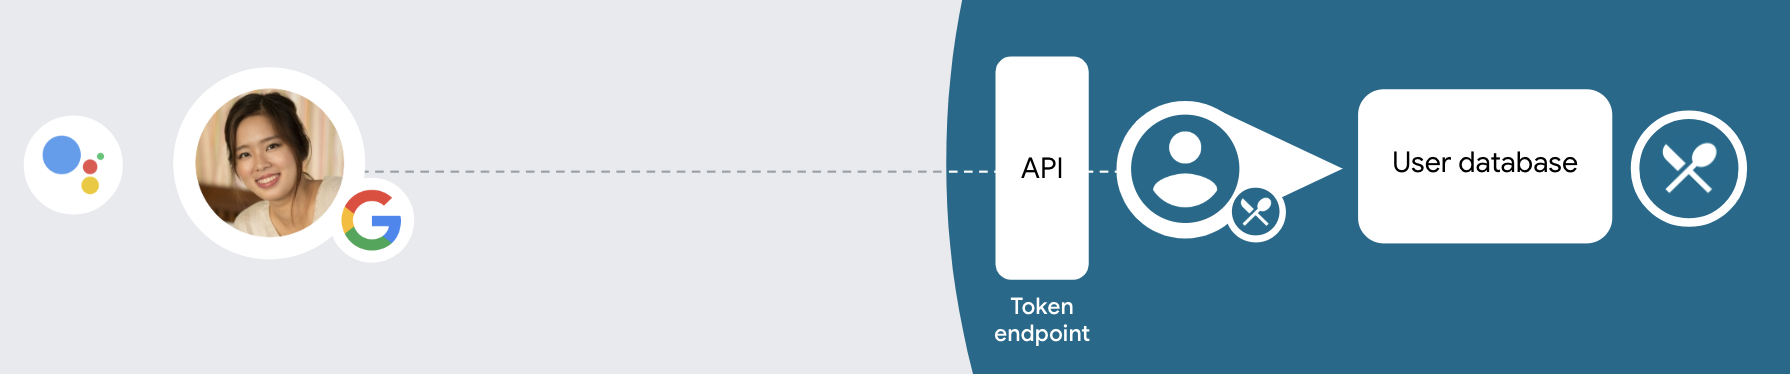
Handle automatic linking
After the user gives your Action consent to access their Google profile, Google sends a request that contains a signed assertion of the Google user's identity. The assertion contains information that includes the user's Google Account ID, name, and email address. The token exchange endpoint configured for your project handles that request.
If the corresponding Google account is already present in your authentication system,
your token exchange endpoint returns a token for the user. If the Google account doesn't
match an existing user, your token exchange endpoint returns a user_not_found error.
The request has the following form:
POST /token HTTP/1.1
Host: oauth2.example.com
Content-Type: application/x-www-form-urlencoded

grant_type=urn:ietf:params:oauth:grant-type:jwt-bearer&intent=get&assertion=JWT&consent_code=CONSENT_CODE&scope=SCOPES
Your token exchange endpoint must be able to handle the following parameters:
| Token endpoint parameters | |
|---|---|
grant_type |
The type of token being exchanged. For these requests, this
parameter has the value urn:ietf:params:oauth:grant-type:jwt-bearer. |
intent |
For these requests, the value of this parameter is `get`. |
assertion |
A JSON Web Token (JWT) that provides a signed assertion of the Google user's identity. The JWT contains information that includes the user's Google Account ID, name, and email address. |
consent_code |
Optional: When present, a one-time code that indicates that the user has granted consent for your Action to access the specified scopes. |
scope |
Optional: Any scopes you configured Google to request from users. |
When your token exchange endpoint receives the linking request, it should do the following:
Validate and decode the JWT assertion
You can validate and decode the JWT assertion by using a JWT-decoding library for your language. Use Google's public keys (available in JWK or PEM format) to verify the token's signature.
When decoded, the JWT assertion looks like the following example:
{
  "sub": 1234567890,        // The unique ID of the user's Google Account
  "iss": "https://accounts.google.com",        // The assertion's issuer
  "aud": "123-abc.apps.googleusercontent.com", // Your server's client ID
  "iat": 233366400,         // Unix timestamp of the assertion's creation time
  "exp": 233370000,         // Unix timestamp of the assertion's expiration time
  "name": "Jan Jansen",
  "given_name": "Jan",
  "family_name": "Jansen",
  "email": "jan@gmail.com", // If present, the user's email address
  "locale": "en_US"
}
In addition to verifying the token's signature, verify that the assertion's issuer
(iss field) is https://accounts.google.com and that the audience (aud field)
is the client ID assigned to your Action.
Check if the Google account is already present in your authentication system
Check whether either of the following conditions are true:
- The Google Account ID, found in the assertion's
subfield, is in your user database. - The email address in the assertion matches a user in your user database.
If either condition is true, the user has already signed up and you can issue an access token.
If neither the Google Account ID nor the email address specified in the assertion
matches a user in your database, the user hasn't signed up yet. In this case, your
token exchange endpoint should reply with a HTTP 401 error, that specifies error=user_not_found,
as in the following example:
HTTP/1.1 401 Unauthorized
Content-Type: application/json;charset=UTF-8

{
  "error":"user_not_found",
}
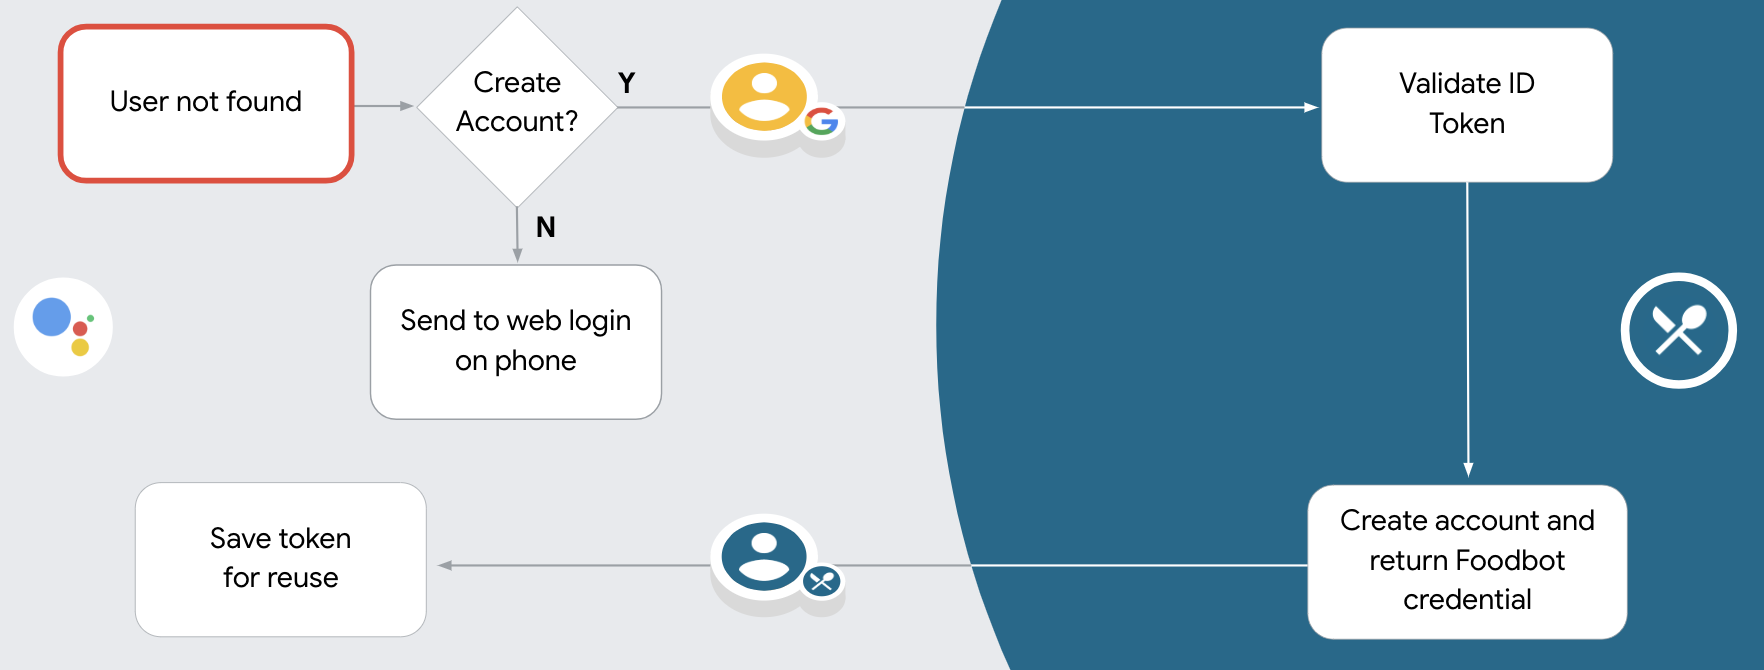
user_not_found error, Google
calls your token exchange endpoint with the value of the intent parameter
set to create and sending an ID token that contains the user's profile information
with the request.
איך מטפלים ביצירת החשבון דרך הכניסה באמצעות חשבון Google
כשמשתמש צריך ליצור חשבון בשירות שלך, Google יוצרת
בקשה לנקודת הקצה של המרת האסימון שמציינת
intent=create, כמו בדוגמה הבאה:
POST /token HTTP/1.1
Host: oauth2.example.com
Content-Type: application/x-www-form-urlencoded

response_type=token&grant_type=urn:ietf:params:oauth:grant-type:jwt-bearer&scope=SCOPES&intent=create&consent_code=CONSENT_CODE&assertion=JWT[&NEW_ACCOUNT_INFO]
הפרמטר assertion מכיל אסימון רשת מבוסס JSON (JWT) שמספק
טענת נכוֹנוּת (assertion) חתומה על זהות המשתמש ב-Google. ה-JWT מכיל מידע
שכוללות את מספר חשבון Google, השם וכתובת האימייל של המשתמש, שבהם אפשר להשתמש
כדי ליצור חשבון חדש בשירות.
כדי להגיב לבקשות ליצירת חשבון, נקודת הקצה (endpoint) של המרת האסימונים חייבת הבאים:
Validate and decode the JWT assertion
You can validate and decode the JWT assertion by using a JWT-decoding library for your language. Use Google's public keys (available in JWK or PEM format) to verify the token's signature.
When decoded, the JWT assertion looks like the following example:
{
  "sub": 1234567890,        // The unique ID of the user's Google Account
  "iss": "https://accounts.google.com",        // The assertion's issuer
  "aud": "123-abc.apps.googleusercontent.com", // Your server's client ID
  "iat": 233366400,         // Unix timestamp of the assertion's creation time
  "exp": 233370000,         // Unix timestamp of the assertion's expiration time
  "name": "Jan Jansen",
  "given_name": "Jan",
  "family_name": "Jansen",
  "email": "jan@gmail.com", // If present, the user's email address
  "locale": "en_US"
}
In addition to verifying the token's signature, verify that the assertion's issuer
(iss field) is https://accounts.google.com and that the audience (aud field)
is the client ID assigned to your Action.
אימות פרטי המשתמש ויצירת חשבון חדש
בודקים אם אחד מהתנאים הבאים מתקיים:
- מספר חשבון Google, שמופיע בשדה
subשל טענת הנכוֹנוּת (assertion), קיים במסד הנתונים של המשתמשים. - כתובת האימייל בטענת הנכונות (assertion) תואמת למשתמש במסד הנתונים של המשתמשים.
אם אחד מהתנאים מתקיים, מבקשים מהמשתמש לקשר את החשבון הקיים עם
לחשבון Google שלהם, על ידי שליחת תגובה לבקשה עם שגיאת HTTP 401, וציון
error=linking_error וכתובת האימייל של המשתמש כ-login_hint, כמו ב-
בדוגמה הבאה:
HTTP/1.1 401 Unauthorized
Content-Type: application/json;charset=UTF-8

{
  "error":"linking_error",
  "login_hint":"foo@bar.com"
}
אם אף אחד מהתנאים לא מתקיים, צריך ליצור חשבון משתמש חדש באמצעות המידע הזה שצוינו ב-JWT. לחשבונות חדשים בדרך כלל לא מוגדרת סיסמה. זה כן מומלץ להוסיף כניסה באמצעות חשבון Google לפלטפורמות אחרות כדי לאפשר למשתמשים להתחבר דרך Google בפלטפורמות השונות של האפליקציה שלכם. לחלופין, אפשר לשלוח למשתמש קישור שמתחיל בתהליך שחזור הסיסמה כדי לאפשר לו להגדיר סיסמה לכניסה בפלטפורמות אחרות.
כשהיצירה הושלמה, צריך להנפיק אסימון גישה ומחזירים את הערכים באובייקט JSON הגוף של תגובת ה-HTTPS, כמו בדוגמה הבאה:
{
  "token_type": "Bearer",
  "access_token": "ACCESS_TOKEN",

  "expires_in": SECONDS_TO_EXPIRATION
}
התחלת תהליך האימות
להשתמש בכוונת העזר לכניסה לחשבון כדי להתחיל את תהליך האימות.
const app = dialogflow({
  // REPLACE THE PLACEHOLDER WITH THE CLIENT_ID OF YOUR ACTIONS PROJECT
  clientId: CLIENT_ID,
})

// Intent that starts the account linking flow.
app.intent('Start Signin', conv => {
  conv.ask(new SignIn('To get your account details'))
})
private String clientId = "<your_client_id>";

@ForIntent("Start Signin")
public ActionResponse text(ActionRequest request) {
  ResponseBuilder rb = getResponseBuilder(request);
  return rb.add(new SignIn().setContext("To get your account details")).build();
}
const app = actionssdk({
  clientId: CLIENT_ID,
})

app.intent('Start Signin', conv => {
  conv.ask(new SignIn('To get your account details'))
})
private String clientId = "<your_client_id>";

@ForIntent("actions.intent.TEXT")
public ActionResponse text(ActionRequest request) {
  ResponseBuilder rb = getResponseBuilder(request);
  return rb.add(new SignIn().setContext("To get your account details")).build();
}
טיפול בבקשות גישה לנתונים
אם הבקשה של Assistant מכילה אסימון גישה, קודם צריך לבדוק שאסימון הגישה בתוקף ושלא פג התוקף שלו, ואז לאחזר מסד נתונים של חשבונות משתמשים, חשבון המשתמש שמשויך לאסימון.