Page Summary
-
The new Android enterprise enrollment flow for custom DPCs uses the Android Management API (AMAPI) SDK and Android Device Policy, shifting away from older Managed Google Play account methods.
-
This new flow streamlines device setup, integrates with Google authentication, and falls back to creating a Managed Google Play account if direct authentication fails.
-
Implementing the new enrollment requires preparing the device environment by updating Google Play and installing Android Device Policy before initiating account setup.
-
The enrollment process involves the EMM creating an enrollment token, the DPC preparing the environment, and then using AMAPI SDK calls to initiate setup and handle user authentication.
-
For new development, using the new enrollment flow is strongly encouraged, while older methods for Managed Google Play accounts are now discouraged except for userless enrollments.
There are two primary user identity types for Android enterprise enrollments: Managed Google Play accounts and Managed Google Accounts. Managed Google Play accounts are device-centric, meaning they aren't tied to a specific user's Google identity. In contrast, Managed Google Accounts are linked to a user's corporate Google identity, which improves the user experience by keeping them logged in on their devices.
Managed Google Play accounts used to be the standard. However, Google now encourages all new development to use the improved enrollment flow, which defaults to creating Managed Google Accounts.
While guidance for the older implementation is provided at the end of this document for context, all new development should follow the new enrollment flow detailed here.
Overview
The improved device enrollment flow streamlines device setup by leveraging several new components and changing how custom Device Policy Controllers (DPCs) are implemented. This new approach requires custom DPC solutions to integrate with the Android Management API (AMAPI) SDK and Android Device Policy to perform device preparation and user enrollment functions.
The AMAPI SDK provides the necessary APIs for interacting with the Android Device Policy on the device itself. On the server side, Enterprise Mobility Management (EMM) solutions will use the Play EMM API to generate the enrollment tokens required to initiate the device enrollment process.
The Android Device Policy application now assumes a central role in handling device-side operations. The AMAPI SDK is used to manage its installation and necessary updates on the device. Android Device Policy also takes over the user authentication flow, handling user authentication directly and providing the user's identity to the EMM. If Google cannot authenticate the user for any reason, a new managed Google Play account is created and added to the device as a fallback.
A key part of this new enrollment flow is managing the device's access to Google services. By default, devices start in a restricted state, and the EMM plays a crucial role in enabling access once the device is compliant.
API Integration
Before getting started, verify that you are using the latest version of the Play EMM API client and the AMAPI SDK.
Enrollment implementation guide
This guide provides the necessary steps for implementing enrollment. It covers preparing the environment, handling different enrollment methods, and managing the device lifecycle.
Prepare environment
Before initiating the account setup, it is necessary to prepare the device
environment. This preparation entails updating the Play Store to its latest
iteration and silently installing the Android Device Policy
(com.google.android.apps.work.clouddpc) onto the device. Android Device Policy
installation is essential as it houses critical components of the Account Setup
process. EMMs need not perform manual environment preparation. Instead, they
should use the
EnvironmentClient,
as documented at and adhere to the provided code examples.
Sample code
Before being able to use the AccountSetup API to add the work account on the device, the DPC must first verify that the device environment is ready.
Use
EnvironmentClientFactoryto instantiate anEnvironmentClientand callprepareEnvironmentorprepareEnvironmentAsyncval notificationReceiverServiceName = ComponentName(context, NotificationReceiver::class.java) // An EMM should implement android.app.admin.DeviceAdminReceiver and use that // class to instantiate a ComponentName val admin = ComponentName(this, com.example.dpc.DeviceAdminReceiver::class.java) EnvironmentClientFactory.create(context) .prepareEnvironment( PrepareEnvironmentRequest.builder() .setRoles( listOf( Role.builder().setRoleType( Role.RoleType.DEVICE_POLICY_CONTROLLER ).build() ) ) .setAdmin(admin) .build(), notificationReceiverServiceName, ) [Proceed with AccountSetup]
This operation could take several seconds or minutes, since applications may be installed or updated to verify a proper working environment. Google recommends starting this process as early as possible in the background and showing appropriate UI while the user waits. When the operation completes, the device is ready for the DPC to use the AccountSetup API.
Enrollment flow
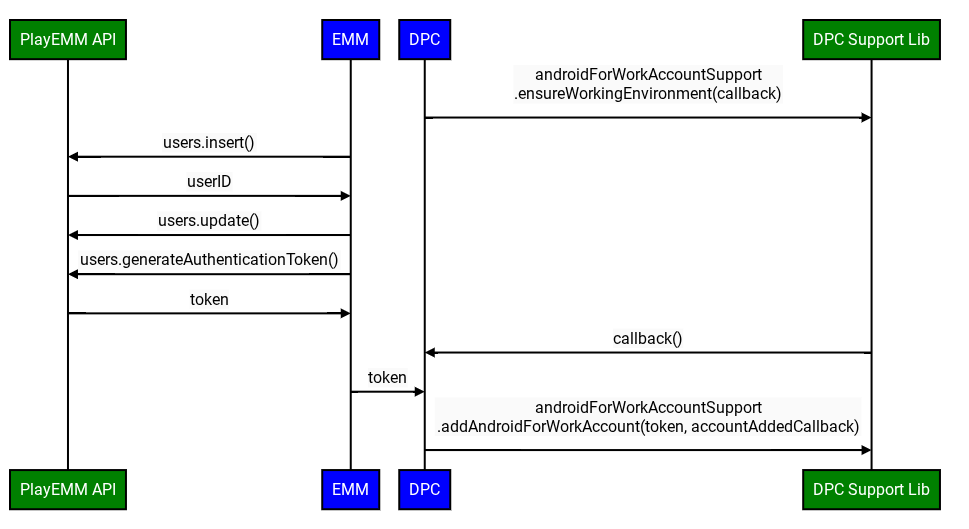
EMMs must discontinue using users.generateAuthenticationToken() and
users.insert() for all devices. Instead, EMMs must call the on-device
API
to perform end-user authentication. The new API will return the userId and
email to the DPC. If Google is not able to authenticate the user, a
Managed Google Play Account will be created and added to the device. In this
case, Google will return the userId of that account.
Google now introduces the use of enrollment tokens, which must be passed to the authentication API. EMMs determine when and how to create the token, and it can be part of an existing enrollment payload (e.g., a QR code or Zero-touch configuration).
However, Google recommends creating the token on demand and replacing the existing API for Managed Google Play Accounts with the new API to minimize the change.
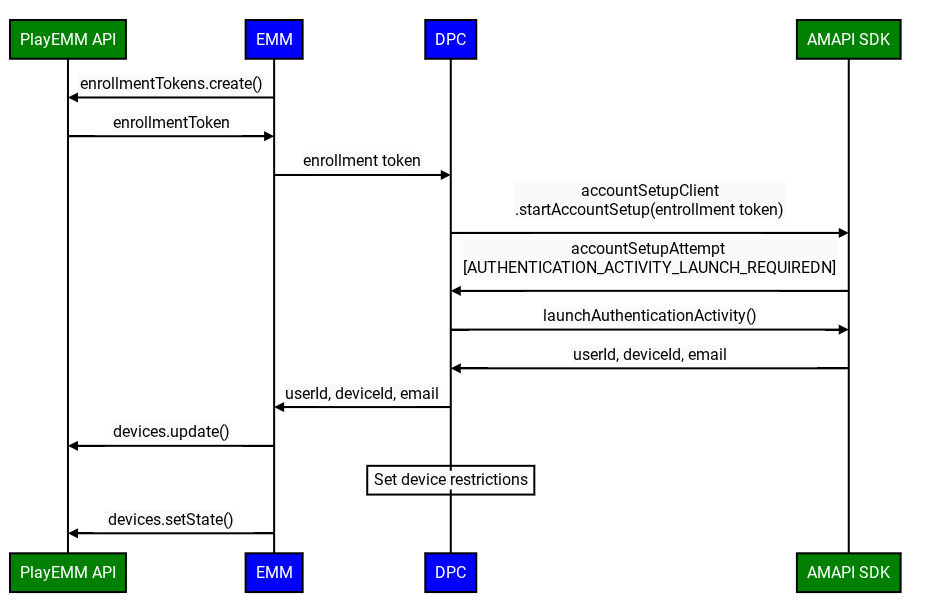
The improved custom DPC enrollment flow involves the following steps:
Important Initial Device State: When enrolling a device with a custom DPC, the Google Account added to the device begins in a disabled state. This means access to Google services, including Google Play, is initially restricted.
This default "disabled" status and the subsequent requirement for the EMM to mark the device as compliant (e.g., by calling Devices.SetState) are specifically applicable under these conditions:
- The organization has verified ownership of their domain with Google.
- The IT admin has explicitly enabled third-party Android mobile management for the user's specific Organizational Unit (OU) within the Google Admin console.
- Create Enrollment Token: The EMM creates an enrollment token using the Play EMM API.
- Prepare Environment: The custom DPC uses the Prepare Environment flow to verify the device is ready for enrollment.
- Initiate Enrollment: The custom DPC invokes the
startAccountSetupAPI in the AMAPI SDK, passing the enrollment token. Note: The DPC must be either device owner or profile owner before calling this API. - Launch Google authentication activity: If required, the custom DPC
invokes the
launchAuthenticationActivityAPI in the AMAPI SDK, passing theAccountSetupAttempt. This starts a Google authentication activity, returning the user to the custom DPC upon successful authentication. The user can also skip this process. In this case, a Managed Google Play account will be added to the device. This option can be configured usinggoogleAuthenticationOptions. - Finalize Enrollment: The AMAPI SDK notifies the custom DPC of the enrollment result.
Enable Google services: Once the custom DPC has fully provisioned the device and confirmed it complies with all enterprise policies, the EMM server must call
Devices.setState()with theaccountStateparameter set to"enabled".- Why this is essential: This API call marks the device as compliant.
- Consequence of not calling: Without this
Devices.setState(setStateRequest)call, the account remains in the "disabled" state. The user will be unable to access Google Play (to install or update apps) and other Google services that require account authentication.
Managing Device State and Service Access
After the initial enrollment, the EMM is responsible for maintaining the device's access to Google services based on its compliance status.
Handling Service Disruptions: BAD_DEVICE_MANAGEMENT
If a device's access to Google services is blocked, Google Play services (GMSCore) will broadcast an Intent with the action: com.google.android.gms.auth.BAD_DEVICE_MANAGEMENT. This can happen for several reasons:
- The EMM never called Devices.setState("enabled") after the initial device enrollment.
- The device no longer complies with EMM policies, and the EMM has not yet re-enabled it.
- The EMM explicitly set the device state to "disabled" by calling Devices.setState() with accountState set to "disabled". This might be due to security concerns, administrative actions, or other reasons.
This Intent includes a status code, such as "ThirdPartyDeviceManagementRequired".
Custom DPCs MUST implement a BroadcastReceiver to listen for this BAD_DEVICE_MANAGEMENT Intent.
Upon receiving this broadcast, the DPC should:
- Re-assess Compliance: Check if the device currently meets all the policies set by the EMM.
- Take Action:
- If Compliant: The DPC should notify the EMM server. The EMM server should then call
Devices.setState()withaccountStateset to"enabled"for the specific user ID and device ID to attempt to restore service access. - If Not Compliant: Once the issues are resolved, and the device is compliant, the EMM should call
Devices.setState().
- If Compliant: The DPC should notify the EMM server. The EMM server should then call
This mechanism ensures that there's a way to detect and recover from situations where a device loses access to Google services.
Enterprise Takeover Considerations
Changes in the organization's account type (e.g., from ManagedGoogleDomainType.TYPE_TEAM to ManagedGoogleDomainType.TYPE_DOMAIN) can occur. While this process doesn't typically break the EMM binding, it can sometimes disrupt Google service access on devices.
EMMs should be aware that if users report service access issues after a known takeover event, even if the device appears compliant with EMM policies, a call to Devices.setState() might be necessary to re-synchronize the device's state with Google's backends under the new customer structure. Proactive calls for all devices post-takeover are generally not required, but it's a key tool for resolving access problems.
Account Setup - sample code
To initiate an account setup attempt, the calling app can use
AccountSetupClientand call either thestartAccountSetup()orstartAccountSetupFuture()method. For an example implementation, see the following code sample:// Create AccountSetupClient val client = AccountSetupClientFactory.create( this, activityResultRegistry ) lifecycle.addObserver(client.lifecycleObserver) // Create adminComponent val notificationReceiver = ComponentName(this, AccountSetupNotificationReceiver::class.java) // Helper method to get enrollment token created with Play EMM API val enrollmentToken = getEnrollmentToken() val request = StartAccountSetupRequest.builder() .setEnrollmentToken(enteredText) .setNotificationReceiverServiceComponentName(notificationReceiver) .setAdminComponentName( ComponentName(this, com.example.dpc.DeviceAdminReceiver::class.java)) .build() try { val accountSetupAttempt = client.startAccountSetup(request) // handle attempt } catch (e: Exception) { // handle exception }Implement
AccountSetupListenerinterface and provide an implementation for how to handle the received status updates.Extend
NotificationReceiverServiceand provide theAccountSetupListenerinstance created in step 2 by overridinggetAccountSetupListener().// Handles account setup changes class AccountSetupNotificationReceiver : NotificationReceiverService(), AccountSetupListener { override fun getAccountSetupListener(): AccountSetupListener = this override fun onAccountSetupChanged(accountSetupAttempt: AccountSetupAttempt) { when (accountSetupAttempt.state.kind) { StateCase.ADDED_ACCOUNT -> { val enterpriseAccount = state.addedAccount() val userId = enterpriseAccount.userId val deviceId = enterpriseAccount.deviceId // Handle account added state. // IMPORTANT: The device/account is now added but *DISABLED* // for Google services. Your EMM backend MUST be notified to // perform policy compliance checks and then call Devices.setState() // to activate Google Play and other services. } StateCase.AUTHENTICATION_ACTIVITY_LAUNCH_REQUIRED -> { val request = LaunchAuthenticationActivityRequest.builder() .setAccountSetupAttempt(accountSetupAttempt) .build(); // Send the attempt to the foreground activity to call: accountSetupClient.launchAuthenticationActivity(request) } StateCase.ACCOUNT_SETUP_ERROR -> { // Handle error state. val failureReason = state.accountSetupError().failureReason } else -> { // Handle unknown account setup attempt state. } } } }Add the extended
NotificationReceiverServiceclass to yourAndroidManifest.xmland verify it is exported.<application> <service android:name = ".accountsetup.AccountSetupNotificationReceiver" android:exported = "true" /> </application>If your app targets SDK 30 or later, then a queries element is needed in the
AndroidManifest.xmlto specify that it will interact with ADP.<queries> <package android:name="com.google.android.apps.work.clouddpc" /> </queries>
Testing guidance
This section provides a set of guidelines and best practices for testing your implementation.
Test PrepareEnvironment
Get Device's Current State: The EMM runs
adb shell dumpsys package com.google.android.apps.work.clouddpc | grep versionNameto get the version of the Android Device Policy present on the device. If the Android Device Policy is not installed, an empty output is expected.
Integrate PrepareEnvironment: The custom DPC invokes
prepareEnvironmentAPI in the AMAPI SDK, passing the correct request.Await PrepareEnvironment result: The custom DPC waits for the
prepareEnvironmentto complete.Confirm PrepareEnvironment success: On completion, EMM runs again
adb shell dumpsys package com.google.android.apps.work.clouddpc | grep versionNameThis time the Android Device Policy version should be higher than in step 1.
Test Google Account authentication
- Create test enterprise: The EMM creates a test domain Google enterprise
linked to a test EMM, with
enterprises.generateSignupUrl. - Enable Google authentication: The EMM enables Google authentication for the test enterprise following these instructions in the Google Admin console.
- Create Enrollment Token: The EMM creates an enrollment token using the Play EMM API with type userDevice.
- Initiate Enrollment: The custom DPC invokes the
startAccountSetupAPI in the AMAPI SDK, passing the enrollment token. - Launch activity required: The AMAPI SDK notifies the custom DPC that an activity must be launched to authenticate the user.
- Authenticate the user: The custom DPC invokes
launchAuthenticationActivityto start the activity. The user authenticates with a Managed Google Account (part of the enterprise created in step 1). - Finalize Enrollment: The AMAPI SDK notifies the custom DPC of the enrollment result.
Test skipping Google authentication
We will use the previously described setup.
This time, in step 7, the user presses Skip instead of authenticating with
their Google Account. The enrollment completes successfully, with a service
account on the device (i.e. the
AuthenticationType
is Anonymous).
Test userless devices
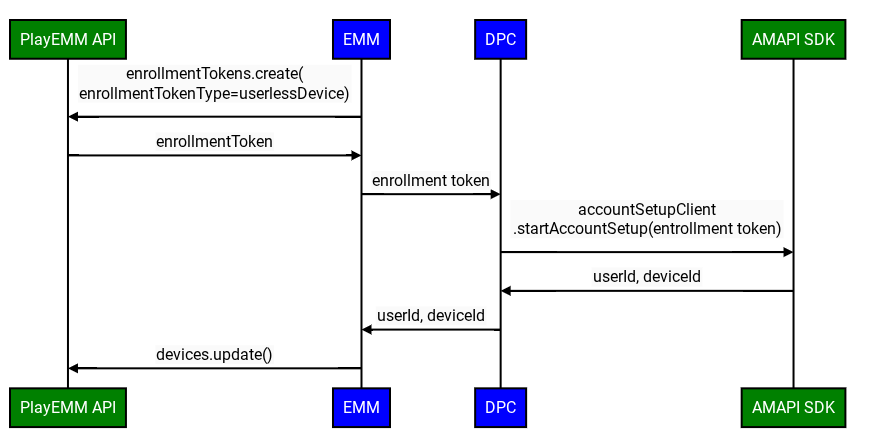
The improved custom DPC enrollment flow utilizes the followeing steps, when Google authentication is disabled:
- Create a test enterprise: This can be the same enterprise as created previously.
- Create Enrollment Token: The EMM creates an enrollmenttoken using the Play EMM API with type userlessDevice.
- Initiate Enrollment: The custom DPC invokes the
startAccountSetupAPI in the AMAPI SDK, passing the enrollment token. - Finalize Enrollment: The AMAPI SDK notifies the custom DPC of the enrollment result.
Managed Google Play Accounts
User account
Provides a single user access to managed Google Play from all their devices. You must provision user accounts for your users. They don't have the credentials to add managed Google Play Accounts themselves.
To create a user account, call Users.insert.
Set the account type to userType, and set an
accountIdentifier, which uniquely references the user within
the enterprise.
Best practice: Don't use the same account on more than 10 devices.
Device account
Provides access to managed Google Play from a single device. If an authentication token has been issued for a device account, a new request for an authentication token for that device account deactivates the previous token. Each device should have its own separate licenses for apps.
To create a device account, call Users.insert
and set the account type to deviceType.
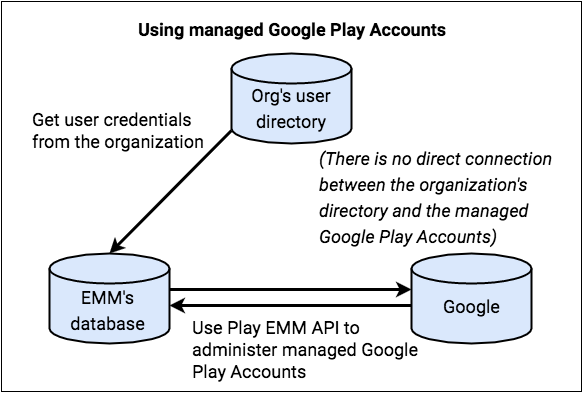
You create and maintain a mapping between the user or device identities and the corresponding managed Google Play Accounts, and you manage the accounts through their lifecycle. The organization doesn't need any direct control over these managed Google Play Accounts, as the accounts exist purely for application management.
Create a managed Google Play user account
- A user signs in to your DPC using corporate credentials.
- The DPC requests details about the user from the EMM server or console.
- Submit request for new managed Google Play Account by calling
Users.insertwith values for newaccountIdentifier,displayName, andaccountType. - Your system must create the
accountIdentifier. The account identifier must be a unique value across your system. Don't use PII for the account identifier. - The
displayNameis shown in the account switcher of the Google Play Store and should have some meaning to the user (but not PII about the user). For example, the name could include the organization name or a generic name related to the EMM. - Set the
accountTypetouserAccountordeviceAccount. AuserAccountis specific to a single device. TheaccountTypespecified can bedeviceTypeoruserType. - Set
managementTypetoemmManaged. - Google Play processes the request, creates the account, and
returns a
userId. - Store the mapping between the
accountIdentifierand theuserIdin your datastore. - Call
Users.generateAuthenticationTokenwith theuserIdand theenterpriseId. Google Play returns an authentication token that can be used once, and which must be used within a few minutes. - Securely forward the authentication token to your DPC.
- The DPC provisions the work profile and adds the account to the work profile or device.
- The user can access managed Google Play within the work profile or device.
Assuming the user is unknown to your system:
Admin accounts
When an admin creates an enterprise with managed Google Play Accounts, the Google Account they use can't be a G Suite account. The account they use becomes an owner for the enterprise, and the owner can add more owners and admins in the managed Google Play console.
Both Enterprises.get and Enterprises.completeSignup
return a list of admin email addresses that are associated with an enterprise
(enterprises with managed Google Play Accounts only).
Manage account life cycles
In a managed Google Play Accounts deployment, you're responsible for user and device account life cycles, which means you create, update, and delete these accounts.
You create the accounts during device provisioning, a process that involves your DPC app and your EMM console. For instructions, see the managed Google Play Accounts method.
To change an account's information, call
Users.update.
To delete an account, call
Users.delete
Admins can't delete individual accounts, but they can delete an enterprise with managed Google Play Accounts. When they do this, the device and user accounts associated with the enterprise are eventually deleted, as described in Unenroll, re-enroll, delete.
Account expiration
Occasionally, accounts or their tokens expire. This can happen for several reasons:
- The authentication token used to add the account to the device has expired.
- The account or enterprise has been deleted.
- For device accounts, the account has been added to a new device and is therefore disabled on the old one.
- Automatic abuse checks have been triggered.
Additionally, a device's information may be deleted due to a batch cleanup process if it remains offline for more than 270 days.
In most cases (unless the EMM is intentionally moving a device account to a new device), the best practice is to use the Play EMM API to request a new token from the EMM server, note the state of the account and enterprise and any returned errors, and then take appropriate action on the device. For example, renew the token, or if the error isn't recoverable, reset or unenroll the device.
To properly renew the token you should:
- Call
users.generateAuthenticationToken. - If the call is successful, remove the existing account and add the new account using the DPC support library.
- If the call is unsuccessful, remove the account from the device and
create a new user using
users.insert, generate an authentication token and add the account to the device.
Google Play services version 9.0.00 notifies your DPC that the account has expired using the broadcast action:
- When the managed Google Play Account is invalidated on a device, the DPC receives a broadcast with the following action:
- The broadcast intent contains
Parcelableextra with nameaccount, which is theAccountobject of the invalidated account. - The DPC checks
Account#namewith the EMM server to identify the invalidated account. - The DPC either requests new credentials or a new account, following the same flow used to provision the device initially.
com.google.android.gms.auth.ACCOUNT_REAUTH_REQUIRED