جلسات را از Google Chat برنامه ریزی کنید

سطح کدنویسی : متوسط
مدت زمان : ۲۵ دقیقه
نوع پروژه : اپلیکیشن گوگل چت

اهداف

  • بفهمید که راه حل چه کاری انجام می‌دهد.
  • درک کنید که سرویس‌های Apps Script در این راهکار چه کاری انجام می‌دهند.
  • محیط خود را تنظیم کنید.
  • اسکریپت را تنظیم کنید.
  • اسکریپت را اجرا کنید.

درباره این راهکار

از طریق یک پیام مستقیم (DM) یا فضایی در Google Chat، یک جلسه را در تقویم گوگل برنامه‌ریزی کنید. می‌توانید جزئیات خاصی مانند موضوع، زمان شروع یا مدت زمان را برای جلسه تنظیم کنید یا از تنظیمات پیش‌فرض برای برنامه‌ریزی فوری جلسه استفاده کنید.

رابط کاربری برنامه چت زمان‌بندی جلسات

چگونه کار می‌کند؟

اسکریپت برنامه چت از دستورات و دیالوگ‌های اسلش برای دریافت جزئیات جلسه از کاربران و برنامه‌ریزی یک رویداد در تقویم استفاده می‌کند. این اسکریپت شامل تنظیمات پیش‌فرض جلسه است که می‌تواند متناسب با نیازهای شما سفارشی‌سازی شود.

سرویس‌های اسکریپت برنامه‌ها

این راهکار از سرویس‌های زیر استفاده می‌کند:

  • سرویس تقویم - رویداد تقویم را از اطلاعات جلسه ارائه شده ایجاد می‌کند.
  • سرویس پایه - از کلاس Session برای دریافت منطقه زمانی اسکریپت استفاده می‌کند. تقویم هنگام زمان‌بندی رویداد از این منطقه زمانی استفاده می‌کند.
  • سرویس Utilities - تاریخ رویداد تقویم را قالب‌بندی می‌کند و شناسه رویداد را برای کمک به دریافت URL رویداد کدگذاری می‌کند.

پیش‌نیازها

محیط خود را تنظیم کنید

پروژه ابری خود را در کنسول گوگل کلود باز کنید

اگر هنوز باز نشده است، پروژه ابری که قصد دارید برای این نمونه استفاده کنید را باز کنید:

  1. در کنسول گوگل کلود، به صفحه انتخاب پروژه بروید.

    یک پروژه ابری انتخاب کنید

  2. پروژه گوگل کلود مورد نظر خود را انتخاب کنید. یا روی ایجاد پروژه کلیک کنید و دستورالعمل‌های روی صفحه را دنبال کنید. اگر یک پروژه گوگل کلود ایجاد می‌کنید، ممکن است لازم باشد پرداخت هزینه را برای آن پروژه فعال کنید .

API را روشن کنید

قبل از استفاده از APIهای گوگل، باید آنها را در یک پروژه گوگل کلود فعال کنید. می‌توانید یک یا چند API را در یک پروژه گوگل کلود فعال کنید.

همه برنامه‌های چت به پیکربندی صفحه رضایت نیاز دارند. پیکربندی صفحه رضایت OAuth برنامه شما، آنچه گوگل به کاربران نمایش می‌دهد را تعریف می‌کند و برنامه شما را ثبت می‌کند تا بتوانید بعداً آن را منتشر کنید.

  1. در کنسول گوگل کلود، به Menu > برویدGoogle Auth platform > برندسازی .

    به بخش برندسازی بروید

  2. اگر قبلاً تنظیمات را انجام داده‌اید Google Auth platformمی‌توانید تنظیمات صفحه رضایت OAuth زیر را در Branding ، Audience و Data Access پیکربندی کنید. اگر پیامی با این مضمون مشاهده کردید Google Auth platform هنوز پیکربندی نشده است ، روی شروع کار کلیک کنید:
    1. در قسمت اطلاعات برنامه ، در قسمت نام برنامه ، نامی برای برنامه وارد کنید.
    2. در ایمیل پشتیبانی کاربر ، یک آدرس ایمیل پشتیبانی انتخاب کنید که کاربران در صورت داشتن هرگونه سوال در مورد رضایت خود بتوانند با شما تماس بگیرند.
    3. روی بعدی کلیک کنید.
    4. در قسمت مخاطبان ، داخلی (Internal) را انتخاب کنید.
    5. روی بعدی کلیک کنید.
    6. در قسمت اطلاعات تماس ، یک آدرس ایمیل وارد کنید که از طریق آن بتوانید از هرگونه تغییر در پروژه خود مطلع شوید.
    7. روی بعدی کلیک کنید.
    8. در قسمت Finish ، سیاست داده‌های کاربر سرویس‌های API گوگل را مرور کنید و در صورت موافقت، گزینه «من با سیاست‌های داده‌های کاربر سرویس‌های API گوگل موافقم» را انتخاب کنید.
    9. روی ادامه کلیک کنید.
    10. روی ایجاد کلیک کنید.
  3. فعلاً می‌توانید از اضافه کردن محدوده‌ها صرف نظر کنید. در آینده، وقتی برنامه‌ای برای استفاده در خارج از سازمان Google Workspace خود ایجاد می‌کنید، باید نوع کاربر (User type) را به خارجی (External) تغییر دهید. سپس محدوده‌های مجوز مورد نیاز برنامه خود را اضافه کنید. برای کسب اطلاعات بیشتر، به راهنمای کامل پیکربندی رضایت OAuth مراجعه کنید.

اسکریپت را تنظیم کنید

پروژه Apps Script را ایجاد کنید

  1. برای باز کردن پروژه‌ی « زمان‌بندی جلسات از اسکریپت برنامه‌های چت گوگل» روی دکمه‌ی زیر کلیک کنید.
    پروژه را باز کنید
  2. روی نمای کلی کلیک کنید.
  3. در صفحه مرور کلی، روی «ایجاد کپی» کلیک کنید آیکون مربوط به کپی کردن .

شماره پروژه ابری را کپی کنید

  1. در کنسول گوگل کلود، به Menu > IAM & Admin > Settings بروید.

    به تنظیمات IAM و مدیریت بروید

  2. در فیلد شماره پروژه ، مقدار را کپی کنید.

پروژه Cloud مربوط به پروژه Apps Script را تنظیم کنید.

  1. در پروژه کپی‌شده‌ی Apps Script خود، روی تنظیمات پروژه کلیک کنید. آیکون مربوط به تنظیمات پروژه .
  2. در زیر پروژه پلتفرم ابری گوگل (GCP) ، روی تغییر پروژه کلیک کنید.
  3. در قسمت شماره پروژه GCP ، شماره پروژه Google Cloud را وارد کنید.
  4. روی تنظیم پروژه کلیک کنید.

ایجاد یک استقرار آزمایشی

  1. در پروژه‌ی Apps Script کپی‌شده، روی Deploy > Test deployments کلیک کنید.
  2. شناسه استقرار Head را برای استفاده در مرحله بعد کپی کنید و روی Done کلیک کنید.

پیکربندی API چت

  1. در کنسول گوگل کلود، به صفحه Chat API بروید.
    به API چت بروید
  2. روی پیکربندی کلیک کنید.
  3. پاک کردن «این برنامه گپ را به عنوان یک افزونه Google Workspace بسازید» . یک کادر محاوره‌ای باز می‌شود که از شما می‌خواهد تأیید کنید. در کادر محاوره‌ای، روی غیرفعال کردن کلیک کنید.
  4. API چت را با اطلاعات زیر پیکربندی کنید:
    • نام : Meeting Scheduler
    • آدرس اینترنتی آواتار : یک آدرس اینترنتی اضافه کنید که به تصویری با حداقل اندازه ۲۵۶x۲۵۶ پیکسل اشاره می‌کند.
    • شرح : Quickly create meetings.
    • عملکرد : هر دو کادر را علامت بزنید تا کاربران بتوانند مستقیماً به برنامه پیام دهند و آن را به فضاها اضافه کنند.
    • تنظیمات اتصال : روی Apps Script کلیک کنید و شناسه استقرار head را وارد کنید.
    • دستورات اسلش : ​​با انجام مراحل زیر، دستورات اسلش را برای /help و /schedule_Meeting اضافه کنید:
      1. روی دستور Add slash کلیک کنید و آن را با اطلاعات زیر پیکربندی کنید:
        • نام : /help
        • شناسه فرمان : 1
        • توضیحات : Learn what this app does.
      2. دوباره روی Add slash command کلیک کنید و آن را با اطلاعات زیر پیکربندی کنید:
        • نام : /schedule_Meeting
        • شناسه فرمان : 2
        • توضیحات : Schedule a meeting.
        • کادر محاوره‌ای Opens a را علامت بزنید.
    • مجوزها : افراد و گروه‌های خاص در دامنه خود را انتخاب کرده و آدرس ایمیل خود را وارد کنید.
  5. روی ذخیره کلیک کنید و صفحه را رفرش کنید.
  6. در صفحه پیکربندی، در قسمت وضعیت برنامه ، وضعیت را روی «زنده - در دسترس کاربران» تنظیم کنید.
  7. روی ذخیره کلیک کنید.

اسکریپت را اجرا کنید

  1. گوگل چت را باز کنید.
  2. روی شروع چت کلیک کنید.
  3. نام برنامه، Meeting Scheduler را جستجو کنید.
  4. برای درخواست مجوز، یک پیام اولیه، مانند hello ، ارسال کنید.
  5. وقتی برنامه پاسخ داد، روی پیکربندی کلیک کنید و برنامه را مجاز کنید. اگر صفحه رضایت OAuth هشدار « این برنامه تأیید نشده است» را نشان می‌دهد، با انتخاب Advanced > Go to {Project Name} (unsafe) ادامه دهید.
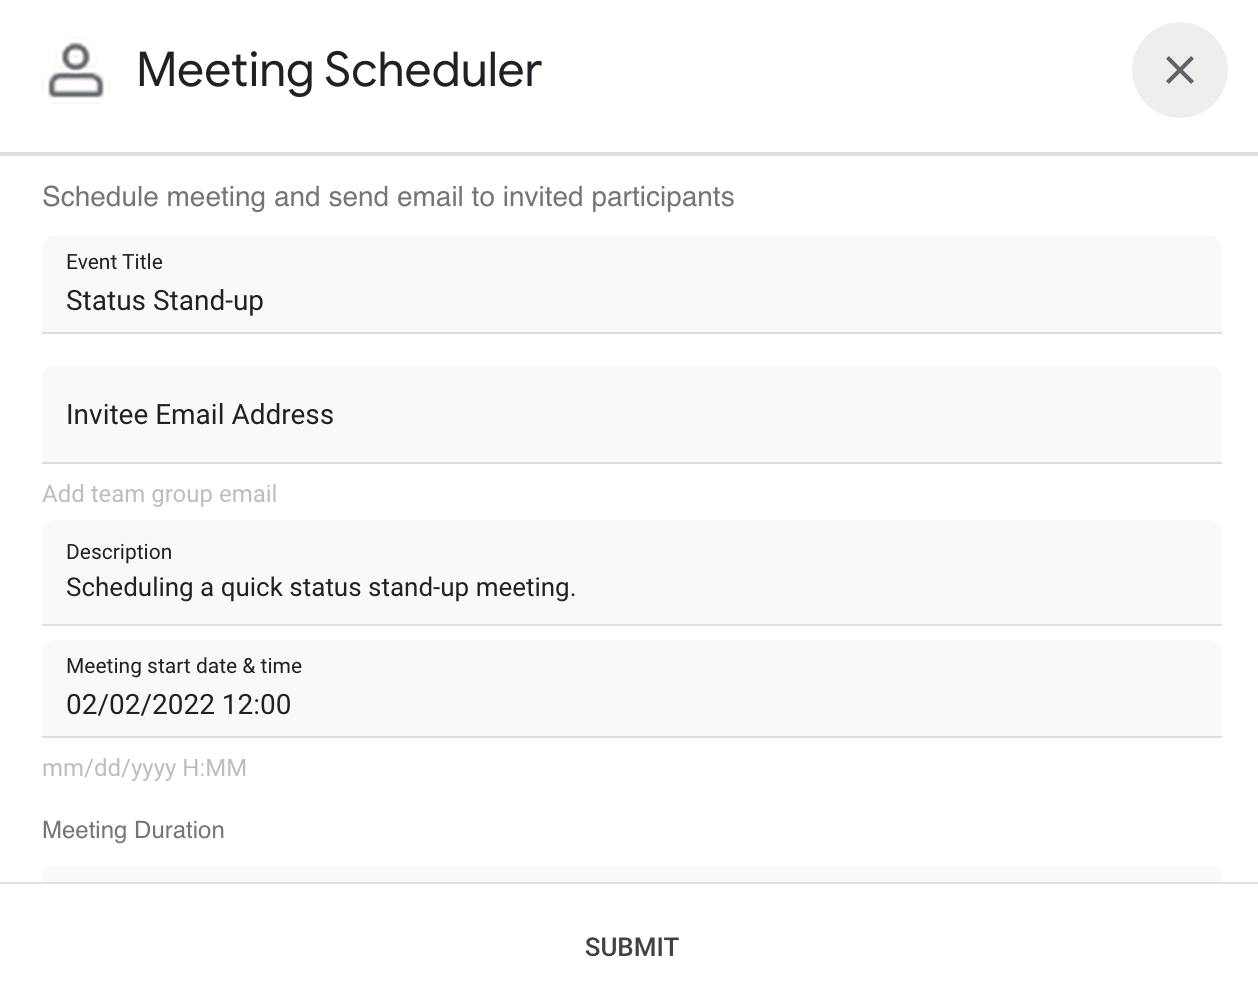
  6. /schedule_Meeting به برنامه ارسال کنید.

  7. در کادر محاوره‌ای، حداقل یک آدرس ایمیل دعوت‌کننده اضافه کنید. می‌توانید فیلدهای دیگر را به‌روزرسانی کنید یا از ورودی‌های پیش‌فرض استفاده کنید.

  8. روی ارسال کلیک کنید.

  9. برای مشاهده جلسه، روی «باز کردن رویداد تقویم» کلیک کنید.

کد را مرور کنید

برای بررسی کد Apps Script برای این راهکار، روی مشاهده کد منبع در زیر کلیک کنید:

مشاهده کد منبع

کد.gs

راهکارها/زمان‌بندی-جلسات/Code.js
// To learn how to use this script, refer to the documentation:
// https://developers.google.com/apps-script/samples/chat-apps/schedule-meetings

/*
Copyright 2022 Google LLC

Licensed under the Apache License, Version 2.0 (the "License");
you may not use this file except in compliance with the License.
You may obtain a copy of the License at

    https://www.apache.org/licenses/LICENSE-2.0

Unless required by applicable law or agreed to in writing, software
distributed under the License is distributed on an "AS IS" BASIS,
WITHOUT WARRANTIES OR CONDITIONS OF ANY KIND, either express or implied.
See the License for the specific language governing permissions and
limitations under the License.
*/

// Application constants
const APPNAME = 'Chat Meeting Scheduler';
const SLASHCOMMAND = {
  HELP: 1, // /help
  DIALOG: 2, // /schedule_Meeting
};

/**
 * Responds to an ADDED_TO_SPACE event in Google Chat.
 * Called when the Chat app is added to a space. The Chat app can either be directly added to the space
 * or added by a @mention. If the Chat app is added by a @mention, the event object includes a message property. 
 * Returns a Message object, which is usually a welcome message informing users about the Chat app.
 *
 * @param {Object} event The event object from Google Chat
 */
function onAddToSpace(event) {
  let message = '';

  // Personalizes the message depending on how the Chat app is called.
  if (event.space.singleUserBotDm) {
    message = `Hi ${event.user.displayName}!`;
  } else {
    const spaceName = event.space.displayName ? event.space.displayName : "this chat";
    message = `Hi! Thank you for adding me to ${spaceName}`;
  }

  // Lets users know what they can do and how they can get help.
  message = message + '/nI can quickly schedule a meeting for you with just a few clicks.' +
    'Try me out by typing */schedule_Meeting*. ' +
    '/nTo learn what else I can do, type */help*.'

  return { "text": message };
}

/**
 * Responds to a MESSAGE event triggered in Chat.
 * Called when the Chat app is already in the space and the user invokes it via @mention or / command.
 * Returns a message object containing the Chat app's response. For this Chat app, the response is either the
 * help text or the dialog to schedule a meeting.
 * 
 * @param {object} event The event object from Google Chat
 * @return {object} JSON-formatted response as text or Card message
 */
function onMessage(event) {

  // Handles regular onMessage logic.
  // Evaluates if and handles for all slash commands.
  if (event.message.slashCommand) {
    switch (event.message.slashCommand.commandId) {

      case SLASHCOMMAND.DIALOG: // Displays meeting dialog for /schedule_Meeting.

        // TODO update this with your own logic to set meeting recipients, subjects, etc (e.g. a group email).
        return getInputFormAsDialog_({
          invitee: '',
          startTime: getTopOfHourDateString_(),
          duration: 30,
          subject: 'Status Stand-up',
          body: 'Scheduling a quick status stand-up meeting.'
        });

      case SLASHCOMMAND.HELP: // Responds with help text for /help.
        return getHelpTextResponse_();

      /* TODO Add other use cases here. E.g:
      case SLASHCOMMAND.NEW_FEATURE:  // Your Feature Here
        getDialogForAddContact(message);
      */

    }
  }
  else {
    // Returns text if users didn't invoke a slash command.
    return { text: 'No action taken - use Slash Commands.' }
  }
}

/**
 * Responds to a CARD_CLICKED event triggered in Chat.
 * @param {object} event the event object from Chat
 * @return {object} JSON-formatted response
 * @see https://developers.google.com/chat/api/guides/message-formats/events
 */
function onCardClick(event) {
  if (event.action.actionMethodName === 'handleFormSubmit') {
    const recipients = getFieldValue_(event.common.formInputs, 'email');
    const subject = getFieldValue_(event.common.formInputs, 'subject');
    const body = getFieldValue_(event.common.formInputs, 'body');

    // Assumes dialog card inputs for date and times are in the correct format. mm/dd/yyy HH:MM
    const dateTimeInput = getFieldValue_(event.common.formInputs, 'date');
    const startTime = getStartTimeAsDateObject_(dateTimeInput);
    const duration = Number(getFieldValue_(event.common.formInputs, 'duration'));

    // Handles instances of missing or invalid input parameters.
    const errors = [];

    if (!recipients) {
      errors.push('Missing or invalid recipient email address.');
    }
    if (!subject) {
      errors.push('Missing subject line.');
    }
    if (!body) {
      errors.push('Missing event description.');
    }
    if (!startTime) {
      errors.push('Missing or invalid start time.');
    }
    if (!duration || isNaN(duration)) {
      errors.push('Missing or invalid duration');
    }
    if (errors.length) {
      // Redisplays the form if missing or invalid inputs exist.
      return getInputFormAsDialog_({
        errors,
        invitee: recipients,
        startTime: dateTimeInput,
        duration,
        subject,
        body
      });
    }

    //  Calculates the end time via duration.
    const endTime = new Date(startTime.valueOf());
    endTime.setMinutes(endTime.getMinutes() + duration);

    // Creates calendar event with notification.
    const calendar = CalendarApp.getDefaultCalendar()
    const scheduledEvent = calendar.createEvent(subject,
      startTime,
      endTime,
      {
        guests: recipients,
        sendInvites: true,
        description: body + '\nThis meeting scheduled by a Google Chat App!'
      });

    // Gets a link to the Calendar event.
    const url = getCalendarEventURL_(scheduledEvent, calendar)

    return getConfirmationDialog_(url);

  } else if (event.action.actionMethodName === 'closeDialog') {

    // Returns this dialog as success.
    return {
      actionResponse: {
        type: 'DIALOG',
        dialog_action: {
          actionStatus: 'OK'
        }
      }
    }
  }
}

/**
 * Responds with help text about this Chat app.
 * @return {string} The help text as seen below
 */
function getHelpTextResponse_() {
  const help = `*${APPNAME}* lets you quickly create meetings from Google Chat. Here\'s a list of all its commands:
  \`/schedule_Meeting\`  Opens a dialog with editable, preset parameters to create a meeting event
  \`/help\`  Displays this help message

  Learn more about creating Google Chat apps at https://developers.google.com/chat.`

  return { 'text': help }
}

دیالوگ.gs

راهکارها/زمان‌بندی-جلسات/Dialog.js
/**
 * Copyright 2022 Google LLC
 *
 * Licensed under the Apache License, Version 2.0 (the "License");
 * you may not use this file except in compliance with the License.
 * You may obtain a copy of the License at
 *
 *      http://www.apache.org/licenses/LICENSE-2.0
 *
 * Unless required by applicable law or agreed to in writing, software
 * distributed under the License is distributed on an "AS IS" BASIS,
 * WITHOUT WARRANTIES OR CONDITIONS OF ANY KIND, either express or implied.
 * See the License for the specific language governing permissions and
 * limitations under the License.
 */

/**
* Form input dialog as JSON.
* @return {object} JSON-formatted cards for the dialog.
*/
function getInputFormAsDialog_(options) {
  const form = getForm_(options);
  return {
    'actionResponse': {
      'type': 'DIALOG',
      'dialogAction': {
        'dialog': {
          'body': form
        }
      }
    }
  };
}

/**
* Form JSON to collect inputs regarding the meeting.
* @return {object} JSON-formatted cards.
*/
function getForm_(options) {
  const sections = [];

  // If errors present, display additional section with validation messages.
  if (options.errors && options.errors.length) {
    let errors = options.errors.reduce((str, err) => `${str}${err}<br>`, '');
    errors = `<b>Errors:</b><br><font color="#ba0000">${errors}</font>`;
    const errorSection = {
      'widgets': [
        {
          textParagraph: {
            text: errors
          }
        }
      ]
    }
    sections.push(errorSection);
  }
  let formSection = {
    'header': 'Schedule meeting and send email to invited participants',
    'widgets': [
      {
        'textInput': {
          'label': 'Event Title',
          'type': 'SINGLE_LINE',
          'name': 'subject',
          'value': options.subject
        }
      },
      {
        'textInput': {
          'label': 'Invitee Email Address',
          'type': 'SINGLE_LINE',
          'name': 'email',
          'value': options.invitee,
          'hintText': 'Add team group email'
        }
      },
      {
        'textInput': {
          'label': 'Description',
          'type': 'MULTIPLE_LINE',
          'name': 'body',
          'value': options.body
        }
      },
      {
        'textInput': {
          'label': 'Meeting start date & time',
          'type': 'SINGLE_LINE',
          'name': 'date',
          'value': options.startTime,
          'hintText': 'mm/dd/yyyy H:MM'
        }
      },
      {
        'selectionInput': {
          'type': 'DROPDOWN',
          'label': 'Meeting Duration',
          'name': 'duration',
          'items': [
            {
              'text': '15 minutes',
              'value': '15',
              'selected': options.duration === 15
            },
            {
              'text': '30 minutes',
              'value': '30',
              'selected': options.duration === 30
            },
            {
              'text': '45 minutes',
              'value': '45',
              'selected': options.duration === 45
            },
            {
              'text': '1 Hour',
              'value': '60',
              'selected': options.duration === 60
            },
            {
              'text': '1.5 Hours',
              'value': '90',
              'selected': options.duration === 90
            },
            {
              'text': '2 Hours',
              'value': '120',
              'selected': options.duration === 120
            }
          ]
        }
      }
    ],
    'collapsible': false
  };
  sections.push(formSection);
  const card =  {
    'sections': sections,
    'name': 'Google Chat Scheduled Meeting',
    'fixedFooter': {
      'primaryButton': {
        'text': 'Submit',
        'onClick': {
          'action': {
            'function': 'handleFormSubmit'
          }
        },
        'altText': 'Submit'
      }
    }
  };
  return card;
}

/**
* Confirmation dialog after a calendar event is created successfully.
* @param {string} url The Google Calendar Event url for link button
* @return {object} JSON-formatted cards for the dialog
*/
function getConfirmationDialog_(url) {
  return {
    'actionResponse': {
      'type': 'DIALOG',
      'dialogAction': {
        'dialog': {
          'body': {
            'sections': [
              {
                'widgets': [
                  {
                    'textParagraph': {
                      'text': 'Meeting created successfully!'
                    },
                    'horizontalAlignment': 'CENTER'
                  },
                  {
                    'buttonList': {
                      'buttons': [
                        {
                          'text': 'Open Calendar Event',
                          'onClick': {
                            'openLink': {
                              'url': url
                            }
                          }
                        }

                      ]
                    },
                    'horizontalAlignment': 'CENTER'
                  }
                ]
              }
            ],
            'fixedFooter': {
              'primaryButton': {
                'text': 'OK',
                'onClick': {
                  'action': {
                    'function': 'closeDialog'
                  }
                }
              }
            }
          }
        }
      }
    }
  }
}

Utilities.gs

solutions/schedule-meetings/Utilities.js
/**
 * Copyright 2022 Google LLC
 *
 * Licensed under the Apache License, Version 2.0 (the "License");
 * you may not use this file except in compliance with the License.
 * You may obtain a copy of the License at
 *
 *      http://www.apache.org/licenses/LICENSE-2.0
 *
 * Unless required by applicable law or agreed to in writing, software
 * distributed under the License is distributed on an "AS IS" BASIS,
 * WITHOUT WARRANTIES OR CONDITIONS OF ANY KIND, either express or implied.
 * See the License for the specific language governing permissions and
 * limitations under the License.
 */

/**
* Helper function that gets the field value from the given form input.
* @return {string} 
*/
function getFieldValue_(formInputs, fieldName) {
  return formInputs[fieldName][''].stringInputs.value[0];
}

// Regular expression to validate the date/time input.
const DATE_TIME_PATTERN = /\d{1,2}\/\d{1,2}\/\d{4}\s+\d{1,2}:\d\d/;

/**
* Casts date and time from string to Date object.
* @return {date} 
*/
function getStartTimeAsDateObject_(dateTimeStr) {
  if (!dateTimeStr || !dateTimeStr.match(DATE_TIME_PATTERN)) {
    return null;
  }

  const parts = dateTimeStr.split(' ');
  const [month, day, year] = parts[0].split('/').map(Number);
  const [hour, minute] = parts[1].split(':').map(Number);


  Session.getScriptTimeZone()

  return new Date(year, month - 1, day, hour, minute)
}

/** 
* Gets the current date and time for the upcoming top of the hour (e.g. 01/25/2022 18:00).
* @return {string} date/time in mm/dd/yyy HH:MM format needed for use by Calendar
*/
function getTopOfHourDateString_() {
  const date = new Date();
  date.setHours(date.getHours() + 1);
  date.setMinutes(0, 0, 0);
  // Adding the date as string might lead to an incorrect response due to time zone adjustments.
  return Utilities.formatDate(date, Session.getScriptTimeZone(), 'MM/dd/yyyy H:mm');
}


/** 
* Creates the URL for the Google Calendar event.
*
* @param {object} event The Google Calendar Event instance
* @param {object} cal The associated Google Calendar 
* @return {string} URL in the form of 'https://www.google.com/calendar/event?eid={event-id}'
*/
function getCalendarEventURL_(event, cal) {
  const baseCalUrl = 'https://www.google.com/calendar';
  // Joins Calendar Event Id with Calendar Id, then base64 encode to derive the event URL.
  let encodedId = Utilities.base64Encode(event.getId().split('@')[0] + " " + cal.getId()).replace(/\=/g, '');
  encodedId = `/event?eid=${encodedId}`;
  return (baseCalUrl + encodedId);

}

مراحل بعدی