Google Chat, Vertex AI ve Google Apps Komut Dosyası ile olaylara yanıt verme

Bu eğitimde, olaylara gerçek zamanlı olarak yanıt veren bir Google Chat uygulaması oluşturma adımları gösterilmektedir. Uygulama, bir olaya yanıt verirken Chat alanı oluşturup bu alanı doldurur, mesajlar, uygulama komutları ve iletişim kutularıyla olayın çözülmesini kolaylaştırır ve olaya verilen yanıtı Google Dokümanlar belgesinde özetlemek için yapay zekayı kullanır.

Bu eğitimde, https://www.googleapis.com/auth/chat.app.* ile başlayan yetkilendirme kapsamları kullanılmaktadır. Chat uygulamasının bu kapsamları kullanabilmesi için tek seferlik yönetici onayı almanız gerekir.

Olay, çözülmesi için bir ekibin acil müdahalesini gerektiren bir etkinliktir. Olaylara örnek olarak şunlar verilebilir:

  • Bir müşteri ilişkileri yönetimi (CRM) platformunda zamana duyarlı bir destek kaydı oluşturulur ve çözüm için servis ekibinin işbirliği yapması gerekir.
  • Bir sistem çevrimdışı olduğunda site güvenilirliği mühendislerinden (SRE) oluşan bir grubu uyarır. Böylece bu grup, sistemi tekrar çevrimiçi hale getirmek için birlikte çalışabilir.
  • Büyük bir deprem meydana geldiğinde acil durum çalışanlarının müdahalelerini koordine etmesi gerekir.

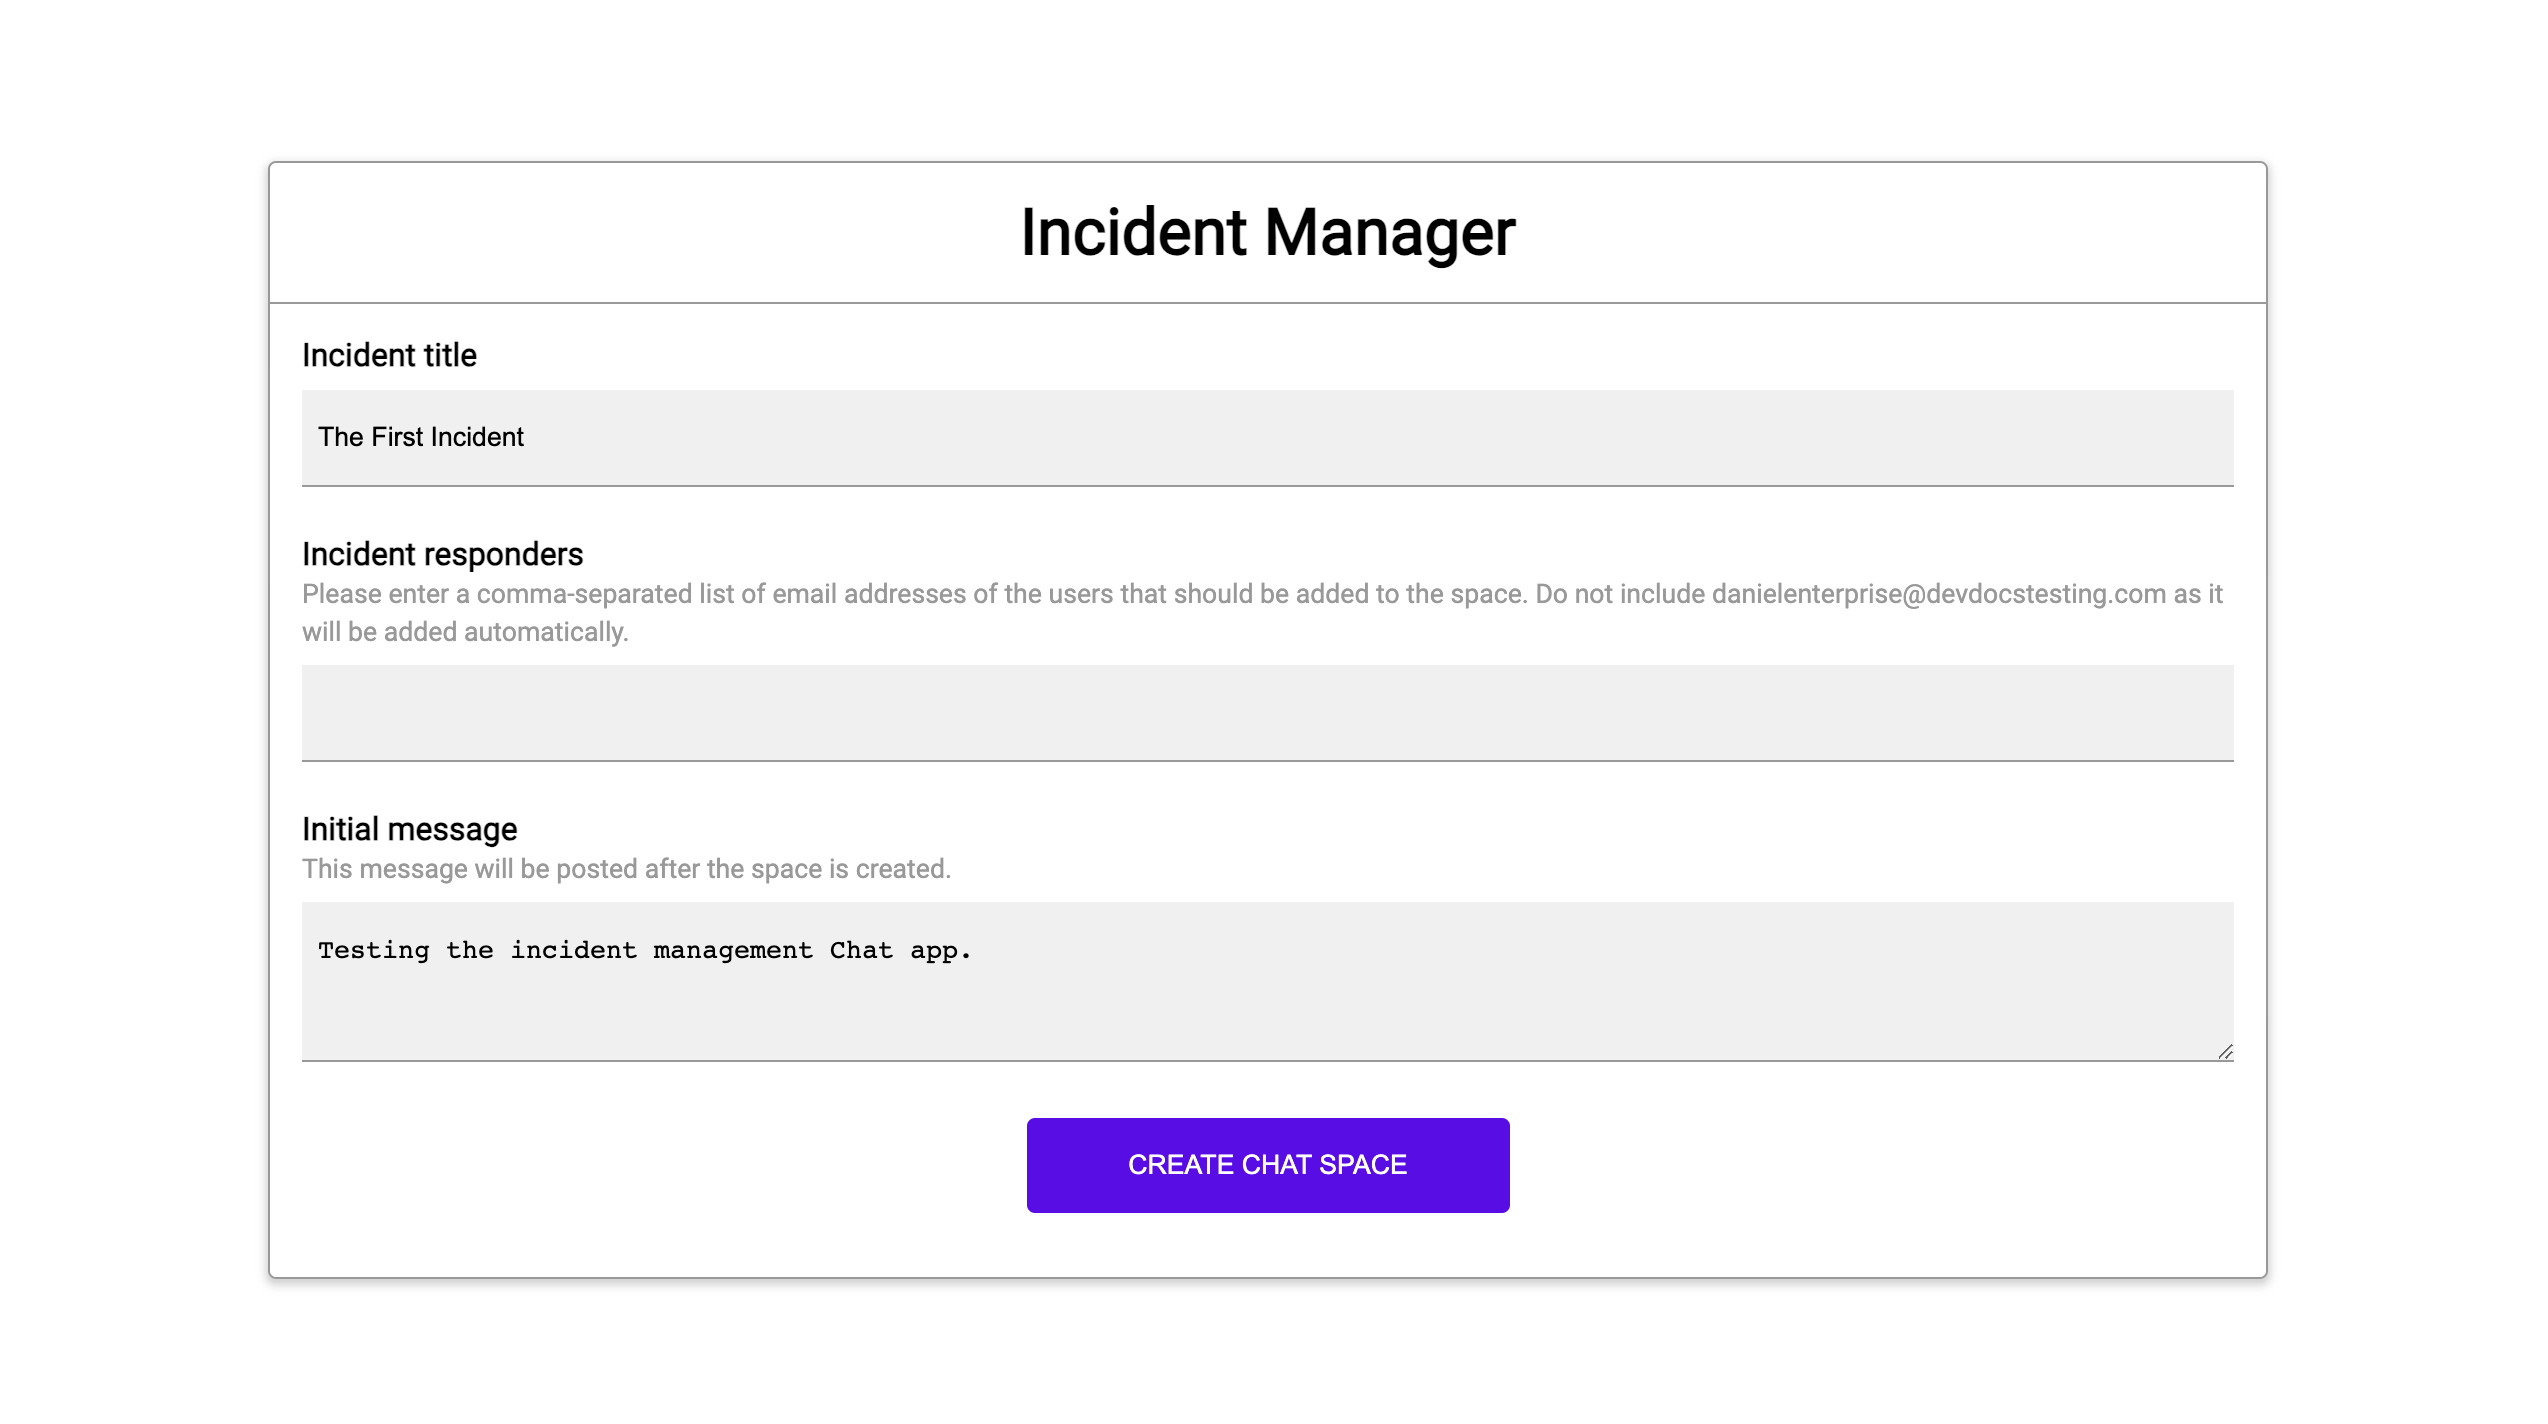
Bu eğitimde, olay uyarısı, bir kullanıcı web sayfasından düğmeyi tıklayarak olayı bildirdiğinde başlar. Web sayfası, kullanıcılardan temel olay bilgilerini (başlık, açıklama ve yanıt verenlerin e-posta adresleri) girmelerini isteyerek bir olayı simüle eder.

Olay yönetimi Chat uygulamasının işleyişini görün:

  • Bir olayı başlatan web sitesi.
    Şekil 1. Kullanıcıların olay bildirebileceği web sitesi.
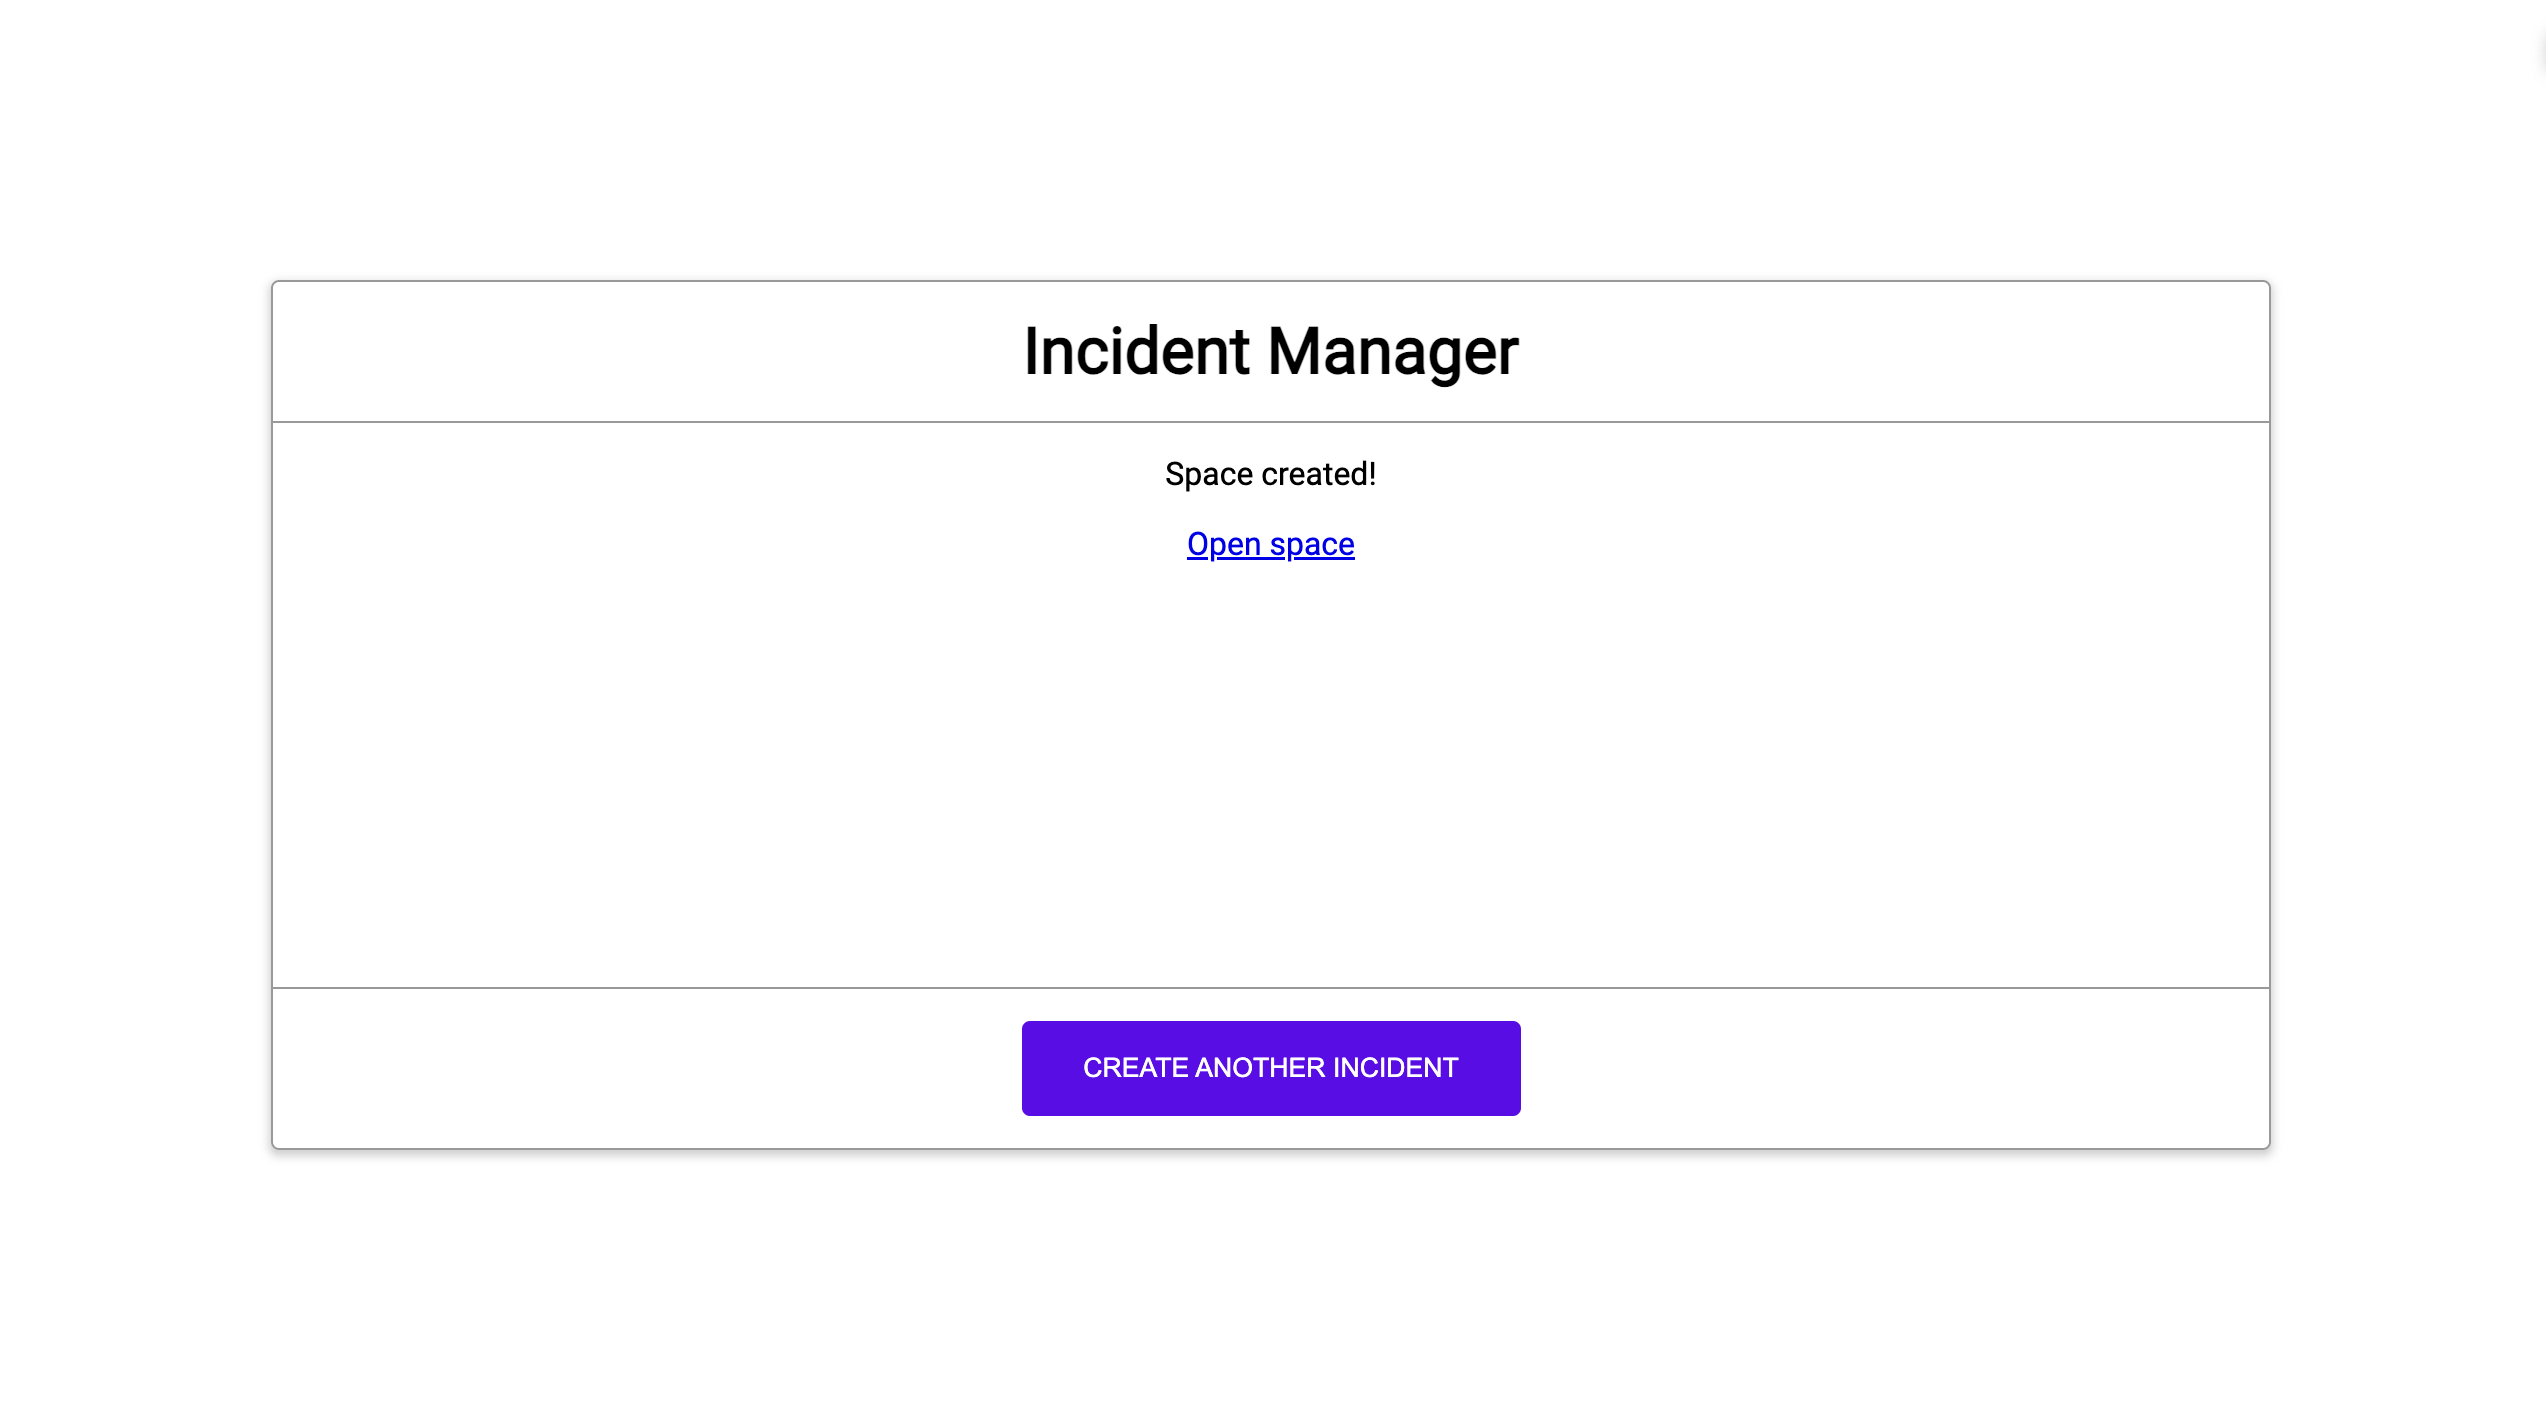
  • Olayla ilgili Chat alanının oluşturulduğuna dair bildirim.
    Şekil 2. Olayla ilgili Chat alanının oluşturulduğuna dair bildirim.
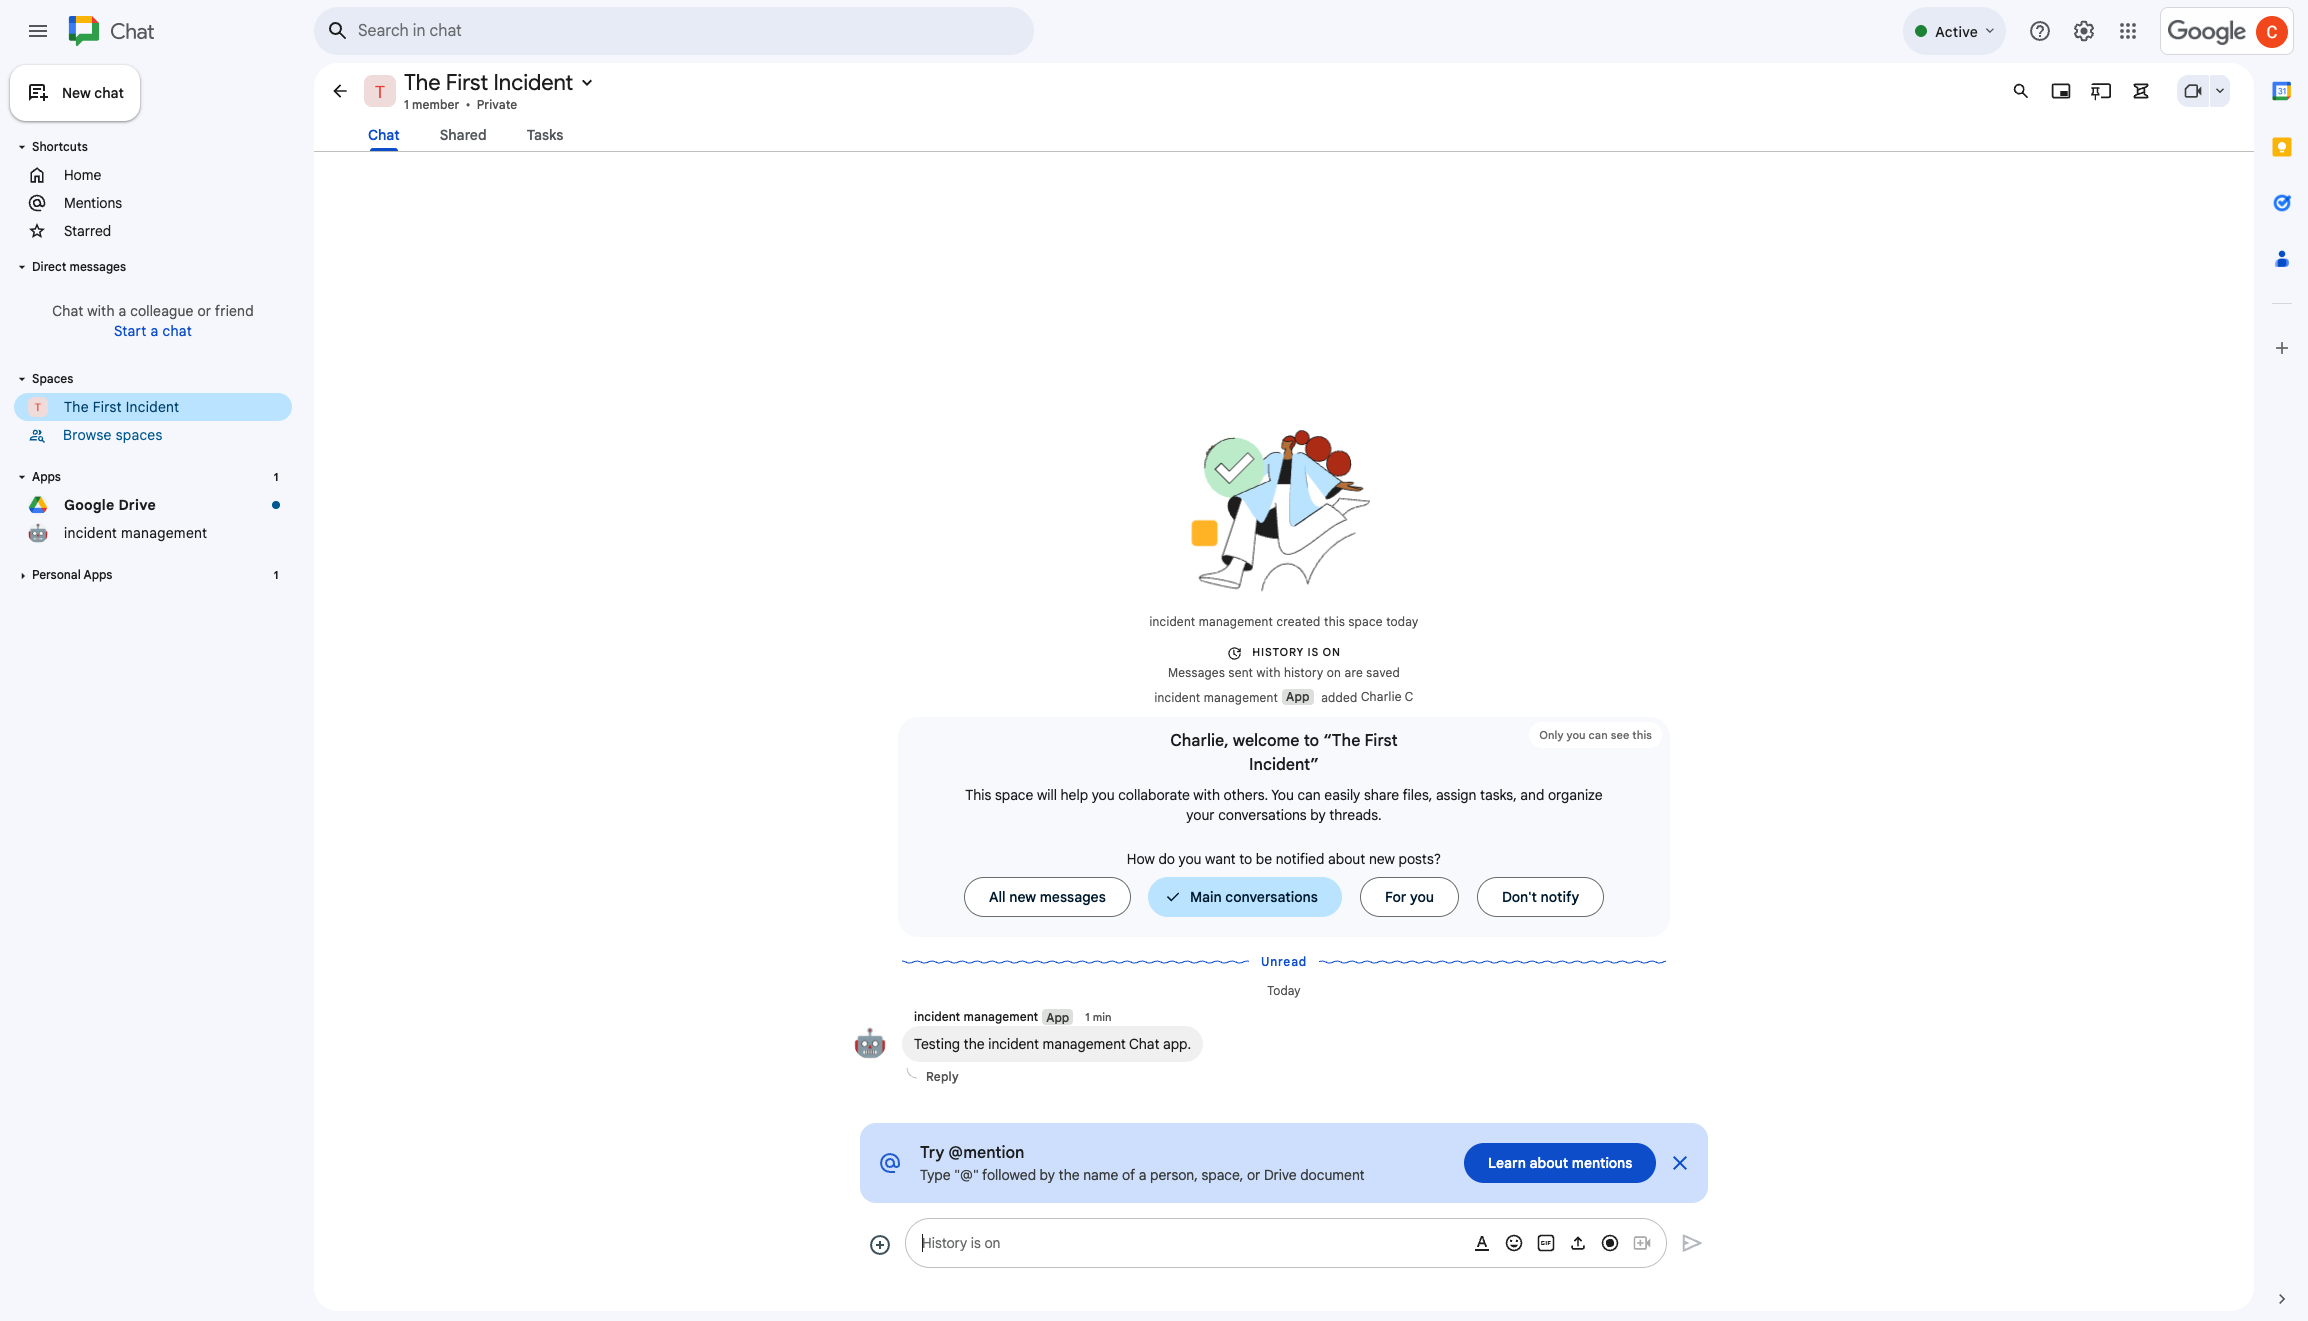
  • Olay yanıtı Chat alanı.
    Şekil 3. Olay yanıtı Chat alanı.
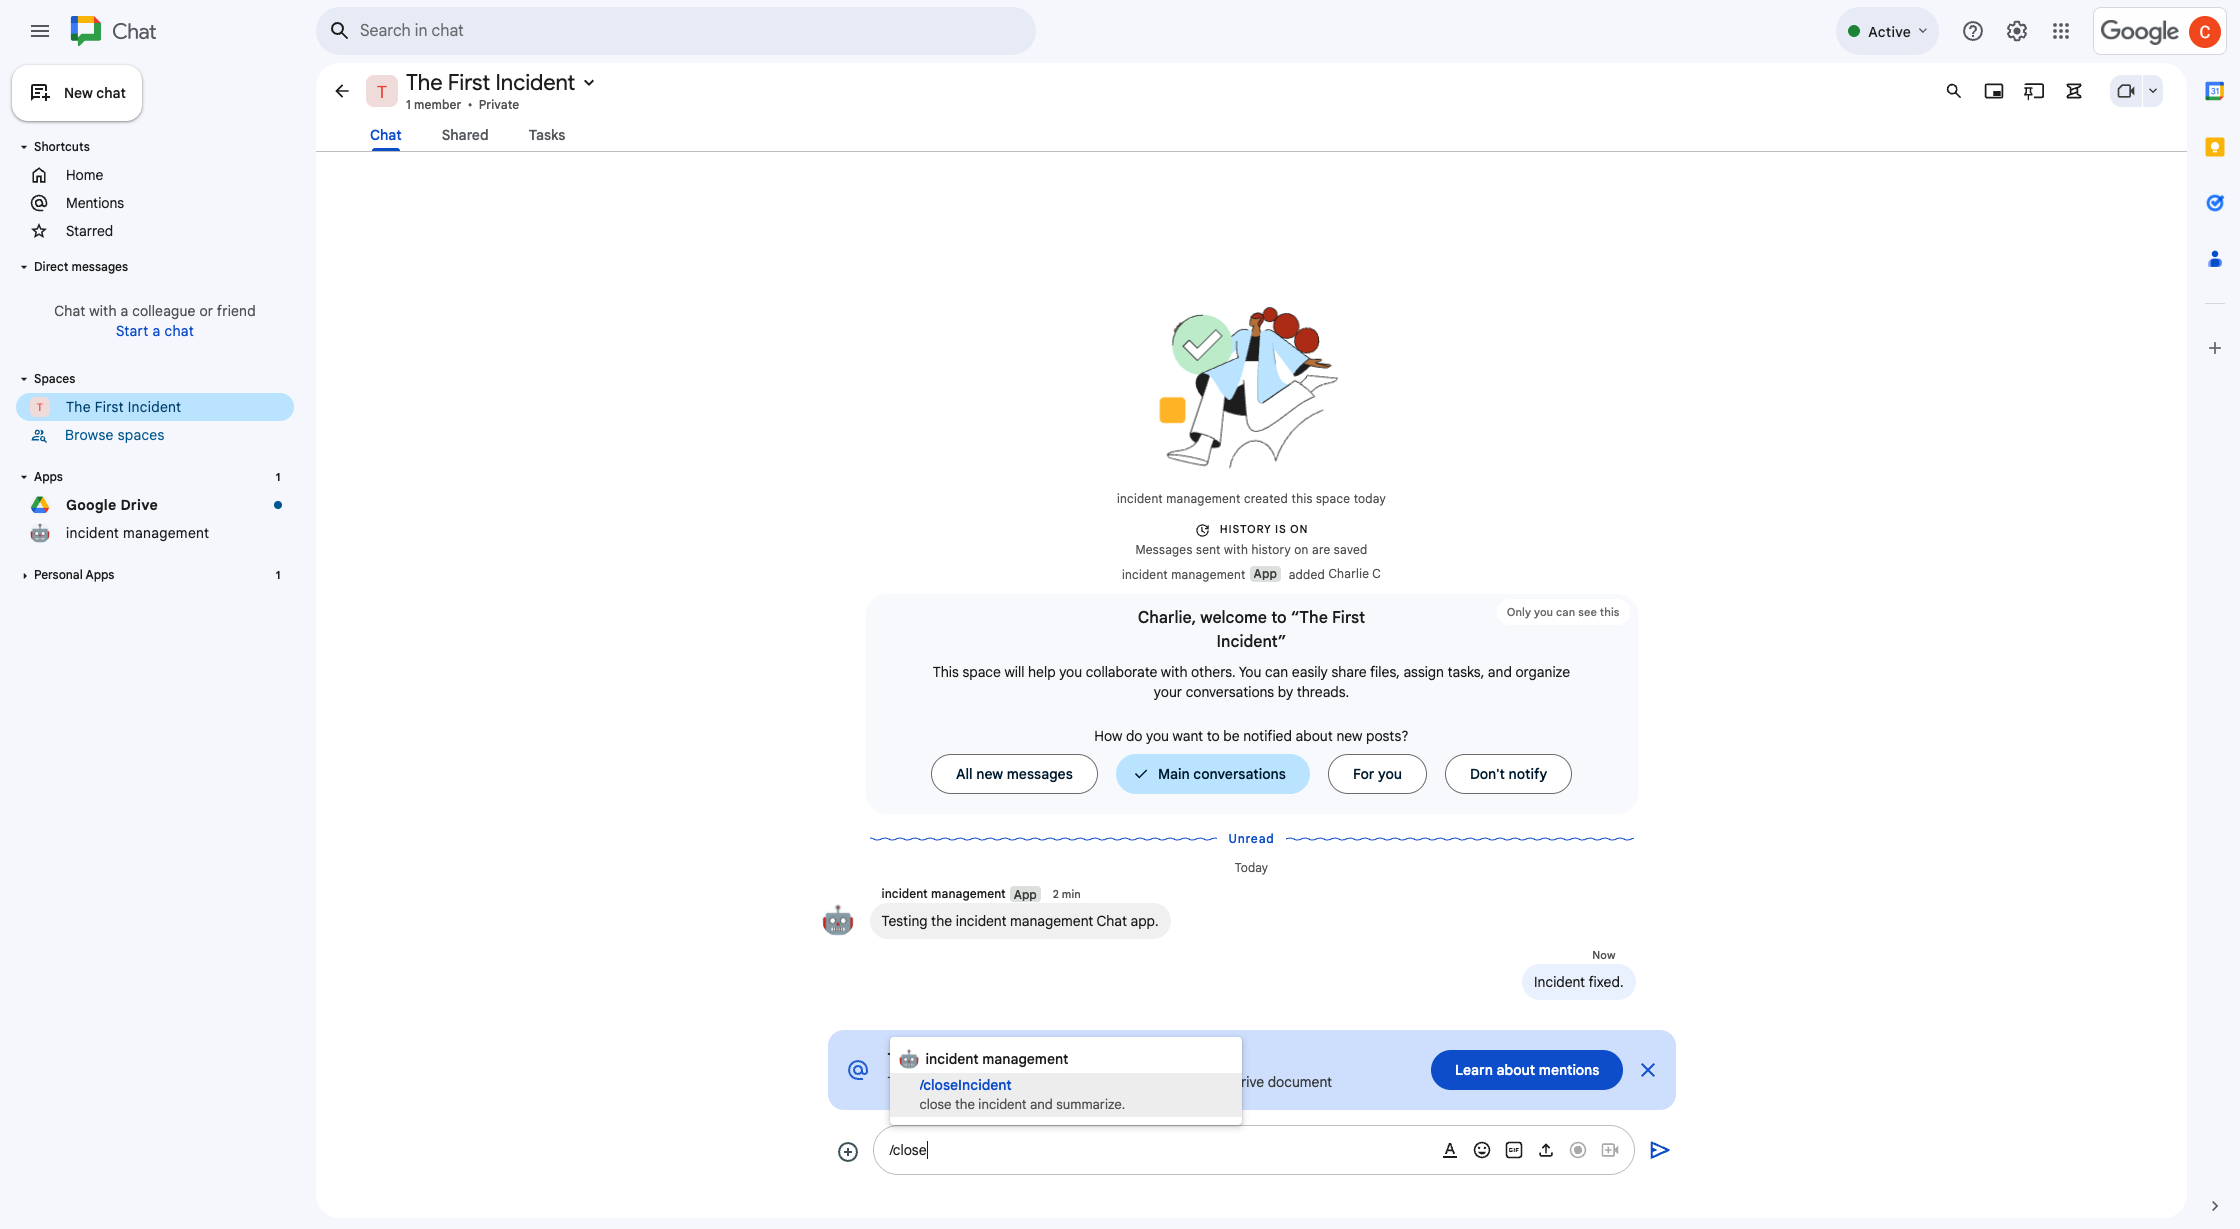
  • Eğik çizgi komutuyla olayı çözme
    Şekil 4. Eğik çizgi komutuyla olayı çözme
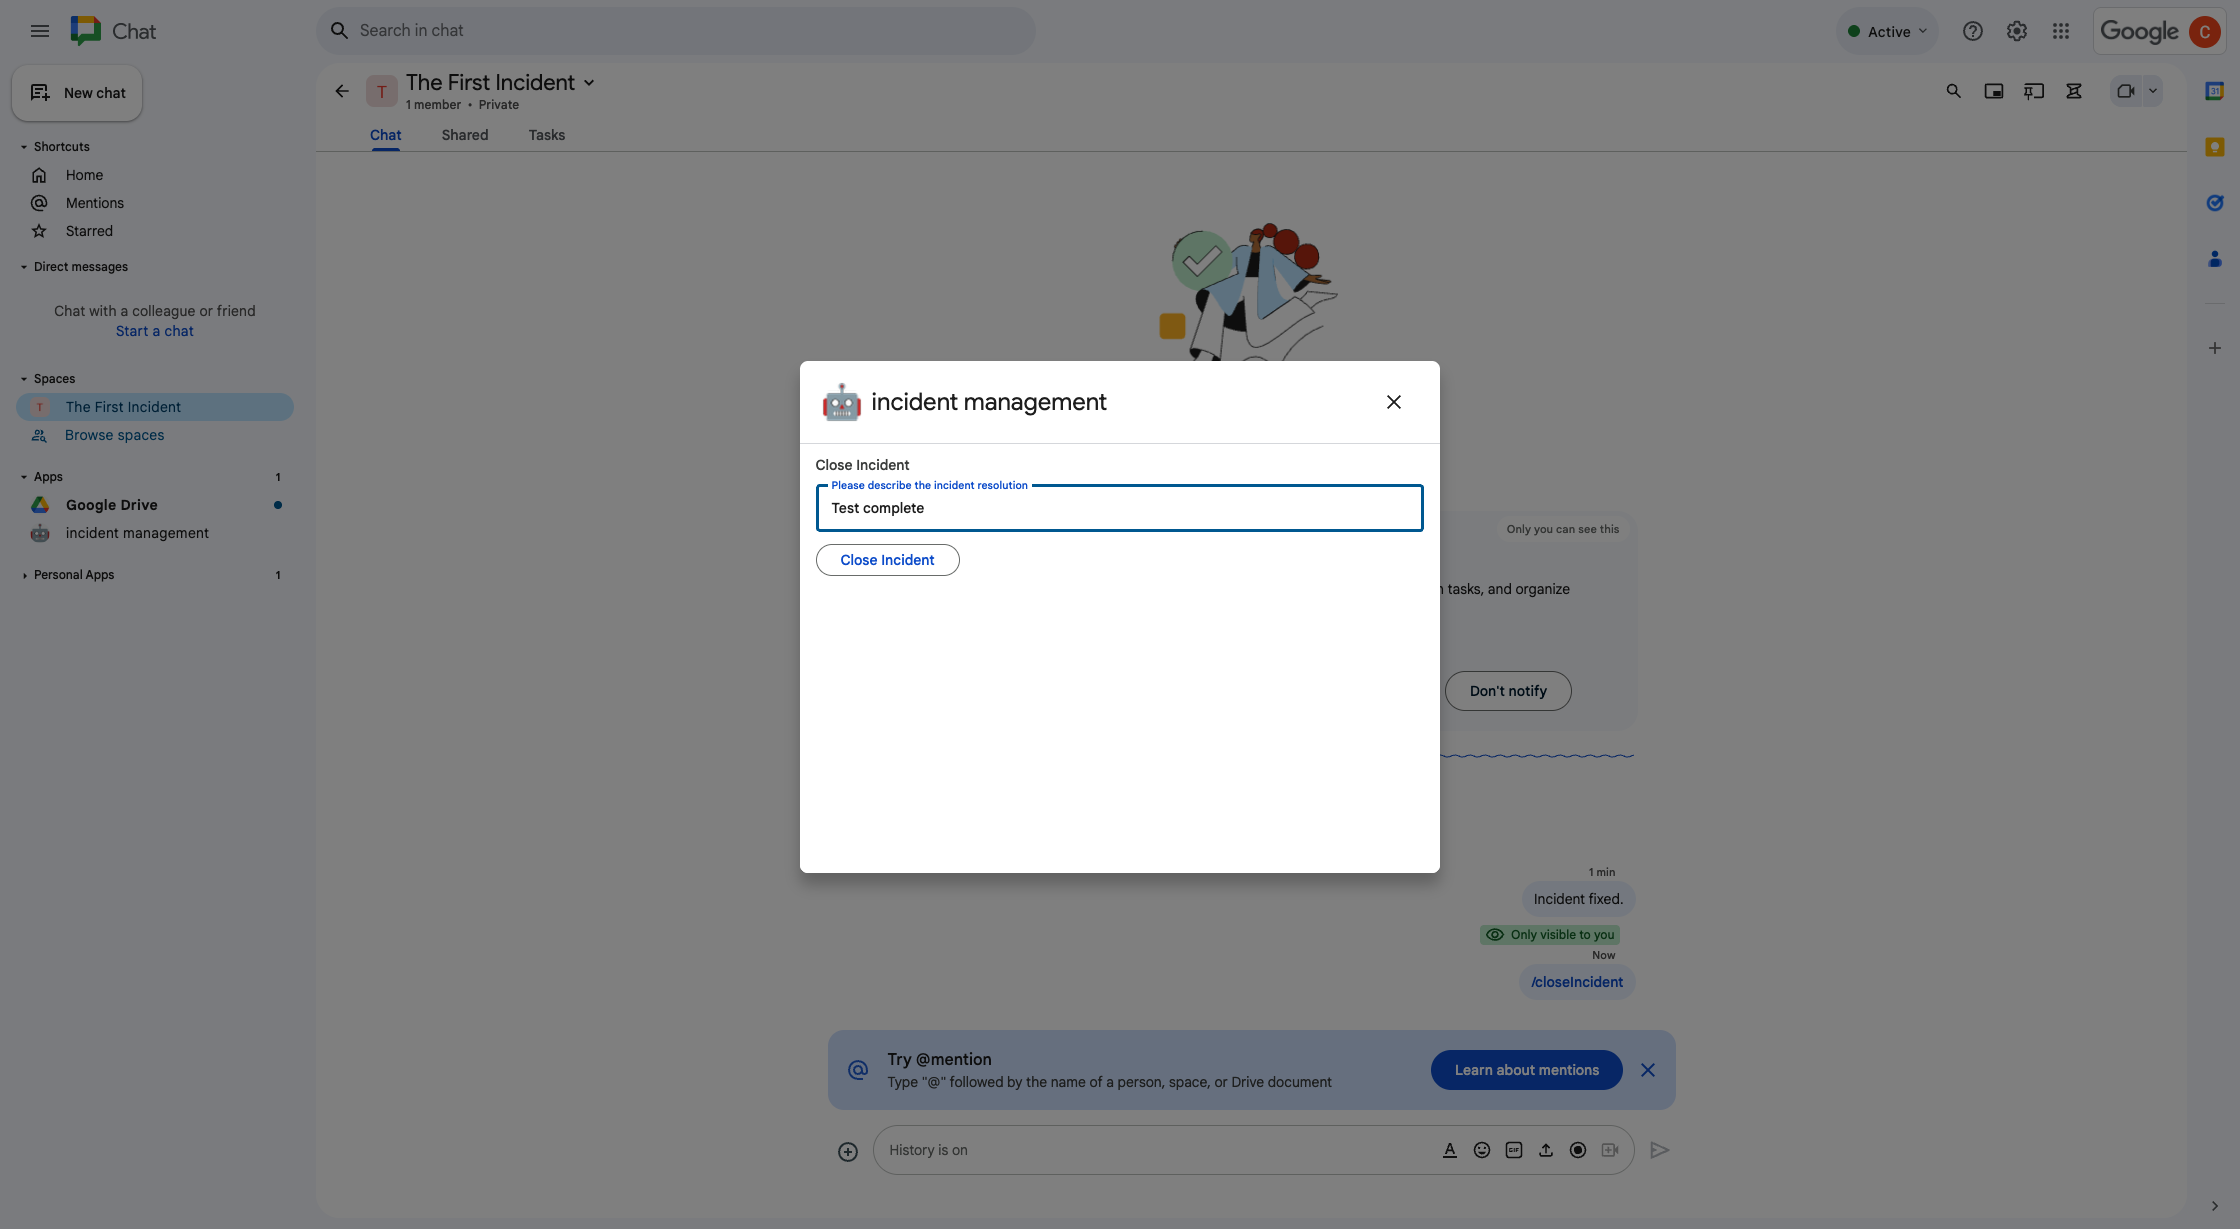
  • Olay çözümü iletişim kutusu.
    Şekil 5. Olay çözümü iletişim kutusu.
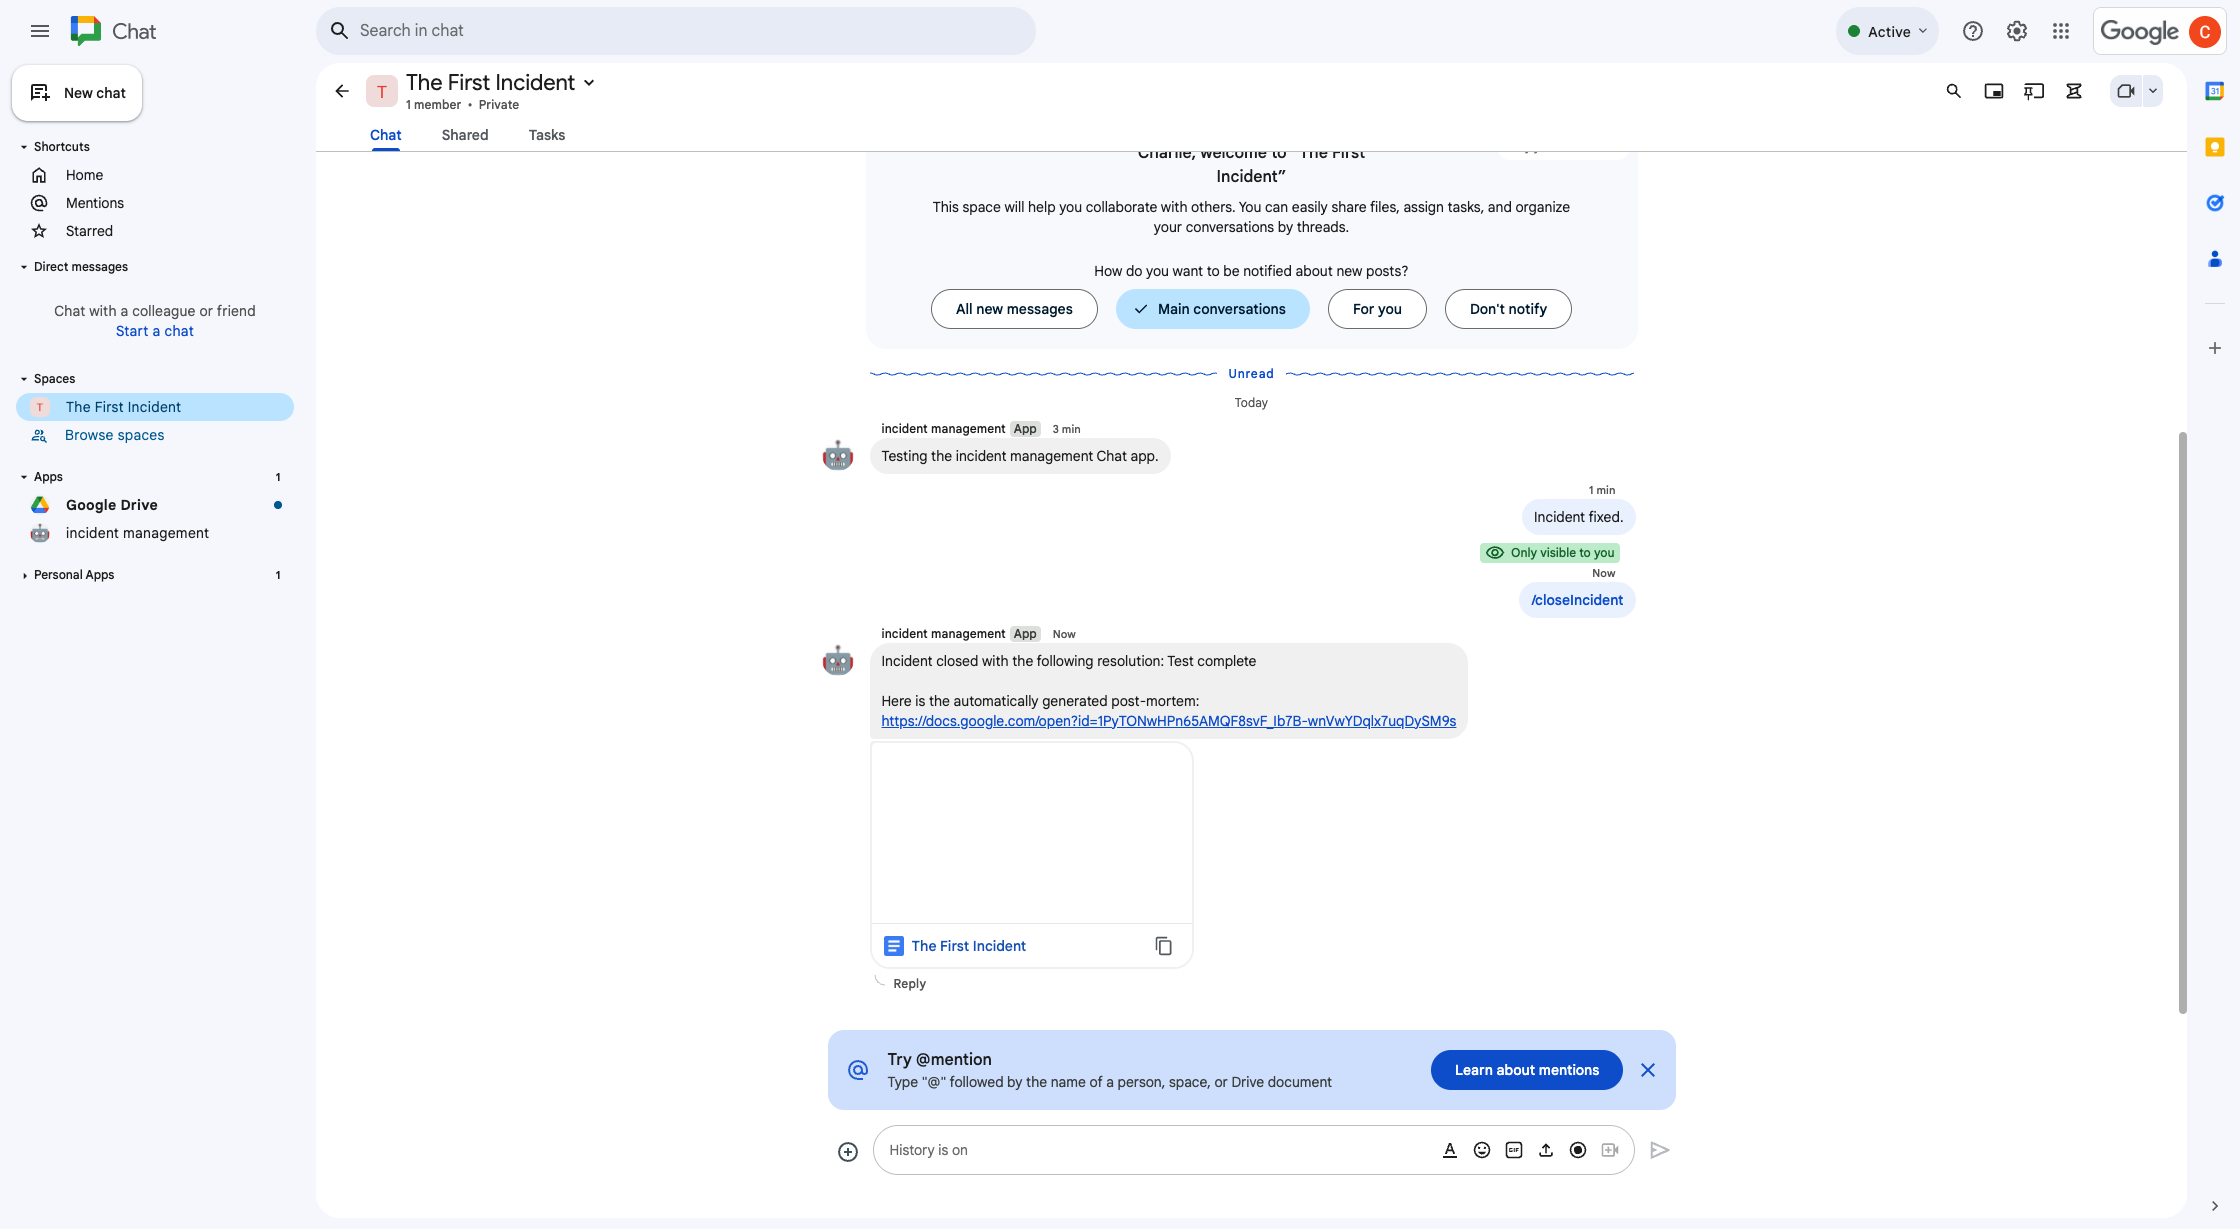
  • Olay çözümüyle ilgili Google Dokümanlar dokümanı alanda paylaşıldı.
    Şekil 6. Olay çözümüyle ilgili Google Dokümanlar belgesi alanda paylaşıldı.
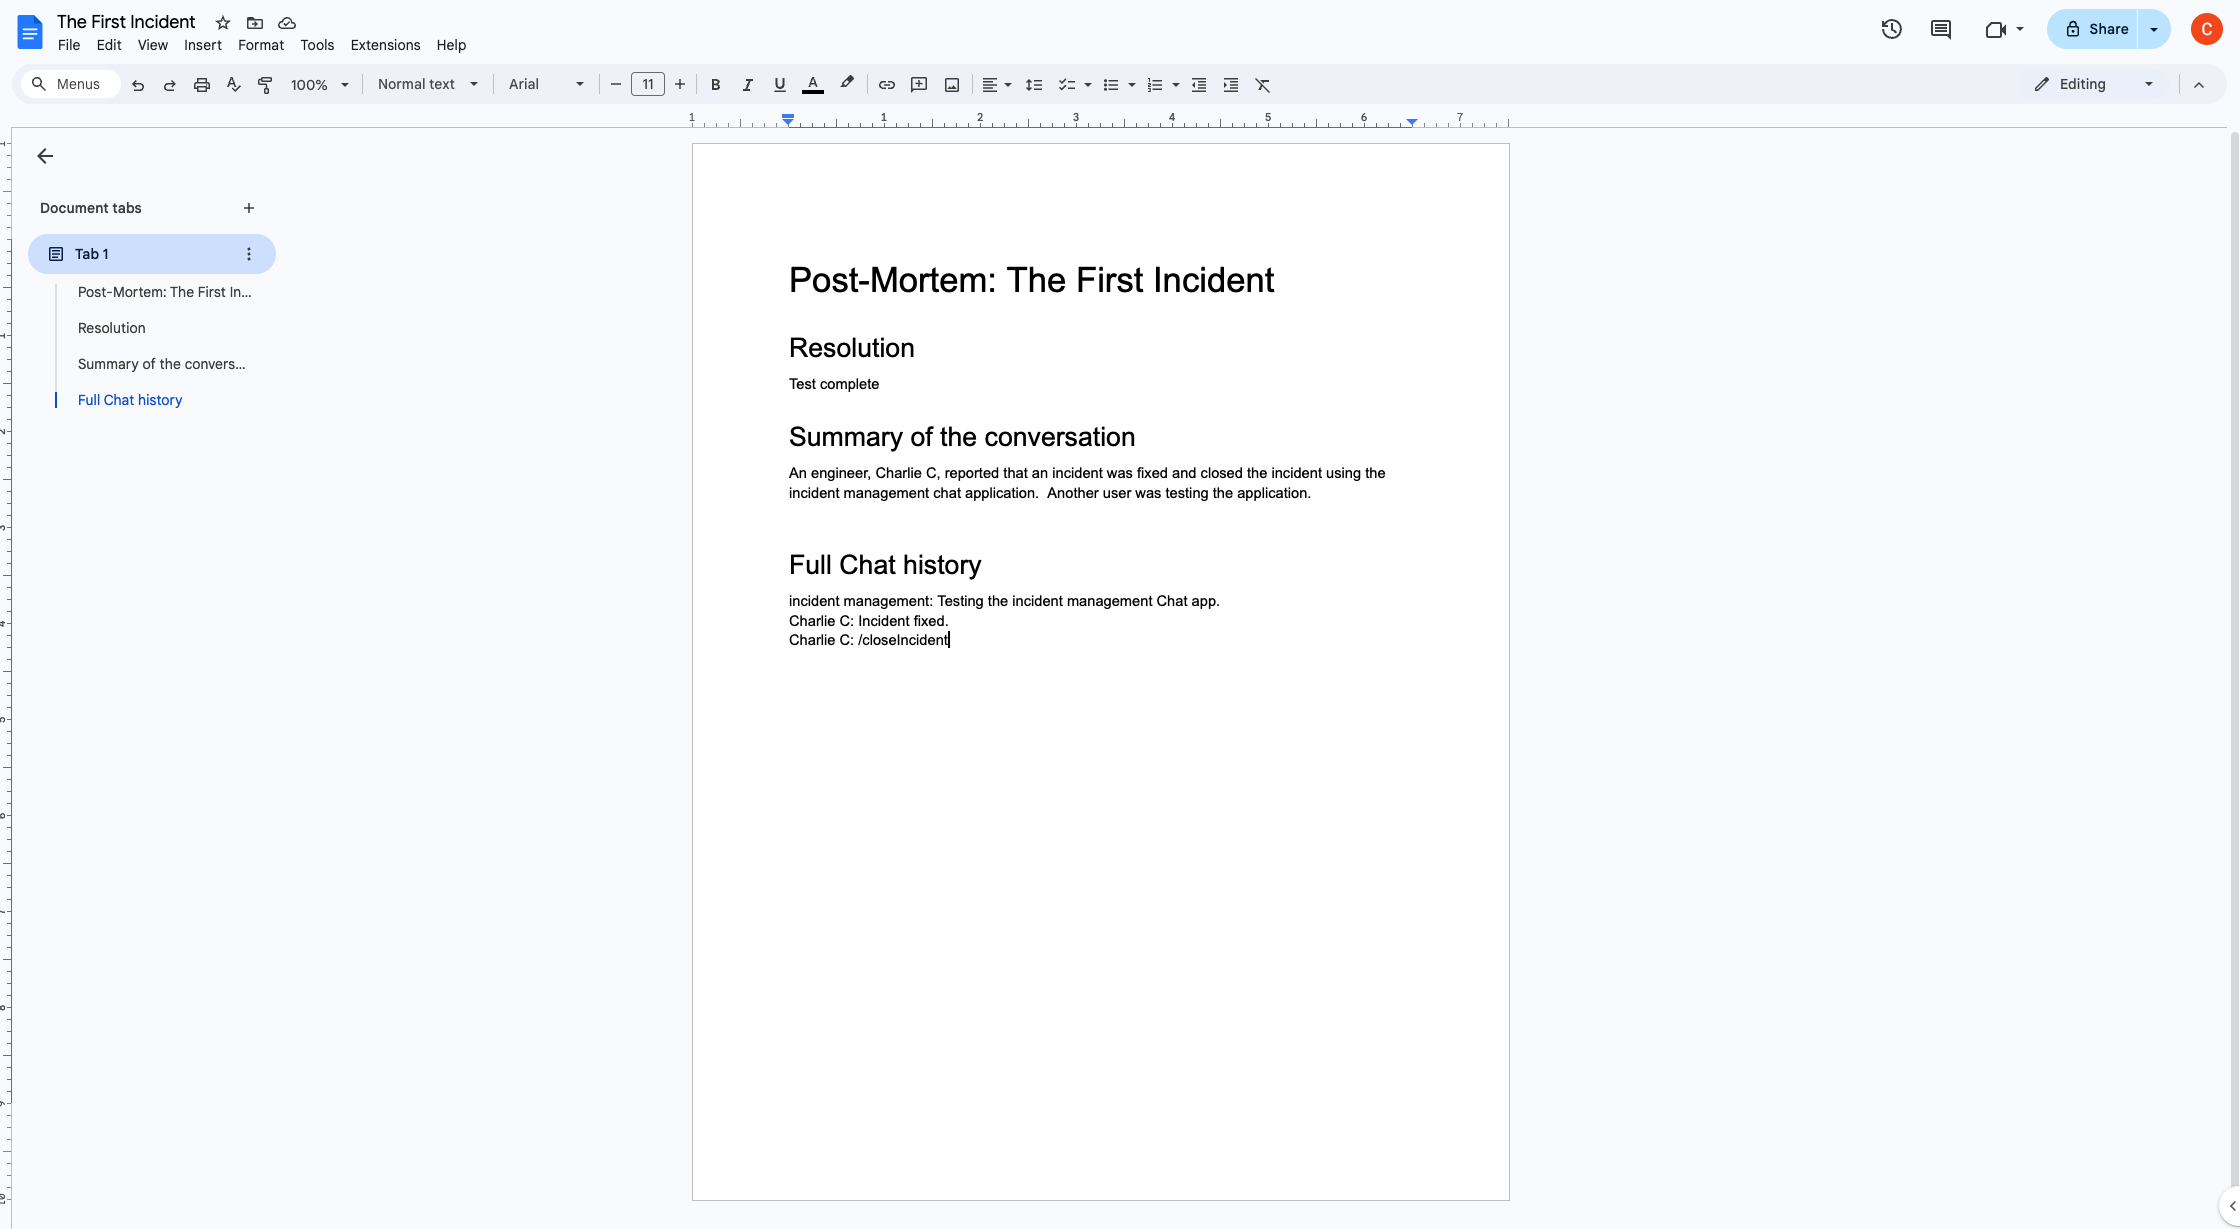
  • Yapay zeka özetiyle ilgili olay çözümü Google Dokümanı.
    Şekil 7. Yapay zeka özetiyle ilgili olay çözümü Google Dokümanı.

Ön koşullar

Kuruluşunuz için bu ön koşullardan herhangi birinin etkinleştirilmesi gerekiyorsa Google Workspace yöneticinizden bunları etkinleştirmesini isteyin:

  • Google Chat'e erişimi olan bir Business veya Enterprise Google Workspace hesabı.
  • Google Workspace için Dizin'in (kişi paylaşımı) etkinleştirilmesi gerekir. Olay uygulaması, olay müdahale ekiplerinin ad ve e-posta adresi gibi iletişim bilgilerini aramak için dizini kullanır. Olay yanıtlayanlar, Google Workspace kuruluşunuzda Chat hesabı olan kullanıcılar olmalıdır.

Hedefler

  • Olaylara yanıt veren bir Chat uygulaması oluşturun.
  • Aşağıdakileri yaparak kullanıcıların olaylara yanıt vermesine yardımcı olun:
    • Olay yanıtı alanları oluşturma
    • Olayları ve yanıtları özetleyen mesajlar yayınlama
    • Etkileşimli sohbet uygulaması özellikleriyle ortak çalışmayı destekler.
  • Vertex AI ile görüşmeleri ve çözümleri özetleyin.

Mimari

Aşağıdaki şemada, olay müdahalesi Chat uygulaması tarafından kullanılan Google Workspace ve Google Cloud kaynaklarının mimarisi gösterilmektedir.
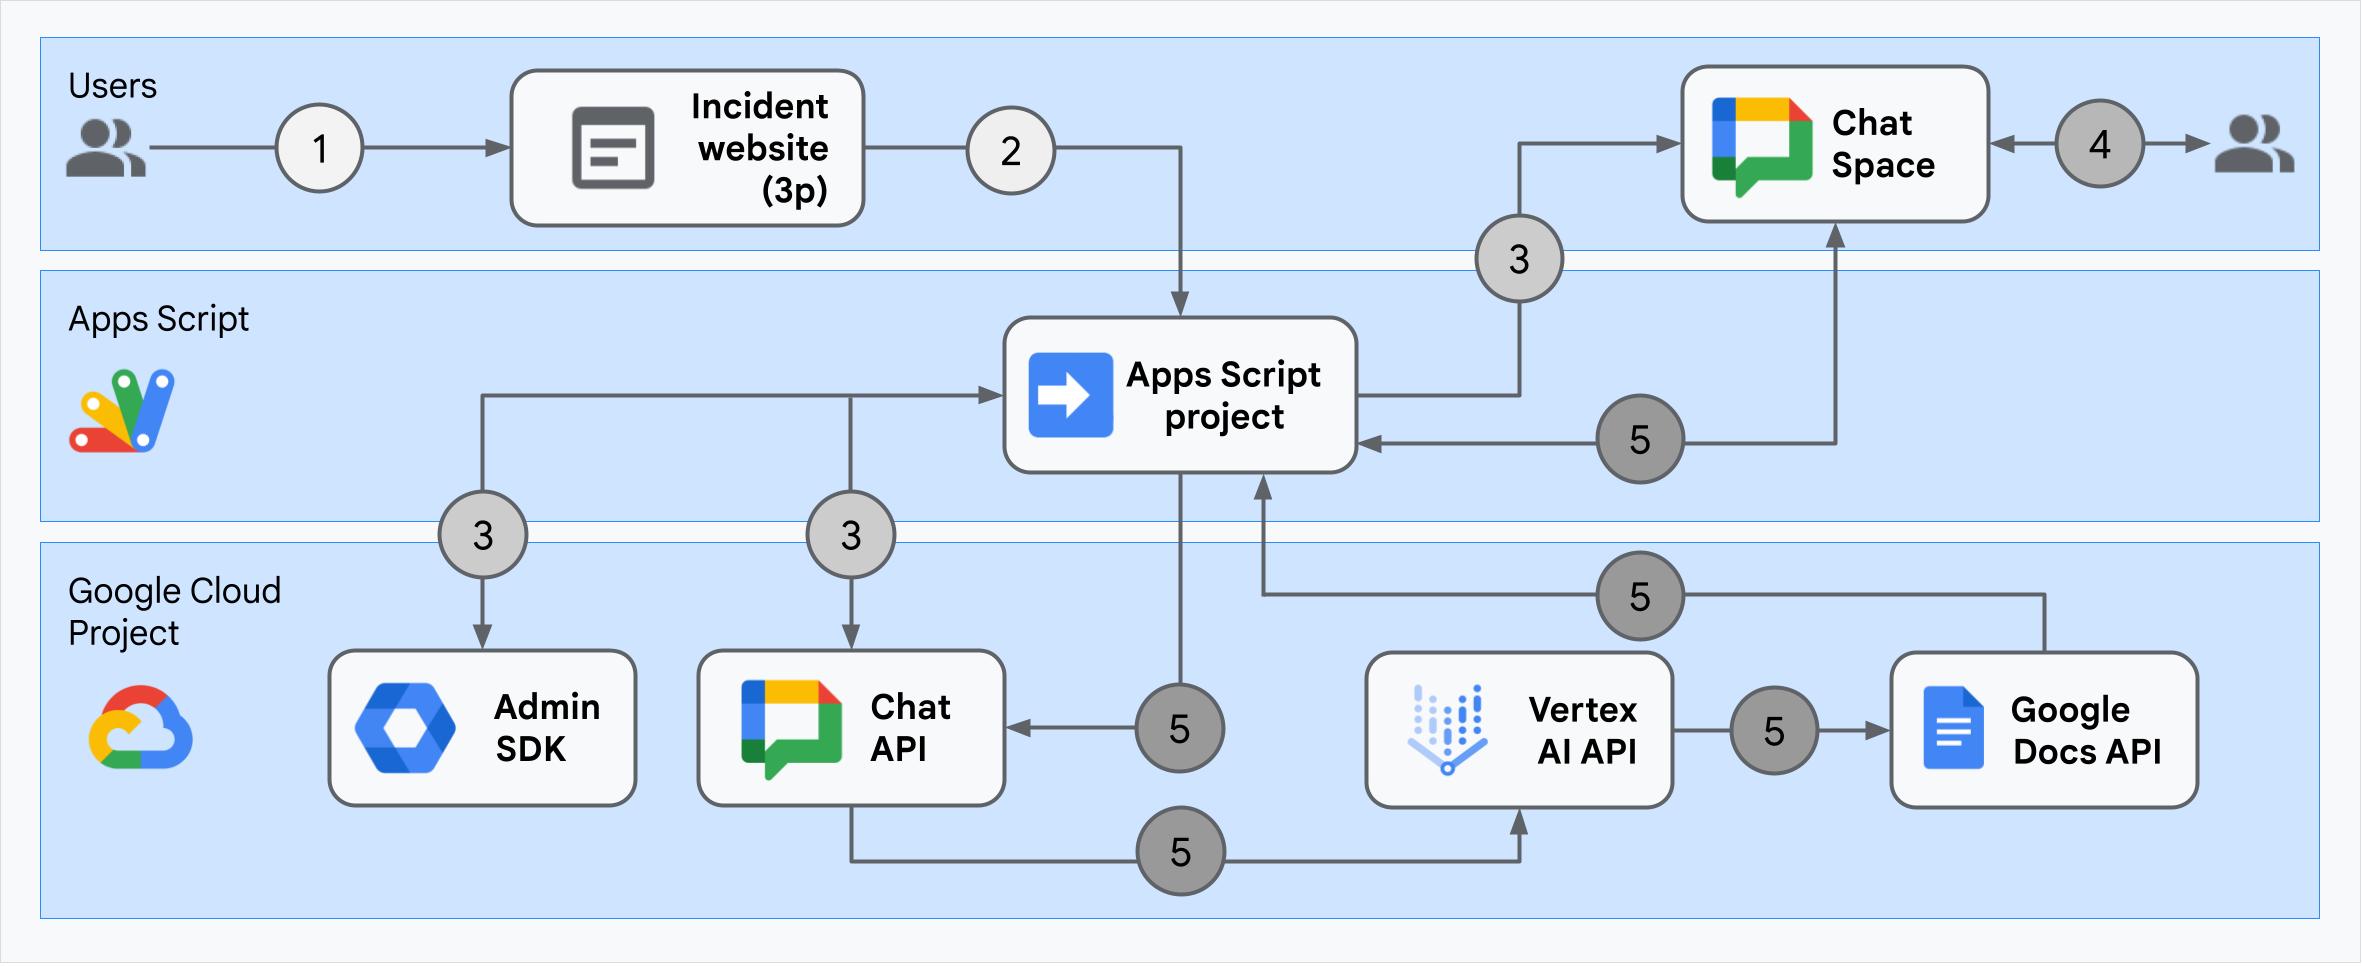
Olay yanıtı Chat uygulamasının mimarisi

Mimari, olay yanıtı Chat uygulamasının bir olayı ve çözümü nasıl işlediğini gösterir.

  1. Kullanıcı, Apps Komut Dosyası'nda barındırılan harici bir web sitesinden olay başlatırsa.

  2. Web sitesi, Apps Komut Dosyası'nda da barındırılan Chat uygulamasına eşzamansız bir HTTP isteği gönderir.

  3. Olaylara müdahale Chat uygulaması, isteği işler:

    1. Apps Komut Dosyası Yönetici SDK'sı hizmeti, kullanıcı kimliği ve e-posta adresi gibi ekip üyesi bilgilerini alır.

    2. Apps Komut Dosyası Gelişmiş Chat hizmetini kullanarak Chat API'ye bir dizi HTTP isteği gönderen olay yanıtı Chat uygulaması, bir olay Chat alanı oluşturur, bu alanı ekip üyeleriyle doldurur ve alana bir mesaj gönderir.

  4. Ekip üyeleri, Chat alanında olayı tartışır.

  5. Bir ekip üyesi, olayın çözüldüğünü bildirmek için hızlı komut kullanır.

    1. Apps Komut Dosyası'ndaki Gelişmiş Chat hizmeti kullanılarak Chat API'ye yapılan bir HTTP çağrısı, tüm Chat alanı mesajlarını listeler.

    2. Vertex AI, listelenen mesajları alır ve bir özet oluşturur.

    3. Apps Komut Dosyası DocumentApp hizmeti, bir Dokümanlar dokümanı oluşturur ve Vertex AI'ın özetini dokümana ekler.

    4. Olay yanıtı Chat uygulaması, özet Dokümanlar dokümanının bağlantısını içeren bir mesaj göndermek için Chat API'yi çağırır.

Ortamı hazırlama

Bu bölümde, sohbet uygulaması için Google Cloud projesinin nasıl oluşturulacağı ve yapılandırılacağı gösterilmektedir.

Google Cloud projesi oluşturma

Google API Konsolu

  1. Google API Console'da Menü > IAM & Admin > Proje Oluştur'a gidin.

    Proje oluşturma bölümüne gitme

  2. Proje Adı alanına projeniz için açıklayıcı bir ad girin.

    İsteğe bağlı: Proje kimliğini düzenlemek için Düzenle'yi tıklayın. Proje kimliği, proje oluşturulduktan sonra değiştirilemez. Bu nedenle, projenin kullanım ömrü boyunca ihtiyaçlarınızı karşılayacak bir kimlik seçin.

  3. Konum alanında, projeniz için olası konumları görüntülemek üzere Göz at'ı tıklayın. Ardından Seç'i tıklayın.
  4. Oluştur'u tıklayın. Google API Konsolu, Kontrol Paneli sayfasına gider ve projeniz birkaç dakika içinde oluşturulur.

gcloud CLI

Aşağıdaki geliştirme ortamlarından birinde Google Cloud KSA'ya (gcloud) erişin:

  • Cloud Shell: gcloud CLI'nın önceden ayarlandığı bir online terminal kullanmak için Cloud Shell'i etkinleştirin.
    Cloud Shell'i etkinleştirme
  • Yerel kabuk: Yerel geliştirme ortamı kullanmak için gcloud CLI'yı yükleyin ve ilk kullanıma hazırlayın.
    Cloud projesi oluşturmak için gcloud projects create komutunu kullanın:
    gcloud projects create PROJECT_ID
    Oluşturmak istediğiniz projenin kimliğini ayarlayarak PROJECT_ID yerine yazın.

Cloud projesi için faturalandırmayı etkinleştirme

Google API Konsolu

  1. Google API Konsolu'nda Faturalandırma'ya gidin. Şunu tıklayın: Menü > Faturalandırma > Projelerim.

    Projelerim için Faturalandırma'ya git

  2. Bir kuruluş seçin bölümünde, Google Cloud projenizle ilişkili kuruluşu seçin.
  3. Proje satırında İşlemler menüsünü () açın, Faturalandırmayı değiştir'i tıklayın ve Cloud Faturalandırma hesabını seçin.
  4. Hesap belirle'yi tıklayın.

gcloud CLI

  1. Kullanılabilir faturalandırma hesaplarını listelemek için şu komutu çalıştırın:
    gcloud billing accounts list
  2. Faturalandırma hesabını Google Cloud projesiyle bağlama:
    gcloud billing projects link PROJECT_ID --billing-account=BILLING_ACCOUNT_ID

    Aşağıdakini değiştirin:

    • PROJECT_ID, faturalandırmayı etkinleştirmek istediğiniz Cloud projesinin proje kimliğidir.
    • BILLING_ACCOUNT_ID, Google Cloud projesiyle ilişkilendirilecek faturalandırma hesabı kimliğidir.

API'leri etkinleştirme

Google API Konsolu

  1. Google API Konsolu'nda Google Chat API, Google Dokümanlar API, Admin SDK API, Google Workspace Marketplace SDK ve Vertex AI API'yi etkinleştirin.

    API'leri etkinleştirme

  2. API'leri doğru Cloud projesinde etkinleştirdiğinizi onaylayın ve İleri'yi tıklayın.

  3. Doğru API'leri etkinleştirdiğinizi onaylayın ve Etkinleştir'i tıklayın.

gcloud CLI

  1. Gerekirse mevcut Cloud projesini gcloud config set project komutuyla oluşturduğunuz projeye ayarlayın:

    gcloud config set project PROJECT_ID

    PROJECT_ID yerine oluşturduğunuz Cloud projesinin proje kimliğini girin.

  2. Google Chat API, Google Dokümanlar API, Admin SDK API, Google Workspace Marketplace SDK ve Vertex AI API'yi gcloud services enable komutuyla etkinleştirin:

    gcloud services enable chat.googleapis.com docs.googleapis.com admin.googleapis.com aiplatform.googleapis.com appsmarket-component.googleapis.com

Kimlik doğrulama ve yetkilendirme ayarlarını yapma

Chat uygulaması, Chat uygulamasının kimlik bilgilerini kullanarak Google Chat API'ye erişir. Uygulama, kullanıcı kimlik bilgileriyle Admin SDK API'ye ve Google Dokümanlar API'sine erişir.

Kullanıcı kimlik doğrulamasını ve yetkilendirmesini ayarlama

Kimlik doğrulama ve yetkilendirme, Chat uygulamasının bir olaya müdahale sürecini yürütmek için Google Workspace ve Google Cloud'daki kaynaklara erişmesine olanak tanır. Özellikle, Dokümanlar API'si ve Admin SDK API'si çağrılırken kullanıcı kimlik doğrulaması kullanılır.

Bu eğitimde, uygulamayı Workspace alanınızda dahili olarak yayınlayacağınız için yer tutucu bilgiler kullanabilirsiniz. Uygulamayı harici olarak yayınlamadan önce kullanıcı rızası ekranındaki yer tutucu bilgileri gerçek bilgilerle değiştirin.

  1. Google API Konsolu'nda Menü > Google Auth platform > Branding'e (Markalama) gidin.

    Markalama'ya gidin.

  2. Google Auth platformunu daha önce yapılandırdıysanız Markalama, Kitle ve Veri Erişimi'nde aşağıdaki OAuth kullanıcı rızası ekranı ayarlarını yapılandırabilirsiniz. Google Auth platformu henüz yapılandırılmadı mesajını görürseniz Başlayın'ı tıklayın:

    1. Uygulama Bilgileri bölümündeki Uygulama adı alanına Incident Management yazın.
    2. Kullanıcı destek e-postası bölümünde e-posta adresinizi veya uygun bir Google Grubu'nu seçin.
    3. İleri'yi tıklayın.
    4. Kitle bölümünde Şirket içi'ni seçin. Dahili'yi seçemiyorsanız Harici'yi seçin.
    5. İleri'yi tıklayın.
    6. İletişim bilgileri bölümünde, projenizde yapılan değişikliklerle ilgili bildirim alabileceğiniz bir e-posta adresi girin.
    7. İleri'yi tıklayın.
    8. Bitir bölümünde Google API Hizmetleri Kullanıcı Verileri Politikası'nı inceleyin ve kabul ediyorsanız Google API Hizmetleri: Kullanıcı Verileri Politikası'nı kabul ediyorum'u seçin.
    9. Devam'ı tıklayın.
    10. Oluştur'u tıklayın.
    11. Kullanıcı türü için Harici'yi seçtiyseniz test kullanıcıları ekleyin:
      1. Kitle'yi tıklayın.
      2. Test kullanıcıları bölümünde Kullanıcı ekle'yi tıklayın.
      3. E-posta adresinizi ve yetkili diğer test kullanıcılarını girip Kaydet'i tıklayın.
  3. Veri erişimi > Kapsam Ekleme veya Kaldırma'yı tıklayın. Google Cloud projenizde etkinleştirdiğiniz her API'nin kapsam listesini içeren bir panel gösterilir.

    1. Kapsamları manuel olarak ekle bölümüne aşağıdaki kapsamları yapıştırın:

      • https://www.googleapis.com/auth/documents
      • https://www.googleapis.com/auth/admin.directory.user.readonly
      • https://www.googleapis.com/auth/script.external_request
      • https://www.googleapis.com/auth/userinfo.email
      • https://www.googleapis.com/auth/cloud-platform
    2. Tabloya Ekle'yi tıklayın.

    3. Güncelle'yi tıklayın.

    4. Uygulamanızın gerektirdiği kapsamları seçtikten sonra Veri Erişimi sayfasında Kaydet'i tıklayın.

Uygulama kimlik doğrulaması ve yetkilendirmesini ayarlama

Chat API'yi çağırmak için uygulama kimlik doğrulaması kullanılır.

Google Cloud Console'da hizmet hesabı oluşturma

Hizmet hesabı oluşturmak için aşağıdaki adımları uygulayın:

Google Cloud Console

  1. Google Cloud Console'da Menü > IAM & Admin > Service Accounts'a (Hizmet Hesapları) gidin.

    Hizmet hesaplarına gidin

    Geri kalan adımlar Google Cloud Console'da gösterilir.

  2. Bir Google Cloud projesi seçin.
  3. Hizmet hesabı oluştur'u tıklayın.
  4. Google Cloud Console'da gösterilecek bir hizmet hesabı adı girin.
  5. Erişim denetimlerini şimdi ayarlamak istemiyorsanız hizmet hesabını oluşturmayı tamamlamak için Bitti'yi tıklayın. Erişim denetimlerini hemen ayarlamak için Oluştur ve devam et'i tıklayın ve sonraki adıma geçin.
  6. İsteğe bağlı: Google Workspace kaynaklarının yanı sıra Google Cloud projenizin kaynaklarına erişim izni vermek için hizmet hesabınıza roller atayın. Daha fazla bilgi için Projelere, klasörlere ve kuruluşlara erişimi yönetme başlıklı makaleyi inceleyin.
  7. Devam'ı tıklayın.
  8. İsteğe bağlı: Bu hizmet hesabıyla işlem yapabilecek ve hesabı yönetebilecek kullanıcıları veya grupları girin. Daha fazla bilgi için Hizmet hesabı kimliğine bürünme başlıklı makaleyi inceleyin.
  9. Hizmet hesabı oluşturma işlemini tamamlamak için Bitti'yi tıklayın.

    Hizmet hesabının e-posta adresini not edin.

gcloud CLI

  1. Hizmet hesabını oluşturun:
    gcloud iam service-accounts create SERVICE_ACCOUNT_NAME \
      --display-name="SERVICE_ACCOUNT_NAME"
  2. İsteğe bağlı: Google Workspace kaynaklarının yanı sıra Google Cloud projenizin kaynaklarına erişim izni vermek için hizmet hesabınıza roller atayın. Daha fazla bilgi için Projelere, klasörlere ve kuruluşlara erişimi yönetme başlıklı makaleyi inceleyin.

Hizmet hesabı, hizmet hesabı sayfasında görünür. Ardından, hizmet hesabı için özel anahtar oluşturun.

Özel anahtar oluşturma

Hizmet hesabı için özel anahtar oluşturmak ve indirmek üzere aşağıdaki adımları uygulayın:

  1. Google Cloud Console'da Menü > IAM & Admin > Service Accounts'a (Hizmet Hesapları) gidin.

    Hizmet hesaplarına gidin

    Geri kalan adımlar Google Cloud Console'da gösterilir.

  2. Bir Google Cloud projesi seçin.
  3. Anahtar oluşturmak istediğiniz hizmet hesabının e-posta adresini tıklayın.
  4. Anahtarlar sekmesini tıklayın.
  5. Anahtar ekle açılır menüsünü tıklayıp Yeni anahtar oluştur'u seçin.
  6. Anahtar türü olarak JSON'u seçin ve Oluştur'u tıklayın.

    Herkese açık/özel yeni anahtar çiftiniz oluşturulur ve makinenize hizmet hesabı anahtarı dosyası olarak indirilir. İndirilen JSON dosyasını çalışma dizininize credentials.json olarak kaydedin. Bu dosya, anahtarın tek kopyasıdır. Anahtar dosyasını indirdikten sonra tekrar indiremezsiniz. Anahtarınızı güvenli bir şekilde nasıl depolayacağınız hakkında bilgi edinmek için Hizmet hesabı anahtarlarını yönetmeyle ilgili en iyi uygulamalar başlıklı makaleyi inceleyin.

Hizmet hesapları hakkında daha fazla bilgi için Google Cloud IAM belgelerindeki Hizmet hesapları başlıklı makaleyi inceleyin.

Google Workspace Marketplace ile uyumlu bir OAuth istemcisi oluşturma

Google Workspace Marketplace ile uyumlu bir OAuth istemcisi oluşturmak için aşağıdaki adımları uygulayın:

  1. Google API Console'da Menü > IAM ve Yönetici > Hizmet Hesapları'na gidin.

    Hizmet hesaplarına gidin

  2. Chat uygulamanız için oluşturduğunuz hizmet hesabını tıklayın.

  3. Gelişmiş ayarlar'ı tıklayın.

  4. Google Workspace Marketplace ile uyumlu OAuth istemcisi oluştur'u tıklayın.

  5. Devam'ı tıklayın.

Google Workspace Marketplace ile uyumlu bir OAuth istemcisinin oluşturulduğunu belirten bir onay mesajı gösterilir.

Chat uygulamasını oluşturma ve dağıtma

Aşağıdaki bölümde, Chat uygulamanız için gereken tüm uygulama kodunu içeren bir Apps Komut Dosyası projesinin tamamını kopyalayıp güncelleyeceksiniz. Bu nedenle, her dosyayı kopyalayıp yapıştırmanız gerekmez.

Bazı işlevlerin adlarının sonunda alt çizgi bulunur. Örneğin, ChatApp.gs işlevinden concatenateAllSpaceMessages_(). Alt çizgi, tarayıcıda açıkken işlevi olay başlatma web sayfasından gizler. Daha fazla bilgi için Özel işlevler konusuna bakın.

Apps Komut Dosyası, .gs komut dosyalarını ve .html dosyalarını destekler. Bu desteğe uymak için uygulamanın istemci tarafındaki JavaScript'i <script /> etiketleri, CSS'si ise bir HTML dosyasındaki <style /> etiketleri içinde yer alır.

İsteğe bağlı olarak, projenin tamamını GitHub'da görüntüleyebilirsiniz.

GitHub'da göster

Her dosyanın genel bir bakışını aşağıda bulabilirsiniz:

Consts.gs

Cloud proje kimliğiniz, Vertex AI konum kimliğiniz, hizmet hesabı için uygulama kimlik bilgileri ve bir olayı kapatmak için kullanılan hızlı komut kimliği dahil olmak üzere diğer kod dosyaları tarafından referans verilen sabitleri tanımlar.

Consts.gs kodunu görüntüleme

apps-script/chat/incident-response-app-auth/Consts.gs
const PROJECT_ID = 'replace-with-your-project-id';
const APP_CREDENTIALS = 'replace-with-your-app-credentials';
const APP_CREDENTIALS_SCOPES = 'https://www.googleapis.com/auth/chat.bot https://www.googleapis.com/auth/chat.app.memberships https://www.googleapis.com/auth/chat.app.spaces.create';
const VERTEX_AI_LOCATION_ID = 'us-central1';
const CLOSE_INCIDENT_COMMAND_ID = 1;
const MODEL_ID = 'gemini-2.5-flash-lite';
ChatApp.gs

Mesajlar, düğme tıklamaları, uygulama komutları (onAppCommand) ve iletişim kutuları dahil olmak üzere Chat etkileşimi etkinliklerini işler. Olay çözümüyle ilgili ayrıntıları toplamak için bir iletişim kutusu açarak Close incident hızlı komutuna yanıt verir. Chat API'deki spaces.messages.list yöntemini çağırarak alandaki mesajları okur. Apps Komut Dosyası'nda Admin SDK Directory hizmetini kullanarak kullanıcı kimliklerini alır.

ChatApp.gs kodunu görüntüleme

apps-script/chat/incident-response-app-auth/ChatApp.gs
/**
 * Responds to a MESSAGE event in Google Chat.
 * 
 * It always responds with a simple "Hello" text message.
 *
 * @param {Object} event the event object from Google Chat
 */
function onMessage(event) {
  return { hostAppDataAction: { chatDataAction: { createMessageAction: { message: {
    text: "Hello from Incident Response app!"
  }}}}};
}

/**
 * Responds to an APP_COMMAND event in Google Chat.
 *
 * @param {Object} event the event object from Google Chat
 */
function onAppCommand(event) {
  if (event.chat.appCommandPayload.appCommandMetadata.appCommandId != CLOSE_INCIDENT_COMMAND_ID) {
    return { hostAppDataAction: { chatDataAction: { createMessageAction: { message: {
      text: "Command not recognized. Use the quick command `Close incident` to close the incident managed by this space."
    }}}}};
  }
  return { action: { navigations: [{ pushCard: { sections: [{
    header: "Close Incident",
    widgets: [{
      textInput: {
        label: "Please describe the incident resolution",
        type: "MULTIPLE_LINE",
        name: "description"
      }
    }, {
      buttonList: { buttons: [{
        text: "Close Incident",
        onClick: { action: { function: "closeIncident" }}
      }]}
    }]
  }]}}]}};
}

/**
 * Responds to a BUTTON_CLICKED event in Google Chat from Close Incident dialog.
 *
 * @param {Object} event the event object from Google Chat
 */
function closeIncident(event) {
  if (event.chat.buttonClickedPayload.isDialogEvent) {
    if (event.chat.buttonClickedPayload.dialogEventType == 'SUBMIT_DIALOG') {
      return processSubmitDialog_(event);
    }
    return { action: { navigations: [{ endNavigation: {
      action: "CLOSE_DIALOG" }
    }]}};
  }
}

/**
 * Responds to a BUTTON_CLICKED event in Google Chat from Close Incident dialog submission.
 *
 * It creates a Doc with a summary of the incident information and posts a message
 * to the space with a link to the Doc.
 *
 * @param {Object} event the event object from Google Chat
 */
function processSubmitDialog_(event) {
  const resolution = event.commonEventObject.formInputs.description.stringInputs.value[0];
  const space = event.chat.buttonClickedPayload.space;
  const chatHistory = concatenateAllSpaceMessages_(space.name);
  const chatSummary = summarizeChatHistory_(chatHistory);
  const docUrl = createDoc_(space.displayName, resolution, chatHistory, chatSummary);
  return { hostAppDataAction: { chatDataAction: { createMessageAction: { message: {
    text: `Incident closed with the following resolution: ${resolution}\n\nHere is the automatically generated post-mortem:\n${docUrl}`
  }}}}};
}

/**
 * Lists all the messages in the Chat space, then concatenate all of them into
 * a single text containing the full Chat history.
 *
 * For simplicity for this demo, it only fetches the first 100 messages.
 *
 * @return {string} a text containing all the messages in the space in the format:
 *          Sender's name: Message
 */
function concatenateAllSpaceMessages_(spaceName) {
  // Call Chat API method spaces.messages.list
  const response = Chat.Spaces.Messages.list(spaceName, { 'pageSize': 100 });
  const messages = response.messages;
  // Fetch the display names of the message senders and returns a text
  // concatenating all the messages.
  let userMap = new Map();
  return messages
    .map(message => `${getUserDisplayName_(userMap, message.sender.name)}: ${message.text}`)
    .join('\n');
}

/**
 * Obtains the display name of a user by using the Admin Directory API.
 *
 * The fetched display name is cached in the provided map, so we only call the API
 * once per user.
 *
 * If the user does not have a display name, then the full name is used.
 *
 * @param {Map} userMap a map containing the display names previously fetched
 * @param {string} userName the resource name of the user
 * @return {string} the user's display name
 */
function getUserDisplayName_(userMap, userName) {
  if (userMap.has(userName)) {
    return userMap.get(userName);
  }
  let displayName = 'Unknown User';
  try {
    const user = AdminDirectory.Users.get(
      userName.replace("users/", ""),
      { projection: 'BASIC', viewType: 'domain_public' });
    displayName = user.name.displayName ? user.name.displayName : user.name.fullName;
  } catch (e) {
    // Ignore error if the API call fails (for example, because it's an
    // out-of-domain user or Chat app) and just use 'Unknown User'.
  }
  userMap.set(userName, displayName);
  return displayName;
}
ChatSpaceCreator.gs

Kullanıcıların olay başlatma web sayfasına girdiği form verilerini alır ve bunları kullanarak Chat alanı oluşturup doldurarak Chat alanı ayarlar. Ardından, olayla ilgili bir mesaj yayınlar.

ChatSpaceCreator.gs kodunu görüntüleme

apps-script/chat/incident-response-app-auth/ChatSpaceCreator.gs
/**
 * Handles an incident by creating a chat space with the provided title and members, and posting a message.
 * All the actions are done using application credentials.
 *
 * @param {Object} formData - The data submitted by the user. It should contain the fields:
 *                           - title: The display name of the chat space.
 *                           - description: The description of the incident.
 *                           - users: A comma-separated string of user emails to be added to the space.
 * @return {string} The resource name of the new space.
 */
function handleIncident(formData) {
  const users = formData.users.trim().length > 0 ? formData.users.split(',') : [];
  const service = getService_();
  if (!service.hasAccess()) {
    console.error(service.getLastError());
    return;
   }
  const spaceName = createChatSpace_(formData.title, service);
  createHumanMembership_(spaceName, getUserEmail(), service);
  for (const user of users ){
    createHumanMembership_(spaceName, user, service);
  }
  createMessage_(spaceName, formData.description, service);
  return spaceName;
}

/**
 * Creates a chat space.
 *
 * @param {string} displayName - The name of the chat space.
 * @param {object} service - The credentials of the service account.
 * @returns {string} The resource name of the new space.
*/
function createChatSpace_(displayName, service) {
  try {
    // For private apps, the alias can be used
    const my_customer_alias = "customers/my_customer";
    // Specify the space to create.
    const space = {
        displayName: displayName,
        spaceType: 'SPACE',                
        customer: my_customer_alias
    };
    // Call Chat API with a service account to create a message.
    const createdSpace = Chat.Spaces.create(
        space,
        {},
        // Authenticate with the service account token.
        {'Authorization': 'Bearer ' + service.getAccessToken()});
    return createdSpace.name;
  } catch (err) {
    // TODO (developer) - Handle exception.
    console.log('Failed to create space with error %s', err.message);
  }
}


/**
 * Creates a human membership in a chat space.
 *
 * @param {string} spaceName - The resource name of the space.
 * @param {string} email - The email of the user to be added.
 * @param {object} service - The credentials of the service account.
 */
function createHumanMembership_(spaceName, email, service){
  try{
    const membership = {
      member: {
        name: 'users/'+email,
        // User type for the membership
        type: 'HUMAN'
      }
    };
    const result = Chat.Spaces.Members.create(
      membership,
      spaceName,
      {},
      {'Authorization': 'Bearer ' + service.getAccessToken()}
    );
  } catch (err){
    console.log('Failed to create membership with error %s', err.message)
  }

}

/**
 * Creates a chat message.
 *
 * @param {string} spaceName - The resource name of the space.
 * @param {string} message - The text to be posted.
 * @param {object} service - The credentials of the service account.
 * @return {string} the resource name of the new message.
 */
function createMessage_(spaceName, message, service) {
  try {
    const request = {
      text: message
    };
    // Call Chat API with a service account to create a message.
    const result = Chat.Spaces.Messages.create(
        request,
        spaceName,
        {},
        // Authenticate with the service account token.
        {'Authorization': 'Bearer ' + service.getAccessToken()});
    return result.name;
  } catch (err) {
    // TODO (developer) - Handle exception.
    console.log('Failed to create message with error %s', err.message);
  }
}

/**
 * Creates a service for the service account.
 * @return {object}  - The credentials of the service account.
 */
function getService_() {
  return OAuth2.createService(APP_CREDENTIALS.client_email)
      .setTokenUrl('https://oauth2.googleapis.com/token')
      .setPrivateKey(APP_CREDENTIALS.private_key)
      .setIssuer(APP_CREDENTIALS.client_email)
      .setSubject(APP_CREDENTIALS.client_email)
      .setScope(APP_CREDENTIALS_SCOPES)
      .setPropertyStore(PropertiesService.getScriptProperties());
}
DocsApi.gs

Kullanıcının Google Drive'ında Dokümanlar belgesi oluşturmak için Dokümanlar API'sini çağırır ve VertexAiApi.gs içinde oluşturulan olay bilgilerinin özetini belgeye yazar.

DocsApi.gs kodunu görüntüleme

apps-script/chat/incident-response-app-auth/DocsApi.gs
/**
 * Creates a Doc in the user's Google Drive and writes a summary of the incident information to it.
 *
 * @param {string} title The title of the incident
 * @param {string} resolution Incident resolution described by the user
 * @param {string} chatHistory The whole Chat history be included in the document
 * @param {string} chatSummary A summary of the Chat conversation to be included in the document
 * @return {string} the URL of the created Doc
 */
function createDoc_(title, resolution, chatHistory, chatSummary) {
  let doc = DocumentApp.create(title);
  let body = doc.getBody();
  body.appendParagraph(`Post-Mortem: ${title}`).setHeading(DocumentApp.ParagraphHeading.TITLE);
  body.appendParagraph("Resolution").setHeading(DocumentApp.ParagraphHeading.HEADING1);
  body.appendParagraph(resolution);
  body.appendParagraph("Summary of the conversation").setHeading(DocumentApp.ParagraphHeading.HEADING1);
  body.appendParagraph(chatSummary);
  body.appendParagraph("Full Chat history").setHeading(DocumentApp.ParagraphHeading.HEADING1);
  body.appendParagraph(chatHistory);
  return doc.getUrl();
}
VertexAiApi.gs

Vertex AI API'yi kullanarak sohbet alanındaki görüşmeyi özetler. Bu özet, DocsAPI.gs'da özel olarak oluşturulmuş bir dokümanda yayınlanır.

VertexAiApi.gs kodunu görüntüleme

apps-script/chat/incident-response-app-auth/VertexAiApi.gs
/**
 * Summarizes a Chat conversation using the Vertex AI text prediction API.
 *
 * @param {string} chatHistory The Chat history that will be summarized.
 * @return {string} The content from the text prediction response.
 */
function summarizeChatHistory_(chatHistory) {
  const API_ENDPOINT = `https://${VERTEX_AI_LOCATION_ID}-aiplatform.googleapis.com/v1/projects/${PROJECT_ID}/locations/${VERTEX_AI_LOCATION_ID}/publishers/google/models/${MODEL_ID}:generateContent`;
  const prompt =
    "Summarize the following conversation between Engineers resolving an incident"
      + " in a few sentences. Use only the information from the conversation.\n\n"
      + chatHistory;
  // Get the access token.
  const accessToken = ScriptApp.getOAuthToken();

  const headers = {
    'Authorization': 'Bearer ' + accessToken,
    'Content-Type': 'application/json',
  };
  const payload = {
    'contents': {
      'role': 'user',
      'parts' : [
        {
          'text': prompt
        }
      ]
    }
  }
  const options = {
    'method': 'post',
    'headers': headers,
    'payload': JSON.stringify(payload),
    'muteHttpExceptions': true,
  };
  try {
    const response = UrlFetchApp.fetch(API_ENDPOINT, options);
    const responseCode = response.getResponseCode();
    const responseText = response.getContentText();

    if (responseCode === 200) {
      const jsonResponse = JSON.parse(responseText);
      console.log(jsonResponse)
      if (jsonResponse.candidates && jsonResponse.candidates.length > 0) {
        return jsonResponse.candidates[0].content.parts[0].text; // Access the summarized text
      } else {
        return "No summary found in response.";
      }

    } else {
      console.error("Vertex AI API Error:", responseCode, responseText);
      return `Error: ${responseCode} - ${responseText}`;
    }
  } catch (e) {
    console.error("UrlFetchApp Error:", e);
    return "Error: " + e.toString();
  }
}
WebController.gs

Olay başlatma web sitesine hizmet verir.

WebController.gs kodunu görüntüleme

apps-script/chat/incident-response-app-auth/WebController.gs
/**
 * Serves the web page from Index.html.
 */
function doGet() {
  return HtmlService
    .createTemplateFromFile('Index')
    .evaluate();
}

/**
 * Serves the web content from the specified filename.
 */
function include(filename) {
  return HtmlService
    .createHtmlOutputFromFile(filename)
    .getContent();
}

/**
 * Returns the email address of the user running the script.
 */
function getUserEmail() {
  return Session.getActiveUser().getEmail();
}
Index.html

Olay başlatma web sitesini oluşturan HTML.

Index.html kodunu görüntüleme

apps-script/chat/incident-response-app-auth/Index.html
<!DOCTYPE html>
<html>
  <head>
    <base target="_top">
    <link href='https://fonts.googleapis.com/css?family=Roboto' rel='stylesheet'>
    <?!= include('Stylesheet'); ?>
  </head>
  <body>
    <div class="container">
      <div class="content">
        <h1>Incident Manager</h1>
        <form id="incident-form" onsubmit="handleFormSubmit(this)">
          <div id="form">
            <p>
              <label for="title">Incident title</label><br/>
              <input type="text" name="title" id="title" />
            </p>
            <p>
              <label for="users">Incident responders</label><br/>
              <small>
                Please enter a comma-separated list of email addresses of the users
                that should be added to the space.
                Do not include <?= getUserEmail() ?> as it will be added automatically.
              </small><br/>
              <input type="text" name="users" id="users" />
            </p>
            <p>
              <label for="description">Initial message</label></br>
              <small>This message will be posted after the space is created.</small><br/>
              <textarea name="description" id="description"></textarea>
            </p>
            <p class="text-center">
              <input type="submit" value="CREATE CHAT SPACE" />
            </p>
          </div>
          <div id="output" class="hidden"></div>
          <div id="clear" class="hidden">
            <input type="reset" value="CREATE ANOTHER INCIDENT" onclick="onReset()" />
          </div>
        </form>
      </div>
    </div>
    <?!= include('JavaScript'); ?>
  </body>
</html>
JavaScript.html

Olay başlatma web sitesi için gönderimler, hatalar ve temizlemeler dahil olmak üzere form davranışını işler. WebController.gs içindeki özel include işleviyle Index.html'ya dahil edilir.

JavaScript.html kodunu görüntüleme

apps-script/chat/incident-response-app-auth/JavaScript.html
<script>
  var formDiv = document.getElementById('form');
  var outputDiv = document.getElementById('output');
  var clearDiv = document.getElementById('clear');

  function handleFormSubmit(formObject) {
    event.preventDefault();
    outputDiv.innerHTML = 'Please wait while we create the space...';
    hide(formDiv);
    show(outputDiv);
    google.script.run
      .withSuccessHandler(updateOutput)
      .withFailureHandler(onFailure)
      .handleIncident(formObject);
  }

  function updateOutput(response) {
    var spaceId = response.replace('spaces/', '');
    outputDiv.innerHTML =
      '<p>Space created!</p><p><a href="https://mail.google.com/chat/#chat/space/'
        + spaceId
        + '" target="_blank">Open space</a></p>';
    show(outputDiv);
    show(clearDiv);
  }

  function onFailure(error) {
    outputDiv.innerHTML = 'ERROR: ' + error.message;
    outputDiv.classList.add('error');
    show(outputDiv);
    show(clearDiv);
  }

  function onReset() {
    outputDiv.innerHTML = '';
    outputDiv.classList.remove('error');
    show(formDiv);
    hide(outputDiv);
    hide(clearDiv);
  }

  function hide(element) {
    element.classList.add('hidden');
  }

  function show(element) {
    element.classList.remove('hidden');
  }
</script>
Stylesheet.html

Olay başlatma web sitesinin CSS'si. WebController.gs içindeki özel include işleviyle Index.html'ya dahil edilir.

Stylesheet.html kodunu görüntüleme

apps-script/chat/incident-response-app-auth/Stylesheet.html
<style>
  * {
    box-sizing: border-box;
  }
  body {
    font-family: Roboto, Arial, Helvetica, sans-serif;
  }
  div.container {
    display: flex;
    justify-content: center;
    align-items: center;
    position: absolute;
    top: 0; bottom: 0; left: 0; right: 0;
  }
  div.content {
    width: 80%;
    max-width: 1000px;
    padding: 1rem;
    border: 1px solid #999;
    border-radius: 0.25rem;
    box-shadow: 0 2px 2px 0 rgba(66, 66, 66, 0.08), 0 2px 4px 2px rgba(66, 66, 66, 0.16);
  }
  h1 {
    text-align: center;
    padding-bottom: 1rem;
    margin: 0 -1rem 1rem -1rem;
    border-bottom: 1px solid #999;
  }
 #output {
    text-align: center;
    min-height: 250px;
  }
  div#clear {
    text-align: center;
    padding-top: 1rem;
    margin: 1rem -1rem 0 -1rem;
    border-top: 1px solid #999;
  }
  input[type=text], textarea {
    width: 100%;
    padding: 1rem 0.5rem;
    margin: 0.5rem 0;
    border: 0;
    border-bottom: 1px solid #999;
    background-color: #f0f0f0;
  }
  textarea {
    height: 5rem;
  }
  small {
    color: #999;
  }
  input[type=submit], input[type=reset] {
    padding: 1rem;
    border: none;
    background-color: #6200ee;
    color: #fff;
    border-radius: 0.25rem;
    width: 25%;
  }
  .hidden {
    display: none;
  }
  .text-center {
    text-align: center;
  }
  .error {
    color: red;
  }
</style>

Cloud proje numaranızı ve kimliğinizi bulma

  1. Google API Konsolu'nda Cloud projenize gidin.

    Google API Konsolu'na git

  2. Ayarlar ve Yardımcı Programlar > Proje ayarları'nı tıklayın.

  3. Proje numarası ve Proje kimliği alanlarındaki değerleri not edin. Bunları aşağıdaki bölümlerde kullanırsınız.

Apps Komut Dosyası projesini oluşturma

Apps Komut Dosyası projesi oluşturmak ve Cloud projenize bağlamak için:

  1. Google Chat ile olaylara yanıt verme Apps Komut Dosyası projesini açmak için aşağıdaki düğmeyi tıklayın.
    Projeyi açın.
  2. Genel bakış'ı tıklayın.
  3. Genel bakış sayfasında Kopya oluşturma simgesi Kopya oluştur'u tıklayın.
  4. Apps Komut Dosyası projesinin kopyanıza ad verin:

    1. Google Chat ile olaylara yanıt verme kopyası'nı tıklayın.

    2. Proje başlığı'na Incident Management Chat app yazın.

    3. Yeniden adlandır'ı tıklayın.

  5. Apps Komut Dosyası projesinin kopyasında Consts.gs dosyasına gidin ve YOUR_PROJECT_ID yerine Cloud projenizin kimliğini yazın.

Apps Komut Dosyası projesinin Cloud projesini ayarlama

  1. Apps Komut Dosyası projenizde Proje ayarları simgesi Proje Ayarları'nı tıklayın.
  2. Google Cloud Platform (GCP) Projesi bölümünde Projeyi değiştir'i tıklayın.
  3. GCP proje numarası bölümüne Cloud projenizin proje numarasını yapıştırın.
  4. Projeyi ayarla'yı tıklayın. Bulut projesi ve Apps Komut Dosyası projesi artık bağlıdır.

Apps Komut Dosyası dağıtımı oluşturma

Tüm kodlar hazır olduğuna göre Apps Komut Dosyası projesini dağıtın. Google Cloud'da Chat uygulamasını yapılandırırken dağıtım kimliğini kullanırsınız.

  1. Apps Komut Dosyası'nda, olay yanıtı uygulamasının projesini açın.

    Apps Komut Dosyası'na gitme

  2. Dağıt > Yeni dağıtım'ı tıklayın.

  3. Eklenti ve Web uygulaması henüz seçilmediyse Tür seçin'in yanındaki dağıtım türlerini Proje ayarları simgesi tıklayın ve Eklenti ile Web uygulaması'nı seçin.

  4. Açıklama bölümüne bu sürümle ilgili bir açıklama girin (ör. Complete version of incident management app).

  5. Şu şekilde yürüt bölümünde Web uygulamasına erişen kullanıcı'yı seçin.

  6. Erişimi olanlar bölümünde Workspace kuruluşunuzdaki herkes'i seçin. Burada "Workspace kuruluşunuz", Google Workspace kuruluşunuzun adıdır.

  7. Dağıt'ı tıklayın. Apps Komut Dosyası, başarılı dağıtım bildirir ve olay başlatma web sayfası için bir dağıtım kimliği ve URL sağlar.

  8. Bir olay başlattığınızda daha sonra ziyaret etmek üzere Web uygulaması URL'sini not edin. Deployment ID'yi (Dağıtım Kimliği) kopyalayın. Bu kimliği, Google API Konsolu'nda Chat uygulamasını yapılandırırken kullanırsınız.

  9. Bitti'yi tıklayın.

Google API Konsolu'nda Chat uygulamasını yapılandırma

Bu bölümde, Google API Konsolu'nda Google Chat API'nin nasıl yapılandırılacağı gösterilmektedir. Bu yapılandırma, Apps Komut Dosyası projenizden yeni oluşturduğunuz dağıtımın kimliği de dahil olmak üzere Chat uygulamanızla ilgili bilgileri içerir.

  1. Google API Console'da Menü > API'ler ve Hizmetler > Etkin API'ler ve Hizmetler > Google Chat API > Yapılandırma'yı tıklayın.

    Chat API yapılandırmasına gitme

  2. Uygulama adı alanına Incident Management yazın.

  3. Avatar URL'si bölümüne https://developers.google.com/chat/images/quickstart-app-avatar.png yazın.

  4. Açıklama bölümüne Responds to incidents. yazın.

  5. Etkileşimli özellikleri etkinleştir açma/kapatma düğmesini açık konumuna getirin.

  6. İşlevsellik bölümünde Alanlara ve grup görüşmelerine katılma'yı seçin.

  7. Bağlantı ayarları bölümünde Apps Komut Dosyası'nı seçin.

  8. Deployment ID (Dağıtım Kimliği) alanına, daha önce Apps Komut Dosyası projesi dağıtımından kopyaladığınız Apps Komut Dosyası dağıtım kimliğini yapıştırın.

  9. Tetikleyiciler bölümünde, Uygulama komutu tetikleyicisi için onAppCommand simgesini yapılandırın.

  10. Tam olarak uygulanmış Chat uygulamasının kullandığı bir hızlı komut kaydedin:

    1. Komutlar bölümünde Komut ekle'yi tıklayın.

    2. Command ID (Komut kimliği) alanına 1 yazın.

    3. Açıklama bölümüne şunu yazın: Closes the incident being discussed in the space.

    4. Komut türü bölümünde Hızlı komut'u seçin.

    5. Hızlı komut adı bölümüne Close incident yazın.

    6. İletişim kutusu açar'ı (veya İletişim kutusu) seçin.

    7. Bitti'yi tıklayın. Komut kaydedilir ve listelenir.

  11. Görünürlük bölümünde Bu sohbet uygulamasını Workspace alanınızdaki belirli kişi ve grupların kullanımına sunun'u seçip e-posta adresinizi girin.

  12. Günlükler bölümünde Günlük hatalarını günlüğe kaydetme'yi seçin.

  13. Kaydet'i tıklayın. Yapılandırma kaydedildi mesajı gösterilir. Bu, uygulamanın test edilmeye hazır olduğu anlamına gelir.

Yönetici onayı alma

Yönetici onayı almak için Google Workspace Marketplace SDK'sında Chat uygulamasını yapılandırmanız gerekir.

Google Workspace Marketplace SDK'sında Chat uygulamasını yapılandırma

Google Workspace Marketplace SDK'sında Chat uygulamasını yapılandırmak için aşağıdaki adımları uygulayın:

  1. Google API Console'da Menü > API'ler ve Hizmetler > Etkin API'ler ve hizmetler > Google Workspace Marketplace SDK'sı > Uygulama Yapılandırması'na gidin.

    Uygulama Yapılandırması'na gidin

  2. Uygulama Yapılandırması sayfasını tamamlayın. Sohbet uygulamanızı nasıl yapılandıracağınız, hedef kitlenizin kim olduğu ve diğer faktörlere bağlıdır. Uygulama yapılandırma sayfasını tamamlama konusunda yardım için SDK'da uygulamanızı yapılandırma başlıklı makaleyi inceleyin. Bu kılavuzun amaçları doğrultusunda aşağıdaki bilgileri girin:

    1. Uygulama görünürlüğü bölümünde Gizli'yi seçin.
    2. Yükleme ayarları bölümünde Yönetici yüklemesi'ni seçin.
    3. Uygulama entegrasyonları bölümünde Chat uygulaması'nı seçin.
    4. OAuth kapsamları bölümünde aşağıdaki kapsamları girin:
      • https://www.googleapis.com/auth/chat.app.spaces
      • https://www.googleapis.com/auth/chat.app.memberships
    5. Geliştirici bilgileri bölümünde Geliştirici adı, Geliştirici web sitesi URL'si ve Geliştirici e-posta adresi'ni girin.
    6. Taslağı kaydet'i tıklayın.

Uygulamayı yapılandırdıktan sonra mağaza girişini güncelleyin:

  1. Google Cloud Console'da Menü > API'ler ve Hizmetler > Etkin API'ler ve hizmetler > Google Workspace Marketplace SDK'sı > Mağaza girişi'ne gidin.
  2. Uygulama ayrıntıları bölümünde Kategori olarak Web Geliştirme'yi seçin.
  3. Grafik Öğeleri bölümünde, uygulama simgelerini istenen biçimlerde yükleyin.
  4. Ekran görüntüleri bölümünde uygulamanın ekran görüntüsünü yükleyin.
  5. Destek Bağlantıları bölümünde Hizmet Şartları URL'si, Gizlilik URL'si ve Destek URL'si girin.
  6. Dağıtım bölümünde, bu uygulamanın kullanılabileceği bölgeleri seçin.
  7. Yayınla'yı tıklayın.

Yönetici onayı alma

Hizmet hesabınız yönetici onayı alacak şekilde yapılandırıldığına göre, Chat uygulamaları için yetkilendirme ayarlama bölümündeki adımları uygulayarak onay verebilecek bir Google Workspace yöneticisinden onay alın.

Chat uygulamasını test etme

Olay yönetimi Chat uygulamasını test etmek için web sayfasından bir olay başlatın ve Chat uygulamasının beklendiği gibi çalıştığını doğrulayın:

  1. Apps Komut Dosyası dağıtımı web uygulaması URL'sine gidin.

  2. Apps Komut Dosyası, verilerinize erişmek için izin istediğinde İzinleri incele'yi tıklayın, Google Workspace alanınızda uygun bir Google Hesabı ile oturum açın ve İzin ver'i tıklayın.

  3. Olay başlatma web sayfası açılır. Test bilgilerini girin:

    1. Olay başlığı bölümüne The First Incident yazın.
    2. İsteğe bağlı olarak, Olay yanıtlayanlar bölümüne diğer olay yanıtlayanların e-posta adreslerini girin. Bu kullanıcıların, Google Workspace kuruluşunuzda Google Chat hesabı olan kullanıcılar olması gerekir. Aksi takdirde alan oluşturma işlemi başarısız olur. Kendi e-posta adresinizi girmeyin. Bu adres otomatik olarak eklenir.
    3. İlk mesaj bölümüne Testing the incident management Chat app. yazın.
  4. Sohbet alanı oluştur'u tıklayın. Bir creating space mesajı gösterilir.

  5. Alan oluşturulduktan sonra Space created! mesajı gösterilir. Alanı aç'ı tıklayın. Alan, Chat'te yeni bir sekmede açılır.

  6. İsteğe bağlı olarak, siz ve diğer olay yanıtlayıcılar alanda mesaj gönderebilirsiniz. Uygulama, Vertex AI'ı kullanarak bu mesajları özetler ve bir geriye dönük belge paylaşır.

  7. Olay yanıtını sonlandırmak ve çözüm sürecini başlatmak için Sohbet alanında Close incident hızlı komutunu çalıştırın. Bir olay yönetimi iletişim kutusu açılır.

  8. Olayı kapat bölümünde, olay çözümüyle ilgili bir açıklama girin. Örneğin, Test complete.

  9. Close Incident'ı (Olayı Kapat) tıklayın.

Olay Yönetimi uygulaması, alandaki mesajları listeler, Vertex AI ile özetler, özeti bir Google Dokümanlar belgesine yapıştırır ve belgeyi alanda paylaşır.

Temizleme

Bu eğitimde kullanılan kaynaklar için Google Cloud hesabınızdan ücret alınmasını önlemek istiyorsanız Cloud projesini silmenizi öneririz.

  1. Google API Konsolu'nda Kaynakları yönet sayfasına gidin. Şunu tıklayın: Menü > IAM & Admin > Kaynakları Yönetin.

    Kaynak Yöneticisi'ne gidin

  2. Proje listesinde, silmek istediğiniz projeyi seçin ve Sil'i tıklayın.
  3. İletişim kutusunda proje kimliğini yazın ve projeyi silmek için Kapat'ı tıklayın.
  • Olay yanıtı uygulaması, API'leri çağırmak ve Chat API ile Vertex AI API gibi Google Cloud hizmetlerini etkinleştirmek için kullanıcı kimlik bilgileriyle kimlik doğrulaması yapar. Bu nedenle, bir olayı başlatan kullanıcının bu hizmetlere erişimi olması gerekir. Uygulamayı daha sağlam hale getirmek için Close incident hızlı komutunu çağıran kullanıcının kimlik bilgileri yerine hizmet hesabıyla Vertex AI API'sini çağırmayı düşünebilirsiniz. Vertex AI API için hizmet hesabı yapılandırma konusunda yardım almak istiyorsanız Özel hizmet hesabı kullanma başlıklı makaleyi inceleyin.

Eklenti olmayan sohbet uygulamaları: Google Chat, Vertex AI ve Google Apps Komut Dosyası ile olaylara yanıt verme (Uygulama kimlik doğrulaması)

Aşağıdaki talimatlar ve kod örnekleri, Google Workspace eklentisi olmayan bir Chat uygulaması için geçerlidir (GitHub'da görüntüleyin).

Apps Komut Dosyası projesini oluşturma ve yapılandırma

  1. Eklenti olmayan bir Chat uygulaması için Google Chat ile olaylara yanıt verme Apps Komut Dosyası projesini açın ve bir kopyasını oluşturun.
  2. Google API Konsolu'nda Chat API'yi yapılandırırken: Bu Chat uygulamasını Google Workspace eklentisi olarak oluştur seçeneğinin işaretini kaldırın. Onaylamanızı isteyen bir iletişim kutusu açılır. İletişim kutusunda Devre dışı bırak'ı tıklayın.
  3. /closeIncident eğik çizgi komutunu kaydedin (Komut Kimliği 1, Bir iletişim kutusu açar'ı seçin) ve bir olayı çözmek için boşluğa /closeIncident yazın.

Kaynak kodu

Consts.gs
apps-script/incident-response-app-auth/Consts.gs
const PROJECT_ID = 'replace-with-your-project-id';
const CLOSE_INCIDENT_COMMAND_ID = 1;
const APP_CREDENTIALS = 'replace-with-your-app-credentials';
const APP_CREDENTIALS_SCOPES = 'https://www.googleapis.com/auth/chat.bot https://www.googleapis.com/auth/chat.app.memberships https://www.googleapis.com/auth/chat.app.spaces.create';
const VERTEX_AI_LOCATION_ID = 'us-central1';
const MODEL_ID = 'gemini-1.5-flash-002';
ChatApp.gs
apps-script/incident-response-app-auth/ChatApp.gs
/**
 * Responds to a MESSAGE event in Google Chat.
 *
 * This app only responds to a slash command with the ID 1 ("/closeIncident").
 * It will respond to any other message with a simple "Hello" text message.
 *
 * @param {Object} event the event object from Google Chat
 */
function onMessage(event) {
  if (event.message.slashCommand) {
    return processSlashCommand_(event);
  }
  return { "text": "Hello from Incident Response app!" };
}

/**
 * Responds to a CARD_CLICKED event in Google Chat.
 *
 * This app only responds to one kind of dialog (Close Incident).
 *
 * @param {Object} event the event object from Google Chat
 */
function onCardClick(event) {
  if (event.isDialogEvent) {
    if (event.dialogEventType == 'SUBMIT_DIALOG') {
      return processSubmitDialog_(event);
    }
    return {
      actionResponse: {
        type: "DIALOG",
        dialogAction: {
          actionStatus: "OK"
        }
      }
    };
  }
}

/**
 * Responds to a MESSAGE event with a Slash command in Google Chat.
 *
 * This app only responds to a slash command with the ID 1 ("/closeIncident")
 * by returning a Dialog.
 *
 * @param {Object} event the event object from Google Chat
 */
function processSlashCommand_(event) {
  if (event.message.slashCommand.commandId != CLOSE_INCIDENT_COMMAND_ID) {
    return {
      "text": "Command not recognized. Use the command `/closeIncident` to close the incident managed by this space."
    };
  }
  const sections = [
    {
      header: "Close Incident",
      widgets: [
        {
          textInput: {
            label: "Please describe the incident resolution",
            type: "MULTIPLE_LINE",
            name: "description"
          }
        },
        {
          buttonList: {
            buttons: [
              {
                text: "Close Incident",
                onClick: {
                  action: {
                    function: "closeIncident"
                  }
                }
              }
            ]
          }
        }
      ]
    }
  ];
  return {
    actionResponse: {
      type: "DIALOG",
      dialogAction: {
        dialog: {
          body: {
            sections,
          }
        }
      }
    }
  };
}

/**
 * Responds to a CARD_CLICKED event with a Dialog submission in Google Chat.
 *
 * This app only responds to one kind of dialog (Close Incident).
 * It creates a Doc with a summary of the incident information and posts a message
 * to the space with a link to the Doc.
 *
 * @param {Object} event the event object from Google Chat
 */
function processSubmitDialog_(event) {
  const resolution = event.common.formInputs.description[""].stringInputs.value[0];
  const chatHistory = concatenateAllSpaceMessages_(event.space.name);
  const chatSummary = summarizeChatHistory_(chatHistory);
  const docUrl = createDoc_(event.space.displayName, resolution, chatHistory, chatSummary);
  return {
    actionResponse: {
      type: "NEW_MESSAGE",
    },
    text: `Incident closed with the following resolution: ${resolution}\n\nHere is the automatically generated post-mortem:\n${docUrl}`
  };
}

/**
 * Lists all the messages in the Chat space, then concatenate all of them into
 * a single text containing the full Chat history.
 *
 * For simplicity for this demo, it only fetches the first 100 messages.
 *
 * Messages with slash commands are filtered out, so the returned history will
 * contain only the conversations between users and not app command invocations.
 *
 * @return {string} a text containing all the messages in the space in the format:
 *          Sender's name: Message
 */
function concatenateAllSpaceMessages_(spaceName) {
  // Call Chat API method spaces.messages.list
  const response = Chat.Spaces.Messages.list(spaceName, { 'pageSize': 100 });
  const messages = response.messages;
  // Fetch the display names of the message senders and returns a text
  // concatenating all the messages.
  let userMap = new Map();
  return messages
    .filter(message => message.slashCommand === undefined)
    .map(message => `${getUserDisplayName_(userMap, message.sender.name)}: ${message.text}`)
    .join('\n');
}

/**
 * Obtains the display name of a user by using the Admin Directory API.
 *
 * The fetched display name is cached in the provided map, so we only call the API
 * once per user.
 *
 * If the user does not have a display name, then the full name is used.
 *
 * @param {Map} userMap a map containing the display names previously fetched
 * @param {string} userName the resource name of the user
 * @return {string} the user's display name
 */
function getUserDisplayName_(userMap, userName) {
  if (userMap.has(userName)) {
    return userMap.get(userName);
  }
  let displayName = 'Unknown User';
  try {
    const user = AdminDirectory.Users.get(
      userName.replace("users/", ""),
      { projection: 'BASIC', viewType: 'domain_public' });
    displayName = user.name.displayName ? user.name.displayName : user.name.fullName;
  } catch (e) {
    // Ignore error if the API call fails (for example, because it's an
    // out-of-domain user or Chat app)) and just use 'Unknown User'.
  }
  userMap.set(userName, displayName);
  return displayName;
}
ChatSpaceCreator.gs
apps-script/incident-response-app-auth/ChatSpaceCreator.gs
/**
 * Handles an incident by creating a chat space, adding members, and posting a message.
 * All the actions are done using application credentials.
 *
 * @param {Object} formData - The data submitted by the user. It should contain the fields:
 *                           - title: The display name of the chat space.
 *                           - description: The description of the incident.
 *                           - users: A comma-separated string of user emails to be added to the space.
 * @return {string} The resource name of the new space.
 */
function handleIncident(formData) {
  const users = formData.users.trim().length > 0 ? formData.users.split(',') : [];
  const service = getService_();
  if (!service.hasAccess()) {
    console.error(service.getLastError());
    return;
   }
  const spaceName = createChatSpace_(formData.title, service);
  createHumanMembership_(spaceName, getUserEmail(), service);
  for (const user of users ){
    createHumanMembership_(spaceName, user, service);
  }
  createMessage_(spaceName, formData.description, service);
  return spaceName;
}
/**
 * Creates a chat space with application credentials.
 *
 * @param {string} displayName - The name of the chat space.
 * @param {object} service - The credentials of the service account.
 * @returns {string} The resource name of the new space.
*/
function createChatSpace_(displayName, service) {
  try {
    // For private apps, the alias can be used
    const my_customer_alias = "customers/my_customer";
    // Specify the space to create.
    const space = {
        displayName: displayName,
        spaceType: 'SPACE',                
        customer: my_customer_alias
    };
    // Call Chat API with a service account to create a message.
    const createdSpace = Chat.Spaces.create(
        space,
        {},
        // Authenticate with the service account token.
        {'Authorization': 'Bearer ' + service.getAccessToken()});
    return createdSpace.name;
  } catch (err) {
    // TODO (developer) - Handle exception.
    console.log('Failed to create space with error %s', err.message);
  }
}
/*
 * Creates a chat message with application credentials.
 *
 * @param {string} spaceName - The resource name of the space.
 * @param {string} message - The text to be posted.
 * @param {object} service - The credentials of the service account.
 * @return {string} the resource name of the new space.
 */
function createMessage_(spaceName, message, service) {
  try {
    // Call Chat API with a service account to create a message.
    const result = Chat.Spaces.Messages.create(
        {'text': message},
        spaceName,
        {},
        // Authenticate with the service account token.
        {'Authorization': 'Bearer ' + service.getAccessToken()});

  } catch (err) {
    // TODO (developer) - Handle exception.
    console.log('Failed to create message with error %s', err.message);
  }
}
/**
 * Creates a human membership in a chat space with application credentials.
 *
 * @param {string} spaceName - The resource name of the space.
 * @param {string} email - The email of the user to be added.
 * @param {object} service - The credentials of the service account.
 */
function createHumanMembership_(spaceName, email, service){
  try{
    const membership = {
      member: {
        name: 'users/'+email,
        // User type for the membership
        type: 'HUMAN'
      }
    };
    const result = Chat.Spaces.Members.create(
      membership,
      spaceName,
      {},
      {'Authorization': 'Bearer ' + service.getAccessToken()}
    );
  } catch (err){
    console.log('Failed to create membership with error %s', err.message)
  }

}

 /*
 * Creates a service for the service account.
 * @return {object}  - The credentials of the service account.
 */
function getService_() {
  return OAuth2.createService(APP_CREDENTIALS.client_email)
      .setTokenUrl('https://oauth2.googleapis.com/token')
      .setPrivateKey(APP_CREDENTIALS.private_key)
      .setIssuer(APP_CREDENTIALS.client_email)
      .setSubject(APP_CREDENTIALS.client_email)
      .setScope(APP_CREDENTIALS_SCOPES)
      .setPropertyStore(PropertiesService.getScriptProperties());
}
DocsApi.gs
apps-script/incident-response-app-auth/DocsApi.gs
/**
 * Creates a Doc in the user's Google Drive and writes a summary of the incident information to it.
 *
 * @param {string} title The title of the incident
 * @param {string} resolution Incident resolution described by the user
 * @param {string} chatHistory The whole Chat history be included in the document
 * @param {string} chatSummary A summary of the Chat conversation to be included in the document
 * @return {string} the URL of the created Doc
 */
function createDoc_(title, resolution, chatHistory, chatSummary) {
  let doc = DocumentApp.create(title);
  let body = doc.getBody();
  body.appendParagraph(`Post-Mortem: ${title}`).setHeading(DocumentApp.ParagraphHeading.TITLE);
  body.appendParagraph("Resolution").setHeading(DocumentApp.ParagraphHeading.HEADING1);
  body.appendParagraph(resolution);
  body.appendParagraph("Summary of the conversation").setHeading(DocumentApp.ParagraphHeading.HEADING1);
  body.appendParagraph(chatSummary);
  body.appendParagraph("Full Chat history").setHeading(DocumentApp.ParagraphHeading.HEADING1);
  body.appendParagraph(chatHistory);
  return doc.getUrl();
}
VertexAiApi.gs
apps-script/incident-response-app-auth/VertexAiApi.gs
/**
 * Summarizes a Chat conversation using the Vertex AI text prediction API.
 *
 * @param {string} chatHistory The Chat history that will be summarized.
 * @return {string} The content from the text prediction response.
 */


function summarizeChatHistory_(chatHistory) {

  const API_ENDPOINT = `https://${VERTEX_AI_LOCATION_ID}-aiplatform.googleapis.com/v1/projects/${PROJECT_ID}/locations/${VERTEX_AI_LOCATION_ID}/publishers/google/models/${MODEL_ID}:generateContent`;
  const prompt = "Summarize the following conversation between Engineers resolving an incident"
      + " in a few sentences. Use only the information from the conversation.\n\n" + chatHistory;
  // Get the access token.
  const accessToken = ScriptApp.getOAuthToken();

  const headers = {
    'Authorization': 'Bearer ' + accessToken,
    'Content-Type': 'application/json',
  };
  const payload = {
    'contents': {
      'role': 'user',
      'parts' : [
        {
          'text': prompt
        }
      ]
    }
  }
  const options = {
    'method': 'post',
    'headers': headers,
    'payload': JSON.stringify(payload),
    'muteHttpExceptions': true,
  };
  try {
    const response = UrlFetchApp.fetch(API_ENDPOINT, options);
    const responseCode = response.getResponseCode();
    const responseText = response.getContentText();

    if (responseCode === 200) {
      const jsonResponse = JSON.parse(responseText);
      console.log(jsonResponse)
      if (jsonResponse.candidates && jsonResponse.candidates.length > 0) {
        return jsonResponse.candidates[0].content.parts[0].text; // Access the summarized text
      } else {
        return "No summary found in response.";
      }

    } else {
      console.error("Vertex AI API Error:", responseCode, responseText);
      return `Error: ${responseCode} - ${responseText}`;
    }
  } catch (e) {
    console.error("UrlFetchApp Error:", e);
    return "Error: " + e.toString();
  }
}
WebController.gs
apps-script/incident-response-app-auth/WebController.gs
/**
 * Serves the web page from Index.html.
 */
function doGet() {
  return HtmlService
    .createTemplateFromFile('Index')
    .evaluate();
}

/**
 * Serves the web content from the specified filename.
 */
function include(filename) {
  return HtmlService
    .createHtmlOutputFromFile(filename)
    .getContent();
}

/**
 * Returns the email address of the user running the script.
 */
function getUserEmail() {
  return Session.getActiveUser().getEmail();
}
Index.html
apps-script/incident-response-app-auth/Index.html
<!DOCTYPE html>
<html>
  <head>
    <base target="_top">
    <link href='https://fonts.googleapis.com/css?family=Roboto' rel='stylesheet'>
    <?!= include('Stylesheet'); ?>
  </head>
  <body>
    <div class="container">
      <div class="content">
        <h1>Incident Manager</h1>
        <form id="incident-form" onsubmit="handleFormSubmit(this)">
          <div id="form">
            <p>
              <label for="title">Incident title</label><br/>
              <input type="text" name="title" id="title" />
            </p>
            <p>
              <label for="users">Incident responders</label><br/>
              <small>
                Please enter a comma-separated list of email addresses of the users
                that should be added to the space.
                Do not include <?= getUserEmail() ?> as it will be added automatically.
              </small><br/>
              <input type="text" name="users" id="users" />
            </p>
            <p>
              <label for="description">Initial message</label></br>
              <small>This message will be posted after the space is created.</small><br/>
              <textarea name="description" id="description"></textarea>
            </p>
            <p class="text-center">
              <input type="submit" value="CREATE CHAT SPACE" />
            </p>
          </div>
          <div id="output" class="hidden"></div>
          <div id="clear" class="hidden">
            <input type="reset" value="CREATE ANOTHER INCIDENT" onclick="onReset()" />
          </div>
        </form>
      </div>
    </div>
    <?!= include('JavaScript'); ?>
  </body>
</html>
JavaScript.html
apps-script/incident-response-app-auth/JavaScript.html
<script>
  var formDiv = document.getElementById('form');
  var outputDiv = document.getElementById('output');
  var clearDiv = document.getElementById('clear');

  function handleFormSubmit(formObject) {
    event.preventDefault();
    outputDiv.innerHTML = 'Please wait while we create the space...';
    hide(formDiv);
    show(outputDiv);
    google.script.run
      .withSuccessHandler(updateOutput)
      .withFailureHandler(onFailure)
      .handleIncident(formObject);
  }

  function updateOutput(response) {
    var spaceId = response.replace('spaces/', '');
    outputDiv.innerHTML =
      '<p>Space created!</p><p><a href="https://mail.google.com/chat/#chat/space/'
        + spaceId
        + '" target="_blank">Open space</a></p>';
    show(outputDiv);
    show(clearDiv);
  }

  function onFailure(error) {
    outputDiv.innerHTML = 'ERROR: ' + error.message;
    outputDiv.classList.add('error');
    show(outputDiv);
    show(clearDiv);
  }

  function onReset() {
    outputDiv.innerHTML = '';
    outputDiv.classList.remove('error');
    show(formDiv);
    hide(outputDiv);
    hide(clearDiv);
  }

  function hide(element) {
    element.classList.add('hidden');
  }

  function show(element) {
    element.classList.remove('hidden');
  }
</script>
Stylesheet.html
apps-script/incident-response-app-auth/Stylesheet.html
<style>
  * {
    box-sizing: border-box;
  }
  body {
    font-family: Roboto, Arial, Helvetica, sans-serif;
  }
  div.container {
    display: flex;
    justify-content: center;
    align-items: center;
    position: absolute;
    top: 0; bottom: 0; left: 0; right: 0;
  }
  div.content {
    width: 80%;
    max-width: 1000px;
    padding: 1rem;
    border: 1px solid #999;
    border-radius: 0.25rem;
    box-shadow: 0 2px 2px 0 rgba(66, 66, 66, 0.08), 0 2px 4px 2px rgba(66, 66, 66, 0.16);
  }
  h1 {
    text-align: center;
    padding-bottom: 1rem;
    margin: 0 -1rem 1rem -1rem;
    border-bottom: 1px solid #999;
  }
 #output {
    text-align: center;
    min-height: 250px;
  }
  div#clear {
    text-align: center;
    padding-top: 1rem;
    margin: 1rem -1rem 0 -1rem;
    border-top: 1px solid #999;
  }
  input[type=text], textarea {
    width: 100%;
    padding: 1rem 0.5rem;
    margin: 0.5rem 0;
    border: 0;
    border-bottom: 1px solid #999;
    background-color: #f0f0f0;
  }
  textarea {
    height: 5rem;
  }
  small {
    color: #999;
  }
  input[type=submit], input[type=reset] {
    padding: 1rem;
    border: none;
    background-color: #6200ee;
    color: #fff;
    border-radius: 0.25rem;
    width: 25%;
  }
  .hidden {
    display: none;
  }
  .text-center {
    text-align: center;
  }
  .error {
    color: red;
  }
</style>