รองรับกล่องโต้ตอบแบบอินเทอร์แอกทีฟ

หน้านี้อธิบายวิธีที่แอป Google Chat สามารถเปิดกล่องโต้ตอบ เพื่อแสดงอินเทอร์เฟซผู้ใช้ (UI) และตอบสนองต่อผู้ใช้

กล่องโต้ตอบคืออินเทอร์เฟซแบบการ์ดในหน้าต่าง ที่เปิดจากพื้นที่ใน Chat หรือข้อความ กล่องโต้ตอบและเนื้อหาของกล่องโต้ตอบจะแสดงต่อผู้ใช้ที่เปิดกล่องโต้ตอบเท่านั้น

แอป Chat สามารถใช้กล่องโต้ตอบเพื่อขอและรวบรวมข้อมูลจากผู้ใช้ Chat รวมถึงแบบฟอร์มหลายขั้นตอน ดูรายละเอียดเพิ่มเติม เกี่ยวกับการสร้างอินพุตแบบฟอร์มได้ที่ รวบรวมและประมวลผลข้อมูลจากผู้ใช้

ข้อกำหนดเบื้องต้น

HTTP

แอป Google Chat ที่รับและตอบสนองต่อการโต้ตอบของผู้ใช้ หากต้องการสร้าง ให้ทำตามการเริ่มต้นใช้งาน HTTP

Apps Script

แอป Google Chat ที่รับและตอบสนองต่อการโต้ตอบของผู้ใช้ หากต้องการสร้าง ให้ทำตามการเริ่มต้นใช้งาน Apps Script อย่างรวดเร็ว

เปิดกล่องโต้ตอบ
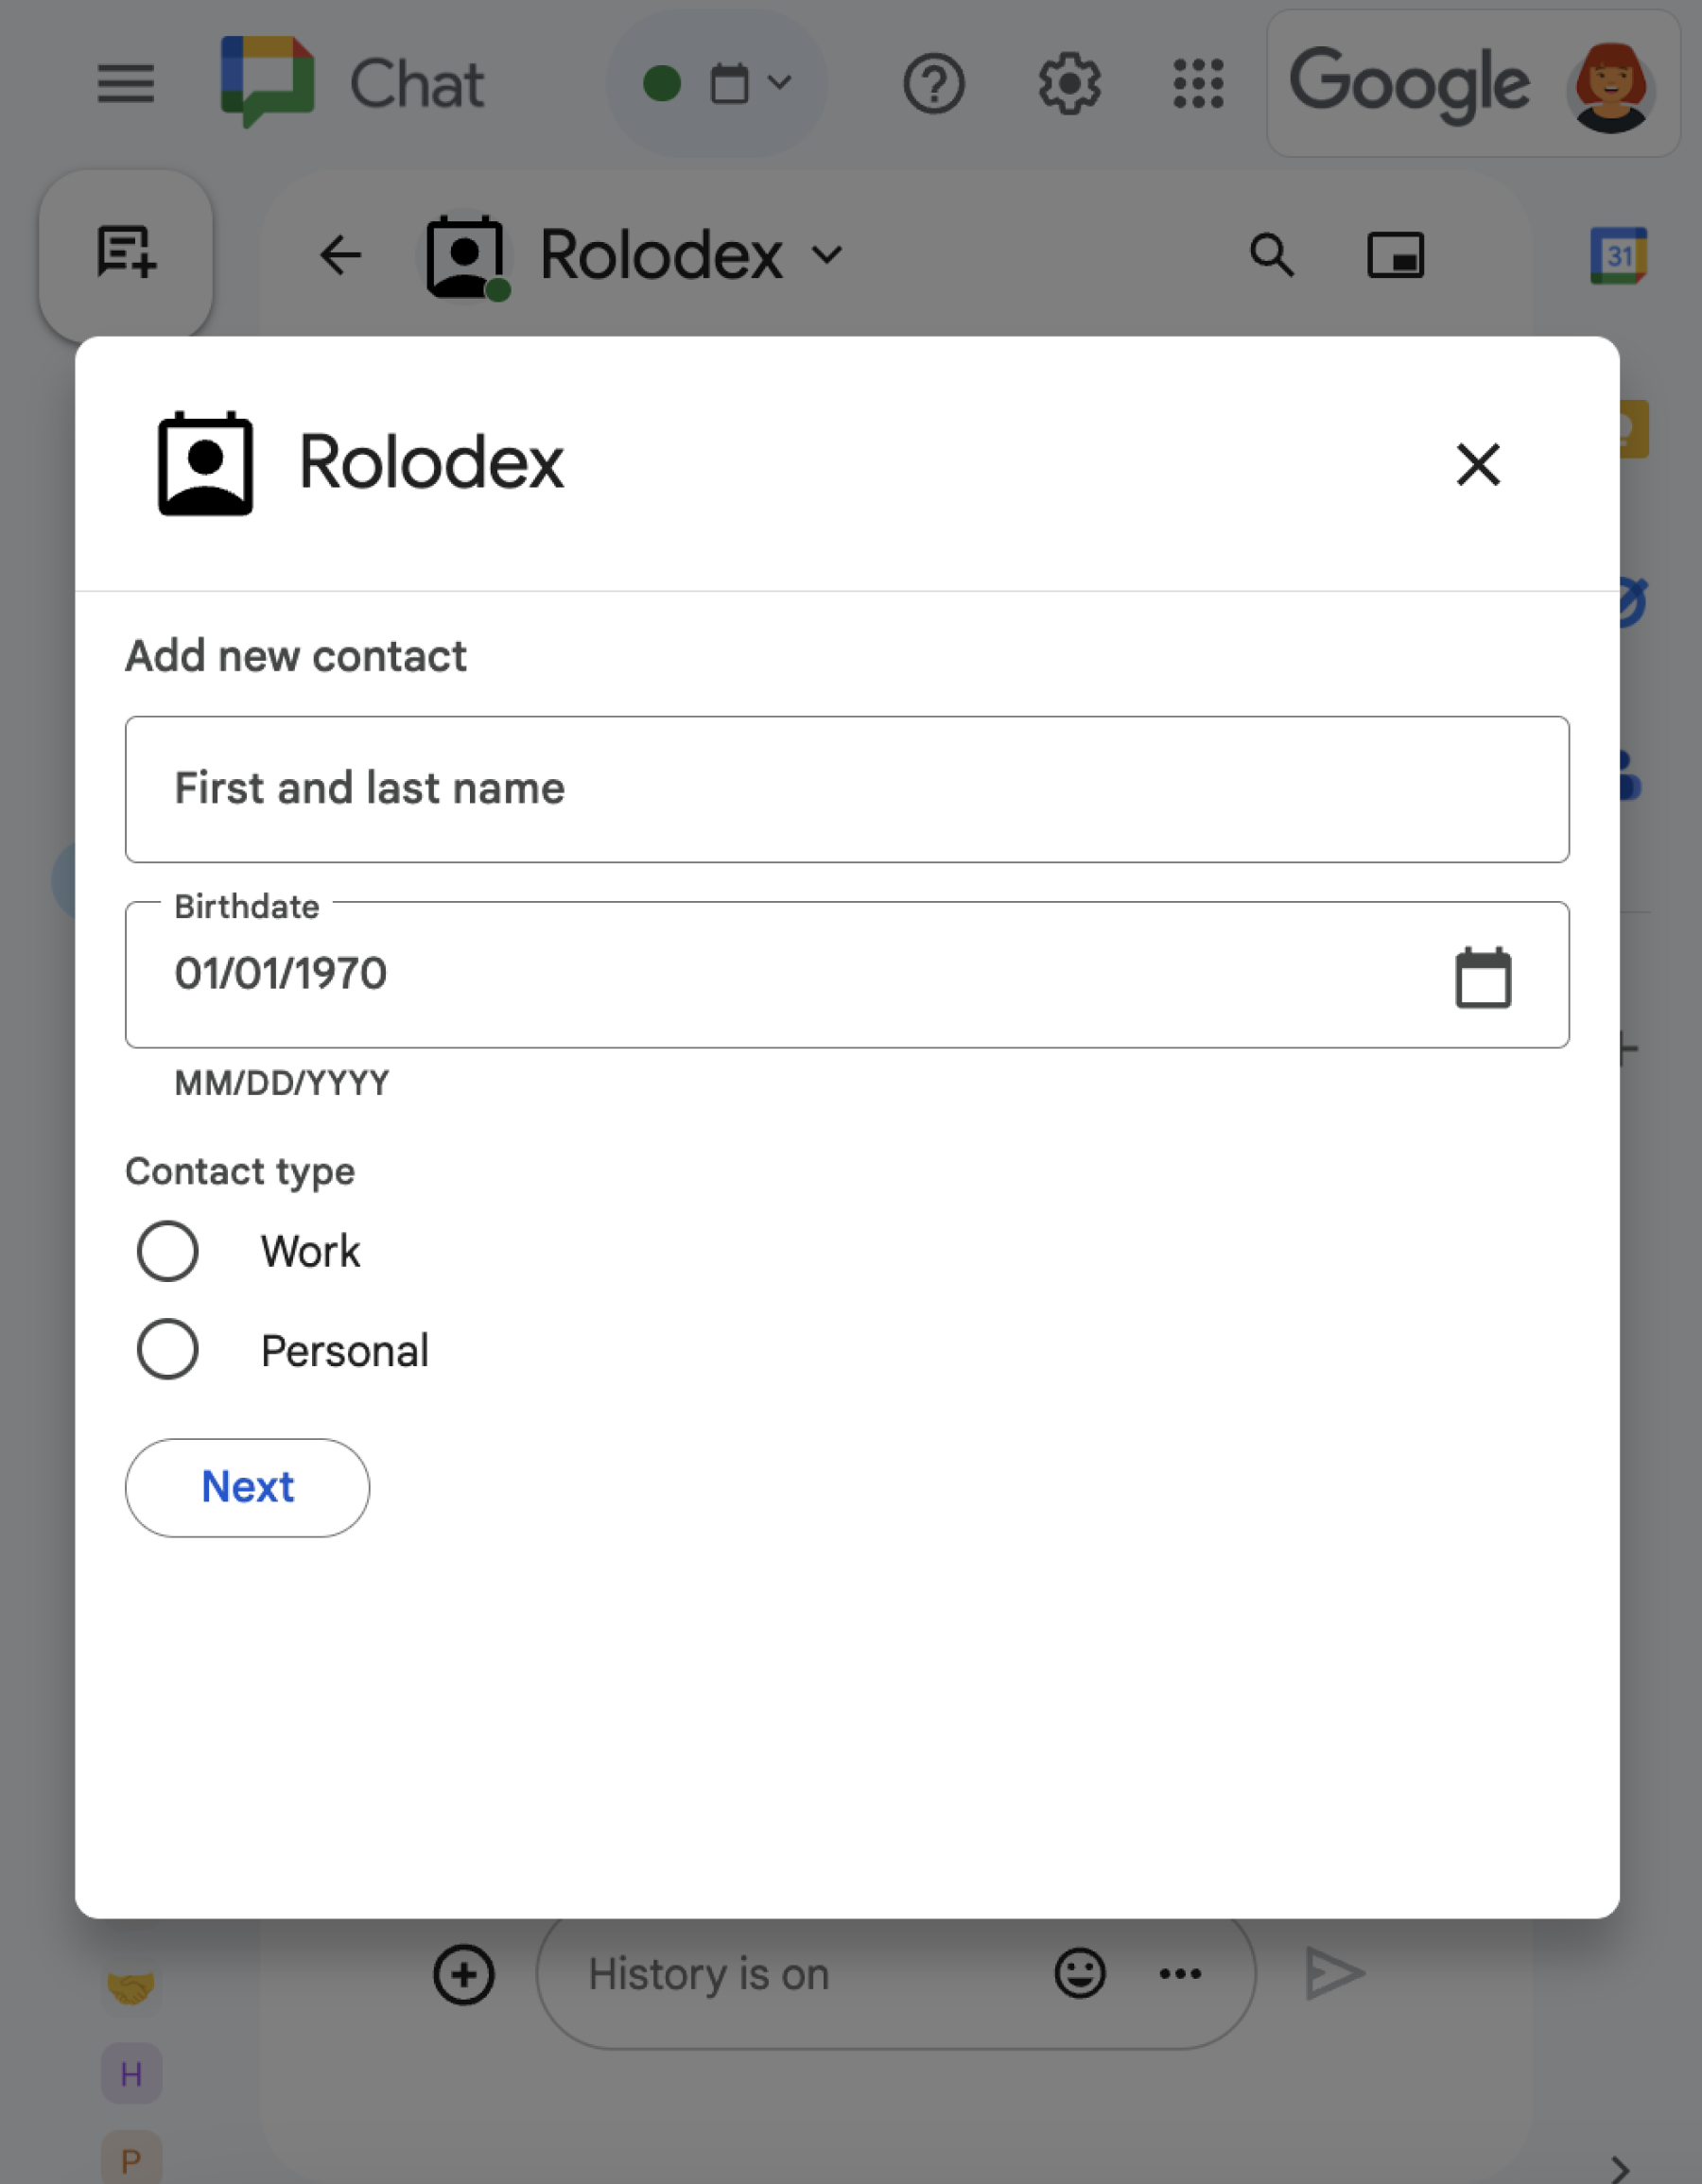
กล่องโต้ตอบที่มีวิดเจ็ตต่างๆ
รูปที่ 1: ตัวอย่าง แอปใน Chat ที่ เปิดกล่องโต้ตอบเพื่อรวบรวมข้อมูลติดต่อ

ส่วนนี้จะอธิบายวิธีตอบกลับและตั้งค่ากล่องโต้ตอบโดยทำดังนี้

  1. ทริกเกอร์คำขอ Dialog จากการโต้ตอบของผู้ใช้
  2. จัดการคำขอโดยกลับไปเปิดกล่องโต้ตอบ
  3. หลังจากที่ผู้ใช้ส่งข้อมูลแล้ว ให้ประมวลผลการส่งโดยปิดกล่องโต้ตอบหรือแสดงกล่องโต้ตอบอื่น

ทริกเกอร์คำขอ Dialog

แอป Chat จะเปิดกล่องโต้ตอบได้ก็ต่อเมื่อตอบสนองต่อการโต้ตอบของผู้ใช้เท่านั้น เช่น คำสั่งหรือการคลิกปุ่มจากข้อความในการ์ด

หากต้องการตอบกลับผู้ใช้ด้วยกล่องโต้ตอบ แอป Chat ต้อง สร้างการโต้ตอบที่ทริกเกอร์คำขอกล่องโต้ตอบ เช่น การโต้ตอบต่อไปนี้

  • ตอบกลับคำสั่ง หากต้องการทริกเกอร์คำขอจากคำสั่ง คุณต้องเลือกช่องทำเครื่องหมายเปิดกล่องโต้ตอบเมื่อกำหนดค่าคำสั่ง
  • ตอบสนองต่อการคลิกปุ่มในข้อความ ไม่ว่าจะอยู่ในส่วนของการ์ดหรือที่ด้านล่างของข้อความ หากต้องการทริกเกอร์คำขอจากปุ่มในข้อความ ให้กำหนดค่าการดำเนินการของonClick ปุ่มโดยตั้งค่า interaction เป็น OPEN_DIALOG
  • ตอบสนองต่อการคลิกปุ่มในหน้าแรกของแอป Chat ดูข้อมูลเกี่ยวกับการเปิดกล่องโต้ตอบจากหน้าแรกได้ที่สร้างหน้าแรกสำหรับแอป Google Chat
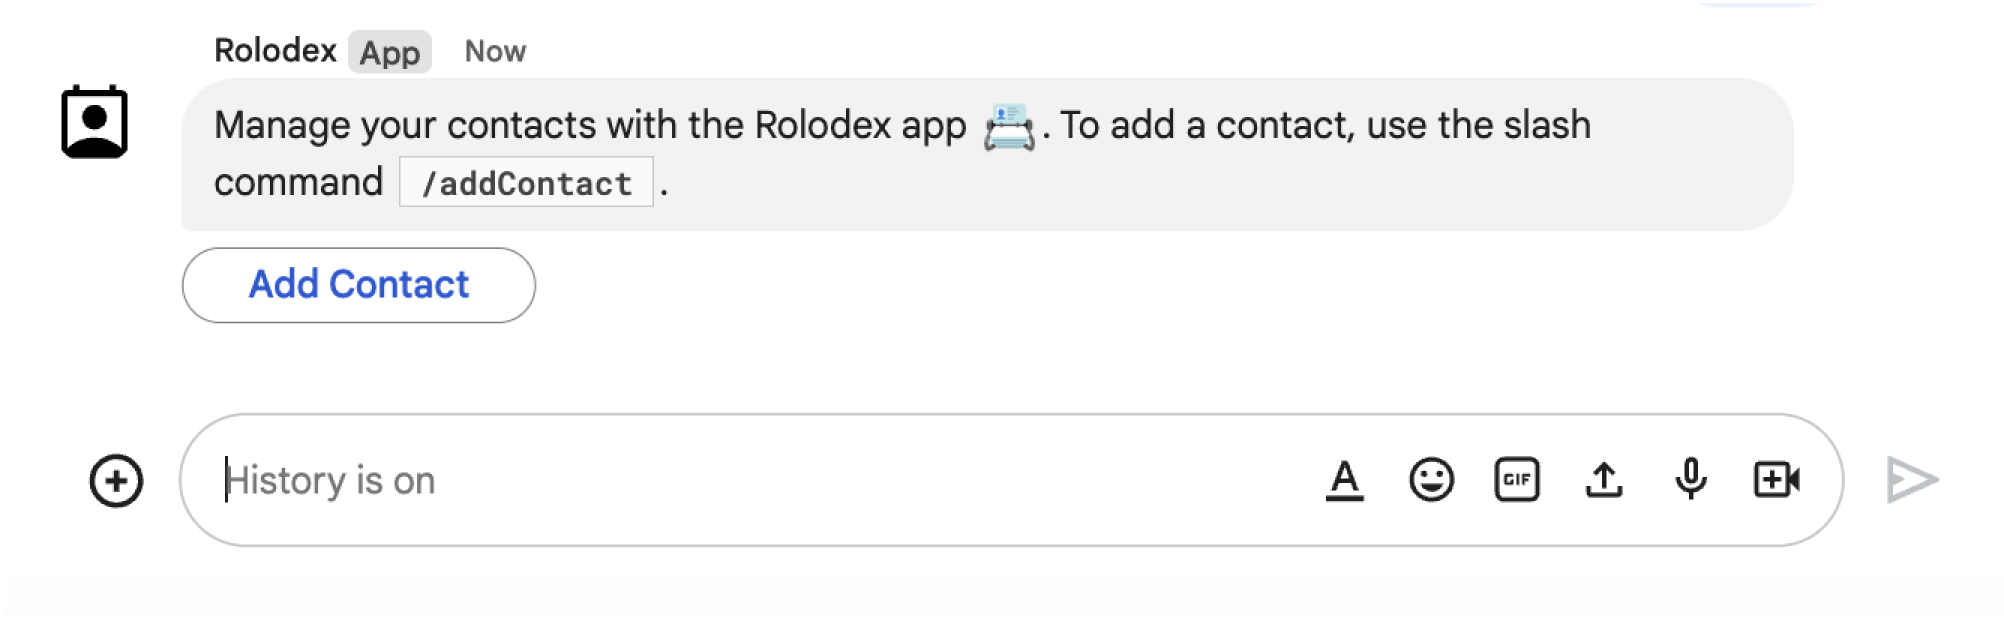
ปุ่มที่เรียกกล่องโต้ตอบ
รูปที่ 2: แอปแชทส่งข้อความที่แจ้งให้ผู้ใช้ใช้/addContactคำสั่งเครื่องหมายทับ
ข้อความยังมีปุ่มที่ผู้ใช้คลิกเพื่อเรียกใช้คำสั่งได้ด้วย

ตัวอย่างโค้ดต่อไปนี้แสดงวิธีทริกเกอร์คำขอ Dialog จากปุ่มใน ข้อความการ์ด หากต้องการเปิดกล่องโต้ตอบ ให้ตั้งค่าฟิลด์ onClick.action.interaction ของปุ่มเป็น OPEN_DIALOG

Node.js

node/chat/contact-form-app/index.js
{ buttonList: { buttons: [{
  text: "ADD CONTACT",
  onClick: { action: {
    function: FUNCTION_URL,
    interaction: "OPEN_DIALOG",
    parameters: [
      { key: "actionName", value: "openInitialDialog" }
    ]
  }}
}]}}

แทนที่ FUNCTION_URL ด้วยปลายทาง HTTP ที่จัดการ การคลิกปุ่ม

Python

python/chat/contact-form-app/main.py
{ 'buttonList': { 'buttons': [{
  'text': "ADD CONTACT",
  'onClick': { 'action': {
    'function': FUNCTION_URL,
    'interaction': "OPEN_DIALOG",
    'parameters': [
      { 'key': "actionName", 'value': "openInitialDialog" }
    ]
  }}
}]}}

แทนที่ FUNCTION_URL ด้วยปลายทาง HTTP ที่จัดการ การคลิกปุ่ม

Java

java/chat/contact-form-app/src/main/java/com/google/chat/contact/App.java
.setButtonList(new GoogleAppsCardV1ButtonList().setButtons(List.of(new GoogleAppsCardV1Button()
  .setText("ADD CONTACT")
  .setOnClick(new GoogleAppsCardV1OnClick().setAction(new GoogleAppsCardV1Action()
    .setFunction(FUNCTION_URL)
    .setInteraction("OPEN_DIALOG")
    .setParameters(List.of(
      new GoogleAppsCardV1ActionParameter().setKey("actionName").setValue("openInitialDialog"))))))))));

แทนที่ FUNCTION_URL ด้วยปลายทาง HTTP ที่จัดการ การคลิกปุ่ม

Apps Script

ตัวอย่างนี้จะส่งข้อความการ์ดโดยการส่งคืน JSON ของการ์ด คุณยังใช้บริการการ์ด Apps Script ได้ด้วย

apps-script/chat/contact-form-app/Code.gs
{ buttonList: { buttons: [{
  text: "ADD CONTACT",
  onClick: { action: {
    function: "openInitialDialog",
    interaction: "OPEN_DIALOG"
  }}
}]}}

เปิดกล่องโต้ตอบเริ่มต้น

เมื่อผู้ใช้ทริกเกอร์คำขอ Dialog แอป Chat ของคุณจะได้รับออบเจ็กต์เหตุการณ์ที่มีเพย์โหลดซึ่งระบุออบเจ็กต์ dialogEventType เป็น REQUEST_DIALOG

หากต้องการเปิดกล่องโต้ตอบ แอป Chat จะตอบกลับคำขอได้โดยการแสดงออบเจ็กต์ RenderActions พร้อมการนำทาง pushCard เพื่อแสดงการ์ด การ์ดควรมีองค์ประกอบของอินเทอร์เฟซผู้ใช้ (UI) รวมถึง sections[] วิดเจ็ตอย่างน้อย 1 รายการ หากต้องการรวบรวมข้อมูลจากผู้ใช้ คุณสามารถระบุวิดเจ็ตอินพุตของแบบฟอร์ม และวิดเจ็ตปุ่มได้ ดูข้อมูลเพิ่มเติมเกี่ยวกับการออกแบบอินพุตของแบบฟอร์มได้ที่ รวบรวมและประมวลผลข้อมูลจากผู้ใช้

ตัวอย่างโค้ดต่อไปนี้แสดงวิธีที่แอป Chat ส่งคืน การตอบกลับที่เปิดกล่องโต้ตอบ

Node.js

node/chat/contact-form-app/index.js
/**
 * Opens the initial step of the dialog that lets users add contact details.
 *
 * @return {Object} open the dialog.
 */
function openInitialDialog() {
  return { action: { navigations: [{ pushCard: { sections: [{ widgets: [
    { textInput: {
      name: "contactName",
      label: "First and last name",
      type: "SINGLE_LINE"
    }},
    { dateTimePicker: {
      name: "contactBirthdate",
      label: "Birthdate",
      type: "DATE_ONLY"
    }},
    { selectionInput: {
      name: "contactType",
      label: "Contact type",
      type: "RADIO_BUTTON",
      items: [
        { text: "Work", value: "Work", selected: false },
        { text: "Personal", value: "Personal", selected: false }
      ]
    }},
    { buttonList: { buttons: [{
      text: "NEXT",
      onClick: { action: {
        function: FUNCTION_URL,
        parameters: [
          { key: "actionName", value: "openConfirmationDialog" }
        ]
      }}
    }]}}
  ]}]}}]}};
}

แทนที่ FUNCTION_URL ด้วยปลายทาง HTTP ที่จัดการ การคลิกปุ่ม

Python

python/chat/contact-form-app/main.py
def open_initial_dialog() -> Mapping[str, Any]:
  """Opens the initial step of the dialog that lets users add contact details.

  Returns:
    Mapping[str, Any]: open the dialog.
  """
  return { 'action': { 'navigations': [{ 'pushCard': { 'sections': [{ 'widgets': [
    { 'textInput': {
      'name': "contactName",
      'label': "First and last name",
      'type': "SINGLE_LINE"
    }},
    { 'dateTimePicker': {
      'name': "contactBirthdate",
      'label': "Birthdate",
      'type': "DATE_ONLY"
    }},
    { 'selectionInput': {
      'name': "contactType",
      'label': "Contact type",
      'type': "RADIO_BUTTON",
      'items': [
        { 'text': "Work", 'value': "Work", 'selected': False },
        { 'text': "Personal", 'value': "Personal", 'selected': False }
      ]
    }},
    { 'buttonList': { 'buttons': [{
      'text': "NEXT",
      'onClick': { 'action': {
        'function': FUNCTION_URL,
        'parameters': [
          { 'key': "actionName", 'value': "openConfirmationDialog" }
        ]
      }}
    }]}}
  ]}]}}]}}

แทนที่ FUNCTION_URL ด้วยปลายทาง HTTP ที่จัดการ การคลิกปุ่ม

Java

java/chat/contact-form-app/src/main/java/com/google/chat/contact/App.java
/**
 * Opens the initial step of the dialog that lets users add contact details.
 *
 * @return {Object} open the dialog.
 */
GenericJson openInitialDialog() {
  GoogleAppsCardV1Card cardV2 = new GoogleAppsCardV1Card()
    .setSections(List.of(new GoogleAppsCardV1Section().setWidgets(List.of(
      new GoogleAppsCardV1Widget().setTextInput(new GoogleAppsCardV1TextInput()
        .setName("contactName")
        .setLabel("First and last name")
        .setType("SINGLE_LINE")),
      new GoogleAppsCardV1Widget().setDateTimePicker(new GoogleAppsCardV1DateTimePicker()
        .setName("contactBirthdate")
        .setLabel("Birthdate")
        .setType("DATE_ONLY")),
      new GoogleAppsCardV1Widget().setSelectionInput(new GoogleAppsCardV1SelectionInput()
        .setName("contactType")
        .setLabel("Contact type")
        .setType("RADIO_BUTTON")
        .setItems(List.of(
          new GoogleAppsCardV1SelectionItem()
            .setText("Work")
            .setValue("Work")
            .setSelected(false),
          new GoogleAppsCardV1SelectionItem()
            .setText("Personal")
            .setValue("Personal")
            .setSelected(false)))),
      new GoogleAppsCardV1Widget().setButtonList(new GoogleAppsCardV1ButtonList().setButtons(List.of(
        new GoogleAppsCardV1Button()
          .setText("NEXT")
          .setOnClick(new GoogleAppsCardV1OnClick().setAction(new GoogleAppsCardV1Action()
            .setFunction(FUNCTION_URL)
            .setParameters(List.of(
              new GoogleAppsCardV1ActionParameter().setKey("actionName").setValue("openConfirmationDialog"))))))))))));
  return new GenericJson() {{
    put("action", new GenericJson() {{
      put("navigations", List.of(new GenericJson() {{
        put("pushCard", cardV2);
      }}));
    }});
  }};
}

แทนที่ FUNCTION_URL ด้วยปลายทาง HTTP ที่จัดการ การคลิกปุ่ม

Apps Script

ตัวอย่างนี้จะส่งข้อความการ์ดโดยการส่งคืน JSON ของการ์ด คุณยังใช้บริการการ์ด Apps Script ได้ด้วย

apps-script/chat/contact-form-app/Code.gs
/**
 * Opens the initial step of the dialog that lets users add contact details.
 *
 * @param {Object} event The event object from the Google Workspace add-on.
 * @return {Object} open the dialog.
 */
function openInitialDialog(event) {
  return { action: { navigations: [{ pushCard: { sections: [{ widgets: [
    { textInput: {
      name: "contactName",
      label: "First and last name",
      type: "SINGLE_LINE"
    }},
    { dateTimePicker: {
      name: "contactBirthdate",
      label: "Birthdate",
      type: "DATE_ONLY"
    }},
    { selectionInput: {
      name: "contactType",
      label: "Contact type",
      type: "RADIO_BUTTON",
      items: [
        { text: "Work", value: "Work", selected: false },
        { text: "Personal", value: "Personal", selected: false }
      ]
    }},
    { buttonList: { buttons: [{
      text: "NEXT",
      onClick: { action: { function : "openConfirmationDialog" }}
    }]}}
  ]}]}}]}};
}

จัดการการส่งกล่องโต้ตอบ

เมื่อผู้ใช้คลิกปุ่มที่ส่งกล่องโต้ตอบ แอป Chat ของคุณจะได้รับออบเจ็กต์เหตุการณ์ที่มีออบเจ็กต์ buttonClickedPayload ในเพย์โหลด ระบบจะตั้งค่า dialogEventType เป็น SUBMIT_DIALOG หากต้องการทำความเข้าใจวิธีรวบรวมและประมวลผลข้อมูลในกล่องโต้ตอบ โปรดดูรวบรวมและประมวลผลข้อมูลจากผู้ใช้ Google Chat

แอป Chat ต้องตอบกลับออบเจ็กต์เหตุการณ์โดยทำอย่างใดอย่างหนึ่งต่อไปนี้

ไม่บังคับ: กลับไปที่กล่องโต้ตอบอื่น

หลังจากที่ผู้ใช้ส่งกล่องโต้ตอบเริ่มต้นแล้ว แอป Chat จะ แสดงกล่องโต้ตอบเพิ่มเติมอย่างน้อย 1 กล่องเพื่อช่วยให้ผู้ใช้ตรวจสอบข้อมูลก่อน ส่ง กรอกแบบฟอร์มแบบหลายขั้นตอน หรือสร้างเนื้อหาแบบฟอร์มแบบไดนามิก

หากต้องการประมวลผลข้อมูลที่ผู้ใช้ป้อน แอป Chat จะจัดการข้อมูลในออบเจ็กต์ commonEventObject.formInputs ของเหตุการณ์ ดูข้อมูลเพิ่มเติมเกี่ยวกับการดึงค่าจากวิดเจ็ตอินพุตได้ที่รวบรวมและประมวลผลข้อมูลจากผู้ใช้

หากต้องการติดตามข้อมูลใดๆ ที่ผู้ใช้ป้อนจากกล่องโต้ตอบเริ่มต้น คุณต้องเพิ่ม พารามิเตอร์ลงในปุ่มที่เปิดกล่องโต้ตอบถัดไป ดูรายละเอียดได้ที่หัวข้อโอนข้อมูลไปยังบัตรอื่น

ในตัวอย่างนี้ แอป Chat จะเปิดกล่องโต้ตอบเริ่มต้น ซึ่งนำไปสู่กล่องโต้ตอบที่ 2 เพื่อยืนยันก่อนส่ง

Node.js

node/chat/contact-form-app/index.js
/**
 * Responds to a message in Google Chat.
 *
 * @return {Object} response that handles dialogs.
 */
function handleMessage() {
  return { hostAppDataAction: { chatDataAction: { createMessageAction: { message: {
    text: "To add a contact, use the `ADD CONTACT` button below.",
    accessoryWidgets: [
      { buttonList: { buttons: [{
        text: "ADD CONTACT",
        onClick: { action: {
          function: FUNCTION_URL,
          interaction: "OPEN_DIALOG",
          parameters: [
            { key: "actionName", value: "openInitialDialog" }
          ]
        }}
      }]}}
    ]
  }}}}};
}

/**
 * Responds to a button clicked in Google Chat.
 *
 * @param {Object} event The event object from the Google Workspace add-on.
 * @return {Object} response depending on the button clicked.
 */
function handleButtonClicked(event) {
  // Initial dialog form page
  if (event.commonEventObject.parameters.actionName === "openInitialDialog") {
    return openInitialDialog();
  // Confirmation dialog form page
  } else if (event.commonEventObject.parameters.actionName === "openConfirmationDialog") {
    return openConfirmationDialog(event);
  // Submission dialog form page
  } else if (event.commonEventObject.parameters.actionName === "submitDialog") {
    return submitDialog(event);
  }
}

/**
 * Opens the initial step of the dialog that lets users add contact details.
 *
 * @return {Object} open the dialog.
 */
function openInitialDialog() {
  return { action: { navigations: [{ pushCard: { sections: [{ widgets: [
    { textInput: {
      name: "contactName",
      label: "First and last name",
      type: "SINGLE_LINE"
    }},
    { dateTimePicker: {
      name: "contactBirthdate",
      label: "Birthdate",
      type: "DATE_ONLY"
    }},
    { selectionInput: {
      name: "contactType",
      label: "Contact type",
      type: "RADIO_BUTTON",
      items: [
        { text: "Work", value: "Work", selected: false },
        { text: "Personal", value: "Personal", selected: false }
      ]
    }},
    { buttonList: { buttons: [{
      text: "NEXT",
      onClick: { action: {
        function: FUNCTION_URL,
        parameters: [
          { key: "actionName", value: "openConfirmationDialog" }
        ]
      }}
    }]}}
  ]}]}}]}};
}

/**
 * Opens the second step of the dialog that lets users confirm details.
 *
 * @param {Object} event The event object from the Google Workspace add-on.
 * @return {Object} update the dialog.
 */
function openConfirmationDialog(event) {
  // Retrieve the form input values
  const name = event.commonEventObject.formInputs["contactName"].stringInputs.value[0];
  const birthdate = event.commonEventObject.formInputs["contactBirthdate"].dateInput.msSinceEpoch;
  const type = event.commonEventObject.formInputs["contactType"].stringInputs.value[0];
  // Display the input values for confirmation
  return { action: { navigations: [{ pushCard: { sections: [{ widgets: [
    { textParagraph: { text: "Confirm contact information and submit:" }},
    { textParagraph: { text: "<b>Name:</b> " + name }},
    { textParagraph: { text: "<b>Birthday:</b> " + new Date(birthdate) }},
    { textParagraph: { text: "<b>Type:</b> " + type }},
    { buttonList: { buttons: [{
      text: "SUBMIT",
      onClick: { action: {
        function: FUNCTION_URL,
        parameters: [
          { key: "actionName", value: "submitDialog" },
          // Pass input values as parameters for last dialog step (submission)
          { key: "contactName", value: name },
          { key: "contactBirthdate", value: birthdate },
          { key: "contactType", value: type }
        ]
      }}
    }]}}
  ]}]}}]}};
}

แทนที่ FUNCTION_URL ด้วยปลายทาง HTTP ที่จัดการ การคลิกปุ่ม

Python

python/chat/contact-form-app/main.py
def handle_message() -> Mapping[str, Any]:
  """Responds to a message in Google Chat.

  Returns:
    Mapping[str, Any]: the response that handles dialogs.
  """
  return { 'hostAppDataAction': { 'chatDataAction': { 'createMessageAction': { 'message': {
    'text': "To add a contact, use the `ADD CONTACT` button below.",
    'accessoryWidgets': [
      { 'buttonList': { 'buttons': [{
        'text': "ADD CONTACT",
        'onClick': { 'action': {
          'function': FUNCTION_URL,
          'interaction': "OPEN_DIALOG",
          'parameters': [
            { 'key': "actionName", 'value': "openInitialDialog" }
          ]
        }}
      }]}}
    ]
  }}}}}


def handle_button_clicked(event: Mapping[str, Any]) -> Mapping[str, Any]:
  """Responds to a button clicked in Google Chat.

  Args:
    Mapping[str, Any] event: the event object from the Google Workspace add-on

  Returns:
    Mapping[str, Any]: the response depending on the button clicked.
  """
  # Initial dialog form page
  if "openInitialDialog" == event['commonEventObject']['parameters']['actionName']:
    return open_initial_dialog()
  # Confirmation dialog form page
  elif "openConfirmationDialog" == event['commonEventObject']['parameters']['actionName'] :
    return open_confirmation_dialog(event)
  # Submission dialog form page
  elif "submitDialog" == event['commonEventObject']['parameters']['actionName']:
    return submit_dialog(event)


def open_initial_dialog() -> Mapping[str, Any]:
  """Opens the initial step of the dialog that lets users add contact details.

  Returns:
    Mapping[str, Any]: open the dialog.
  """
  return { 'action': { 'navigations': [{ 'pushCard': { 'sections': [{ 'widgets': [
    { 'textInput': {
      'name': "contactName",
      'label': "First and last name",
      'type': "SINGLE_LINE"
    }},
    { 'dateTimePicker': {
      'name': "contactBirthdate",
      'label': "Birthdate",
      'type': "DATE_ONLY"
    }},
    { 'selectionInput': {
      'name': "contactType",
      'label': "Contact type",
      'type': "RADIO_BUTTON",
      'items': [
        { 'text': "Work", 'value': "Work", 'selected': False },
        { 'text': "Personal", 'value': "Personal", 'selected': False }
      ]
    }},
    { 'buttonList': { 'buttons': [{
      'text': "NEXT",
      'onClick': { 'action': {
        'function': FUNCTION_URL,
        'parameters': [
          { 'key': "actionName", 'value': "openConfirmationDialog" }
        ]
      }}
    }]}}
  ]}]}}]}}


def open_confirmation_dialog(event: Mapping[str, Any]) -> Mapping[str, Any]:
  """Opens the second step of the dialog that lets users confirm details.

  Args:
    Mapping[str, Any] event: the event object from the Google Workspace add-on

  Returns:
    Mapping[str, Any]: update the dialog.
  """
  name = event.get('commonEventObject').get('formInputs')["contactName"].get('stringInputs').get('value')[0]
  birthdateEpoch = event.get('commonEventObject').get('formInputs')["contactBirthdate"].get('dateInput').get('msSinceEpoch')
  birthdate = datetime.fromtimestamp(int(birthdateEpoch) / 1000.0).strftime("%Y-%m-%d")
  type = event.get('commonEventObject').get('formInputs')["contactType"].get('stringInputs').get('value')[0]
  # Display the input values for confirmation
  return { 'action': { 'navigations': [{ 'pushCard': { 'sections': [{ 'widgets': [
    { 'textParagraph': { 'text': "Confirm contact information and submit:" }},
    { 'textParagraph': { 'text': "<b>Name:</b> " + name }},
    { 'textParagraph': { 'text': "<b>Birthday:</b> " + birthdate }},
    { 'textParagraph': { 'text': "<b>Type:</b> " + type }},
    { 'buttonList': { 'buttons': [{
      'text': "SUBMIT",
      'onClick': { 'action': {
        'function': FUNCTION_URL,
        'parameters': [
          { 'key': "actionName", 'value': "submitDialog" },
          # Pass input values as parameters for last dialog step (submission)
          { 'key': "contactName", 'value': name },
          { 'key': "contactBirthdate", 'value': birthdate },
          { 'key': "contactType", 'value': type }
        ]
      }}
    }]}}
  ]}]}}]}}

แทนที่ FUNCTION_URL ด้วยปลายทาง HTTP ที่จัดการ การคลิกปุ่ม

Java

java/chat/contact-form-app/src/main/java/com/google/chat/contact/App.java
/**
 * Responds to a message in Google Chat.
 *
 * @return response that handles dialogs.
 */
GenericJson handleMessage() {
  Message message = new Message()
    .setText("To add a contact, use the `ADD CONTACT` button below.")
    .setAccessoryWidgets(List.of(new AccessoryWidget()
      .setButtonList(new GoogleAppsCardV1ButtonList().setButtons(List.of(new GoogleAppsCardV1Button()
        .setText("ADD CONTACT")
        .setOnClick(new GoogleAppsCardV1OnClick().setAction(new GoogleAppsCardV1Action()
          .setFunction(FUNCTION_URL)
          .setInteraction("OPEN_DIALOG")
          .setParameters(List.of(
            new GoogleAppsCardV1ActionParameter().setKey("actionName").setValue("openInitialDialog"))))))))));
  return new GenericJson() {{
    put("hostAppDataAction", new GenericJson() {{
      put("chatDataAction", new GenericJson() {{
        put("createMessageAction", new GenericJson() {{
          put("message", message);
        }});
      }});
    }});
  }};
}

/**
 * Responds to a button clicked in Google Chat.
 *
 * @param event The event object from the Google Workspace add-on.
 * @return response depending on the button clicked.
 */
GenericJson handleButtonClicked(JsonNode event) {
  String actionName = event.at("/commonEventObject/parameters/actionName").asText();
  // Initial dialog form page
  if ("openInitialDialog".equals(actionName)) {
    return openInitialDialog();
  // Confirmation dialog form page
  } else if ("openConfirmationDialog".equals(actionName)) {
    return openConfirmationDialog(event);
  // Submission dialog form page
  } else if ("submitDialog".equals(actionName)) {
    return submitDialog(event);
  }
  return null; 
}

/**
 * Opens the initial step of the dialog that lets users add contact details.
 *
 * @return {Object} open the dialog.
 */
GenericJson openInitialDialog() {
  GoogleAppsCardV1Card cardV2 = new GoogleAppsCardV1Card()
    .setSections(List.of(new GoogleAppsCardV1Section().setWidgets(List.of(
      new GoogleAppsCardV1Widget().setTextInput(new GoogleAppsCardV1TextInput()
        .setName("contactName")
        .setLabel("First and last name")
        .setType("SINGLE_LINE")),
      new GoogleAppsCardV1Widget().setDateTimePicker(new GoogleAppsCardV1DateTimePicker()
        .setName("contactBirthdate")
        .setLabel("Birthdate")
        .setType("DATE_ONLY")),
      new GoogleAppsCardV1Widget().setSelectionInput(new GoogleAppsCardV1SelectionInput()
        .setName("contactType")
        .setLabel("Contact type")
        .setType("RADIO_BUTTON")
        .setItems(List.of(
          new GoogleAppsCardV1SelectionItem()
            .setText("Work")
            .setValue("Work")
            .setSelected(false),
          new GoogleAppsCardV1SelectionItem()
            .setText("Personal")
            .setValue("Personal")
            .setSelected(false)))),
      new GoogleAppsCardV1Widget().setButtonList(new GoogleAppsCardV1ButtonList().setButtons(List.of(
        new GoogleAppsCardV1Button()
          .setText("NEXT")
          .setOnClick(new GoogleAppsCardV1OnClick().setAction(new GoogleAppsCardV1Action()
            .setFunction(FUNCTION_URL)
            .setParameters(List.of(
              new GoogleAppsCardV1ActionParameter().setKey("actionName").setValue("openConfirmationDialog"))))))))))));
  return new GenericJson() {{
    put("action", new GenericJson() {{
      put("navigations", List.of(new GenericJson() {{
        put("pushCard", cardV2);
      }}));
    }});
  }};
}

/**
 * Opens the second step of the dialog that lets users confirm details.
 *
 * @param event The event object from the Google Workspace add-on.
 * @return update the dialog.
 */
GenericJson openConfirmationDialog(JsonNode event) {
  // Retrieve the form input values
  String name = event.at("/commonEventObject/formInputs/contactName/stringInputs/value").get(0).asText();
  String birthdateEpoch = event.at("/commonEventObject/formInputs/contactBirthdate/dateInput/msSinceEpoch").asText();
  String birthdate = new SimpleDateFormat("MM/dd/yyyy").format(new Date((long)Double.parseDouble(birthdateEpoch)));
  String type = event.at("/commonEventObject/formInputs/contactType/stringInputs/value").get(0).asText();
  // Display the input values for confirmation
  GoogleAppsCardV1Card cardV2 = new GoogleAppsCardV1Card()
    .setSections(List.of(new GoogleAppsCardV1Section().setWidgets(List.of(
      new GoogleAppsCardV1Widget().setTextParagraph(new GoogleAppsCardV1TextParagraph()
        .setText("Confirm contact information and submit:")),
      new GoogleAppsCardV1Widget().setTextParagraph(new GoogleAppsCardV1TextParagraph()
        .setText("<b>Name:</b> " + name)),
      new GoogleAppsCardV1Widget().setTextParagraph(new GoogleAppsCardV1TextParagraph()
        .setText("<b>Birthday:</b> " + birthdate)),
      new GoogleAppsCardV1Widget().setTextParagraph(new GoogleAppsCardV1TextParagraph()
        .setText("<b>Type:</b> " + type)),
      new GoogleAppsCardV1Widget().setButtonList(new GoogleAppsCardV1ButtonList().setButtons(List.of(
        new GoogleAppsCardV1Button()
          .setText("SUBMIT")
          .setOnClick(new GoogleAppsCardV1OnClick().setAction(new GoogleAppsCardV1Action()
            .setFunction(FUNCTION_URL)
            .setParameters(List.of(
              new GoogleAppsCardV1ActionParameter().setKey("actionName").setValue("submitDialog"),
              // Pass input values as parameters for last dialog step (submission)
              new GoogleAppsCardV1ActionParameter().setKey("contactName").setValue(name),
              new GoogleAppsCardV1ActionParameter().setKey("contactBirthdate").setValue(birthdate),
              new GoogleAppsCardV1ActionParameter().setKey("contactType").setValue(type))))))))))));
  return new GenericJson() {{
    put("action", new GenericJson() {{
      put("navigations", List.of(new GenericJson() {{
        put("pushCard", cardV2);
      }}));
    }});
  }};
}

แทนที่ FUNCTION_URL ด้วยปลายทาง HTTP ที่จัดการ การคลิกปุ่ม

Apps Script

ตัวอย่างนี้จะส่งข้อความการ์ดโดยการส่งคืน JSON ของการ์ด คุณยังใช้บริการการ์ด Apps Script ได้ด้วย

apps-script/chat/contact-form-app/Code.gs
/**
 * Responds to a message in Google Chat.
 *
 * @param {Object} event The event object from the Google Workspace add-on.
 * @return {Object} response that handles dialogs.
 */
function onMessage(event) {
  // Reply with a message that contains a button to open the initial dialog
  return { hostAppDataAction: { chatDataAction: { createMessageAction: { message: {
    text: "To add a contact, use the `ADD CONTACT` button below.",
    accessoryWidgets: [
      { buttonList: { buttons: [{
        text: "ADD CONTACT",
        onClick: { action: {
          function: "openInitialDialog",
          interaction: "OPEN_DIALOG"
        }}
      }]}}
    ]
  }}}}};
}

/**
 * Opens the initial step of the dialog that lets users add contact details.
 *
 * @param {Object} event The event object from the Google Workspace add-on.
 * @return {Object} open the dialog.
 */
function openInitialDialog(event) {
  return { action: { navigations: [{ pushCard: { sections: [{ widgets: [
    { textInput: {
      name: "contactName",
      label: "First and last name",
      type: "SINGLE_LINE"
    }},
    { dateTimePicker: {
      name: "contactBirthdate",
      label: "Birthdate",
      type: "DATE_ONLY"
    }},
    { selectionInput: {
      name: "contactType",
      label: "Contact type",
      type: "RADIO_BUTTON",
      items: [
        { text: "Work", value: "Work", selected: false },
        { text: "Personal", value: "Personal", selected: false }
      ]
    }},
    { buttonList: { buttons: [{
      text: "NEXT",
      onClick: { action: { function : "openConfirmationDialog" }}
    }]}}
  ]}]}}]}};
}

/**
 * Opens the second step of the dialog that lets users confirm details.
 *
 * @param {Object} event The event object from the Google Workspace add-on.
 * @return {Object} update the dialog.
 */
function openConfirmationDialog(event) {
  // Retrieve the form input values
  const name = event.commonEventObject.formInputs["contactName"].stringInputs.value[0];
  const birthdate = event.commonEventObject.formInputs["contactBirthdate"].dateInput.msSinceEpoch;
  const type = event.commonEventObject.formInputs["contactType"].stringInputs.value[0];
  // Display the input values for confirmation
  return { action: { navigations: [{ pushCard: { sections: [{ widgets: [
    { textParagraph: { text: "Confirm contact information and submit:" }},
    { textParagraph: { text: "<b>Name:</b> " + name }},
    { textParagraph: { text: "<b>Birthday:</b> " + new Date(birthdate) }},
    { textParagraph: { text: "<b>Type:</b> " + type }},
    { buttonList: { buttons: [{
      text: "SUBMIT",
      onClick: { action: {
        function: "submitDialog",
        // Pass input values as parameters for last dialog step (submission)
        parameters: [
          { key: "contactName", value: name },
          { key: "contactBirthdate", value: birthdate },
          { key: "contactType", value: type }
        ]
      }}
    }]}}
  ]}]}}]}};
}

ปิดกล่องโต้ตอบ

เมื่อผู้ใช้คลิกปุ่มส่งในกล่องโต้ตอบ แอป Chat จะดำเนินการที่เชื่อมโยงไว้และระบุออบเจ็กต์เหตุการณ์โดยตั้งค่า buttonClickedPayload เป็นค่าต่อไปนี้

  • isDialogEvent คือtrue
  • dialogEventType คือSUBMIT_DIALOG

แอปใน Chat ควรแสดงออบเจ็กต์ RenderActions โดยตั้งค่า endNavigation เป็น CLOSE_DIALOG (endNavigation: "CLOSE_DIALOG")

ไม่บังคับ: แสดงการแจ้งเตือนชั่วคราว

เมื่อปิดกล่องโต้ตอบ คุณยังแสดงการแจ้งเตือนแบบข้อความชั่วคราว ต่อผู้ใช้ที่โต้ตอบกับแอปได้ด้วย

หากต้องการแสดงการแจ้งเตือน ให้ส่งคืนออบเจ็กต์ RenderActions ที่มีการตั้งค่าฟิลด์ notification

ตัวอย่างต่อไปนี้จะปิดกล่องโต้ตอบพร้อมการแจ้งเตือนแบบข้อความ

Node.js

node/chat/contact-form-app/index.js
// Validate the parameters.
if (!event.commonEventObject.parameters["contactName"]) {
  return { action: {
    navigations: [{ endNavigation: { action: "CLOSE_DIALOG"}}],
    notification: { text: "Failure, the contact name was missing!" }
  }};
}

Python

python/chat/contact-form-app/main.py
# Validate the parameters.
if event.get('commonEventObject').get('parameters')["contactName"] == "":
  return { 'action': {
    'navigations': [{ 'endNavigation': { 'action': "CLOSE_DIALOG"}}],
    'notification': { 'text': "Failure, the contact name was missing!" }
  }}

Java

java/chat/contact-form-app/src/main/java/com/google/chat/contact/App.java
    // Validate the parameters.
    if (event.at("/commonEventObject/parameters/contactName").asText().isEmpty()) {
      return new GenericJson() {{
        put("action", new GenericJson() {{
          put("navigations", List.of(new GenericJson() {{
            put("endNavigation", new GenericJson() {{
              put("action", "CLOSE_DIALOG");
            }});
          }}));
          put("notification", new GenericJson() {{
            put("text", "Failure, the contact name was missing!");
          }});
        }});
      }};
    }

    return new GenericJson() {{
      put("hostAppDataAction", new GenericJson() {{
        put("chatDataAction", new GenericJson() {{
          put("createMessageAction", new GenericJson() {{
            put("message", new Message()
              .setText( "✅ " + event.at("/commonEventObject/parameters/contactName").asText() +
                        " has been added to your contacts."));
          }});
        }});
      }});
    }};
  }
}

Apps Script

ตัวอย่างนี้จะส่งข้อความการ์ดโดยการส่งคืน JSON ของการ์ด คุณยังใช้บริการการ์ด Apps Script ได้ด้วย

apps-script/chat/contact-form-app/Code.gs
// Validate the parameters.
if (!event.commonEventObject.parameters["contactName"]) {
  return { action: {
    navigations: [{ endNavigation: { action: "CLOSE_DIALOG"}}],
    notification: { text: "Failure, the contact name was missing!" }
  }};
}

ดูรายละเอียดเกี่ยวกับการส่งพารามิเตอร์ระหว่างกล่องโต้ตอบได้ที่ โอนข้อมูลไปยังการ์ดอื่น

ไม่บังคับ: ส่งข้อความยืนยันใน Chat

เมื่อปิดกล่องโต้ตอบแล้ว คุณยังส่งข้อความแชทใหม่ หรืออัปเดตข้อความที่มีอยู่ได้ด้วย

หากต้องการส่งข้อความใหม่ ให้ส่งออบเจ็กต์ DataActions ที่มีฟิลด์ CreateMessageAction ตั้งค่าเป็นข้อความใหม่ ตัวอย่างต่อไปนี้จะปิดกล่องโต้ตอบโดยการส่งข้อความใหม่

Node.js

node/chat/contact-form-app/index.js
return { hostAppDataAction: { chatDataAction: { createMessageAction: { message: {
  text: "✅ " + event.commonEventObject.parameters["contactName"] + " has been added to your contacts."
}}}}};

Python

python/chat/contact-form-app/main.py
return { 'hostAppDataAction': { 'chatDataAction': { 'createMessageAction': { 'message': {
  'text': "✅ " + event.get('commonEventObject').get('parameters')["contactName"] + " has been added to your contacts."
}}}}}

Java

java/chat/contact-form-app/src/main/java/com/google/chat/contact/App.java
return new GenericJson() {{
  put("hostAppDataAction", new GenericJson() {{
    put("chatDataAction", new GenericJson() {{
      put("createMessageAction", new GenericJson() {{
        put("message", new Message()
          .setText( "✅ " + event.at("/commonEventObject/parameters/contactName").asText() +
                    " has been added to your contacts."));
      }});
    }});
  }});
}};

Apps Script

ตัวอย่างนี้จะส่งข้อความการ์ดโดยการส่งคืน JSON ของการ์ด คุณยังใช้บริการการ์ด Apps Script ได้ด้วย

apps-script/chat/contact-form-app/Code.gs
return { hostAppDataAction: { chatDataAction: { createMessageAction: { message: {
  text: "✅ " + event.commonEventObject.parameters["contactName"] + " has been added to your contacts."
}}}}};

หากต้องการอัปเดตข้อความหลังจากที่ผู้ใช้ส่งกล่องโต้ตอบ ให้ส่งคืนออบเจ็กต์ DataActions ที่มีการดำเนินการอย่างใดอย่างหนึ่งต่อไปนี้

แก้ปัญหา

เมื่อแอป Google Chat หรือการ์ดแสดงข้อผิดพลาด อินเทอร์เฟซ Chat จะแสดงข้อความว่า "เกิดข้อผิดพลาด" หรือ "ดำเนินการตามคำขอของคุณไม่ได้" บางครั้ง UI ของ Chat อาจไม่แสดงข้อความแสดงข้อผิดพลาด แต่แอป Chat หรือ การ์ดอาจให้ผลลัพธ์ที่ไม่คาดคิด เช่น ข้อความในการ์ดอาจไม่ ปรากฏ

แม้ว่าข้อความแสดงข้อผิดพลาดอาจไม่ปรากฏใน UI ของ Chat แต่ข้อความแสดงข้อผิดพลาดและข้อมูลบันทึกที่อธิบายไว้จะช่วยคุณแก้ไขข้อผิดพลาดได้เมื่อเปิดการบันทึกข้อผิดพลาดสำหรับแอป Chat หากต้องการความช่วยเหลือในการดู การแก้ไขข้อบกพร่อง และการแก้ไขข้อผิดพลาด โปรดดู แก้ปัญหาและแก้ไขข้อผิดพลาดของ Google Chat

แอปแชทที่ไม่ได้เป็นส่วนเสริม: เปิดกล่องโต้ตอบแบบอินเทอร์แอกทีฟ

เอกสารต่อไปนี้ใช้กับแอป Chat ที่ไม่ใช่ส่วนเสริมของ Google Workspace หากต้องการย้ายข้อมูลแอป Chat ที่ไม่ใช่ส่วนเสริม โปรดดูหัวข้อแปลงแอป Google Chat เป็นส่วนเสริม Google Workspace

ทริกเกอร์คำขอ Dialog

ตัวอย่างโค้ดต่อไปนี้แสดงวิธีที่แอป Chat ที่ไม่ใช่ส่วนเสริมจะทริกเกอร์คำขอ Dialog จากปุ่มในข้อความการ์ด หากต้องการเปิดกล่องโต้ตอบ ให้ตั้งค่าฟิลด์ button.interaction เป็น OPEN_DIALOG

Node.js

node/contact-form-app/index.js
buttonList: { buttons: [{
  text: "Add Contact",
  onClick: { action: {
    function: "openInitialDialog",
    interaction: "OPEN_DIALOG"
  }}
}]}

Python

python/contact-form-app/main.py
'buttonList': { 'buttons': [{
  'text': "Add Contact",
  'onClick': { 'action': {
    'function': "openInitialDialog",
    'interaction': "OPEN_DIALOG"
  }}
}]}

Java

java/contact-form-app/src/main/java/com/google/chat/contact/App.java
.setButtonList(new GoogleAppsCardV1ButtonList().setButtons(List.of(new GoogleAppsCardV1Button()
  .setText("Add Contact")
  .setOnClick(new GoogleAppsCardV1OnClick().setAction(new GoogleAppsCardV1Action()
    .setFunction("openInitialDialog")
    .setInteraction("OPEN_DIALOG"))))))));

Apps Script

ตัวอย่างนี้จะส่งข้อความการ์ดโดยการส่งคืน JSON ของการ์ด คุณยังใช้บริการการ์ด Apps Script ได้ด้วย

apps-script/contact-form-app/main.gs
buttonList: { buttons: [{
  text: "Add Contact",
  onClick: { action: {
    function: "openInitialDialog",
    interaction: "OPEN_DIALOG"
  }}
}]}

เปิดกล่องโต้ตอบเริ่มต้น

เมื่อผู้ใช้ทริกเกอร์คำขอของกล่องโต้ตอบ แอป Chat ที่ ไม่ใช่ส่วนเสริม จะได้รับเหตุการณ์การโต้ตอบ ซึ่งแสดงเป็นประเภท event ใน Chat API หากการโต้ตอบทริกเกอร์คำขอของกล่องโต้ตอบ ระบบจะตั้งค่าฟิลด์ dialogEventType ของเหตุการณ์เป็น REQUEST_DIALOG

หากต้องการเปิดกล่องโต้ตอบ แอป Chat ที่ไม่ใช่ส่วนเสริมจะตอบกลับคำขอได้โดยการแสดงผลออบเจ็กต์ actionResponse ที่มี type: "DIALOG" และออบเจ็กต์ Message หากต้องการระบุเนื้อหาของกล่องโต้ตอบ ให้รวมออบเจ็กต์ต่อไปนี้

  • ออบเจ็กต์ actionResponse โดยตั้งค่า type เป็น DIALOG
  • ออบเจ็กต์ dialogAction ฟิลด์ body มีองค์ประกอบอินเทอร์เฟซผู้ใช้ (UI) ที่จะแสดงในการ์ด รวมถึงวิดเจ็ตอย่างน้อย 1 รายการ sections หากต้องการรวบรวมข้อมูลจากผู้ใช้ คุณสามารถระบุวิดเจ็ตอินพุตแบบฟอร์มและวิดเจ็ต ปุ่ม

ตัวอย่างโค้ดต่อไปนี้แสดงวิธีที่แอป Chat ที่ไม่ใช่ส่วนเสริม ส่งคืนการตอบกลับที่เปิดกล่องโต้ตอบ

Node.js

node/contact-form-app/index.js
/**
 * Opens the initial step of the dialog that lets users add contact details.
 *
 * @return {Object} a message with an action response to open a dialog.
 */
function openInitialDialog() {
  return { actionResponse: {
    type: "DIALOG",
    dialogAction: { dialog: { body: { sections: [{
      header: "Add new contact",
      widgets: CONTACT_FORM_WIDGETS.concat([{
        buttonList: { buttons: [{
          text: "Review and submit",
          onClick: { action: { function: "openConfirmation" }}
        }]}
      }])
    }]}}}
  }};
}

Python

python/contact-form-app/main.py
def open_initial_dialog() -> dict:
  """Opens the initial step of the dialog that lets users add contact details."""
  return { 'actionResponse': {
    'type': "DIALOG",
    'dialogAction': { 'dialog': { 'body': { 'sections': [{
      'header': "Add new contact",
      'widgets': CONTACT_FORM_WIDGETS + [{
        'buttonList': { 'buttons': [{
          'text': "Review and submit",
          'onClick': { 'action': { 'function': "openConfirmation" }}
        }]}
      }]
    }]}}}
  }}

Java

java/contact-form-app/src/main/java/com/google/chat/contact/App.java
// Opens the initial step of the dialog that lets users add contact details.
Message openInitialDialog() {
  return new Message().setActionResponse(new ActionResponse()
    .setType("DIALOG")
    .setDialogAction(new DialogAction().setDialog(new Dialog().setBody(new GoogleAppsCardV1Card()
      .setSections(List.of(new GoogleAppsCardV1Section()
        .setHeader("Add new contact")
        .setWidgets(Stream.concat(
          CONTACT_FORM_WIDGETS.stream(),
          List.of(new GoogleAppsCardV1Widget()
            .setButtonList(new GoogleAppsCardV1ButtonList().setButtons(List.of(new GoogleAppsCardV1Button()
            .setText("Review and submit")
            .setOnClick(new GoogleAppsCardV1OnClick().setAction(new GoogleAppsCardV1Action()
              .setFunction("openConfirmation"))))))).stream()).collect(Collectors.toList()))))))));
}

Apps Script

ตัวอย่างนี้จะส่งข้อความการ์ดโดยการส่งคืน JSON ของการ์ด คุณยังใช้บริการการ์ด Apps Script ได้ด้วย

apps-script/contact-form-app/main.gs
/**
 * Opens the initial step of the dialog that lets users add contact details.
 *
 * @return {Object} a message with an action response to open a dialog.
 */
function openInitialDialog() {
  return { actionResponse: {
    type: "DIALOG",
    dialogAction: { dialog: { body: { sections: [{
      header: "Add new contact",
      widgets: CONTACT_FORM_WIDGETS.concat([{
        buttonList: { buttons: [{
          text: "Review and submit",
          onClick: { action: { function: "openConfirmation" }}
        }]}
      }])
    }]}}}
  }};
}

จัดการการส่งกล่องโต้ตอบ

เมื่อผู้ใช้คลิกปุ่มที่ส่งกล่องโต้ตอบ แอปแชทที่ไม่ใช่ส่วนเสริม จะได้รับ เหตุการณ์การโต้ตอบ CARD_CLICKED ซึ่งมี dialogEventType เป็น SUBMIT_DIALOG

ไม่บังคับ: กลับไปที่กล่องโต้ตอบอื่น

หากต้องการประมวลผลข้อมูลที่ผู้ใช้ป้อนในแอป Chat ที่ไม่ใช่ส่วนเสริม แอป Chat จะใช้ออบเจ็กต์ event.common.formInputs

ในตัวอย่างนี้ แอปแชทที่ไม่ใช่ ส่วนเสริมจะเปิด กล่องโต้ตอบเริ่มต้นซึ่งนำไปสู่กล่องโต้ตอบที่ 2 เพื่อยืนยันก่อนส่ง

Node.js

node/contact-form-app/index.js
/**
 * Responds to CARD_CLICKED interaction events in Google Chat.
 *
 * @param {Object} event the CARD_CLICKED interaction event from Google Chat.
 * @return {Object} message responses specific to the dialog handling.
 */
function onCardClick(event) {
  // Initial dialog form page
  if (event.common.invokedFunction === "openInitialDialog") {
    return openInitialDialog();
  // Confirmation dialog form page
  } else if (event.common.invokedFunction === "openConfirmation") {
    return openConfirmation(event);
  // Submission dialog form page
  } else if (event.common.invokedFunction === "submitForm") {
    return submitForm(event);
  }
}

/**
 * Opens the initial step of the dialog that lets users add contact details.
 *
 * @return {Object} a message with an action response to open a dialog.
 */
function openInitialDialog() {
  return { actionResponse: {
    type: "DIALOG",
    dialogAction: { dialog: { body: { sections: [{
      header: "Add new contact",
      widgets: CONTACT_FORM_WIDGETS.concat([{
        buttonList: { buttons: [{
          text: "Review and submit",
          onClick: { action: { function: "openConfirmation" }}
        }]}
      }])
    }]}}}
  }};
}

/**
 * Returns the second step as a dialog or card message that lets users confirm details.
 *
 * @param {Object} event the interactive event with form inputs.
 * @return {Object} returns a dialog or private card message.
 */
function openConfirmation(event) {
  const name = fetchFormValue(event, "contactName") ?? "";
  const birthdate = fetchFormValue(event, "contactBirthdate") ?? "";
  const type = fetchFormValue(event, "contactType") ?? "";
  const cardConfirmation = {
    header: "Your contact",
    widgets: [{
      textParagraph: { text: "Confirm contact information and submit:" }}, {
      textParagraph: { text: "<b>Name:</b> " + name }}, {
      textParagraph: {
        text: "<b>Birthday:</b> " + convertMillisToDateString(birthdate)
      }}, {
      textParagraph: { text: "<b>Type:</b> " + type }}, {
      buttonList: { buttons: [{
        text: "Submit",
        onClick: { action: {
          function: "submitForm",
          parameters: [{
            key: "contactName", value: name }, {
            key: "contactBirthdate", value: birthdate }, {
            key: "contactType", value: type
          }]
        }}
      }]}
    }]
  };

  // Returns a dialog with contact information that the user input.
  if (event.isDialogEvent) {
    return { action_response: {
      type: "DIALOG",
      dialogAction: { dialog: { body: { sections: [ cardConfirmation ]}}}
    }};
  }

  // Updates existing card message with contact information that the user input.
  return {
    actionResponse: { type: "UPDATE_MESSAGE" },
    privateMessageViewer: event.user,
    cardsV2: [{
      card: { sections: [cardConfirmation]}
    }]
  }
}

Python

python/contact-form-app/main.py
def on_card_click(event: dict) -> dict:
  """Responds to CARD_CLICKED interaction events in Google Chat."""
  # Initial dialog form page
  if "openInitialDialog" == event.get('common').get('invokedFunction'):
    return open_initial_dialog()
  # Confirmation dialog form page
  elif "openConfirmation" == event.get('common').get('invokedFunction'):
    return open_confirmation(event)
  # Submission dialog form page
  elif "submitForm" == event.get('common').get('invokedFunction'):
    return submit_form(event)


def open_initial_dialog() -> dict:
  """Opens the initial step of the dialog that lets users add contact details."""
  return { 'actionResponse': {
    'type': "DIALOG",
    'dialogAction': { 'dialog': { 'body': { 'sections': [{
      'header': "Add new contact",
      'widgets': CONTACT_FORM_WIDGETS + [{
        'buttonList': { 'buttons': [{
          'text': "Review and submit",
          'onClick': { 'action': { 'function': "openConfirmation" }}
        }]}
      }]
    }]}}}
  }}


def open_confirmation(event: dict) -> dict:
  """Returns the second step as a dialog or card message that lets users confirm details."""
  name = fetch_form_value(event, "contactName") or ""
  birthdate = fetch_form_value(event, "contactBirthdate") or ""
  type = fetch_form_value(event, "contactType") or ""
  card_confirmation = {
    'header': "Your contact",
    'widgets': [{
      'textParagraph': { 'text': "Confirm contact information and submit:" }}, {
      'textParagraph': { 'text': "<b>Name:</b> " + name }}, {
      'textParagraph': {
        'text': "<b>Birthday:</b> " + convert_millis_to_date_string(birthdate)
      }}, {
      'textParagraph': { 'text': "<b>Type:</b> " + type }}, {
      'buttonList': { 'buttons': [{
        'text': "Submit",
        'onClick': { 'action': {
          'function': "submitForm",
          'parameters': [{
            'key': "contactName", 'value': name }, {
            'key': "contactBirthdate", 'value': birthdate }, {
            'key': "contactType", 'value': type
          }]
        }}
      }]}
    }]
  }

  # Returns a dialog with contact information that the user input.
  if event.get('isDialogEvent'): 
    return { 'action_response': {
      'type': "DIALOG",
      'dialogAction': { 'dialog': { 'body': { 'sections': [card_confirmation] }}}
    }}

  # Updates existing card message with contact information that the user input.
  return {
    'actionResponse': { 'type': "UPDATE_MESSAGE" },
    'privateMessageViewer': event.get('user'),
    'cardsV2': [{
      'card': { 'sections': [card_confirmation] }
    }]
  }

Java

java/contact-form-app/src/main/java/com/google/chat/contact/App.java
// Responds to CARD_CLICKED interaction events in Google Chat.
Message onCardClick(JsonNode event) {
  String invokedFunction = event.at("/common/invokedFunction").asText();
  // Initial dialog form page
  if ("openInitialDialog".equals(invokedFunction)) {
    return openInitialDialog();
  // Confirmation dialog form page
  } else if ("openConfirmation".equals(invokedFunction)) {
    return openConfirmation(event);
  // Submission dialog form page
  } else if ("submitForm".equals(invokedFunction)) {
    return submitForm(event);
  }
  return null; 
}

// Opens the initial step of the dialog that lets users add contact details.
Message openInitialDialog() {
  return new Message().setActionResponse(new ActionResponse()
    .setType("DIALOG")
    .setDialogAction(new DialogAction().setDialog(new Dialog().setBody(new GoogleAppsCardV1Card()
      .setSections(List.of(new GoogleAppsCardV1Section()
        .setHeader("Add new contact")
        .setWidgets(Stream.concat(
          CONTACT_FORM_WIDGETS.stream(),
          List.of(new GoogleAppsCardV1Widget()
            .setButtonList(new GoogleAppsCardV1ButtonList().setButtons(List.of(new GoogleAppsCardV1Button()
            .setText("Review and submit")
            .setOnClick(new GoogleAppsCardV1OnClick().setAction(new GoogleAppsCardV1Action()
              .setFunction("openConfirmation"))))))).stream()).collect(Collectors.toList()))))))));
}

// Returns the second step as a dialog or card message that lets users confirm details.
Message openConfirmation(JsonNode event) {
  String name = fetchFormValue(event, "contactName") != null ?
    fetchFormValue(event, "contactName") : "";
  String birthdate = fetchFormValue(event, "contactBirthdate") != null ?
    fetchFormValue(event, "contactBirthdate") : "";
  String type = fetchFormValue(event, "contactType") != null ?
    fetchFormValue(event, "contactType") : "";
  GoogleAppsCardV1Section cardConfirmationSection = new GoogleAppsCardV1Section()
    .setHeader("Your contact")
    .setWidgets(List.of(
      new GoogleAppsCardV1Widget().setTextParagraph(new GoogleAppsCardV1TextParagraph()
        .setText("Confirm contact information and submit:")),
      new GoogleAppsCardV1Widget().setTextParagraph(new GoogleAppsCardV1TextParagraph()
        .setText("<b>Name:</b> " + name)),
      new GoogleAppsCardV1Widget().setTextParagraph(new GoogleAppsCardV1TextParagraph()
        .setText("<b>Birthday:</b> " + convertMillisToDateString(birthdate))),
      new GoogleAppsCardV1Widget().setTextParagraph(new GoogleAppsCardV1TextParagraph()
        .setText("<b>Type:</b> " + type)),
      new GoogleAppsCardV1Widget().setButtonList(new GoogleAppsCardV1ButtonList().setButtons(List.of(new GoogleAppsCardV1Button()
        .setText("Submit")
        .setOnClick(new GoogleAppsCardV1OnClick().setAction(new GoogleAppsCardV1Action()
          .setFunction("submitForm")
          .setParameters(List.of(
            new GoogleAppsCardV1ActionParameter().setKey("contactName").setValue(name),
            new GoogleAppsCardV1ActionParameter().setKey("contactBirthdate").setValue(birthdate),
            new GoogleAppsCardV1ActionParameter().setKey("contactType").setValue(type))))))))));

  // Returns a dialog with contact information that the user input.
  if (event.at("/isDialogEvent") != null && event.at("/isDialogEvent").asBoolean()) {
    return new Message().setActionResponse(new ActionResponse()
      .setType("DIALOG")
      .setDialogAction(new DialogAction().setDialog(new Dialog().setBody(new GoogleAppsCardV1Card()
        .setSections(List.of(cardConfirmationSection))))));
  }

  // Updates existing card message with contact information that the user input.
  return new Message()
    .setActionResponse(new ActionResponse()
      .setType("UPDATE_MESSAGE"))
    .setPrivateMessageViewer(new User().setName(event.at("/user/name").asText()))
    .setCardsV2(List.of(new CardWithId().setCard(new GoogleAppsCardV1Card()
      .setSections(List.of(cardConfirmationSection)))));
}

Apps Script

ตัวอย่างนี้จะส่งข้อความการ์ดโดยการส่งคืน JSON ของการ์ด คุณยังใช้บริการการ์ด Apps Script ได้ด้วย

apps-script/contact-form-app/main.gs
/**
 * Responds to CARD_CLICKED interaction events in Google Chat.
 *
 * @param {Object} event the CARD_CLICKED interaction event from Google Chat.
 * @return {Object} message responses specific to the dialog handling.
 */
function onCardClick(event) {
  // Initial dialog form page
  if (event.common.invokedFunction === "openInitialDialog") {
    return openInitialDialog();
  // Confirmation dialog form page
  } else if (event.common.invokedFunction === "openConfirmation") {
    return openConfirmation(event);
  // Submission dialog form page
  } else if (event.common.invokedFunction === "submitForm") {
    return submitForm(event);
  }
}

/**
 * Opens the initial step of the dialog that lets users add contact details.
 *
 * @return {Object} a message with an action response to open a dialog.
 */
function openInitialDialog() {
  return { actionResponse: {
    type: "DIALOG",
    dialogAction: { dialog: { body: { sections: [{
      header: "Add new contact",
      widgets: CONTACT_FORM_WIDGETS.concat([{
        buttonList: { buttons: [{
          text: "Review and submit",
          onClick: { action: { function: "openConfirmation" }}
        }]}
      }])
    }]}}}
  }};
}

/**
 * Returns the second step as a dialog or card message that lets users confirm details.
 *
 * @param {Object} event the interactive event with form inputs.
 * @return {Object} returns a dialog or private card message.
 */
function openConfirmation(event) {
  const name = fetchFormValue(event, "contactName") ?? "";
  const birthdate = fetchFormValue(event, "contactBirthdate") ?? "";
  const type = fetchFormValue(event, "contactType") ?? "";
  const cardConfirmation = {
    header: "Your contact",
    widgets: [{
      textParagraph: { text: "Confirm contact information and submit:" }}, {
      textParagraph: { text: "<b>Name:</b> " + name }}, {
      textParagraph: {
        text: "<b>Birthday:</b> " + convertMillisToDateString(birthdate)
      }}, {
      textParagraph: { text: "<b>Type:</b> " + type }}, {
      buttonList: { buttons: [{
        text: "Submit",
        onClick: { action: {
          function: "submitForm",
          parameters: [{
            key: "contactName", value: name }, {
            key: "contactBirthdate", value: birthdate }, {
            key: "contactType", value: type
          }]
        }}
      }]}
    }]
  };

  // Returns a dialog with contact information that the user input.
  if (event.isDialogEvent) {
    return { action_response: {
      type: "DIALOG",
      dialogAction: { dialog: { body: { sections: [ cardConfirmation ]}}}
    }};
  }

  // Updates existing card message with contact information that the user input.
  return {
    actionResponse: { type: "UPDATE_MESSAGE" },
    privateMessageViewer: event.user,
    cardsV2: [{
      card: { sections: [cardConfirmation]}
    }]
  }
}

ปิดกล่องโต้ตอบ

เมื่อผู้ใช้คลิกปุ่มในกล่องโต้ตอบ แอป Chat ที่ไม่ใช่ส่วนเสริมจะดำเนินการที่เชื่อมโยงและ ระบุออบเจ็กต์เหตุการณ์พร้อมข้อมูลต่อไปนี้

แอป Chat ที่ไม่ใช่ส่วนเสริมควรแสดงออบเจ็กต์ ActionResponse โดยตั้งค่า type เป็น DIALOG และระบุค่า dialogAction หาก การดำเนินการไม่ล้มเหลว dialogAction.actionStatus ควรเป็น OK ดังใน ตัวอย่างต่อไปนี้

Node.js

node/contact-form-app/index.js
// The Chat app indicates that it received form data from the dialog or card.
// Sends private text message that confirms submission.
const confirmationMessage = "✅ " + contactName + " has been added to your contacts.";
if (event.dialogEventType === "SUBMIT_DIALOG") {
  return {
    actionResponse: {
      type: "DIALOG",
      dialogAction: { actionStatus: {
        statusCode: "OK",
        userFacingMessage: "Success " + contactName
      }}
    }
  };
}

Python

python/contact-form-app/main.py
# The Chat app indicates that it received form data from the dialog or card.
# Sends private text message that confirms submission.
confirmation_message = "✅ " + contact_name + " has been added to your contacts.";
if "SUBMIT_DIALOG" == event.get('dialogEventType'):
  return {
    'actionResponse': {
      'type': "DIALOG",
      'dialogAction': { 'actionStatus': {
        'statusCode': "OK",
        'userFacingMessage': "Success " + contact_name
      }}
    }
  }

Java

java/contact-form-app/src/main/java/com/google/chat/contact/App.java
// The Chat app indicates that it received form data from the dialog or card.
// Sends private text message that confirms submission.
String confirmationMessage = "✅ " + contactName + " has been added to your contacts.";
if (event.at("/dialogEventType") != null && "SUBMIT_DIALOG".equals(event.at("/dialogEventType").asText())) {
  return new Message().setActionResponse(new ActionResponse()
    .setType("DIALOG")
    .setDialogAction(new DialogAction().setActionStatus(new ActionStatus()
      .setStatusCode("OK")
      .setUserFacingMessage("Success " + contactName))));
}

Apps Script

ตัวอย่างนี้จะส่งข้อความการ์ดโดยการส่งคืน JSON ของการ์ด คุณยังใช้บริการการ์ด Apps Script ได้ด้วย

apps-script/contact-form-app/main.gs
// The Chat app indicates that it received form data from the dialog or card.
// Sends private text message that confirms submission.
const confirmationMessage = "✅ " + contactName + " has been added to your contacts.";
if (event.dialogEventType === "SUBMIT_DIALOG") {
  return {
    actionResponse: {
      type: "DIALOG",
      dialogAction: { actionStatus: {
        statusCode: "OK",
        userFacingMessage: "Success " + contactName
      }}
    }
  };
}
ไม่บังคับ: แสดงการแจ้งเตือนชั่วคราว

แอปแชทที่ไม่ใช่ ส่วนเสริมสามารถตอบกลับด้วยการแจ้งเตือน ความสำเร็จหรือข้อผิดพลาดได้โดยการส่งคืน ActionResponse ที่มีการตั้งค่า actionStatus

ตัวอย่างต่อไปนี้จะตรวจสอบว่าพารามิเตอร์ถูกต้องหรือไม่ และปิดกล่องโต้ตอบ พร้อมการแจ้งเตือนแบบข้อความเมื่อไม่ถูกต้อง

Node.js

node/contact-form-app/index.js
const contactName = event.common.parameters["contactName"];
// Checks to make sure the user entered a contact name.
// If no name value detected, returns an error message.
const errorMessage = "Don't forget to name your new contact!";
if (!contactName && event.dialogEventType === "SUBMIT_DIALOG") {
  return { actionResponse: {
    type: "DIALOG",
    dialogAction: { actionStatus: {
      statusCode: "INVALID_ARGUMENT",
      userFacingMessage: errorMessage
    }}
  }};
}

Python

python/contact-form-app/main.py
contact_name = event.get('common').get('parameters')["contactName"]
# Checks to make sure the user entered a contact name.
# If no name value detected, returns an error message.
error_message = "Don't forget to name your new contact!"
if contact_name == "" and "SUBMIT_DIALOG" == event.get('dialogEventType'):
  return { 'actionResponse': {
    'type': "DIALOG",
    'dialogAction': { 'actionStatus': {
      'statusCode': "INVALID_ARGUMENT",
      'userFacingMessage': error_message
    }}
  }}

Java

java/contact-form-app/src/main/java/com/google/chat/contact/App.java
String contactName = event.at("/common/parameters/contactName").asText();
// Checks to make sure the user entered a contact name.
// If no name value detected, returns an error message.
String errorMessage = "Don't forget to name your new contact!";
if (contactName.isEmpty() && event.at("/dialogEventType") != null && "SUBMIT_DIALOG".equals(event.at("/dialogEventType").asText())) {
  return new Message().setActionResponse(new ActionResponse()
    .setType("DIALOG")
    .setDialogAction(new DialogAction().setActionStatus(new ActionStatus()
      .setStatusCode("INVALID_ARGUMENT")
      .setUserFacingMessage(errorMessage))));
}

Apps Script

ตัวอย่างนี้จะส่งข้อความการ์ดโดยการส่งคืน JSON ของการ์ด คุณยังใช้บริการการ์ด Apps Script ได้ด้วย

apps-script/contact-form-app/main.gs
const contactName = event.common.parameters["contactName"];
// Checks to make sure the user entered a contact name.
// If no name value detected, returns an error message.
const errorMessage = "Don't forget to name your new contact!";
if (!contactName && event.dialogEventType === "SUBMIT_DIALOG") {
  return { actionResponse: {
    type: "DIALOG",
    dialogAction: { actionStatus: {
      statusCode: "INVALID_ARGUMENT",
      userFacingMessage: errorMessage
    }}
  }};
}
ไม่บังคับ: ส่งข้อความยืนยันใน Chat

หากต้องการส่งข้อความใหม่เมื่อปิดกล่องโต้ตอบในแอป Chat ที่ไม่ใช่ส่วนเสริม ให้ส่งออบเจ็กต์ ActionResponse ที่มี type: "NEW_MESSAGE" ตัวอย่างต่อไปนี้ปิด กล่องโต้ตอบด้วยข้อความยืนยัน

Node.js

node/contact-form-app/index.js
return {
  actionResponse: { type: "NEW_MESSAGE" },
  privateMessageViewer: event.user,
  text: confirmationMessage
};

Python

python/contact-form-app/main.py
return {
  'actionResponse': { 'type': "NEW_MESSAGE" },
  'privateMessageViewer': event.get('user'),
  'text': confirmation_message
}

Java

java/contact-form-app/src/main/java/com/google/chat/contact/App.java
return new Message()
  .setActionResponse(new ActionResponse().setType("NEW_MESSAGE"))
  .setPrivateMessageViewer(new User().setName(event.at("/user/name").asText()))
  .setText(confirmationMessage);

Apps Script

ตัวอย่างนี้จะส่งข้อความการ์ดโดยการส่งคืน JSON ของการ์ด คุณยังใช้บริการการ์ด Apps Script ได้ด้วย

apps-script/contact-form-app/main.gs
return {
  actionResponse: { type: "NEW_MESSAGE" },
  privateMessageViewer: event.user,
  text: confirmationMessage
};

หากต้องการอัปเดตข้อความ ให้ส่งคืนออบเจ็กต์ actionResponse ที่มีข้อความที่อัปเดตแล้ว และตั้งค่า type เป็นค่าใดค่าหนึ่งต่อไปนี้