
يوضّح هذا البرنامج التعليمي كيفية إنشاء تطبيق Google Chat يستجيب للحوادث في الوقت الفعلي. عند الاستجابة لحادث، ينشئ التطبيق مساحة في Chat ويملأها، ويسهّل حل الحادث من خلال الرسائل وأوامر التطبيق ومربّعات الحوار، ويستخدم الذكاء الاصطناعي لتلخيص الاستجابة للحادث في مستند Google.
الحادث هو حدث يتطلّب اهتمامًا فوريًا من فريق من الأشخاص لحلّه. تشمل الأمثلة على الحوادث ما يلي:
- يتم إنشاء طلب دعم عاجل في منصة إدارة علاقات العملاء (CRM)، ما يتطلّب تعاون فريق الخدمة لحلّ المشكلة.
- يتوقف أحد الأنظمة عن العمل، فيتم تنبيه مجموعة من مهندسي موثوقية المواقع (SRE) ليتعاونوا معًا لإعادة تشغيله.
- يحدث زلزال قوي، ويحتاج عمّال الطوارئ إلى تنسيق جهودهم.
لأغراض هذا الدليل التوجيهي، يبدأ تنبيه الحادث عندما يبلّغ أحد المستخدمين عن الحادث من خلال النقر على زر في صفحة ويب. تحاكي صفحة الويب حادثة من خلال مطالبة المستخدمين بإدخال معلومات أساسية عن الحادثة، مثل العنوان والوصف وعناوين البريد الإلكتروني للمستجيبين.
إليك طريقة عمل تطبيق Chat لإدارة الحوادث:
-
الشكل 1. تمثّل هذه السمة الموقع الإلكتروني الذي يمكن للمستخدم من خلاله الإبلاغ عن حادثة. -
الشكل 2. إشعار بأنّه تم إنشاء مساحة Chat للحادثة -
الشكل 3. مساحة Chat للاستجابة للحوادث -
الشكل 4. حلّ المشكلة باستخدام أمر سريع -
الشكل 5. مربّع حوار حلّ المشكلة -
الشكل 6. تمت مشاركة مستند "مستندات Google" الخاص بحلّ المشاكل في المساحة. -
الشكل 7. مستند Google Docs الخاص بحلّ المشاكل باستخدام ملخّص من إنشاء الذكاء الاصطناعي
المتطلبات الأساسية
إذا كنت بحاجة إلى تفعيل أي من المتطلبات الأساسية التالية لمؤسستك، اطلب من مشرف حسابات Google Workspace تفعيلها:
- حساب Google Workspace تابع للعمل أو لمؤسسة مع إمكانية الوصول إلى Google Chat
- يجب تفعيل ميزة الدليل (مشاركة جهات الاتصال) في Google Workspace. يستخدم تطبيق الحوادث الدليل للبحث عن معلومات الاتصال الخاصة بالجهات المستجيبة للحوادث، مثل الاسم وعنوان البريد الإلكتروني. يجب أن يكون المستجيبون للحوادث مستخدمين لديهم حساب على Google Chat في مؤسسة Google Workspace.
الأهداف
- إنشاء تطبيق Chat يستجيب للحوادث
- يمكنك مساعدة المستخدمين في الرد على الحوادث من خلال اتّباع الخطوات التالية:
- إنشاء مساحات للاستجابة للحوادث
- نشر رسائل تلخّص الحوادث والردود
- إتاحة التعاون باستخدام ميزات تطبيق الدردشة التفاعلية
- تلخيص المحادثات والحلول باستخدام Vertex AI
الهندسة المعمارية
يوضّح المخطّط التالي بنية موارد Google Workspace وGoogle Cloud التي يستخدمها تطبيق Google Chat الخاص بالاستجابة للحوادث.
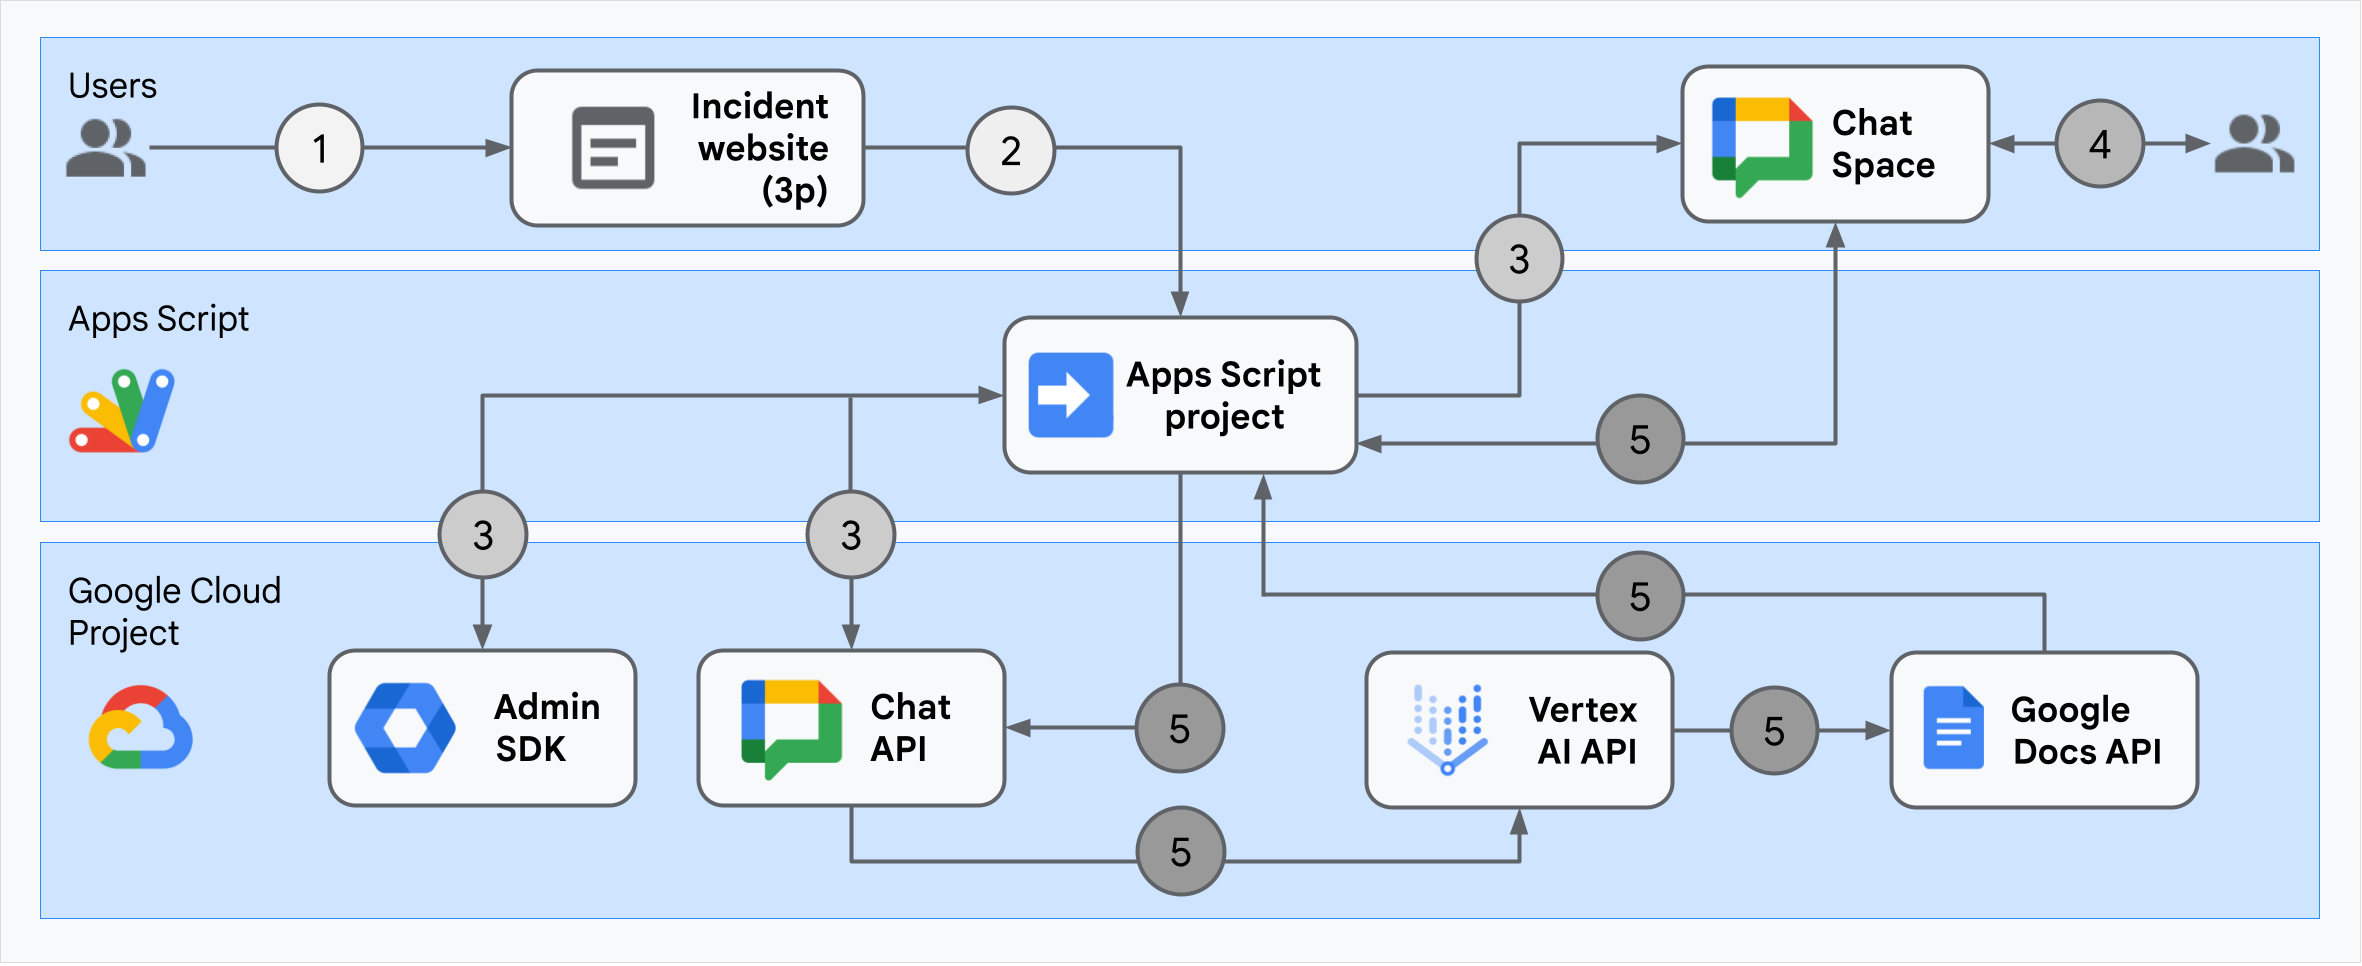
توضّح البنية كيف يعالج تطبيق Google Chat المخصّص للاستجابة للحوادث حادثًا ما وحلّه.
يبدأ المستخدم بلاغًا من موقع إلكتروني خارجي مستضاف على برمجة تطبيقات.
يرسل الموقع الإلكتروني طلب HTTP غير متزامن إلى تطبيق Google Chat، الذي تتم استضافته أيضًا على برمجة تطبيقات.
يعالج تطبيق Google Chat للاستجابة للحوادث الطلب على النحو التالي:
تحصل خدمة Admin SDK في Apps Script على معلومات أعضاء الفريق، مثل رقم تعريف المستخدم وعنوان البريد الإلكتروني.
باستخدام مجموعة من طلبات HTTP إلى Chat API من خلال خدمة Chat المتقدّمة في "برمجة تطبيقات Google"، ينشئ تطبيق Google Chat الخاص بالاستجابة للحوادث مساحة في Chat مخصّصة للحوادث، ويضيف إليها أعضاء الفريق، ويرسل رسالة إلى المساحة.
يناقش أعضاء الفريق الحادث في مساحة Chat.
يستخدم أحد أعضاء الفريق أمرًا سريعًا للإشارة إلى حلّ المشكلة.
يؤدي طلب HTTP إلى Chat API باستخدام خدمة Chat المتقدّمة في Apps Script إلى إدراج جميع رسائل مساحة Chat.
تتلقّى Vertex AI الرسائل المُدرَجة وتنشئ ملخّصًا.
تنشئ خدمة
DocumentAppفي "برمجة تطبيقات Google" مستندًا على "مستندات Google" وتضيف ملخّص Vertex AI إلى المستند.يطلب تطبيق Google Chat الخاص بالاستجابة للحوادث من واجهة برمجة تطبيقات Chat إرسال رسالة تتضمّن رابطًا إلى مستند "ملخّص" في "مستندات Google".
إعداد البيئة
يوضّح هذا القسم كيفية إنشاء مشروع على Google Cloud وإعداده لتطبيق Chat.
إنشاء مشروع على Google Cloud
وحدة تحكّم Google API
- في Google API Console، انتقِل إلى "القائمة" > إدارة الهوية وإمكانية الوصول (IAM) والمشرف > إنشاء مشروع.
-
في حقل اسم المشروع، أدخِل اسمًا وصفيًا لمشروعك.
اختياري: لتعديل رقم تعريف المشروع، انقر على تعديل. لا يمكن تغيير رقم تعريف المشروع بعد إنشائه، لذا اختَر رقم تعريف يلبي احتياجاتك طوال مدة المشروع.
- في حقل الموقع الجغرافي، انقر على تصفّح لعرض المواقع الجغرافية المحتملة لمشروعك. بعد ذلك، انقر على اختيار.
- انقر على إنشاء. ستنتقل بك "وحدة تحكّم واجهة Google API" إلى صفحة "لوحة البيانات"، وسيتم إنشاء مشروعك في غضون بضع دقائق.
gcloud CLI
في إحدى بيئات التطوير التالية، يمكنك الوصول إلى واجهة سطر الأوامر (CLI) في Google Cloud (gcloud):
-
Cloud Shell: لتفعيل Cloud Shell واستخدام وحدة طرفية على الإنترنت مع إعداد واجهة سطر الأوامر gcloud مسبقًا
تفعيل Cloud Shell -
Local Shell: لاستخدام بيئة تطوير محلية، عليك تثبيت وإعداد gcloud CLI.
لإنشاء مشروع على السحابة الإلكترونية، استخدِم الأمرgcloud projects create:gcloud projects create PROJECT_ID
تفعيل الفوترة لمشروع على السحابة الإلكترونية
وحدة تحكّم Google API
- في Google API Console، انتقِل إلى الفوترة. انقر على القائمة > الفوترة > مشاريعي.
- في اختيار مؤسسة، اختَر المؤسسة المرتبطة بمشروعك على Google Cloud.
- في صف المشروع، افتح قائمة الإجراءات ()، وانقر على تغيير الفوترة، ثم اختَر حساب الفوترة السحابية.
- انقر على ضبط الحساب.
gcloud CLI
- لعرض قائمة بحسابات الفوترة المتاحة، نفِّذ الأمر التالي:
gcloud billing accounts list - ربط حساب فوترة بمشروع على Google Cloud:
gcloud billing projects link PROJECT_ID --billing-account=BILLING_ACCOUNT_IDغيِّر القيم في السلسلة على الشكل التالي:
PROJECT_IDهو رقم تعريف المشروع لمشروع على السحابة الإلكترونية الذي تريد تفعيل الفوترة فيه.BILLING_ACCOUNT_IDهو معرّف حساب الفوترة الذي سيتم ربطه بمشروع Google Cloud.
تفعيل واجهات برمجة التطبيقات
وحدة تحكّم Google API
في Google API Console، فعِّل Google Chat API وGoogle Docs API وAdmin SDK API وVertex AI API.
تأكَّد من أنّك بصدد تفعيل واجهات برمجة التطبيقات في مشروع على السحابة الإلكترونية الصحيح، ثم انقر على التالي.
تأكَّد من تفعيل واجهات برمجة التطبيقات الصحيحة، ثم انقر على تفعيل.
gcloud CLI
إذا لزم الأمر، اضبط مشروع على السحابة الإلكترونية الحالي على المشروع الذي أنشأته باستخدام الأمر
gcloud config set project:gcloud config set project PROJECT_IDاستبدِل PROJECT_ID برقم تعريف المشروع لمشروع على السحابة الإلكترونية الذي أنشأته.
فعِّل واجهة Google Chat API وواجهة Google Docs API وواجهة Admin SDK API وواجهة Vertex AI API باستخدام الأمر
gcloud services enable:gcloud services enable chat.googleapis.com docs.googleapis.com admin.googleapis.com aiplatform.googleapis.com
إعداد المصادقة والتفويض
تتيح المصادقة والتفويض لتطبيق Chat الوصول إلى الموارد في Google Workspace وGoogle Cloud لمعالجة استجابة الحوادث.
في هذا البرنامج التعليمي، ستنشر التطبيق داخليًا، لذا لا بأس من استخدام معلومات نائبة. قبل نشر التطبيق خارجيًا، استبدِل المعلومات النائبة بمعلومات حقيقية في شاشة طلب الموافقة.
في Google API Console، انتقِل إلى "القائمة" > منصة Google Auth > العلامة التجارية.
إذا سبق لك إعداد منصة Google Auth، يمكنك إعداد إعدادات شاشة طلب الموافقة المتعلّقة ببروتوكول OAuth التالية في العلامة التجارية والجمهور والوصول إلى البيانات. إذا ظهرت لك الرسالة لم يتم إعداد منصة Google Auth بعد، انقر على البدء:
- ضمن معلومات التطبيق، في اسم التطبيق، اكتب
Incident Management with User Auth. - في حقل البريد الإلكتروني لدعم المستخدمين، اختَر عنوان بريدك الإلكتروني أو مجموعة Google المناسبة.
- انقر على التالي.
- ضمن الجمهور، اختَر داخلي. إذا لم تتمكّن من اختيار داخلي، اختَر خارجي.
- انقر على التالي.
- ضمن معلومات الاتصال، أدخِل عنوان بريد إلكتروني يمكنك تلقّي إشعارات فيه بشأن أي تغييرات تطرأ على مشروعك.
- انقر على التالي.
- ضمن إنهاء، راجِع سياسة بيانات المستخدمين في خدمات Google API، ثم ضَع علامة في المربّع أوافق على "سياسة بيانات المستخدمين في خدمات Google API" إذا كنت توافق عليها.
- انقر على متابعة.
- انقر على إنشاء.
- إذا اخترت خارجي لنوع المستخدم، أضِف مستخدمين اختباريين:
- انقر على الجمهور.
- ضمن المستخدمون التجريبيون، انقر على إضافة مستخدمين.
- أدخِل عنوان بريدك الإلكتروني وأي مستخدمين آخرين معتمَدين للاختبار، ثم انقر على حفظ.
- ضمن معلومات التطبيق، في اسم التطبيق، اكتب
انقر على الوصول إلى البيانات > إضافة نطاقات أو إزالتها. ستظهر لوحة تتضمّن قائمة بنطاقات كل واجهة برمجة تطبيقات فعّلتها في مشروعك على Google Cloud.
ضمن إضافة النطاقات يدويًا، الصِق النطاقات التالية:
https://www.googleapis.com/auth/chat.spaces.createhttps://www.googleapis.com/auth/chat.membershipshttps://www.googleapis.com/auth/chat.memberships.apphttps://www.googleapis.com/auth/chat.messageshttps://www.googleapis.com/auth/documentshttps://www.googleapis.com/auth/admin.directory.user.readonlyhttps://www.googleapis.com/auth/script.external_requesthttps://www.googleapis.com/auth/userinfo.emailhttps://www.googleapis.com/auth/cloud-platform
انقر على إضافة إلى الجدول.
انقر على تعديل.
بعد اختيار النطاقات التي يتطلّبها تطبيقك، انقر على حفظ في صفحة الوصول إلى البيانات.
إنشاء تطبيق Chat ونشره
في القسم التالي، يمكنك نسخ مشروع كامل من مشاريع "برمجة التطبيقات" وتعديله، وهو مشروع يحتوي على جميع رموز التطبيق المطلوبة لتطبيق Chat، لذا لن تحتاج إلى نسخ كل ملف ولصقه.
تتضمّن بعض الدوال شرطات سفلية في نهاية أسمائها، مثل
concatenateAllSpaceMessages_() من ChatApp.gs. يخفي الشرطة السفلية الدالة من صفحة الويب الخاصة ببدء الحادث عند فتحها في المتصفّح.
لمزيد من المعلومات، راجِع الدوال الخاصة.
تتوافق "برمجة التطبيقات" مع نوعَين من الملفات، هما نصوص .gs وملفات .html. للامتثال لهذا الدعم، يتم تضمين JavaScript من جهة العميل في التطبيق داخل علامات <script />، ويتم تضمين CSS داخل علامات <style /> داخل ملف HTML.
يمكنك اختياريًا الاطّلاع على المشروع بأكمله على GitHub.
في ما يلي نظرة عامة على كل ملف:
Consts.gsتحدّد الثوابت التي تشير إليها ملفات الرموز البرمجية الأخرى، بما في ذلك رقم تعريف مشروع على السحابة الإلكترونية، ورقم تعريف الموقع الجغرافي في Vertex AI، ورقم تعريف الأمر السريع لإغلاق بلاغ، ونموذج Gemini.
عرض رمز
Consts.gsChatApp.gsيتعامل هذا الصف مع أحداث التفاعل في Chat، بما في ذلك الرسائل والنقرات على الأزرار وأوامر التطبيق والحوارات. يستجيب للأمر السريع
Close incidentمن خلال فتح مربّع حوار لجمع تفاصيل حول حلّ المشكلة. يقرأ الرسائل في المساحة من خلال استدعاء الطريقةspaces.messages.listفي Chat API. يحصل على أرقام تعريف المستخدمين باستخدام خدمة Admin SDK Directory في برمجة تطبيقات.عرض رمز
ChatApp.gsChatSpaceCreator.gsيتلقّى بيانات النموذج التي يدخلها المستخدمون في صفحة الويب الخاصة ببدء الحادث، ويستخدمها لإعداد مساحة في Chat من خلال إنشائها وتعبئتها، ثم ينشر رسالة حول الحادث.
عرض رمز
ChatSpaceCreator.gsDocsApi.gsيطلب من Google Docs API إنشاء مستند في "مستندات Google" ضمن حساب Google Drive الخاص بالمستخدم، ويكتب ملخّصًا لمعلومات الحدث، تم إنشاؤه في
VertexAiApi.gs، في المستند.عرض رمز
DocsApi.gsVertexAiApi.gsتلخّص هذه الطريقة المحادثة في مساحة Chat باستخدام Vertex AI. يتم نشر هذا الملخّص في مستند تم إنشاؤه خصيصًا في
DocsAPI.gs.عرض رمز
VertexAiApi.gsWebController.gsيعرض الموقع الإلكتروني الخاص بتهيئة الحوادث.
عرض رمز
WebController.gsIndex.htmlتمثّل هذه السمة رمز HTML الذي يتضمّن الموقع الإلكتروني الذي تمّت فيه عملية إعداد الحدث.
عرض رمز
Index.htmlJavaScript.htmlتعالج هذه السمة سلوك النموذج، بما في ذلك عمليات الإرسال والأخطاء وعمليات المسح، وذلك لموقع الويب الذي يتم فيه إعداد الحادث. يتم تضمينها في
Index.htmlمن خلال الدالة المخصّصةincludeفيWebController.gs.عرض رمز
JavaScript.htmlStylesheet.htmlتمثّل هذه السمة ملف CSS الخاص بالموقع الإلكتروني الذي يتم فيه بدء عملية إنشاء الحدث. يتم تضمينها في
Index.htmlمن خلال الدالة المخصّصةincludeفيWebController.gs.عرض رمز
Stylesheet.html
العثور على رقم تعريف مشروعك على السحابة الإلكترونية
في Google API Console، انتقِل إلى مشروعك على السحابة الإلكترونية.
انقر على "الإعدادات والأدوات" > إعدادات المشروع.
دوِّن القيم في حقلَي رقم المشروع ورقم تعريف المشروع. يمكنك استخدامها في الأقسام التالية.
إنشاء مشروع "برمجة تطبيقات Google"
لإنشاء مشروع في "برمجة تطبيقات" وربطه بمشروعك على السحابة الإلكترونية، اتّبِع الخطوات التالية:
- انقر على الزر التالي لفتح مشروع تطبيق Chat لإدارة الحوادث مع مصادقة المستخدم في "برمجة تطبيقات Google".
افتح المشروع - انقر على نظرة عامة.
- في صفحة النظرة العامة، انقر على
 إنشاء نسخة.
 ضع اسمًا لنسخة مشروع "برمجة التطبيقات Google":
انقر على نسخة من تطبيق Chat لإدارة الحوادث مع مصادقة المستخدم.
في عنوان المشروع، اكتب
Incident Management Chat app with User Auth.انقر على إعادة تسمية.
في نسختك من مشروع "برمجة تطبيقات Google"، انتقِل إلى الملف
Consts.gsواضبطPROJECT_IDباستخدام معرّف مشروعك على السحابة الإلكترونية.
ضبط مشروع Cloud لمشروع "برمجة التطبيقات"
- في مشروع "برمجة تطبيقات Google"، انقر على
 إعدادات المشروع.
 - ضمن مشروع Google Cloud Platform (GCP)، انقر على تغيير المشروع.
- في رقم مشروع GCP، الصِق رقم مشروع على السحابة الإلكترونية.
- انقر على تحديد المشروع. تم الآن ربط مشروع على السحابة الإلكترونية بمشروع "برمجة التطبيقات".
إنشاء عملية نشر تجريبية في برمجة تطبيقات
بعد الانتهاء من إعداد الرمز البرمجي وحفظه، يمكنك نشر مشروع "برمجة التطبيقات". يمكنك استخدام معرّف النشر عند إعداد تطبيق Chat في Google Cloud.
في برمجة تطبيقات، افتح مشروع تطبيق الاستجابة للحوادث.
انقر على نشر > اختبار عمليات النشر.
إذا لم يكن الخياران إضافة Google Workspace وتطبيق الويب محدّدين، انقر على أنواع النشر
بجانب اختيار النوع، ثم اختَر إضافة Google Workspace وتطبيق الويب.توفّر خدمة برمجة تطبيقات رقم تعريف وعنوان URL لعملية النشر الخاصة بتطبيق الويب.
دوِّن عنوان URL لتطبيق الويب الذي ستنتقل إليه لاحقًا عند بدء حادثة. انسخ رقم تعريف عملية النشر. يمكنك استخدام هذا المعرّف أثناء ضبط تطبيق Chat في وحدة تحكّم Google API.
انقر على تم.
ضبط تطبيق Chat في Google API Console
يوضّح هذا القسم كيفية ضبط Google Chat API في "وحدة تحكّم Google API" باستخدام معلومات عن تطبيق Chat، بما في ذلك معرّف عملية النشر التي أنشأتها للتو من مشروع برمجة تطبيقات.
في Google API Console، انقر على القائمة > واجهات برمجة التطبيقات والخدمات > واجهات برمجة التطبيقات والخدمات المفعَّلة > Google Chat API > الإعدادات.
في حقل اسم التطبيق، اكتب
Incident Management with User Auth.في عنوان URL للأفاتار، اكتب
https://developers.google.com/chat/images/quickstart-app-avatar.png.في حقل الوصف، اكتب
Responds to incidents.انقر على مفتاح التبديل تفعيل الميزات التفاعلية لتفعيله.
ضمن الوظائف، اختَر الانضمام إلى المساحات والمحادثات الجماعية.
ضمن إعدادات الربط، اختَر برمجة تطبيقات.
في حقل رقم تعريف النشر، الصِق رقم تعريف نشر برمجة تطبيقات الذي نسخته سابقًا من عملية نشر مشروع برمجة تطبيقات.
سجِّل طلبًا سريعًا يستخدمه تطبيق Chat الذي تم تنفيذه بالكامل:
ضمن الأوامر، انقر على إضافة أمر.
في معرّف الأمر، اكتب
1.في حقل الوصف، اكتب
Closes the incident being discussed in the space.ضمن نوع الأمر، اختَر أمر سريع.
في اسم الأمر السريع، اكتب
Close incident.انقر على مربع الحوار.
انقر على تم. يتم تسجيل الأمر وإدراجه.
ضمن مستوى الرؤية، اختَر إتاحة تطبيق Chat هذا لأشخاص ومجموعات معيّنة في نطاق Workspace وأدخِل عنوان بريدك الإلكتروني.
ضمن السجلات، اختَر تسجيل الأخطاء في خدمة تسجيل البيانات.
انقر على حفظ. ستظهر رسالة تفيد بأنّه تم حفظ الإعدادات، ما يعني أنّ التطبيق جاهز للاختبار.
اختبار تطبيق Chat
لاختبار تطبيق Chat لإدارة الحوادث، ابدأ حادثًا من صفحة الويب وتأكَّد من أنّ تطبيق Chat يعمل على النحو المتوقّع:
انتقِل إلى عنوان URL لتطبيق الويب الذي تم تفعيله في Apps Script.
عندما يطلب برمجة تطبيقات الإذن بالوصول إلى بياناتك، انقر على مراجعة الأذونات، وسجِّل الدخول باستخدام حساب Google مناسب في نطاق Google Workspace، ثم انقر على السماح.
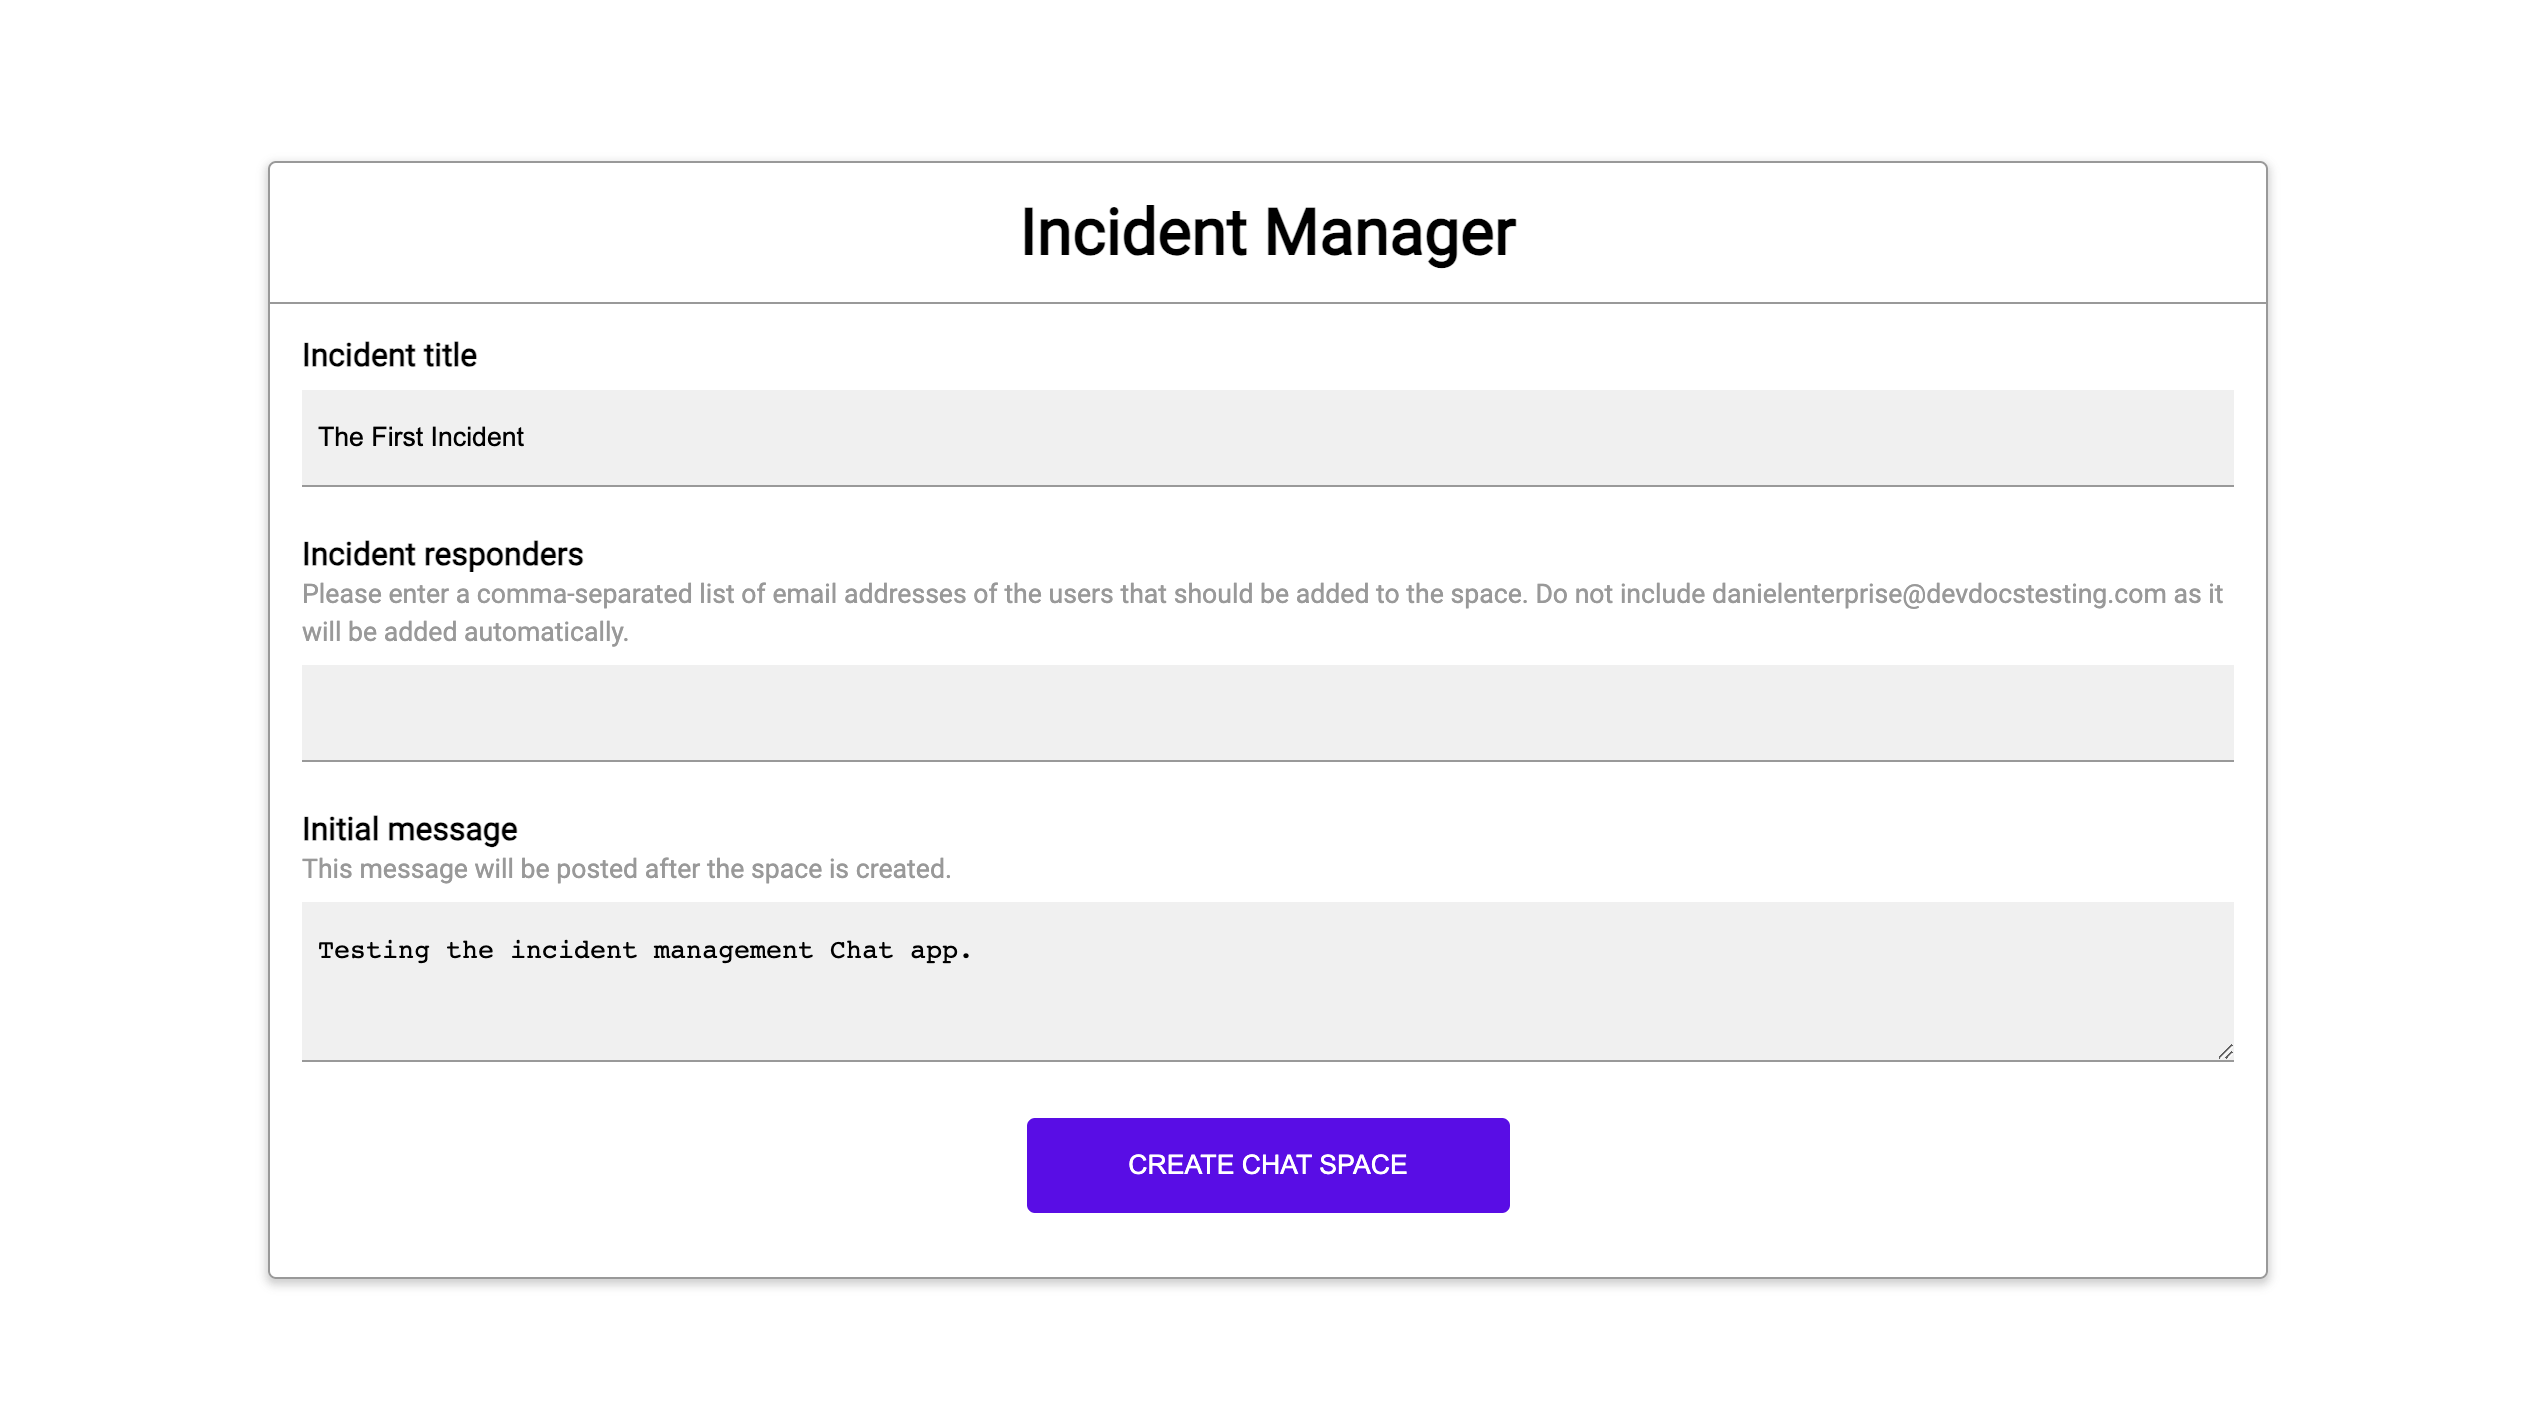
يتم فتح صفحة الويب الخاصة ببدء الحادث. أدخِل معلومات الاختبار:
- في عنوان الحدث، اكتب
The First Incident. - اختياريًا، في المستجيبون للحوادث، أدخِل عناوين البريد الإلكتروني الخاصة بالمستجيبين الآخرين للحوادث. يجب أن يكونوا مستخدمين لديهم حساب على Google Chat في مؤسسة Google Workspace أو ستتعذّر عملية إنشاء المساحة. لا تُدخِل عنوان بريدك الإلكتروني لأنّه يتم تضمينه تلقائيًا.
- في الرسالة الأولية، اكتب
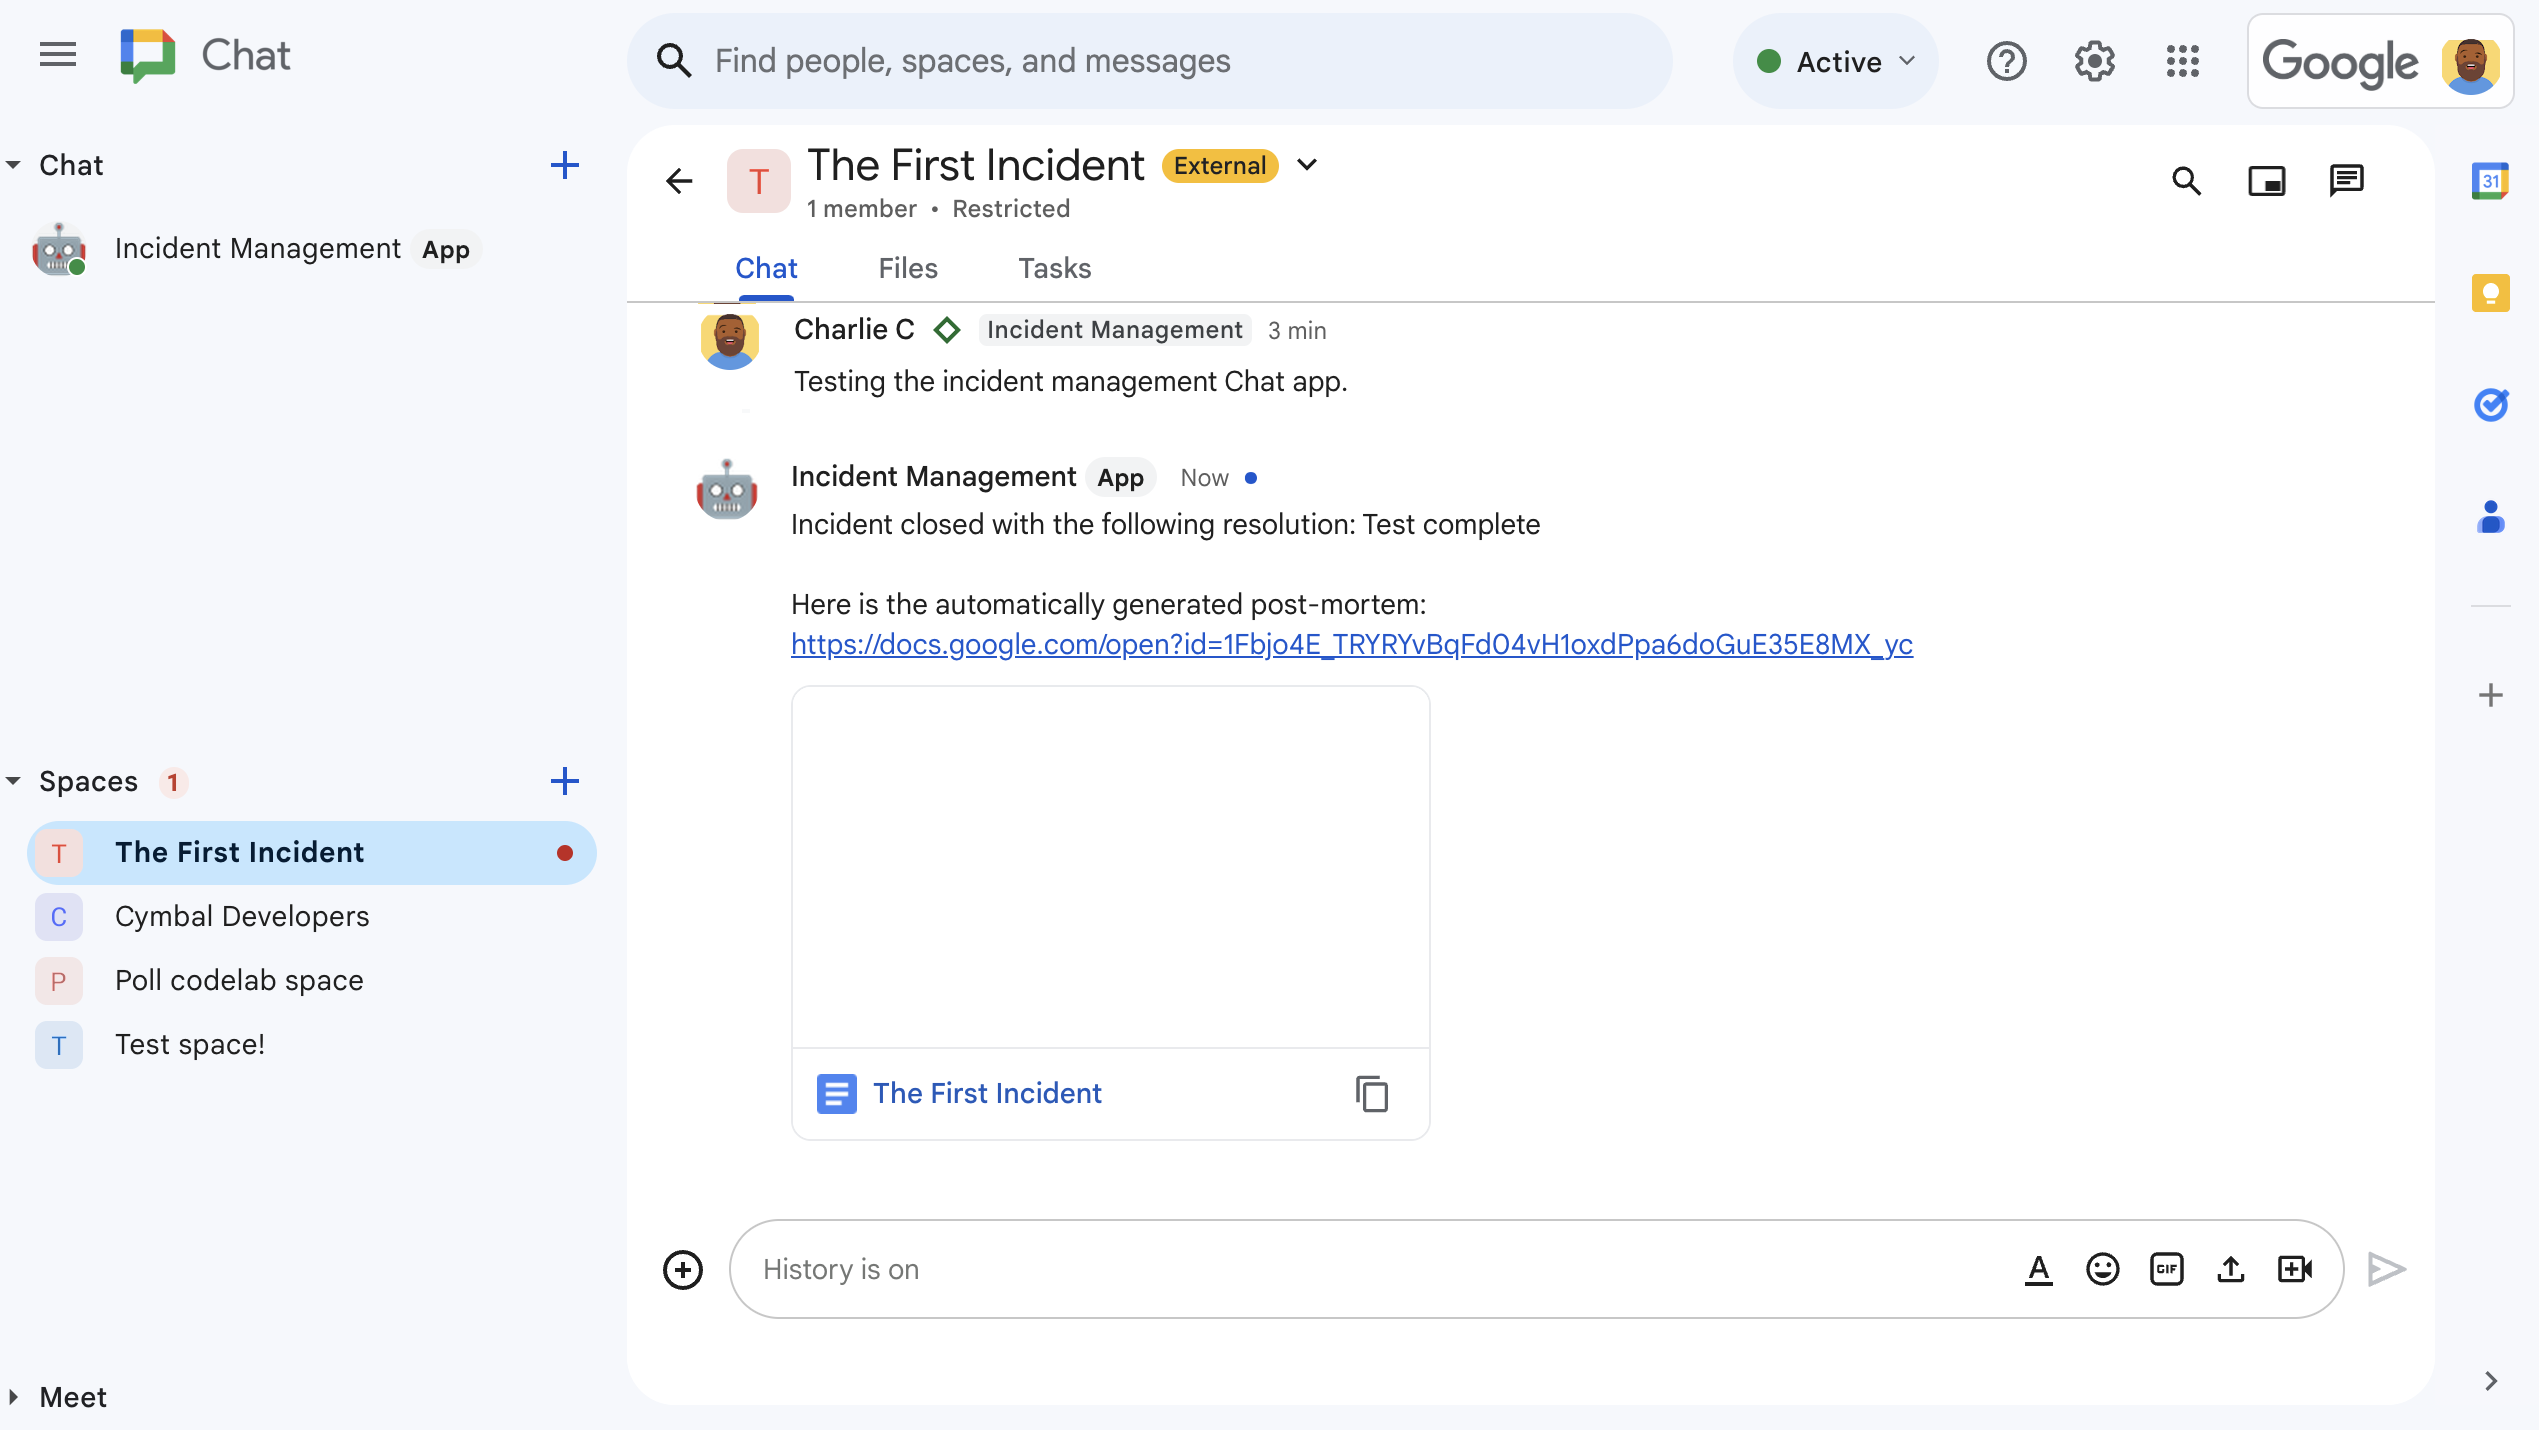
Testing the incident management Chat app.
- في عنوان الحدث، اكتب
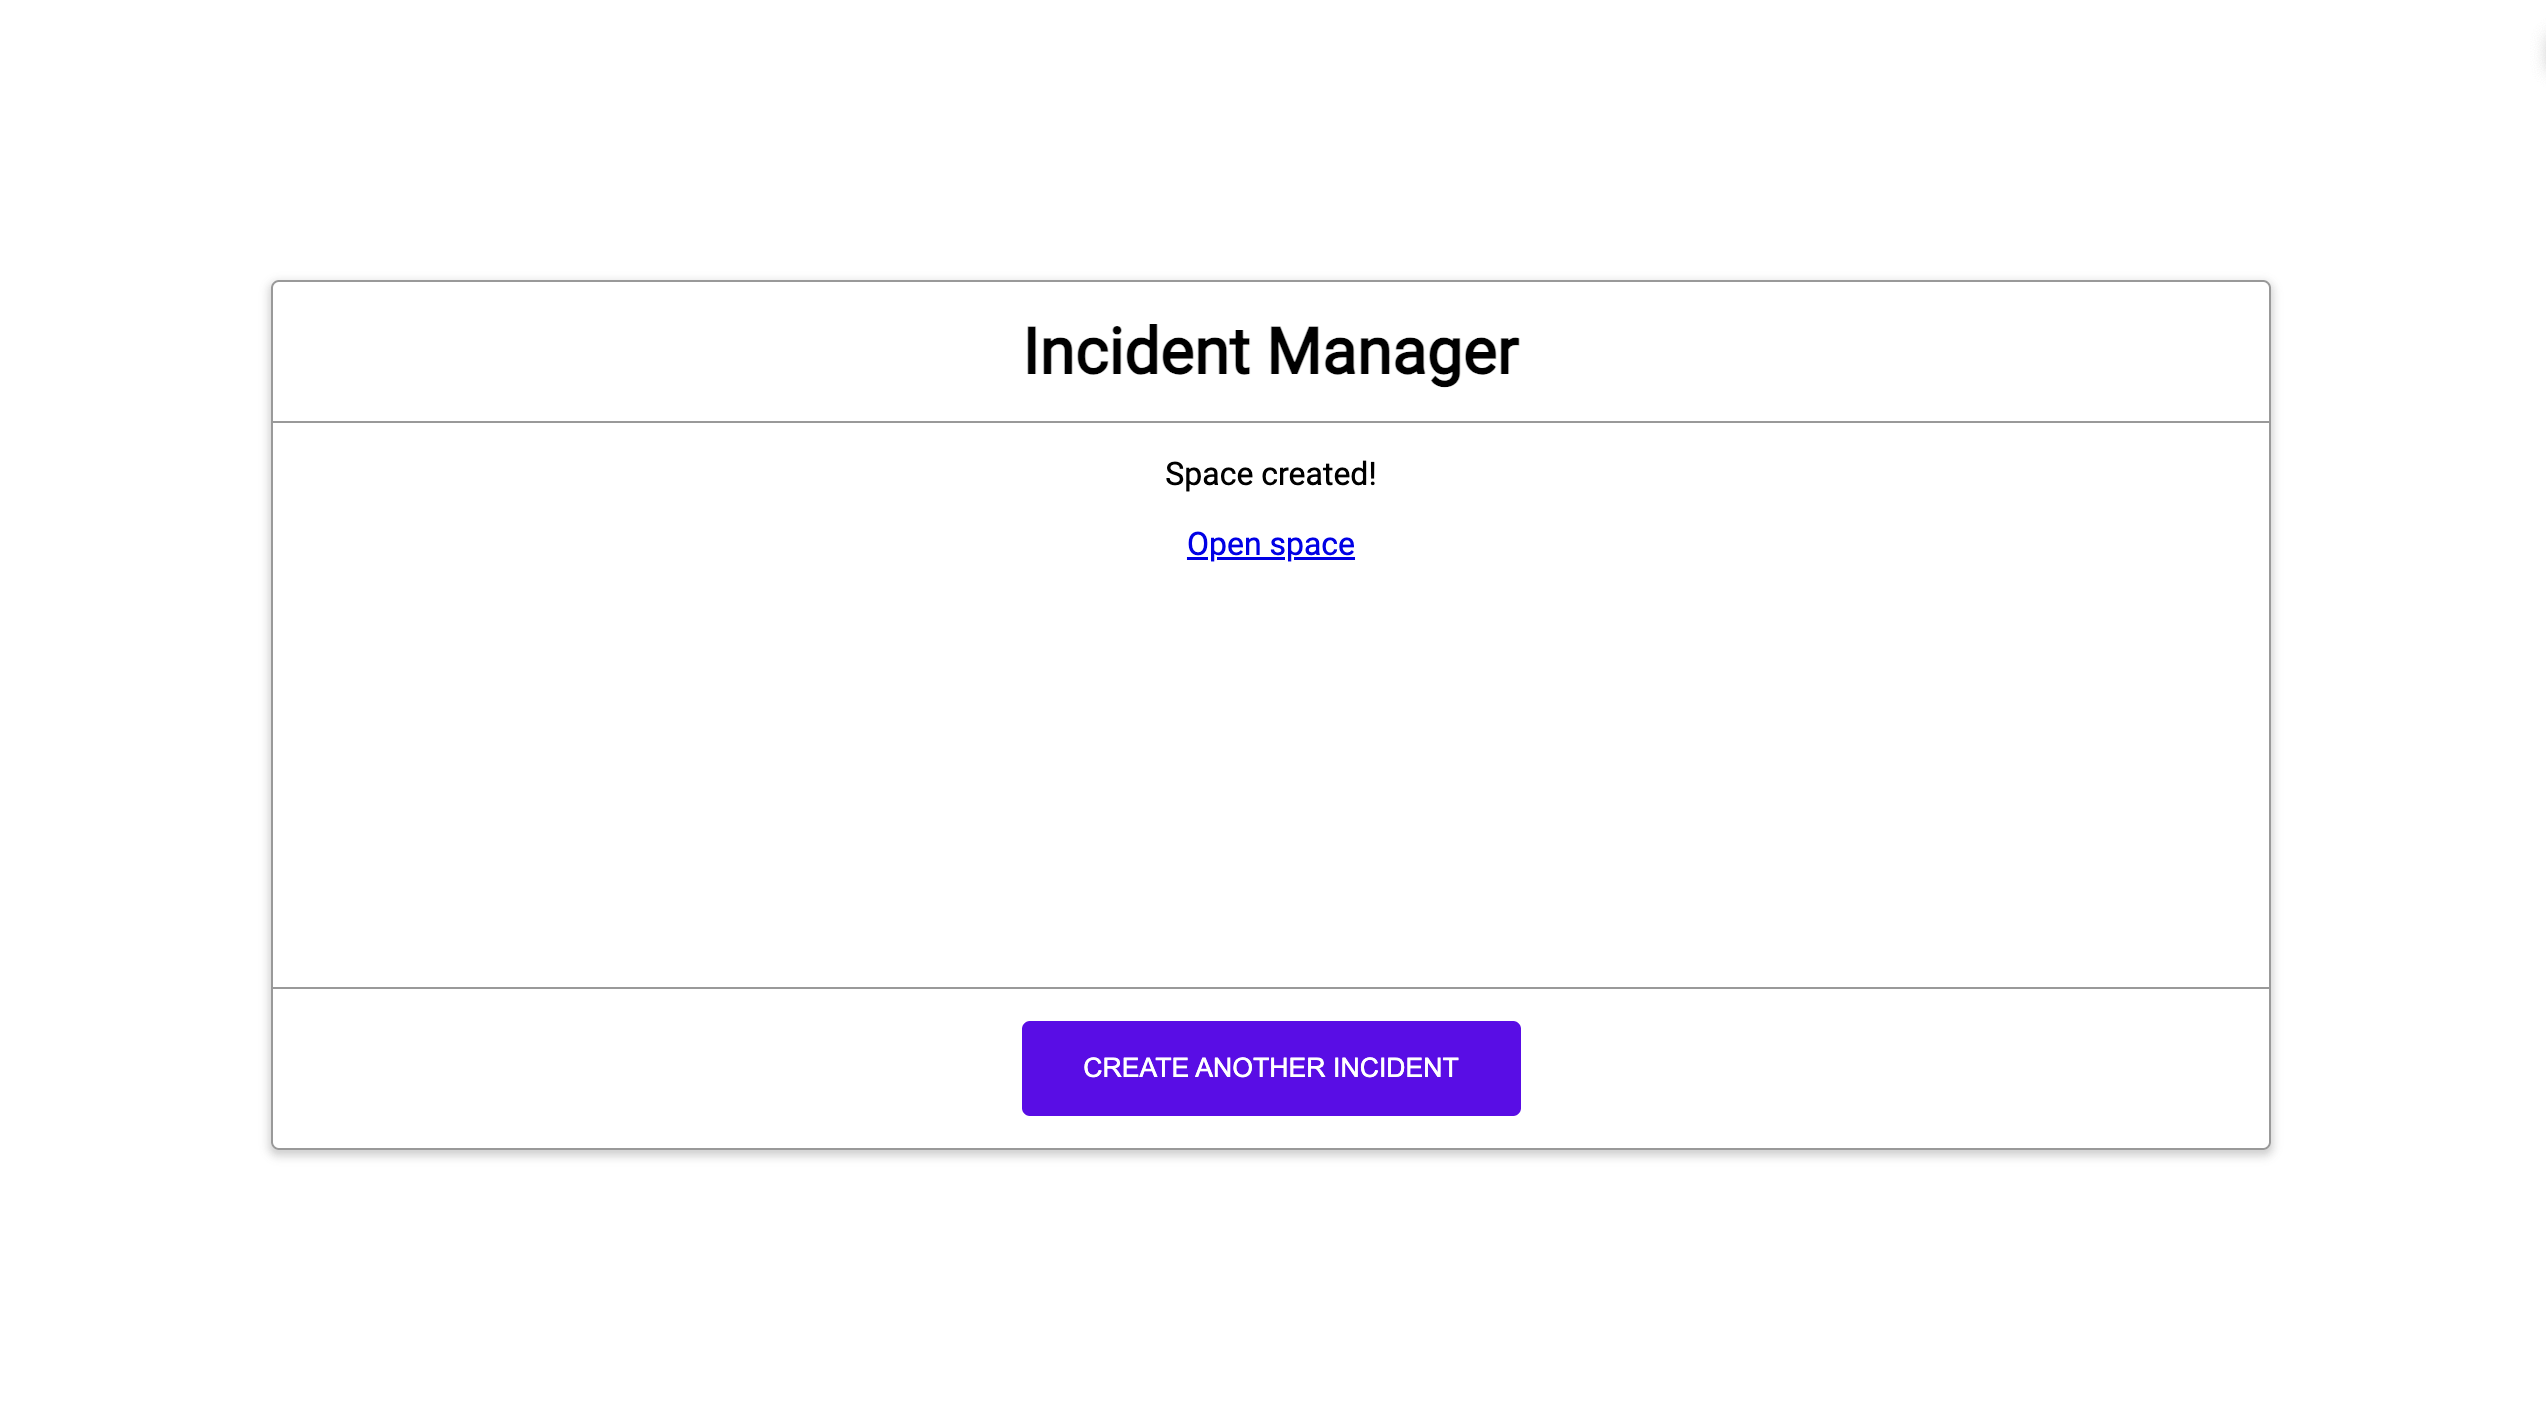
انقر على إنشاء مساحة Chat. ستظهر الرسالة
creating space.بعد إنشاء المساحة، ستظهر رسالة
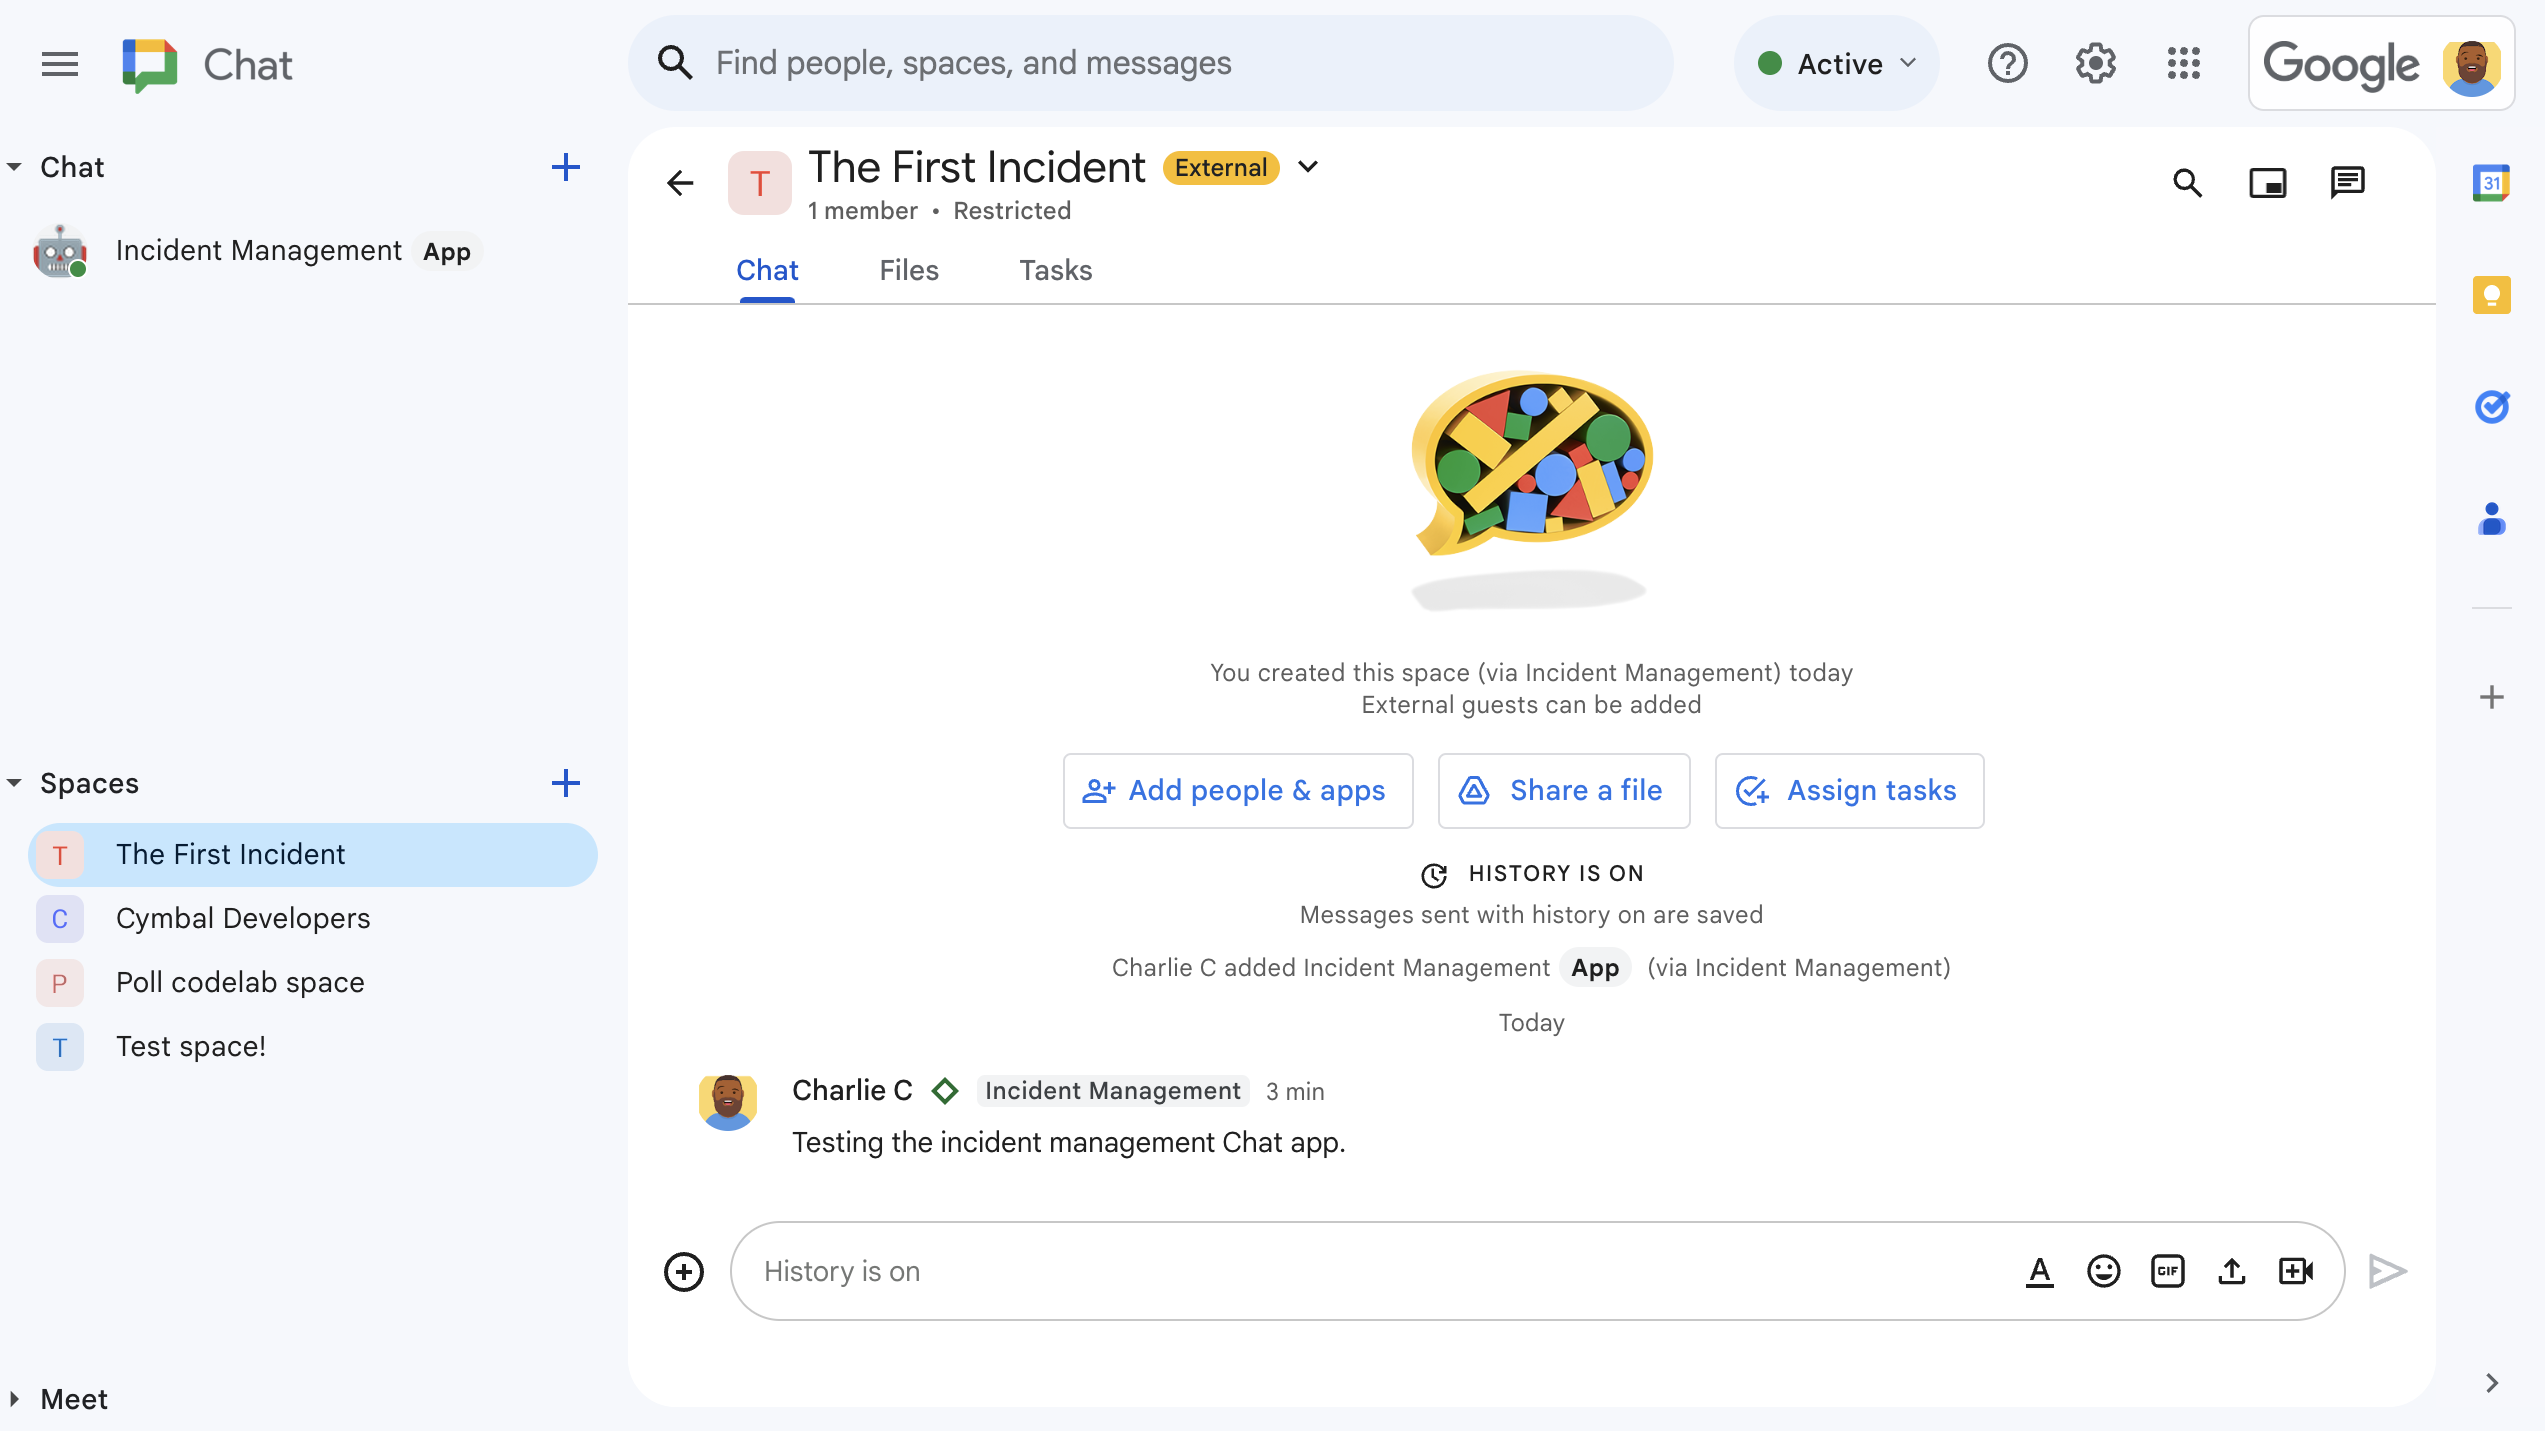
Space created!. انقر على فتح المساحة، ما يؤدي إلى فتح المساحة في Chat في علامة تبويب جديدة.يمكنك أنت والمستجيبون الآخرون للحوادث إرسال رسائل في المساحة، إذا أردت. يلخّص التطبيق هذه الرسائل باستخدام Vertex AI ويشارك مستندًا استرجعيًا.
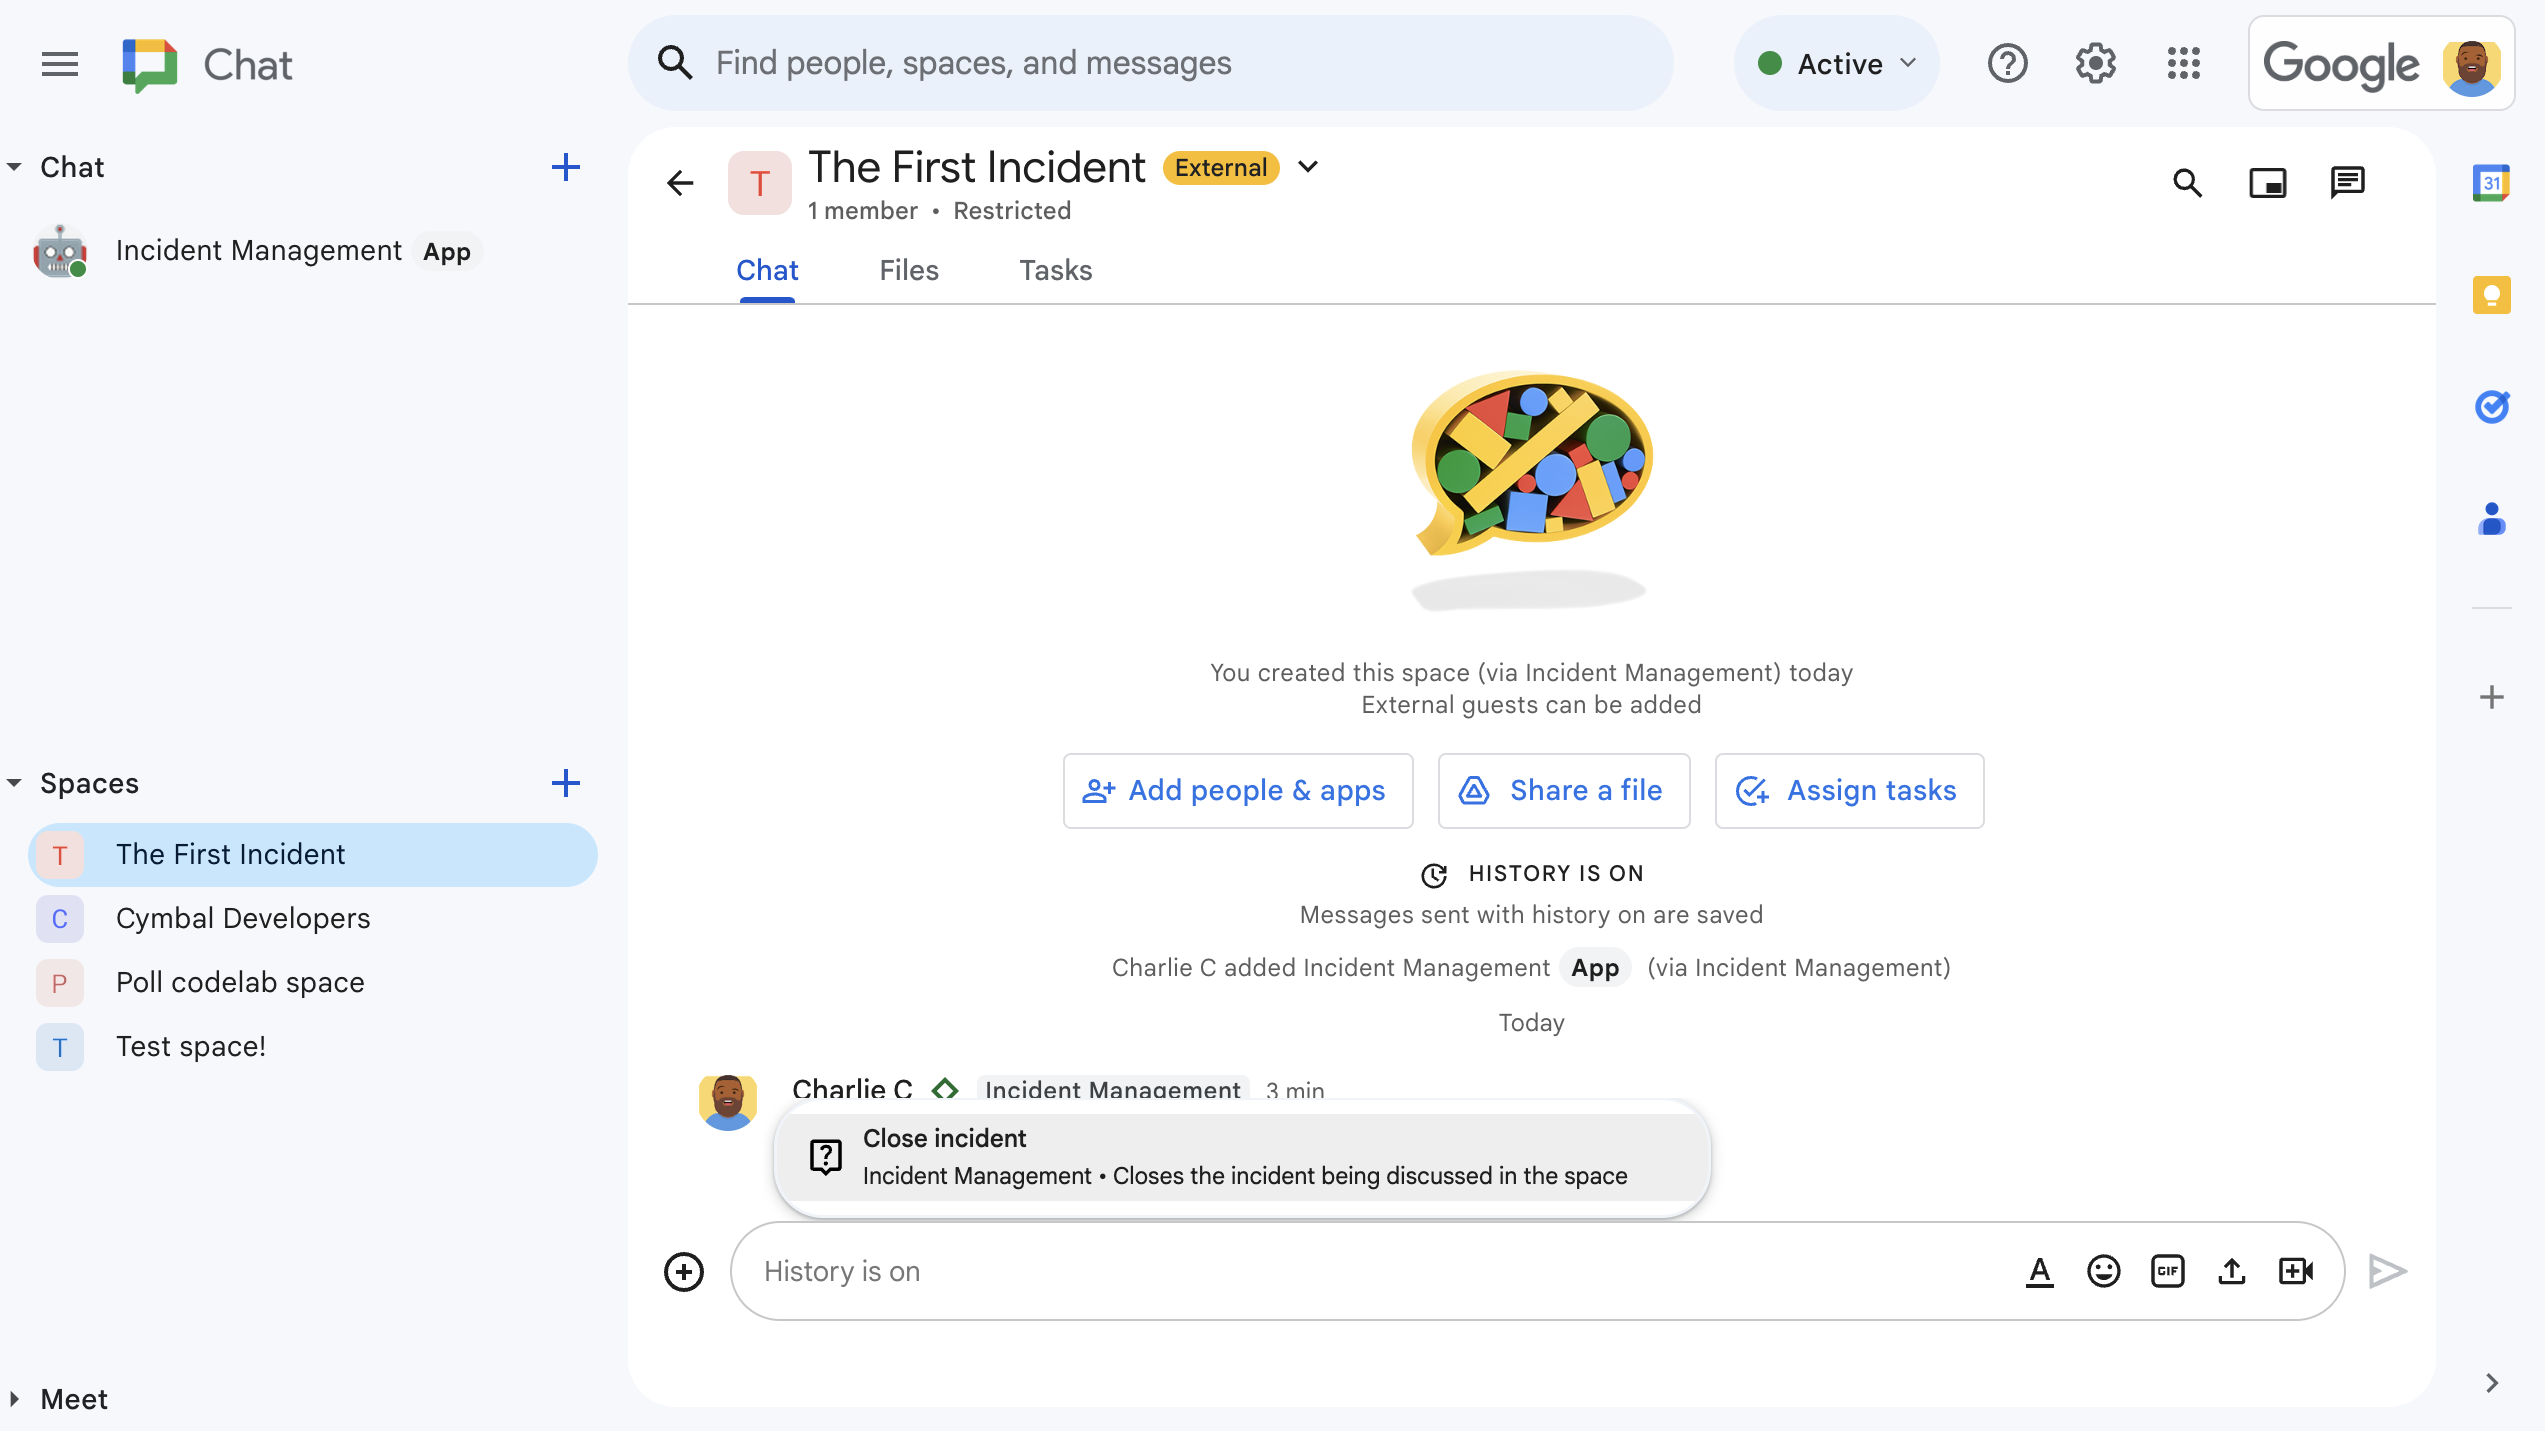
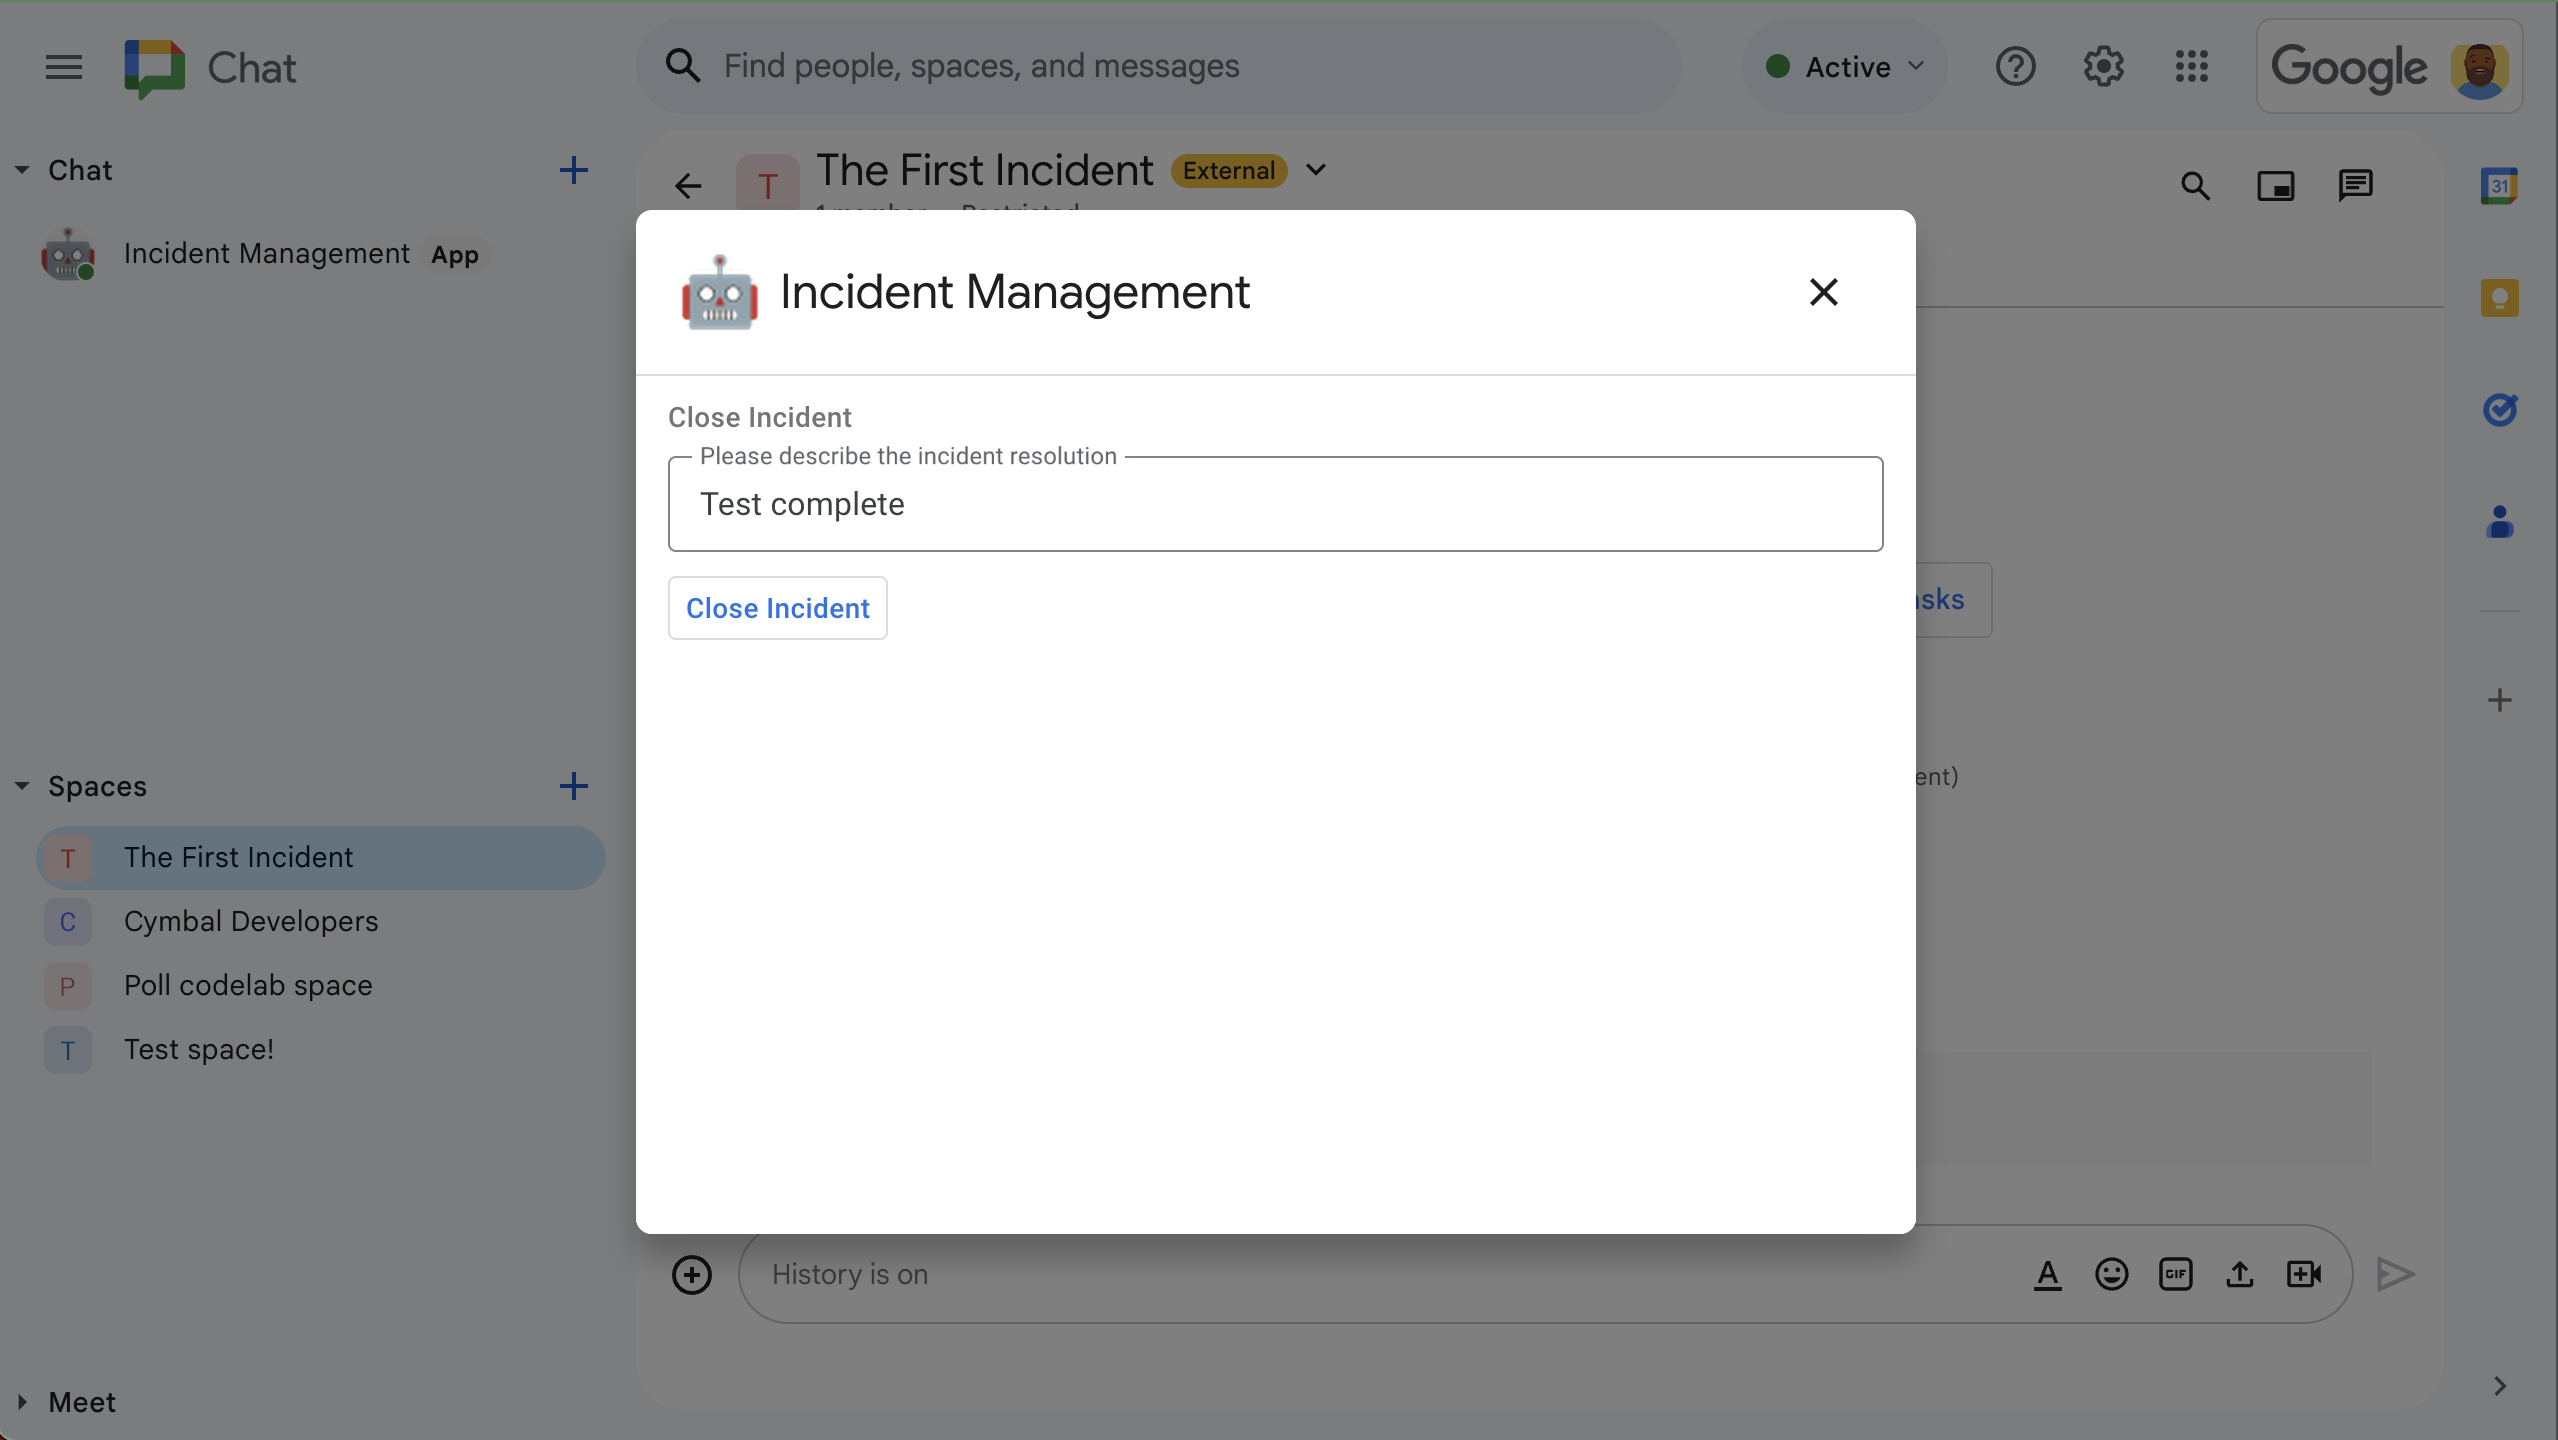
لإنهاء الاستجابة للحوادث وبدء عملية الحل، شغِّل الأمر السريع
Close incidentفي مساحة Chat. يتم فتح مربّع حوار لإدارة الحوادث.في إغلاق العطل، أدخِل وصفًا لحلّ العطل، مثل
Test complete.انقر على إغلاق الحادثة.
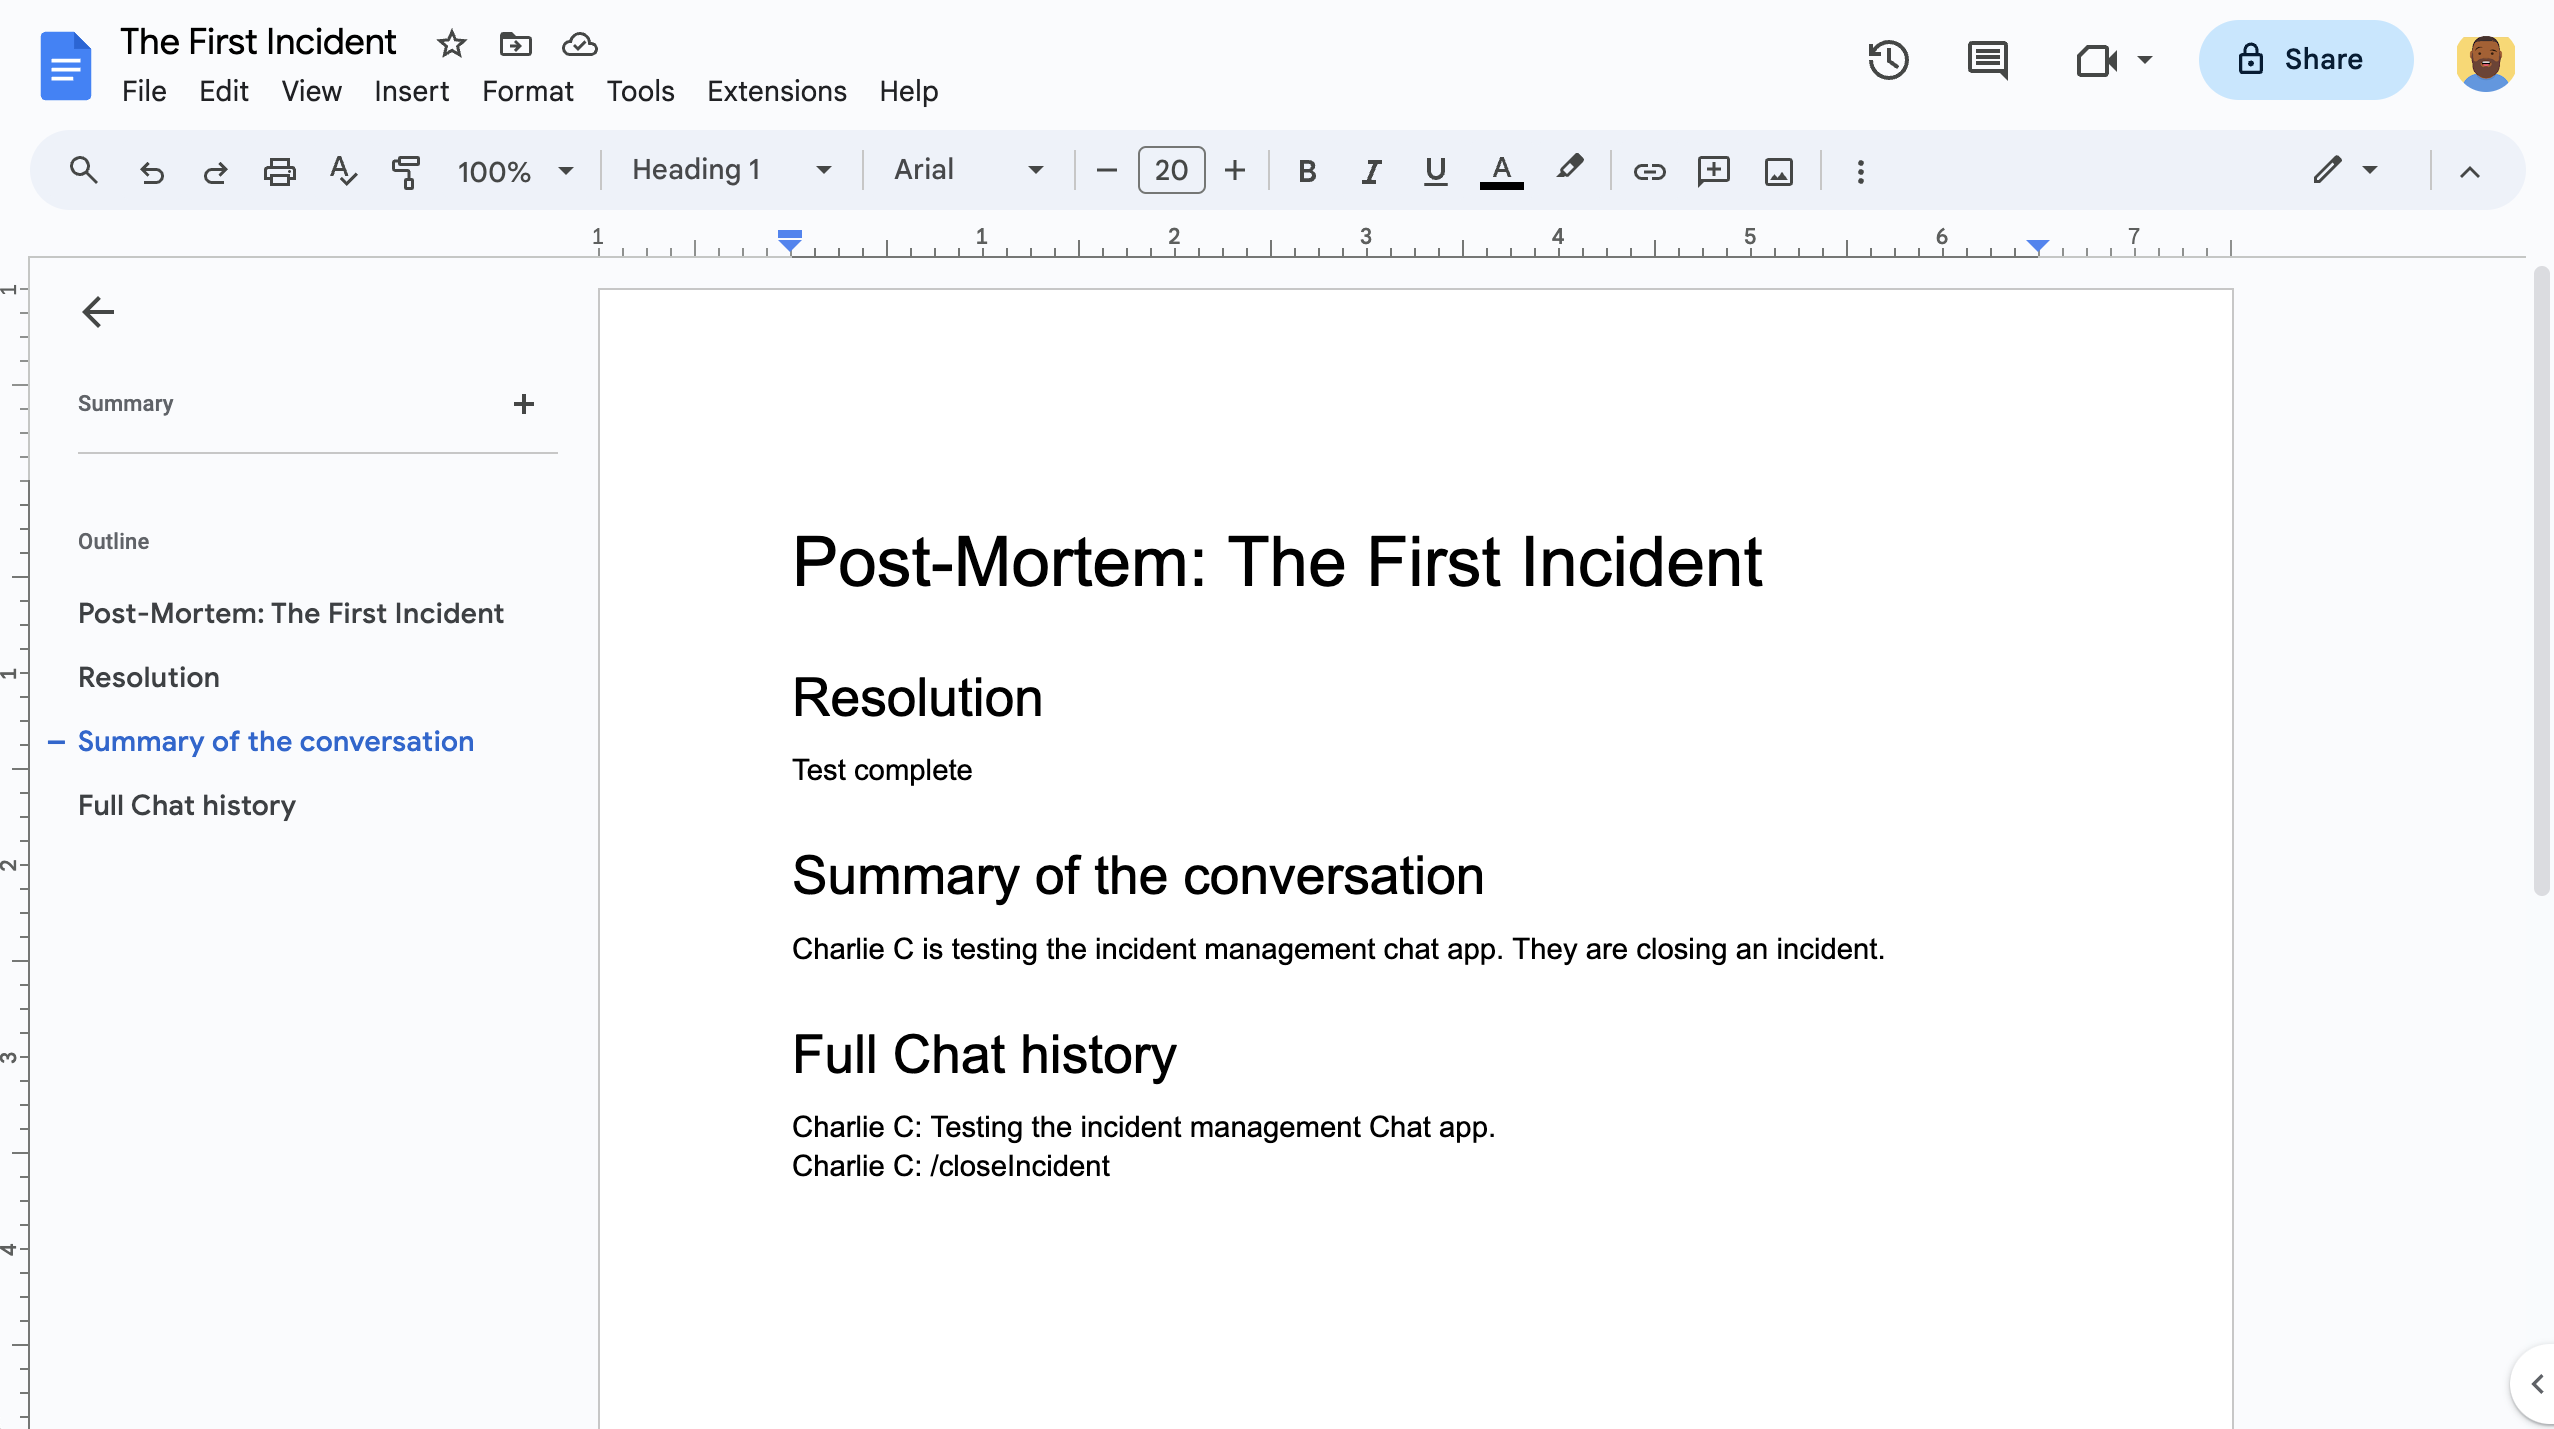
يعرض تطبيق "إدارة الحوادث" الرسائل في المساحة ويلخّصها باستخدام Vertex AI، ثم ينسخ الملخّص في مستند Google ويشاركه في المساحة.
تَنظيم
لتجنُّب تحمّل رسوم في حسابك على Google Cloud مقابل الموارد المستخدَمة في هذا البرنامج التعليمي، ننصحك بحذف مشروع على السحابة الإلكترونية.
- في Google API Console، انتقِل إلى صفحة إدارة الموارد. انقر على القائمة > إدارة الهوية وإمكانية الوصول والمشرف > إدارة الموارد.
- في قائمة المشاريع، اختَر المشروع الذي تريد حذفه، ثم انقر على حذف .
- في مربّع الحوار، اكتب رقم تعريف المشروع، ثم انقر على إيقاف لحذف المشروع.
مواضيع ذات صلة
- تخطيط الرحلات باستخدام وكيل الذكاء الاصطناعي يمكن الوصول إليه في مختلف منتجات Google Workspace
- الإجابة عن الأسئلة استنادًا إلى محادثات Chat باستخدام تطبيق الذكاء الاصطناعي من Gemini
- إدارة المشاريع باستخدام Google Chat وVertex AI وFirestore
- التأكّد من صحة البيانات باستخدام وكيل الذكاء الاصطناعي في "حزمة تطوير التطبيقات" ونموذج Gemini
- دمج مفاهيم الذكاء الاصطناعي الأساسية في تطبيقات Chat
- إنشاء تطبيق Chat كإضافة على Google Workspace باستخدام "برمجة تطبيقات Google"