Page Summary
-
Google Standard Payments utilizes authentication flows to verify user identity for account association and payment capture.
-
Two primary authentication methods are available: Redirect Authentication (web and Android) and SMS-MT OTP Authentication.
-
Authentication types include Initial Authentication for account association and Re-authentication for subsequent actions like payments.
-
Re-authentication may be triggered before a purchase to ensure security and confirm user identity.
-
SMS-MO authentication and its simulated version are available for adding new payment methods and testing purposes, respectively.
Overview
The purpose of the Authentication flow is to identify and authenticate the user to the Payment Integrator (integrator).
Authentication is an input to other methods. Particularly for associateAccount and capture. This means that the proof of authentication is used as an input (parameter) to those two methods.
Google can also use the authentication flow in standalone mode to verify a user. In this case it is not used as an input to any other flow, but only to verify that a user is able to authenticate this identity.
Keep in mind that when you are onboarding, Google will work with you to choose the authentication mechanism that will best fit your product.
How the flow works
There are two ways to authenticate a user, each with its own flow. At the time of integration, the integrator must determine which to use.
- Redirect authentication
- SMS-MT OTP authentication
Redirect authentication
A Google user who needs authentication may be redirected to the integrator’s app or their website to have their identity verified. Here is a brief overview of the steps in this flow:
- Google redirects the user to the integrator’s web or Android app where they can be authenticated.
- To authenticate, the authentication
requestId(fromAuthenticationRequest) is used as proof of authentication. - This results in a signed response, called the
AuthenticationResponse. - Afterwards, the app or website redirects the user back to Google.
The redirect authentication uses an HTTP GET method, with parameters encoded in the URL for a web application. It uses an Android Intent for an Android application authentication. For more details on encoding, see Web Authentication, and for Android intent parameters, see Android Authentication.
The result from each of these authentication mechanisms is a signed response called the AuthenticationResponse. This intent should include the encrypted, encoded Google Standard Payments Authentication Response (gspAuthenticationResponse) to communicate a successful authentication. If used in standalone mode, the gspResult and signature are used to determine the successful authentication.
The following sequence diagram shows the interaction between the user's browser, Google, and the integrator's web application:
Redirect-Web authentication flow
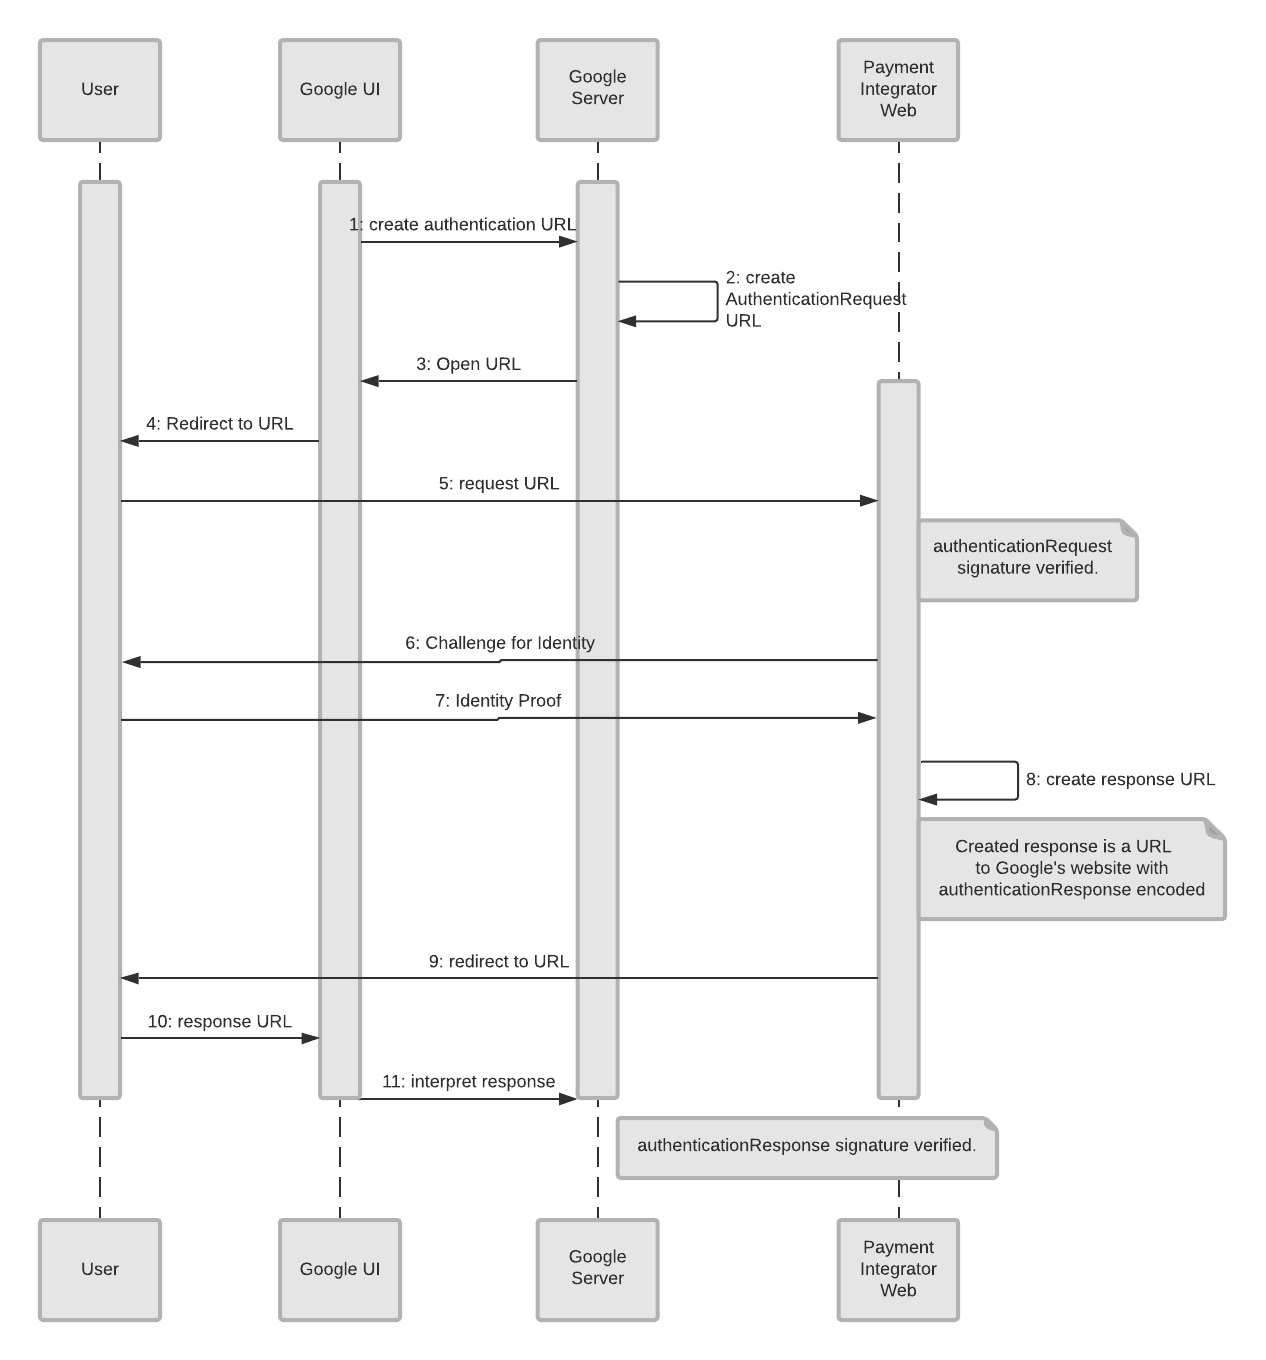
Here is a list of the objects and what they represent:
- User: This is the person who wants to add a payment method to their Google account.
- Google UI: In this case, the web interface at Google, where the customer begins to setup a payment method.
- Google Server: The backend server at Google that does the authentication check, along with other authentication tasks.
- Payment Integrator Web: The website of the integrator where the user has an account.
For this authentication flow, we already assume the user is on Google’s website (Google UI) and is trying to add a payment method. Here is where everything starts.
- The Google UI creates an authentication URL which is sent to the Google Server (backend). This is what triggers the authentication process.
- The Google Server creates an authentication request (
AuthenticationRequest). - The authentication request sent to the Google UI.
- The user receives the prompt that they need to authenticate their ID with the integrator.
- The user responds that they want to authenticate, which sends that message to the integrator’s website.
- The Payment Integrator’s website asks for verification of the user’s identity.
- The user provides proof of their identity, which is sent to the Payment Integrator’s website.
- The integrator creates a response (
authenticationResponse) to the evidence they were given (with theauthenticationResponseencoded in the message). - This response URL is sent to the user.
- The response URL is immediately sent from the user to the Google UI.
- The Google UI sends the response the Google Server.
- The Google Server interprets the response as verified.
The next sequence diagram shows the interaction between the user's phone, Google, and the integrator's Android application:
Redirect-Android app authentication flow
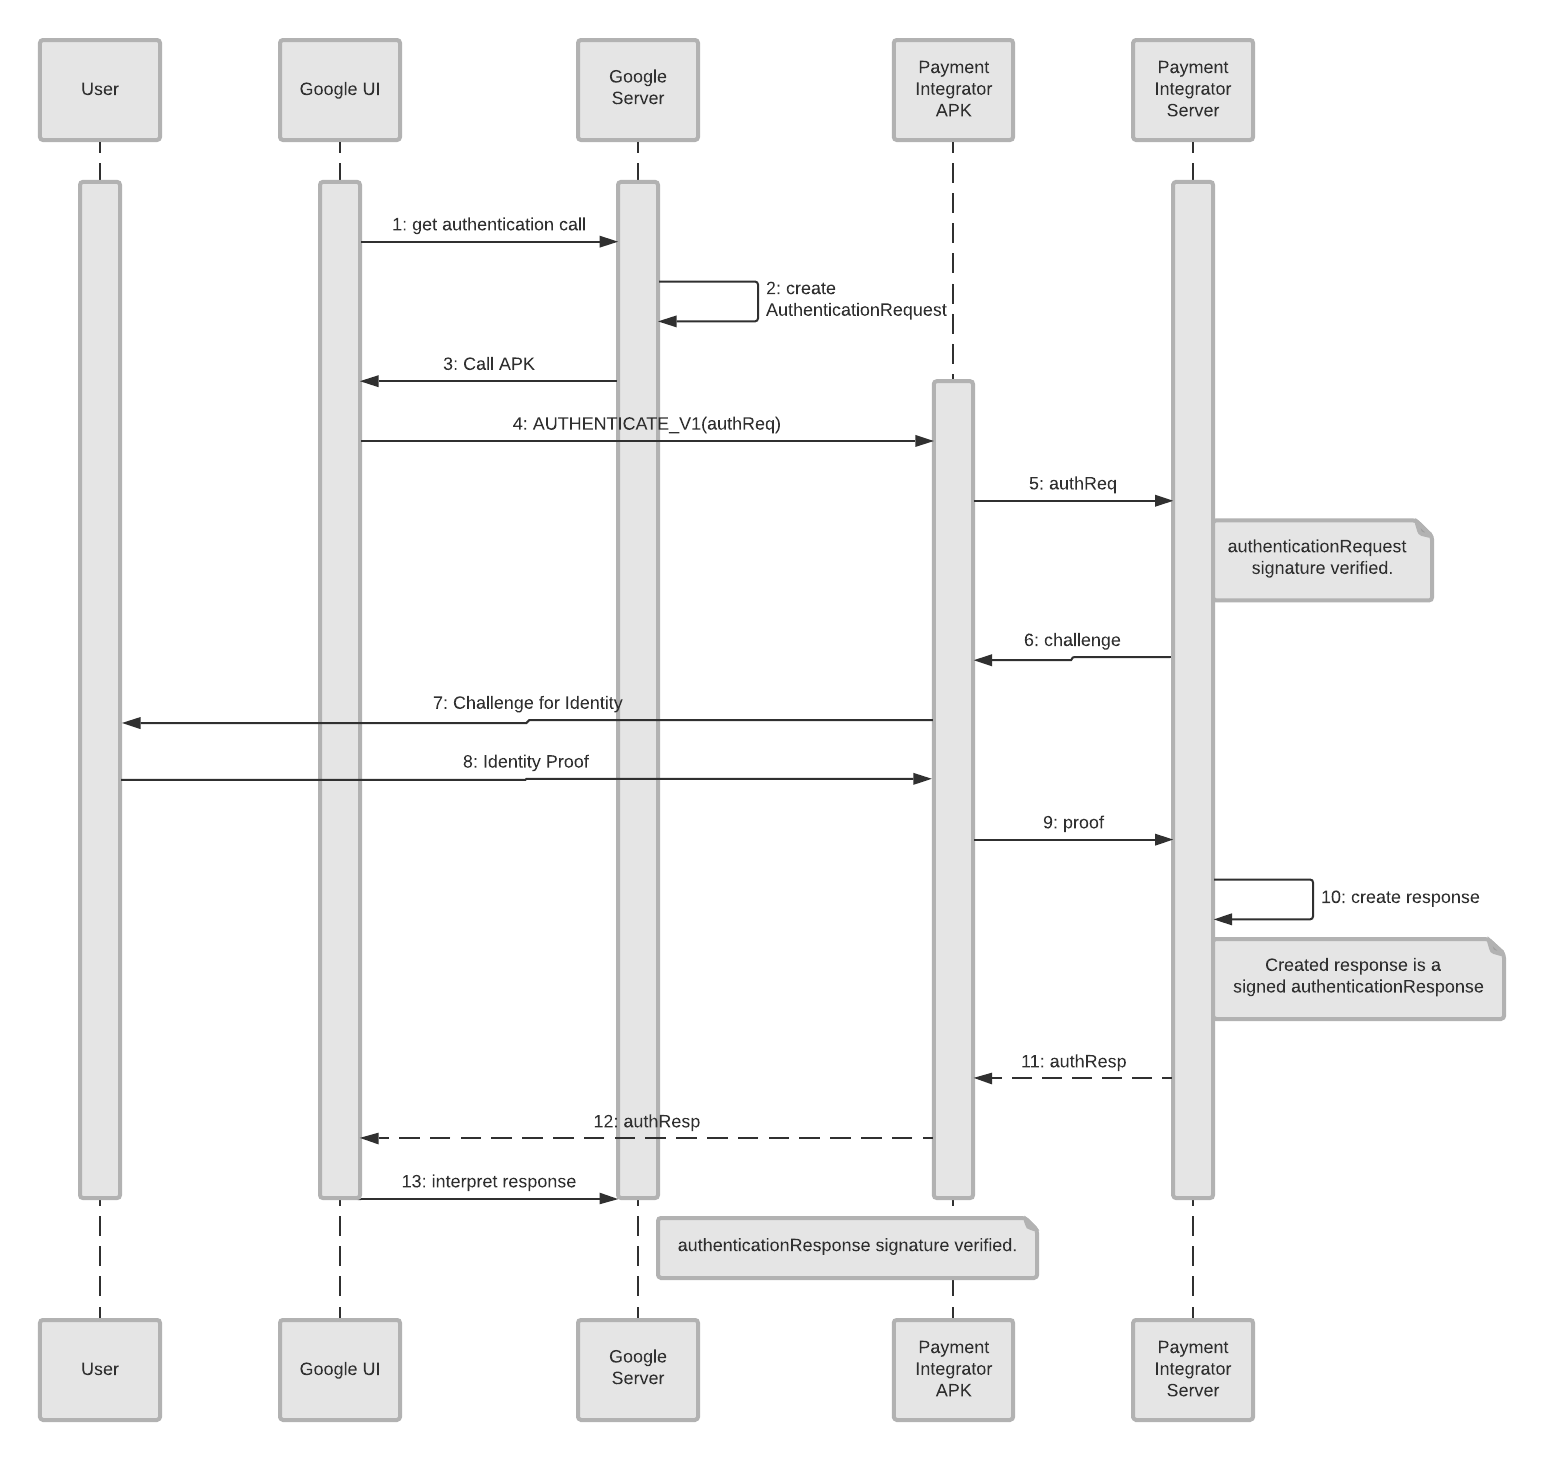
Here are the objects and what they represent:
- User: This is the person who wants to add a payment method to their Google account.
- Google UI: In this case, the app interface, where the customer begins to setup a payment method.
- Google Server: The backend server at Google that does the authentication check, along with other authentication tasks.
- Payment Integrator APK: The integrator’s app where the user has access to their integrator account.
- Payment Integrator Server: The backend server of the integrator where the user’s information is stored.
Since this is an authentication flow, we already assume the user is using an app (Google UI) and is trying to add a payment method. This is where initialization begins.
- The Google UI creates an authentication call which is sent to the Google Server (backend).
- The Google Server create an authentication request (
AuthenticationRequest). - The Google Server sends a call APK to the Google UI (app), requesting authentication.
- The Google UI sends the user information to the Payment Integrator APK (
AUTHENTICATE_V1(authReq)). - The Payment Integrator APK sends the request (
authReq) to the Payment Integrator’s server. - The Payment Integrator Server sends a challenge back to the Payment Integrator APK.
- The Payment Integrator APK sends the challenge back to the user.
- The user provides proof of their identity, which is sent to the Payment Integrator APK.
- This proof is then sent to the Payment Integrator Server.
- The Server creates a signed
authenticationResponse. - The authentication response is successful, and an
authRespmessage is sent to the Payment Integrator APK. - The success message (
authResp) is sent to from the Payment Integrator APK to the Google UI. - The Google UI sends the response to the Google Server.
- The Google Server interprets the successful response.
SMS-MT OTP Authentication
Another authentication method is Short Message Service, Mobile Terminated, One-Time Password (SMS-MT OTP). This mechanism utilizes the user’s phone number to send them a one-time password for authentication. Google asks the integrator to send an OTP to the user’s phone number, and after a user receives it, and then inputs this into Google’s interface, the user will be verified.
This includes the following steps:
- Google’s user interface (UI) prompts the user to enter the phone number, which is already registered with the integrator.
- User enters a phone number in the Google UI.
- Google triggers the integrator (calls the
sendOtpmethod) to send a one-time password (OTP) to the user. - The user receives the SMS message with the OTP.
- The user then enter the OTP (used as input for
capture,associateAccount, andverifyOtp) they received into Google’s interface, authenticating the user. This is proof of authentication.
In standalone mode, only the verifyOtp method will be called to verify the OTP value.
The following sequence diagram shows the interaction between the user's phone, Google, and the integrator when sending an OTP:
Phone (sending OTP) authentication flow
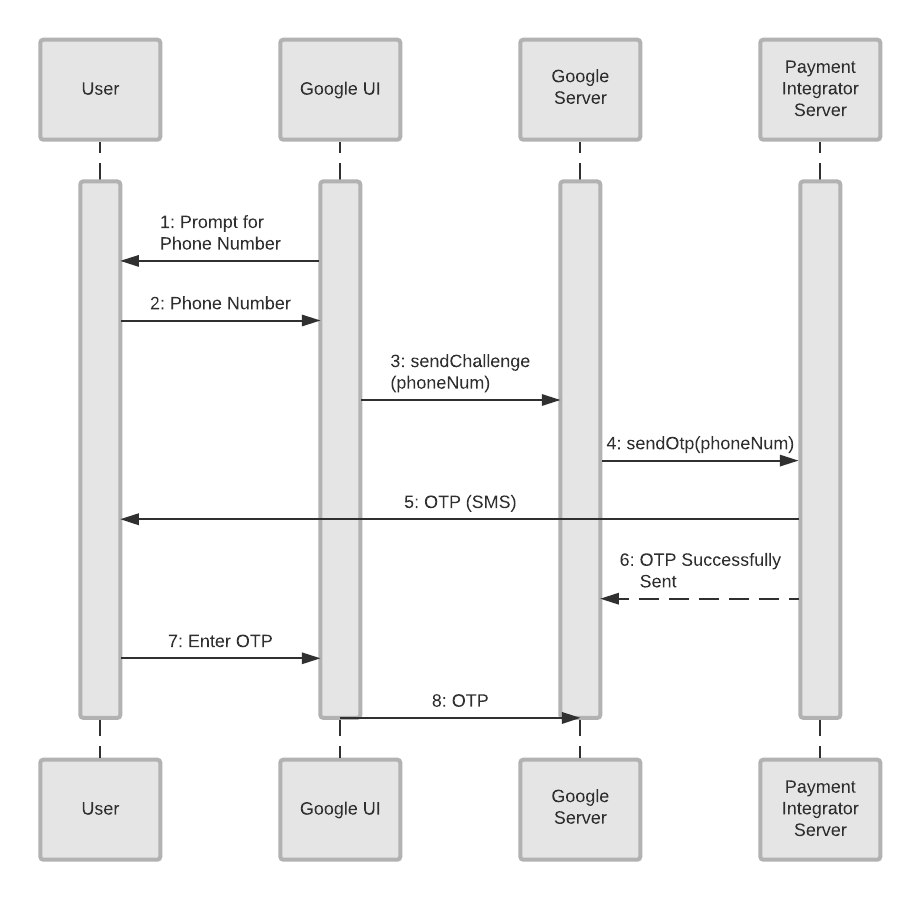
Here is a list of objects in the diagram and what they represent:
- User: This is the person who wants to add a payment method to their Google account.
- Google UI: In this case, a Google website or phone app where the customer begins to setup a payment method. Note: If the Google UI is a phone app, the first couple of steps will be skipped because the phone already knows the user’s phone number.
- Google Server: The backend server at Google that does the authentication check, along with other authentication tasks.
- Payment Integrator Server: The backend server of the integrator where the user’s information is stored.
Since this is an OTP authentication flow, we already assume the user is on a Google phone app or website (Google UI) and is trying to add a payment method. This is where initialization begins.
- The Google UI (phone or website) prompts the user for their phone number.
- The User enters their phone number into the Google UI.
- The Google UI sends the number (
sendChallenge(phoneNum)) to the Google Server. - The Google Server sends a request to the Payment Integrator Server (
SendOtp(phoneNum)) to send a one-time password. - The Payment Integrator Server sends a one-time password (OTP) to the user.
- The Payment Integrator Server responds to Google's request in #5, signalling the OTP was successfully sent.
- The User enters this OTP into the Google UI (phone or website).
- The Google UI sends the OTP to the Google Server where it is eventually sent to the payment integrator for verification. This verifies the user’s identity and authenticates the user.
Authentication and Re-authentication
There are two points in time that authentication can occur:
- Initial authentication—used to identify and authenticate a user. The initial authentication is used as input to the
associateAccountmethod. - Re-authentication—used in all other contexts, such as standalone or as input to
capture.
Re-authentication differs from initial authentication. It never desires to re-identify a user, simply to re-authenticate. Re-authentication is used by Google to challenge the user to prove they own a particular account and this happens at Google's discretion.
In this process a reference, called the associationId, is provided to the original association (from the association flow). This is provided through the call to the associateAccount method during the association flow. The associationId identifies the account to challenge against. For security, the user must not be able to change the account being challenged.
For SMS-MT OTP re-authentication, Google holds the phone number provided during the original call to sendOtp as a fixed number. This cannot be changed, again for security.
Here's an example flow where Google decides to challenge (re-authenticate) prior to making a purchase:
Re-authentication flow
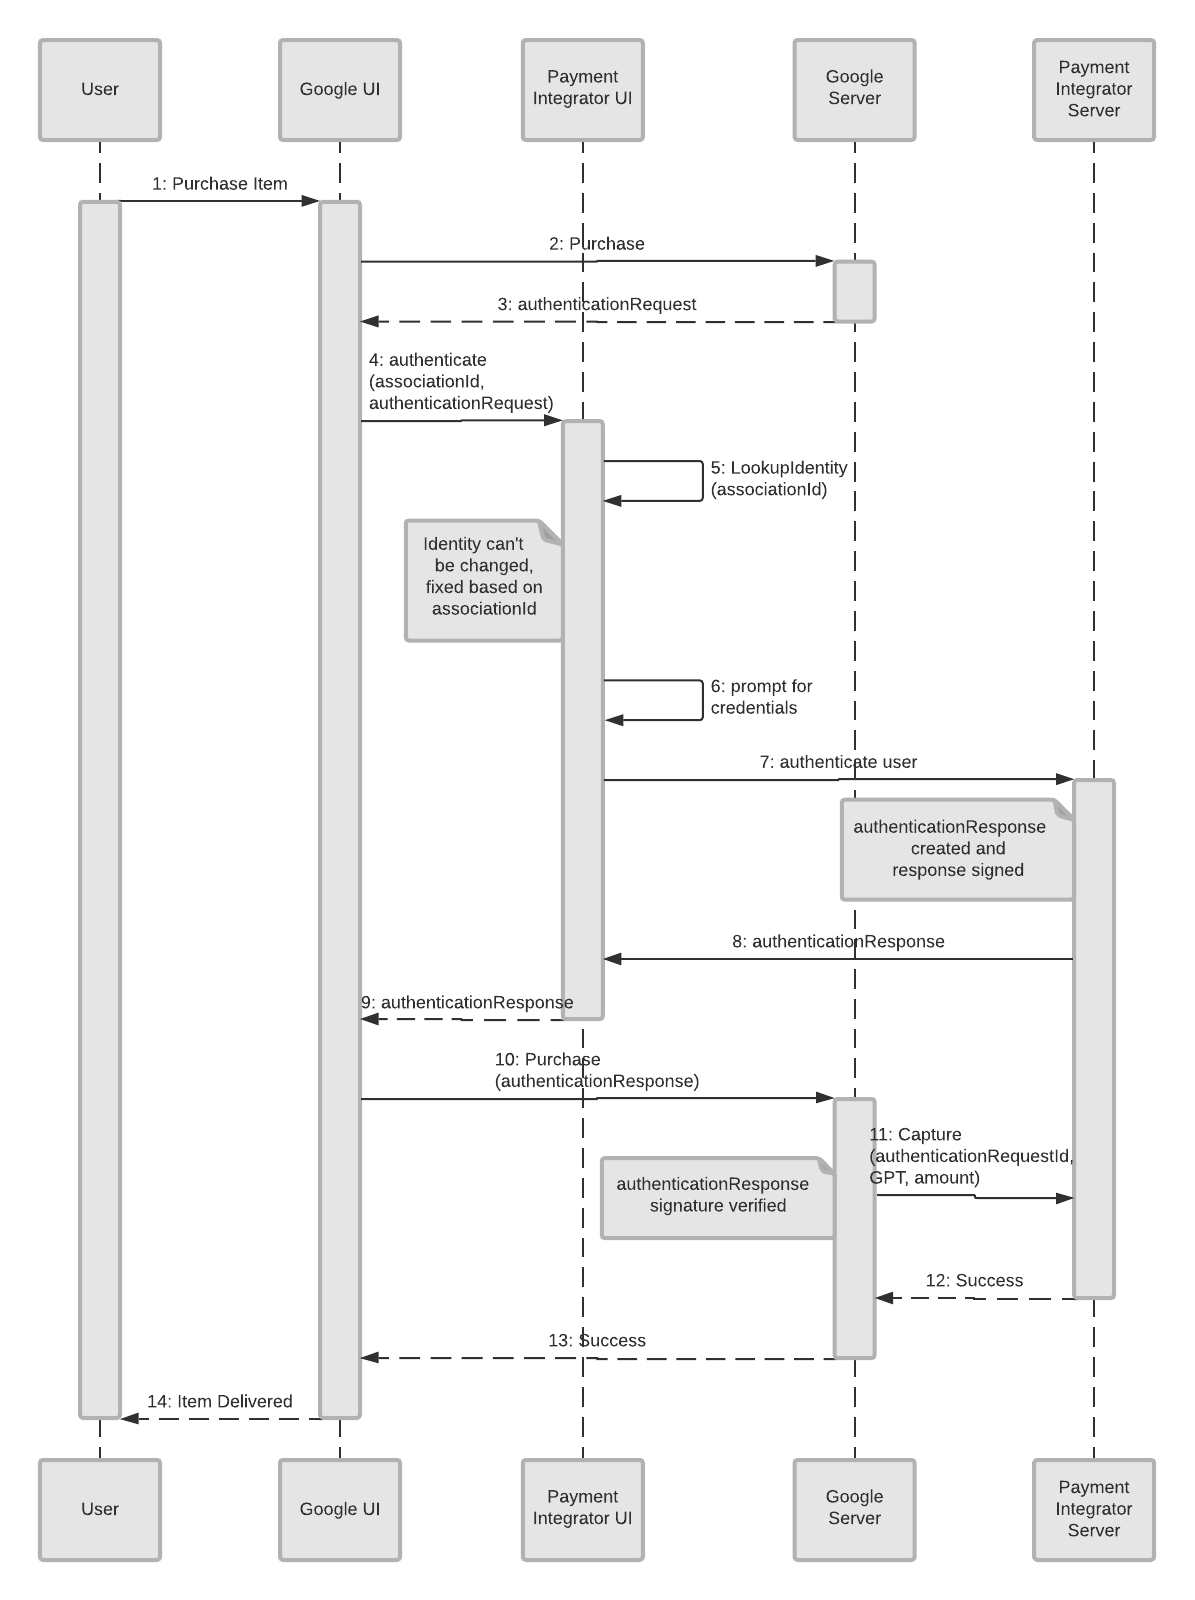
The list of objects and what they represent are as follows:
- User: This is the person who wants to make a purchase.
- Google UI: In this case, a Google website or phone app where the customer begins to make the purchase.
- Payment Integrator UI: The customer facing website or app where the user can access their account information with the Integrator.
- Google Server: The backend server at Google that does the re-authentication check, along with other tasks.
- Payment Integrator Server: The backend server of the integrator where the user’s information is stored.
The re-authentication flow begins when a customer begins to make a purchase. This initializes a flow to re-authenticate the user.
- The user decides to purchase an item or service.
- The request is sent from the Google UI to the Google Server.
- The Google Server sends back an authentication request (
authenticationRequest) to the Google UI. - The Google UI sends a request to the Payment Integrator UI to authenticate (
associationId,authenticationRequest) the user. - The Payment Integrator UI looks up the user to verify their identity (
LookupIdentity(associationId)). - The Payment Integrator UI prompts the user for credentials on their UI (integrator’s website or app).
- The authentication response is sent to the Payment Integrator Server.
- The signed authentication response (
authenticationResponse) is sent back to the Payment Integrator UI. - The authentication response (
authenticationResponse) is sent from the Payment Integrator UI to the Google UI. - The Google UI sends the response with the purchase information to the Google Server.
- Google’s Server sends a
capturemessage (to find available funds) to the Payment Integrator Server (authenticationRequestId, GPT, amount). - The Payment Integrator Server sends a message of success back to the Google Server.
- Google’s Server sends a message of success to the Google UI.
- The Google UI delivers the item(s) to the customer (or notifies them that they will soon be delivered).
SMS-MO Authentication
Short Message Service, Mobile Originated authentication flow utilizes a SMS containing an Authentication Request ID sent from the user's phone to the Payment Integrator to authenticate the user.

Here is a list of objects in the diagram and what they represent:
- User: This is the person who wants to add a payment method to their Google account.
- Google UI/Device: In this case, a Google phone app where the customer begins to setup a payment method.
- Google Server: The backend server at Google that generates the SMS instructions with a Authentication Request ID (ARID) and receives the authentication result from the integrator.
- Payment Integrator Server: The backend server of the integrator that receives the authentication SMS and returns the Authentication Request ID to Google.
Since this is an authentication flow, we already assume the user is using an app (Google UI) and is trying to add a payment method. This is where initialization begins.
- The User selects a Tokenized instrument to add.
- The Google UI calls the Google Server to initiate the SMS-MO Challenge.
- The Google Server returns SMS instructions, consisting of a destination and a body containing the Authentication Request ID.
- The Google UI sends the SMS to the Payment Integrator.
- The Payment Integrator Server calls the authenticationResultNotification endpoint on the Google Server with the Authentication Request ID.
- The Authentication Request ID is validated by the Google Server, which responds SUCCESS.
- The Google UI calls the Google Server to obtain the result of the authentication attempt.
- The Google Server response SUCCESS.
Simulated SMS-MO Authentication
For the purposes of performing diagnostic tests of the SMS-MO Authentication flow, Google defines a Simulate SMS endpoint. This eliminates the need for a real SMS to be sent and validated when performing test Associations in the sandbox environment.
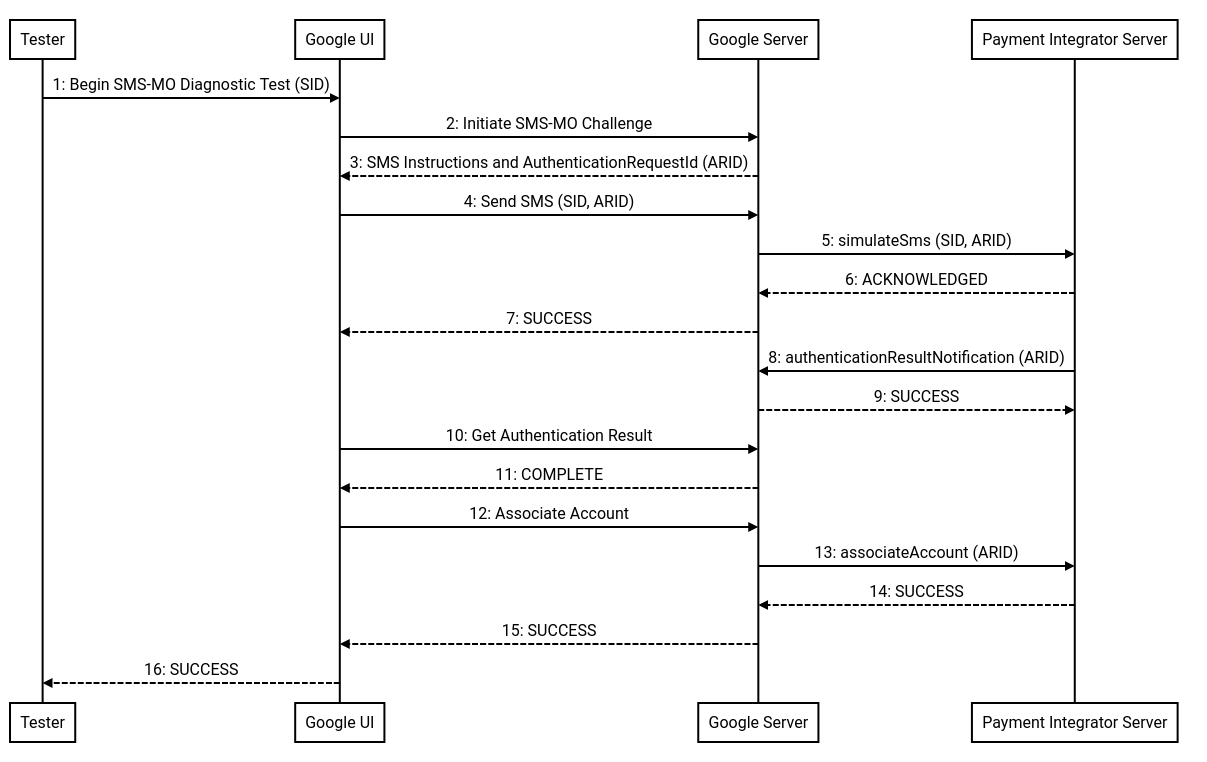
Here is a list of objects in the diagram and what they represent:
- Tester: This is the person who initiates an SMS-MO association diagnostic test.
- Google UI: A Google UI where the tester begins and monitors the status of the SMS-MO diagnostic test.
- Google Server: The backend server at Google that generates the SMS instructions with a Authentication Request ID (ARID), sends the simulated SMS message, and receives the authentication result from the integrator.
- Payment Integrator Server: The backend server of the integrator that receives the simulated authentication SMS and returns the Authentication Request ID to Google.
The steps in this flow are:
- The Tester begins the SMS-MO diagnostic test by providing a test subscriber ID (SID) to use for the test. This SID will be included in the
simulateSmscall to the Payment Integrator. - The Google UI calls the Google Server to initiate the SMS-MO Challenge.
- The Google Server returns SMS instructions, consisting of a destination and a body containing the Authentication Request ID. For the purposes of this test, the destination will be overridden by the Payment Integrator's sandbox HTTPS connection.
- The Google UI calls the Google Server to send the simulated SMS message.
- The
simulateSmscall is made from the Google Server to the Payment Integrator Server. Both the Authentication Request ID and Subscriber ID (as provided in step 1) is included in the API call. - The Payment Integrator Server responds ACKNOWLEDGED.
- The Google Server responds SUCCESS to the Google UI.
- The Payment Integrator Server calls the authenticationResultNotification endpoint on the Google Server with the Authentication Request ID.
- The Google Server responds SUCCESS.
- The Google UI calls the Google Server to obtain the result of the authentication attempt.
- The Google Server responds COMPLETED.
- The Google UI calls the Google Server to execute an Association attempt.
- The
associateAccountcall is made from the Google Server to the Payment Integrator Server. - The Payment Integrator Server responds SUCCESS.
- The Google Server responds SUCCESS.
- The Google UI updates to indicate to the Tester that the SMS-MO diagnostic test has completed successfully.
Best practices and other considerations
Choice of platforms
Providing a mobile app and desktop web authentication flow will allow the integrator to reach the most users. Google strongly recommends that integrators support the Android application as it provides the best user experience resulting in the highest conversion rate. The parameters passed in the authentication APIs for the web and Android applications are the same.