
Page Summary
-
Gadgets are HTML and JavaScript applications that can be embedded in web pages, including Google Sites, to integrate external and dynamic content, such as miniature apps and interactive elements.
-
Building a gadget involves choosing a hosting method, creating an XML specification file, defining the content type, and incorporating either HTML or a URL to external content.
-
Gadgets enhance Google Sites by pulling in external data, presenting it dynamically, and allowing for user-configurable settings, although user preference modification is limited to site administrators.
-
Configuration views provide a custom interface for gadget user preferences, enabling more complex options and layouts compared to the standard UserPref method, and can be implemented in the gadget's XML specification file.
-
Developers should be mindful of security and visibility when creating gadgets, avoiding the inclusion of sensitive information in specifications and considering URL-based inclusion to limit public exposure.

At Google, gadgets are HTML and JavaScript applications that can be embedded in web pages and other apps, including Sites. These gadgets offer the ability to include external and dynamic content within your site, such as miniature applications and database-driven lists, incorporated with text and images for a seamless user experience.
Every Sites page is a potential gadget container. What's more, Sites offers a Data API that may be used in conjunction with gadgets to create powerful applications. That means as a gadget developer you can leverage the classic Sites API to build engaging tools for other Web developers and their audiences, as well for your own use.
When you build a gadget for Sites, it becomes available to millions of active users. Just submit your gadget to us, and it will appear where users can easily browse, configure, and add your gadget to their Sites.
So now you know {sites_name_short} is a great distribution platform for your gadget, what are you waiting for? Get started building gadgets for Sites now!
Sites gadget overview
Generically, gadgets are small utilities that generate or pull external information into web pages. In its simplest form, a gadget is a small .xml file that retrieves information with the ability to make it available in multiple web pages at once. In Sites, including a gadget results in an iframe that acts as the conduit for this external information. Some gadgets are no more than that, iframes that pass through information from another web site.
More advanced gadgets collect dynamic content and provide for interactive applications within your Sites pages. See Example gadget.
Gadgets consist of the following components:
- Gadget spec file - A .xml file that wraps HTML and JavaScript functions.
- Container page - The Web page where the gadget is inserted, in this case a Google Site.
- External data source - This is optional and may reside in the same location as the .xml file but is often called by the gadget spec over HTTP to provide its results.
Gadgets built for Sites may be used by all viewers of a site. They tend to be interactive, focused on pulling in dynamic content rather than on presentation, and are designed to complement the content of the site.
A calendar gadget is a good example of this distinction. A personalized calendar gadget in would likely show the calendar of the logged in user by default, while a calendar gadget in Sites might allow collaborators to select from a variety of location-specific calendars.
Sites gadgets allow you to present multiple pieces of information from external sources (say live diagrams from distinct but related performance dashboards) in a single page along with explanatory text published directly in Sites. This saves visual real estate while collecting disparate information on the same topic in the same view. Gadgets also allow you to include dynamic content that would otherwise be prevented by Sites security checks.
Warning: Gadgets built with the legacy
gadgets API may work in Sites but are not officially supported. Built-in and feed-based gadgets
are similarly not supported. Therefore, Google recommends you build all Sites gadgets using the
current gadgets.* API. See this post for an explanation:
http://igoogledeveloper.blogspot.com/2009/09/more-things-change-more-they-stay-same.html
Example gadget
Here is a simple but popular Include gadget that does little more than provide an iframe for passing through other web content:
<?xml version="1.0" encoding="UTF-8" ?>
<Module>
  <ModulePrefs title="Include gadget (iframe)" title_url="http://sites.google.com/"
          description="Include another web page in your Google Site"
          thumbnail="https://www.gstatic.com/sites-gadgets/common/images/sites-icon-gadget-thumb.png"
          screenshot="https://www.gstatic.com/sites-gadgets/common/images/sites-icon-gadget-ss.png"
          height="800" width="600" author="Google">
    <Require feature="dynamic-height"/>
  </ModulePrefs>
  <UserPref name="iframeURL" display_name="URL to content" required="true"/>
  <UserPref name="scroll" display_name="Display scrollbar" default_value="auto" datatype="enum">
    <EnumValue value="auto" display_value="Automatic"/>
    <EnumValue value="no" display_value="No"/>
    <EnumValue value="yes" display_value="Yes"/>
  </UserPref>
  <Content type="html" view="default,canvas">
  <div id='dest'><img src="http://www.google.com/ig/images/spinner.gif"></div>
  <script type="text/javascript">
  gadgets.util.registerOnLoadHandler(doRender);

  function doRender(){
    // setup variables
    var prefs = new gadgets.Prefs();
    var iframeURL = prefs.getString('iframeURL');
    var scroll = prefs.getString('scroll');
    var height = 800;
    var width = 600;

    if (gadgets.window) {
      var viewport = gadgets.window.getViewportDimensions();
      if (viewport.width) {
        var width = viewport.width;
      }
      if (viewport.height) {
        var height = viewport.height;
      }
    }

    var iframe = document.createElement('iframe');
    iframe.setAttribute('width', width + 'px');
    iframe.setAttribute('height', height + 'px');
    iframe.setAttribute('frameborder','no');
    if(scroll){
      iframe.setAttribute('scrolling', scroll);
    }
    iframe.setAttribute('src', iframeURL);

    // set the slideshow to the placeholder div
    var dest = document.getElementById('dest');
    dest.innerHTML = '';
    dest.appendChild(iframe);
  }
  </script>
  </Content>
</Module>
See Getting Started: gadgets.* API for a complete description of gadget tags and expected contents.
Hosting your gadget
Regardless of what your gadget does, its files must reside on the World Wide Web to be found and used. Any online location accessible over HTTP without authentication will do. Just remember, your gadget will have to be published in a public directory to be selected. Otherwise, users must embed it by directly inserting its URL.
Here are your gadget hosting options:
- App Engine - Capable of storing all files required by your gadgets. Does require some setup, namely the creation of projects and subsequent file uploads. But it will readily scale to a large number of users. You can create an application to store all of your gadgets and another to serve static files, including an app.yaml file resembling:
application: <your app name>
version: 1
runtime: python
api_version: 1

handlers:
- url: /.*
  static_dir: static
If you put all of the gadget files in the static directory, you may then edit the files on your local directory and deploy to App Engine each time you make changes. If you have a file /static/gadget.xml, its URL will be: http://<your-app-name>.appspot.com/static/gadget.xml
- Any online location of your choosing - Completely under your control but also your complete responsibility. Downtime on your server may result in an outage for users of your gadgets.
Building your gadget
Gadgets are just HTML and (optionally) JavaScript, Flash or Silverlight wrapped in XML. The Gadget Developer Guide provides all necessary details for building your own gadgets. In addition, OpenSocial templates may be used to quickly build social applications in gadgets.
Here are the high-level steps for building a gadget for Sites:
- Decide where your gadget will be hosted. See the Hosting your gadget section for descriptions of your options.
- Create a new .xml file that will act as your spec using the text editor of your choice.
- Decide on the content type, either HTML or URL, and specify it within the gadget .xml file, like so:
<Content type="html">
This will almost invariably be HTML, which assumes all content is provided directly in the .xml file. But if you intend to supply the content in a separate file, use the URL content type. See Choosing a Content Type for a full description of their differences. - Create content in the gadget .xml file or in separate files called by the spec. See the Viewing example gadgets section for ways to examine existing gadgets.
- Define basic preferences for the gadget that can be altered by users. See Defining User Preferences for instructions. To provide more advanced configuration, see the Allowing advanced user configuration section.
- Define module preferences that only the gadget author may change. See Defining Gadget Preferences for additional details.
- Test the gadget. See the Testing your gadget section for instructions.
Embedding your gadget
Gadgets can be embedded in Sites pages either by selecting it from the Sites gadget directory (which is synchronized with the iGoogle gadget directory) or by including its URL directly.
To embed a gadget in Sites:
- Go to the Sites page that will contain the new gadget.
- Open the page for editing.
- Select Insert > More gadgets.
- Search for the gadget, select it from the categories on the left, or click Add gadget by URL and paste in the URL to your .xml file. Then click Add.
Tip: This same Add gadget by URL method may be used to embed gadgets from iGoogle and anywhere else online. - Specify the gadget's dimensions, select from available settings and click OK. The gadget is added to your page.
- Save the page to view and test your gadget in the site.
Testing your gadget
After building your gadget, you should test it thoroughly before using it and allowing others to do the same. Test your gadget manually by creating one or more test Google Sites and embedding your gadget. See the Embedding your gadget section for precise steps. The functionality and appearance of your gadget depends on the site that contains it. Therefore, the best way to debug your gadget is to test it in the context of an actual Google Site. Try switching between various Sites themes to ensure your gadget appears correctly in each.
As you test your gadget, you'll inevitably discover bugs and need to make corrections to your gadget .xml file. You should disable gadget caching while you're tweaking the XML. Otherwise, your changes won't show up on the page. Gadget specs are cached unless you tell Sites not to. To bypass the cache during development, add this to the end of the Sites page URL containing the gadget (and not the URL of the gadget spec .xml file):
?nocache=1
Sites provides a standard UI for adding and configuring gadgets. When you add a gadget, it will display a preview and show any UserPref parameters that can be configured. Test updating various configuration values and
adding your gadget to your test site. Confirm your gadget works as expected on the
site itself. You should test that
any UserPref you've defined can correctly be configured by the site administrator.
Then refer to the Preparing for Publication section of Publishing Your Gadget for other tests to carry out.
Allowing advanced user configuration
All gadgets may offer the ability to set basic user preferences, done through the UserPref section of the gadget spec file. These typically affect dimensions, scrollbars, borders, titles and gadget-specific settings, as depicted in the screenshot here:
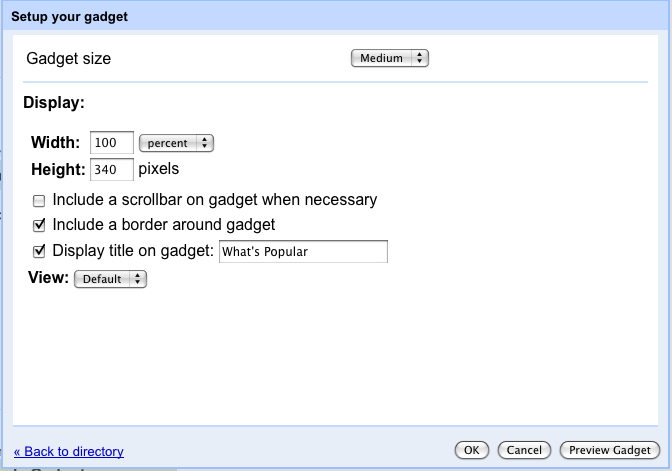
But there are many cases where gadgets benefit from more advanced preferences than the standard UserPref components offer. Preferences often need to include features like custom business logic, validations, or pickers. The interface generated from the gadget UserPref sections supports a limited number of datatypes (string, enum, etc.), so validation of inputs like URLs or dates cannot be conducted.
Further, in containers like iGoogle where the viewer and editor are the same, gadget authors can extended configuration as part of the standard view. In Sites, the viewer is not always the editor, so the gadget author can't guarantee the viewing user has access to update preferences. Social containers such as Sites cannot allow any user to modify the preferences, only the author.
In Sites, the basic gadget preferences interface generated by UserPref can be replaced by a configuration view where many additional preferences and data types may be supplied, as in the screenshot shown here:
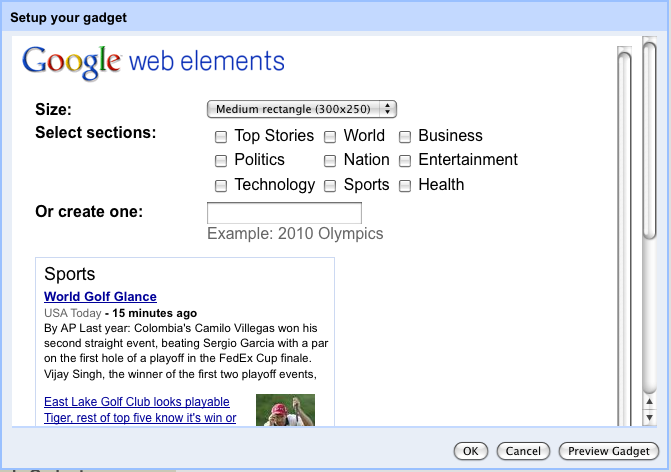
The configuration view is shown in place of UserPref settings at insertion time or edit time and allows you to set user preferences with a custom interface. And you can have custom input elements, such as for picking a position on a map rather than entering map coordinates.
Developers can use the standard setprefs APIs to save preferences in this view. See Gadgets XML Reference and the Saving State section of Developer Fundamentals for additional details. These views allow the container application to provide supplementary configuration information and are established in the gadget .xml spec files following the UserPref sections with an opening tag resembling:
<Content type="html" view="configuration" preferred_height="150">
For instance, the news.xml gadget that provides the configuration view above contains this section:
<Content type="html" view="configuration" preferred_height="300">
<style type="text/css">
  .config-options {
    margin: 10px;
  }
  .label {
    font-weight: bold;
    width: 35%;
    vertical-align: top;
  }
  .gray {
    color:#666666;
  }
  html {
    font-family:arial,sans-serif;
    font-size:0.81em;
    font-size-adjust:none;
    font-style:normal;
    font-variant:normal;
    font-weight:normal;
    line-height:1.5;
  }
  a:link, a:visited, a:active { text-decoration: none }
</style>
  <img alt="Google Web Elements" src="http://www.google.com/webelements/images/web_elements_logo.gif"/>
  <table class="config-options">
  <tr>
  <td align="left" class="label">Size:</td>
  <td align="left">
  <select id="size" onchange="Update()">
  <option selected="selected" value="300x250">Medium rectangle (300x250)</option>
  <option value="728x90">Leaderboard (728x90)</option>
  </select>
  </td>
  </tr>
  <tr>
  <td align="left" class="label">Select sections:</td>
  <td align="left">
  <table>
  <tbody><tr>
  <td><input type="checkbox" onclick="Update()" id="sec_h" value="h"/> Top Stories</td>
  <td><input type="checkbox" onclick="Update()" id="sec_w" value="w"/> World</td>
  <td><input type="checkbox" onclick="Update()" id="sec_b" value="b"/> Business</td>
  </tr><tr>
  <td><input type="checkbox" onclick="Update()" id="sec_p" value="p"/> Politics</td>
  <td><input type="checkbox" onclick="Update()" id="sec_n" value="n"/> Nation</td>
  <td><input type="checkbox" onclick="Update()" id="sec_e" value="e"/> Entertainment</td>
  </tr><tr>
  <td><input type="checkbox" onclick="Update()" id="sec_t" value="t"/> Technology</td>
  <td><input type="checkbox" onclick="Update()" id="sec_s" value="s"/> Sports</td>
  <td><input type="checkbox" onclick="Update()" id="sec_m" value="m"/> Health</td>
  </tr></tbody>
  </table>
  </td>
  </tr>
  <tr>
  <td align="left" class="label">Or create one:</td>
  <td align="left">
  <input type="text" id="query" onchange="Update()"/>
  <br/>
  <span class="gray">Example: 2010 Olympics</span>
  </td>
  </tr>
  <tr>
  <td colspan="2">
  <div id="preview" style="margin-top:10px;overflow:auto;width:100%;">
  <iframe id="preview_ifr" frameborder="0" marginwidth="0" marginheight="0" border="0"
  style="border:0;margin:0;"
  scrolling="no" allowtransparency="true"></iframe>
  </div>
  </td>
  </tr>
  </table>
  <script type="text/javascript">
  var prefs = new gadgets.Prefs();

  function getSelectedTopics() {
    var selected = [];
    var topics = ['h', 'w', 'b', 'p', 'n', 'e', 't', 's', 'm'];
    for (var i = 0; i < topics.length; i++) {
      if (document.getElementById('sec_' + topics[i]).checked) {
        selected.push(topics[i]);
      }
    }
    return selected.join(',');
  }

  function setSelectedTopics(selected) {
    if (selected && selected.length >= 0) {
      var topics = selected.split(',');
      for (var i = 0; i < topics.length; i++) {
        document.getElementById('sec_' + topics[i]).checked = true;
      }
    }
  }

  function Update() {
    var topic = getSelectedTopics();
    var query = document.getElementById('query').value;
    var size = document.getElementById('size').value;

    var url = 'http://www.google.com/uds/modules/elements/newsshow/iframe.html?rsz=large&' +
        'format=SIZE&element=true';
    var iframe = document.getElementById('preview_ifr');
    url = url.replace(/SIZE/, size);
    if (topic.length > 0) {
      url += '&topic=' + topic;
    }
    if (query.length > 0) {
      url += '&q=' + encodeURIComponent(query);
    }
    iframe.src = url;
    if (size == '728x90') {
      iframe.style.width = '728px';
      iframe.style.height = '90px'
    } else {
      iframe.style.width = '300px';
      iframe.style.height = '250px';
    }
    prefs.set('size', size);
    prefs.set('topic', topic);
    prefs.set('query', query);
    gadgets.window.adjustHeight();
  }

  function Initialize() {
    var size = '__UP_size__';
    if (size.length > 0) {
      document.getElementById('size').value = size;
    }
    var query = '__UP_query__';
    if (query.length > 0) {
      document.getElementById('query').value = query;
    }
    setSelectedTopics('__UP_topic__');
    Update();
  }

  gadgets.util.registerOnLoadHandler(Initialize);
  </script>
  </Content>
You can find this example and other Sites-specific gadgets with configuration views here:
https://www.gstatic.com/sites-gadgets/news/news.xml
http://gadgets.pardonmyzinger.org/static/qrcode.xml
https://www.gstatic.com/sites-gadgets/news/youtube_news.xml
Following best practices for Sites gadgets
Sites users want to look good on the web. Follow these best practices so your gadget blends seamlessly with the many themes used in Sites. See Gadgets Overview for details on creating gadgets. The rest of this section presents guidelines particular to Sites gadgets.
- Do not put sensitive information in gadget specs or titles because your gadget is viewable by the public. For example, don't include internal project names.
- To minimize visibility to your gadget, do not submit it to the iGoogle gadget directory or any other public listing service. Instead, have all users include it by URL only. In addition, you may create a URL-type gadget (rather than the typical HTML type containing all contents) that merely calls another file for its contents. With this pass-through option, only the URL of the second file is exposed. See the Choosing a Content Type section of Developer Fundamentals for differences between HTML and URL gadgets and the Gadgets are Public section of Writing Your Own Gadgets for other ways to mask your gadget.
- Most importantly, test your gadget on a number of different sites. Modify the site's background color, text color, and font face to ensure your gadget blends with a wide range of templates.