이 페이지에서는 Hello 양식 양식 샘플 앱의 코드를 탐색하여 주요 개념을 설명합니다. 참고:
이 샘플은 Sceneform 및 ARCore를 사용합니다.
ARCore 없이 장면 양식을 사용하려면 아래 단계를 따라 ARCore 종속 항목과 CAMERA 권한 요구사항을 무시합니다. 장면 빌드에 설명된 대로 앱의 레이아웃에서
SceneView을 사용합니다.이 샘플 앱은 AR 필수 앱으로 작성되었습니다.
AR 선택사항 및 AR 필수 앱의 자세한 내용은 ARCore 사용 설정을 참조하세요.
프로젝트에서 장면 양식을 시작하려면 다음을 수행해야 합니다.
scform 플러그인을 프로젝트로 가져옵니다.
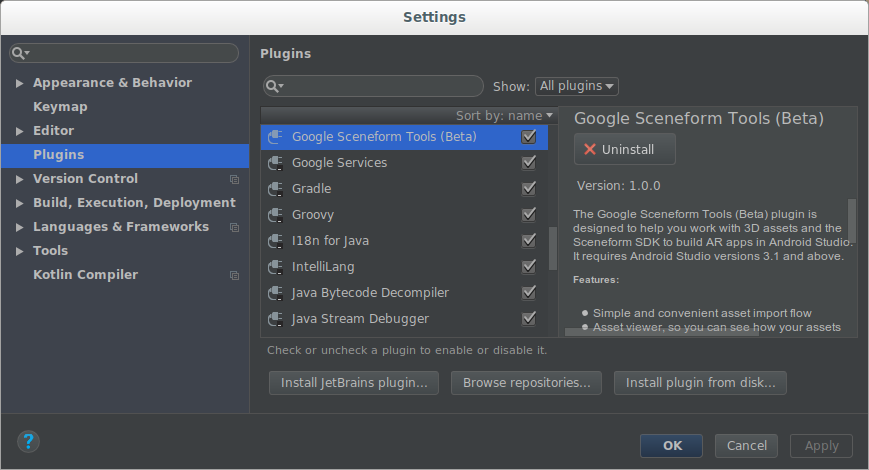
장면이 설치되면 Android 스튜디오의 AR 앱용 Sceneform SDK에서 3D 애셋을 가져오고, 보고, 빌드할 수 있습니다. Android 스튜디오 버전 3.1 이상이 필요합니다.
플러그인을 설치하려면 다음을 사용하세요.
Android 스튜디오에서 Plugins 설정을 엽니다.
Windows: 파일 > 설정 > 플러그인 및 저장소 찾아보기
macOS: Android 스튜디오 > Preferences > Plugins
저장소 찾아보기를 클릭하고 Google 장면 도구 도구 (베타)를 설치합니다.
프로젝트의 build.gradle 파일 구성
프로젝트
build.gradle에 Google의 Maven 저장소가 포함되어 있는지 확인합니다.allprojects { repositories { google() …앱
build.gradle을 업데이트하여 최신 ARCore 및 장면 양식 UX 종속 항목을 추가하고 프로젝트 설정이 두 라이브러리와 모두 호환되는지 확인합니다.android { … defaultConfig { // Sceneform requires minSdkVersion >= 24. minSdkVersion 24 … } // Sceneform libraries use language constructs from Java 8. // Add these compile options if targeting minSdkVersion < 26. compileOptions { sourceCompatibility JavaVersion.VERSION_1_8 targetCompatibility JavaVersion.VERSION_1_8 } } dependencies { … // Provides ARCore Session and related resources. implementation 'com.google.ar:core:1.15.0' // Provides ArFragment, and other UX resources. implementation 'com.google.ar.sceneform.ux:sceneform-ux:1.15.0' // Alternatively, use ArSceneView without the UX dependency. implementation 'com.google.ar.sceneform:core:1.15.0' }
AndroidManifest.xml 업데이트
앱에서 ARCore 및 CAMERA 액세스를 사용(AR 선택사항) 또는 필요 (AR 필수)하도록 나타내도록 AndroidManifest.xml을 수정합니다.
<!-- Both "AR Optional" and "AR Required" apps require CAMERA permission. -->
<uses-permission android:name="android.permission.CAMERA" />

<!-- Sceneform requires OpenGL ES 3.0 or later. -->
<uses-feature android:glEsVersion="0x00030000" android:required="true" />

<!-- Indicates that app requires ARCore ("AR Required"). Ensures the app is
     visible only in the Google Play Store on devices that support ARCore.
     For "AR Optional" apps remove this line. -->
<uses-feature android:name="android.hardware.camera.ar" />

<application>
    …
    <!-- Indicates that app requires ARCore ("AR Required"). Causes the Google
         Play Store to download and install Google Play Services for AR along
         with the app. For an "AR Optional" app, specify "optional" instead of
         "required".
    -->
    <meta-data android:name="com.google.ar.core" android:value="required" />
</application>
런타임 검사 실행 및 장면 뷰 만들기
장면 양식 사용을 시작하고 장면 뷰를 만드는 가장 쉬운 방법은 필요한 ARCore 런타임 검사를 실행한 후 ARCore 세션 관리를 자동으로 처리하는 ArFragment를 사용하는 것입니다.
호환되는 버전의 Google Play AR 서비스가 설치되어 있는지 확인하여 필요한 경우 사용자에게 설치 또는 업데이트하라는 메시지를 표시합니다.
앱이 카메라에 액세스할 수 있는지 확인하고 아직 부여되지 않은 경우 사용자에게 권한을 요청합니다.
앱에서 추가 권한을 요청해야 하거나 AR 세션이 생성되는 방식과 시기를 맞춤설정하려는 경우 다음 단계를 따르세요.
ArFragment의 서브클래스를 만들어 추가 권한을 요청합니다.ArSceneView를 직접 사용하거나 확장합니다. 앱은 태양광 시스템 샘플에 나와 있는 것처럼 ARCore 버전 확인을 실행하고setupSession()를 호출하여 ARCore 세션을 수동으로 만들어야 합니다.
검사를 통과하면 ArFragment에서 다음을 만듭니다.
getArSceneView()를 통해 액세스할 수 있는ArSceneView세션에서 카메라 표면으로 카메라 이미지 렌더링
사용자에게 AR을 활성화하기 위해 휴대전화를 어떻게 움직여야 하는지 보여주는 내장 장면 양식 UX 애니메이션을 렌더링합니다.
강조표시된 항목
Planes기본값 사용PlaneRenderer
getSession()를 통해 액세스할 수 있는 ARCoreSession
앱에서 ArFragment를 사용하려면 Hello scform 샘플의 activity_ux.xml에 설명된 대로 활동의 레이아웃에 추가합니다.
<fragment android:name="com.google.ar.sceneform.ux.ArFragment"
    android:id="@+id/ux_fragment"
    android:layout_width="match_parent"
    android:layout_height="match_parent" />
렌더링 가능 애셋 만들기
Renderable은 장면의 어디에나 배치할 수 있는 3D 모델이며 메시, 머티리얼, 텍스처로 구성됩니다.
Renderable은 다음에서 만들 수 있습니다.
표준 Android
ViewRenderable는 3D 장면에서 플랫 2D 카드로 렌더링되며 터치를 통해 상호작용하는 기능은 유지합니다.Android 스튜디오 플러그인을 사용하여 3D 애셋 파일(OBJ, AOSP, glTF)을 가져오고 변환하고 미리 볼 수 있습니다. 자세한 내용은 3D 애셋 가져오기 및 미리보기를 참고하세요.
기본 모양과 머티리얼은 프로그래매틱 방식으로 결합하여 런타임 시 더 복잡한 객체를 만들 수 있습니다.
샘플 앱은 3D andy.obj 애셋 파일에서 렌더러를 만듭니다. 이 애셋을 가져오면 장면 플러그인이 app build.gradle를 업데이트하여 플러그인을 적용하고 가져온 모델의 sceneform.asset() 항목을 추가합니다.
apply plugin: 'com.google.ar.sceneform.plugin'

sceneform.asset('sampledata/models/andy.obj', // 'Source Asset Path' specified during import.
                'default',                    // 'Material Path' specified during import.
                'sampledata/models/andy.sfa', // '.sfa Output Path' specified during import.
                'src/main/res/raw/andy')      // '.sfb Output Path' specified during import.
res/raw/andy 리소스는 ModelRenderable를 만드는 데 사용됩니다.
private ModelRenderable andyRenderable;

@Override
protected void onCreate(Bundle savedInstanceState) {
    …

    ModelRenderable.builder()
        .setSource(this, R.raw.andy)
        .build()
        .thenAccept(renderable -> andyRenderable = renderable)
        .exceptionally(
            throwable -> {
            Log.e(TAG, "Unable to load Renderable.", throwable);
            return null;
        });
}
장면 빌드
ARSceneView에는 Scene가 연결되어 있습니다.
장면은 렌더링할 가상 객체인 Node를 보유하는 나무와 같은 데이터 구조입니다.
여기서 앤디 렌더러블은 루트 장면 노드에 직접 연결됩니다.
Node node = new Node();
node.setParent(arFragment.getArSceneView().getScene());
node.setRenderable(andyRenderable);
각 노드에는 장면 렌더링에 필요한 모든 정보(위치, 방향, 렌더링 가능한 객체 포함)와 상호작용 (충돌 모양 및 이벤트 리스너 포함)이 포함됩니다.
노드를 다른 노드에 추가하여 상위-하위 관계를 형성할 수 있습니다. 노드가 다른 노드의 하위 요소인 경우 몸이 이동할 때 팔이 움직이는 방식과 같이 상위 요소로 이동, 회전, 확장됩니다. 노드에는 여러 개의 하위 요소가 있지만 상위 요소는 하나만 있을 수 있으므로 트리 같은 구조가 형성됩니다. 이 구조를 장면 그래프라고 합니다.
각 프레임에서 장면 양식은 카메라의 관점에서 장면 그래프를 렌더링합니다(ARCore 모션 추적에 따라 안내됨). 앱은 터치 및 동작 이벤트를 수신 대기하고, 노드에 관한 조회 테스트를 실행하고, 앵커를 배치하여 장면과 상호작용할 수 있습니다. 자세한 내용은 장면 빌드 및 상호작용을 참고하세요.