There are three ways to quickly get started building an Opal. We recommend using the Gallery to choose an existing demo Opal built by Google, and then remixing it to create your own!
Remix your own Opal from the Gallery
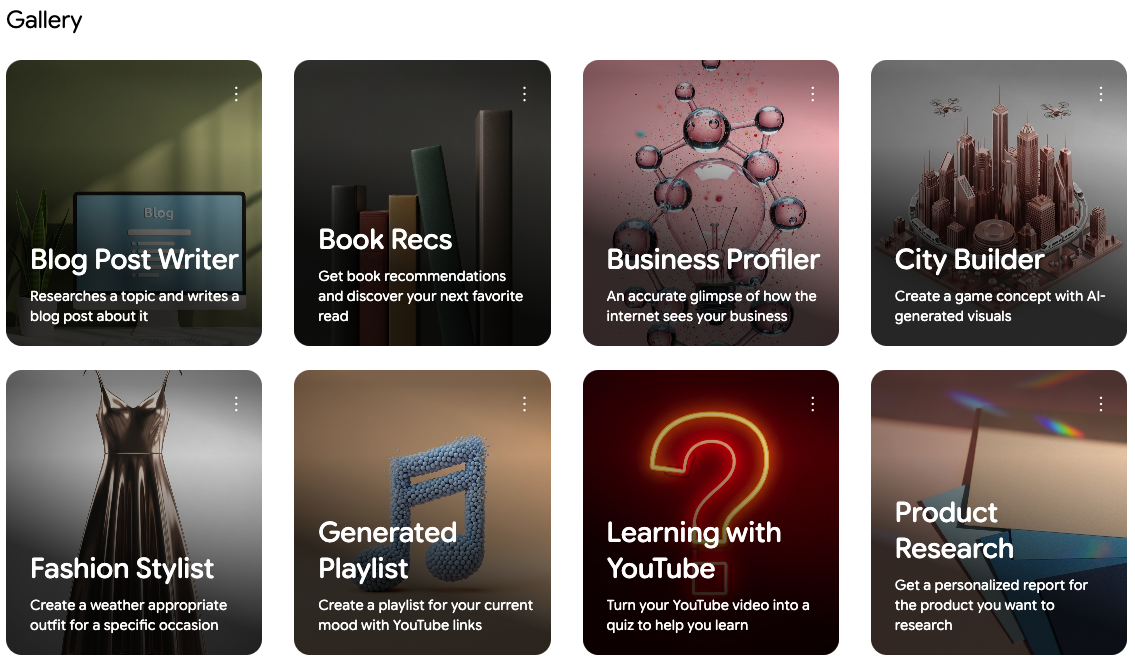
You can use the Gallery to find demo Opals created by Google. The Gallery is a good place to get started because you can remix any Opal from the Gallery to make your own copy and changes.
- Start on the Opal homepage and go to the Gallery section.
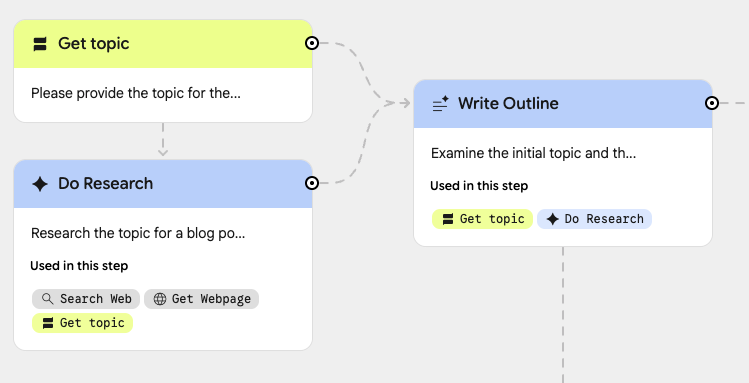
- Click any Opal in the Gallery to open it up and see how it works. For example, try clicking on the Blog Post Writer Opal: it's a mini app designed to get a topic from the user and generate a full blog post, with multiple generation steps.
- Once the Opal has been opened, click the Remix button to make a copy of the Opal that you can make changes to.
- In your new Opal, click the natural language editor at the bottom of the
screen.

Describe what you want to build with natural language and Opal will help build your app - Enter a change you want to make to the Opal. For example, using the Blog Post Writer Opal, enter an edit like Add a new step to generate a 256x256 sharable social image based on the banner image, and then include that social image in the blog post.
- After some time, the Opal should update with the requested changes. You can preview your Opal by clicking the background in the editor and then checking the Preview section of the sidebar.
See the Gallery documentation for more details.
Create an Opal with the natural language editor
If you have an idea for what you want to build but you're not sure how to start, the natural language editor makes it quick to build your Opal.

- Click the Create New button (or open an existing Opal)
- Click into the natural language prompt area of the editor:
Describe what you want to build with natural language and Opal will build your app - Type in the app you want to create by explaining it in natural language.
Here are a few examples:
- Create a Google Doodle that inputs a date, looks up a significant historical event, and generates a Google Logo to educate and inspire users
- Create an app that take the screenshot of a math problem, provides a detailed description of the concept behind it, ask for user's feedback, and provide a detailed solution
- Given a mood or preferences, generate a DJ track. Each song should have a witty DJ intro, plus a link to the videos on youtube.
- Wait for the Opal to be ready and try it out!
You can also use the natural language editor to make changes to your existing Opal. Try asking the editor to add a new input or anything else you want to change!
See the full natural language editor documentation.
Create an Opal with the visual editor
The visual editor gives you the most control over each step of your Opal. This guide will walk through creating a basic Opal using the visual editor.
- Click the Create New button.
- Choose a name for your Opal and enter it in the top-left of the app.
- Click User Input to add an input step.

There are multiple types of steps available in an Opal app. User input is the best for collecting input from your end users. - Click the newly created input step to ensure that it is selected.
- Using the sidebar with the input step selected, type in the prompt for the
user who will be using your app to answer.
- For example, you can ask the user here: When is your birthday?
- Now click Generate at the top of the editor to add a new generate step.
- This will create a new step in the visual editor. You may need to drag the steps so that they are not overlapping.
- Drag from the connection point on the input step to anywhere on the generate
step.
Opal steps can be connected by dragging or by adding a reference to steps in the prompt editor - Connecting steps in the visual editor ensures the right inputs and outputs are used when generating and outputting. Basic apps might only have one input and output, but you can create more complex apps that use many!
- Select the new node on the map to edit that node in the sidebar. After
selecting the node, the sidebar should open up to the "Step" editor where
you can edit the prompt sent to the AI model. The prompt can include dynamic
elements, such as tools or other steps in the Opal.
- For example, you can change the prompt here to look something like:
- The user's birthday is: [User Input]. Use [Search Web] and google.com to find a historical event that happened on the user's birthday. Try to find events that are fun and positive, like celebrations.
- To use a tool or reference other nodes, you can use the
@symbol to pull up a menu of tools, assets, and steps.
- Click Output at the top of the editor to add a new output step.
- Drag from the connection point on the generate step to anywhere on the output step.
- Using the sidebar with the output step selected, select the output type and
change it to webpage with auto-layout.
- The AI model will automatically generate the style for the page with this option selected. If you want more control over the layout, try selecting the manual layout option and then specify what you want the page to look like in your prompt.
- Adjust the prompt that will get sent to the AI model by selecting the text
input under the output configuration selector.
- For example, you can change the prompt here to look something like:
- [Search Web] Generate a page for the user to learn more about the event that happened on their birthday. Include an image, about a paragraph of explanation, and a link for the user to learn more.
Now you're ready to preview your new Opal!
- Click the background of the visual editor to ensure that no specific steps are selected.
- Using the sidebar with no steps selected, click Preview to see what your app looks like from a user's perspective!
- Click the Start button in the app preview.
- Fill in the input prompt, such as inputting a birthdate, then submit.
- The app will move through to the generate step, searching the web, and then generating a page for the user.
See the full visual editor documentation.