
Model your fleet activities for the first and last mile of deliveries with the Fleet Engine Deliveries API. You can use this API by using the Driver SDK for Android and iOS, or directly by using HTTP REST or gRPC calls.
Initial setup
You configure the Fleet Engine Deliveries API in the Google Cloud Console.
For information on the steps to take within the console and how to create a JSON Web Token for authorization, see Authentication and authorization.
For details on using the console, see the Google Cloud Console documentation.
Verify your setup
After creating service accounts, verify that your setup is complete and you can create a delivery vehicle. Verifying your setup right away ensures that you have addressed common authorization issues that can arise when setting up your project. There are two ways to verify your setup:
Test two key parts of your setup: authorization token signing and trial delivery vehicle creation with the
gcloudcommand line utility. For details, see the Verifying your setup guide.Test your setup with the Fleet Engine Auth Sample Scripts.
Client Libraries
For a better developer experience over raw gRPC or REST, use the client libraries in several common programming languages. For instructions on how to obtain client libraries for your server application, see Client Libraries.
The Java examples in this documentation assume you are familiar with gRPC.
Data structures
The Fleet Engine Deliveries API uses two data structures to model the pickup and delivery of shipments:
- The delivery vehicle used to transport the shipment.
- The shipment pickup and delivery tasks.
You also use tasks to model driver breaks and scheduled stops throughout the day.
Delivery vehicles
Delivery vehicles transport shipments from a depot to a delivery location, and from a pickup location to the depot. In certain cases, they may also transport a shipment directly from the pickup location to the delivery location.
Use the Driver SDK to create a DeliveryVehicle object in Fleet Engine
and send location updates for shipment and fleet tracking.
DeliveryVehicle objects.
Tasks
For the actions a vehicle takes during the day, you assign tasks according to the type of action:
- For pickups and deliveries, assign Shipment tasks.
- For times when drivers are unavailable, like required breaks, assign Unavailability tasks.
- For non-driving tasks at drop boxes or customer locations, assign Scheduled stop tasks.
Each task you assign must have a unique task ID, but tasks can share the same tracking ID. When Fleet Engine calculates the ETA windows for each task, it uses all of the tasks and the order in which they are scheduled to make estimations. For more information about task IDs, see Task ID guidelines.
To create tasks in Fleet Engine, use the Driver SDK Task Manager.
Shipment tasks
Create shipment tasks for both pickup and delivery of a shipment, and include the following information:
- The location of the pickup or delivery.
- A tracking number or ID.
- A dwell time to account for additional time to complete the task, look for parking, or walk to the handoff location.
- A unique task ID. See Task ID guidelines.
For more information, see the following topics:
Android
iOS
Unavailability tasks
Unavailability tasks cover time periods when a vehicle is not available for pickups or deliveries, such as breaks for refueling the vehicle or driver rest breaks.
Create an unavailability task with the following information:
- The length of the break.
- Optionally, the location of the break. You don't have to provide a specific location, but doing so provides more accurate ETA windows throughout the day.
For more information, see the following topics:
Android
iOS
Scheduled stop tasks
Create scheduled stop tasks to model the stops that a delivery vehicle needs to make. For example, create a scheduled stop task for a daily scheduled collection stop at a specific location, independent of other deliveries or pickups at the same location. You can also create scheduled stop tasks for collections from drop boxes or to model feeder-vehicle transfers or stops at service centers and service points.
For more information, see the following topics:
Android
iOS
Task ID guidelines
When you create task IDs, follow these content and format guidelines:
- Create unique task IDs
- Don't expose any personally-identifiable information (PII) or clear text data.
- Use valid Unicode strings.
- Use 64 or fewer characters.
- Don't include any of the following ASCII characters: "/", ":", "\", "?", or "#".
- Normalize according to Unicode Normalization Form C.
The following are some examples of good Task IDs:
- 566c33d9-2a31-4b6a-9cd4-80ba1a0c643b
- e4708eabcfa39bf2767c9546c9273f747b4626e8cc44e9630d50f6d129013d38
- NTA1YTliYWNkYmViMTI0ZmMzMWFmOWY2NzNkM2Jk
The following table shows examples of unsupported Task IDs:
| Unsupported Task IDs | Reason |
|---|---|
| 8/31/2019-20:48-46.70746,-130.10807,-85.17909,61.33680 | Violates PII and character requirements: commas, periods, colons, and slashes. |
| JohnDoe-577b484da26f-Cupertino-SantaCruz | Violates PII requirements. |
| 4R0oXLToF"112 Summer Dr. East Hartford, CT06118"577b484da26f8a | Violates PII and character requirements: whitespace, commas, and quotation marks. Longer than 64 characters. |
More resources
To see the specific fields contained in each data
structure, see the API Reference documentation for DeliveryVehicle
(gRPC, REST)
and Task (gRPC, REST).
Life of a vehicle
The DeliveryVehicle object represents a first or last mile delivery vehicle.
You create a DeliveryVehicle object using:
- The project ID of the Google Cloud project that contains the service account used to call the Fleet Engine APIs.
- A customer-owned vehicle ID.
Use vehicle IDs that are unique for each vehicle. Don't reuse a vehicle ID unless there are no active tasks for the original vehicle.
Fleet Engine automatically deletes DeliveryVehicle objects that have not
been updated using UpdateDeliveryVehicle after seven days. The recommended
approach to keep a vehicle available in Fleet Engine is to update its location
at regular intervals. Updates to most other fields in the DeliveryVehicle
entity will also extend its life, provided that the new field value is different
from the existing one.
To see if a vehicle exists:
- Make a call to
UpdateDeliveryVehicle. - If you get a NOT_FOUND error, then call
CreateDeliveryVehicleto recreate the vehicle. If the call returns a vehicle, it is still available to update.
Vehicle attributes
The DeliveryVehicle entity contains a repeated field of
DeliveryVehicleAttribute. The ListDeliveryVehicles API includes a filter
field that can limit returned DeliveryVehicle entities to those with the
specified attributes. DeliveryVehicleAttribute doesn't impact Fleet Engine
routing behavior.
Don't include personally-identifiable information (PII) or sensitive information in attributes since this field may be visible to users.
Life of a task
You can create, update, and query tasks in Fleet Engine with the Deliveries API gRPC or REST interfaces.
A Task object has a state field to track its progression through
its lifecycle. The values move from OPEN to CLOSED. New tasks are created
in the OPEN state, which indicates that either:
- The task has not yet been assigned to a delivery vehicle.
- The delivery vehicle has not yet passed the task's assigned vehicle stop.
Task guidelines
You can only assign a task to a vehicle when it is in the OPEN state.
You cancel a task by removing it from the list of vehicle stops, which sets the task state to CLOSED automatically.
When the task's vehicle completes the task's vehicle stop:
Update the task's outcome field to either SUCCEEDED or FAILED.
Specify the timestamp of the event.
The JavaScript Fleet Tracking library then indicates the outcome of the task and the task status is set to CLOSED automatically. For more information, see Track your Fleet with the JavaScript Fleet Tracking library.
As with vehicles, Fleet Engine deletes tasks that have not been updated after seven days, and if you try to create a task with an ID that already exists, it returns an error.
Note: Fleet Engine does not support explicitly deleting a task. The service automatically deletes tasks after seven days without updates. If you want to retain task data longer than seven days, you must implement that capability yourself.
Task attributes
The Task entity contains a repeated field of
TaskAttribute, which can have a value from one of the 3 types: string, number
and bool. The ListTasks API includes a filter field that can limit returned
Task entities to those with the specified attributes. Task attributes don't
impact Fleet Engine routing behavior.
Don't include personally-identifiable information (PII) or other sensitive information in attributes since these attributes may be visible to users.
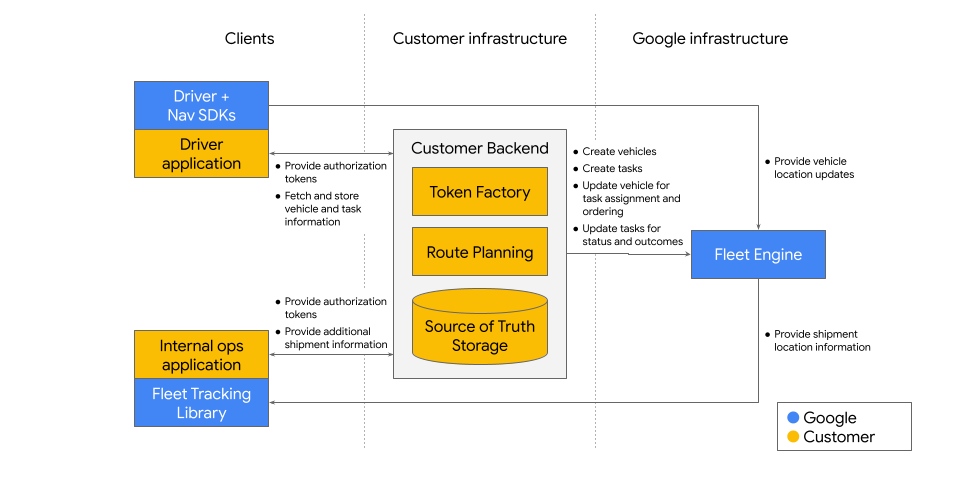
Manage vehicle and task lifecycle
Reminder: Your internal system acts as the trusted source of the data that the Fleet Engine Deliveries API augments on your behalf.
To manage vehicle and task lifecycles in your system, use the Fleet Engine Deliveries API to create, update, and track your vehicles and their associated tasks.
At the same time, the driver application communicates directly to Fleet Engine to update device location and route information. This model lets Fleet Engine efficiently manage real-time location. It sends the location directly to the tracking library, which you can then use to update consumers on the status of their order.
For example, suppose you have the following scenario:
- A driver nears a delivery stop. The driver application sends its location to Fleet Engine.
- Fleet Engine sends device location to the tracking library, which your consumer application uses to alert the consumer to the proximity of their package.
- After the driver completes the shipment, they click a "Shipment delivered" button on the driver application.
- The "Shipment delivered" action sends the information to your backend system, which performs necessary business validation and verification steps.
- Your system confirms the task as SUCCEEDED and updates Fleet Engine using the Deliveries API.
The following diagram illustrates these processes at a generic level. It also shows the standard relationship between your system, the client, and Fleet Engine.
Manage client tokens
Location updates originating from the driver application and sent directly to Fleet Engine require authorization tokens. Here is the recommended approach to handle updates from the client to Fleet Engine:
Generate the token using the Fleet Engine Delivery Untrusted Driver User service account role.
Provide the driver application with a token of limited scope. This scope only lets it update device location in Fleet Engine.
This approach ensures that calls originating from a mobile devices--considered low-trust environments--adhere to the principle of least privilege.
Other service account roles
If instead you want to authorize the driver applications to make direct Fleet Engine updates beyond the those restricted to the Untrusted Driver role, such as for certain task updates, you can use the Trusted Driver role. For information on a model that uses the Trusted Driver role, see Trusted Driver model.
For more information on the uses for untrusted and trusted driver roles, see Cloud project setup.
Model a work day
The following table describes how a work day for first- or last-mile drivers might look like at a delivery and logistics company. Your company may differ in the details, but you can see how you might model a work day.
| Time | Activity | Modeling |
|---|---|---|
| Within 24 hours of the start of the day | Dispatcher assigns shipments to delivery vehicles or routes. | You can create tasks for shipment deliveries, pickups, breaks, and
others in Fleet Engine ahead of time. For example, you can create a
shipment pickup task,
shipment delivery task,
scheduled unavailability, or
scheduled stop.
Assign tasks to a vehicle once the set of delivery packages and the order in which they should be delivered are finalized. |
| Start of day | Driver starts the day at the depot by logging into the Driver app. | Initialize the Delivery Driver API. Create the delivery vehicle in Fleet Engine as needed. |
| Driver loads shipments onto the delivery vehicle, scanning shipments. | If shipment delivery tasks weren't created ahead of time, create shipment delivery tasks at the time of scanning. | |
| Driver confirms order of tasks to be performed. | If they weren't created ahead of time, create shipment pickup tasks, scheduled unavailability, and scheduled stops. | |
| Driver leaves depot and commits to the next number of tasks to be completed. | Assign all tasks or a subset of tasks to the vehicle by committing their completion order. | |
| Driver delivers a shipment. | After arriving at the delivery stop, perform actions related to a vehicle arriving at a stop. After delivering the shipment, close the delivery task and, optionally, store shipment status and other meta information. After completing all tasks at the stop and before starting to drive to the next stop, perform actions related to vehicle completes a stop and vehicle enroute to the next stop. | |
| Driver meets a feeder vehicle to transfer additional shipments onto the delivery vehicle. | The meeting point for a transfer between feeder and delivery vehicles
should be modeled as a scheduled stop.
After transferring and scanning the shipments, create delivery tasks if they haven't already been created. Then update the task completion order by assigning tasks to a vehicle and updating the task ordering. |
|
| Driver receives notification of a pickup request. | After accepting the pickup request, create a shipment pickup task. Then update the task execution order by assigning tasks to a vehicle and updating the task ordering. | |
| Noon | Driver takes lunch break. | If a location is associated with the unavailability task, treat it like
any other task. Perform actions related to a vehicle
arriving at a stop,
vehicle completes a stop
and vehicle enroute to the next stop.
Otherwise, no further action is necessary until the end of the break. Remove the task by confirming the next and remaining tasks, and updating the task ordering. |
| Driver picks up a shipment. | This is modeled just like a delivery stop. Perform actions related to a vehicle arriving at a stop and closing a task and, optionally, storing shipment status and other meta information. After completing all tasks at the stop and before starting to drive to the next stop, perform actions related to vehicle completes a stop and vehicle enroute to the next stop. Note: To ensure correct billing, all pickups must have a corresponding delivery task. If the pickup is to be delivered to another location on the driver's same route that day, we recommend modeling that delivery task as any other delivery task on the route. If the driver is bringing the pickup back to the depot, we recommend creating a delivery task at the depot destination. | |
| Driver makes a scheduled stop to pick up shipments from a drop box. | This is modeled just like any other pickup stop. Perform actions related to a vehicle arriving at a stop and closing a task. After completing all tasks at the stop and starting to drive to the next stop, perform actions related to vehicle completes a stop and vehicle enroute to the next stop. | |
| Driver receives notification of a shipment being diverted to an alternative location. | Set the original shipment delivery task status to COMPLETED and create a new shipment delivery task for the new delivery location. For more information, see Reroute a shipment. | |
| Driver attempted to deliver a package but was unable to do so. | This is modeled similarly to a successful delivery stop, marking the delivery task as completed. Perform actions related to a vehicle arriving at a stop. After failing to deliver the shipment, close the task and, optionally, store shipment status and other meta information. After completing all tasks at the stop and before starting to drive to the next stop, perform actions related to vehicle completes a stop and vehicle enroute to the next stop. | |
| Driver was notified to hold (not deliver) a shipment. | After notification is received and confirmed, set the task status to COMPLETED. | |
| Driver was notified to deliver a certain shipment next, changing the committed delivery order. | Update the task ordering. | |
| Driver chooses to deliver a shipment out of order. | Update the task ordering and then proceed as normal. | |
| Driver delivers multiple shipments to a single location. | This is modeled similarly to a single shipment delivery stop. After arriving at the stop, perform actions related to a vehicle arriving at a stop. After delivering each shipment, close each task and, optionally, store shipment status and other meta information. After completing all tasks at the stop and before starting to drive to the next stop, perform actions related to vehicle completes a stop and vehicle enroute to the next stop. | |
| End of day | Driver returns to the depot. | If the driver returns to the depot with shipments picked up during their route, you must also create and close out each package as a delivery task to ensure correct billing. You can do this by modeling the depot like any other delivery stop. If the depot is not being used as a delivery stop, you may still optionally model the depot as a scheduled stop. Modeling the stop enables your drivers to see the route back to the depot and provide visibility into their estimated time of arrival. |
How location updates work
For the best performance with Fleet Engine, provide it with a stream of vehicle location updates. Use either of the following ways to provide these updates:
- Use the Driver SDK - Android, iOS -- simplest option.
- Use custom code -- useful if locations are relayed through your backend, or if you use devices other than Android or iOS.
Regardless of how you provide vehicle location updates, your backend is responsible for updating Fleet Engine when a delivery vehicle is enroute to a stop (including the depot) and when it arrives at a stop. Fleet Engine does not detect these events automatically.
Vehicle stops and delivery locations
A vehicle stop is where a delivery vehicle completes a shipment task or some other task. It is either an access point such as a loading dock or a road-snapped location.
The delivery location is the location where the shipment is delivered or picked up. Getting to and from the delivery location may require some walking from the vehicle stop.
For example, when a driver is delivering a shipment to a store in a mall, the delivery vehicle stops in the parking lot of the mall near the closest entrance to the store. This is the vehicle stop. The driver then walks from the vehicle stop to the location within the mall where the store is located. This is the delivery location.
For the best shipment tracking experience for your users, consider how shipment tasks are assigned to vehicle stops and keep in mind that the number of remaining vehicle stops for shipment tasks is reported to the user to help them view progress of their shipment.
For example, if a driver is making many deliveries to a single office building, consider assigning all the delivery tasks to a single vehicle stop. If each delivery task is assigned to its own vehicle stop, your shipment tracking experience would be less helpful to your users since tracking is only available once the vehicle is within a limited number of vehicle stops before its destination. Having many vehicle stops completed in a short time does not give a user much time to use to track progress of their delivery.
Use the mobile SDKs
Before you make any calls to the Driver SDK, make sure to initialize it.
Initialize the Delivery Driver API
Before initializing the Delivery Driver API in the Driver SDK, make sure to initialize the Navigation SDK. Then initialize the Delivery Driver API as shown in the following example:
static final String PROVIDER_ID = "provider-1234";
static final String VEHICLE_ID = "vehicle-8241890";

NavigationApi.getNavigator(
   this, // Activity.
   new NavigatorListener() {
     @Override
     public void onNavigatorReady(Navigator navigator) {
       DeliveryDriverApi.createInstance(DriverContext.builder(getApplication())
         .setNavigator(navigator)
         .setProviderId(PROVIDER_ID)
         .setVehicleId(VEHICLE_ID)
         .setAuthTokenFactory((context) -> "JWT") // AuthTokenFactory returns JWT for call context.
         .setRoadSnappedLocationProvider(NavigationApi.getRoadSnappedLocationProvider(getApplication()))
         .setNavigationTransactionRecorder(NavigationApi.getNavigationTransactionRecorder(getApplication()))
         .setStatusListener((statusLevel,statusCode,statusMsg) -> // Optional, surfaces polling errors.
             Log.d("TAG", String.format("New status update. %s, %s, %s", statusLevel, statusCode, statusMsg)))
         .build));
     }
     @Override
     public void onError(int errorCode) {
       Log.e("TAG", String.format("Error loading Navigator instance: %s", errorCode));
     }
   });
Use cases
This section describes how to use the Deliveries API to model common use cases.
Unique entity identifiers
The format and value of the unique entity identifiers used in REST calls are opaque to Fleet Engine. Avoid using auto-incrementing IDs, and make sure that the identifier does not contain any personally-identifiable information (PII), such as the driver's phone number.
Create a vehicle
You can create a vehicle either from the Driver SDK or from a server environment using gRPC or REST.
gRPC
To create a new vehicle, you make a CreateDeliveryVehicle call to Fleet Engine.
Use the CreateDeliveryVehicleRequest object to define the attributes of
the new delivery vehicle. Note that any value specified for the Name field does be
ignored per API guidance for user-specified IDs.
You should use the DeliveryVehicleId field to set the ID of the vehicle.
When creating a DeliveryVehicle, you can optionally specify these fields:
- Attributes
- LastLocation
- Type
Don't set any other fields. If you do, Fleet Engine returns an error
because those fields are either read-only or can only be updated with a call to
UpdateDeliveryVehicle.
To create a vehicle without setting any optional fields, you can leave the
DeliveryVehicle field unset in the CreateDeliveryVehicleRequest.
The following example shows how to use the Java gRPC library to create a vehicle:
    static final String PROJECT_ID = "my-delivery-co-gcp-project";
    static final String VEHICLE_ID = "vehicle-8241890"; // Avoid auto-incrementing IDs.

    DeliveryServiceBlockingStub deliveryService =
      DeliveryServiceGrpc.newBlockingStub(channel);

    // Vehicle settings
    String parent = "providers/" + PROJECT_ID;
    DeliveryVehicle vehicle = DeliveryVehicle.newBuilder()
      .addAttributes(DeliveryVehicleAttribute.newBuilder()
        .setKey("route_number").setValue("1"))  // Opaque to the Fleet Engine
      .build();

    // Vehicle request
    CreateDeliveryVehicleRequest createVehicleRequest =
      CreateDeliveryVehicleRequest.newBuilder()  // No need for the header
          .setParent(parent)
          .setDeliveryVehicleId(VEHICLE_ID)     // Vehicle ID assigned by the Provider
          .setDeliveryVehicle(vehicle)
          .build();

    // Error handling
    // If Fleet Engine does not have vehicle with that ID and the credentials of the
    // requestor pass, the service creates the vehicle successfully.

    try {
      DeliveryVehicle createdVehicle =
        deliveryService.createDeliveryVehicle(createVehicleRequest);
    } catch (StatusRuntimeException e) {
      Status s = e.getStatus();
      switch (s.getCode()) {
         case ALREADY_EXISTS:
           break;
         case PERMISSION_DENIED:
           break;
      }
      return;
    }
REST
To create a vehicle from a server environment, make an HTTP REST call
to CreateDeliveryVehicle:
POST https://fleetengine.googleapis.com/v1/providers/<project_id>/deliveryVehicles?deliveryVehicleId=<id>
<id> is a unique identifier for a delivery vehicle in your fleet.
The request header must contain a field Authorization with the value Bearer <token>, where <token> is a token issued by a Fleet Engine token factory.
The POST body represents the DeliveryVehicle entity to be created. You can specify
the following optional fields:
- attributes
- lastLocation
- type
Example curl command:
# Set $JWT, $PROJECT_ID, and $VEHICLE_ID in the local
# environment
curl -X POST "https://fleetengine.googleapis.com/v1/providers/${PROJECT_ID}/deliveryVehicles?deliveryVehicleId=${VEHICLE_ID}" \
  -H "Content-type: application/json" \
  -H "Authorization: Bearer ${JWT}" \
--data-binary @- << EOM
{
  "attributes": [{"key": "model", "value": "sedan"}],
  "lastLocation": {"location": {"latitude": 12.1, "longitude": 14.5}}
}
EOM
Fleet Engine ignores the name field of the DeliveryVehicle entity per API guidance for user-specified IDs.
Don't set any other fields. If you do, Fleet Engine returns an error
because those fields are either read-only or can only be updated using a call to
UpdateDeliveryVehicle.
To create a vehicle without setting any fields, leave the body of the POST
request empty. The newly-created vehicle then extracts a vehicle ID from the
deliveryVehicleId parameter in the POST URL.
Example curl command:
# Set $JWT, $PROJECT_ID, and $VEHICLE_ID in the local
# environment
curl -X POST "https://fleetengine.googleapis.com/v1/providers/${PROJECT_ID}/deliveryVehicles?deliveryVehicleId=${VEHICLE_ID}" \
  -H "Content-type: application/json" \
  -H "Authorization: Bearer ${JWT}"
Create a shipment pickup task
You can create a shipment pickup task either from the Driver SDK or from a server environment using gRPC or REST.
gRPC
The following example shows how to use the Java gRPC library to create a shipment pickup task:
static final String PROJECT_ID = "my-delivery-co-gcp-project";

DeliveryServiceBlockingStub deliveryService =
  DeliveryServiceGrpc.newBlockingStub(channel);

// Task settings
String parent = "providers/" + PROJECT_ID;
Task task = Task.newBuilder()
  .setType(Task.Type.PICKUP)
  .setState(Task.State.OPEN)
  .setTrackingId("my-tracking-id")
  .setPlannedLocation(               // Grand Indonesia East Mall
    LocationInfo.newBuilder().setPoint(
      LatLng.newBuilder().setLatitude(-6.195139).setLongitude(106.820826)))
  .setTaskDuration(
    Duration.newBuilder().setSeconds(2 * 60))
  .setTargetTimeWindow(
    TimeWindow.newBuilder()
      .setStartTime(Timestamp.newBuilder().setSeconds(1680123600))
      .setEndTime(Timestamp.newBuilder().setSeconds(1680130800)))
  .addAttributes(TaskAttribute.newBuilder().setKey("foo").setStringValue("value"))
  .addAttributes(TaskAttribute.newBuilder().setKey("bar").setNumberValue(10))
  .addAttributes(TaskAttribute.newBuilder().setKey("baz").setBoolValue(false))
  .build();

// Task request
CreateTaskRequest createTaskRequest =
  CreateTaskRequest.newBuilder()  // No need for the header
      .setParent(parent)          // Avoid using auto-incrementing IDs for the taskId
      .setTaskId("task-8241890")  // Task ID assigned by the Provider
      .setTask(task)              // Initial state
      .build();

// Error handling
// If Fleet Engine does not have a task with that ID and the credentials of the
// requestor pass, the service creates the task successfully.

try {
  Task createdTask = deliveryService.createTask(createTaskRequest);
} catch (StatusRuntimeException e) {
  Status s = e.getStatus();
  switch (s.getCode()) {
     case ALREADY_EXISTS:
       break;
     case PERMISSION_DENIED:
       break;
  }
  return;
}
REST
To create a shipment pickup task from a server environment, make an HTTP REST call
to CreateTask:
`POST https://fleetengine.googleapis.com/v1/providers/<project_id>/tasks?taskId=<id>`
<id> is a unique identifier for the task. It must not be the tracking number for the shipment. If you don't have task IDs in your system, you may generate a universally unique identifier (UUID).
The request header must contain a field Authorization with the value Bearer <token>, where <token> is a token issued by a Fleet Engine token factory.
The request body must contain a Task entity:
Required fields:
Field Value type Type.PICKUP state State.OPEN trackingId The number or identifier you are using to track a shipment. plannedLocation The location where the task is to be completed, in this case the shipment pickup location. taskDuration The expected time, in seconds, that it takes to pick up the shipment at the pickup location. Optional fields:
Field Value targetTimeWindow The time window during which the task should be completed. This does not affect routing behavior. attributes A list of custom Task attributes. Each attribute must have a unique key.
All other fields in the entity are ignored for creation. Fleet Engine throws
an exception if the request includes an assigned deliveryVehicleId. You assign
tasks using UpdateDeliveryVehicleRequest. For more information, see
Assign tasks to a vehicle and UpdateDeliveryVehicleRequest.
Example curl command:
# Set $JWT, $PROJECT_ID, $TRACKING_ID, and $TASK_ID in the local
# environment
curl -X POST "https://fleetengine.googleapis.com/v1/providers/${PROJECT_ID}/tasks?taskId=${TASK_ID}" \
  -H "Content-type: application/json" \
  -H "Authorization: Bearer ${JWT}" \
  --data-binary @- << EOM
{
  "type": "PICKUP",
  "state": "OPEN",
  "trackingId": "${TRACKING_ID}",
  "plannedLocation": {
     "point": {
        "latitude": -6.195139,
        "longitude": 106.820826
     }
  },
  "taskDuration": "90s",
  "targetTimeWindow": {
    "startTime": "2023-03-29T21:00:00Z",
    "endTime": "2023-03-29T23:00:00Z"
  }
}
EOM
Create a shipment delivery task
Create a shipment delivery task either from the Driver SDK or from a server environment using gRPC or REST.
gRPC
The following example shows how to use the Java gRPC library to create a shipment delivery task:
static final String PROJECT_ID = "my-delivery-co-gcp-project";

DeliveryServiceBlockingStub deliveryService =
  DeliveryServiceGrpc.newBlockingStub(channel);

// Task settings
String parent = "providers/" + PROJECT_ID;
Task task = Task.newBuilder()
  .setType(Task.Type.DELIVERY)
  .setState(Task.State.OPEN)
  .setTrackingId("my-tracking-id")
  .setPlannedLocation(               // Grand Indonesia East Mall
    LocationInfo.newBuilder().setPoint(
      LatLng.newBuilder().setLatitude(-6.195139).setLongitude(106.820826)))
  .setTaskDuration(
    Duration.newBuilder().setSeconds(2 * 60))
  .setTargetTimeWindow(
    TimeWindow.newBuilder()
      .setStartTime(Timestamp.newBuilder().setSeconds(1680123600))
      .setEndTime(Timestamp.newBuilder().setSeconds(1680130800)))
  .addAttributes(TaskAttribute.newBuilder().setKey("foo").setStringValue("value"))
  .addAttributes(TaskAttribute.newBuilder().setKey("bar").setNumberValue(10))
  .addAttributes(TaskAttribute.newBuilder().setKey("baz").setBoolValue(false))
  .build();

// Task request
CreateTaskRequest createTaskRequest =
  CreateTaskRequest.newBuilder()  // No need for the header
      .setParent(parent)          // Avoid using auto-incrementing IDs for the taskId
      .setTaskId("task-8241890")  // Task ID assigned by the Provider
      .setTask(task)              // Initial state
      .build();

// Error handling
// If Fleet Engine does not have task with that ID and the credentials of the
// requestor pass, the service creates the task successfully.

try {
  Task createdTask = deliveryService.createTask(createTaskRequest);
} catch (StatusRuntimeException e) {
  Status s = e.getStatus();
  switch (s.getCode()) {
     case ALREADY_EXISTS:
       break;
     case PERMISSION_DENIED:
       break;
  }
  return;
}
REST
To create a shipment delivery task from a server environment using gRPC or REST, make an HTTP REST call
to CreateTask:
`POST https://fleetengine.googleapis.com/v1/providers/<project_id>/tasks?taskId=<id>`
<id> is a unique identifier for the task. It must not be the tracking number for the shipment. If you don't have task IDs in your system, you may generate a universally unique identifier (UUID).
The request header must contain a field Authorization with the value Bearer <token>, where <token> is a token issued by a Fleet Engine token factory.
The request body must contain a Task entity:
Required fields:
Field Value type Type.DELIVERY state State.OPEN trackingId The number or identifier you are using to track a shipment. plannedLocation The location where the task is to be completed, in this case the delivery location for this shipment. taskDuration The expected time, in seconds, that it takes to drop off the shipment at the delivery location. Optional fields:
Field Value targetTimeWindow The time window during which the task should be completed. This does not affect routing behavior. attributes A list of custom Task attributes. Each attribute must have a unique key.
All other fields in the entity are ignored for creation. Fleet Engine throws
an exception if the request includes an assigned deliveryVehicleId. You assign
tasks using UpdateDeliveryVehicleRequest. For more information, see
Assign tasks to a vehicle and UpdateDeliveryVehicleRequest.
Example curl command:
# Set $JWT, $PROJECT_ID, $TRACKING_ID, and $TASK_ID in the local
# environment
curl -X POST "https://fleetengine.googleapis.com/v1/providers/${PROJECT_ID}/tasks?taskId=${TASK_ID}" \
  -H "Content-type: application/json" \
  -H "Authorization: Bearer ${JWT}" \
  --data-binary @- << EOM
{
  "type": "DELIVERY",
  "state": "OPEN",
  "trackingId": "${TRACKING_ID}",
  "plannedLocation": {
     "point": {
        "latitude": -6.195139,
        "longitude": 106.820826
     }
  },
  "taskDuration": "90s",
  "targetTimeWindow": {
    "startTime": "2023-03-29T21:00:00Z",
    "endTime": "2023-03-29T23:00:00Z"
  }
}
EOM
Batch Create Tasks
You can create a batch of tasks from a server environment using gRPC or REST.
gRPC
The following example shows how to use the Java gRPC library to create two tasks, one for a delivery and one for a pickup at the same location:
static final String PROJECT_ID = "my-delivery-co-gcp-project";

DeliveryServiceBlockingStub deliveryService =
  DeliveryServiceGrpc.newBlockingStub(channel);

// Delivery Task settings
Task deliveryTask = Task.newBuilder()
  .setType(Task.Type.DELIVERY)
  .setState(Task.State.OPEN)
  .setTrackingId("delivery-tracking-id")
  .setPlannedLocation(               // Grand Indonesia East Mall
    LocationInfo.newBuilder().setPoint(
      LatLng.newBuilder().setLatitude(-6.195139).setLongitude(106.820826)))
  .setTaskDuration(
    Duration.newBuilder().setSeconds(2 * 60))
  .build();

// Delivery Task request
CreateTaskRequest createDeliveryTaskRequest =
  CreateTaskRequest.newBuilder()  // No need for the header or parent fields
      .setTaskId("task-8312508")  // Task ID assigned by the Provider
      .setTask(deliveryTask)      // Initial state
      .build();

// Pickup Task settings
Task pickupTask = Task.newBuilder()
  .setType(Task.Type.PICKUP)
  .setState(Task.State.OPEN)
  .setTrackingId("pickup-tracking-id")
  .setPlannedLocation(               // Grand Indonesia East Mall
    LocationInfo.newBuilder().setPoint(
      LatLng.newBuilder().setLatitude(-6.195139).setLongitude(106.820826)))
  .setTaskDuration(
    Duration.newBuilder().setSeconds(2 * 60))
  .build();

// Pickup Task request
CreateTaskRequest createPickupTaskRequest =
  CreateTaskRequest.newBuilder()  // No need for the header or parent fields
      .setTaskId("task-8241890")  // Task ID assigned by the Provider
      .setTask(pickupTask)        // Initial state
      .build();

// Batch Create Tasks settings
String parent = "providers/" + PROJECT_ID;

// Batch Create Tasks request
BatchCreateTasksRequest batchCreateTasksRequest =
  BatchCreateTasksRequest.newBuilder()
      .setParent(parent)
      .addRequests(createDeliveryTaskRequest)
      .addRequests(createPickupTaskRequest)
      .build();

// Error handling
// If Fleet Engine does not have any task(s) with these task ID(s) and the
// credentials of the requestor pass, the service creates the task(s)
// successfully.

try {
  BatchCreateTasksResponse createdTasks = deliveryService.batchCreateTasks(
    batchCreateTasksRequest);
} catch (StatusRuntimeException e) {
  Status s = e.getStatus();
  switch (s.getCode()) {
     case ALREADY_EXISTS:
       break;
     case PERMISSION_DENIED:
       break;
  }
  return;
}
REST
To create a delivery and a pickup task from a server environment, make an
HTTP REST call to BatchCreateTasks:
POST https://fleetengine.googleapis.com/v1/providers/<project_id>/tasks:batchCreate
The request header must contain a field Authorization with the value Bearer <token>, where <token> is a token issued by a Fleet Engine token factory.
The request body must contain a BatchCreateTasksRequest entity:
Required fields:
Field Value requests Array< CreateTasksRequest>Optional fields:
Field Value header `DeliveryRequestHeader`
Each CreateTasksRequest element in requests must pass the same validation
rules as a CreateTask request, with the exception that the parent
and header fields are optional. If set, they must be identical to
their respective fields at the top level BatchCreateTasksRequest. See
create a shipment pickup task and
create a shipment delivery task
for specific validation rules for each.
For more information see the API Reference documentation for BatchCreateTasks
(gRPC, REST).
Example curl command:
# Set $JWT, $PROJECT_ID, $DELIVERY_TRACKING_ID, $DELIVERY_TASK_ID,
# $PICKUP_TRACKING_ID, and $PICKUP_TASK_ID in the local environment
curl -X POST "https://fleetengine.googleapis.com/v1/providers/${PROJECT_ID}/tasks:batchCreate" \
  -H "Content-type: application/json" \
  -H "Authorization: Bearer ${JWT}" \
  --data-binary @- << EOM
{
  "requests" : [
    {
      "taskId": "${DELIVERY_TASK_ID}",
      "task" : {
        "type": "DELIVERY",
        "state": "OPEN",
        "trackingId": "${DELIVERY_TRACKING_ID}",
        "plannedLocation": {
          "point": {
              "latitude": -6.195139,
              "longitude": 106.820826
          }
        },
        "taskDuration": "90s"
      }
    },
    {
      "taskId": "${PICKUP_TASK_ID}",
      "task" : {
        "type": "PICKUP",
        "state": "OPEN",
        "trackingId": "${PICKUP_TRACKING_ID}",
        "plannedLocation": {
          "point": {
              "latitude": -6.195139,
              "longitude": 106.820826
          }
        },
        "taskDuration": "90s"
      }
    }
  ]
}
EOM
Scheduled unavailability
You can create a task indicating unavailability (for example, for driver breaks or vehicle refueling) either from the Driver SDK, or from a server environment using gRPC or REST. A scheduled unavailability task must not include a tracking ID. You may optionally provide a location.
gRPC
The following example shows how to use the Java gRPC library to create an unavailability task:
    static final String PROJECT_ID = "my-delivery-co-gcp-project";

    DeliveryServiceBlockingStub deliveryService =
      DeliveryServiceGrpc.newBlockingStub(channel);

    // Task settings
    String parent = "providers/" + PROJECT_ID;
    Task task = Task.newBuilder()
      .setType(Task.Type.UNAVAILABLE)
      .setState(Task.State.OPEN)
      .setTaskDuration(
        Duration.newBuilder().setSeconds(60 * 60))  // 1hr break
      .build();

    // Task request
    CreateTaskRequest createTaskRequest =
      CreateTaskRequest.newBuilder()  // No need for the header
          .setParent(parent)          // Avoid using auto-incrementing IDs for the taskId
          .setTaskId("task-8241890")  // Task ID assigned by the Provider
          .setTask(task)              // Initial state
          .build();

    // Error handling
    // If Fleet Engine does not have task with that ID and the credentials of the
    // requestor pass, the service creates the task successfully.

    try {
      Task createdTask = deliveryService.createTask(createTaskRequest);
    } catch (StatusRuntimeException e) {
      Status s = e.getStatus();
      switch (s.getCode()) {
         case ALREADY_EXISTS:
           break;
         case PERMISSION_DENIED:
           break;
      }
      return;
    }
REST
To create an unavailability task from a server environment, make an HTTP REST call
to CreateTask:
`POST https://fleetengine.googleapis.com/v1/providers/<project_id>/tasks?taskId=<id>`
<id> is a unique identifier for the task. If you don't have task IDs in your system, you may generate a universally unique identifier (UUID).
The request header must contain a field Authorization with the value Bearer <token>, where <token> is a token issued by a Fleet Engine token factory.
The request body must contain a Task entity:
Required fields:
Field Value type Type.UNAVAILABLE state State.OPEN taskDuration The length of the break in seconds. Optional fields:
Field Value plannedLocation The location of the break if it must be taken at a specific location.
All other fields in the entity are ignored for creation. Fleet Engine throws
an exception if the request includes an assigned deliveryVehicleId. You assign
tasks using UpdateDeliveryVehicleRequest. For more information, see
Assign tasks to a vehicle and UpdateDeliveryVehicleRequest.
Example curl command:
    # Set $JWT, $PROJECT_ID, and $TASK_ID in the local environment
    curl -X POST "https://fleetengine.googleapis.com/v1/providers/${PROJECT_ID}/tasks?taskId=${TASK_ID}" \
      -H "Content-type: application/json" \
      -H "Authorization: Bearer ${JWT}" \
      --data-binary @- << EOM
    {
      "type": "UNAVAILABLE",
      "state": "OPEN",
      "plannedLocation": {
         "point": {
            "latitude": -6.195139,
            "longitude": 106.820826
         }
      },
      "taskDuration": "300s"
    }
    EOM
Scheduled stops
You can create a scheduled stop task either from the Driver SDK, or from a server environment using gRPC or REST. A scheduled stop task may not include a tracking ID.
gRPC
The following example shows how to use the Java gRPC library to create a scheduled stop task:
static final String PROJECT_ID = "my-delivery-co-gcp-project";

DeliveryServiceBlockingStub deliveryService =
  DeliveryServiceGrpc.newBlockingStub(channel);

// Task settings
String parent = "providers/" + PROJECT_ID;
Task task = Task.newBuilder()
  .setType(Task.Type.SCHEDULED_STOP)
  .setState(Task.State.OPEN)
  .setPlannedLocation(               // Grand Indonesia East Mall
    LocationInfo.newBuilder().setPoint(
      LatLng.newBuilder().setLatitude(-6.195139).setLongitude(106.820826)))
  .setTaskDuration(
    Duration.newBuilder().setSeconds(2 * 60))
  .build();

// Task request
CreateTaskRequest createTaskRequest =
  CreateTaskRequest.newBuilder()  // No need for the header
      .setParent(parent)
      .setTaskId("task-8241890")  // Task ID assigned by the Provider
      .setTrip(task)              // Initial state
      .build();

// Error handling
// If Fleet Engine does not have task with that ID and the credentials of the
// requestor pass, the service creates the task successfully.

try {
  Task createdTask = deliveryService.createTask(createTaskRequest);
} catch (StatusRuntimeException e) {
  Status s = e.getStatus();
  switch (s.getCode()) {
     case ALREADY_EXISTS:
       break;
     case PERMISSION_DENIED:
       break;
  }
  return;
}
REST
To create a scheduled stop task from a server environment, make an HTTP REST call
to CreateTask:
`POST https://fleetengine.googleapis.com/v1/providers/<project_id>/tasks?taskId=<id>`
<id> is a unique identifier for the task. If you don't have task IDs in your system, you may generate a universally unique identifier (UUID).
The request header must contain a field Authorization with the value Bearer <token>, where <token> is a token issued by a Fleet Engine token factory.
The request body must contain a Task entity:
Required fields:
Field Value type Type.SCHEDULED_STOP state State.OPEN plannedLocation The location of the stop. taskDuration The anticipated length of the stop in seconds. Optional fields:
- None
All other fields in the entity are ignored for creation. Fleet Engine throws
an exception if the request includes an assigned deliveryVehicleId. You assign
tasks using UpdateDeliveryVehicleRequest. For more information, see
Assign tasks to a vehicle and UpdateDeliveryVehicleRequest.
Example curl command:
    # Set $JWT, $PROJECT_ID, and $TASK_ID in the local environment
    curl -X POST "https://fleetengine.googleapis.com/v1/providers/${PROJECT_ID}/tasks?taskId=${TASK_ID}" \
      -H "Content-type: application/json" \
      -H "Authorization: Bearer ${JWT}" \
      --data-binary @- << EOM
    {
      "type": "SCHEDULED_STOP",
      "state": "OPEN",
      "plannedLocation": {
         "point": {
            "latitude": -6.195139,
            "longitude": 106.820826
         }
      },
      "taskDuration": "600s"
    }
    EOM
Set target time window
The target time window is the TimeWindow during which the task should be completed. For example, if you communicate a delivery time window to delivery recipients, you can use the task target time window to capture this time window and generate alerts or analyze post trip performance using the field.
The target time window consists of a start time and an end time and can be set on any task type. The target time window does not affect routing behavior.
gRPC
The following example shows how to use the Java gRPC library to set a task time window:
    static final String PROJECT_ID = "my-delivery-co-gcp-project";
    static final String TASK_ID = "task-8241890";

    DeliveryServiceBlockingStub deliveryService =
      DeliveryServiceGrpc.newBlockingStub(channel);

    // Task settings
    String taskName = "providers/" + PROJECT_ID + "/tasks/" + TASK_ID;
    Task task = Task.newBuilder()
      .setName(taskName)
      .setTargetTimeWindow(
        TimeWindow.newBuilder()
          .setStartTime(Timestamp.newBuilder().setSeconds(1680123600))
          .setEndTime(Timestamp.newBuilder().setSeconds(1680130800)))
      .build();

    // Task request
    UpdateTaskRequest updateTaskRequest =
      UpdateTaskRequest.newBuilder()  // No need for the header
          .setTask(task)
          .setUpdateMask(FieldMask.newBuilder().addPaths("targetTimeWindow"))
          .build();

    try {
      Task updatedTask = deliveryService.updateTask(updateTaskRequest);
    } catch (StatusRuntimeException e) {
      Status s = e.getStatus();
      switch (s.getCode()) {
         case NOT_FOUND:
           break;
         case PERMISSION_DENIED:
           break;
      }
      return;
    }
REST
To set a task time window using HTTP, call UpdateTask:
`PATCH https://fleetengine.googleapis.com/v1/providers/<project_id>/tasks/<id>?updateMask=targetTimeWindow`
<id> is a unique identifier for the task.
The request header must contain a field Authorization with the value Bearer <token>, where <token> is a token issued by a Fleet Engine token factory.
The request body must contain a Task entity:
Required fields:
Field Value targetTimeWindow The time window during which the task should be completed. This setting does not affect routing behavior Optional fields:
- None
All other fields in the entity are ignored for the update.
Example curl command:
# Set JWT, PROJECT_ID, and TASK_ID in the local environment
curl -X PATCH "https://fleetengine.googleapis.com/v1/providers/${PROJECT_ID}/tasks/${TASK_ID}?updateMask=targetTimeWindow" \
  -H "Content-type: application/json" \
  -H "Authorization: Bearer ${JWT}" \
  --data-binary @- << EOM
{
  "targetTimeWindow": {
    "startTime": "2023-03-29T21:00:00Z",
    "endTime": "2023-03-29T23:00:00Z"
  }
}
EOM
Set task tracking visibility config
The visibility of data in the Shipment Tracking library and of that data
returned from a call to GetTaskTrackingInfo can be controlled on a per task
basis by setting a
TaskTrackingViewConfig
on the task. See
Active vehicle tasks
for more information. This can be done when either creating or updating the
task. The following is an example of updating the task with this config:
gRPC
The following example shows how to use the Java gRPC library to set the task tracking view config:
static final String PROJECT_ID = "my-delivery-co-gcp-project";
static final String TASK_ID = "task-8241890";

DeliveryServiceBlockingStub deliveryService =
  DeliveryServiceGrpc.newBlockingStub(channel);

// Task settings
String taskName = "providers/" + PROJECT_ID + "/tasks/" + TASK_ID;
Task task = Task.newBuilder()
  .setName(taskName)
  .setTaskTrackingViewConfig(
    TaskTrackingViewConfig.newBuilder()
      .setRoutePolylinePointsVisibility(
        VisibilityOption.newBuilder().setRemainingStopCountThreshold(3))
      .setEstimatedArrivalTimeVisibility(
        VisibilityOption.newBuilder().remainingDrivingDistanceMetersThreshold(5000))
      .setRemainingStopCountVisibility(
        VisibilityOption.newBuilder().setNever(true)))
  .build();

// Task request
UpdateTaskRequest updateTaskRequest =
  UpdateTaskRequest.newBuilder()  // No need for the header
      .setTask(task)
      .setUpdateMask(FieldMask.newBuilder().addPaths("taskTrackingViewConfig"))
      .build();

try {
  Task updatedTask = deliveryService.updateTask(updateTaskRequest);
} catch (StatusRuntimeException e) {
  Status s = e.getStatus();
  switch (s.getCode()) {
      case NOT_FOUND:
        break;
      case PERMISSION_DENIED:
        break;
  }
  return;
}
REST
To set the task tracking view config window using HTTP, call UpdateTask:
`PATCH https://fleetengine.googleapis.com/v1/providers/<project_id>/tasks/<id>?updateMask=taskTrackingViewConfig`
<id> is a unique identifier for the task.
The request header must contain a field Authorization with the value Bearer <token>, where <token> is a token issued by a Fleet Engine token factory.
The request body must contain a Task entity:
Required fields:
Field Value taskTrackingViewConfig The configuration for task tracking that specifies which data elements are visible to the end users under what circumstances. Optional fields:
- None
All other fields in the entity are ignored for the update.
Example curl command:
# Set JWT, PROJECT_ID, and TASK_ID in the local environment
curl -X PATCH "https://fleetengine.googleapis.com/v1/providers/${PROJECT_ID}/tasks/${TASK_ID}?updateMask=taskTrackingViewConfig" \
  -H "Content-type: application/json" \
  -H "Authorization: Bearer ${JWT}" \
  --data-binary @- << EOM
{
  "taskTrackingViewConfig": {
    "routePolylinePointsVisibility": {
      "remainingStopCountThreshold": 3
    },
    "estimatedArrivalTimeVisibility": {
      "remainingDrivingDistanceMetersThreshold": 5000
    },
    "remainingStopCountVisibility": {
      "never": true
    }
  }
}
EOM
Assign tasks to a vehicle
You assign tasks to a delivery vehicle by updating the task ordering for the vehicle. The task ordering for a vehicle is determined by the list of vehicle stops for the delivery vehicle, and you can assign one or more tasks to each vehicle stop. For details, see Update the task ordering.
To change a shipment from one vehicle to another, close the original task and then recreate it before assigning it the new vehicle. If you update the task ordering for a task that is already assigned to a different vehicle, you get an error.
Update task ordering
You can update the order tasks assigned to a vehicle are performed from either the Driver SDK, or the server environment. Don't use both methods to avoid race conditions and maintain a single source of truth.
When you update the task ordering for a vehicle, it also does the following:
- Assigns tasks that are new to the vehicle.
- Closes any tasks that were previously assigned to the vehicle, but aren't in the updated ordering.
To change a shipment from one vehicle to another, close the original task and then recreate it before assigning it the new vehicle. If you update the task ordering for a task that is already assigned to a different vehicle, you get an error.
You can update task ordering at any time.
gRPC
The following example shows how to use the Java gRPC library to update the task ordering for the vehicle:
static final String PROJECT_ID = "my-delivery-co-gcp-project";
static final String VEHICLE_ID = "vehicle-8241890";
static final String TASK1_ID = "task-756390";
static final String TASK2_ID = "task-849263";

DeliveryServiceBlockingStub deliveryService =
  DeliveryServiceGrpc.newBlockingStub(channel);

// Vehicle settings
String vehicleName = "providers/" + PROJECT_ID + "/deliveryVehicles/" + VEHICLE_ID;
DeliveryVehicle deliveryVehicle = DeliveryVehicle.newBuilder()
    .addRemainingVehicleJourneySegments(VehicleJourneySegment.newBuilder()  // 1st stop
       .setStop(VehicleStop.newBuilder()
           .setPlannedLocation(LocationInfo.newBuilder()
               .setPoint(LatLng.newBuilder()
                   .setLatitude(37.7749)
                   .setLongitude(122.4194)))
           .addTasks(TaskInfo.newBuilder().setTaskId(TASK1_ID))
           .setState(VehicleStop.State.NEW)))
    .addRemainingVehicleJourneySegments(VehicleJourneySegment.newBuilder()  // 2nd stop
       .setStop(VehicleStop.newBuilder()
           .setPlannedLocation(LocationInfo.newBuilder()
               .setPoint(LatLng.newBuilder()
                   .setLatitude(37.3382)
                   .setLongitude(121.8863)))
           .addTasks(TaskInfo.newBuilder().setTaskId(TASK2_ID))
           .setState(VehicleStop.State.NEW)))
    .build();

// DeliveryVehicle request
UpdateDeliveryVehicleRequest updateDeliveryRequest =
  UpdateDeliveryVehicleRequest.newBuilder()  // No need for the header
      .setName(vehicleName)
      .setDeliveryVehicle(deliveryVehicle)
      .setUpdateMask(FieldMask.newBuilder().addPaths("remaining_vehicle_journey_segments"))
      .build();

try {
  DeliveryVehicle updatedDeliveryVehicle =
      deliveryService.updateDeliveryVehicle(updateDeliveryVehicleRequest);
} catch (StatusRuntimeException e) {
  Status s = e.getStatus();
  switch (s.getCode()) {
     case NOT_FOUND:
       break;
     case PERMISSION_DENIED:
       break;
  }
  return;
}
REST
To update the task ordering for a vehicle from a server environment, make an HTTP REST call
to UpdateDeliveryVehicle:
`PATCH https://fleetengine.googleapis.com/v1/providers/<project_id>/deliveryVehicles/<id>?updateMask=remainingVehicleJourneySegments`
<id> is a unique identifier for a delivery vehicle in your fleet for which you intend to update the task ordering. It is the identifier that you specified when creating the vehicle.
The request header must contain a field Authorization with the value Bearer <token>, where <token> is a token issued by a Fleet Engine token factory.
The request body must contain a DeliveryVehicle entity:
Required fields:
Field Value remainingVehicleJourneySegments A list of journey segments for tasks in the order they should be executed. The first task in the list is executed first. remainingVehicleJourneySegments[i].stop The stop for task i in the list. remainingVehicleJourneySegments[i].stop.plannedLocation The planned location for the stop. remainingVehicleJourneySegments[i].stop.tasks A list of tasks to be performed at this vehicle stop. remainingVehicleJourneySegments[i].stop.state State.NEW Optional fields:
- None
All other fields in the entity are ignored for the update.
Example curl command:
# Set JWT, PROJECT_ID, VEHICLE_ID, TASK1_ID, and TASK2_ID in the local
# environment
curl -X PATCH "https://fleetengine.googleapis.com/v1/providers/${PROJECT_ID}/deliveryVehicles/${VEHICLE_ID}?updateMask=remainingVehicleJourneySegments" \
  -H "Content-type: application/json" \
  -H "Authorization: Bearer ${JWT}" \
  --data-binary @- << EOM
{
  "remainingVehicleJourneySegments": [
    {
      "stop": {
        "state": "NEW",
        "plannedLocation": {
          "point": {
            "latitude": 37.7749,
            "longitude": -122.084061
          }
        },
        "tasks": [
          {
            "taskId": "${TASK1_ID}"
          }
        ]
      }
    },
    {
      "stop": {
        "state": "NEW",
        "plannedLocation": {
          "point": {
            "latitude": 37.3382,
            "longitude": 121.8863
          }
        },
        "tasks": [
          {
            "taskId": "${TASK2_ID}"
          }
        ]
      }
    }
  ]
}
EOM
Vehicle is enroute to the next stop
Fleet Engine must be notified when a vehicle departs from a stop or begins navigation. You can notify Fleet Engine either from the Driver SDK, or from a server environment using gRPC or REST. Don't use both methods to avoid race conditions and to maintain a single source of truth.
gRPC
The following example shows how to use the Java gRPC library to notify Fleet Engine that a vehicle is enroute to its next stop.
    static final String PROJECT_ID = "my-delivery-co-gcp-project";
    static final String VEHICLE_ID = "vehicle-8241890";

    DeliveryServiceBlockingStub deliveryService =
      DeliveryServiceGrpc.newBlockingStub(channel);

    // Vehicle settings
    DeliveryVehicle deliveryVehicle = DeliveryVehicle.newBuilder()
        // Next stop marked as ENROUTE
        .addRemainingVehicleJourneySegments(VehicleJourneySegment.newBuilder()  // 1st stop
           .setStop(VehicleStop.newBuilder()
               .setPlannedLocation(LocationInfo.newBuilder()
                   .setPoint(LatLng.newBuilder()
                       .setLatitude(37.7749)
                       .setLongitude(122.4194)))
               .addTasks(TaskInfo.newBuilder().setTaskId(TASK1_ID))
               .setState(VehicleStop.State.ENROUTE)))
        // All other stops marked as NEW
        .addRemainingVehicleJourneySegments(VehicleJourneySegment.newBuilder()  // 2nd stop
           .setStop(VehicleStop.newBuilder()
               .setPlannedLocation(LocationInfo.newBuilder()
                   .setPoint(LatLng.newBuilder()
                       .setLatitude(37.3382)
                       .setLongitude(121.8863)))
               .addTasks(TaskInfo.newBuilder().setTaskId(TASK2_ID))
               .setState(VehicleStop.State.NEW)))
        .build();

    // DeliveryVehicle request
    UpdateDeliveryVehicleRequest updateDeliveryVehicleRequest =
      UpdateDeliveryVehicleRequest.newBuilder()  // No need for the header
          .setName(vehicleName)
          .setDeliveryVehicle(deliveryVehicle)
          .setUpdateMask(FieldMask.newBuilder().addPaths("remaining_vehicle_journey_segments"))
          .build();

    try {
      DeliveryVehicle updatedDeliveryVehicle =
          deliveryService.updateDeliveryVehicle(updateDeliveryVehicleRequest);
    } catch (StatusRuntimeException e) {
      Status s = e.getStatus();
      switch (s.getCode()) {
         case NOT_FOUND:
           break;
         case PERMISSION_DENIED:
           break;
      }
      return;
    }
REST
To notify Fleet Engine that a vehicle is enroute to its next stop from a
server environment, make an HTTP REST call to UpdateDeliveryVehicle:
`PATCH https://fleetengine.googleapis.com/v1/providers/<project_id>/deliveryVehicles/<id>?updateMask=remainingVehicleJourneySegments`
<id> is a unique identifier for the delivery vehicle in your fleet for which you intend to update the task ordering. It is the identifier that you specified when creating the vehicle.
The request header must contain a field Authorization with the value Bearer <token>, where <token> is a token issued by a Fleet Engine token factory.
The request body must contain a DeliveryVehicle entity:
Required field:
Field Value remainingVehicleJourneySegments List of remaining vehicle stops with their states marked as State.NEW. The first stop on the list must have its state marked as State.ENROUTE. Optional fields:
- None
All other fields in the entity are ignored for the notification.
Example curl command:
# Set JWT, PROJECT_ID, VEHICLE_ID, TASK1_ID, and TASK2_ID in the local
# environment
curl -X PATCH "https://fleetengine.googleapis.com/v1/providers/${PROJECT_ID}/deliveryVehicles/${VEHICLE_ID}?updateMask=remainingVehicleJourneySegments" \
  -H "Content-type: application/json" \
  -H "Authorization: Bearer ${JWT}" \
  --data-binary @- << EOM
{
  "remainingVehicleJourneySegments": [
    {
      "stop": {
        "state": "ENROUTE",
        "plannedLocation": {
          "point": {
            "latitude": 37.7749,
            "longitude": -122.084061
          }
        },
        "tasks": [
          {
            "taskId": "${TASK1_ID}"
          }
        ]
      }
    },
    {
      "stop": {
        "state": "NEW",
        "plannedLocation": {
          "point": {
            "latitude": 37.3382,
            "longitude": 121.8863
          }
        },
        "tasks": [
          {
            "taskId": "${TASK2_ID}"
          }
        ]
      }
    }
  ]
}
EOM
Update vehicle location
If not using the Driver SDK to update the vehicle's location, you can make a direct call to Fleet Engine with the vehicle's location. For any active vehicle, Fleet Engine expects a location update at least once every minute and at most once every 5 seconds.
gRPC
The following example shows how to use the Java gRPC library to update a vehicle's location in Fleet Engine:
static final String PROJECT_ID = "my-delivery-co-gcp-project";
static final String VEHICLE_ID = "vehicle-8241890";

DeliveryServiceBlockingStub deliveryService =
  DeliveryServiceGrpc.newBlockingStub(channel);

// Vehicle settings
String vehicleName = "providers/" + PROJECT_ID + "/deliveryVehicles/" + VEHICLE_ID;
DeliveryVehicle myDeliveryVehicle = DeliveryVehicle.newBuilder()
    .setLastLocation(DeliveryVehicleLocation.newBuilder()
        .setSupplementalLocation(LatLng.newBuilder()
            .setLatitude(37.3382)
            .setLongitude(121.8863))
        .setSupplementalLocationTime(now())
        .setSupplementalLocationSensor(DeliveryVehicleLocationSensor.CUSTOMER_SUPPLIED_LOCATION)
        .setSupplementalLocationAccuracy(DoubleValue.of(15.0)))  // Optional
    .build();

// DeliveryVehicle request
UpdateDeliveryVehicleRequest updateDeliveryVehicleRequest =
  UpdateDeliveryVehicleRequest.newBuilder()  // No need for the header
      .setName(vehicleName)
      .setDeliveryVehicle(myDeliveryVehicle)
      .setUpdateMask(FieldMask.newBuilder()
          .addPaths("last_location"))
      .build();

try {
  DeliveryVehicle updatedDeliveryVehicle =
      deliveryService.updateDeliveryVehicle(updateDeliveryVehicleRequest);
} catch (StatusRuntimeException e) {
  Status s = e.getStatus();
  switch (s.getCode()) {
     case NOT_FOUND:
       break;
     case PERMISSION_DENIED:
       break;
  }
  return;
}
REST
To update a vehicle's location in Fleet Engine using HTTP REST, make a call to
UpdateDeliveryVehicle:
`PATCH https://fleetengine.googleapis.com/v1/providers/<project_id>/deliveryVehicles/<id>?updateMask=last_location`
<id> is a unique identifier for the delivery vehicle in your fleet or which you intend to update the location. It is the identifier that you specified when creating the vehicle.
The request header must contain a field Authorization with the value Bearer <token>, where <token> is a token issued by a Fleet Engine token factory.
The request body must contain a DeliveryVehicle entity:
Required field:
Field Value lastLocation.supplementalLocation The location of the vehicle. lastLocation.supplementalLocationTime The last known timestamp the vehicle was at this location. lastLocation.supplementalLocationSensor Should be populated with CUSTOMER_SUPPLIED_LOCATION. Optional fields:
Field Value lastLocation.supplementalLocationAccuracy Accuracy of the supplied location, in meters.
Example curl command:
# Set JWT, PROJECT_ID, VEHICLE_ID, TASK1_ID, and TASK2_ID in the local
# environment
curl -X PATCH "https://fleetengine.googleapis.com/v1/providers/${PROJECT_ID}/deliveryVehicles/${VEHICLE_ID}?updateMask=remainingVehicleJourneySegments" \
  -H "Content-type: application/json" \
  -H "Authorization: Bearer ${JWT}" \
  --data-binary @- << EOM
{
  "lastLocation": {
    "supplementalLocation": {"latitude": 12.1, "longitude": 14.5},
    "supplementalLocationTime": "$(date -u --iso-8601=seconds)",
    "supplementalLocationSensor": "CUSTOMER_SUPPLIED_LOCATION",
    "supplementalLocationAccuracy": 15
  }
}
EOM
Vehicle arrives at a stop
Fleet Engine must be notified when a vehicle arrives at a stop. You can notify Fleet Engine either from the Driver SDK, or from a server environment using gRPC or REST. Don't use both methods to avoid race conditions and to maintain a single source of truth.
gRPC
The following example shows how to use the Java gRPC library to notify Fleet Engine that a vehicle arrived at a stop:
static final String PROJECT_ID = "my-delivery-co-gcp-project";
static final String VEHICLE_ID = "vehicle-8241890";

DeliveryServiceBlockingStub deliveryService =
  DeliveryServiceGrpc.newBlockingStub(channel);

// Vehicle settings
String vehicleName = "providers/" + PROJECT_ID + "/deliveryVehicles/" + VEHICLE_ID;
DeliveryVehicle deliveryVehicle = DeliveryVehicle.newBuilder()
    // Marking the arrival at stop.
    .addRemainingVehicleJourneySegments(VehicleJourneySegment.newBuilder()
       .setStop(VehicleStop.newBuilder()
           .setPlannedLocation(LocationInfo.newBuilder()
               .setPoint(LatLng.newBuilder()
                   .setLatitude(37.7749)
                   .setLongitude(122.4194)))
           .addTasks(TaskInfo.newBuilder().setTaskId(TASK1_ID))
           .setState(VehicleStop.State.ARRIVED)))
    // All other remaining stops marked as NEW.
    .addRemainingVehicleJourneySegments(VehicleJourneySegment.newBuilder()  // 2nd stop
       .setStop(VehicleStop.newBuilder()
           .setPlannedLocation(LocationInfo.newBuilder()
               .setPoint(LatLng.newBuilder()
                   .setLatitude(37.3382)
                   .setLongitude(121.8863)))
           .addTasks(TaskInfo.newBuilder().setTaskId(TASK2_ID))
           .setState(VehicleStop.State.NEW))) // Remaining stops must be NEW.
    .build();

// DeliveryVehicle request
UpdateDeliveryVehicleRequest updateDeliveryVehicleRequest =
  UpdateDeliveryVehicleRequest.newBuilder()  // No need for the header
      .setName(vehicleName)
      .setDeliveryVehicle(deliveryVehicle)
      .setUpdateMask(FieldMask.newBuilder()
          .addPaths("remaining_vehicle_journey_segments"))
      .build();

try {
  DeliveryVehicle updatedDeliveryVehicle =
      deliveryService.updateDeliveryVehicle(updateDeliveryVehicleRequest);
} catch (StatusRuntimeException e) {
  Status s = e.getStatus();
  switch (s.getCode()) {
     case NOT_FOUND:
       break;
     case PERMISSION_DENIED:
       break;
  }
  return;
}
REST
To notify Fleet Engine about the arrival of a vehicle at a stop from a server environment,
make an HTTP REST call to UpdateDeliveryVehicle:
`PATCH https://fleetengine.googleapis.com/v1/providers/<project_id>/deliveryVehicles/<id>?updateMask=remainingVehicleJourneySegments`
<id> is a unique identifier for the delivery vehicle in your fleet for which you intend to update the task ordering. It is the identifier that you specified when creating the vehicle.
The request header must contain a field Authorization with the value Bearer <token>, where <token> is a token issued by a Fleet Engine token factory.
The request body must contain a DeliveryVehicle entity:
Required fields:
Field Value remainingVehicleJourneySegments The stop you have arrived at with its state set as State.ARRIVED, followed by a list of remaining vehicle stops with their states marked as State.NEW. Optional fields:
- None
All other fields in the entity are ignored for the update.
Example curl command:
# Set JWT, PROJECT_ID, VEHICLE_ID, TASK1_ID, and TASK2_ID in the local
# environment
curl -X PATCH "https://fleetengine.googleapis.com/v1/providers/${PROJECT_ID}/deliveryVehicles/${VEHICLE_ID}?updateMask=remainingVehicleJourneySegments" \
  -H "Content-type: application/json" \
  -H "Authorization: Bearer ${JWT}" \
  --data-binary @- << EOM
{
  "remainingVehicleJourneySegments": [
    {
      "stop": {
        "state": "ARRIVED",
        "plannedLocation": {
          "point": {
            "latitude": 37.7749,
            "longitude": -122.084061
          }
        },
        "tasks": [
          {
            "taskId": "${TASK1_ID}"
          }
        ]
      }
    },
    {
      "stop": {
        "state": "NEW",
        "plannedLocation": {
          "point": {
            "latitude": 37.3382,
            "longitude": 121.8863
          }
        },
        "tasks": [
          {
            "taskId": "${TASK2_ID}"
          }
        ]
      }
    }
  ]
}
EOM
Vehicle completes a stop
Fleet Engine must be notified when a vehicle completes a stop. This causes all tasks associated with the stop to be set to a CLOSED state. You can notify Fleet Engine either from the Driver SDK, or from a server environment using gRPC or REST. Don't use both methods to avoid race conditions and to maintain a single source of truth.
gRPC
The following example shows how to use the Java gRPC library to notify Fleet Engine that a vehicle has completed a stop.
static final String PROJECT_ID = "my-delivery-co-gcp-project";
static final String VEHICLE_ID = "vehicle-8241890";

DeliveryServiceBlockingStub deliveryService =
  DeliveryServiceGrpc.newBlockingStub(channel);

// Vehicle settings
String vehicleName = "providers/" + PROJECT_ID + "/deliveryVehicles/" + VEHICLE_ID;
DeliveryVehicle deliveryVehicle = DeliveryVehicle.newBuilder()
    // This stop has been completed and is commented out to indicate it
    // should be removed from the list of vehicle journey segments.
    // .addRemainingVehicleJourneySegments(VehicleJourneySegment.newBuilder()
    //    .setStop(VehicleStop.newBuilder()
    //        .setPlannedLocation(LocationInfo.newBuilder()
    //            .setPoint(LatLng.newBuilder()
    //                .setLatitude(37.7749)
    //                .setLongitude(122.4194)))
    //        .addTasks(TaskInfo.newBuilder().setTaskId(TASK1_ID))
    //        .setState(VehicleStop.State.ARRIVED)))
    // All other remaining stops marked as NEW.
    // The next stop could be marked as ENROUTE if the vehicle has begun
    // its journey to the next stop.
    .addRemainingVehicleJourneySegments(VehicleJourneySegment.newBuilder()  // Next stop
       .setStop(VehicleStop.newBuilder()
           .setPlannedLocation(LocationInfo.newBuilder()
               .setPoint(LatLng.newBuilder()
                   .setLatitude(37.3382)
                   .setLongitude(121.8863)))
           .addTasks(TaskInfo.newBuilder().setTaskId(TASK2_ID))
           .setState(VehicleStop.State.NEW)))
    .build();

// DeliveryVehicle request
UpdateDeliveryVehicleRequest updateDeliveryVehicleRequest =
  UpdateDeliveryVehicleRequest.newBuilder()  // no need for the header
      .setName(vehicleName)
      .setDeliveryVehicle(deliveryVehicle)
      .setUpdateMask(FieldMask.newBuilder()
          .addPaths("remaining_vehicle_journey_segments"))
      .build();

try {
  DeliveryVehicle updatedDeliveryVehicle =
      deliveryService.updateDeliveryVehicle(updateDeliveryVehicleRequest);
} catch (StatusRuntimeException e) {
  Status s = e.getStatus();
  switch (s.getCode()) {
     case NOT_FOUND:
       break;
     case PERMISSION_DENIED:
       break;
  }
  return;
}
REST
To notify Fleet Engine about the completion of a stop from a server environment,
make an HTTP REST call to UpdateDeliveryVehicle:
`PATCH https://fleetengine.googleapis.com/v1/providers/<project_id>/deliveryVehicles/<id>?updateMask=remaining_vehicle_journey_segments`
<id> is a unique identifier for the delivery vehicle in your fleet for which you intend to update the task ordering. It is the identifier that you specified when creating the vehicle.
The request header must contain a field Authorization with the value Bearer <token>, where <token> is a token issued by a Fleet Engine token factory.
The request body must contain a DeliveryVehicle entity:
Required fields:
Field Value remaining_vehicle_journey_segments The stop you have have completed should no longer be in the list of remaining vehicle stops. Optional fields:
- None
All other fields in the entity are ignored for the update.
Example curl command:
    # Set JWT, PROJECT_ID, VEHICLE_ID, TASK1_ID, and TASK2_ID in the local
    # environment
    curl -X PATCH "https://fleetengine.googleapis.com/v1/providers/${PROJECT_ID}/deliveryVehicles/${VEHICLE_ID}?updateMask=remainingVehicleJourneySegments" \
      -H "Content-type: application/json" \
      -H "Authorization: Bearer ${JWT}" \
      --data-binary @- << EOM
    {
      "remainingVehicleJourneySegments": [
        {
          "stop": {
            "state": "NEW",
            "plannedLocation": {
              "point": {
                "latitude": 37.3382,
                "longitude": 121.8863
              }
            },
            "tasks": [
              {
                "taskId": "${TASK2_ID}"
              }
            ]
          }
        }
      ]
    }
    EOM
Update a task
Most task fields are immutable. However, you can modify state, task outcome, task outcome time, task outcome location, and attributes by directly updating the task entity. For example, in cases where a task has not been assigned to a vehicle, you can close the task by updating the state directly.
gRPC
This is an example of updating a task through gRPC.
REST
This is an example of updating a task through REST.
Close a task
To close a task that has been assigned to a vehicle, either notify Fleet Engine that the vehicle has completed the stop where the task takes place or remove it from the list of vehicle stops. To do that you can set the list of the remaining vehicle stops just as when updating the task ordering for a vehicle.
If a task was not yet assigned a vehicle and needs to be closed, update the task to a CLOSED state. However, you may not reopen a CLOSED task.
Closing of a task does not indicate success or failure. It indicates that the task is no longer considered in progress. For fleet tracking, it is important to indicate the actual outcome of a task so that a delivery outcome can be shown.
gRPC
static final String PROJECT_ID = "my-delivery-co-gcp-project";
static final String TASK_ID = "task-8241890";

DeliveryServiceBlockingStub deliveryService =
  DeliveryServiceGrpc.newBlockingStub(channel);

// Task settings
String taskName = "providers/" + PROJECT_ID + "/tasks/" + TASK_ID;
Task task = Task.newBuilder()
  .setName(taskName)
  .setState(Task.State.CLOSED) // You can only directly CLOSE a
  .build();                    // task that is NOT assigned to a vehicle.

// Task request
UpdateTaskRequest updateTaskRequest =
  UpdateTaskRequest.newBuilder()  // No need for the header
      .setTask(task)
      .setUpdateMask(FieldMask.newBuilder().addPaths("state"))
      .build();

try {
  Task updatedTask = deliveryService.updateTask(updateTaskRequest);
} catch (StatusRuntimeException e) {
  Status s = e.getStatus();
  switch (s.getCode()) {
     case NOT_FOUND:
       break;
     case PERMISSION_DENIED:
       break;
  }
  return;
}
REST
To mark a task as closed from a server environment, make an HTTP REST call to
UpdateTask:
`PATCH https://fleetengine.googleapis.com/v1/providers/<project_id>/tasks/<id>?updateMask=state`
<id> is a unique identifier for the task.
Your request header must contain a field Authorization with the value Bearer <token>, where <token> is a token issued by a Fleet Engine token factory.
You must include a Task entity in the request body:
Required fields:
Field Value state State.CLOSED Optional fields:
Field Value taskOutcome Outcome.SUCCEEDED or Outcome.FAILED taskOutcomeTime The time when the task was completed. taskOutcomeLocation The location where the task was completed. Fleet Engine defaults this to the last vehicle location unless manually overridden by provider.
All other fields in the entity are ignored for the update.
Example curl command:
    # Set JWT, PROJECT_ID, and TASK_ID in the local environment
    curl -X PATCH "https://fleetengine.googleapis.com/v1/providers/${PROJECT_ID}/tasks/${TASK_ID}?updateMask=state,taskOutcome,taskOutcomeTime" \
      -H "Content-type: application/json" \
      -H "Authorization: Bearer ${JWT}" \
      --data-binary @- << EOM
    {
      "state": "CLOSED",
      "taskOutcome": "SUCCEEDED",
      "taskOutcomeTime": "$(date -u --iso-8601=seconds)"
    }
    EOM
Set the task outcome and outcome location
The closing of a task does not indicate success or failure, it indicates that the task is no longer considered in progress. For fleet tracking, it is important to indicate the actual outcome of a task so that a delivery outcome can be shown and there is proper billing for the services. Once set, you cannot change the task outcome. You can, however, modify the task outcome time and task outcome location after they have been set.
Tasks that are in the CLOSED state can have their outcome set to either SUCCEEDED or FAILED. Fleet Engine charges only delivery tasks with a state of SUCCEEDED.
When marking the outcome of a task, Fleet Engine automatically fills in the task outcome location with the last known vehicle location. You can override this behavior.
gRPC
You have the option to set the task outcome location when you set the outcome. Setting the location prevents Fleet Engine from setting it to the default of the last vehicle location. You can also overwrite the task outcome location Fleet Engine set at a later time. Fleet Engine never overwrites a task outcome location that you provide. You cannot set a task outcome location for a task which does not have a task outcome set. You can set both task outcome and task outcome location within the same request.
The following example shows how to use the Java gRPC library to set a task outcome to SUCCEEDED and set the location where the task was completed:
static final String PROJECT_ID = "my-delivery-co-gcp-project";
static final String TASK_ID = "task-8241890";

DeliveryServiceBlockingStub deliveryService =
  DeliveryServiceGrpc.newBlockingStub(channel);

// Task settings
String taskName = "providers/" + PROJECT_ID + "/tasks/" + TASK_ID;
Task task = Task.newBuilder()
  .setName(taskName)
  .setTaskOutcome(TaskOutcome.SUCCEEDED)
  .setTaskOutcomeTime(now())
  .setTaskOutcomeLocation(               // Grand Indonesia East Mall
    LocationInfo.newBuilder().setPoint(
      LatLng.newBuilder().setLatitude(-6.195139).setLongitude(106.820826)))
  .build();

// Task request
UpdateTaskRequest updateTaskRequest =
  UpdateTaskRequest.newBuilder()  // No need for the header
      .setTask(task)
      .setUpdateMask(FieldMask.newBuilder().addPaths("task_outcome", "task_outcome_time", "task_outcome_location"))
      .build();

try {
  Task updatedTask = deliveryService.updateTask(updateTaskRequest);
} catch (StatusRuntimeException e) {
  Status s = e.getStatus();
  switch (s.getCode()) {
     case NOT_FOUND:
       break;
     case PERMISSION_DENIED:
       break;
  }
  return;
}
REST
To mark a task as completed from a server environment,
make an HTTP REST call to UpdateTask:
`PATCH https://fleetengine.googleapis.com/v1/providers/<project_id>/tasks/<id>?updateMask=taskOutcome,taskOutcomeTime,taskOutcomeLocation`
<id> is a unique identifier for the task.
The request header must contain a field Authorization with the value Bearer <token>, where <token> is a token issued by a Fleet Engine token factory.
The request body must contain a Task entity:
Required fields:
Field Value taskOutcome Outcome.SUCCEEDED or Outcome.FAILED Optional fields:
Field Value taskOutcomeLocation The location where the task was completed. If not set, Fleet Engine defaults this to the last vehicle location. taskOutcomeTime The timestamp when the task was completed.
All other fields in the entity are ignored for the update.
Example curl command:
# Set JWT, PROJECT_ID, and TASK_ID in the local environment
curl -X PATCH "https://fleetengine.googleapis.com/v1/providers/${PROJECT_ID}/tasks/${TASK_ID}?updateMask=taskOutcome,taskOutcomeTime,taskOutcomeLocation" \
  -H "Content-type: application/json" \
  -H "Authorization: Bearer ${JWT}" \
  --data-binary @- << EOM
{
  "taskOutcome": "SUCCEEDED",
  "taskOutcomeTime": "$(date -u --iso-8601=seconds)",
  "taskOutcomeLocation": {
    "point": {
      "latitude": -6.195139,
      "longitude": 106.820826
    }
  }
}
EOM
Reroute a shipment
Once a shipment task has been created, its planned location can't be changed. To reroute a shipment, close the shipment task without setting an outcome, and then create a new task with the updated planned location. After creating the new task, assign the task to the same vehicle. For more information, see close the shipment task and assign the task.
Use feeder and delivery vehicles
If you use feeder vehicles to transport shipments to delivery vehicles throughout the day, model the transfer of shipments as a scheduled stop task for the delivery vehicle. To ensure accurate location tracking, only assign a shipment delivery task for a transferred shipment after it is loaded onto the delivery vehicle. For more information, see scheduled stop.
Store shipment status and other meta information
When a shipment task is completed, the task state and outcome are recorded in the task. However, you may want to update other meta information specific to the shipment. To store other meta information that you can reference outside the Fleet Engine service, use the tracking_id associated with the task as a key in an external table.
For more information, see Life of a task.
Look up a vehicle
You can look up a vehicle either from the Driver SDK, or from a server environment using gRPC or REST.
gRPC
The following example shows how to use the Java gRPC library to look up a vehicle:
static final String PROJECT_ID = "my-delivery-co-gcp-project";
static final String VEHICLE_ID = "vehicle-8241890";

DeliveryServiceBlockingStub deliveryService =
  DeliveryServiceGrpc.newBlockingStub(channel);

// Vehicle request
String name = "providers/" + PROJECT_ID + "/deliveryVehicles/" + VEHICLE_ID;
GetDeliveryVehicleRequest getVehicleRequest = GetDeliveryVehicleRequest.newBuilder()  // No need for the header
    .setName(name)
    .build();

try {
  DeliveryVehicle vehicle = deliveryService.getDeliveryVehicle(getVehicleRequest);
} catch (StatusRuntimeException e) {
  Status s = e.getStatus();
  switch (s.getCode()) {
     case NOT_FOUND:
       break;
     case PERMISSION_DENIED:
       break;
  }
  return;
}
REST
To look up a vehicle from a server environment,
make an HTTP REST call to GetVehicle:
`GET https://fleetengine.googleapis.com/v1/providers/<project_id>/deliveryVehicles/<vehicleId>`
<id> is a unique identifier for the task.
<vehicleId> is the ID of the vehicle to look up.
The request header must contain a field Authorization with the value Bearer <token>, where <token> is a token issued by a Fleet Engine token factory.
The request body must be empty.
If the lookup is successful, the response body contains a vehicle entity.
Example curl command:
# Set JWT, PROJECT_ID, and VEHICLE_ID in the local environment
curl -H "Authorization: Bearer ${JWT}" \
  "https://fleetengine.googleapis.com/v1/providers/${PROJECT_ID}/deliveryVehicles/${VEHICLE_ID}"
Look up a task
You can look up a task from a server environment using gRPC or REST. The Driver SDK does not support looking up a task.
gRPC
The following example shows how to use the Java gRPC library to look up a task:
static final String PROJECT_ID = "my-delivery-co-gcp-project";
static final String TASK_ID = "task-8597549";

DeliveryServiceBlockingStub deliveryService =
  DeliveryServiceGrpc.newBlockingStub(channel);

// Task request
String taskName = "providers/" + PROJECT_ID + "/tasks/" + TASK_ID;
GetTaskRequest getTaskRequest = GetTaskRequest.newBuilder()  // No need for the header
    .setName(taskName)
    .build();

try {
  Task task = deliveryService.getTask(getTaskRequest);
} catch (StatusRuntimeException e) {
  Status s = e.getStatus();
  switch (s.getCode()) {
     case NOT_FOUND:
       break;

     case PERMISSION_DENIED:
       break;
  }
  return;
}
REST
To look up a task from a server environment,
make an HTTP REST call to GetTask:
`GET https://fleetengine.googleapis.com/v1/providers/<project_id>/tasks/<taskId>`
<id> is a unique identifier for the task.
<taskId> is the ID of the task to look up.
The request header must contain a field Authorization with the value Bearer <token>, where <token> is a token issued by a Fleet Engine token factory.
The request body must be empty.
If the lookup is successful, the response body contains a task entity.
Example curl command:
    # Set JWT, PROJECT_ID, and TASK_ID in the local environment
    curl -H "Authorization: Bearer ${JWT}" \
      "https://fleetengine.googleapis.com/v1/providers/${PROJECT_ID}/tasks/${TASK_ID}"
Look up shipment task information by its tracking ID
You can look up fleet task information in the following ways, each of which has a separate purpose:
- by a task ID: used by users like fleet operators who have access to the full view of the task data.
- by a tracking ID: used by your client software to provide limited information to an end user, such as when a package is expected at their house.
This section discusses looking up task information by a tracking ID. If you want to look up a task by the task ID, go to Look up a task.
To look up information by a tracking ID, you can use either of the following:
Lookup requirements
Shipment information provided by a tracking ID adheres to visibility rules stated in Control the visibility of tracked locations.
Use Fleet Engine to look up shipment information by tracking ID. The Driver SDK does not support information lookups by tracking ID. To do this with Fleet Engine, you use either a server or browser environment.
Use the narrowest token possible to limit security risks. For example, if you use a Delivery Consumer Token, any Fleet Engine Deliveries API calls return only information relevant to that end user, such as the shipper or the receiver of a shipment. All other information in the responses is redacted. For more information about tokens, see Creating a JSON Web Token (JWT) for authorization.
Lookups with Java using gRPC
The following example shows how to use the Java gRPC library to look up information about a shipment task by its tracking ID.
static final String PROJECT_ID = "my-delivery-co-gcp-project";
static final String TRACKING_ID = "TID-7449w087464x5";

DeliveryServiceBlockingStub deliveryService =
  DeliveryServiceGrpc.newBlockingStub(channel);

// Tasks request
String parent = "providers/" + PROJECT_ID;
GetTaskTrackingInfoRequest getTaskTrackingInfoRequest = GetTaskTrackingInfoRequest.newBuilder()  // No need for the header
    .setParent(parent)
    .setTrackingId(TRACKING_ID)
    .build();

try {
  TaskTrackingInfo taskTrackingInfo = deliveryService.getTaskTrackingInfo(getTaskTrackingInfoRequest);
} catch (StatusRuntimeException e) {
  Status s = e.getStatus();
  switch (s.getCode()) {
     case NOT_FOUND:
       break;

     case PERMISSION_DENIED:
       break;
  }
  return;
}
Lookups using HTTP
To look up a shipment task from a browser, make an HTTP REST call to
GetTaskTrackingInfo:
`GET https://fleetengine.googleapis.com/v1/providers/<project_id>/taskTrackingInfo/<tracking_id>`
<tracking_id> is the tracking ID associated with the task.
The request header must contain a field Authorization with the value Bearer <token>, where <token> is a token issued by a Fleet Engine token factory.
If the lookup is successful, the response body contains a taskTrackingInfo entity.
Example curl command:
# Set JWT, PROJECT_ID, and TRACKING_ID in the local environment
curl -H "Authorization: Bearer ${JWT}" \
  "https://fleetengine.googleapis.com/v1/providers/${PROJECT_ID}/taskTrackingInfo/${TRACKING_ID}"
List tasks
You can list tasks from a server or browser environment. The Driver SDK does not support listing tasks.
Listing tasks requests broad access to tasks. Listing tasks is intended only for trusted users. Use Delivery Fleet Reader or Delivery Super User Authentication Tokens when making list tasks requests.
Listed tasks have the following fields redacted:
- VehicleStop.planned_location
- VehicleStop.state
- VehicleStop.TaskInfo.taskId
Listed tasks can be filtered by most task properties. For filter query syntax, see AIP-160. The following list shows valid task properties that you can use for filtering:
- attributes
- delivery_vehicle_id
- state
- planned_location
- task_duration
- task_outcome
- task_outcome_location
- task_outcome_location_source
- task_outcome_time
- tracking_id
- type
Use the following field formats based on Google API Improvement Proposals:
| Field Type | Format | Example |
|---|---|---|
| Timestamp | RFC-3339 | task_outcome_time = 2022-03-01T11:30:00-08:00 |
| Duration | Number of seconds followed by an s |
task_duration = 120s |
| Enum | String | state = CLOSED AND type = PICKUP |
| Location | point.latitude and point.longitude |
planned_location.point.latitude > 36.1 AND planned_location.point.longitude < -122.0 |
See AIP-160 for a full list of filter query operators.
If no filter query is specified, all tasks are listed.
Task lists are paginated. A page size can be specified in list tasks requests. If a page size is specified, the number of returned tasks is no greater than the specified page size. If no page size is present, a reasonable default is used. If the requested page size exceeds an internal maximum value, then the internal maximum is used.
A task list can include a token for reading the next page of results. Use the page token with a request that is otherwise identical to the previous request to retrieve the next page of tasks. When the returned page token is empty, no more tasks are available for retrieval.
gRPC
The following example shows how to use the Java gRPC library to list tasks for a deliveryVehicleId and a task attribute. A successful response can still be empty. An empty response indicates that no Tasks are associated the supplied deliveryVehicleId.
static final String PROJECT_ID = "my-delivery-co-gcp-project";
static final String TRACKING_ID = "TID-7449w087464x5";

DeliveryServiceBlockingStub deliveryService =
  DeliveryServiceGrpc.newBlockingStub(channel);

// Tasks request
String parent = "providers/" + PROJECT_ID;
ListTasksRequest listTasksRequest = ListTasksRequest.newBuilder()  // No need for the header
    .setParent(parent)
    .setFilter("delivery_vehicle_id = 123 AND attributes.foo = true")
    .build();

try {
  ListTasksResponse listTasksResponse = deliveryService.listTasks(listTasksRequest);
} catch (StatusRuntimeException e) {
  Status s = e.getStatus();
  switch (s.getCode()) {
     case NOT_FOUND:
       break;

     case PERMISSION_DENIED:
       break;
  }
  return;
}
REST
To list tasks from a browser, make an HTTP REST call to ListTasks:
`GET https://fleetengine.googleapis.com/v1/providers/<project_id>/tasks`
To apply a filter to the listed tasks, include a "filter" URL parameter with a URL-escaped filter query as its value.
The request header must contain a field Authorization with the value Bearer <token>, where <token> is a token issued by a Fleet Engine token factory.
If the lookup is successful, the response body contains data with the following structure:
    // JSON representation
    {
      "tasks": [
        {
          object (Task)
        }
      ],
      "nextPageToken": string,
      "totalSize": integer
    }
A successful response can still be empty. An empty response indicates that no tasks were found meeting the specified filter criteria.
Example curl command:
    # Set JWT, PROJECT_ID, and VEHICLE_ID in the local environment
    curl -H "Authorization: Bearer ${JWT}" \
      "https://fleetengine.googleapis.com/v1/providers/${PROJECT_ID}/tasks?filter=state%20%3D%20OPEN%20AND%20delivery_vehicle_id%20%3D%20${VEHICLE_ID}"
List delivery vehicles
You can list delivery vehicles from a server or browser environment. The Driver SDK does not support listing delivery vehicles.
Listing delivery vehicles requests broad access to delivery vehicles and is intended only for trusted users. Use Delivery Fleet Reader or Delivery Super User Authentication Tokens when making list delivery vehicles requests.
Listed delivery vehicles have the following fields redacted due to their impact on response size:
- CurrentRouteSegment
- RemainingVehicleJourneySegments
You can filter list delivery vehicles by their attributes property. For
example, to query an attribute with key my_key and value my_value, use
attributes.my_key = my_value. To query for multiple attributes, join queries
using the logical AND and OR operators as in attributes.key1 = value1 AND
attributes.key2 = value2. See AIP-160 for a full
description of filter query syntax.
You can filter listed delivery vehicles by location using the viewport request
parameter. The viewport request parameter defines viewports using two bounding
coordinates: a high (northeast) and low (southwest) latitude and longitude
coordinates pair. Requests are rejected if they contain a high latitude
that is geographically lower than a low latitude.
Delivery vehicle lists are paginated by default using a reasonable page size. If you specify a page size, the request returns only the number of vehicles specified by the limit, or fewer. If the requested page size exceeds an internal maximum value, then the internal maximum is used. The default and maximum page sizes are both 100 vehicles.
A delivery vehicles list can include a token for reading the next page of results. A page token is only present in a response when more pages of delivery vehicles are available for retrieval. To retrieve the next page of tasks, use the page token with a request that is otherwise identical to the previous request.
gRPC
The following example shows how to use the Java gRPC library to list delivery vehicles in a particular region with a certain attribute. A successful response can still be empty. When that happens, it means that no vehicles with the specified attribute are already in the specified viewport.
static final String PROJECT_ID = "my-delivery-co-gcp-project";

DeliveryServiceBlockingStub deliveryService =
  DeliveryServiceGrpc.newBlockingStub(channel);

// Tasks request
String parent = "providers/" + PROJECT_ID;
ListDeliveryVehiclesRequest listDeliveryVehiclesRequest =
  ListDeliveryVehiclesRequest.newBuilder()  // No need for the header
      .setParent(parent)
      .setViewport(
            Viewport.newBuilder()
              .setHigh(LatLng.newBuilder()
                  .setLatitude(37.45)
                  .setLongitude(-122.06)
                  .build())
              .setLow(LatLng.newBuilder()
                  .setLatitude(37.41)
                  .setLongitude(-122.11)
                  .build())
      .setFilter("attributes.my_key = my_value")
      .build();

try {
  ListDeliveryVehiclesResponse listDeliveryVehiclesResponse =
      deliveryService.listDeliveryVehicles(listDeliveryVehiclesRequest);
} catch (StatusRuntimeException e) {
  Status s = e.getStatus();
  switch (s.getCode()) {
      case NOT_FOUND:
          break;

      case PERMISSION_DENIED:
          break;
  }
  return;
}
REST
To list tasks from a browser, make an HTTP REST call to ListDeliveryVehicles:
`GET https://fleetengine.googleapis.com/v1/providers/<project_id>/deliveryVehicles`
To apply a filter to the listed tasks, include a "filter" URL parameter with a URL-escaped filter query as its value.
The request header must contain a field Authorization with the value Bearer <token>, where <token> is a token issued by a Fleet Engine token factory.
If the lookup is successful, the response body contains data with the following structure:
// JSON representation
{
  "deliveryVehicles": [
    {
      object (DeliveryVehicle)
    }
  ],
  "nextPageToken": string,
  "totalSize": integer
}
A successful response can still be empty. When that happens, it means that no delivery vehicles were found meeting the specified filter query and viewport.
Example curl command:
# Set JWT, PROJECT_ID, and VEHICLE_ID in the local environment
curl -H "Authorization: Bearer ${JWT}" \
  "https://fleetengine.googleapis.com/v1/providers/${PROJECT_ID}/deliveryVehicles?filter=attributes.my_key%20%3D%20my_value%20&viewport.high.latitude=37.45&viewport.high.longitude=-122.06&viewport.low.latitude=37.41&viewport.low.longitude=-122.11"
Fleet tracking
You have two options for using the Fleet Engine Deliveries API to enable fleet tracking:
Preferred: Use the JavaScript Fleet Tracking library. The library lets you visualize the location of vehicles and locations of interest tracked in Fleet Engine. It contains a JavaScript map component that is a drop-in replacement for a standard google.maps.Map object, and data components to connect with Fleet Engine. This component lets you provide a customizable, animated fleet tracking experience from your web or mobile application.
Implement your own fleet tracking on top of the Fleet Engine Deliveries API.
The key is to look up fleet tasks by tracking ID.
Logging
You can set Fleet Engine to send RPC logs to Cloud Logging. For more information, see Logging.
Authorization Roles and Tokens
As described in Manage vehicle and task lifecycle and the authorization notes for individual uses cases, making calls to Fleet Engine requires authentication with JSON Web Tokens that have been signed using service account credentials. The service accounts used to issue those tokens may have one or more roles, with each role granting a different set of permissions.
For more information, see Authentication and Authorization.
Troubleshoot common issues
Check the following sections for help if you experience any issues.
Resiliency
Fleet Engine is not considered a source of truth. You are responsible for restoring the state of your system, if necessary, without relying on Fleet Engine.
Lost state in Fleet Engine
When working with Fleet Engine, implement clients so that the system heals itself if there is a failure. For example, when Fleet Engine tries to update a vehicle, it may respond with an error indicating that the vehicle does not exist. The client should then recreate the vehicle in the new state. Although this issue rarely occurs, make sure your system is resilient enough to handle it.
In the extremely unlikely scenario of a catastrophic failure of Fleet Engine, you may need to recreate most or all vehicles and tasks. If the creation rate becomes too high, some requests may fail again due to quota issues since quota checks are in place to avoid denial of service (DOS) attacks. In this case, slow down the recreation rate using a backoff strategy for reattempts.
Lost state in the driver app
If the driver app crashes, the app must recreate the current state within the Driver SDK. The app should attempt to recreate tasks to ensure that they exist and to restore their current states. The app should also recreate and explicitly set the list of stops for the Driver SDK.
FAQ
What if a driver stops for a task out of order?
In this case, first update the order of the tasks and then proceed as normal, marking the arrival at the stop, task completion, and other details. If you don't, the system may become inconsistent, ETAs may become incorrect, and unexpected errors may be reported.