
使用 iOS 版 Navigation SDK,您可以決定要在地圖上顯示哪些內建 UI 控制項和元素,以及允許哪些手勢,藉此修改地圖的使用者體驗。你也可以修改導航使用者介面的外觀。如需導覽 UI 的可接受修改方式相關規範,請參閱「政策頁面」。
地圖 UI 控制項
Navigation SDK 提供一些內建的 UI 控制項,與 Google 地圖 iOS 應用程式的控制項類似。您可以使用 GMSUISettings 類別切換這些控制項的顯示設定。以這個類別進行的變更會立即反映在地圖上。
指南針
在某些情況下,Navigation SDK 會提供指南針圖形 (顯示在地圖右上角),但僅限啟用時。使用者按一下指南針後,攝影機就會移動回航向為零的位置 (預設方向),且指南針之後很快就會消失。
如果已啟用導航功能,且攝影機模式設為「跟隨」,指南針會持續顯示,輕觸指南針即可在傾斜和鳥瞰攝影機視角之間切換。
為避免駕駛人分心,如果標題 (直向模式) 展開並與羅盤的預設位置衝突,羅盤會保持在相同位置。如果新增次要標頭自訂控制項或標頭配件檢視區塊,為避免 UI 衝突,指南針會隱藏。
指南針支援日間和夜間模式,以及深色模式。
指南針預設為停用。如要啟用指南針,請將 GMSUISettings 的 compassButton 屬性設為 true。但無法強制指南針保持顯示。
Swift
mapView.settings.compassButton = true
Objective-C
mapView.settings.compassButton = YES;
我的位置按鈕
只有在啟用「我的位置」按鈕時,畫面右下角才會顯示「我的位置」按鈕。使用者按一下該按鈕後,攝影機就會移動到使用者目前位置 (如為已知)。如要啟用按鈕,請將 GMSUISettings 的 myLocationButton 屬性設為 true。
Swift
mapView.settings.myLocationButton = true
Objective-C
mapView.settings.myLocationButton = YES;
「回到地圖中心點」按鈕
啟用導覽功能後,使用者捲動地圖檢視畫面時,系統會顯示重新置中按鈕;使用者輕觸按鈕將地圖重新置中時,系統會隱藏按鈕。如要顯示重新置中按鈕,請將 GMSUISettings 的 recenterButtonEnabled 屬性設為 true。如要避免顯示重新置中按鈕,請將 recenterButtonEnabled 設為 false。
Swift
mapView.settings.isRecenterButtonEnabled = true
Objective-C
mapView.settings.recenterButtonEnabled = YES;
地圖 UI 配件
Navigation SDK 提供 UI 配件,可在導航期間顯示,與 iOS 版 Google 地圖應用程式中的配件類似。如本節所述,您可以調整這些控制項的顯示設定或外觀。您在這裡所做的變更,會在使用者下次行程中生效。
導覽頁首和頁尾
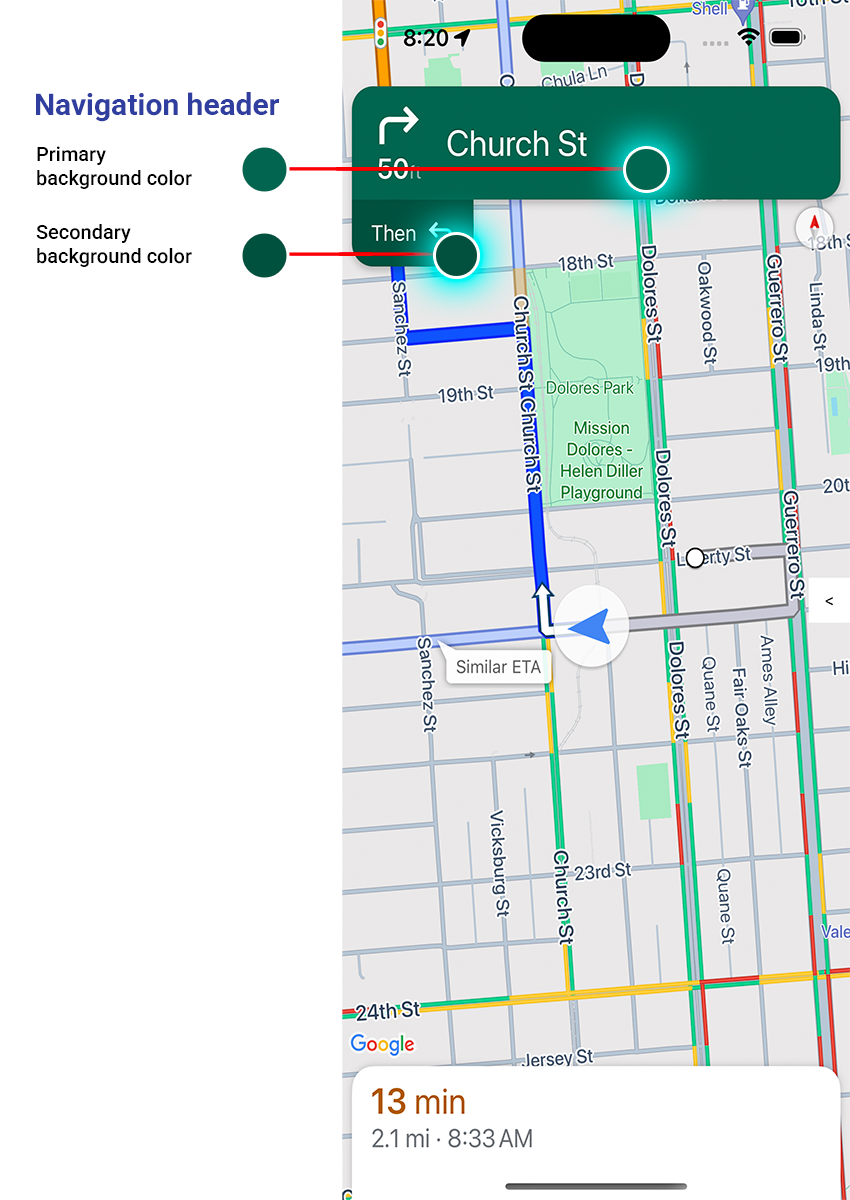
導覽時,導覽標題會顯示在畫面頂端,導覽頁尾則會顯示在底部。導航標題會顯示路線上接下來要轉彎的街道名稱和方向,以及下一個轉彎的方向。導覽頁尾會顯示預計抵達時間、目的地距離,以及預計抵達時間。
您可以使用下列屬性,以程式輔助方式切換導覽頁首和頁尾的顯示設定,並設定其顏色:
navigationHeaderEnabled— 控制導覽標頭是否顯示 (預設為true)。navigationFooterEnabled— 控制導覽頁尾是否顯示 (預設為true)。navigationHeaderPrimaryBackgroundColor:設定導覽標題的主要背景顏色。navigationHeaderSecondaryBackgroundColor:設定導覽標題的次要背景顏色。
以下程式碼範例顯示如何開啟頁首和頁尾的可見度,然後將 navigationHeaderPrimaryBackgroundColor 設為藍色,並將 navigationHeaderSecondaryBackgroundColor 設為紅色。
Swift
mapView.settings.isNavigationHeaderEnabled = true
mapView.settings.isNavigationFooterEnabled = true
mapView.settings.navigationHeaderPrimaryBackgroundColor = .blue
mapView.settings.navigationHeaderSecondaryBackgroundColor = .red
Objective-C
mapView.settings.navigationHeaderEnabled = YES;
mapView.settings.navigationFooterEnabled = YES;
mapView.settings.navigationHeaderPrimaryBackgroundColor = [UIColor blueColor];
mapView.settings.navigationHeaderSecondaryBackgroundColor = [UIColor redColor];
導覽配件標頭檢視畫面
您可以替換次要導覽標題檢視區塊,改用自訂的配件檢視區塊,藉此自訂應用程式。方法是建立實作 GMSNavigationAccessoryView 通訊協定的檢視區塊。這個通訊協定有一個必要方法:-heightForAccessoryViewConstrainedToSize:onMapView:。系統會提供 mapView 中檢視區塊可用的最大尺寸,您必須提供檢視區塊所需的高度。
接著,您可以呼叫 setHeaderAccessoryView:,將這個檢視區塊傳遞至 mapView。mapView 會將所有目前的檢視區塊動畫化,然後將自訂檢視區塊動畫化。導覽標題必須顯示,自訂檢視畫面才能顯示。
如要移除自訂標頭配件檢視畫面,請將 nil 傳遞至 setHeaderAccessoryView:。
如果檢視區塊必須隨時變更大小,您可以呼叫 invalidateLayoutForAccessoryView:,並傳遞需要變更大小的檢視區塊。
範例
下列程式碼範例示範了實作 GMSNavigationAccessoryView 協定的自訂檢視區塊。然後使用這個自訂檢視區塊,設定自訂導覽標頭配件檢視區塊。
Swift
class MyCustomView: UIView, GMSNavigationAccessoryView {
…
  func heightForAccessoryViewConstrained(to size: CGSize, on mapView: GMSMapView) -> CGFloat {
    // viewHeight gets calculated as the height your view needs.
    return viewHeight
  }
…
}

let customView = MyCustomView(...)
mapView.setHeaderAccessory(customView)

// At some later point customView changes size.
mapView.invalidateLayout(forAccessoryView: customView)

// Remove the custom header accessory view.
mapView.setHeaderAccessory(nil)
Objective-C
@interface MyCustomView : UIView <GMSNavigationAccessoryView>
…
@end

@implementation MyCustomView
…
- (CGFloat)heightForAccessoryViewConstrainedToSize:(CGSize)size onMapView:(GMSMapView *)mapView {
  // viewHeight gets calculated as the height your view needs.
  return viewHeight;
}
…
@end

MyCustomView *customView = [[MyCustomView alloc] init…];
[_mapView setHeaderAccessoryView:customView];

// At some later point customView changes size.
[_mapView invalidateLayoutForAccessoryView:customView];

// Remove the custom header accessory view.
[_mapView setHeaderAccessoryView:nil];
一般模式和低光源模式
系統更新預估照明條件時,會觸發 GMSNavigatorListener.didChangeSuggestedLightingMode 監聽器方法。舉例來說,當裝置目前所在位置天黑時,您可以透過下列方式,以程式輔助方式修改低光源模式行為:
- 使用
GMSNavigationLightingMode列舉,選擇何時使用一般和低光源模式。 - 設定
navigationHeaderPrimaryBackgroundColorNightMode和navigationHeaderSecondaryBackgroundColorNightMode屬性的值,即可選取微光模式的主要和次要背景顏色。
路線清單
您可以在應用程式中提供逐步路線指引。以下範例顯示其中一種做法。這些步驟可能會因您的實作方式而異。
- 在
GMSNavigator(導覽器) 上的setDestinations成功完成setDestinations之後,啟用進入點按鈕,並啟用導覽器上的guidanceActive。 - 使用者輕觸進入點按鈕後,請使用與
GMSMapView(mapView) 相關聯的導覽器,建立GMSNavigationDirectionsListController(控制器)。 - 將控制器新增至
UIViewController(檢視控制器) 的例項,並將directionsListView新增為檢視控制器的子檢視區塊。應呼叫控制器上的reloadData和invalidateLayout方法,就像使用UICollectionView一樣。 - 將檢視畫面控制器推送到應用程式的檢視畫面控制器階層。
以下程式碼範例說明如何新增 DirectionsListViewController。
Swift
override func viewDidLoad() {
  super.viewDidLoad()
  // Add the directionsListView to the host view controller's view.
  let directionsListView = directionsListController.directionsListView
  directionsListView.frame = self.view.frame
  self.view.addSubview(directionsListView)
  directionsListView.translatesAutoresizingMaskIntoConstraints = false
  directionsListView.topAnchor.constraint(equalTo: self.view.topAnchor).isActive = true
  directionsListView.leadingAnchor.constraint(equalTo: self.view.leadingAnchor).isActive = true
  directionsListView.trailingAnchor.constraint(equalTo: self.view.trailingAnchor).isActive = true
  directionsListView.bottomAnchor.constraint(equalTo: self.view.bottomAnchor).isActive = true
  ...
}

override func viewWillAppear(_ animated: Bool) {
  super.viewWillAppear(animated)
  // Make sure data is fresh when the view appears.
  directionsListController.reloadData()
  ...
}

override func willTransition(to newCollection: UITraitCollection, with coordinator: UIViewControllerTransitionCoordinator) {
  super.willTransition(to: newCollection, with: coordinator)
  // Invalidate the layout during rotation.
  coordinator.animate(alongsideTransition: {_ in
    self.directionsListController.invalidateLayout()
  })
  ...
}
Objective-C
- (void)viewDidLoad {
  [super viewDidLoad];
  // Add the directionsListView to the host view controller's view.
  UIView *directionsListView = _directionsListController.directionsListView;
  directionsListView.frame = self.view.bounds;
  [self.view addSubview:directionsListView];
  directionsListView.translatesAutoresizingMaskIntoConstraints = NO;
  [directionsListView.topAnchor constraintEqualToAnchor:self.view.topAnchor].active = YES;
  [directionsListView.leadingAnchor constraintEqualToAnchor:self.view.leadingAnchor].active = YES;
  [directionsListView.trailingAnchor constraintEqualToAnchor:self.view.trailingAnchor].active = YES;
  [directionsListView.bottomAnchor constraintEqualToAnchor:self.view.bottomAnchor].active = YES;
  ...
}

- (void)viewWillAppear:(BOOL)animated {
  [super viewWillAppear:animated];
  // Make sure data is fresh when the view appears.
  [_directionsListController reloadData];
  ...
}

- (void)willTransitionToTraitCollection:(UITraitCollection *)newCollection
              withTransitionCoordinator:(id<UIViewControllerTransitionCoordinator>)coordinator {
  [super willTransitionToTraitCollection:newCollection withTransitionCoordinator:coordinator];
  void(^animationBlock)(id <UIViewControllerTransitionCoordinatorContext>context) =
      ^void(id <UIViewControllerTransitionCoordinatorContext>context) {
    [_directionsListController invalidateLayout];
  };
  // Invalidate the layout during rotation.
  [coordinator animateAlongsideTransition:animationBlock
                               completion:nil];
  ...
}

...
行程進度列

導航開始時,地圖的開頭/引導側會顯示垂直的行程進度列。啟用後,系統會顯示整趟行程的總覽,以及使用者的目的地和目前位置。
使用者不必放大地圖,即可快速預測即將發生的問題,例如交通狀況。然後視需要重新規劃行程。如果使用者重新規劃行程,進度列會重設,就像從該點開始新行程一樣。
行程進度列會顯示下列狀態指標:
交通狀況:即將到來的交通狀況。
目前位置:司機在行程中的目前位置。
已行駛路線:行程中已行駛的部分。
在 GMSUISettings 中設定 navigationTripProgressBarEnabled 屬性,即可啟用行程進度列。
Swift
mapView.settings.isNavigationTripProgressBarEnabled = true
Objective-C
mapView.settings.navigationTripProgressBarEnabled = YES;
行程進度列的位置
- 左側的橫條大約會與速度計、Google 標誌和「重新置中」按鈕 (顯示時) 的左側對齊。寬度為 12 點。
- 行程進度列會根據畫面上的垂直空間動態調整。工具列底部距離畫面底部 210 pt。行程進度列頂端與畫面頂端之間至少要有 170 pt 的距離,且進度列高度上限為 400 pt。
- 如果行程進度列與迴轉卡或其他導航 UI 元素重疊,系統會將進度列顯示在其他元素下方。
提示瀏覽權限 API (實驗性)
您可以透過提示顯示 API 新增監聽器,在 Navigation SDK UI 元素即將顯示前和移除後立即接收回呼,避免 Navigation SDK 產生的 UI 元素與自訂 UI 元素發生衝突。如需更多資訊 (包括程式碼範例),請參閱「設定即時中斷」頁面的「提示顯示 API」一節。
紅綠燈和停止標誌
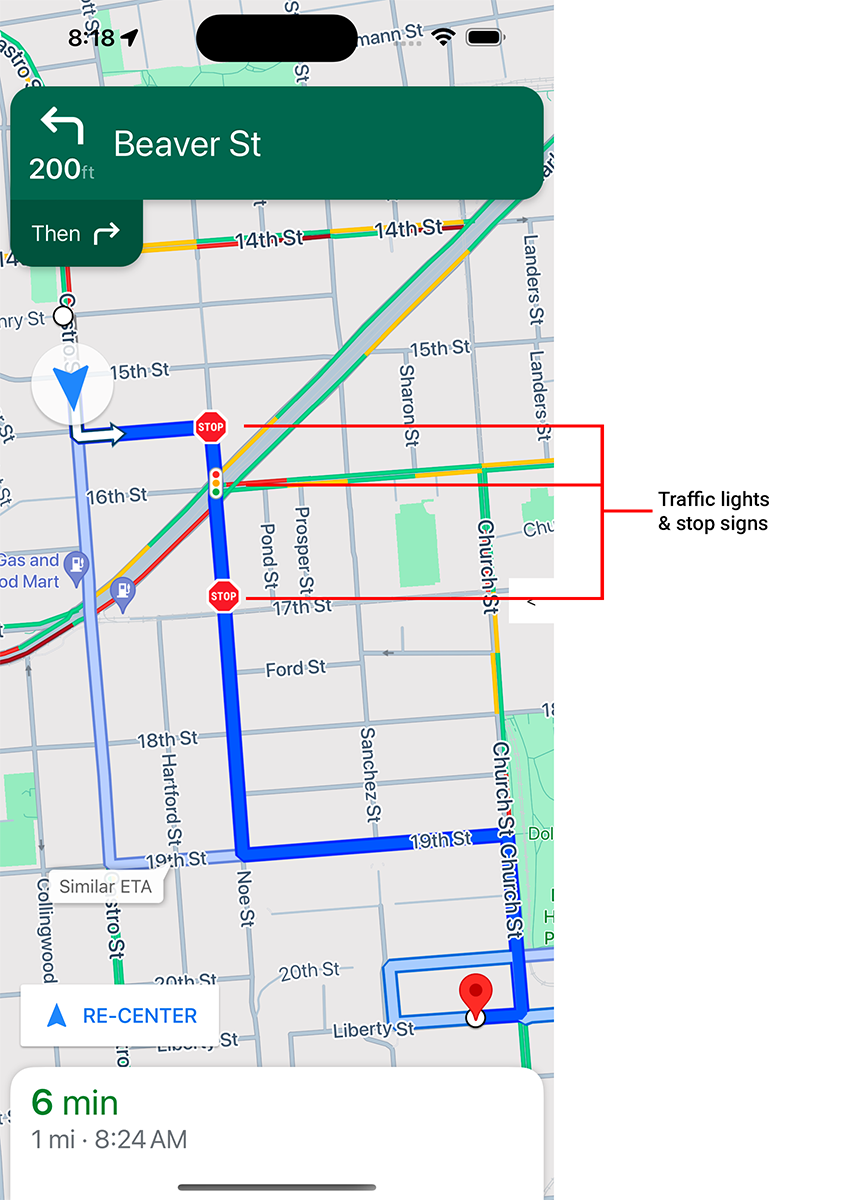
在 mapView 中啟用導航時,系統會顯示紅綠燈和停止標誌,提供路線和行程操作的額外背景資訊。
根據預設,Navigation SDK for iOS 會停用紅綠燈和停止標誌。如要啟用這項功能,請分別呼叫各選項的 GMSMapView 設定:showsTrafficLights 和 showsStopSigns。
Swift
mapView.settings.showsTrafficLights = true
mapView.settings.showsStopSigns = true
Objective-C
mapView.settings.showsTrafficLights = YES;
mapView.settings.showsStopSigns = YES;
車速表控制
啟用導航功能並將交通方式設為開車時,Navigation SDK for iOS 會在地圖的下角顯示速限控制項,指出目前的速限。如果駕駛人超速,控制項會展開,顯示第二個計速器,指出駕駛人目前的速度。
您可以設定快訊等級,在駕駛人超過速限指定金額時,變更速度計的格式。舉例來說,您可以指定當駕駛人超速 5 英里/小時時,目前車速以紅色文字顏色顯示;當駕駛人超速 10 英里/小時時,目前車速以紅色背景顏色顯示。
如要顯示速限控制項,請將 GMSUISettings 的 shouldDisplaySpeedometer 屬性設為 true。如要停用速限控制項的顯示功能,請將 shouldDisplaySpeedometer 設為 false。
Swift
mapView.settings.shouldDisplaySpeedometer = true
Objective-C
mapView.settings.shouldDisplaySpeedometer = YES;
如要進一步瞭解如何設定速限警示,請參閱「設定速限警示」。
目的地標記
如要顯示或隱藏特定路線的目的地標記,請設定 GMSUISettings 的 showsDestinationMarkers 屬性。以下範例顯示如何關閉目的地標記。
Swift
mapView.settings.showsDestinationMarkers = false
Objective-C
mapView.settings.showsDestinationMarkers = NO;
地圖體驗功能
Navigation SDK 可讓您進一步自訂使用者的導航體驗。使用者下次更新應用程式時,系統就會套用您對執行個體所做的變更。
目的地醒目顯示和入口

使用 placeID 建立目的地時,系統會醒目顯示目的地建築物,並盡可能顯示入口圖示。這些視覺提示可協助使用者辨識並前往目的地。
如要使用 placeID 建立目的地,請使用接受 placeID 的 GMSNavigationWaypoint 初始化程式。舉例來說,在「導覽路線教學課程」中建立的目的地會醒目顯示,並在適用的情況下顯示入口標籤。
導航時顯示 3D 建築物

導航時預設會顯示 3D 建築物。如要停用這項功能,請將 buildingsEnabled 設為 false (Swift) 或 NO (Objective-C)。
停用預設地圖手勢
如要停用地圖上的預設手勢,請設定 GMSUISettings 類別的屬性,該類別可做為 GMSMapView 的屬性。下面的手勢可以啟用和禁用編程。請注意,停用手勢不會限制程式輔助存取攝影機設定。
scrollGestures:控制是否啟用或停用捲動手勢。啟用後,使用者可以滑動來平移攝影機。zoomGestures:控管是否啟用或停用縮放手勢。啟用後,使用者可以輕觸兩下、雙指輕觸或雙指撥動來縮放攝影機畫面。請注意,啟用scrollGestures後,輕觸兩下或雙指撥動可能會將攝影機平移至指定點。tiltGestures:控制是否啟用或停用傾斜手勢。啟用後,使用者可以兩指向上或向下滑動,傾斜攝影機。rotateGestures:控制是否啟用或停用旋轉手勢。啟用後,使用者就能以雙指旋轉手勢旋轉攝影機。
在本例中,平移和縮放手勢都已停用。
Swift
mapView.settings.scrollGestures = false
mapView.settings.zoomGestures = false
Objective-C
mapView.settings.scrollGestures = NO;
mapView.settings.zoomGestures = NO;
放置控制項和 UI 元素
您可以使用下列屬性,根據導覽標頭和頁尾的位置,放置控制項和其他 UI 元素:
navigationHeaderLayoutGuidenavigationFooterLayoutGuidebottomTrailingButtonsLayoutGuide
以下程式碼範例說明如何使用版面配置輔助線,在地圖檢視畫面中放置一對標籤:
Swift
/* Add a label to the top left, positioned below the header. */
let topLabel = UILabel()
topLabel.text = "Top Left"
mapView.addSubview(topLabel)
topLabel.translatesAutoresizingMaskIntoConstraints = false
topLabel.topAnchor.constraint(equalTo: mapView.navigationHeaderLayoutGuide.bottomAnchor).isActive = true
topLabel.leadingAnchor.constraint(equalTo: mapView.leadingAnchor).isActive = true

/* Add a label to the bottom right, positioned above the footer. */
let bottomLabel = UILabel()
bottomLabel.text = "Bottom Right"
mapView.addSubview(bottomLabel)
bottomLabel.translatesAutoresizingMaskIntoConstraints = false
bottomLabel.bottomAnchor.constraint(equalTo: mapView.navigationFooterLayoutGuide.topAnchor).isActive = true
bottomLabel.trailingAnchor.constraint(equalTo: mapView.trailingAnchor).isActive = true
Objective-C
/* Add a label to the top left, positioned below the header. */
UILabel *topLabel = [[UILabel alloc] init];
topLabel.text = @"Top Left";
[view addSubview:topLabel];
topLabel.translatesAutoresizingMaskIntoConstraints = NO;
[topLabel.topAnchor
    constraintEqualToAnchor:mapView.navigationHeaderLayoutGuide.bottomAnchor].active = YES;
[topLabel.leadingAnchor constraintEqualToAnchor:mapView.leadingAnchor].active = YES;

/* Add a label to the bottom right, positioned above the footer. */
UILabel *bottomLabel = [[UILabel alloc] init];
bottomLabel.text = @"Bottom Right";
[view addSubview:bottomLabel];
bottomLabel.translatesAutoresizingMaskIntoConstraints = NO;
[bottomLabel.bottomAnchor
    constraintEqualToAnchor:mapView.navigationFooterLayoutGuide.topAnchor].active = YES;
[bottomLabel.trailingAnchor constraintEqualToAnchor:mapView.trailingAnchor].active = YES;
如要瞭解如何使用 bottomTrailingButtonsLayoutGuide 定位即時交通中斷回報按鈕,請參閱「設定即時交通中斷」。
隱藏替代路線
如果使用者介面因資訊過多而顯得雜亂,您可以減少顯示的替代路線 (少於預設的兩條),或完全不顯示替代路線,藉此減少雜亂感。您可以在擷取路徑前設定此選項,方法是設定 GMSNavigationRoutingOptions,並將 alternateRoutesStrategy 設為下列其中一個列舉值:
| 列舉值 | 說明 |
|---|---|
| GMSNavigationAlternateRoutesStrategyAll | 預設。最多顯示兩條替代路線。 |
| GMSNavigationAlternateRoutesStrategyOne | 顯示一條替代路線 (如有)。 |
| GMSNavigationAlternateRoutesStrategyNone | 隱藏替代路線。 |
範例
以下程式碼範例示範如何完全隱藏替代路線。
Swift
let routingOptions = GMSNavigationRoutingOptions(alternateRoutesStrategy: .none)
navigator?.setDestinations(destinations,
                           routingOptions: routingOptions) { routeStatus in
  ...
}
Objective-C
GMSNavigationRoutingOptions *routingOptions = [[GMSNavigationRoutingOptions alloc] initWithAlternateRoutesStrategy:GMSNavigationAlternateRoutesStrategyNone];
[navigator setDestinations:destinations
            routingOptions:routingOptions
                  callback:^(GMSRouteStatus routeStatus){...}];