

您可以使用 Navigation SDK for iOS,指定要在地圖上顯示的內建 UI 控制項和元素,以及允許的手勢,藉此修改地圖的使用者體驗。您也可以修改導覽 UI 的外觀。如需導覽使用者介面可接受的修改方式相關指南,請參閱「政策」頁面。
地圖 UI 控制項
Navigation SDK 提供一些內建 UI 控制項,與 iOS 版 Google 地圖應用程式的控制項類似。您可以使用 GMSUISettings 類別切換這些控制項的顯示設定。您對這個類別所做的變更會立即反映在地圖上。
指南針
在某些情況下,Navigation SDK 會提供指南針圖形 (顯示在地圖右上角),但僅限啟用時。使用者按一下指南針後,攝影機會移動回航向為零的位置 (預設方向),指南針隨後也會消失。
如果啟用導航功能,且相機模式設為「追蹤」,指南針會持續顯示,輕觸指南針即可切換傾斜和總覽相機視角。
為避免駕駛人分心等級,如果標頭 (肖像模式) 展開並與指南針的預設位置衝突,指南針會保持在相同位置。如果您新增次要標頭自訂控制項或標頭附屬檢視畫面,系統會隱藏指南針,避免 UI 衝突。
指南針支援日間和夜間模式,以及深色模式。
11.0.0 以上版本預設會啟用指南針。如要停用指南針,請將 GMSUISettings 的 compassButton 屬性設為 false。
Swift
mapView.settings.compassButton = false
Objective-C
mapView.settings.compassButton = NO;
我的位置按鈕
只有在啟用「我的位置」按鈕時,畫面右下角才會顯示「我的位置」按鈕。使用者按一下該按鈕後,攝影機會移動到使用者目前位置 (如果已知)。如要啟用按鈕,請將 GMSUISettings 的 myLocationButton 屬性設為 true。
Swift
mapView.settings.myLocationButton = true
Objective-C
mapView.settings.myLocationButton = YES;
「回到中心點」按鈕
啟用導覽功能後,使用者捲動地圖檢視畫面時,系統會顯示重新置中按鈕;使用者輕觸按鈕將地圖重新置中時,系統會隱藏按鈕。如要顯示重新置中按鈕,請將 GMSUISettings 的 recenterButtonEnabled 屬性設為 true。如要避免顯示重新置中按鈕,請將 recenterButtonEnabled 設為 false。
Swift
mapView.settings.isRecenterButtonEnabled = true
Objective-C
mapView.settings.recenterButtonEnabled = YES;
地圖 UI 輔助工具
Navigation SDK 提供導航期間顯示的 UI 附屬項目,與 iOS 版 Google 地圖應用程式中的項目類似。您可以按照本節所述,調整這些控制項的顯示設定或外觀。您在這裡所做的變更,會在使用者下次行程中生效。
導覽標題和頁尾
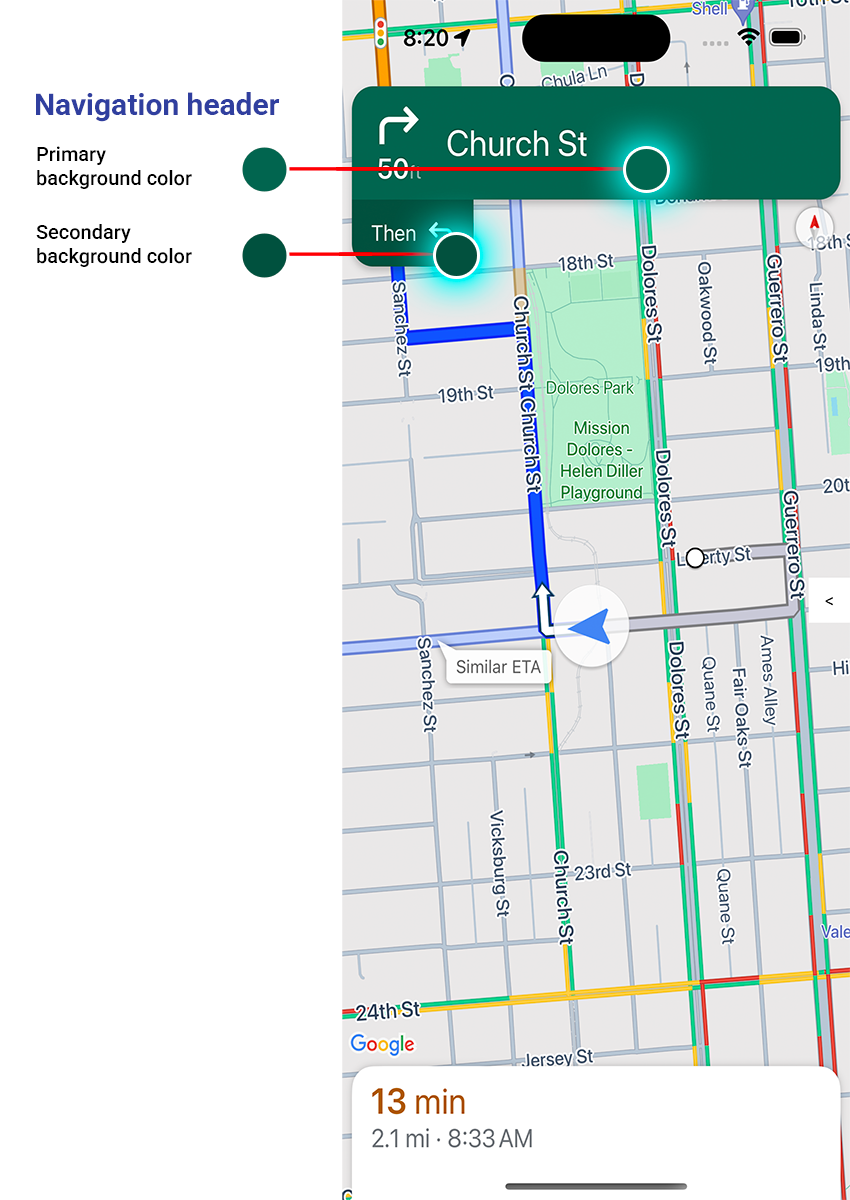
導航期間,導航標頭會顯示在畫面頂端,導航頁尾則會顯示在底部。導航標頭會顯示路線上,下一個轉彎處的街道名稱和方向,以及再下一個轉彎處的方向。導覽頁尾會顯示預計到達目的地的時間和距離,以及預計到達時間。
您可以使用下列屬性,以程式輔助方式切換導覽頁首和頁尾的顯示設定,並設定其顏色:
navigationHeaderEnabled— 控制導覽標頭是否顯示 (預設為true)。navigationFooterEnabled:控制是否顯示導覽頁尾 (預設為true)。navigationHeaderPrimaryBackgroundColor:設定導覽標頭的主要背景顏色。navigationHeaderSecondaryBackgroundColor— 設定導覽標題的次要背景顏色。
以下程式碼範例顯示如何開啟頁首和頁尾的可見性,然後將 navigationHeaderPrimaryBackgroundColor 設為藍色,並將 navigationHeaderSecondaryBackgroundColor 設為紅色。
Swift
mapView.settings.isNavigationHeaderEnabled = true
mapView.settings.isNavigationFooterEnabled = true
mapView.settings.navigationHeaderPrimaryBackgroundColor = .blue
mapView.settings.navigationHeaderSecondaryBackgroundColor = .red
Objective-C
mapView.settings.navigationHeaderEnabled = YES;
mapView.settings.navigationFooterEnabled = YES;
mapView.settings.navigationHeaderPrimaryBackgroundColor = [UIColor blueColor];
mapView.settings.navigationHeaderSecondaryBackgroundColor = [UIColor redColor];
導覽附屬標頭檢視畫面
您可以替換次要導覽標題檢視畫面,改用自訂的配件檢視畫面,藉此自訂應用程式。方法是建立實作 GMSNavigationAccessoryView 通訊協定的檢視區塊。這個通訊協定有一個必要方法:-heightForAccessoryViewConstrainedToSize:onMapView:。系統會提供指定 mapView 中檢視區塊的最大可用大小,您必須提供檢視區塊所需的高度。
接著,您可以呼叫 setHeaderAccessoryView:,將這個檢視畫面傳遞至 mapView。mapView 會以動畫方式淡出任何目前的檢視畫面,然後以動畫方式淡入自訂檢視畫面。導覽標題必須顯示,自訂檢視畫面才能顯示。
如要移除自訂標頭配件檢視區塊,請將 nil 傳遞至 setHeaderAccessoryView:。
如果檢視區塊必須隨時變更大小,您可以呼叫 invalidateLayoutForAccessoryView:,並傳遞需要變更大小的檢視區塊。
範例
下列程式碼範例示範實作 GMSNavigationAccessoryView 協定的自訂檢視區塊。然後使用這個自訂檢視區塊,設定自訂導覽標頭配件檢視區塊。
Swift
class MyCustomView: UIView, GMSNavigationAccessoryView {
…
  func heightForAccessoryViewConstrained(to size: CGSize, on mapView: GMSMapView) -> CGFloat {
    // viewHeight gets calculated as the height your view needs.
    return viewHeight
  }
…
}

let customView = MyCustomView(...)
mapView.setHeaderAccessory(customView)

// At some later point customView changes size.
mapView.invalidateLayout(forAccessoryView: customView)

// Remove the custom header accessory view.
mapView.setHeaderAccessory(nil)
Objective-C
@interface MyCustomView : UIView <GMSNavigationAccessoryView>
…
@end

@implementation MyCustomView
…
- (CGFloat)heightForAccessoryViewConstrainedToSize:(CGSize)size onMapView:(GMSMapView *)mapView {
  // viewHeight gets calculated as the height your view needs.
  return viewHeight;
}
…
@end

MyCustomView *customView = [[MyCustomView alloc] init…];
[_mapView setHeaderAccessoryView:customView];

// At some later point customView changes size.
[_mapView invalidateLayoutForAccessoryView:customView];

// Remove the custom header accessory view.
[_mapView setHeaderAccessoryView:nil];
低光源模式標頭顏色
iOS 版 Navigation SDK 會根據時間和裝置目前所在位置計算建議的照明模式,並在建議模式變更時 (例如日出或日落時),呼叫 GMSNavigatorListener.didChangeSuggestedLightingMode 監聽器方法。您可以透過下列方式,以程式輔助方式修改微光模式行為:
- 將
GMSMapView.lightingMode設為GMSNavigationLightingMode值,即可控制地圖何時使用一般和低光源模式。如要進一步瞭解如何啟用自動切換照明模式,請參閱「設定一般和低光源模式」。 - 如要自訂低光源模式下導覽標頭的主要和次要背景顏色,請設定
GMSUISettings的navigationHeaderPrimaryBackgroundColorNightMode和navigationHeaderSecondaryBackgroundColorNightMode屬性。
路線清單
您可以在應用程式中提供逐步指示。以下範例顯示其中一種做法。實際步驟可能會因導入方式而異。
- 在
GMSNavigator(導覽器) 上的setDestinations成功完成,且導覽器上的guidanceActive已啟用後,啟用進入點按鈕。 - 使用者輕觸進入點按鈕後,請使用與
GMSMapView(mapView) 相關聯的導覽器建立GMSNavigationDirectionsListController(控制器)。 - 將控制器新增至
UIViewController(檢視控制器) 的例項,並將directionsListView新增為檢視控制器的子檢視區塊。應呼叫控制器上的reloadData和invalidateLayout方法,就像使用UICollectionView一樣。 - 將檢視控制器推送至應用程式的檢視控制器階層。
以下程式碼範例說明如何新增 DirectionsListViewController。
Swift
override func viewDidLoad() {
  super.viewDidLoad()
  // Add the directionsListView to the host view controller's view.
  let directionsListView = directionsListController.directionsListView
  directionsListView.frame = self.view.frame
  self.view.addSubview(directionsListView)
  directionsListView.translatesAutoresizingMaskIntoConstraints = false
  directionsListView.topAnchor.constraint(equalTo: self.view.topAnchor).isActive = true
  directionsListView.leadingAnchor.constraint(equalTo: self.view.leadingAnchor).isActive = true
  directionsListView.trailingAnchor.constraint(equalTo: self.view.trailingAnchor).isActive = true
  directionsListView.bottomAnchor.constraint(equalTo: self.view.bottomAnchor).isActive = true
  ...
}

override func viewWillAppear(_ animated: Bool) {
  super.viewWillAppear(animated)
  // Make sure data is fresh when the view appears.
  directionsListController.reloadData()
  ...
}

override func willTransition(to newCollection: UITraitCollection, with coordinator: UIViewControllerTransitionCoordinator) {
  super.willTransition(to: newCollection, with: coordinator)
  // Invalidate the layout during rotation.
  coordinator.animate(alongsideTransition: {_ in
    self.directionsListController.invalidateLayout()
  })
  ...
}
Objective-C
- (void)viewDidLoad {
  [super viewDidLoad];
  // Add the directionsListView to the host view controller's view.
  UIView *directionsListView = _directionsListController.directionsListView;
  directionsListView.frame = self.view.bounds;
  [self.view addSubview:directionsListView];
  directionsListView.translatesAutoresizingMaskIntoConstraints = NO;
  [directionsListView.topAnchor constraintEqualToAnchor:self.view.topAnchor].active = YES;
  [directionsListView.leadingAnchor constraintEqualToAnchor:self.view.leadingAnchor].active = YES;
  [directionsListView.trailingAnchor constraintEqualToAnchor:self.view.trailingAnchor].active = YES;
  [directionsListView.bottomAnchor constraintEqualToAnchor:self.view.bottomAnchor].active = YES;
  ...
}

- (void)viewWillAppear:(BOOL)animated {
  [super viewWillAppear:animated];
  // Make sure data is fresh when the view appears.
  [_directionsListController reloadData];
  ...
}

- (void)willTransitionToTraitCollection:(UITraitCollection *)newCollection
              withTransitionCoordinator:(id<UIViewControllerTransitionCoordinator>)coordinator {
  [super willTransitionToTraitCollection:newCollection withTransitionCoordinator:coordinator];
  void(^animationBlock)(id <UIViewControllerTransitionCoordinatorContext>context) =
      ^void(id <UIViewControllerTransitionCoordinatorContext>context) {
    [_directionsListController invalidateLayout];
  };
  // Invalidate the layout during rotation.
  [coordinator animateAlongsideTransition:animationBlock
                               completion:nil];
  ...
}

...
行程進度列
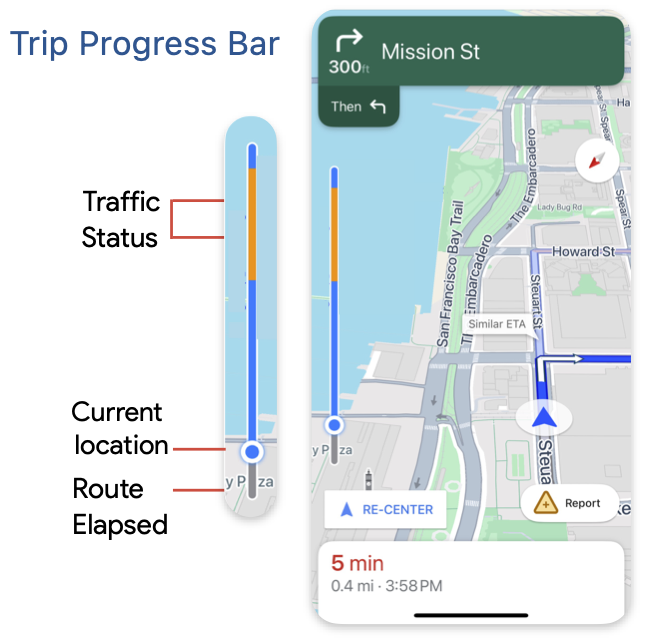
行程進度列是垂直長條,會在導航開始時顯示在地圖的起始/前側。啟用後,系統會顯示整趟行程的總覽,以及使用者的目的地和目前位置。
使用者不必放大地圖,就能快速預測即將發生的問題,例如塞車。並視需要重新規劃路線。如果使用者重新規劃路線,進度列會重設,就像從該點開始新行程一樣。
行程進度列會顯示下列狀態指標:
路況:前方路況。
目前位置:司機在行程中的目前位置。
Route elapsed:行程中已完成的部分。
在 GMSUISettings 中設定 navigationTripProgressBarEnabled 屬性,即可啟用行程進度列。
Swift
mapView.settings.isNavigationTripProgressBarEnabled = true
Objective-C
mapView.settings.navigationTripProgressBarEnabled = YES;
行程進度列位置
- 搜尋列的左側大致與時速表、Google 標誌和「重新置中」按鈕 (如有顯示) 的左側對齊。寬度為 12 點。
- 行程進度列會根據螢幕上的垂直空間動態調整。工具列底部距離畫面底部 210 pt。行程進度列頂端與畫面頂端至少相距 170 點,進度列高度上限為 400 點。
- 如果行程進度列與導覽標題或其他 Navigation UI 元素重疊,系統會將進度列顯示在這些元素下方。
Prompt Visibility API (實驗版)
Prompt Visibility API 可讓您新增事件監聽器,在 Navigation SDK UI 元素即將顯示前和移除後接收回呼,避免 Navigation SDK 產生的 UI 元素與自訂 UI 元素發生衝突。如需更多資訊 (包括程式碼範例),請參閱「設定即時中斷」頁面的「提示顯示設定 API」一節。
速度計控制項
啟用導航功能並將交通方式設為開車後,Navigation SDK for iOS 會在地圖下角顯示速限控制項,指出目前的速限。如果駕駛人超速,控制項會展開,顯示第二個車速表,標示駕駛人目前的車速。
您可以設定警示等級,在駕駛人超速達到指定程度時,變更時速表的顯示格式。舉例來說,您可以指定當駕駛超速 5 英里/小時,目前速度會以紅色文字顯示;超速 10 英里/小時,則會以紅色背景顯示。
如要顯示速限控制項,請將 GMSUISettings 的 shouldDisplaySpeedometer 屬性設為 true。如要停用速限控制項,請將 shouldDisplaySpeedometer 設為 false。
Swift
mapView.settings.shouldDisplaySpeedometer = true
Objective-C
mapView.settings.shouldDisplaySpeedometer = YES;
如要進一步瞭解如何設定時速表的快訊,請參閱「設定時速表快訊」。
目的地標記
您可以設定 GMSUISettings 的 showsDestinationMarkers 屬性,顯示或隱藏特定路線的目的地標記。以下範例說明如何關閉目的地標記。
Swift
mapView.settings.showsDestinationMarkers = false
Objective-C
mapView.settings.showsDestinationMarkers = NO;
地圖體驗功能
Navigation SDK 可讓您進一步自訂使用者的導航體驗。使用者下次更新應用程式時,系統就會套用您對執行個體所做的變更。
醒目顯示目的地和入口
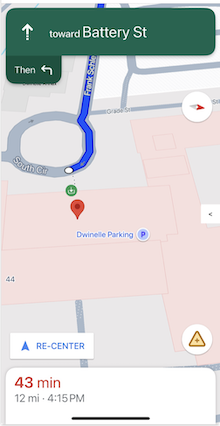
使用 placeID 建立目的地時,系統會醒目顯示目的地建築物,並盡可能顯示入口圖示。這些視覺提示可協助使用者區分並前往預定目的地。
如要使用 placeID 建立目的地,請使用接受 placeID 的 GMSNavigationWaypoint 初始化程式。舉例來說,在「導航路線」教學課程中建立的目的地,會包含目的地醒目顯示和入口標籤 (如有)。
導航時顯示 3D 建築物
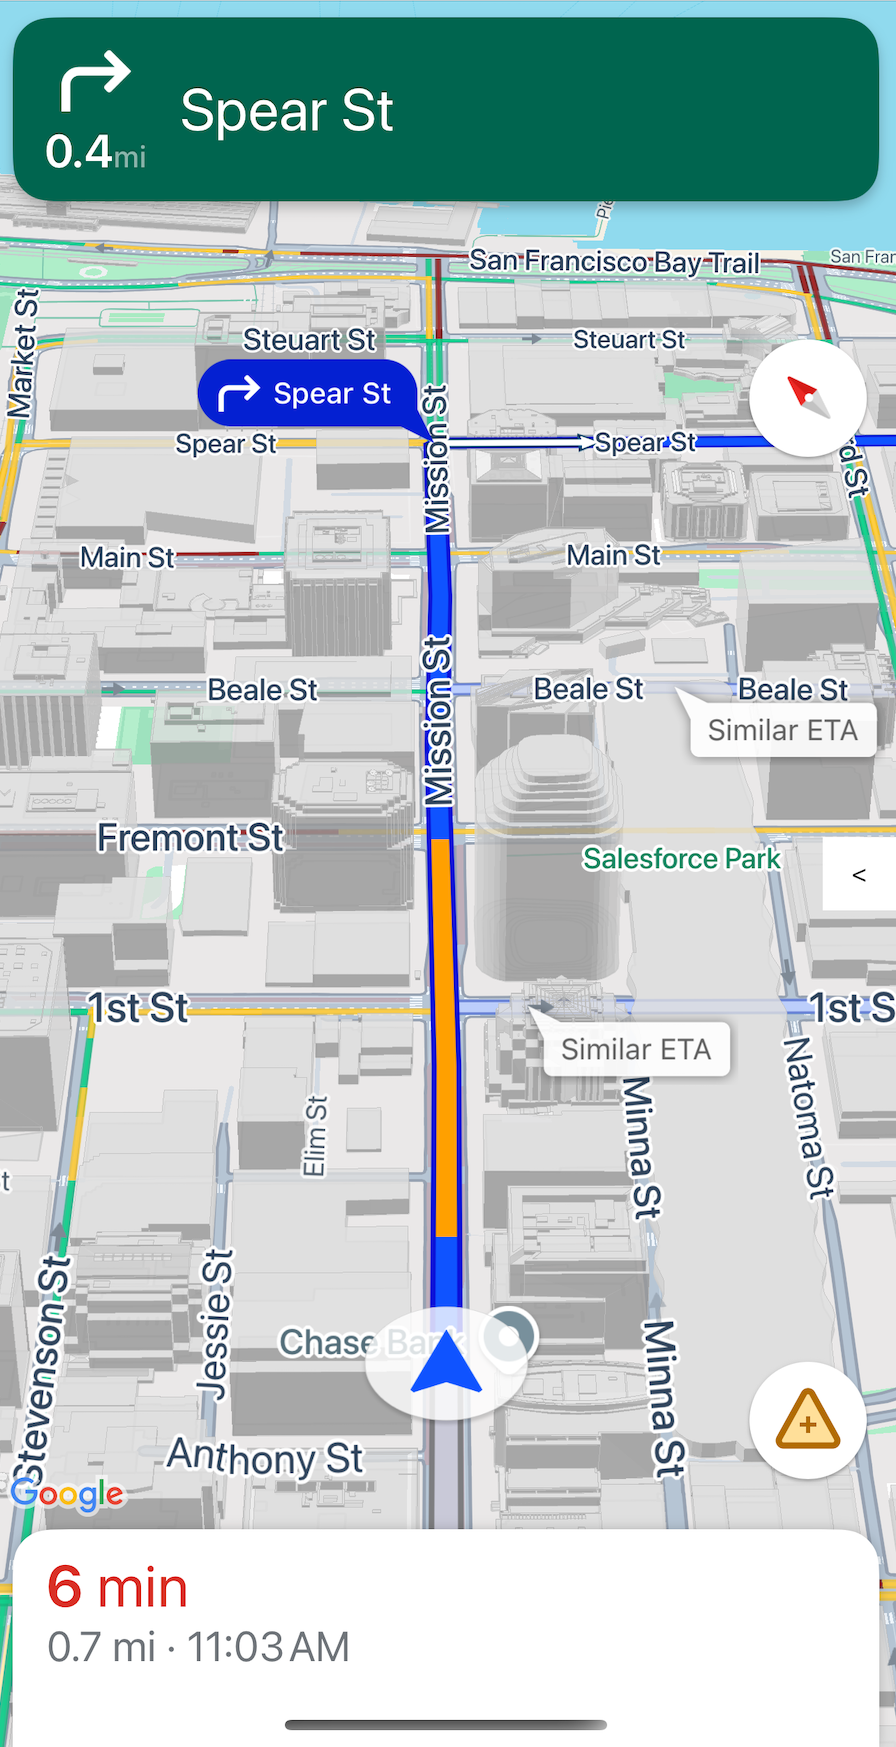
導航時,系統預設會顯示 3D 建築物。如要停用這項功能,請將 buildingsEnabled 設為 false (Swift) 或 NO (Objective-C)。
停用預設地圖手勢
您可以設定 GMSUISettings 類別的屬性,停用地圖上的預設手勢。GMSUISettings 類別是 GMSMapView 的屬性。下面的手勢可以啟用和禁用編程。請注意,停用手勢並不會限制透過程式輔助方式存取攝影機設定。
scrollGestures:控制是否啟用捲動手勢。啟用後,使用者可以滑動平移攝影機。zoomGestures:控制是否啟用或停用縮放手勢。啟用後,使用者可以輕觸兩下、雙指輕觸或雙指撥動,縮放相機畫面。請注意,啟用scrollGestures時,輕觸兩下或雙指撥動可能會將攝影機平移至指定點。tiltGestures— 控制是否啟用或停用傾斜手勢。啟用後,使用者可以垂直向下或向上滑動兩指,傾斜鏡頭。rotateGestures:控制是否啟用旋轉手勢。啟用後,使用者可以使用雙指旋轉手勢旋轉攝影機。
在這個範例中,平移和縮放手勢都已停用。
Swift
mapView.settings.scrollGestures = false
mapView.settings.zoomGestures = false
Objective-C
mapView.settings.scrollGestures = NO;
mapView.settings.zoomGestures = NO;
位置控制項和 UI 元素
您可以使用下列屬性,根據導航標頭和頁尾的位置,調整控制項和其他 UI 元素的位置:
navigationHeaderLayoutGuidenavigationFooterLayoutGuidebottomTrailingButtonsLayoutGuide
以下程式碼範例說明如何使用版面配置指南,在地圖檢視畫面中放置一組標籤:
Swift
/* Add a label to the top left, positioned below the header. */
let topLabel = UILabel()
topLabel.text = "Top Left"
mapView.addSubview(topLabel)
topLabel.translatesAutoresizingMaskIntoConstraints = false
topLabel.topAnchor.constraint(equalTo: mapView.navigationHeaderLayoutGuide.bottomAnchor).isActive = true
topLabel.leadingAnchor.constraint(equalTo: mapView.leadingAnchor).isActive = true

/* Add a label to the bottom right, positioned above the footer. */
let bottomLabel = UILabel()
bottomLabel.text = "Bottom Right"
mapView.addSubview(bottomLabel)
bottomLabel.translatesAutoresizingMaskIntoConstraints = false
bottomLabel.bottomAnchor.constraint(equalTo: mapView.navigationFooterLayoutGuide.topAnchor).isActive = true
bottomLabel.trailingAnchor.constraint(equalTo: mapView.trailingAnchor).isActive = true
Objective-C
/* Add a label to the top left, positioned below the header. */
UILabel *topLabel = [[UILabel alloc] init];
topLabel.text = @"Top Left";
[view addSubview:topLabel];
topLabel.translatesAutoresizingMaskIntoConstraints = NO;
[topLabel.topAnchor
    constraintEqualToAnchor:mapView.navigationHeaderLayoutGuide.bottomAnchor].active = YES;
[topLabel.leadingAnchor constraintEqualToAnchor:mapView.leadingAnchor].active = YES;

/* Add a label to the bottom right, positioned above the footer. */
UILabel *bottomLabel = [[UILabel alloc] init];
bottomLabel.text = @"Bottom Right";
[view addSubview:bottomLabel];
bottomLabel.translatesAutoresizingMaskIntoConstraints = NO;
[bottomLabel.bottomAnchor
    constraintEqualToAnchor:mapView.navigationFooterLayoutGuide.topAnchor].active = YES;
[bottomLabel.trailingAnchor constraintEqualToAnchor:mapView.trailingAnchor].active = YES;
如要瞭解如何使用 bottomTrailingButtonsLayoutGuide 定位即時交通中斷回報按鈕,請參閱「設定即時交通中斷」。
隱藏替代路線
如果使用者介面顯示過多資訊而顯得雜亂,您可以減少顯示的替代路線 (預設為兩條),或完全不顯示替代路線,藉此減少雜亂感。您可以在擷取路線前,先設定 GMSNavigationRoutingOptions,並將 alternateRoutesStrategy 設為下列其中一個列舉值,藉此設定這個選項:
| 列舉值 | 說明 |
|---|---|
| GMSNavigationAlternateRoutesStrategyAll | 預設。最多顯示兩條替代路線。 |
| GMSNavigationAlternateRoutesStrategyOne | 顯示一條替代路線 (如有)。 |
| GMSNavigationAlternateRoutesStrategyNone | 隱藏替代路線。 |
範例
以下程式碼範例示範如何完全隱藏替代路線。
Swift
let routingOptions = GMSNavigationRoutingOptions(alternateRoutesStrategy: .none)
navigator?.setDestinations(destinations,
                           routingOptions: routingOptions) { routeStatus in
  ...
}
Objective-C
GMSNavigationRoutingOptions *routingOptions = [[GMSNavigationRoutingOptions alloc] initWithAlternateRoutesStrategy:GMSNavigationAlternateRoutesStrategyNone];
[navigator setDestinations:destinations
            routingOptions:routingOptions
                  callback:^(GMSRouteStatus routeStatus){...}];