
本教學課程說明如何在 Android 應用程式中加入 Google 地圖,並以折線和多邊形表示地圖上的路線和區域。
請按照教學課程的說明,使用 Maps SDK for Android 建構 Android 應用程式。建議的開發環境為 Android Studio。
取得程式碼
從 GitHub 複製或下載 Google Maps Android API 第 2 版範例存放區。
查看 Java 版本的活動:
    // Copyright 2020 Google LLC
//
// Licensed under the Apache License, Version 2.0 (the "License");
// you may not use this file except in compliance with the License.
// You may obtain a copy of the License at
//
//      http://www.apache.org/licenses/LICENSE-2.0
//
// Unless required by applicable law or agreed to in writing, software
// distributed under the License is distributed on an "AS IS" BASIS,
// WITHOUT WARRANTIES OR CONDITIONS OF ANY KIND, either express or implied.
// See the License for the specific language governing permissions and
// limitations under the License.

package com.example.polygons;

import android.os.Bundle;
import android.widget.Toast;
import androidx.appcompat.app.AppCompatActivity;
import com.google.android.gms.maps.CameraUpdateFactory;
import com.google.android.gms.maps.GoogleMap;
import com.google.android.gms.maps.OnMapReadyCallback;
import com.google.android.gms.maps.SupportMapFragment;
import com.google.android.gms.maps.model.BitmapDescriptorFactory;
import com.google.android.gms.maps.model.CustomCap;
import com.google.android.gms.maps.model.Dash;
import com.google.android.gms.maps.model.Dot;
import com.google.android.gms.maps.model.Gap;
import com.google.android.gms.maps.model.JointType;
import com.google.android.gms.maps.model.LatLng;
import com.google.android.gms.maps.model.PatternItem;
import com.google.android.gms.maps.model.Polygon;
import com.google.android.gms.maps.model.PolygonOptions;
import com.google.android.gms.maps.model.Polyline;
import com.google.android.gms.maps.model.PolylineOptions;
import com.google.android.gms.maps.model.RoundCap;
import java.util.Arrays;
import java.util.List;


/**
 * An activity that displays a Google map with polylines to represent paths or routes,
 * and polygons to represent areas.
 */
public class PolyActivity extends AppCompatActivity
        implements
                OnMapReadyCallback,
                GoogleMap.OnPolylineClickListener,
                GoogleMap.OnPolygonClickListener {

    @Override
    protected void onCreate(Bundle savedInstanceState) {
        super.onCreate(savedInstanceState);

        // Retrieve the content view that renders the map.
        setContentView(R.layout.activity_maps);

        // Get the SupportMapFragment and request notification when the map is ready to be used.
        SupportMapFragment mapFragment = (SupportMapFragment) getSupportFragmentManager()
                .findFragmentById(R.id.map);
        mapFragment.getMapAsync(this);
    }

    /**
     * Manipulates the map when it's available.
     * The API invokes this callback when the map is ready to be used.
     * This is where we can add markers or lines, add listeners or move the camera.
     * In this tutorial, we add polylines and polygons to represent routes and areas on the map.
     */
    @Override
    public void onMapReady(GoogleMap googleMap) {

        // Add polylines to the map.
        // Polylines are useful to show a route or some other connection between points.
        Polyline polyline1 = googleMap.addPolyline(new PolylineOptions()
                .clickable(true)
                .add(
                        new LatLng(-35.016, 143.321),
                        new LatLng(-34.747, 145.592),
                        new LatLng(-34.364, 147.891),
                        new LatLng(-33.501, 150.217),
                        new LatLng(-32.306, 149.248),
                        new LatLng(-32.491, 147.309)));
        // Store a data object with the polyline, used here to indicate an arbitrary type.
        polyline1.setTag("A");
        // Style the polyline.
        stylePolyline(polyline1);

        Polyline polyline2 = googleMap.addPolyline(new PolylineOptions()
                .clickable(true)
                .add(
                        new LatLng(-29.501, 119.700),
                        new LatLng(-27.456, 119.672),
                        new LatLng(-25.971, 124.187),
                        new LatLng(-28.081, 126.555),
                        new LatLng(-28.848, 124.229),
                        new LatLng(-28.215, 123.938)));
        polyline2.setTag("B");
        stylePolyline(polyline2);

        // Add polygons to indicate areas on the map.
        Polygon polygon1 = googleMap.addPolygon(new PolygonOptions()
                .clickable(true)
                .add(
                        new LatLng(-27.457, 153.040),
                        new LatLng(-33.852, 151.211),
                        new LatLng(-37.813, 144.962),
                        new LatLng(-34.928, 138.599)));
        // Store a data object with the polygon, used here to indicate an arbitrary type.
        polygon1.setTag("alpha");
        // Style the polygon.
        stylePolygon(polygon1);

        Polygon polygon2 = googleMap.addPolygon(new PolygonOptions()
                .clickable(true)
                .add(
                        new LatLng(-31.673, 128.892),
                        new LatLng(-31.952, 115.857),
                        new LatLng(-17.785, 122.258),
                        new LatLng(-12.4258, 130.7932)));
        polygon2.setTag("beta");
        stylePolygon(polygon2);

        // Position the map's camera near Alice Springs in the center of Australia,
        // and set the zoom factor so most of Australia shows on the screen.
        googleMap.moveCamera(CameraUpdateFactory.newLatLngZoom(new LatLng(-23.684, 133.903), 4));

        // Set listeners for click events.
        googleMap.setOnPolylineClickListener(this);
        googleMap.setOnPolygonClickListener(this);
    }

    private static final int COLOR_BLACK_ARGB = 0xff000000;
    private static final int POLYLINE_STROKE_WIDTH_PX = 12;

    /**
     * Styles the polyline, based on type.
     * @param polyline The polyline object that needs styling.
     */
    private void stylePolyline(Polyline polyline) {
        String type = "";
        // Get the data object stored with the polyline.
        if (polyline.getTag() != null) {
            type = polyline.getTag().toString();
        }

        switch (type) {
            // If no type is given, allow the API to use the default.
            case "A":
                // Use a custom bitmap as the cap at the start of the line.
                polyline.setStartCap(
                        new CustomCap(
                                BitmapDescriptorFactory.fromResource(R.drawable.ic_arrow), 10));
                break;
            case "B":
                // Use a round cap at the start of the line.
                polyline.setStartCap(new RoundCap());
                break;
        }

        polyline.setEndCap(new RoundCap());
        polyline.setWidth(POLYLINE_STROKE_WIDTH_PX);
        polyline.setColor(COLOR_BLACK_ARGB);
        polyline.setJointType(JointType.ROUND);
    }

    private static final int PATTERN_GAP_LENGTH_PX = 20;
    private static final PatternItem DOT = new Dot();
    private static final PatternItem GAP = new Gap(PATTERN_GAP_LENGTH_PX);

    // Create a stroke pattern of a gap followed by a dot.
    private static final List<PatternItem> PATTERN_POLYLINE_DOTTED = Arrays.asList(GAP, DOT);

    /**
     * Listens for clicks on a polyline.
     * @param polyline The polyline object that the user has clicked.
     */
    @Override
    public void onPolylineClick(Polyline polyline) {
        // Flip from solid stroke to dotted stroke pattern.
        if ((polyline.getPattern() == null) || (!polyline.getPattern().contains(DOT))) {
            polyline.setPattern(PATTERN_POLYLINE_DOTTED);
        } else {
            // The default pattern is a solid stroke.
            polyline.setPattern(null);
        }

        Toast.makeText(this, "Route type " + polyline.getTag().toString(),
                Toast.LENGTH_SHORT).show();
    }

    /**
     * Listens for clicks on a polygon.
     * @param polygon The polygon object that the user has clicked.
     */
    @Override
    public void onPolygonClick(Polygon polygon) {
        // Flip the values of the red, green, and blue components of the polygon's color.
        int color = polygon.getStrokeColor() ^ 0x00ffffff;
        polygon.setStrokeColor(color);
        color = polygon.getFillColor() ^ 0x00ffffff;
        polygon.setFillColor(color);

        Toast.makeText(this, "Area type " + polygon.getTag().toString(), Toast.LENGTH_SHORT).show();
    }

    private static final int COLOR_WHITE_ARGB = 0xffffffff;
    private static final int COLOR_DARK_GREEN_ARGB = 0xff388E3C;
    private static final int COLOR_LIGHT_GREEN_ARGB = 0xff81C784;
    private static final int COLOR_DARK_ORANGE_ARGB = 0xffF57F17;
    private static final int COLOR_LIGHT_ORANGE_ARGB = 0xffF9A825;

    private static final int POLYGON_STROKE_WIDTH_PX = 8;
    private static final int PATTERN_DASH_LENGTH_PX = 20;
    private static final PatternItem DASH = new Dash(PATTERN_DASH_LENGTH_PX);

    // Create a stroke pattern of a gap followed by a dash.
    private static final List<PatternItem> PATTERN_POLYGON_ALPHA = Arrays.asList(GAP, DASH);

    // Create a stroke pattern of a dot followed by a gap, a dash, and another gap.
    private static final List<PatternItem> PATTERN_POLYGON_BETA =
        Arrays.asList(DOT, GAP, DASH, GAP);

    /**
     * Styles the polygon, based on type.
     * @param polygon The polygon object that needs styling.
     */
    private void stylePolygon(Polygon polygon) {
        String type = "";
        // Get the data object stored with the polygon.
        if (polygon.getTag() != null) {
            type = polygon.getTag().toString();
        }

        List<PatternItem> pattern = null;
        int strokeColor = COLOR_BLACK_ARGB;
        int fillColor = COLOR_WHITE_ARGB;

        switch (type) {
            // If no type is given, allow the API to use the default.
            case "alpha":
                // Apply a stroke pattern to render a dashed line, and define colors.
                pattern = PATTERN_POLYGON_ALPHA;
                strokeColor = COLOR_DARK_GREEN_ARGB;
                fillColor = COLOR_LIGHT_GREEN_ARGB;
                break;
            case "beta":
                // Apply a stroke pattern to render a line of dots and dashes, and define colors.
                pattern = PATTERN_POLYGON_BETA;
                strokeColor = COLOR_DARK_ORANGE_ARGB;
                fillColor = COLOR_LIGHT_ORANGE_ARGB;
                break;
        }

        polygon.setStrokePattern(pattern);
        polygon.setStrokeWidth(POLYGON_STROKE_WIDTH_PX);
        polygon.setStrokeColor(strokeColor);
        polygon.setFillColor(fillColor);
    }
}
查看 Kotlin 版本的活動:
    // Copyright 2020 Google LLC
//
// Licensed under the Apache License, Version 2.0 (the "License");
// you may not use this file except in compliance with the License.
// You may obtain a copy of the License at
//
//      http://www.apache.org/licenses/LICENSE-2.0
//
// Unless required by applicable law or agreed to in writing, software
// distributed under the License is distributed on an "AS IS" BASIS,
// WITHOUT WARRANTIES OR CONDITIONS OF ANY KIND, either express or implied.
// See the License for the specific language governing permissions and
// limitations under the License.
package com.example.polygons

import android.os.Bundle
import android.widget.Toast
import androidx.appcompat.app.AppCompatActivity
import com.google.android.gms.maps.CameraUpdateFactory
import com.google.android.gms.maps.GoogleMap
import com.google.android.gms.maps.GoogleMap.OnPolygonClickListener
import com.google.android.gms.maps.GoogleMap.OnPolylineClickListener
import com.google.android.gms.maps.OnMapReadyCallback
import com.google.android.gms.maps.SupportMapFragment
import com.google.android.gms.maps.model.BitmapDescriptorFactory
import com.google.android.gms.maps.model.CustomCap
import com.google.android.gms.maps.model.Dash
import com.google.android.gms.maps.model.Dot
import com.google.android.gms.maps.model.Gap
import com.google.android.gms.maps.model.JointType
import com.google.android.gms.maps.model.LatLng
import com.google.android.gms.maps.model.PatternItem
import com.google.android.gms.maps.model.Polygon
import com.google.android.gms.maps.model.PolygonOptions
import com.google.android.gms.maps.model.Polyline
import com.google.android.gms.maps.model.PolylineOptions
import com.google.android.gms.maps.model.RoundCap

/**
 * An activity that displays a Google map with polylines to represent paths or routes,
 * and polygons to represent areas.
 */
class PolyActivity : AppCompatActivity(), OnMapReadyCallback, OnPolylineClickListener, OnPolygonClickListener {

    override fun onCreate(savedInstanceState: Bundle?) {
        super.onCreate(savedInstanceState)

        // Retrieve the content view that renders the map.
        setContentView(R.layout.activity_maps)

        // Get the SupportMapFragment and request notification when the map is ready to be used.
        val mapFragment = supportFragmentManager
            .findFragmentById(R.id.map) as SupportMapFragment?
        mapFragment?.getMapAsync(this)
    }

    /**
     * Manipulates the map when it's available.
     * The API invokes this callback when the map is ready to be used.
     * This is where we can add markers or lines, add listeners or move the camera.
     * In this tutorial, we add polylines and polygons to represent routes and areas on the map.
     */
    override fun onMapReady(googleMap: GoogleMap) {

        // Add polylines to the map.
        // Polylines are useful to show a route or some other connection between points.
        val polyline1 = googleMap.addPolyline(PolylineOptions()
            .clickable(true)
            .add(
                LatLng(-35.016, 143.321),
                LatLng(-34.747, 145.592),
                LatLng(-34.364, 147.891),
                LatLng(-33.501, 150.217),
                LatLng(-32.306, 149.248),
                LatLng(-32.491, 147.309)))
        // Store a data object with the polyline, used here to indicate an arbitrary type.
        polyline1.tag = "A"
        // Style the polyline.
        stylePolyline(polyline1)

        val polyline2 = googleMap.addPolyline(PolylineOptions()
            .clickable(true)
            .add(
                LatLng(-29.501, 119.700),
                LatLng(-27.456, 119.672),
                LatLng(-25.971, 124.187),
                LatLng(-28.081, 126.555),
                LatLng(-28.848, 124.229),
                LatLng(-28.215, 123.938)))
        polyline2.tag = "B"
        stylePolyline(polyline2)

        // Add polygons to indicate areas on the map.
        val polygon1 = googleMap.addPolygon(PolygonOptions()
            .clickable(true)
            .add(
                LatLng(-27.457, 153.040),
                LatLng(-33.852, 151.211),
                LatLng(-37.813, 144.962),
                LatLng(-34.928, 138.599)))
        // Store a data object with the polygon, used here to indicate an arbitrary type.
        polygon1.tag = "alpha"
        // Style the polygon.
        stylePolygon(polygon1)

        val polygon2 = googleMap.addPolygon(PolygonOptions()
            .clickable(true)
            .add(
                LatLng(-31.673, 128.892),
                LatLng(-31.952, 115.857),
                LatLng(-17.785, 122.258),
                LatLng(-12.4258, 130.7932)))
        polygon2.tag = "beta"
        stylePolygon(polygon2)

        // Position the map's camera near Alice Springs in the center of Australia,
        // and set the zoom factor so most of Australia shows on the screen.
        googleMap.moveCamera(CameraUpdateFactory.newLatLngZoom(LatLng(-23.684, 133.903), 4f))

        // Set listeners for click events.
        googleMap.setOnPolylineClickListener(this)
        googleMap.setOnPolygonClickListener(this)
    }

    private val COLOR_BLACK_ARGB = -0x1000000
    private val POLYLINE_STROKE_WIDTH_PX = 12

    /**
     * Styles the polyline, based on type.
     * @param polyline The polyline object that needs styling.
     */
    private fun stylePolyline(polyline: Polyline) {
        // Get the data object stored with the polyline.
        val type = polyline.tag?.toString() ?: ""
        when (type) {
            "A" -> {
                // Use a custom bitmap as the cap at the start of the line.
                polyline.startCap = CustomCap(
                    BitmapDescriptorFactory.fromResource(R.drawable.ic_arrow), 10f)
            }
            "B" -> {
               // Use a round cap at the start of the line.
                polyline.startCap = RoundCap()
            }
        }
        polyline.endCap = RoundCap()
        polyline.width = POLYLINE_STROKE_WIDTH_PX.toFloat()
        polyline.color = COLOR_BLACK_ARGB
        polyline.jointType = JointType.ROUND
    }

    private val PATTERN_GAP_LENGTH_PX = 20
    private val DOT: PatternItem = Dot()
    private val GAP: PatternItem = Gap(PATTERN_GAP_LENGTH_PX.toFloat())

    // Create a stroke pattern of a gap followed by a dot.
    private val PATTERN_POLYLINE_DOTTED = listOf(GAP, DOT)

    /**
     * Listens for clicks on a polyline.
     * @param polyline The polyline object that the user has clicked.
     */
    override fun onPolylineClick(polyline: Polyline) {
        // Flip from solid stroke to dotted stroke pattern.
        if (polyline.pattern == null || !polyline.pattern!!.contains(DOT)) {
            polyline.pattern = PATTERN_POLYLINE_DOTTED
        } else {
            // The default pattern is a solid stroke.
            polyline.pattern = null
        }
        Toast.makeText(this, "Route type " + polyline.tag.toString(),
            Toast.LENGTH_SHORT).show()
    }

    /**
     * Listens for clicks on a polygon.
     * @param polygon The polygon object that the user has clicked.
     */
    override fun onPolygonClick(polygon: Polygon) {
        // Flip the values of the red, green, and blue components of the polygon's color.
        var color = polygon.strokeColor xor 0x00ffffff
        polygon.strokeColor = color
        color = polygon.fillColor xor 0x00ffffff
        polygon.fillColor = color
        Toast.makeText(this, "Area type ${polygon.tag?.toString()}", Toast.LENGTH_SHORT).show()
    }

    private val COLOR_WHITE_ARGB = -0x1
    private val COLOR_DARK_GREEN_ARGB = -0xc771c4
    private val COLOR_LIGHT_GREEN_ARGB = -0x7e387c
    private val COLOR_DARK_ORANGE_ARGB = -0xa80e9
    private val COLOR_LIGHT_ORANGE_ARGB = -0x657db
    private val POLYGON_STROKE_WIDTH_PX = 8
    private val PATTERN_DASH_LENGTH_PX = 20

    private val DASH: PatternItem = Dash(PATTERN_DASH_LENGTH_PX.toFloat())

    // Create a stroke pattern of a gap followed by a dash.
    private val PATTERN_POLYGON_ALPHA = listOf(GAP, DASH)

    // Create a stroke pattern of a dot followed by a gap, a dash, and another gap.
    private val PATTERN_POLYGON_BETA = listOf(DOT, GAP, DASH, GAP)

    /**
     * Styles the polygon, based on type.
     * @param polygon The polygon object that needs styling.
     */
    private fun stylePolygon(polygon: Polygon) {
        // Get the data object stored with the polygon.
        val type = polygon.tag?.toString() ?: ""
        var pattern: List<PatternItem>? = null
        var strokeColor = COLOR_BLACK_ARGB
        var fillColor = COLOR_WHITE_ARGB
        when (type) {
            "alpha" -> {
                // Apply a stroke pattern to render a dashed line, and define colors.
                pattern = PATTERN_POLYGON_ALPHA
                strokeColor = COLOR_DARK_GREEN_ARGB
                fillColor = COLOR_LIGHT_GREEN_ARGB
            }
            "beta" -> {
                // Apply a stroke pattern to render a line of dots and dashes, and define colors.
                pattern = PATTERN_POLYGON_BETA
                strokeColor = COLOR_DARK_ORANGE_ARGB
                fillColor = COLOR_LIGHT_ORANGE_ARGB
            }
        }
        polygon.strokePattern = pattern
        polygon.strokeWidth = POLYGON_STROKE_WIDTH_PX.toFloat()
        polygon.strokeColor = strokeColor
        polygon.fillColor = fillColor
    }
}
設定開發專案
如要在 Android Studio 中建立教學課程專案,請按照下列步驟操作。
- 下載並安裝 Android Studio。
- 將 Google Play 服務套件加入 Android Studio。
- 如果您尚未複製或下載 Google Maps Android API 第 2 版範例存放區,請先複製或下載。
匯入教學課程專案:
- 在 Android Studio 中,選取「File」(檔案) >「New」(新增) >「Import Project」(匯入專案)。
- 下載完成後,請前往您儲存 Google Maps Android API 第 2 版範例存放區的位置。
- 在這個位置找到 Polygons 專案:
PATH-TO-SAVED-REPO/android-samples/tutorials/java/Polygons(Java) 或
PATH-TO-SAVED-REPO/android-samples/tutorials/kotlin/Polygons(Kotlin) - 選取專案目錄,然後按一下「Open」(開啟)。Android Studio 現在會使用 Gradle 建構工具來建立您的專案。
啟用必要的 API 並取得 API 金鑰
如想完成本教學課程,請建立 Google Cloud 專案並啟用必要的 API,以及加入具備 Maps SDK for Android 使用授權的 API 金鑰。 相關詳情請參閱:
在應用程式中加入 API 金鑰
- 開啟專案的
local.properties檔案。 加入以下字串,然後將
YOUR_API_KEY替換成您的 API 金鑰值:MAPS_API_KEY=YOUR_API_KEY建構應用程式時,Secrets Gradle Plugin for Android 會複製 API 金鑰,並將該金鑰當成 Android 資訊清單的建構變數使用,相關詳情請見下方說明。
建構並執行應用程式
如要建構並執行應用程式,請按照下列步驟操作:
將 Android 裝置連接到電腦。按照操作說明在 Android 裝置中啟用開發人員選項,並設定系統以偵測裝置。
您也可以使用 Android 虛擬裝置管理工具 (AVD Manager) 來設定虛擬裝置;選擇模擬器時,請務必挑選包含 Google API 的映像檔。如要進一步瞭解相關詳情,請參閱「設定 Android Studio 專案」一文。
在 Android Studio 中,按一下「Run」(執行) 選單選項 (或播放按鈕圖示),然後按照系統提示選擇裝置。
Android Studio 會叫用 Gradle 來建構應用程式,然後在裝置或模擬器上執行應用程式。
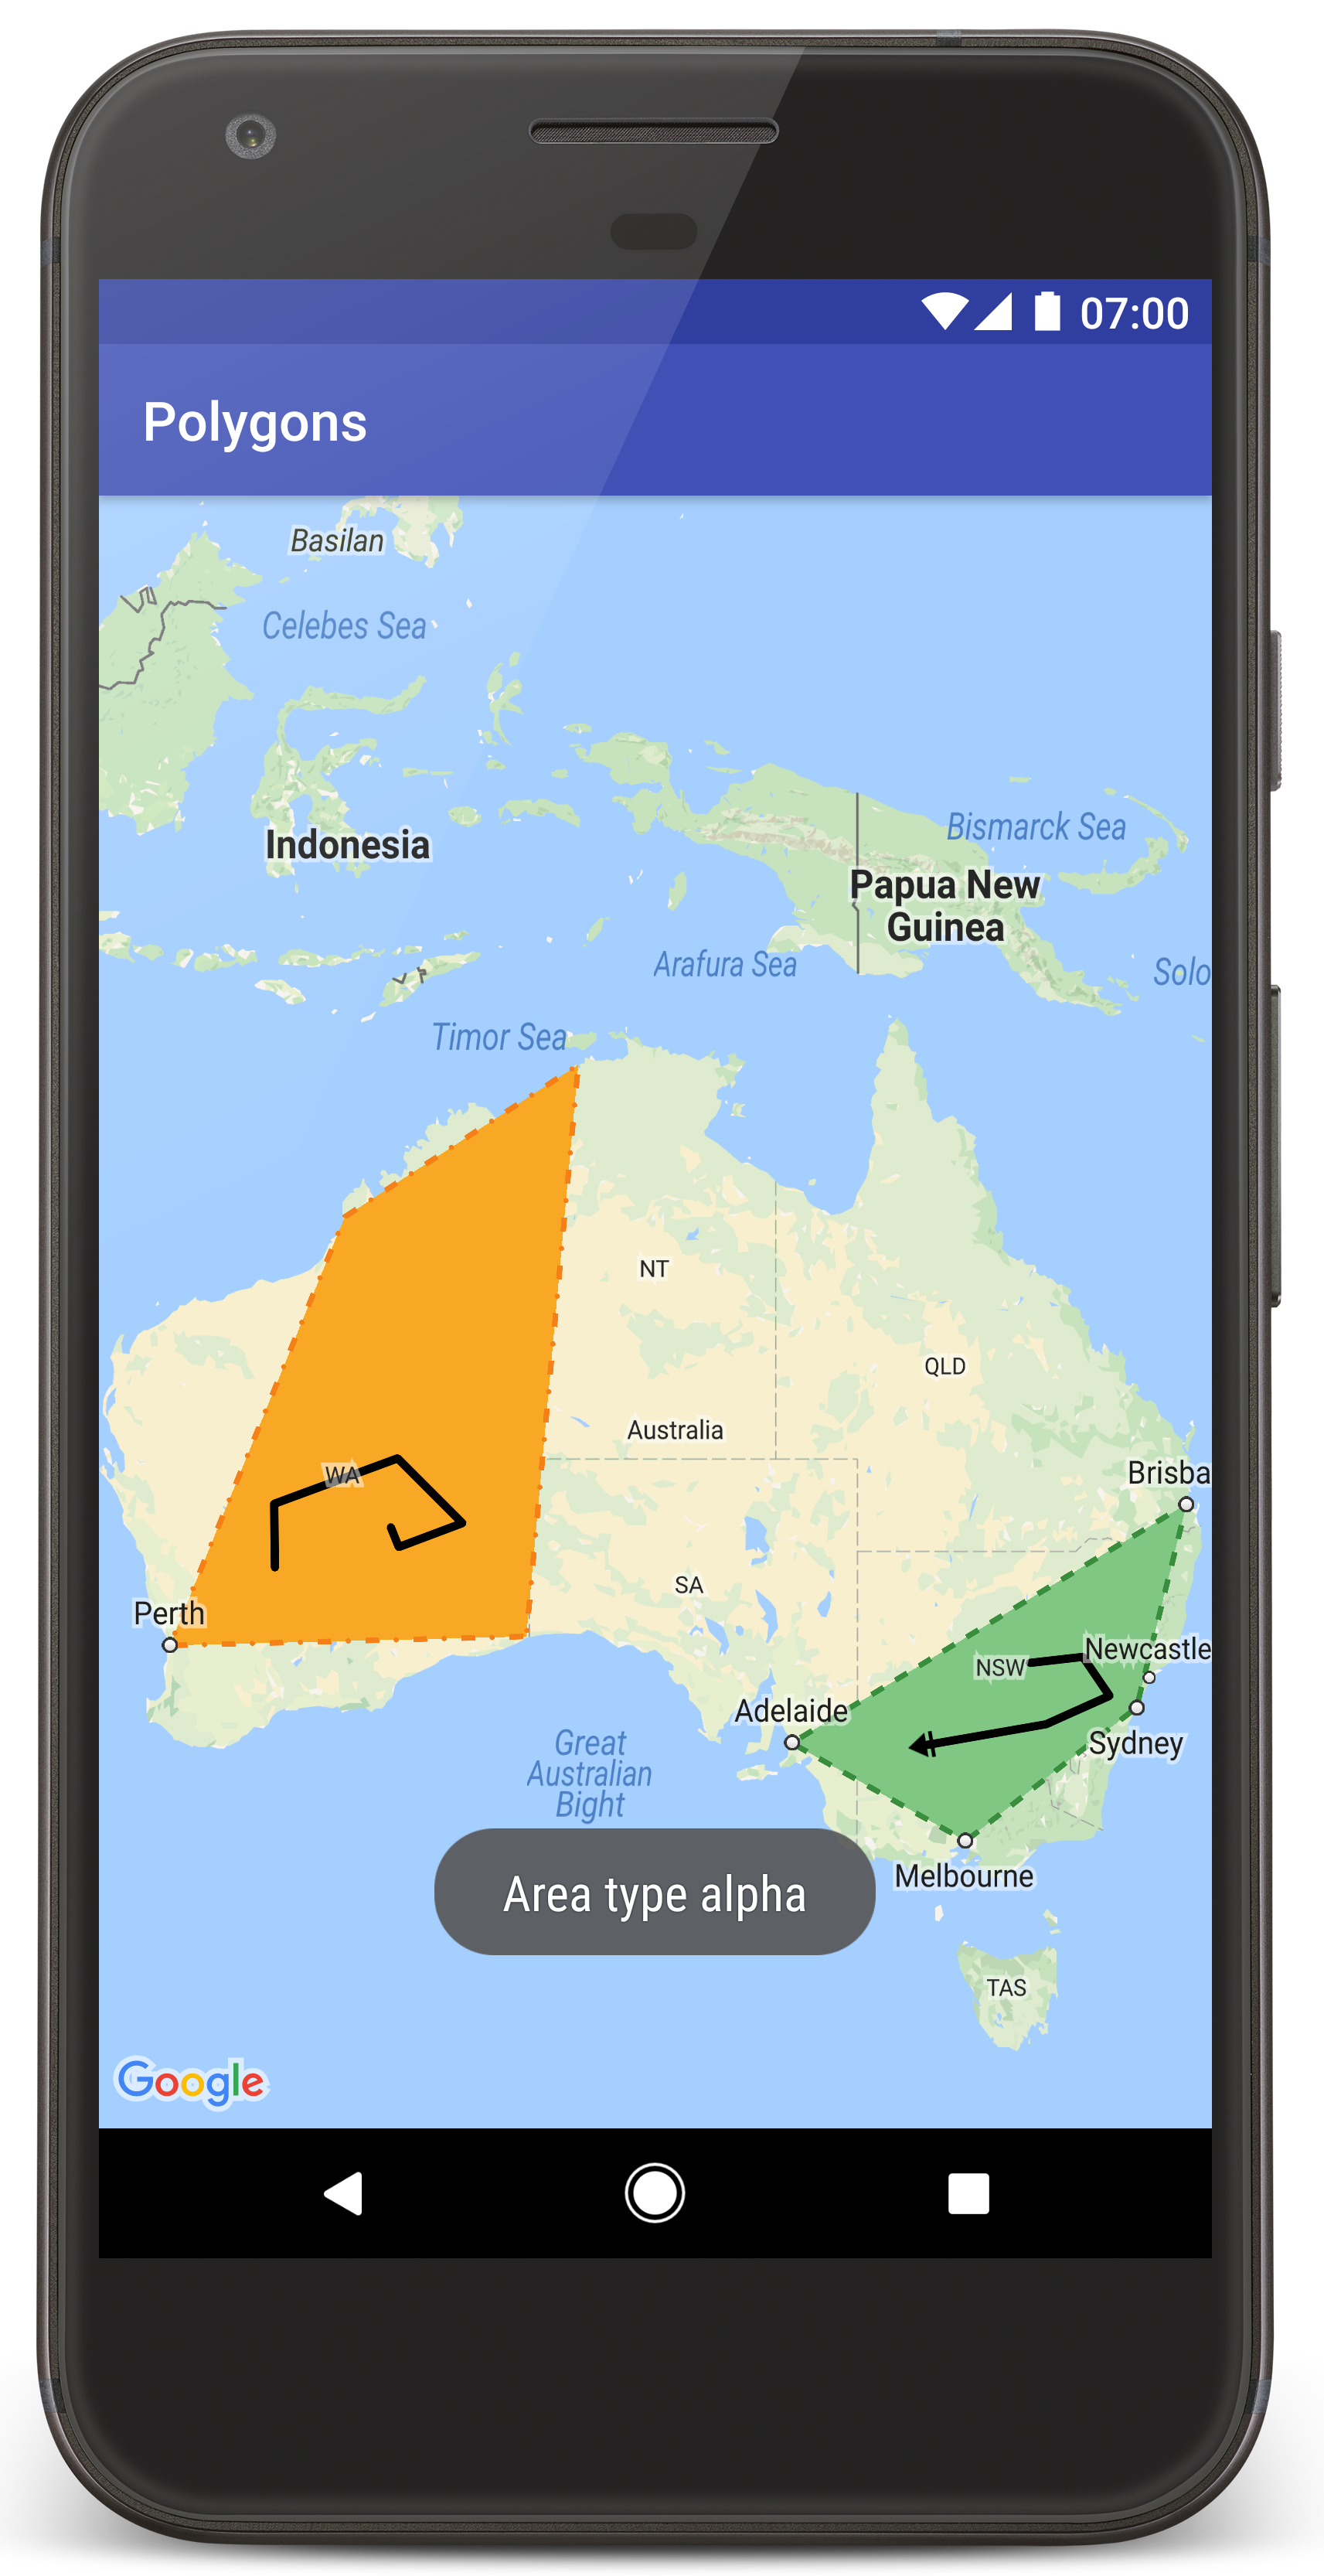
您應該會看到地圖上的澳洲上方有兩個多邊形重疊,與本網頁中的圖片類似。
疑難排解:
- 如未看到地圖,請檢查您是否已按照上述步驟取得 API 金鑰,並加到應用程式。在 Android Studio 的 Android Monitor 查看記錄檔,檢視是否有關於 API 金鑰的錯誤訊息。
- 使用 Android Studio 偵錯工具查看記錄檔並為應用程式偵錯。
瞭解程式碼
本教學課程這一段將說明 Polygons 應用程式最重要的部分,協助您瞭解如何建構類似的應用程式。
檢查您的 Android 資訊清單
請注意應用程式 AndroidManifest.xml 檔案中的下列元素:
新增
meta-data元素,以嵌入用來編譯應用程式的 Google Play 服務版本。<meta-data android:name="com.google.android.gms.version" android:value="@integer/google_play_services_version" />新增指定 API 金鑰的
meta-data元素。在本教學課程的範例中,API 金鑰值對應的建構變數,會符合您先前定義的金鑰名稱 (MAPS_API_KEY)。建構應用程式時,Secrets Gradle Plugin for Android 會將local.properties檔案中的金鑰當成資訊清單建構變數使用。<meta-data android:name="com.google.android.geo.API_KEY" android:value="${MAPS_API_KEY}" />在
build.gradle檔案中,下列這行程式碼會將您的 API 金鑰傳遞至 Android 資訊清單。id 'com.google.android.libraries.mapsplatform.secrets-gradle-plugin'
以下是資訊清單的完整範例:
<?xml version="1.0" encoding="utf-8"?>
<!--
Copyright 2020 Google LLC
Licensed under the Apache License, Version 2.0 (the "License");
you may not use this file except in compliance with the License.
You may obtain a copy of the License at
http://www.apache.org/licenses/LICENSE-2.0
Unless required by applicable law or agreed to in writing, software
distributed under the License is distributed on an "AS IS" BASIS,
WITHOUT WARRANTIES OR CONDITIONS OF ANY KIND, either express or implied.
See the License for the specific language governing permissions and
limitations under the License.
-->
<manifest xmlns:android="http://schemas.android.com/apk/res/android">
<application
android:allowBackup="true"
android:icon="@mipmap/ic_launcher"
android:label="@string/app_name"
android:supportsRtl="true"
android:theme="@style/AppTheme">
<meta-data
    android:name="com.google.android.gms.version"
    android:value="@integer/google_play_services_version" />
<!--
The API key for Google Maps-based APIs.
-->
<meta-data
  android:name="com.google.android.geo.API_KEY"
  android:value="${MAPS_API_KEY}" />
<activity
android:name="com.example.polygons.PolyActivity"
android:exported="true"
android:label="@string/title_activity_maps">
<intent-filter>
<action android:name="android.intent.action.MAIN" />
<category android:name="android.intent.category.LAUNCHER" />
</intent-filter>
</activity>
</application>
</manifest>
新增地圖
使用 Maps SDK for Android 顯示地圖。
在活動的版面配置檔案
activity_maps.xml中加入<fragment>元素。這個元素會將SupportMapFragment定義為地圖的容器,並提供GoogleMap物件的存取權。本教學課程使用 Android 支援資料庫版本的地圖片段,確保與舊版 Android 架構能回溯相容。<!-- Copyright 2020 Google LLC Licensed under the Apache License, Version 2.0 (the "License"); you may not use this file except in compliance with the License. You may obtain a copy of the License at http://www.apache.org/licenses/LICENSE-2.0 Unless required by applicable law or agreed to in writing, software distributed under the License is distributed on an "AS IS" BASIS, WITHOUT WARRANTIES OR CONDITIONS OF ANY KIND, either express or implied. See the License for the specific language governing permissions and limitations under the License. --> <fragment xmlns:android="http://schemas.android.com/apk/res/android" xmlns:tools="http://schemas.android.com/tools" android:id="@+id/map" android:name="com.google.android.gms.maps.SupportMapFragment" android:layout_width="match_parent" android:layout_height="match_parent" tools:context="com.example.polygons.PolyActivity" />在活動的
onCreate()方法中,將版面配置檔案設為內容檢視畫面。呼叫FragmentManager.findFragmentById()以取得地圖片段的控制代碼,然後使用getMapAsync()註冊地圖回呼:Java
@Override protected void onCreate(Bundle savedInstanceState) { super.onCreate(savedInstanceState); // Retrieve the content view that renders the map. setContentView(R.layout.activity_maps); // Get the SupportMapFragment and request notification when the map is ready to be used. SupportMapFragment mapFragment = (SupportMapFragment) getSupportFragmentManager() .findFragmentById(R.id.map); mapFragment.getMapAsync(this); }Kotlin
override fun onCreate(savedInstanceState: Bundle?) { super.onCreate(savedInstanceState) // Retrieve the content view that renders the map. setContentView(R.layout.activity_maps) // Get the SupportMapFragment and request notification when the map is ready to be used. val mapFragment = supportFragmentManager .findFragmentById(R.id.map) as SupportMapFragment? mapFragment?.getMapAsync(this) }導入
OnMapReadyCallback介面並覆寫onMapReady()方法。當GoogleMap物件可用時,API 會叫用這個回呼,因此您可以在地圖中加入物件,並進一步為應用程式自訂物件:Java
public class PolyActivity extends AppCompatActivity implements OnMapReadyCallback, GoogleMap.OnPolylineClickListener, GoogleMap.OnPolygonClickListener { @Override protected void onCreate(Bundle savedInstanceState) { super.onCreate(savedInstanceState); // Retrieve the content view that renders the map. setContentView(R.layout.activity_maps); // Get the SupportMapFragment and request notification when the map is ready to be used. SupportMapFragment mapFragment = (SupportMapFragment) getSupportFragmentManager() .findFragmentById(R.id.map); mapFragment.getMapAsync(this); } /** * Manipulates the map when it's available. * The API invokes this callback when the map is ready to be used. * This is where we can add markers or lines, add listeners or move the camera. * In this tutorial, we add polylines and polygons to represent routes and areas on the map. */ @Override public void onMapReady(GoogleMap googleMap) { // Add polylines to the map. // Polylines are useful to show a route or some other connection between points. Polyline polyline1 = googleMap.addPolyline(new PolylineOptions() .clickable(true) .add( new LatLng(-35.016, 143.321), new LatLng(-34.747, 145.592), new LatLng(-34.364, 147.891), new LatLng(-33.501, 150.217), new LatLng(-32.306, 149.248), new LatLng(-32.491, 147.309))); // Position the map's camera near Alice Springs in the center of Australia, // and set the zoom factor so most of Australia shows on the screen. googleMap.moveCamera(CameraUpdateFactory.newLatLngZoom(new LatLng(-23.684, 133.903), 4)); // Set listeners for click events. googleMap.setOnPolylineClickListener(this); googleMap.setOnPolygonClickListener(this); }Kotlin
class PolyActivity : AppCompatActivity(), OnMapReadyCallback, OnPolylineClickListener, OnPolygonClickListener { override fun onCreate(savedInstanceState: Bundle?) { super.onCreate(savedInstanceState) // Retrieve the content view that renders the map. setContentView(R.layout.activity_maps) // Get the SupportMapFragment and request notification when the map is ready to be used. val mapFragment = supportFragmentManager .findFragmentById(R.id.map) as SupportMapFragment? mapFragment?.getMapAsync(this) } /** * Manipulates the map when it's available. * The API invokes this callback when the map is ready to be used. * This is where we can add markers or lines, add listeners or move the camera. * In this tutorial, we add polylines and polygons to represent routes and areas on the map. */ override fun onMapReady(googleMap: GoogleMap) { // Add polylines to the map. // Polylines are useful to show a route or some other connection between points. val polyline1 = googleMap.addPolyline(PolylineOptions() .clickable(true) .add( LatLng(-35.016, 143.321), LatLng(-34.747, 145.592), LatLng(-34.364, 147.891), LatLng(-33.501, 150.217), LatLng(-32.306, 149.248), LatLng(-32.491, 147.309))) // Position the map's camera near Alice Springs in the center of Australia, // and set the zoom factor so most of Australia shows on the screen. googleMap.moveCamera(CameraUpdateFactory.newLatLngZoom(LatLng(-23.684, 133.903), 4f)) // Set listeners for click events. googleMap.setOnPolylineClickListener(this) googleMap.setOnPolygonClickListener(this) }
新增折線以在地圖上繪製線條
Polyline 是一組連續線段。折線可用於表示地圖上的路線、路徑或不同位置之間的其他交通路線。
建立
PolylineOptions物件並新增路線點。 每個路線點都代表地圖上的一個位置,您可以使用包含緯度和經度值的LatLng物件定義該位置。下方的程式碼範例會建立一條含有 6 個路線點的折線。呼叫
GoogleMap.addPolyline()即可將折線加入地圖。Java
Polyline polyline1 = googleMap.addPolyline(new PolylineOptions() .clickable(true) .add( new LatLng(-35.016, 143.321), new LatLng(-34.747, 145.592), new LatLng(-34.364, 147.891), new LatLng(-33.501, 150.217), new LatLng(-32.306, 149.248), new LatLng(-32.491, 147.309)));Kotlin
val polyline1 = googleMap.addPolyline(PolylineOptions() .clickable(true) .add( LatLng(-35.016, 143.321), LatLng(-34.747, 145.592), LatLng(-34.364, 147.891), LatLng(-33.501, 150.217), LatLng(-32.306, 149.248), LatLng(-32.491, 147.309)))
如要處理折線上的點擊事件,請將折線的 clickable 選項設為 true。本教學課程稍後將進一步說明事件處理方式。
使用折線儲存任意資料
您可以使用折線和其他幾何物件來儲存任意資料物件。
呼叫
Polyline.setTag()即可使用折線儲存資料物件。以下程式碼會定義指定折線類型的任意標記 (A)。Java
Polyline polyline1 = googleMap.addPolyline(new PolylineOptions()
    .clickable(true)
    .add(
            new LatLng(-35.016, 143.321),
            new LatLng(-34.747, 145.592),
            new LatLng(-34.364, 147.891),
            new LatLng(-33.501, 150.217),
            new LatLng(-32.306, 149.248),
            new LatLng(-32.491, 147.309)));
// Store a data object with the polyline, used here to indicate an arbitrary type.
polyline1.setTag("A");
Kotlin
val polyline1 = googleMap.addPolyline(PolylineOptions()
.clickable(true)
.add(
    LatLng(-35.016, 143.321),
    LatLng(-34.747, 145.592),
    LatLng(-34.364, 147.891),
    LatLng(-33.501, 150.217),
    LatLng(-32.306, 149.248),
    LatLng(-32.491, 147.309)))
// Store a data object with the polyline, used here to indicate an arbitrary type.
polyline1.tag = "A
使用
Polyline.getTag()可擷取資料,如下一節所示。
在折線中加入自訂樣式
您可以在 PolylineOptions 物件中指定各種樣式屬性。樣式選項包括筆劃顏色、筆劃寬度、筆劃圖案、接角類型,以及線條的開始及結束端點樣式。如果未指定特定屬性,API 就會使用該屬性的預設值。
下方程式碼會在線條末端套用圓形端點樣式,並根據折線的「類型」套用不同的開始端點樣式;所謂「類型」,是指儲存在折線資料物件中的任意屬性。範例中也指定了筆劃寬度、筆劃顏色和接角類型:
Java
private static final int COLOR_BLACK_ARGB = 0xff000000;
private static final int POLYLINE_STROKE_WIDTH_PX = 12;
/**
* Styles the polyline, based on type.
* @param polyline The polyline object that needs styling.
*/
private void stylePolyline(Polyline polyline) {
String type = "";
// Get the data object stored with the polyline.
if (polyline.getTag() != null) {
type = polyline.getTag().toString();
}
switch (type) {
// If no type is given, allow the API to use the default.
case "A":
// Use a custom bitmap as the cap at the start of the line.
polyline.setStartCap(
new CustomCap(
BitmapDescriptorFactory.fromResource(R.drawable.ic_arrow), 10));
break;
case "B":
// Use a round cap at the start of the line.
polyline.setStartCap(new RoundCap());
break;
}
polyline.setEndCap(new RoundCap());
polyline.setWidth(POLYLINE_STROKE_WIDTH_PX);
polyline.setColor(COLOR_BLACK_ARGB);
polyline.setJointType(JointType.ROUND);
}
Kotlin
private val COLOR_BLACK_ARGB = -0x1000000
private val POLYLINE_STROKE_WIDTH_PX = 12
/**
* Styles the polyline, based on type.
* @param polyline The polyline object that needs styling.
*/
private fun stylePolyline(polyline: Polyline) {
// Get the data object stored with the polyline.
val type = polyline.tag?.toString() ?: ""
when (type) {
"A" -> {
// Use a custom bitmap as the cap at the start of the line.
polyline.startCap = CustomCap(
BitmapDescriptorFactory.fromResource(R.drawable.ic_arrow), 10f)
}
"B" -> {
// Use a round cap at the start of the line.
polyline.startCap = RoundCap()
}
}
polyline.endCap = RoundCap()
polyline.width = POLYLINE_STROKE_WIDTH_PX.toFloat()
polyline.color = COLOR_BLACK_ARGB
polyline.jointType = JointType.ROUND
}
上述程式碼會指定 A 類型折線開始端點樣式的自訂點陣圖,並將參考筆劃寬度指定為 10 像素。API 會根據參考筆劃寬度調整點陣圖比例。指定參考筆劃寬度時,請提供您在設計點陣圖圖片時使用的寬度 (以圖片的原始尺寸為準)。提示:在圖片編輯器中開啟點陣圖圖片並縮放至 100%,然後繪製相對於圖片的特定線條筆劃寬度。
處理折線上的點擊事件
呼叫
Polyline.setClickable()即可將折線設為可點按 (折線預設為不可點按,使用者輕觸折線時,您的應用程式也不會收到通知)。導入
OnPolylineClickListener介面並呼叫GoogleMap.setOnPolylineClickListener(),即可在地圖上設定事件監聽器:Java
public class PolyActivity extends AppCompatActivity implements OnMapReadyCallback, GoogleMap.OnPolylineClickListener, GoogleMap.OnPolygonClickListener { @Override protected void onCreate(Bundle savedInstanceState) { super.onCreate(savedInstanceState); // Retrieve the content view that renders the map. setContentView(R.layout.activity_maps); // Get the SupportMapFragment and request notification when the map is ready to be used. SupportMapFragment mapFragment = (SupportMapFragment) getSupportFragmentManager() .findFragmentById(R.id.map); mapFragment.getMapAsync(this); } /** * Manipulates the map when it's available. * The API invokes this callback when the map is ready to be used. * This is where we can add markers or lines, add listeners or move the camera. * In this tutorial, we add polylines and polygons to represent routes and areas on the map. */ @Override public void onMapReady(GoogleMap googleMap) { // Add polylines to the map. // Polylines are useful to show a route or some other connection between points. Polyline polyline1 = googleMap.addPolyline(new PolylineOptions() .clickable(true) .add( new LatLng(-35.016, 143.321), new LatLng(-34.747, 145.592), new LatLng(-34.364, 147.891), new LatLng(-33.501, 150.217), new LatLng(-32.306, 149.248), new LatLng(-32.491, 147.309))); // Position the map's camera near Alice Springs in the center of Australia, // and set the zoom factor so most of Australia shows on the screen. googleMap.moveCamera(CameraUpdateFactory.newLatLngZoom(new LatLng(-23.684, 133.903), 4)); // Set listeners for click events. googleMap.setOnPolylineClickListener(this); googleMap.setOnPolygonClickListener(this); }Kotlin
class PolyActivity : AppCompatActivity(), OnMapReadyCallback, OnPolylineClickListener, OnPolygonClickListener { override fun onCreate(savedInstanceState: Bundle?) { super.onCreate(savedInstanceState) // Retrieve the content view that renders the map. setContentView(R.layout.activity_maps) // Get the SupportMapFragment and request notification when the map is ready to be used. val mapFragment = supportFragmentManager .findFragmentById(R.id.map) as SupportMapFragment? mapFragment?.getMapAsync(this) } /** * Manipulates the map when it's available. * The API invokes this callback when the map is ready to be used. * This is where we can add markers or lines, add listeners or move the camera. * In this tutorial, we add polylines and polygons to represent routes and areas on the map. */ override fun onMapReady(googleMap: GoogleMap) { // Add polylines to the map. // Polylines are useful to show a route or some other connection between points. val polyline1 = googleMap.addPolyline(PolylineOptions() .clickable(true) .add( LatLng(-35.016, 143.321), LatLng(-34.747, 145.592), LatLng(-34.364, 147.891), LatLng(-33.501, 150.217), LatLng(-32.306, 149.248), LatLng(-32.491, 147.309))) // Position the map's camera near Alice Springs in the center of Australia, // and set the zoom factor so most of Australia shows on the screen. googleMap.moveCamera(CameraUpdateFactory.newLatLngZoom(LatLng(-23.684, 133.903), 4f)) // Set listeners for click events. googleMap.setOnPolylineClickListener(this) googleMap.setOnPolygonClickListener(this) }覆寫
onPolylineClick()回呼方法。以下範例會在使用者每次點按折線時,以實線和虛線交替顯示線條筆劃圖案:Java
private static final int PATTERN_GAP_LENGTH_PX = 20; private static final PatternItem DOT = new Dot(); private static final PatternItem GAP = new Gap(PATTERN_GAP_LENGTH_PX); // Create a stroke pattern of a gap followed by a dot. private static final List<PatternItem> PATTERN_POLYLINE_DOTTED = Arrays.asList(GAP, DOT); /** * Listens for clicks on a polyline. * @param polyline The polyline object that the user has clicked. */ @Override public void onPolylineClick(Polyline polyline) { // Flip from solid stroke to dotted stroke pattern. if ((polyline.getPattern() == null) || (!polyline.getPattern().contains(DOT))) { polyline.setPattern(PATTERN_POLYLINE_DOTTED); } else { // The default pattern is a solid stroke. polyline.setPattern(null); } Toast.makeText(this, "Route type " + polyline.getTag().toString(), Toast.LENGTH_SHORT).show(); }Kotlin
private val PATTERN_GAP_LENGTH_PX = 20 private val DOT: PatternItem = Dot() private val GAP: PatternItem = Gap(PATTERN_GAP_LENGTH_PX.toFloat()) // Create a stroke pattern of a gap followed by a dot. private val PATTERN_POLYLINE_DOTTED = listOf(GAP, DOT) /** * Listens for clicks on a polyline. * @param polyline The polyline object that the user has clicked. */ override fun onPolylineClick(polyline: Polyline) { // Flip from solid stroke to dotted stroke pattern. if (polyline.pattern == null || !polyline.pattern!!.contains(DOT)) { polyline.pattern = PATTERN_POLYLINE_DOTTED } else { // The default pattern is a solid stroke. polyline.pattern = null } Toast.makeText(this, "Route type " + polyline.tag.toString(), Toast.LENGTH_SHORT).show() }
新增多邊形來代表地圖上的區域
Polygon 是由特定順序的數個座標組成的形狀。雖然與 Polyline 類似,但多邊形定義了內部可填充的封閉區域,折線則是開放式的。
建立
PolygonOptions物件並新增路線點。 每個路線點都代表地圖上的一個位置,您可以使用包含緯度和經度值的LatLng物件定義該位置。下方的程式碼範例會建立一個含有 4 個路線點的多邊形。呼叫
Polygon.setClickable()即可將多邊形設為可點按 (多邊形根據預設為不可點按,使用者輕觸多邊形時,您的應用程式也不會收到通知)。處理多邊形點擊事件與處理折線上的事件類似,如本教學課程前文所述。呼叫
GoogleMap.addPolygon()可將多邊形加入地圖。呼叫
Polygon.setTag()可使用多邊形儲存資料物件。以下程式碼會定義多邊形的任意類型 (alpha)。Java
// Add polygons to indicate areas on the map. Polygon polygon1 = googleMap.addPolygon(new PolygonOptions() .clickable(true) .add( new LatLng(-27.457, 153.040), new LatLng(-33.852, 151.211), new LatLng(-37.813, 144.962), new LatLng(-34.928, 138.599))); // Store a data object with the polygon, used here to indicate an arbitrary type. polygon1.setTag("alpha");Kotlin
// Add polygons to indicate areas on the map. val polygon1 = googleMap.addPolygon(PolygonOptions() .clickable(true) .add( LatLng(-27.457, 153.040), LatLng(-33.852, 151.211), LatLng(-37.813, 144.962), LatLng(-34.928, 138.599))) // Store a data object with the polygon, used here to indicate an arbitrary type. polygon1.tag = "alpha" // Style the polygon.
在多邊形中加入自訂樣式
您可以在 PolygonOptions 物件中指定多個樣式屬性。樣式選項包括筆劃顏色、筆劃寬度、筆劃模式、筆劃轉折類型和填滿顏色。如果未指定特定屬性,API 就會使用該屬性的預設值。
以下程式碼會根據多邊形的「類型」套用特定顏色和筆劃圖案;所謂「類型」,是指儲存在多邊形資料物件中的任意屬性。
Java
private static final int COLOR_WHITE_ARGB = 0xffffffff;
private static final int COLOR_DARK_GREEN_ARGB = 0xff388E3C;
private static final int COLOR_LIGHT_GREEN_ARGB = 0xff81C784;
private static final int COLOR_DARK_ORANGE_ARGB = 0xffF57F17;
private static final int COLOR_LIGHT_ORANGE_ARGB = 0xffF9A825;
private static final int POLYGON_STROKE_WIDTH_PX = 8;
private static final int PATTERN_DASH_LENGTH_PX = 20;
private static final PatternItem DASH = new Dash(PATTERN_DASH_LENGTH_PX);
// Create a stroke pattern of a gap followed by a dash.
private static final List<PatternItem> PATTERN_POLYGON_ALPHA = Arrays.asList(GAP, DASH);
// Create a stroke pattern of a dot followed by a gap, a dash, and another gap.
private static final List<PatternItem> PATTERN_POLYGON_BETA =
Arrays.asList(DOT, GAP, DASH, GAP);
/**
* Styles the polygon, based on type.
* @param polygon The polygon object that needs styling.
*/
private void stylePolygon(Polygon polygon) {
String type = "";
// Get the data object stored with the polygon.
if (polygon.getTag() != null) {
type = polygon.getTag().toString();
}
List<PatternItem> pattern = null;
int strokeColor = COLOR_BLACK_ARGB;
int fillColor = COLOR_WHITE_ARGB;
switch (type) {
// If no type is given, allow the API to use the default.
case "alpha":
// Apply a stroke pattern to render a dashed line, and define colors.
pattern = PATTERN_POLYGON_ALPHA;
strokeColor = COLOR_DARK_GREEN_ARGB;
fillColor = COLOR_LIGHT_GREEN_ARGB;
break;
case "beta":
// Apply a stroke pattern to render a line of dots and dashes, and define colors.
pattern = PATTERN_POLYGON_BETA;
strokeColor = COLOR_DARK_ORANGE_ARGB;
fillColor = COLOR_LIGHT_ORANGE_ARGB;
break;
}
polygon.setStrokePattern(pattern);
polygon.setStrokeWidth(POLYGON_STROKE_WIDTH_PX);
polygon.setStrokeColor(strokeColor);
polygon.setFillColor(fillColor);
}
Kotlin
private val COLOR_WHITE_ARGB = -0x1
private val COLOR_DARK_GREEN_ARGB = -0xc771c4
private val COLOR_LIGHT_GREEN_ARGB = -0x7e387c
private val COLOR_DARK_ORANGE_ARGB = -0xa80e9
private val COLOR_LIGHT_ORANGE_ARGB = -0x657db
private val POLYGON_STROKE_WIDTH_PX = 8
private val PATTERN_DASH_LENGTH_PX = 20
private val DASH: PatternItem = Dash(PATTERN_DASH_LENGTH_PX.toFloat())
// Create a stroke pattern of a gap followed by a dash.
private val PATTERN_POLYGON_ALPHA = listOf(GAP, DASH)
// Create a stroke pattern of a dot followed by a gap, a dash, and another gap.
private val PATTERN_POLYGON_BETA = listOf(DOT, GAP, DASH, GAP)
/**
* Styles the polygon, based on type.
* @param polygon The polygon object that needs styling.
*/
private fun stylePolygon(polygon: Polygon) {
// Get the data object stored with the polygon.
val type = polygon.tag?.toString() ?: ""
var pattern: List<PatternItem>? = null
var strokeColor = COLOR_BLACK_ARGB
var fillColor = COLOR_WHITE_ARGB
when (type) {
"alpha" -> {
// Apply a stroke pattern to render a dashed line, and define colors.
pattern = PATTERN_POLYGON_ALPHA
strokeColor = COLOR_DARK_GREEN_ARGB
fillColor = COLOR_LIGHT_GREEN_ARGB
}
"beta" -> {
// Apply a stroke pattern to render a line of dots and dashes, and define colors.
pattern = PATTERN_POLYGON_BETA
strokeColor = COLOR_DARK_ORANGE_ARGB
fillColor = COLOR_LIGHT_ORANGE_ARGB
}
}
polygon.strokePattern = pattern
polygon.strokeWidth = POLYGON_STROKE_WIDTH_PX.toFloat()
polygon.strokeColor = strokeColor
polygon.fillColor = fillColor
}
後續步驟
瞭解圓形物件。圓形與多邊形類似,但形狀屬性為圓形。