Page Summary
-
This tutorial demonstrates how to integrate a KML file into a Google Mashup Editor (GME) project using the Google Maps API.
-
GME simplifies the process of creating and editing KML-based mashups, enabling developers to build dynamic map components without extensive HTML or JavaScript knowledge.
-
The tutorial provides a step-by-step guide, covering selecting a KML file, creating a GME project, adding a map, testing, publishing, and embedding the mashup into web pages.
-
Users can further enhance their mashups by adding Google Analytics tracking and submitting them to the GME Mashup Gallery for wider visibility.
-
Published mashups can be parameterized to dynamically load different KML files and can be converted into Gadgets for integration into Google Personalized Home Page and other web pages.
Introduction
Google Mashup Editor (GME) is one of the most long-awaited and useful tools for mashup developers. GME helps developers create and edit dynamic components in Web pages, such as maps, tables, lists, and other elements, based on connections with external data. These elements can be then be included in Web pages and blogs using an iframe.This tutorial will show you how to incorporate a KML file into a Map created with GME.
My first impressions of Google Mashup Editor
- It has the utmost simplicity, with a clean and distinct interface, like the majority of Google products.
- It has a convenient project index with a constantly increasing collection of code examples, as well as the author's code.
- It allows for the easy storage of additional resources to the project (such as image files).
- It has an easy-to-use XML debugger.
- It has lots of easy-to-use sample applications.
GME for KML Developers
Before the advent of the Internet, spatial data was traditionally difficult to share. However, with the development of the Internet, mapping applications became a standard way of easily sharing Geographic Information Systems (GIS) data with the world. KML is becoming a standard for the presentation and interchange of GIS data because it is compact, easy to develop, and is supported by popular applications such as Google Earth and Google Maps.
Until recently, the process of creating and editing pages based on JavaScript was a large problem for KML developers. It required a large number of additional steps to create a mashup and debug it. GME makes it possible to create a KML-based mashup very rapidly out of a few basic components. The process of creation does not require special knowledge of HTML or JavaScript. The GME sample projects provide enough to get started.
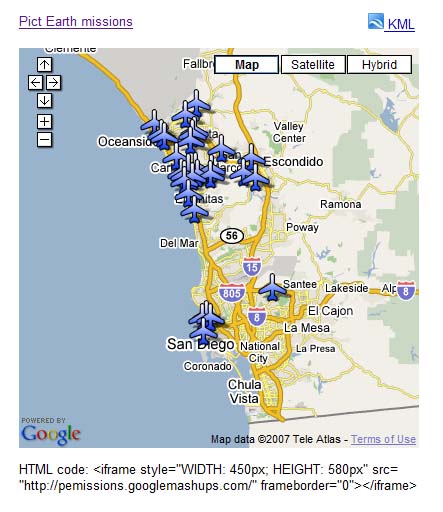
In the following example, I'll be using a KML file that points to the collection of the photographs taken during Pict Earth USA flights.
This is a snapshot of the Pict Earth maps mashup:
Here are the steps to integrate a KML file into a GME project using the Google Maps API:
Step 1: Select the KML file
Step 2: Create a new GME project
Step 3: Create a function to add the KML
Step 4: Add a map
Step 5: Test the mashup
Step 6: Publish the mashup
Step 7: Add the mashup to a web page
Step 8: Put it in the GME gallery
Step 1: Select the KML file
Select the KML file you would like to add to your Map. This can be anything that has features supported in Google Maps. It must be hosted on a publicly available server.
Step 2: Create a New GME Project
Create a new blank GME project.
This is what a blank GME project looks like:
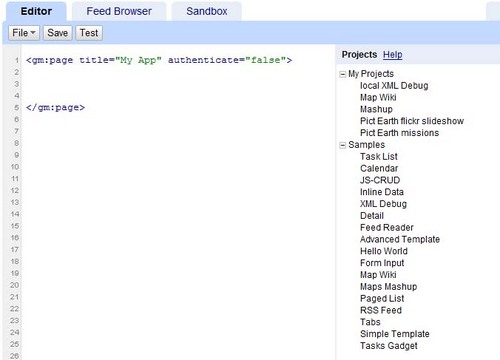
Add a title and a name for your function.
<gm:page title="Pict Earth missions" authenticate="false" onload="kmlPE()"></gm:page>
Step 3: Create a function to add the KML
Create a JavaScript function with the path to the KML file to be added to the Map.
<script>
  function kmlPE()
  {
    <!-- Get map -->
    var myMap = google.mashups.getObjectById('map').getMap();
    <!-- Get KML -->
    var geoXml = new GGeoXml("http://pictearthusa.com/kml/missions.kml");
    <!--Place KML on Map -->
    myMap.addOverlay(geoXml);
    <!--Set zoom on double click -->
    myMap.enableDoubleClickZoom();
  }
</script>
Step 4: Add a Map
Add map and parameters.
<gm:map id="map" height="400px" width="400px" lat="32.9393" lng="-117.206" zoom="9" maptypes="true"/>
Step 5: Test the mashup.
Press the Test button (F4).
This is an image of the Pict Earth mashup tested in the Sandbox.
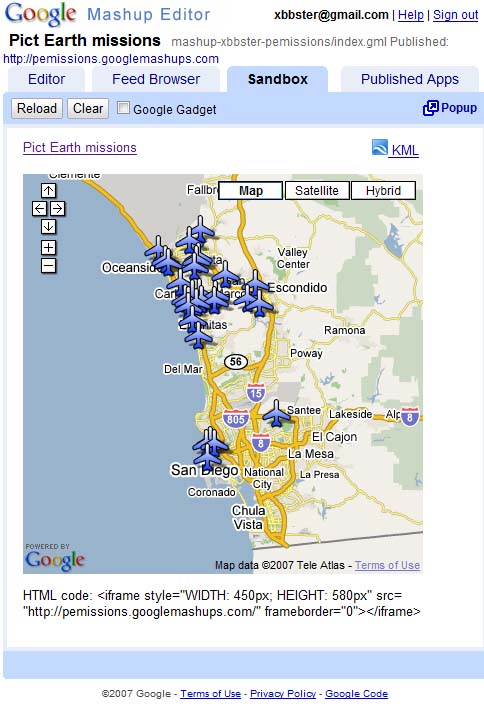
Now we can verify the text of application and see the first result. We can add a title and links and test it again.
Step 6: Publish the mashup
Set the name of the project, and then publish it. This will give you a permanent link to your mashup, which you can use to incorporate it into web pages. Using my example, this is the link to the GME project home page. You can also see source code of project.
Step 7: Add the mashup to a web page
Add the mashup to a web page using an iframe. For instance, to insert the example project, add this:
<iframe style="WIDTH: 439px; HEIGHT: 491px" src="http://pemissions.googlemashups.com/" frameborder="0"></iframe>
Here are examples of the mashup in a web page and a blog.
You can also add your Google Analytics code to the project, which will allow you to track statistics about who is viewing your page. Here's the simple script to add it:
<script src="http://www.google-analytics.com/urchin.js" type="text/javascript"></script>
<script type="text/javascript">uacct = "youraccountnumber";urchinTracker();</script>
Step 8: Put it in the GME Gallery
Publish your mashup to the GME Mashup Gallery. This will allow other users to view your mashup.
For more information:
Check out the Google Mashup Editor Getting Started Guide, which presents in detail the process of creating mashups. Also, check out the list of tags for a brief description of all gm tags with examples.
Code:
Here is the whole code for using the Pict Earth KML in GME:
<gm:page title="Pict Earth missions" authenticate="false" onload="kmlPE()>

<!-- Map definition -->
<gm:mapid="map" height="400px" width="400px" lat="32.9393" lng="-117.206" zoom="9" maptypes="true"/>

<script>
  function kmlPE(){

    <!-- Get map -->
    var myMap = google.mashups.getObjectById('map').getMap();

    <!-- Get KML -->
    var geoXml = new GGeoXml("http://pictearthusa.com/kml/missions.kml");

    <!-- Place KML on Map -->
    myMap.addOverlay(geoXml);

    <!-- Set zoom on double click -->
    myMap.enableDoubleClickZoom();
  }
</script>
</gm:page>
What's next?
Once you've published your mashup, you can use the KML file in it as a parameter to include in another application, or loaded directly as a map. For instance, this page:
http://param.googlemashups.com is a GME mashup. You can directly reference a KML file to the mashup by adding kml= as a parameter in the URL, like this: http://param.googlemashups.com/?kml=http://mapgadgets.googlepages.com/cta.kmlYou can also create a Gadget from your project. Once you've submitted it, go to the file menu and click on Submit Gadget, and follow the directions. This will allow you to easily add your application to your Google personalized home page, on other web pages, and to share it with others.