Page Summary
-
This tutorial explains how to use new KML elements like
<gx:physicalWidth>,<gx:outerColor>,<gx:outerWidth>, and<gx:drawOrder>in Google Earth 6.0. -
These elements enable creating complex cartographic styles for LineStrings, like roads with sidewalks or highway overpasses with multiple colors and layers.
-
<gx:physicalWidth>sets the LineString width in meters for consistent visualization at different altitudes, while<gx:outerColor>and<gx:outerWidth>add outer styling like sidewalks. -
<gx:drawOrder>controls the rendering order of overlapping LineStrings, ensuring elements like highway overpasses appear on top of other roads. -
By combining these elements, users can create detailed and realistic cartographic representations previously not possible in Google Earth.
December, 2010
Objective
This tutorial introduces you to a few new KML elements introduced with Google Earth 6.0, and how they can be used to create complex cartography for your LineStyles. The elements you will learn about are <gx:physicalWidth>, <gx:outerColor>, <gx:outerWidth>, and <gx:drawOrder>.
Introduction
Prior to the release of Google Earth 6.0, you were limited in their ability to define complex cartographic styles for LineStrings. For example, if you wanted to create a style for a road, where the center of the LineString had a different color than the edges, you would have to draw two separate LineStrings with different widths, and even then you could not guarantee the order they would draw in.
The following examples walk through creating a road. First, the road will have a simple style. Then you will add a sidewalk. Finally, you'll add a highway overpass.
A Basic Road
The first element of interest is <gx:physicalWidth>, which allows you to set the width of a LineString to be in meters, rather than pixels. In the case of our road example, this means you can set the width of our road to match the underlying imagery no matter what altitude the end user views the road from. As you gain altitude, the road diminishes in pixels, creating an effect where you can only see the LineString when zoomed in closely. This may be useful if you don't want to emphasize small roads from a distance, or you want to ensure your cartography matches the satellite imagery at all times.
<?xml version="1.0" encoding="UTF-8"?>
<kml xmlns="http://www.opengis.net/kml/2.2" xmlns:gx="http://www.google.com/kml/ext/2.2" xmlns:kml="http://www.opengis.net/kml/2.2" xmlns:atom="http://www.w3.org/2005/Atom">
<Document>
  <name>Road Styling</name>
  <Style id="street">
    <LineStyle>
      <color>ff235523</color>
      <gx:physicalWidth>12</gx:physicalWidth>
    </LineStyle>
  </Style>
  <Placemark>
    <styleUrl>#street</styleUrl>
    <LineString>
      <coordinates>
      -122.2442883478408,37.4347536724074,0
      -122.2417741446485,37.43594997501623,0
      -122.2414951359056,37.43611878445952,0
      </coordinates>
    </LineString>
  </Placemark>
</Document>
</kml>
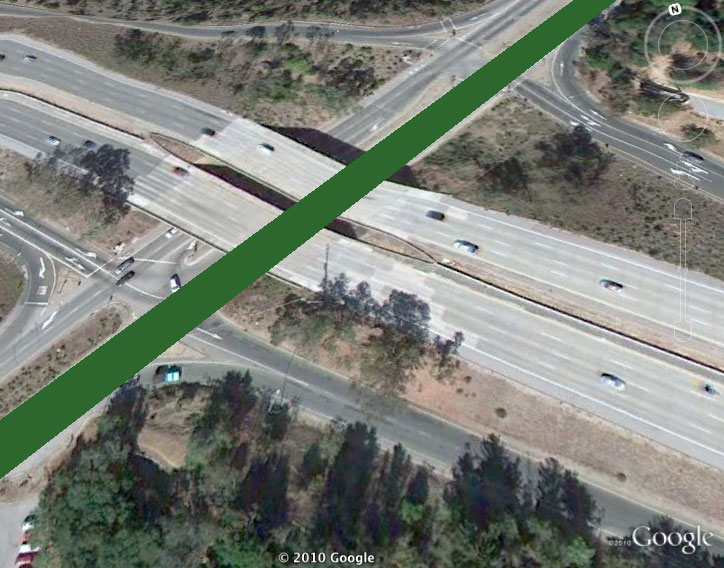 As you change the camera altitude in Google Earth, note how it closely matches the width of the underlying imagery at all times.
Adding Sidewalks
Now you can add in the <gx:outerColor> and <gx:outerWidth> elements by adding a light green to the edges of our road to signify sidewalks. Set 25% of the total pixels of the road to be light grey.
<?xml version="1.0" encoding="UTF-8"?>
<kml xmlns="http://www.opengis.net/kml/2.2" xmlns:gx="http://www.google.com/kml/ext/2.2" xmlns:kml="http://www.opengis.net/kml/2.2" xmlns:atom="http://www.w3.org/2005/Atom">
<Document>
  <name>Road Styling</name>
  <Style id="street_sidewalk">
    <LineStyle>
      <color>ff235523</color>
      <gx:physicalWidth>12</gx:physicalWidth>
      <gx:outerColor>ff55ff55</gx:outerColor>
      <gx:outerWidth>0.25</gx:outerWidth>
    </LineStyle>
  </Style>
  <Placemark>
    <styleUrl>#street_sidewalk</styleUrl>
    <LineString>
      <coordinates>
      -122.2442883478408,37.4347536724074,0
      -122.2417741446485,37.43594997501623,0
      -122.2414951359056,37.43611878445952,0
      </coordinates>
    </LineString>
  </Placemark>
</Document>
</kml>
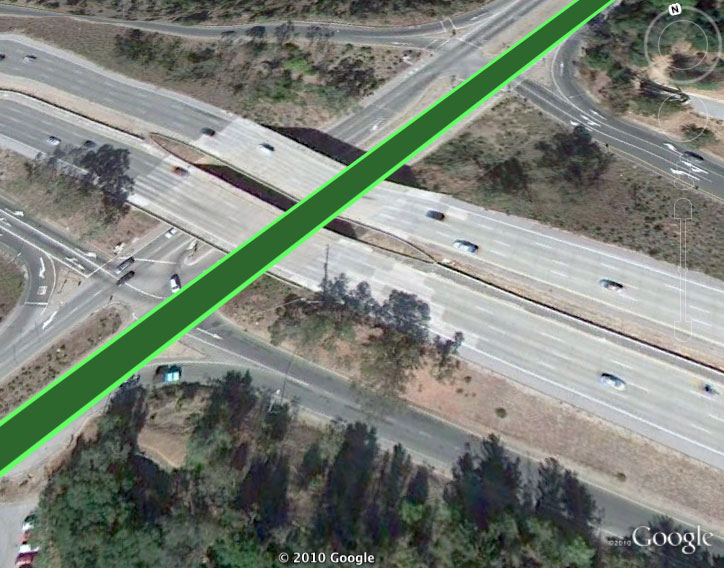 Because the width of the road was set to be 12 meters, the value of .25 for the outerWidth means 3 meters of that width will be set to a lighter green (about 1.5 meters on each side of the road).
A Highway Overpass
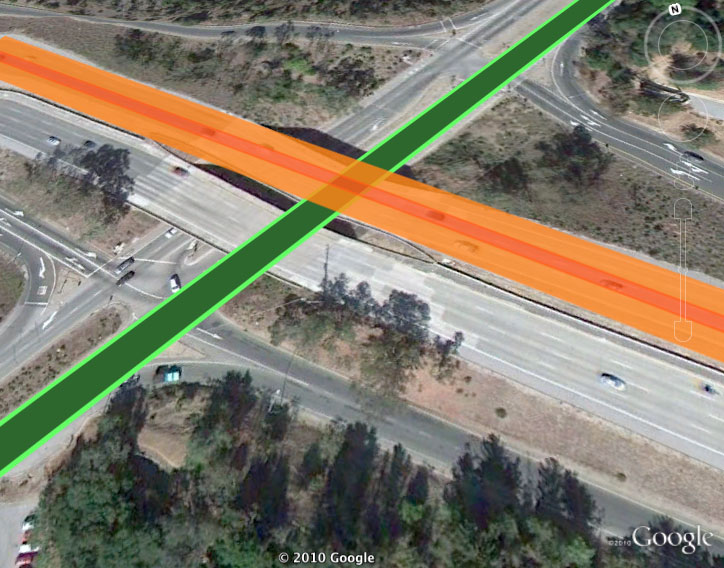
Now that you have a basic road, it's time to tackle a highway overpass. This one will be colored a light orange with a darker orange median line. The key addition here is to include a <gx:drawOrder> of 1 (the default is 0) in the <LineSring> to ensure the highway will be rendered on top of the road. If you were building a more complex highway interchange (or any cartography that required more than two overlapping LineStrings) you can simply add a higher value to the <gx:drawOrder> for whichever one you want rendered on the top.
<?xml version="1.0" encoding="UTF-8"?>
<kml xmlns="http://www.opengis.net/kml/2.2" xmlns:gx="http://www.google.com/kml/ext/2.2" xmlns:kml="http://www.opengis.net/kml/2.2" xmlns:atom="http://www.w3.org/2005/Atom">
<Document>
  <name>Road Styling</name>
  <Style id="street_sidewalk">
    <LineStyle>
      <color>ff235523</color>
      <gx:physicalWidth>10</gx:physicalWidth>
      <gx:outerColor>ff55ff55</gx:outerColor>
      <gx:outerWidth>0.25</gx:outerWidth>
    </LineStyle>
  </Style>
  <Style id="highway">
    <LineStyle>
      <color>cc1447ff</color>
      <gx:physicalWidth>20</gx:physicalWidth>
      <gx:outerColor>cc1473ff</gx:outerColor>
      <gx:outerWidth>0.75</gx:outerWidth>
    </LineStyle>
  </Style>
  <Placemark>
    <styleUrl>#street_sidewalk</styleUrl>
    <LineString>
      <coordinates>
     -122.2442883478408,37.4347536724074,0
     -122.2417741446485,37.43594997501623,0
     -122.2414951359056,37.43611878445952,0
      </coordinates>
    </LineString>
  </Placemark>
  <Placemark>
    <styleUrl>#highway</styleUrl>
    <LineString>
    <gx:drawOrder>1</gx:drawOrder>
    <coordinates>
      -122.2442692500139,37.43634904345254,0
      -122.2415928723012,37.43416417520744,0
    </coordinates>
    </LineString>
  </Placemark>
</Document>
</kml>
What's next?
The ability to describe a single LineString with multiple colors, combined with control over the rendering order allows you to create complex line cartography that was not previously possible. Whether you're building a highway overpass or a an abstract art project, have fun with these styling rules!
Except as otherwise noted, the content of this page is licensed under the Creative Commons Attribution 4.0 License, and code samples are licensed under the Apache 2.0 License. For details, see the Google Developers Site Policies. Java is a registered trademark of Oracle and/or its affiliates.
Last updated 2023-11-03 UTC.