
Page Summary
-
This guide demonstrates building a basic Google Chat app that responds to user messages with their avatar and name using Cloud Functions.
-
The app follows an HTTP-based architecture where user messages trigger HTTP requests to a Cloud Function, which processes the request and sends a response back to Chat.
-
Prerequisites include a Google Workspace account and a Google Cloud project with billing enabled.
-
Setup involves enabling APIs, creating and deploying a Cloud Function, and authorizing Chat.
-
After deployment, you can test the app by sending messages in Chat, and it will respond with a card displaying your avatar and name.
This page explains how to create an HTTP Chat app. There are different ways to implement this architecture. On Google Cloud, you can use Cloud Run and App Engine. In this quickstart, you write and deploy a Cloud Run function that the Chat app uses to respond to a user's message.
With this architecture, you configure Chat to integrate with Google Cloud or an on-premises server by using HTTP, as shown in the following diagram:

In the preceding diagram, a user interacting with an HTTP Chat app has the following flow of information:
- A user sends a message in Chat to a Chat app, either in a direct message or in a Chat space.
- An HTTP request is sent to a web server that is either a cloud or on-premises system that contains the Chat app logic.
- Optionally, the Chat app logic can integrate with Google Workspace services (like Calendar and Sheets), other Google services (like Maps, YouTube, and Vertex AI), or other web services (like a project management system or ticketing tool).
- The web server sends an HTTP response back to the Chat app service in Chat.
- The response is delivered to the user.
- Optionally, the Chat app can call the Chat API to asynchronously post messages or perform other operations.
This architecture provides you the flexibility to use existing libraries and components that already exist in your system because these Chat apps can be designed using different programming languages.
Objectives
- Set up your environment.
- Create and deploy a Cloud Run function.
- Publish the app to Chat.
- Test the app.
Prerequisites
- A Business or Enterprise Google Workspace account with access to Google Chat.
- A Google Cloud project with billing enabled. To check that an existing project has billing enabled, see Verify the billing status of your projects. To create a project and set up billing, see Create a Google Cloud project.
Set up the environment
Before using Google APIs, you need to turn them on in a Google Cloud project. You can turn on one or more APIs in a single Google Cloud project.In the Google API Console, enable the Google Chat API, Cloud Build API, Cloud Functions API, Cloud Pub/Sub API, Cloud Logging API, Artifact Registry API, and Cloud Run API.
Create and deploy a Cloud Run function
Create and deploy a Cloud Run function that generates a Chat card with the sender's display name and avatar image. When the Chat app receives a message, it runs the function and responds with the card.
To create and deploy the function for your Chat app, complete the following steps:
Node.js
In the Google API Console, go to the Cloud Run page:
Make sure that the project for your Chat app is selected.
Click Write a function.
On the Create service page, set up your function:
- In the Service name field, enter
quickstartchatapp. - In the Region list, select a region.
- In the Runtime list, select the most recent version of Node.js.
- In the Authentication section, select Require authentication.
- Click Create, and wait for Cloud Run to create the service. The console redirects you to the Source tab.
- In the Service name field, enter
In the Source tab:
- In Entry point, delete the default text and enter
avatarApp. Replace the contents of
index.jswith the following code:Click Save and redeploy.
- In Entry point, delete the default text and enter
Python
In the Google API Console, go to the Cloud Run page:
Make sure that the project for your Chat app is selected.
Click Write a function.
On the Create service page, set up your function:
- In the Service name field, enter
quickstartchatapp. - In the Region list, select a region.
- In the Runtime list, select the most recent version of Python.
- In the Authentication section, select Require authentication.
- Click Create, and wait for Cloud Run to create the service. The console redirects you to the Source tab.
- In the Service name field, enter
In the Source tab:
- In Entry point, delete the default text and enter
avatar_app. Replace the contents of
main.pywith the following code:Click Save and redeploy.
- In Entry point, delete the default text and enter
Java
In the Google API Console, go to the Cloud Run page:
Make sure that the project for your Chat app is selected.
Click Write a function.
On the Create service page, set up your function:
- In the Service name field, enter
quickstartchatapp. - In the Region list, select a region.
- In the Runtime list, select the most recent version of Java.
- In the Authentication section, select Require authentication.
- Click Create, and wait for Cloud Run to create the service. The console redirects you to the Source tab.
- In the Service name field, enter
In the Source tab:
- In Entry point, delete the default text and enter
App. - Rename
src/main/java/com/example/Example.javatosrc/main/java/AvatarApp.java. Replace the contents of
AvatarApp.javawith the following code:Replace the contents of
pom.xmlwith the following code:Click Save and redeploy.
- In Entry point, delete the default text and enter
Authorize Google Chat to invoke your function
To authorize Google Chat to invoke your function, add the Google Chat service account with the Cloud Run Invoker role.
In the Google API Console, go to the Cloud Run page:
In the Cloud Run services list, select the checkbox next to the receiving function. (Don't click the function itself.)
Click Permissions. The Permissions panel opens.
Click Add principal.
In New principals, enter
chat@system.gserviceaccount.com.In Select a role, select Cloud Run > Cloud Run Invoker.
Click Save.
Configure the Chat app
After the Cloud Run function is deployed, follow these steps to turn it into a Google Chat app:
In the Google API Console, go to the Cloud Run page:
Make sure that the project for which you enabled Cloud Run is selected.
In the list of services, click quickstartchatapp.
On the Service details page, copy the URL for the function.
Search for "Google Chat API" and click Google Chat API, then click Manage.
Click Configuration and set up the Google Chat app:
- Clear Build this Chat app as a Google Workspace add-on. A dialog opens asking you to confirm. In the dialog, click Disable.
- In App name, enter
Quickstart App. - In Avatar URL, enter
https://developers.google.com/chat/images/quickstart-app-avatar.png. - In Description, enter
Quickstart app. - Under Functionality, select Join spaces and group conversations.
- Under Connection settings, select HTTP endpoint URL.
- Under Triggers, select Use a common HTTP endpoint URL for all triggers, and paste the URL for the Cloud Run function trigger into the box.
- Under Visibility, select Make this Chat app available to specific people and groups in your domain and enter your email address.
- Under Logs, select Log errors to Logging.
Click Save.
The Chat app is ready to receive and respond to messages on Chat.
Test your Chat app
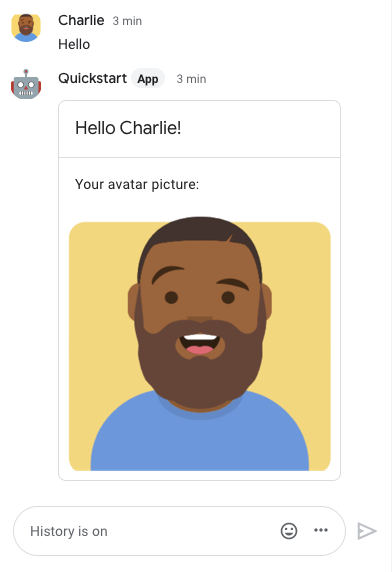
To test your Chat app, open a direct message space with the Chat app and send a message:
Open Google Chat using the Google Workspace account that you provided when you added yourself as a trusted tester.
- Click New chat.
- In the Add 1 or more people field, type the name of your Chat app.
Select your Chat app from the results. A direct message opens.
- In the new direct message with the app, type
Helloand pressenter.
The Chat app's response contains a card message that displays the sender's name and avatar image, as demonstrated in the following image:
To add trusted testers and learn more about testing interactive features, see Test interactive features for Google Chat apps.
Troubleshoot
When a Google Chat app or card returns an error, the Chat interface surfaces a message saying "Something went wrong." or "Unable to process your request." Sometimes the Chat UI doesn't display any error message, but the Chat app or card produces an unexpected result; for example, a card message might not appear.
Although an error message might not display in the Chat UI, descriptive error messages and log data are available to help you fix errors when error logging for Chat apps is turned on. For help viewing, debugging, and fixing errors, see Troubleshoot and fix Google Chat errors.
Clean up
To avoid incurring charges to your Google Cloud account for the resources used in this tutorial, we recommend that you delete the Cloud project.
- In the Google API Console, go to the Manage resources page. Click Menu > IAM & Admin > Manage Resources.
- In the project list, select the project you want to delete and then click Delete .
- In the dialog, type the project ID and then click Shut down to delete the project.
Related topics
To add more features to your Chat app, see the following: