本部分介绍了 CsvDataSourceServlet。CsvDataSourceServlet 是一个使用 CSV 文件作为外部数据存储区的实现示例。本部分还提供了有关如何运行和测试 CsvDataSourceServlet 的分步说明。
注意:在开始本部分之前,您应先完成数据源使用入门部分。
隆重推出CsvDataSourceServlet
CsvDataSourceServlet 类位于 examples 软件包中。这个类提供了一个使用 CSV 文件作为外部数据存储区的实现示例。CsvDataSourceServlet 继承自 DataSourceServlet,实现 generateDataTable(),并且必须在 servlet 容器中运行。
CsvDataSourceServlet 的代码段如下所示。generateDataTable 函数用于向库公开数据。此函数会创建数据表说明、定义数据表列,并使用从 CSV 文件获取的数据填充数据表。系统会从发出请求的可视化图表的查询中指定的网址读取 CSV 文件。该库会处理将数据表返回到查询可视化图表所需的所有其他操作。
/**
 * A demo servlet for serving a simple, constant data table.
 * This servlet extends DataSourceServlet, but does not override the default
 * empty implementation of method getCapabilities(). This servlet therefore ignores the
 * user query (as passed in the 'tq' url parameter), leaving the
 * query engine to apply it to the data table created here.
 *
 * @author Nimrod T.
 */
public class CsvDataSourceServlet extends DataSourceServlet {

  /**
   * Log.
   */
  private static final Log log = LogFactory.getLog(CsvDataSourceServlet.class.getName());

  /**
   * The name of the parameter that contains the url of the CSV to load.
   */
  private static final String URL_PARAM_NAME = "url";

  /**
   * Generates the data table.
   * This servlet assumes a special parameter that contains the CSV URL from which to load
   * the data.
   */
  @Override
  public DataTable generateDataTable(Query query, HttpServletRequest request)
      throws DataSourceException {
    String url = request.getParameter(URL_PARAM_NAME);
    if (StringUtils.isEmpty(url)) {
      log.error("url parameter not provided.");
      throw new DataSourceException(ReasonType.INVALID_REQUEST, "url parameter not provided");
    }

    Reader reader;
    try {
      reader = new BufferedReader(new InputStreamReader(new URL(url).openStream()));
    } catch (MalformedURLException e) {
      log.error("url is malformed: " + url);
      throw new DataSourceException(ReasonType.INVALID_REQUEST, "url is malformed: " + url);
    } catch (IOException e) {
      log.error("Couldn't read from url: " + url, e);
      throw new DataSourceException(ReasonType.INVALID_REQUEST, "Couldn't read from url: " + url);
    }
    DataTable dataTable = null;
    ULocale requestLocale = DataSourceHelper.getLocaleFromRequest(request);
    try {
      // Note: We assume that all the columns in the CSV file are text columns. In cases where the
      // column types are known in advance, this behavior can be overridden by passing a list of
      // ColumnDescription objects specifying the column types. See CsvDataSourceHelper.read() for
      // more details.
      dataTable = CsvDataSourceHelper.read(reader, null, true, requestLocale);
    } catch (IOException e) {
      log.error("Couldn't read from url: " + url, e);
      throw new DataSourceException(ReasonType.INVALID_REQUEST, "Couldn't read from url: " + url);
    }
    return dataTable;
  }
}
运行和测试 CsvDataSourceServlet
本部分介绍如何运行和测试 CsvDataSourceServlet。
如需运行和测试 CsvDataSourceServlet,请创建一个 CSV 文件,更新 Web 应用,并设置查询数据源的可视化图表,如以下部分所述:
创建 CSV 文件
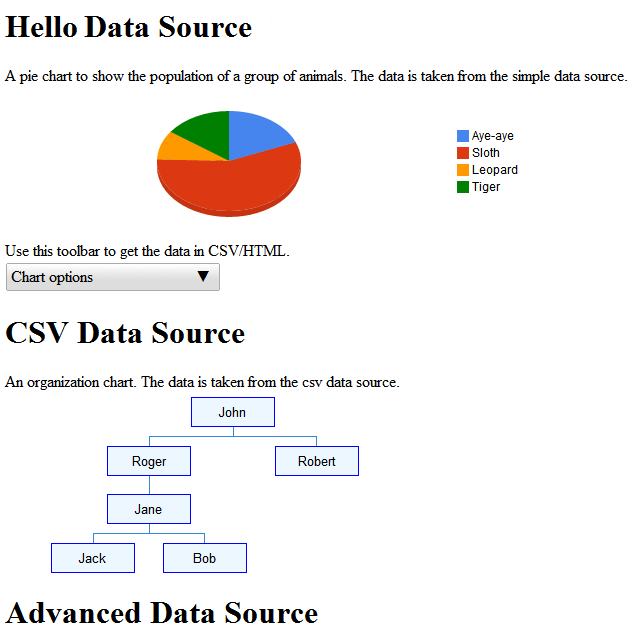
文件 csv_example.csv 在 <data_source_library_install>/examples/src/html 目录中提供。它包含以下值:
Employee,Manager
Roger,John
Robert,John
Jane,Roger
Jack,Jane
Bob,Jane
将此文件复制到您在使用入门部分创建的 <tomcat_home>/webapps/myWebApp 目录。
在 Apache Tomcat 上更新 Web 应用
请按照或调整下面的说明,在 Apache Tomcat 上更新您的 Web 应用。以下说明特定于 Windows 系统上的 Apache Tomcat:
- 您之前复制到
WEB-INF目录的web.xml文件已包含此示例所需的定义和映射。定义这些内容的行包括:
<servlet>
  <servlet-name>CSV Example</servlet-name>
  <description>
  CsvDataSourceServlet
  </description>
  <servlet-class>CsvDataSourceServlet</servlet-class>
</servlet>

<servlet-mapping>
  <servlet-name>CSV Example</servlet-name>
  <url-pattern>/csv</url-pattern>
</servlet-mapping>
- 启动 Tomcat;如果 Tomcat 已在运行,请重新启动。
- 点击以下链接:
http://localhost:8080/myWebApp/csv?url=http://localhost:8080/myWebApp/csv_example.csv
屏幕会显示 6-7 行文本,具体取决于您的屏幕宽度。
文本以google.visualization.Query.setResponse
开头并以{c:[{v:'Bob'},{v:'Jane'}]}]}});结尾
这是示例 CSV 数据源发送到可视化图表的响应。
使用可视化图表查看数据
<data_source_library_install>/examples/src/html 目录中的 all_examples.html 文件可用于查看数据的可视化图表。
如果您查看 all_examples.html 文件的源代码,会发现该文件中包含三个可视化图表。以下代码段重现了这些可视化图表的规范。
- 下面这行代码指定了本部分中介绍的
csv示例:
query = new google.visualization.Query('csv?url=http://localhost:8080/myWebApp/csv_example.csv');下面这行代码指定了组织结构图的可视化图表:var chart = new google.visualization.OrgChart(document.getElementById('csv_div')); - 下面这行代码指定了使用入门部分涵盖的
simpleexample:
var query = new google.visualization.Query('simpleexample?tq=select name,population');下面这行代码指定了饼图可视化图表:var chart = new google.visualization.PieChart(document.getElementById('simple_div')); - 下面这行代码指定了定义功能和事件流部分介绍的
advanced示例:
query = new google.visualization.Query('advanced?tableId=planets&tq=select planet,mass');下面这行代码指定了条形图的直观呈现方式:var chart = new google.visualization.BarChart(document.getElementById('advanced_div'));
如需详细了解如何指定图表和使用查询语言,请参阅图表工具使用简介和查询语言参考。
请按照或调整下面的说明,查看 CsvDataSourceServlet 所传送数据的可视化效果:
- 将
all_examples.html文件从<data_source_library_install>/examples/src/html目录复制到<tomcat_home>/webapps/myWebApp/目录。 - 点击以下链接:http://localhost:8080/myWebApp/all_examples.html,您应该会看到以下可视化效果。
定义功能和事件流中讨论了高级数据源示例。
后续步骤
定义功能和事件流 部分介绍了下一个示例。或者,您也可以访问以下链接:
- 有关该库中最常用的类的说明,请参阅关键类。
- 您可以让数据源从其他类继承,而不是让数据源从
DataSourceServlet继承。如需了解详情,请参阅使用您自己的 Servlet。 - 如需了解如何将参数从应用传递到数据源,请参阅将参数传递给
DataTableGenerator.generateDataTable。