Page Summary
-
RCS Business Messaging rich cards, while powerful, only support static images or videos for media.
-
To display dynamic, user-specific content in rich cards, HTML can be converted into an image.
-
Programming libraries or APIs like node-webshot with PhantomJS can be used to generate images from HTML.
-
The generated image needs to be stored at a publicly accessible URL to be used in an RBM rich card.
-
By converting dynamically generated HTML to an image, you can create more versatile and compelling visuals within RBM agents.
One of the most powerful and versatile types of content in RCS Business Messaging is the rich card. With a rich card, you can send chunks of related information in a single message, including an image or video, title, description, and up to four suggested replies or actions.
Standalone rich cards and rich card carousels are powerful features that can help you create engaging experiences for users. These work great as long as the images you need to share are static images like a coupon or product. But what happens if you need to send dynamic content based on information about the user, like a boarding pass?
In this document, I'll show you how to create images on the fly with HTML and embed those images within the rich cards your agent sends. See how to convert HTML into an image next.
From HTML to image
HTML is great for laying out combinations of text and media. As developers, if we need to build a product to send a user something like a boarding pass, data usage chart, or any other type of user-specific information, dynamically generated HTML is likely the tool we'll use. In RCS Business Messaging, rich cards only support image and video media types, so in order to use the power of HTML for dynamic content generation, the HTML first needs to be converted into an image.
Luckily, most modern programming languages support libraries for taking screenshots of webpages or components that can render at least basic HTML (for example, JEditorPane), which you can use to generate an image.
There are also APIs available for taking pictures of webpages. For example, Google's Page Insights API can automatically generate screenshots from a URL.
Example:
https://www.googleapis.com/pagespeedonline/v1/runPagespeed?url=https://www.google.com&screenshot=true
In what follows, we use a Node.js express app to generate a user-specific boarding pass with HTML, convert it into an image, upload it to a publicly accessible URL, and then attach the image within a rich card to send to a user.
Creating a dynamic boarding pass
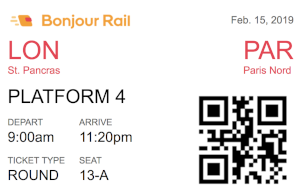
To start, we need the HTML to generate a boarding pass like the following image.
There are many ways to accomplish this, but we're going to define a URL endpoint
in a Node.js app called /getTicket?msisdn=+12223334444, which renders the HTML
we need for the boarding pass using the EJS view engine.
Assume that there is a function called getUserTicket that takes the user's
phone number and returns a ticket object that contains information like
departure time, seat, ticket type, and starting location.
Within the express app's router, we define the getTicket endpoint, call the
getUserTicket function, and pass the ticket to the EJS template.
router.get('/getTicket', function(req, res, next) {
    // Get the passed in phone number
    let msisdn = req.body.msisdn;

    // Get the ticket object for this user
    let ticket = getUserTicket(msisdn);

    // Render the ticket in HTML using an EJS template
    res.render('ticket', {ticket: ticket});
});
The ticket EJS template defines the following HTML to render the sample Bonjour Rail ticket.
<div>
  <div>
    <div class="left"><img width="200" src="/images/bonjour-rail-logo.png" /></div>
    <div class="right muted-text"><%= ticket.dateOfDeparture; %></div>
    <div class="cl"></div>
  </div>
  <div>
    <div class="left highlighted-text-color"><h2><%= ticket.startingLocation.city %></h2><br/><%= ticket.startingLocation.station %></div>
    <div class="right highlighted-text-color"><h2><%= ticket.endingLocation.city %></h2><br/><%= ticket.endingLocation.station %></div>
    <div class="cl"></div>
  </div>

  <div>
    <div class="left">
        <h3>PLATFORM <%= ticket.platform %></h3>
      <div>
        <div class="left">
          <div><h4>DEPART</h4></div>
          <div><%= ticket.departureTime %></div>
        </div>
        <div class="left">
          <div><h4>ARRIVE</h4></div>
          <div><%= ticket.arrivalTime %></div>
        </div>
        <div class="cl"></div>
      </div>
      <div>
        <div class="left">
          <div><h4>TICKET TYPE</h4></div>
          <div><%= ticket.ticketType %></div>
        </div>
        <div class="left">
          <div><h4>SEAT</h4></div>
          <div><%= ticket.seat %></div>
        </div>
        <div class="cl"></div>
      </div>
    </div>
    <div class="right">
      <img src="<%= ticket.qrCode %>" width="170" />
    </div>
    <div class="cl"></div>
  </div>
</div>
Creating an image from HTML
We've defined the HTML to construct the boarding pass, but we need a way to convert it into an image.
There are many open-source Node.js modules available to convert both raw HTML and URLs into images. For the purpose of this example, we're going to use node-webshot, which is a light wrapper around PhantomJS.
PhantomJS is a scriptable headless browser that can render HTML into images. Since PhantomJS relies on WebKit for rendering, it can handle complex pages with images, CSS, and JavaScript.
After installing node webshot (npm install --save node-webshot), converting
HTML to an image is straightforward.
var webshot = require('node-webshot');
let url = '/getTicket?msisdn=' + msisdn;
let htmlAsImageFileLocation = 'ticket.png';

// Define screenshot options
var options = {
      screenSize: {
            width: 550,
            height: 450
      },
      shotSize: {
            width: 550,
            height: 450
      },
      userAgent: 'Mozilla/5.0 (iPhone; U; CPU iPhone OS 3_2 like Mac OS X; en-us) AppleWebKit/531.21.20 (KHTML, like Gecko) Mobile/7B298g'
    };

// Save html as an image
webshot(url, htmlAsImageFileLocation, options, function(err) {
  // TODO: Upload image to a publicly accessible URL
});
Storing files to a publicly accessible URL
To make use of the image generated by webshot, we need a publicly accessible URL. If you're generating the image on a dedicated web server, you may be able to save the file to a public folder, but in this example, we're going to upload the file to Google Cloud Storage.
The following function takes a local image location and uploads it to Google Cloud Storage, returning the newly created media link.
function uploadImage(imageLocation) {
    const {Storage} = require('@google-cloud/storage');

    // Creates a client
    const storage = new Storage();

    // Define the Cloud storage location and filename
    const bucketName = 'sample-image-uploads';
    const yourFileDestination = 'uploaded-image.png';

    // Set the options for the upload to be readable by anyone
    const options = {
        destination: yourFileDestination,
        predefinedAcl: 'publicRead'
    };

    // Return a promise that includes the storage upload
    return new Promise(function(resolve, reject) {
        // Uploads a local file to the bucket
        storage.bucket(bucketName).upload(imageLocation, options)
            .then(results => {
                // Return the image URL
                resolve(results[0].metadata.mediaLink);
            }).catch(error => {
                reject(error);
            });
    });
}
Next, we need to replace the commented TODO from before with a call to use
this uploadImage function.
// Save html as image
webshot(url, htmlAsImageFileLocation, options, function(err) {
      let uploadRequest = uploadImage(filename);

      uploadRequest.then(function(imageUrl) {
         // TODO: Use the imageUrl in a rich card to send to the user
      });
});
Sending a rich card with the image
We're nearly there. Complete the final step by defining the
sendBoardingPass(imageUrl, msisdn) function, which creates an RBM rich card
using the image created in the prior step and sends it to the user.
To send the rich card with RBM, I use the same Node.js SDK available in the First Agent Sample.
function sendBoardingPass(imageUrl, msisdn) {
    let title = 'Here is your boarding pass.';

    let suggestions = [
                {
                    reply: {
                        text: 'See more options',
                        postbackData: 'more_options',
                    }
                },
            ];

    let params = {
        messageText: title,
        msisdn: msisdn,
        imageUrl: imageUrl,
        suggestions: suggestions,
        height: 'TALL',
    };

    // Send the boarding pass
    rbmApiHelper.sendRichCard(params);
}
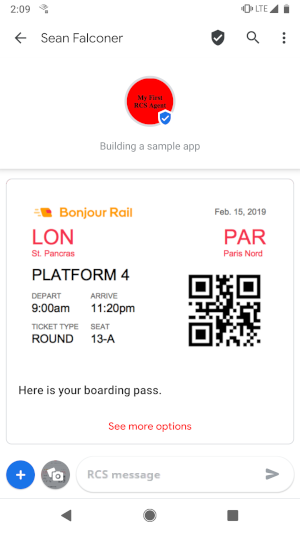
Following is a screenshot of the final result.
Wrap-up & summary
The simplest way to make rich cards more versatile is to use dynamic HTML and convert the HTML into images. Most modern programming languages support libraries or APIs that will help you complete the conversion. You may need to play around with the image sizing to get things looking right for your use case, but it's a fantastic approach to creating more compelling visuals within your RBM agents.
Good luck and happy coding!