

ประเภทการลิงก์ OAuth รองรับขั้นตอน OAuth 2.0 มาตรฐานอุตสาหกรรม 2 ขั้นตอน ซึ่งเรียกว่า implicit และขั้นตอนของรหัสการให้สิทธิ์
In the implicit code flow, Google opens your authorization endpoint in the user's browser. After successful sign in, you return a long-lived access token to Google. This access token is now included in every request sent from the Assistant to your Action.
In the authorization code flow, you need two endpoints:
- The authorization endpoint, which is responsible for presenting the sign-in UI to your users that aren't already signed in and recording consent to the requested access in the form of a short-lived authorization code.
- The token exchange endpoint, which is responsible for two types of exchanges:
- Exchanges an authorization code for a long-lived refresh token and a short-lived access token. This exchange happens when the user goes through the account linking flow.
- Exchanges a long-lived refresh token for a short-lived access token. This exchange happens when Google needs a new access token because the one it had expired.
Although the implicit code flow is simpler to implement, Google recommends that access tokens issued using the implicit flow never expire, because using token expiration with the implicit flow forces the user to link their account again. If you need token expiration for security reasons, you should strongly consider using the auth code flow instead.
ใช้การลิงก์บัญชี OAuth
กำหนดค่าโปรเจ็กต์
หากต้องการกำหนดค่าโปรเจ็กต์ให้ใช้การลิงก์บัญชี OAuth ให้ทำตามขั้นตอนต่อไปนี้
- เปิดคอนโซล Actions และเลือกโปรเจ็กต์ที่ต้องการใช้
- คลิกแท็บพัฒนา แล้วเลือกการลิงก์บัญชี
- เปิดใช้สวิตช์ข้างการลิงก์บัญชี
- ในส่วนการสร้างบัญชี ให้เลือกไม่ ฉันต้องการอนุญาตให้สร้างบัญชีบนเว็บไซต์ของฉันเท่านั้น
ในส่วนประเภทการลิงก์ ให้เลือก OAuth และ Implicit
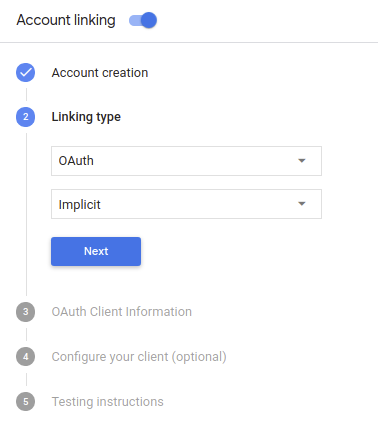
ในส่วนข้อมูลลูกค้า ให้ทำดังนี้
- กำหนดค่าให้กับรหัสไคลเอ็นต์ที่ออกโดย Actions to Google เพื่อระบุ คำขอที่มาจาก Google
- แทรก URL สำหรับปลายทาง Authorization และ Token Exchange
- คลิกบันทึก
ใช้เซิร์ฟเวอร์ OAuth
บริการของคุณจะให้สิทธิ์เพื่อรองรับขั้นตอนโดยนัยของ OAuth 2.0 ปลายทางที่พร้อมใช้งานผ่าน HTTPS ปลายทางนี้มีหน้าที่ในการตรวจสอบสิทธิ์และ ได้รับความยินยอมจากผู้ใช้ในการเข้าถึงข้อมูล ปลายทางการให้สิทธิ์ แสดง UI การลงชื่อเข้าใช้แก่ผู้ใช้ที่ยังไม่ได้ลงชื่อเข้าใช้และบันทึกไว้ ความยินยอมต่อการเข้าถึงที่ขอ
เมื่อการดำเนินการของคุณจำเป็นต้องเรียกใช้ API ที่ได้รับอนุญาตของบริการ Google จะใช้ ปลายทางนี้เพื่อขอสิทธิ์จากผู้ใช้เพื่อเรียกใช้ API เหล่านี้ใน แทน
เซสชันโฟลว์แบบโดยนัยของ OAuth 2.0 ทั่วไปที่ Google เป็นผู้เริ่มต้นจะมี ขั้นตอนดังต่อไปนี้
- Google จะเปิดปลายทางการให้สิทธิ์ในเบราว์เซอร์ของผู้ใช้ ผู้ใช้ ลงชื่อเข้าใช้หากยังไม่ได้ลงชื่อเข้าใช้ และให้สิทธิ์แก่ Google ในการเข้าถึง ข้อมูลของตนเองกับ API ของคุณ หากผู้ใช้ยังไม่ได้ให้สิทธิ์
- บริการของคุณจะสร้างโทเค็นเพื่อการเข้าถึงและส่งไปยัง Google โดยการเปลี่ยนเส้นทางเบราว์เซอร์ของผู้ใช้กลับไปยัง Google ด้วยโทเค็นเพื่อการเข้าถึง ที่แนบมากับคำขอ
- Google จะเรียกใช้ API ของบริการ และแนบโทเค็นเพื่อการเข้าถึงกับ คำขอแต่ละรายการ บริการของคุณยืนยันว่าโทเค็นเพื่อการเข้าถึงให้สิทธิ์ Google การอนุญาตให้เข้าถึง API จากนั้นจึงเรียก API
จัดการคำขอการให้สิทธิ์
เมื่อการดำเนินการของคุณต้องลิงก์บัญชีผ่านขั้นตอนโดยนัย OAuth2 Google จะส่งผู้ใช้ไปยังปลายทางการให้สิทธิ์พร้อมคำขอที่มี พารามิเตอร์ต่อไปนี้
| พารามิเตอร์ปลายทางการให้สิทธิ์ | |
|---|---|
client_id |
รหัสไคลเอ็นต์ที่คุณกำหนดให้กับ Google |
redirect_uri |
URL ที่คุณส่งการตอบกลับคำขอนี้ |
state |
มูลค่าการทำบัญชีที่ส่งกลับไปยัง Google ไม่เปลี่ยนแปลงใน URI การเปลี่ยนเส้นทาง |
response_type |
ประเภทของค่าที่จะแสดงในคำตอบ สำหรับ OAuth 2.0 โดยปริยาย
ประเภทการตอบกลับจะเป็น token เสมอ |
ตัวอย่างเช่น หากปลายทางการให้สิทธิ์อยู่ที่ https://myservice.example.com/auth
คำขออาจมีลักษณะดังนี้
GET https://myservice.example.com/auth?client_id=GOOGLE_CLIENT_ID&redirect_uri=REDIRECT_URI&state=STATE_STRING&response_type=token
สำหรับปลายทางการให้สิทธิ์ในการจัดการคำขอลงชื่อเข้าใช้ ให้ทำตามขั้นตอนต่อไปนี้
ยืนยันค่า
client_idและredirect_uriเพื่อ ป้องกันการให้สิทธิ์เข้าถึงแอปไคลเอ็นต์ที่ไม่ได้ตั้งใจหรือกำหนดค่าไม่ถูกต้อง- ยืนยันว่า
client_idตรงกับรหัสไคลเอ็นต์ที่คุณ ที่มอบหมายให้กับ Google - ยืนยันว่า URL ที่ระบุโดย
redirect_uriจะมีรูปแบบต่อไปนี้https://oauth-redirect.googleusercontent.com/r/YOUR_PROJECT_ID
- ยืนยันว่า
ตรวจสอบว่าผู้ใช้ลงชื่อเข้าใช้บริการของคุณหรือไม่ หากผู้ใช้ไม่ได้เซ็น ดำเนินการตามขั้นตอนการลงชื่อเข้าใช้หรือลงชื่อสมัครใช้บริการของคุณ
สร้างโทเค็นเพื่อการเข้าถึงที่ Google จะใช้เพื่อเข้าถึง API ของคุณ โทเค็นเพื่อการเข้าถึงสามารถเป็นค่าสตริงใดก็ได้ แต่จะต้องแสดงถึง ผู้ใช้และไคลเอ็นต์ที่ใช้โทเค็นและต้องคาดเดาไม่ได้
ส่งการตอบกลับ HTTP ที่เปลี่ยนเส้นทางเบราว์เซอร์ของผู้ใช้ไปยัง URL ที่ระบุโดยพารามิเตอร์
redirect_uriรวม พารามิเตอร์ต่อไปนี้ในส่วนย่อยของ URLaccess_token: โทเค็นเพื่อการเข้าถึงที่คุณเพิ่งสร้างtoken_type: สตริงbearerstate: ค่าสถานะที่ไม่มีการแก้ไขจากค่าเดิม คำขอ ตัวอย่างของ URL ที่ได้มีดังนี้https://oauth-redirect.googleusercontent.com/r/YOUR_PROJECT_ID#access_token=ACCESS_TOKEN&token_type=bearer&state=STATE_STRING
เครื่องจัดการการเปลี่ยนเส้นทาง OAuth 2.0 ของ Google จะได้รับโทเค็นเพื่อการเข้าถึงและยืนยัน
ค่า state ยังไม่มีการเปลี่ยนแปลง หลังจากที่ Google ได้รับ
โทเค็นเพื่อการเข้าถึงสำหรับบริการของคุณ Google จะแนบโทเค็นไปกับการเรียกครั้งต่อๆ ไป
ไปยังการดำเนินการของคุณได้โดยเป็นส่วนหนึ่งของ AppRequest
เริ่มขั้นตอนการตรวจสอบสิทธิ์
ใช้จุดประสงค์ของตัวช่วยในการลงชื่อเข้าใช้บัญชี เพื่อเริ่มขั้นตอนการตรวจสอบสิทธิ์ ข้อมูลโค้ดต่อไปนี้อธิบายวิธี ส่งคำตอบใน Dialogflow และ Actions SDK เพื่อใช้ตัวช่วยนี้
Dialogflow
const {dialogflow, SignIn} = require('actions-on-google');
const app = dialogflow({
  // REPLACE THE PLACEHOLDER WITH THE CLIENT_ID OF YOUR ACTIONS PROJECT
  clientId: CLIENT_ID,
});
// Intent that starts the account linking flow.
app.intent('Start Signin', (conv) => {
  conv.ask(new SignIn('To get your account details'));
});
@ForIntent("Start Signin")
public ActionResponse text(ActionRequest request) {
  ResponseBuilder rb = getResponseBuilder(request);
  return rb.add(new SignIn().setContext("To get your account details")).build();
}
{
  "payload": {
    "google": {
      "expectUserResponse": true,
      "richResponse": {
        "items": [
          {
            "simpleResponse": {
              "textToSpeech": "PLACEHOLDER"
            }
          }
        ]
      },
      "userStorage": "{\"data\":{}}",
      "systemIntent": {
        "intent": "actions.intent.SIGN_IN",
        "data": {
          "@type": "type.googleapis.com/google.actions.v2.SignInValueSpec",
          "optContext": "To get your account details"
        }
      }
    }
  },
  "outputContexts": [
    {
      "name": "/contexts/_actions_on_google",
      "lifespanCount": 99,
      "parameters": {
        "data": "{}"
      }
    }
  ]
}
Actions SDK:
const {actionssdk, SignIn} = require('actions-on-google');
const app = actionssdk({
  // REPLACE THE PLACEHOLDER WITH THE CLIENT_ID OF YOUR ACTIONS PROJECT
  clientId: CLIENT_ID,
});
// Intent that starts the account linking flow.
app.intent('actions.intent.TEXT', (conv) => {
  conv.ask(new SignIn('To get your account details'));
});
@ForIntent("actions.intent.TEXT")
public ActionResponse text(ActionRequest request) {
  ResponseBuilder rb = getResponseBuilder(request);
  return rb.add(new SignIn().setContext("To get your account details")).build();
}
{
  "expectUserResponse": true,
  "expectedInputs": [
    {
      "inputPrompt": {
        "richInitialPrompt": {
          "items": [
            {
              "simpleResponse": {
                "textToSpeech": "PLACEHOLDER"
              }
            }
          ]
        }
      },
      "possibleIntents": [
        {
          "intent": "actions.intent.SIGN_IN",
          "inputValueData": {
            "@type": "type.googleapis.com/google.actions.v2.SignInValueSpec",
            "optContext": "To get your account details"
          }
        }
      ]
    }
  ],
  "conversationToken": "{\"data\":{}}",
  "userStorage": "{\"data\":{}}"
}
จัดการคำขอเข้าถึงข้อมูล
หากคําขอ Assistant มีโทเค็นเพื่อการเข้าถึง ก่อนอื่นให้ตรวจสอบว่าโทเค็นเพื่อการเข้าถึงถูกต้อง (และไม่หมดอายุ) แล้วเรียกข้อมูลบัญชีผู้ใช้ที่เชื่อมโยงจากฐานข้อมูล