
Jenis penautan OAuth dan Login dengan Google menambahkan Login dengan Google, bukan berbasis OAuth penautan akun. Fitur ini memberikan penautan berbasis suara yang lancar bagi pengguna Google sekaligus mengaktifkan penautan akun untuk pengguna yang telah mendaftar ke layanan Anda dengan identitas non-Google.
Jenis penautan ini dimulai dengan Login dengan Google, yang memungkinkan Anda memeriksa apakah Informasi profil Google ada dalam sistem Anda. Jika informasi pengguna tidak ditemukan di sistem Anda, alur OAuth standar akan dimulai. Pengguna juga dapat memilih untuk membuat akun baru dengan informasi profil Google mereka.
Untuk melakukan penautan akun dengan OAuth dan Login dengan Google, ikuti langkah-langkah langkah:
- Pertama, minta pengguna untuk memberikan izin agar dapat mengakses profil Google miliknya.
- Menggunakan informasi di profil mereka untuk mengidentifikasi pengguna.
- Jika Anda tidak dapat menemukan kecocokan untuk
pengguna Google di sistem autentikasi Anda,
alurnya akan berjalan, bergantung pada apakah Anda telah mengonfigurasi project Action atau tidak
di konsol Actions untuk memungkinkan pembuatan akun pengguna melalui suara atau hanya
{i>website<i} Anda.
- Jika Anda mengizinkan pembuatan akun melalui suara, validasikan ID yang diterima dari Google. Anda kemudian dapat membuat pengguna berdasarkan informasi profil yang ada dalam token ID.
- Jika Anda tidak mengizinkan pembuatan akun melalui Voice, pengguna akan ditransfer ke browser tempat mereka dapat memuat halaman otorisasi Anda dan menyelesaikan alur kreasi.
Mendukung pembuatan akun melalui suara
Jika Anda mengizinkan pembuatan akun pengguna melalui suara, Asisten akan bertanya kepada pengguna apakah mereka ingin melakukan hal berikut:
- Membuat akun baru di sistem menggunakan informasi Akun Google pengguna, atau
- Login ke sistem autentikasi Anda dengan akun lain jika akun tersebut memiliki akun non-Google yang ada.
Sebaiknya izinkan pembuatan akun melalui suara jika Anda ingin meminimalkan hambatan dari alur pembuatan akun. Pengguna hanya perlu keluar dari alur suara jika mereka ingin masuk menggunakan akun non-Google yang ada.
Larang pembuatan akun melalui suara
Jika Anda tidak mengizinkan pembuatan akun pengguna melalui suara, Asisten akan membuka URL ke situs web yang Anda berikan untuk otentikasi pengguna. Jika interaksi terjadi di perangkat yang tidak memiliki layar, Asisten mengarahkan pengguna ke ponsel untuk melanjutkan alur penautan akun.
Jangan izinkan pembuatan direkomendasikan jika:
Anda tidak ingin mengizinkan pengguna yang memiliki akun non-Google untuk membuat akun pengguna dan ingin mereka menautkan akun pengguna mereka yang ada di sistem otentikasi. Misalnya, jika Anda menawarkan program loyalitas, Anda pengguna mungkin ingin memastikan bahwa pengguna tidak kehilangan poin yang diperoleh akun yang sudah ada.
Anda harus memiliki kontrol penuh atas alur pembuatan akun. Misalnya, Anda dapat larang pembuatan jika Anda perlu menunjukkan persyaratan layanan Anda kepada pengguna selama pembuatan akun.
Terapkan penautan akun OAuth dan Login dengan Google
Akun ditautkan dengan alur OAuth 2.0 standar industri. Actions on Google mendukung alur kode implisit dan otorisasi.
Dalam alur kode implisit, Google membuka endpoint otorisasi Anda di browser pengguna. Setelah berhasil login, Anda akan menampilkan token akses berumur panjang ke Google. Token akses ini sekarang disertakan di setiap permintaan yang dikirim dari Asisten ke Action.
Dalam alur kode otorisasi, Anda membutuhkan dua endpoint:
- Endpoint otorisasi, yang bertanggung jawab untuk menampilkan UI login kepada pengguna yang belum login, dan merekam izin untuk akses yang diminta dalam bentuk kode otorisasi yang memiliki masa aktif singkat.
- Endpoint pertukaran token, yang bertanggung jawab atas dua jenis pertukaran:
- Menukarkan kode otorisasi dengan token refresh yang memiliki masa aktif lama dan token akses yang memiliki masa aktif singkat. Pertukaran ini terjadi saat pengguna melalui alur penautan akun.
- Menukarkan token refresh yang memiliki masa aktif lama dengan token akses yang memiliki masa aktif singkat. Pertukaran ini terjadi saat Google memerlukan token akses baru karena masa berlakunya telah berakhir.
Meskipun alur kode implisit lebih mudah diimplementasikan, Google merekomendasikan agar token akses yang dikeluarkan menggunakan alur implisit tidak pernah kedaluwarsa, karena menggunakan masa berlaku token dengan alur implisit akan memaksa pengguna untuk menautkan akunnya lagi. Jika Anda memerlukan masa berlaku token untuk alasan keamanan, Anda harus mempertimbangkan penggunaan alur kode autentikasi.
Mengonfigurasi project
Untuk mengonfigurasi project Anda agar dapat menggunakan OAuth dan akun Login dengan Google menautkan, ikuti langkah-langkah berikut:
- Buka konsol Actions dan pilih project yang ingin Anda gunakan.
- Klik tab Develop dan pilih Account linking.
- Aktifkan tombol di samping Penautan akun.
- Di bagian Pembuatan akun, pilih Ya.
Pada Linking type, pilih OAuth & Login dengan Google dan Implisit.
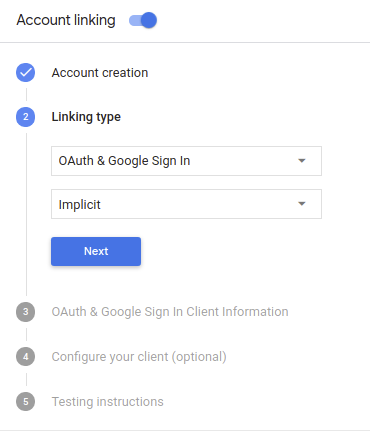
Di Informasi Klien, lakukan hal berikut:
- Tetapkan nilai ke Client ID yang diterbitkan oleh Actions to Google Anda untuk mengidentifikasi permintaan yang berasal dari Google.
- Masukkan URL untuk endpoint Otorisasi dan Token Exchange.
Klik Simpan.
Mengimplementasikan server OAuth
Untuk mendukung alur implisit OAuth 2.0, layanan Anda membuat otorisasi endpoint yang tersedia melalui HTTPS. Endpoint ini bertanggung jawab untuk mengotentikasi dan mendapatkan izin dari pengguna untuk akses data. Endpoint otorisasi menampilkan UI login kepada pengguna Anda yang belum login dan merekam menyetujui akses yang diminta.
Jika Action Anda perlu memanggil salah satu API yang diotorisasi layanan Anda, Google akan menggunakan endpoint ini guna mendapatkan izin dari pengguna untuk memanggil API ini di nama Anda.
Sesi alur implisit OAuth 2.0 umum yang dimulai oleh Google memiliki alur berikut:
- Google akan membuka endpoint otorisasi Anda di browser pengguna. Tujuan pengguna masuk jika belum masuk, dan memberikan izin kepada Google untuk mengakses data mereka dengan API Anda jika mereka belum memberikan izin.
- Layanan Anda membuat token akses dan mengembalikannya ke Google dengan mengalihkan browser pengguna kembali ke Google dengan token akses dilampirkan pada permintaan.
- Google memanggil API layanan Anda, dan melampirkan token akses tersebut dengan setiap permintaan. Layanan Anda memverifikasi bahwa token akses tersebut memberikan untuk mengakses API, lalu menyelesaikan panggilan API.
Menangani permintaan otorisasi
Saat Action Anda perlu melakukan penautan akun melalui alur implisit OAuth2, Google mengirim pengguna ke endpoint otorisasi Anda dengan permintaan yang mencakup parameter berikut:
| Parameter endpoint otorisasi | |
|---|---|
client_id |
Client ID yang Anda tetapkan ke Google. |
redirect_uri |
URL tempat Anda mengirim respons atas permintaan ini. |
state |
Nilai pembukuan yang diteruskan kembali ke Google tanpa berubah dalam URI pengalihan. |
response_type |
Jenis nilai yang akan ditampilkan dalam respons. Untuk OAuth 2.0 implisit
alur, jenis respons selalu token. |
Misalnya, jika endpoint otorisasi Anda tersedia di https://myservice.example.com/auth,
permintaan akan terlihat seperti:
GET https://myservice.example.com/auth?client_id=GOOGLE_CLIENT_ID&redirect_uri=REDIRECT_URI&state=STATE_STRING&response_type=token
Agar endpoint otorisasi Anda dapat menangani permintaan login, lakukan langkah-langkah berikut:
Verifikasi nilai
client_iddanredirect_uriuntuk mencegah pemberian akses ke aplikasi klien yang tidak diinginkan atau salah dikonfigurasi:- Konfirmasi bahwa
client_idcocok dengan client ID Anda ditetapkan ke Google. - Konfirmasi bahwa URL yang ditentukan oleh
redirect_uriparameter memiliki bentuk berikut:https://oauth-redirect.googleusercontent.com/r/YOUR_PROJECT_ID
- Konfirmasi bahwa
Periksa apakah pengguna sudah login ke layanan Anda. Jika pengguna tidak login di layanan Anda, selesaikan proses login atau pendaftaran.
Buat token akses yang akan digunakan Google untuk mengakses API Anda. Tujuan token akses dapat berupa nilai string apa pun, tetapi harus secara unik mewakili klien dan klien yang menjadi tujuan token, dan tidak boleh ditebak.
Mengirim respons HTTP yang mengalihkan browser pengguna ke URL yang ditentukan oleh parameter
redirect_uri. Sertakan semua parameter berikut dalam fragmen URL:access_token: token akses yang baru saja Anda buattoken_type: stringbearerstate: nilai status yang tidak dimodifikasi dari aslinya minta Berikut adalah contoh URL yang dihasilkan:https://oauth-redirect.googleusercontent.com/r/YOUR_PROJECT_ID#access_token=ACCESS_TOKEN&token_type=bearer&state=STATE_STRING
Pengendali pengalihan OAuth 2.0 Google akan menerima token akses dan mengonfirmasi
bahwa nilai state tidak berubah. Setelah Google mendapatkan
token akses untuk layanan Anda, Google akan melampirkan token tersebut ke panggilan berikutnya
ke Action Anda sebagai bagian dari AppRequest.
Menangani penautan otomatis
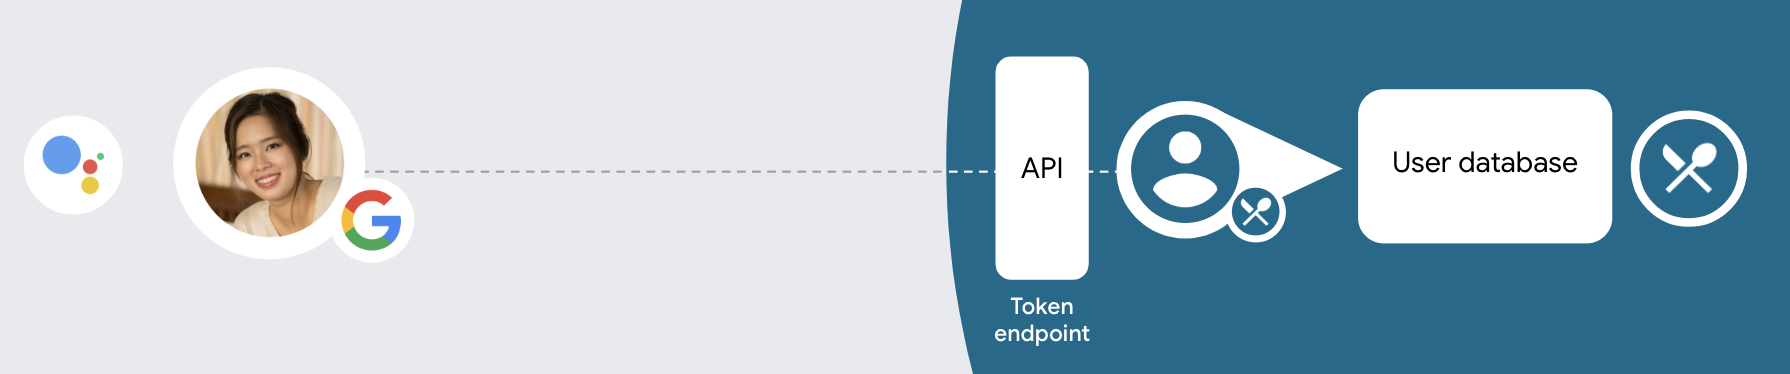
Setelah pengguna memberikan izin kepada Action Anda untuk mengakses profil Google mereka, Google mengirimkan permintaan yang berisi pernyataan bertanda tangan tentang identitas pengguna Google. Pernyataan berisi informasi yang menyertakan ID Akun Google, nama, dan alamat email Anda. Endpoint pertukaran token yang dikonfigurasi untuk nama sebutan akun project Anda terhadap permintaan tersebut.
Jika Akun Google yang sesuai sudah ada di sistem autentikasi Anda,
endpoint pertukaran token mengembalikan
sebuah token untuk pengguna. Jika Akun Google tidak
cocok dengan pengguna yang sudah ada, endpoint pertukaran token akan menampilkan error user_not_found.
Permintaan tersebut memiliki bentuk berikut:
POST /token HTTP/1.1
Host: oauth2.example.com
Content-Type: application/x-www-form-urlencoded

grant_type=urn:ietf:params:oauth:grant-type:jwt-bearer&intent=get&assertion=JWT&consent_code=CONSENT_CODE&scope=SCOPES
Endpoint pertukaran token Anda harus dapat menangani parameter berikut:
| Parameter endpoint token | |
|---|---|
grant_type |
Jenis token yang dipertukarkan. Untuk permintaan tersebut,
parameter memiliki nilai urn:ietf:params:oauth:grant-type:jwt-bearer. |
intent |
Untuk permintaan ini, nilai parameter ini adalah `get`. |
assertion |
JSON Web Token (JWT) yang menyediakan pernyataan bertanda tangan Google identitas pengguna. JWT berisi informasi yang menyertakan alamat ID akun, nama, dan alamat email. |
consent_code |
Opsional: Jika ada, kode sekali pakai yang menunjukkan bahwa pengguna telah memberikan izin kepada Action Anda untuk mengakses cakupan yang ditentukan. |
scope |
Opsional: Cakupan apa pun yang Anda konfigurasikan Google untuk minta dari pengguna. |
Saat menerima permintaan penautan, endpoint pertukaran token Anda harus melakukan berikut ini:
Memvalidasi dan mendekode pernyataan JWT
Anda dapat memvalidasi dan mendekode pernyataan JWT menggunakan library decoding JWT untuk bahasa Anda. Gunakan kunci publik Google (tersedia di JWK atau PEM) untuk memverifikasi tanda tangan.
Saat didekode, pernyataan JWT akan terlihat seperti contoh berikut:
{
  "sub": 1234567890,        // The unique ID of the user's Google Account
  "iss": "https://accounts.google.com",        // The assertion's issuer
  "aud": "123-abc.apps.googleusercontent.com", // Your server's client ID
  "iat": 233366400,         // Unix timestamp of the assertion's creation time
  "exp": 233370000,         // Unix timestamp of the assertion's expiration time
  "name": "Jan Jansen",
  "given_name": "Jan",
  "family_name": "Jansen",
  "email": "jan@gmail.com", // If present, the user's email address
  "locale": "en_US"
}
Selain memverifikasi tanda tangan token, verifikasi bahwa penerbit pernyataan
(kolom iss) adalah https://accounts.google.com dan bahwa audiens (kolom aud)
adalah client ID yang ditetapkan untuk Action Anda.
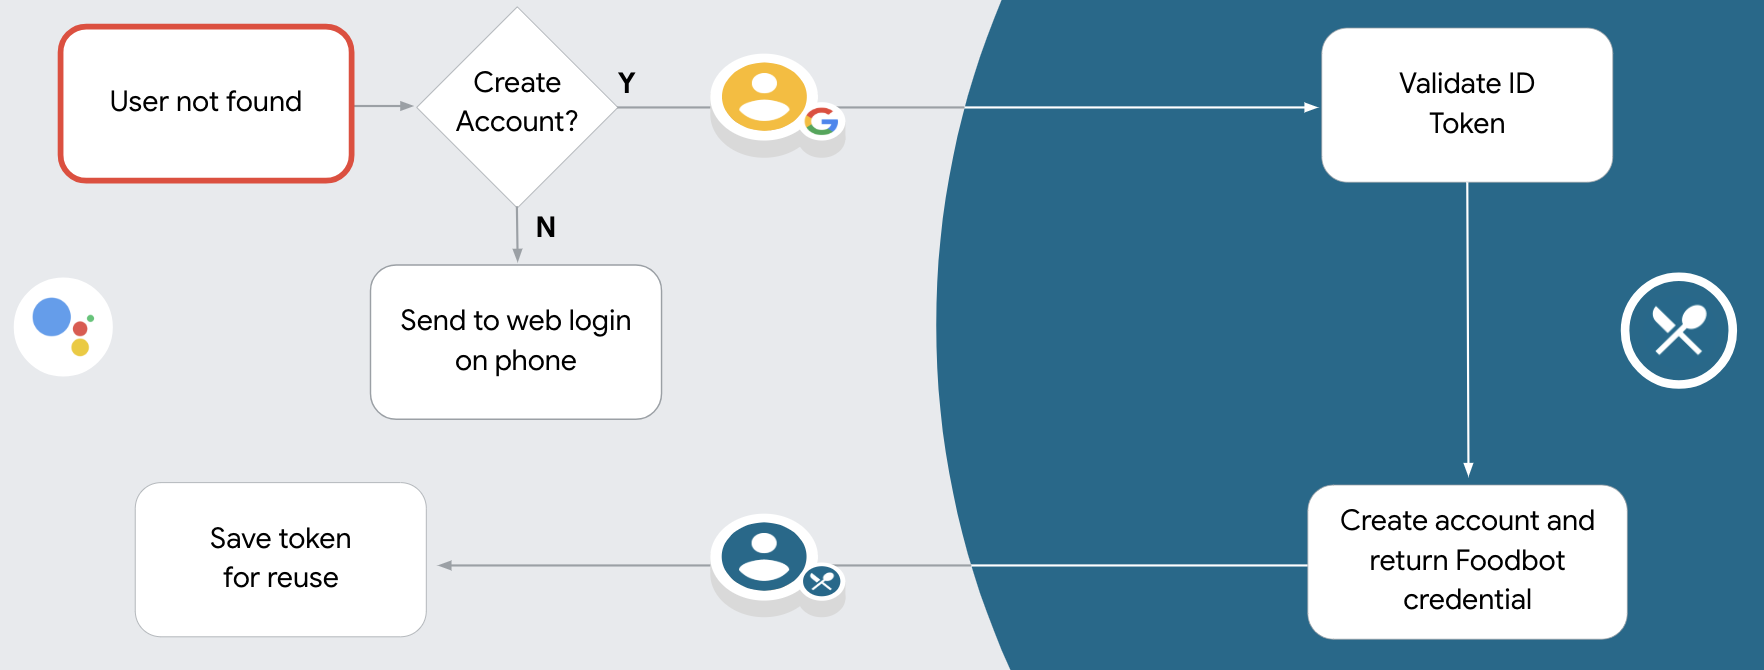
Periksa apakah Akun Google sudah ada dalam sistem autentikasi Anda
Periksa apakah salah satu kondisi berikut terpenuhi:
- ID Akun Google yang ada di kolom
subpernyataan berada di database pengguna Anda. - Alamat email dalam pernyataan cocok dengan pengguna di database pengguna Anda.
Jika salah satu kondisinya benar, pengguna telah mendaftar dan Anda dapat mengeluarkan token masing-masing.
Jika ID Akun Google atau alamat email yang disebutkan dalam pernyataan tidak disebutkan
cocok dengan pengguna di {i>database<i} Anda, pengguna tersebut belum mendaftar. Dalam hal ini,
endpoint pertukaran token harus membalas dengan error HTTP 401, yang menentukan error=user_not_found,
seperti dalam contoh berikut:
HTTP/1.1 401 Unauthorized
Content-Type: application/json;charset=UTF-8

{
  "error":"user_not_found",
}
user_not_found,
memanggil endpoint pertukaran token dengan nilai parameter intent
ditetapkan untuk membuat dan mengirim token ID yang berisi informasi profil pengguna
dengan permintaan tersebut.
Menangani pembuatan akun melalui Login dengan Google
Saat pengguna perlu membuat akun di layanan Anda, Google akan membuat
permintaan ke endpoint pertukaran token yang menentukan
intent=create, seperti dalam contoh berikut:
POST /token HTTP/1.1
Host: oauth2.example.com
Content-Type: application/x-www-form-urlencoded

response_type=token&grant_type=urn:ietf:params:oauth:grant-type:jwt-bearer&scope=SCOPES&intent=create&consent_code=CONSENT_CODE&assertion=JWT[&NEW_ACCOUNT_INFO]
Parameter assertion berisi Token Web JSON (JWT) yang menyediakan
pernyataan bertanda tangan
tentang identitas pengguna Google. JWT berisi informasi
yang mencakup ID Akun Google, nama, dan alamat email pengguna, yang dapat Anda gunakan
untuk membuat akun baru
di layanan Anda.
Untuk merespons permintaan pembuatan akun, endpoint pertukaran token Anda harus memiliki hal berikut:
Memvalidasi dan mendekode pernyataan JWT
Anda dapat memvalidasi dan mendekode pernyataan JWT menggunakan library decoding JWT untuk bahasa Anda. Gunakan kunci publik Google (tersedia di JWK atau PEM) untuk memverifikasi tanda tangan.
Saat didekode, pernyataan JWT akan terlihat seperti contoh berikut:
{
  "sub": 1234567890,        // The unique ID of the user's Google Account
  "iss": "https://accounts.google.com",        // The assertion's issuer
  "aud": "123-abc.apps.googleusercontent.com", // Your server's client ID
  "iat": 233366400,         // Unix timestamp of the assertion's creation time
  "exp": 233370000,         // Unix timestamp of the assertion's expiration time
  "name": "Jan Jansen",
  "given_name": "Jan",
  "family_name": "Jansen",
  "email": "jan@gmail.com", // If present, the user's email address
  "locale": "en_US"
}
Selain memverifikasi tanda tangan token, verifikasi bahwa penerbit pernyataan
(kolom iss) adalah https://accounts.google.com dan bahwa audiens (kolom aud)
adalah client ID yang ditetapkan untuk Action Anda.
Memvalidasi informasi pengguna dan membuat akun baru
Periksa apakah salah satu kondisi berikut terpenuhi:
- ID Akun Google yang ada di kolom
subpernyataan berada di database pengguna Anda. - Alamat email dalam pernyataan cocok dengan pengguna di database pengguna Anda.
Jika salah satu kondisinya benar, minta pengguna menautkan akun mereka yang sudah ada dengan
ke Akun Google mereka dengan merespons permintaan melalui error HTTP 401,
error=linking_error dan alamat email pengguna sebagai login_hint, seperti pada
contoh berikut:
HTTP/1.1 401 Unauthorized
Content-Type: application/json;charset=UTF-8

{
  "error":"linking_error",
  "login_hint":"foo@bar.com"
}
Jika tidak satu pun kondisinya benar, buat akun pengguna baru menggunakan informasi tersebut yang disediakan di JWT. Akun baru biasanya tidak memiliki sandi yang disetel. Penting sebaiknya tambahkan Login dengan Google ke platform lain agar pengguna dapat login melalui Google di seluruh platform aplikasi Anda. Atau, Anda dapat mengirimkan email kepada pengguna tautan yang memulai alur pemulihan sandi Anda untuk memungkinkan pengguna mengatur {i>password<i} untuk masuk di platform lain.
Setelah pembuatan selesai, keluarkan token akses , lalu tampilkan nilai dalam objek JSON di isi respons HTTPS, seperti dalam contoh berikut:
{
  "token_type": "Bearer",
  "access_token": "ACCESS_TOKEN",

  "expires_in": SECONDS_TO_EXPIRATION
}
Memulai alur autentikasi
Menggunakan intent bantuan Login Akun untuk memulai alur otentikasi.
const app = dialogflow({
  // REPLACE THE PLACEHOLDER WITH THE CLIENT_ID OF YOUR ACTIONS PROJECT
  clientId: CLIENT_ID,
})

// Intent that starts the account linking flow.
app.intent('Start Signin', conv => {
  conv.ask(new SignIn('To get your account details'))
})
private String clientId = "<your_client_id>";

@ForIntent("Start Signin")
public ActionResponse text(ActionRequest request) {
  ResponseBuilder rb = getResponseBuilder(request);
  return rb.add(new SignIn().setContext("To get your account details")).build();
}
const app = actionssdk({
  clientId: CLIENT_ID,
})

app.intent('Start Signin', conv => {
  conv.ask(new SignIn('To get your account details'))
})
private String clientId = "<your_client_id>";

@ForIntent("actions.intent.TEXT")
public ActionResponse text(ActionRequest request) {
  ResponseBuilder rb = getResponseBuilder(request);
  return rb.add(new SignIn().setContext("To get your account details")).build();
}
Menangani permintaan akses data
Jika permintaan Asisten berisi token akses, periksa terlebih dahulu apakah token akses valid dan belum kedaluwarsa, lalu ambil dari {i>database <i}akun pengguna akun pengguna yang terkait dengan token.